KEY MERCEDES-BENZ B-CLASS HATCHBACK 2011 Repair Manual
[x] Cancel search | Manufacturer: MERCEDES-BENZ, Model Year: 2011, Model line: B-CLASS HATCHBACK, Model: MERCEDES-BENZ B-CLASS HATCHBACK 2011Pages: 329, PDF Size: 7.91 MB
Page 192 of 329
The outside temperature display is in the mul-
tifunction display.
Changes in the outside temperature are dis-
played after a short delay. Speedometer with segments
The segments in the speedometer indicate
which speed range is available.
Cruise control (Y page 149) activated:
The segments light up from the stored speed
to the maximum speed.
Variable SPEEDTRONIC (Y page 151) activa-
ted:
The segments light up from the start of the
scale to the selected limit speed.
DISTRONIC PLUS (Y page 154) activated:
One or two segments in the set speed range
light up.
DISTRONIC PLUS detects a vehicle in front:
The segments between the speed of the vehi-
cle in fronta nd the stored speed light up. Operating the on-board computer
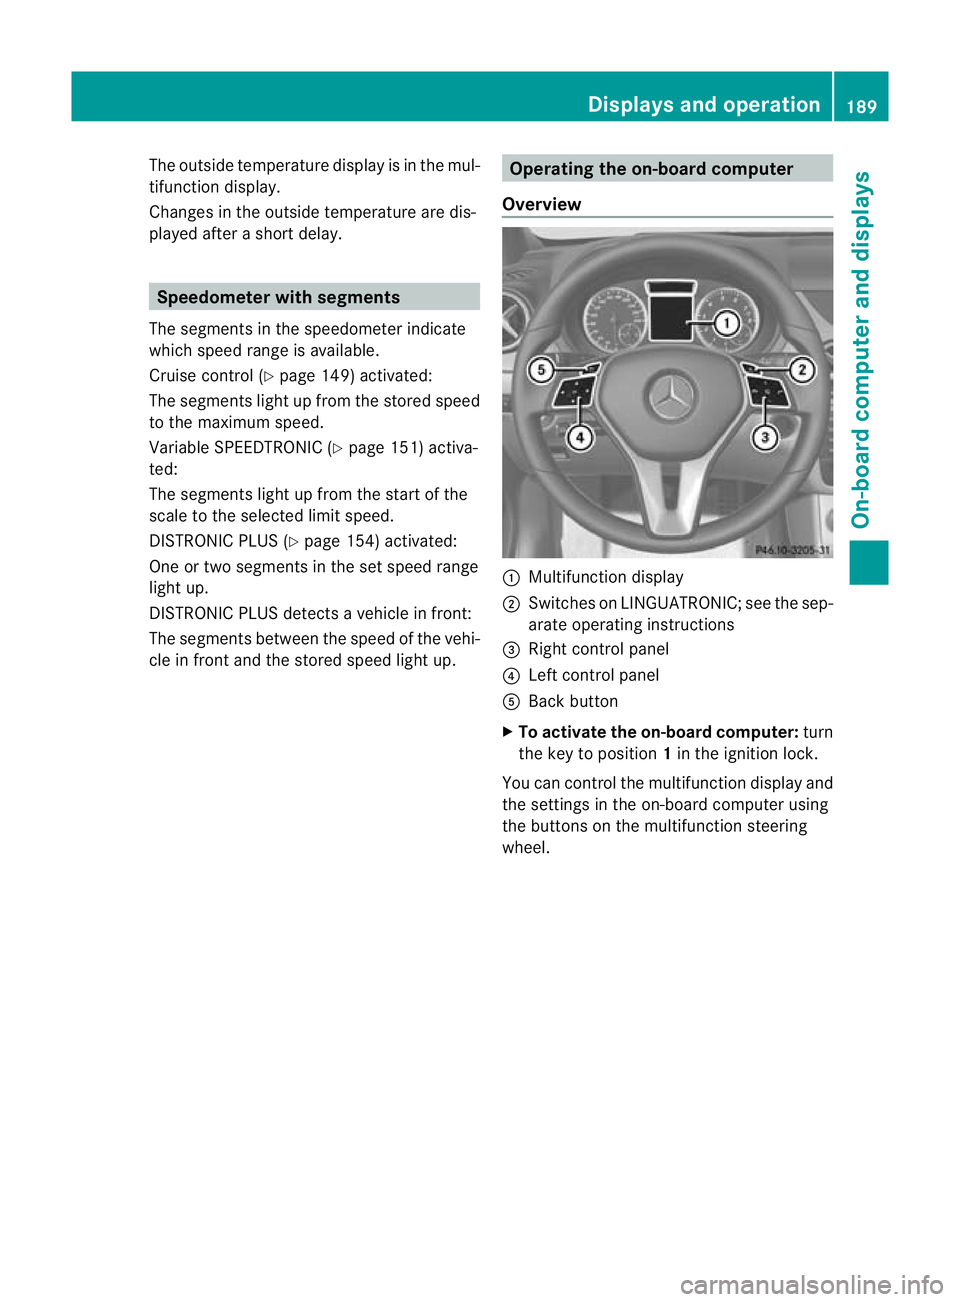
Overview :
Multifunctio ndisplay
; Switches on LINGUATRONIC; see the sep-
arate operating instructions
= Right control panel
? Left control panel
A Back button
X To activat ethe on-board computer: turn
the key to position 1in the ignition lock.
You can control the multifunction display and
the settings in the on-board computer using
the buttons on the multifunction steering
wheel. Displays and operation
189On-board computer and displays Z
Page 205 of 329
X
Press :or9 to select the Dipped headl. Setting for: function.
You will see the selected setting: Right-side traffic or
Left-side traffic .
X Press the abutton to save the setting.
When you change the setting, conversion
does not take place until the next time the
vehicle is stationary.
This function is only available on vehicles with
the Intelligent Light System.
You can use this function to switch between
symmetrical and asymmetrical dipped beam
(Y page 96).
If you set the dipped-beam headlamps for
driving on the right/left, then motorway
mode and the extended range foglamps are
not available.
You can also have the dipped-beam head-
lamps set for driving on the right/left at a
qualified specialist workshop, e.g. a
Mercedes-Benz Service Centre.
Switching Adaptive Highbeam Assist on/
off
X Press the =or; button on the steer-
ing wheel to select the Settings menu.
X Press the :or9 button to select the
Light submenu.
X Press the abutton to confirm.
X Press the :or9 button to select the
Adaptive Main-beam Assist: function.
You will see the selected setting: Activa‐ted or
Deactivated .
X Press the abutton to save the setting.
Activating/deactivating the surround
lighting and exterior lighting delayed
switch-off
If you have activated the Surround light‐ing: function and the light switch is set to
Ã, the following functions are activated
when it is dark:
R Surround lighting: the exterior lighting
remains lit for 40 seconds after unlocking
with the key. If you start the engine, the surround lighting is switched off and auto-
matic headlamp mode is activated
(Y
page 97).
R Exterior lighting delayed switch-off: the
exterior lighting remains lit for 60seconds
after the engine is switched off. If you close
all the doors and the tailgate, the exterior
lighting goes off after 15 seconds.
X Press the =or; button on the steer-
ing wheel to select the Settings menu.
X Press the :or9 button to select the
Light submenu.
X Press the abutton to confirm.
X Press the :or9 button to select the
Surround lighting: function.
You will see the selected setting: on or
off .
X Press the abutton to save the setting.
Deactivating delayed switch-off of the exte-
rior lighting temporarily:
X Before leaving the vehicle, turn the key to
position 0in the ignition lock.
X Turn the key to position 2in the ignition
lock.
The exterior lighting delayed switch-off is
deactivated.
Delayed switch-off of the exterior lighting is
reactivated the next time you start the
engine.
i Depending on your vehicle's equipment,
when the surround lighting and delayed
switch-off exterior lighting are on, the fol-
lowing light up:
R side lamps
R foglamps
R dipped-beam headlamps
R daytime driving lights
R surround lighting in the exterior mirrors
Activating/deactivating the interior light-
ing delayed switch-off
If you activate the Interior lighting delay sw. off: function, the interior light-202
Menus and submenusOn-board computer and displays
Page 206 of 329
ing remains on for 20 seconds after you
remove the key from the ignition lock.
X Press the =or; button on the steer-
ing wheel to selec tthe Settings menu.
X Press the :or9 button to select the
Light submenu.
X Press the abutton to confirm.
X Press the :or9 button to select the
Interior lighting delay sw. off: function.
You will see the selected setting:
on or
off .
X Press the abutton to save the setting.
Vehicle Setting permanent SPEEDTRONIC
X Press the =or; button on the steer-
ing wheel to select the Settings menu.
X Press the :or9 button to select the
Vehicle submenu.
X Press the abutton to confirm.
X Press the :or9 button to select the
Limit speed (winter tyres): function.
You will see the current setting.
X Press the abutton to confirm.
X Press the :or9 button to adjust
permanent SPEEDTRONIC in increments of
ten (230 km/h to
160 km/h ). The
Off set-
ting switches permanent SPEEDTRONIC
off.
X Press the abutton to store the entry.
You can set permanent SPEEDTRONIC
(Y page 154) using the Limit speed (win‐ter tyres): function.
Switching the automatic locking feature
on/off
X Press the =or; button on the steer-
ing wheel to select the Settings menu.
X Press the :or9 button to select the
Vehicle submenu.
X Press the abutton to confirm. X
Press the :or9 button to select the
Automatic door locks: function.
You will see the selected setting: on or
off .
X Press the abutton to save the setting.
If you select the Automatic door locks: function, the vehicle is centrally locked above
a speed of around 15 km/h.
i
For further information on the automatic
locking feature, see (Y page 77).
Activating/deactivating the acoustic
locking confirmation
If you switch on the Acoustic Lock feed‐ back function, an acoustic signal sounds
when you lock the vehicle.
X Press the =or; button on the steer-
ing wheel to select the Settings menu.
X Press the :or9 button to select the
Vehicle submenu.
X Press the abutton to confirm.
X Press the :or9 button to select the
Acoustic Lock feedback function.
You will see the selected setting: Activa‐ ted or
Deactivated .
X Press the abutton to save the setting.
Activating/deactivating the radar sensor
system
X Press the =or; button on the steer-
ing wheel to select the Settings menu.
X Press the :or9 button to select the
Vehicle submenu.
X Press the abutton to confirm.
X Press the 9or: button to select
Radar sensor (See Owner's Man.) .
You will see the selected setting: on or
off .
X Press the abutton to save the setting.
i You must deactivate the radar sensor sys-
tem in certain countries and near radio
telescope facilities. For further informa-
tion, see (Y page 320). Menus and submenus
203On-board computer and displays Z
Page 207 of 329
If the radars
ensor system is switched off,
Blind Spot Assist is deactivated
(Y page 177).
Convenience Switching the belt adjustment on/off
X
Press the =or; button on the steer-
ing wheel to select the Settings menu.
X Press the :or9 button to select the
Convenience submenu.
X Press the abutton to confirm.
X Press the :or9 button to select the
Belt adjustment: function.
You will see the selected setting: Activa‐ted or
Deactivated .
X Press the abutton to save the setting.
For further information on belt adjustment,
see (Y page 45).
Switching on/off the fold in mirrors when
locking function
X Press the =or; button on the steer-
ing wheel to select the Settings menu.
X Press the :or9 button to select the
Convenience submenu.
X Press the abutton to confirm.
X Press the :or9 button to select the
Fold mirrors in when locking: func-
tion.
You will see the selected setting: on or
off .
X Press the abutton to save the setting.
If you switch on the Fold mirrors in when
locking: function, the exterior mirrors fold
in when you lock the vehicle. When you
unlock the vehicle and then open the driver's
or front-passenger door, the exterior mirrors
fold out again.
If you have switched the function on and you
fold the exterior mirror sinusing the button
on the door (Y page 92), they will not fold out
automatically. The exterior mirrors can then
only be folded out using the button on the
door. Resetting to factory settings X
Press the =or; button on the steer-
ing wheel to select the Settings menu.
X Press the :or9 button to select the
Factory setting submenu.
X Press the abutton to confirm.
The Reset all settings? message
appears.
X Press the :or9 button to select
No or
Yes .
X Press the abutton to confirm the selec-
tion.
If you have selected Yes , the multifunction
display shows a confirmation message.
For safety reasons, not all functions are reset:
the Limit speed (winter tyres): func-
tion in permanent SPEEDTRONIC can only be
set in the Vehicle submenu. If you want to
reset the Daytime driving lights: in the
Light submenu, you must turn the key in the
ignition lock to position 1.204
Menus and submenusOn-board computer and displays
Page 215 of 329
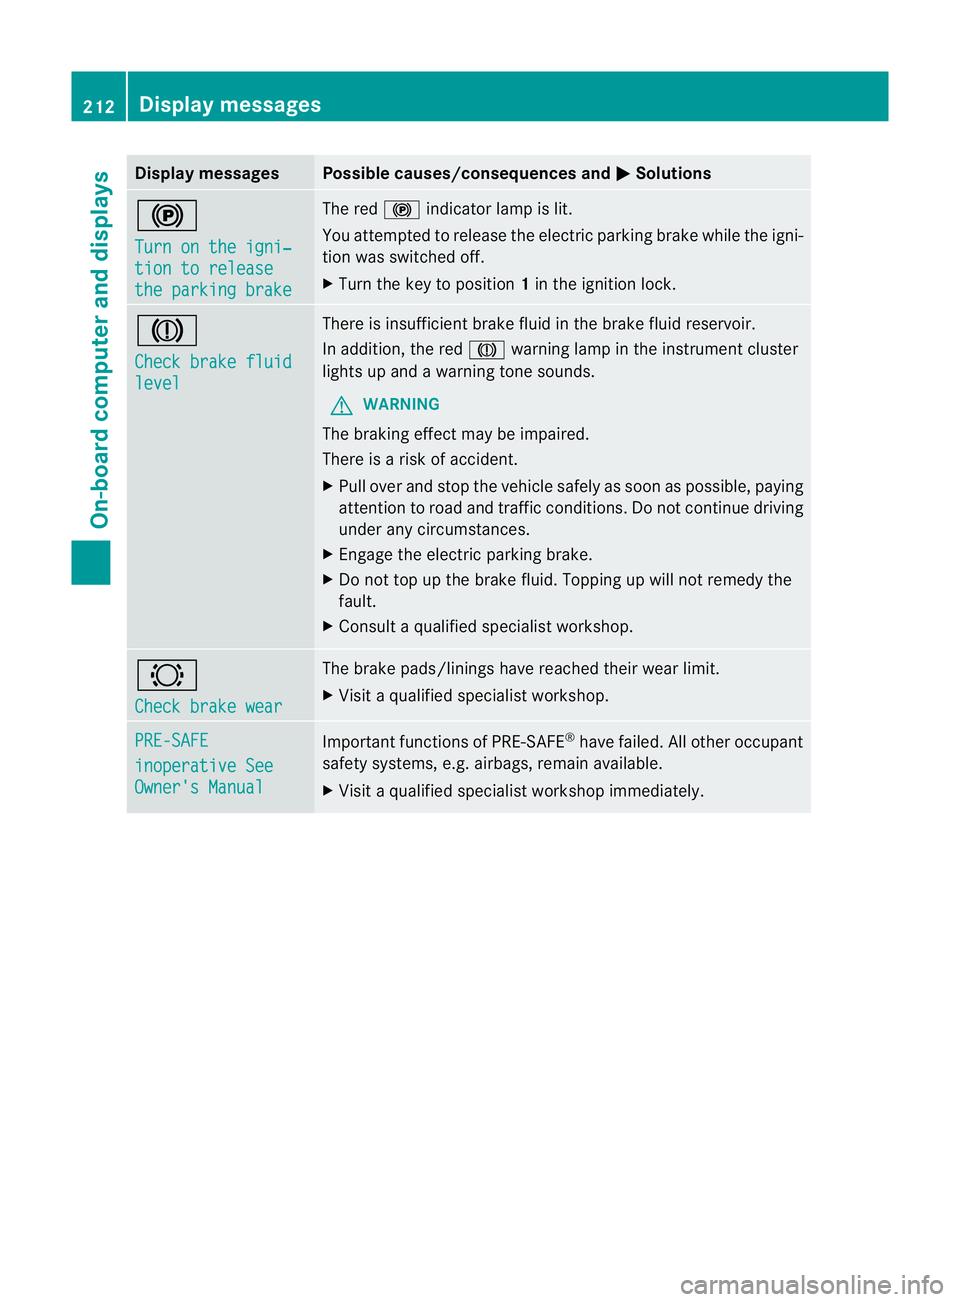
Display messages Possible causes/consequences and
M Solutions
!
Turn on the igni‐
tion to release
the parking brake The red
!indicato rlamp is lit.
You attempted to release the electric parking brak ewhile the igni-
tion was switched off.
X Turn the key to position 1in the ignition lock. J
Check brake fluid
level There is insufficient brake fluid in the brake fluid reservoir.
In addition, the red
Jwarning lamp in the instrument cluster
lights up and a warning tone sounds.
G WARNING
The braking effect may be impaired.
There is a risk of accident.
X Pull over and stop the vehicle safely as soon as possible, paying
attention to road and traffic conditions. Do not continue driving
under any circumstances.
X Engage the electric parking brake.
X Do not top up the brake fluid. Topping up will not remedy the
fault.
X Consult a qualified specialist workshop. #
Check brake wear The brake pads/linings have reached their wear limit.
X
Visit a qualified specialist workshop. PRE-SAFE
inoperative See
Owner's Manual Important functions of PRE-SAFE
®
have failed. All other occupant
safety systems, e.g. airbags, remain available.
X Visit a qualified specialist workshop immediately. 212
Display messagesOn-board computer and displays
Page 234 of 329
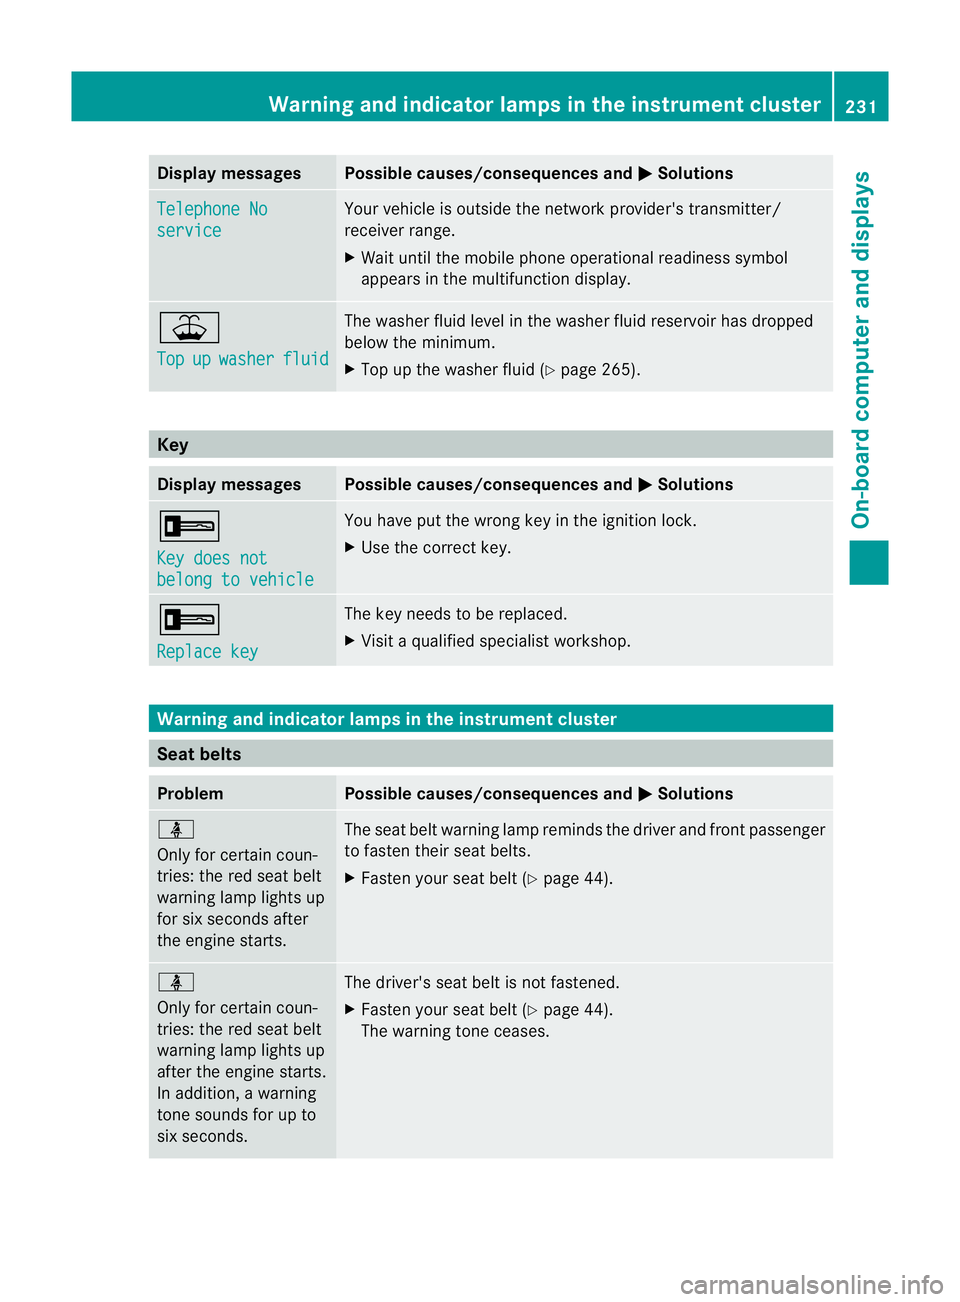
Display messages Possible causes/consequences and
M Solutions
Telephone No
service Your vehicle is outside the network provider's transmitter/
receiver range.
X
Wait until the mobile phone operational readiness symbol
appears in the multifunction display. ¥
Top
up washer fluid The washer fluid level in th
ewasher fluid reservoir has dropped
below the minimum.
X Top up the washe rfluid (Y page 265). Key
Displa
ymessages Possible causes/consequences and
M Solutions
+
Key does not
belong to vehicle You have put the wrong key in the ignitio
nlock.
X Use the correct key. +
Replace key The key needs to be replaced.
X Visit a qualified specialist workshop. Warning and indicator lamps in the instrument cluster
Seat belts
Problem Possible causes/consequences and
M Solutions
ü
Only for certain coun-
tries: the red seat belt
warning lamp lights up
for six seconds after
the engine starts. The seat belt warning lamp reminds the driver and front passenger
to fasten their seat belts.
X Fasten your seat belt (Y page 44).ü
Only for certain coun-
tries: the red seat belt
warning lamp lights up
after the engine starts.
In addition, a warning
tone sounds for up to
six seconds.
The driver's seat belt is not fastened.
X
Fasten your seat belt (Y page 44).
The warning tone ceases. Warning and indicator lamps in the instrument cluster
231On-board computer and displays Z
Page 260 of 329

Example: vehicles with a cove
rover the stowage
compartment
X To open: push the lower section of
cover :.
The cover opens.
X To remove the insert: lift insert=
up ; and out.
X To refit the insert: press insert=into the
holder until it engages.
i If you remove the ashtray insert, you can
use the resulting compartment for stow-
age.
Ashtray in the rear-compartment centre
console X
To open: pull cover ;out by its top edge.
X To remove the insert: pull out insert:
beyond the stop.
X To fit the insert: fit insert:from above
into the holder and press down into the
holder until it engages. Cigarette lighter
G
WARNING
Only hold the hot cigarette lighter by its knob.
Otherwise, you might burn yourself.
Make sure that children travelling in the vehi-
cle are not able to injure themselves on the
hot cigarette lighter or cause a fire with it. Example: vehicles with a cover over the stowage
compartment
X
Turn the key to position 2in the ignition
lock.
X To open: push the lower section of
cover :.
The ashtray opens.
X Press in cigarette lighter ;.
Cigarette lighter ;will pop out automati-
cally when the heating element is red-hot. 12
Vsockets
Points to observe before use X
Turn the key to position 1in the ignition
lock.
The sockets can be used for accessories with
a maximum current draw of 180 W (15A).
Accessories include such items as lamps, or
chargers for mobile phones.
If you use the sockets for long periods when
the engine is switched off ,the battery may
discharge.
i An emergency cut-offe nsures thatthe on-
board voltage does not drop too low. If the Features
257Stowing and features Z
Page 263 of 329
X
To fold the bracket up: press button:.
X To fold the bracket down: press the
bracket down and allow it to engage.
You can fold the pre-installed bracket up to
improve access to the stowage space
beneath it. Depending on the vehicle's equip-
ment, a USB connection and an AUX-IN con-
nection/Media Interface are fitted in the
stowage compartment (Y page 246).
You can operate the telephone using the
6 and~ buttons on the multifunction
steering wheel. You can operate othe rmobile
phone functions via the on-board computer
(Y page 196).
If you take the key out of the ignition lock, the
mobile phone stays on but you can no longer
use the hands-free system.
If you are making a call and you would like to
take the key out of the ignition lock, first
remove the mobile phone from the bracket.
Otherwise, the call will be ended.
i When a mobile phone bracket is used that
is connected to the mobile phone via Blue-
tooth ®
: if you want to continue a call in
"Private mode", you have to perform the
necessary steps on the mobile phone (see
the separate mobile phone operating
instructions). Floormat on the driver's side
G
WARNING
Make sure that there is sufficient clearance
around the pedals when floormats are used,
and that the floormats are properly secured.
The floormats must be correctly secured at all
times using the securing knob and retainers.
Before you drive off, check the floormats and
secure them if necessary. Afloormat which is
not properly secured can slip and thereby
interfere with the movemen tofthe pedals.
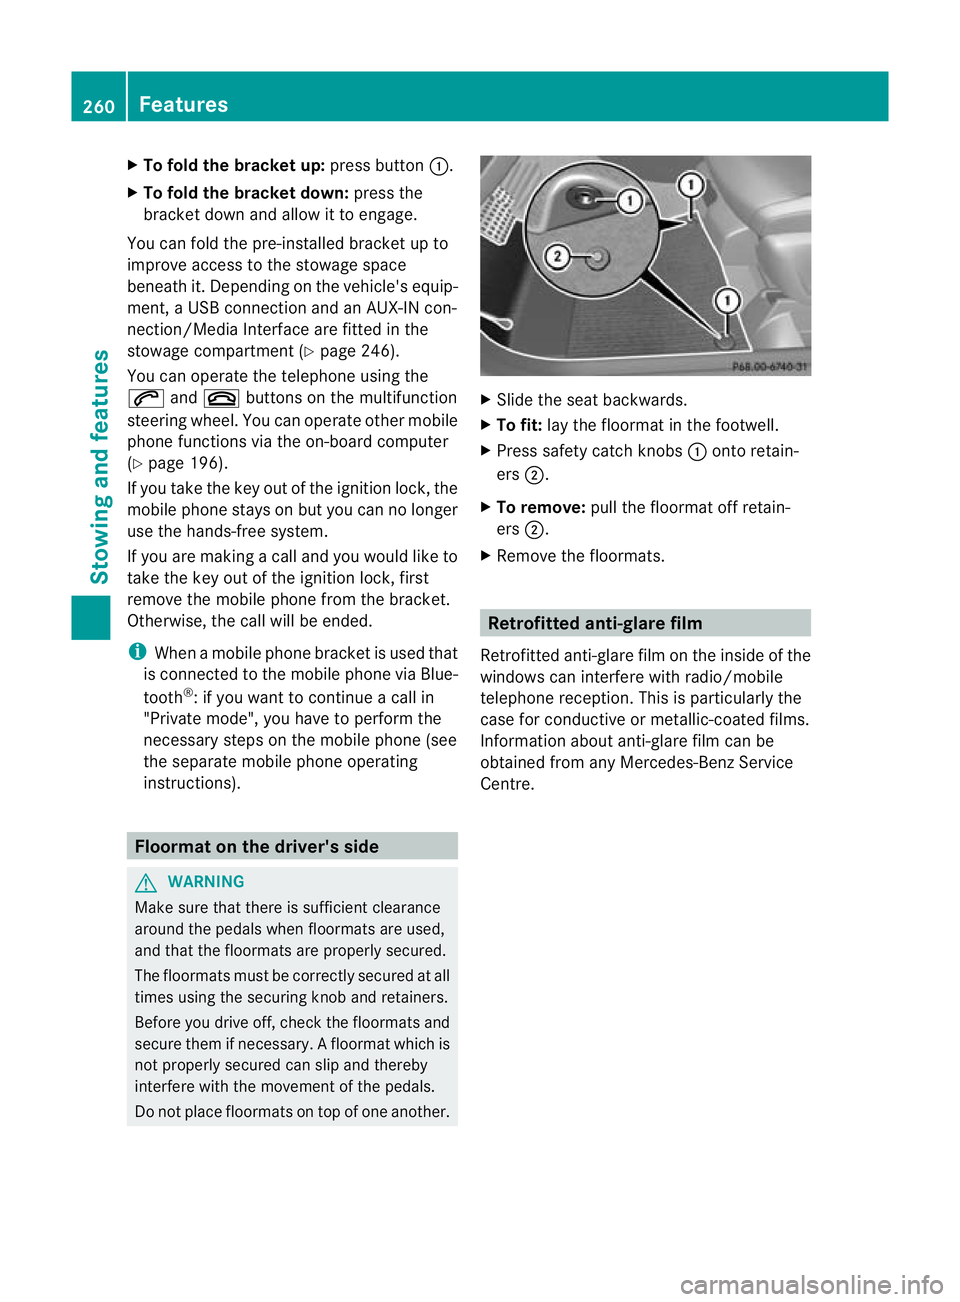
Do not place floormats on top of one another. X
Slide the seat backwards.
X To fit: lay the floormat in the footwell.
X Press safety catch knobs :onto retain-
ers ;.
X To remove: pull the floormat off retain-
ers ;.
X Remove the floormats. Retrofitted anti-glare film
Retrofitted anti-glare film on the inside of the
windows can interfere with radio/mobile
telephone reception. This is particularly the
case for conductive or metallic-coated films.
Information about anti-glare film can be
obtained from any Mercedes-Benz Service
Centre. 260
FeaturesStowing and features
Page 265 of 329
Useful information
i This Owner's Manual describes all models
and all standard and optional equipment
available to your vehicle at the time of pub-
lication of the Owner's Manual. Country-
specific deviations are possible. Please
note that your vehicle may not be equipped
with all features described. This also
applies to safety-relevan tsystems and
functions.
i Please read the information on qualified
specialist workshops (Y page 22).Engine compartment
Bonnet
Opening the bonnet G
WARNING
Do no tpull the release leve rwhile the vehicle
is in motion. If you do so, the bonnet may open
up and block your view. G
WARNING
There is a risk of injury if the bonnet is open,
even if the engine is not running.
Some engine components can become very
hot.
To avoid the risk of burns, only touch those
components described in the Owner's Manual
and observe the relevant safety notes. G
WARNING
The radiator fan between the radiator and the
engine can start automatically, even if the key
has been removed from the ignition lock. For
this reason, you must not reach into the fan
rotation area. You could otherwise be injured. Vehicles with
apetrol engine: The elec-
tronic ignitio nsystem uses high voltage. For
this reason, you mus tnever touch ignition
system components (ignition coil, ignition
cables, spark plug connectors or test socket)
while:
R the engine is running
R the engine is being started
R the ignition is switched on and the engine
is being cranked by hand
You could otherwise suffer an electric shock
and be seriously or even fatally injured.
Vehicles with adiesel engine: The elec-
tronic injection control uses high voltage. For
this reason, you must never touch injection
system components while:
R the engine is running
R the engine is being started
R the ignition is switched on
You could otherwise suffer an electric shock
and be seriously or even fatally injured. G
WARNING
The windscreen wipers and wiper linkage
could be set in motion.
When the bonnet is open, you or others could
be injured by the wiper linkage.
Make sure that the windscreen wipers are
switched off and that the key has been pulled
out of the ignition lock before opening the
bonnet.
! Make sure that the windscreen wipers are
not folded away from the windscreen .Oth-
erwise, you could damage the windscreen
wipers or the bonnet. 262
Engine compartmentMaintenance and care
Page 268 of 329
X
Replace cap :on the filler neck and turn
clockwise.
Make sure that the cap locks into place
securely.
X Chec kthe oil level again with the oil dip-
stick (Y page 264).
Further information on engine oil
(Y page 314). Checking and adding other service
products
Checking the coolant level G
WARNING
The cooling system is pressurised. Therefore,
only unscrew the cap once the engine has
cooled down. The coolant temperature dis-
play must show less than 40 †. Otherwise,
you could be scalded if hot coolant escapes.
! The coolant level must only be checked
and corrected when the engine has cooled
down (coolant temperature under 40 †).
Checking the coolant level when the cool-
ant temperature is over 40 † can lead to
damage to the engine or engine cooling
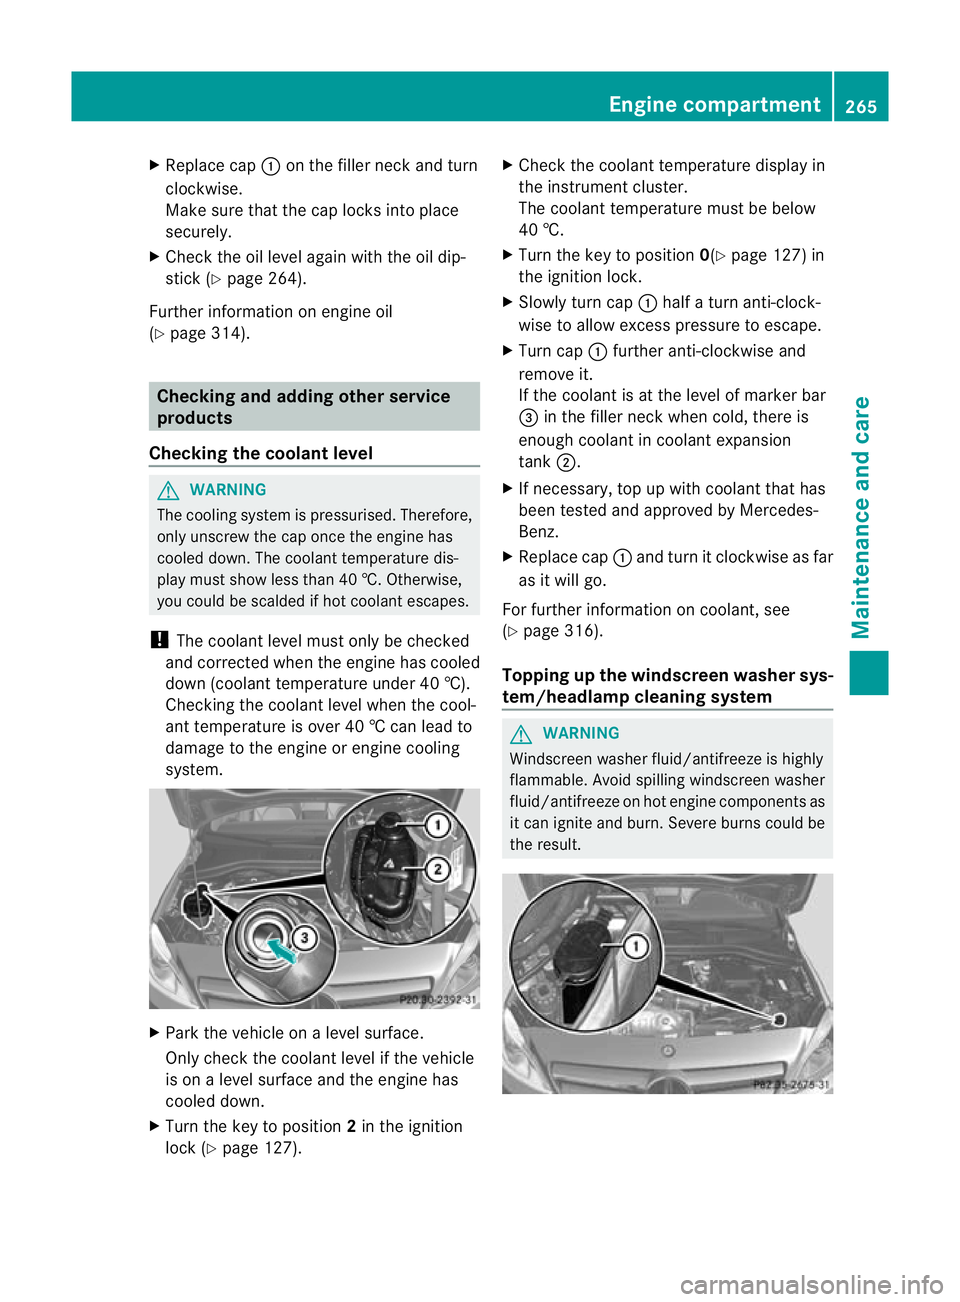
system. X
Park the vehicle on a level surface.
Only check the coolant level if the vehicle
is on a level surface and the engine has
cooled down.
X Turn the key to position 2in the ignition
lock (Y page 127). X
Check the coolant temperature display in
the instrument cluster.
The coolant temperature must be below
40 †.
X Turn the key to position 0(Ypage 127) in
the ignition lock.
X Slowly turn cap :half a turn anti-clock-
wise to allow excess pressure to escape.
X Turn cap :further anti-clockwise and
remove it.
If the coolant is at the level of marker bar
= in the filler neck when cold, there is
enough coolant in coolant expansion
tank ;.
X If necessary, top up with coolant that has
been tested and approved by Mercedes-
Benz.
X Replace cap :and turn it clockwise as far
as it will go.
For further information on coolant, see
(Y page 316).
Topping up the windscreen washer sys-
tem/headlampc leaning system G
WARNING
Windscreen washer fluid/antifreeze is highly
flammable. Avoid spilling windscreen washer
fluid/antifreeze on hot engine components as
it can ignite and burn. Severe burns could be
the result. Engine compartment
265Maintenance and care Z