MERCEDES-BENZ B-CLASS HATCHBACK 2015 Owners Manual
Manufacturer: MERCEDES-BENZ, Model Year: 2015, Model line: B-CLASS HATCHBACK, Model: MERCEDES-BENZ B-CLASS HATCHBACK 2015Pages: 293, PDF Size: 10.83 MB
Page 171 of 293
:
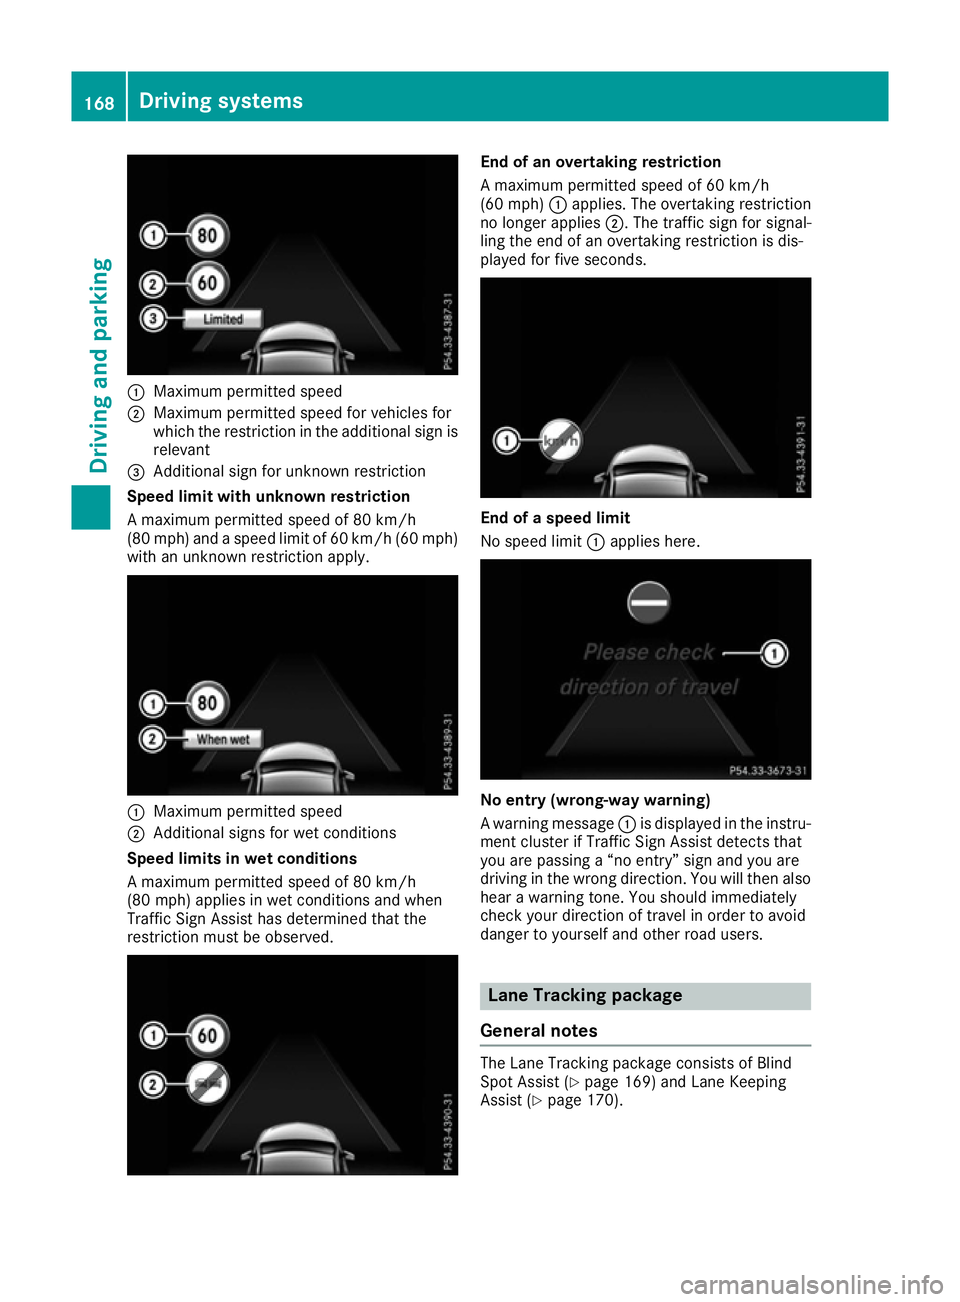
Maximum permitted speed
; Maximum permitted speed for vehicles for
which the restriction in the additional sign is
relevant
= Additional sign for unknown restriction
Speed limit with unknown restriction
A maximum permitted speed of 80 km/h
(80 mph) and a speed limit of 60 km/h (60 mph) with an unknown restriction apply. :
Maximum permitted speed
; Additional signs for wet conditions
Speed limits in wet conditions
A maximum permitted speed of 80 km/h
(80 mph) applies in wet conditions and when
Traffic Sign Assist has determined that the
restriction must be observed. End of an overtaking restriction
A maximum permitted speed of 60 km/h
(60 mph)
:applies. The overtaking restriction
no longer applies ;. The traffic sign for signal-
ling the end of an overtaking restriction is dis-
played for five seconds. End of a speed limit
No speed limit :applies here. No entry (wrong-way warning)
A warning message
:is displayed in the instru-
ment cluster if Traffic Sign Assist detects that
you are passing a “no entry” sign and you are
driving in the wrong direction. You will then also hear a warning tone. You should immediately
check your direction of travel in order to avoid
danger to yourself and other road users. Lane Tracking package
General notes The Lane Tracking package consists of Blind
Spot Assist (Y
page 169) and Lane Keeping
Assist (Y page 170). 168
Driving systemsDriving and parking
Page 172 of 293
Blind Spot Assist
General notes
Blind Spot Assist monitors the areas on either
side of the vehicle that are not visible to the
driver with two lateral, rear-facing radar sen-
sors. A warning display in the exterior mirrors
draws your attention to vehicles detected in the
monitored area. If you then switch on the cor-
responding turn signal to change lanes, you will also receive a visual and audible collision warn-
ing.
Blind Spot Assist supports you from a speed of
approximately 30 km/h.
Important safety notes G
WARNING
Blind Spot Assist does not react to vehicles:
R overtaken too closely on the side, placing
them in the blind spot area
R when the difference in the speed of
approach and overtaking is too great
As a result, Blind Spot Assist cannot warn
drivers in these situations. There is a risk of an accident.
Always pay careful attention to the traffic sit- uation and maintain a safe distance at the side
of the vehicle.
Blind Spot Assist is only an aid. It may fail to
detect some vehicles and is no substitute for
attentive driving. Always ensure that there is
sufficient distance to the side for other road
users and obstacles. Radar sensors
The radar sensors for Blind Spot Assist are inte-
grated into the rear bumper. Make sure that the bumpers are free from dirt, ice or slush. The
sensors must not be covered, for example by
cycle racks or overhanging loads. Following a
severe impact or in the event of damage to the
bumpers, have the function of the radar sensors
checked at a qualified specialist workshop.
Blind Spot Assist may no longer work properly. Monitoring range of the sensors
In particular, the detection of obstacles can be
impaired in the case of:
R dirt on the sensors or obscured sensors
R poor visibility, e.g. due to fog, heavy rain or
snow
R a narrow vehicle travelling in front, e.g. a
motorcycle or a bicycle
R very wide lanes
R narrow lanes
R vehicles not driving in the middle of their lane
R barriers or other road boundaries
Vehicles in the monitoring range are then not
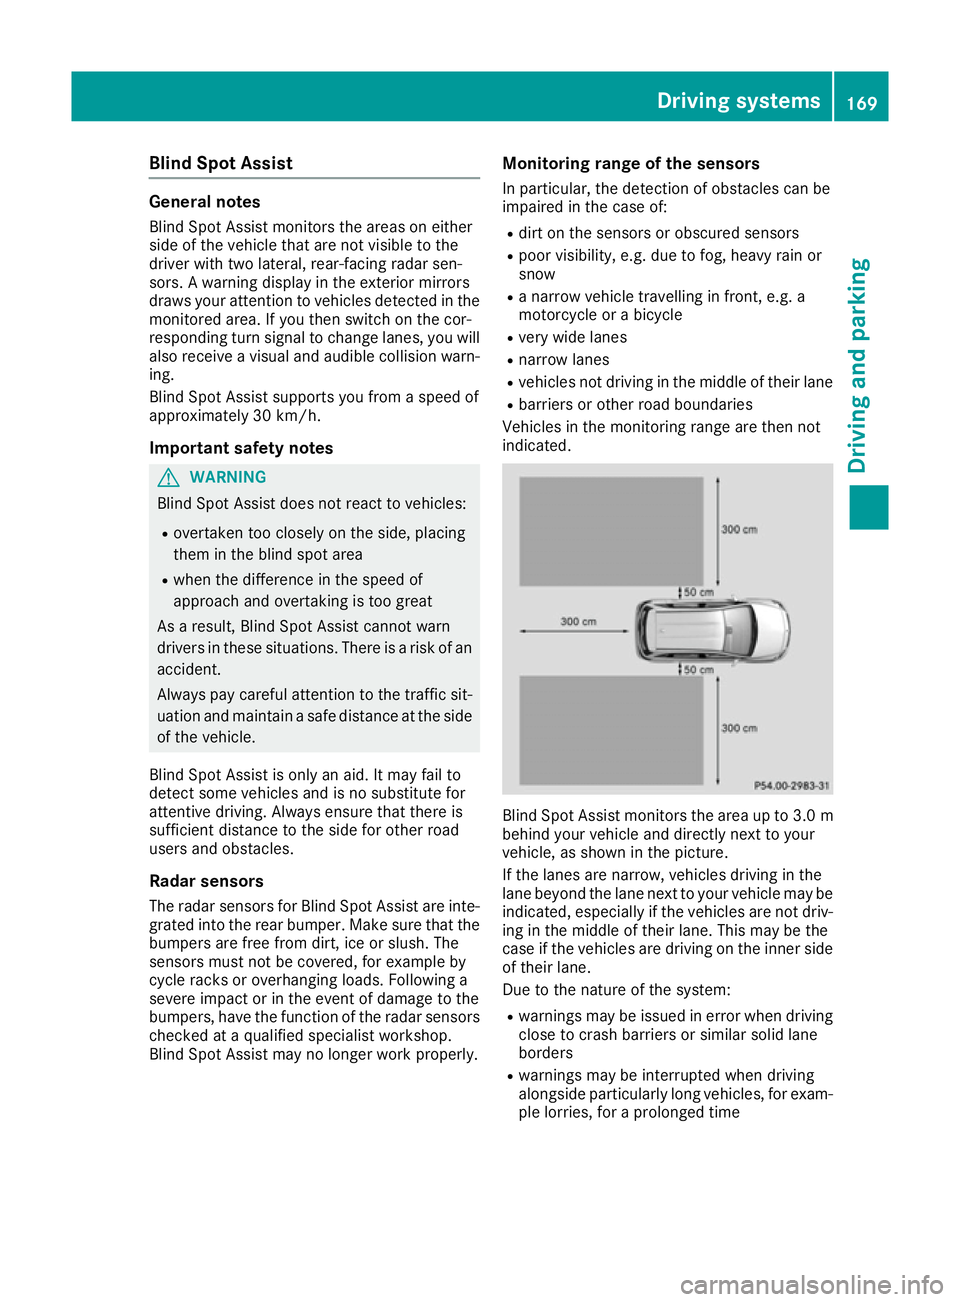
indicated. Blind Spot Assist monitors the area up to 3.0 m
behind your vehicle and directly next to your
vehicle, as shown in the picture.
If the lanes are narrow, vehicles driving in the
lane beyond the lane next to your vehicle may be
indicated, especially if the vehicles are not driv-
ing in the middle of their lane. This may be the
case if the vehicles are driving on the inner side of their lane.
Due to the nature of the system:
R warnings may be issued in error when driving
close to crash barriers or similar solid lane
borders
R warnings may be interrupted when driving
alongside particularly long vehicles, for exam-
ple lorries, for a prolonged time Driving systems
169Driving and parking Z
Page 173 of 293
Warning display
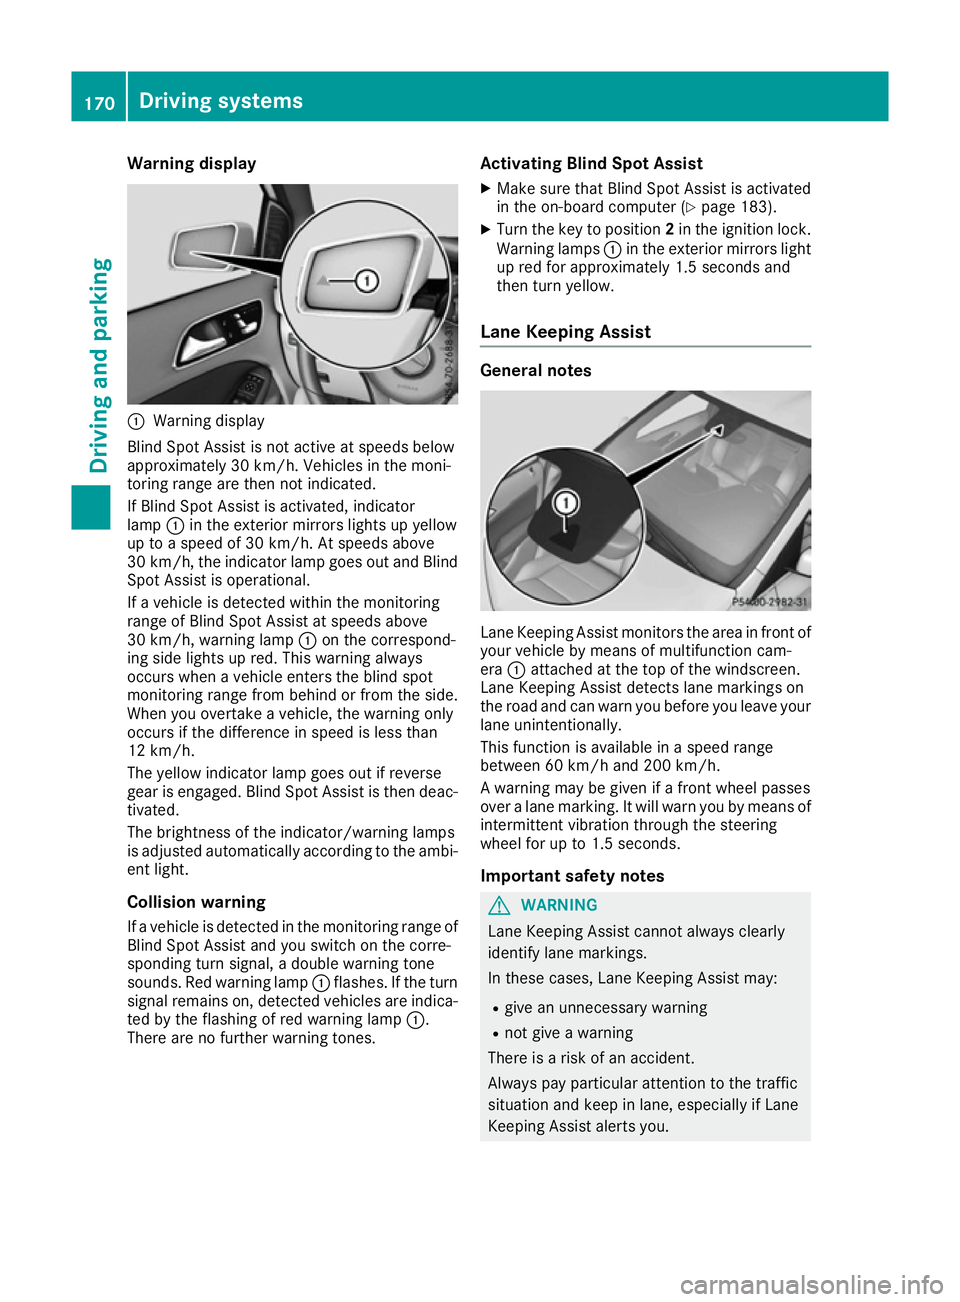
:
Warning display
Blind Spot Assist is not active at speeds below
approximately 30 km/h. Vehicles in the moni-
toring range are then not indicated.
If Blind Spot Assist is activated, indicator
lamp :in the exterior mirrors lights up yellow
up to a speed of 30 km/h. At speeds above
30 km/h, the indicator lamp goes out and Blind
Spot Assist is operational.
If a vehicle is detected within the monitoring
range of Blind Spot Assist at speeds above
30 km/h, warning lamp :on the correspond-
ing side lights up red. This warning always
occurs when a vehicle enters the blind spot
monitoring range from behind or from the side.
When you overtake a vehicle, the warning only
occurs if the difference in speed is less than
12 km/h.
The yellow indicator lamp goes out if reverse
gear is engaged. Blind Spot Assist is then deac- tivated.
The brightness of the indicator/warning lamps
is adjusted automatically according to the ambi-
ent light.
Collision warning
If a vehicle is detected in the monitoring range of
Blind Spot Assist and you switch on the corre-
sponding turn signal, a double warning tone
sounds. Red warning lamp :flashes. If the turn
signal remains on, detected vehicles are indica-
ted by the flashing of red warning lamp :.
There are no further warning tones. Activating Blind Spot Assist
X Make sure that Blind Spot Assist is activated
in the on-board computer (Y page 183).
X Turn the key to position 2in the ignition lock.
Warning lamps :in the exterior mirrors light
up red for approximately 1.5 seconds and
then turn yellow.
Lane Keeping Assist General notes
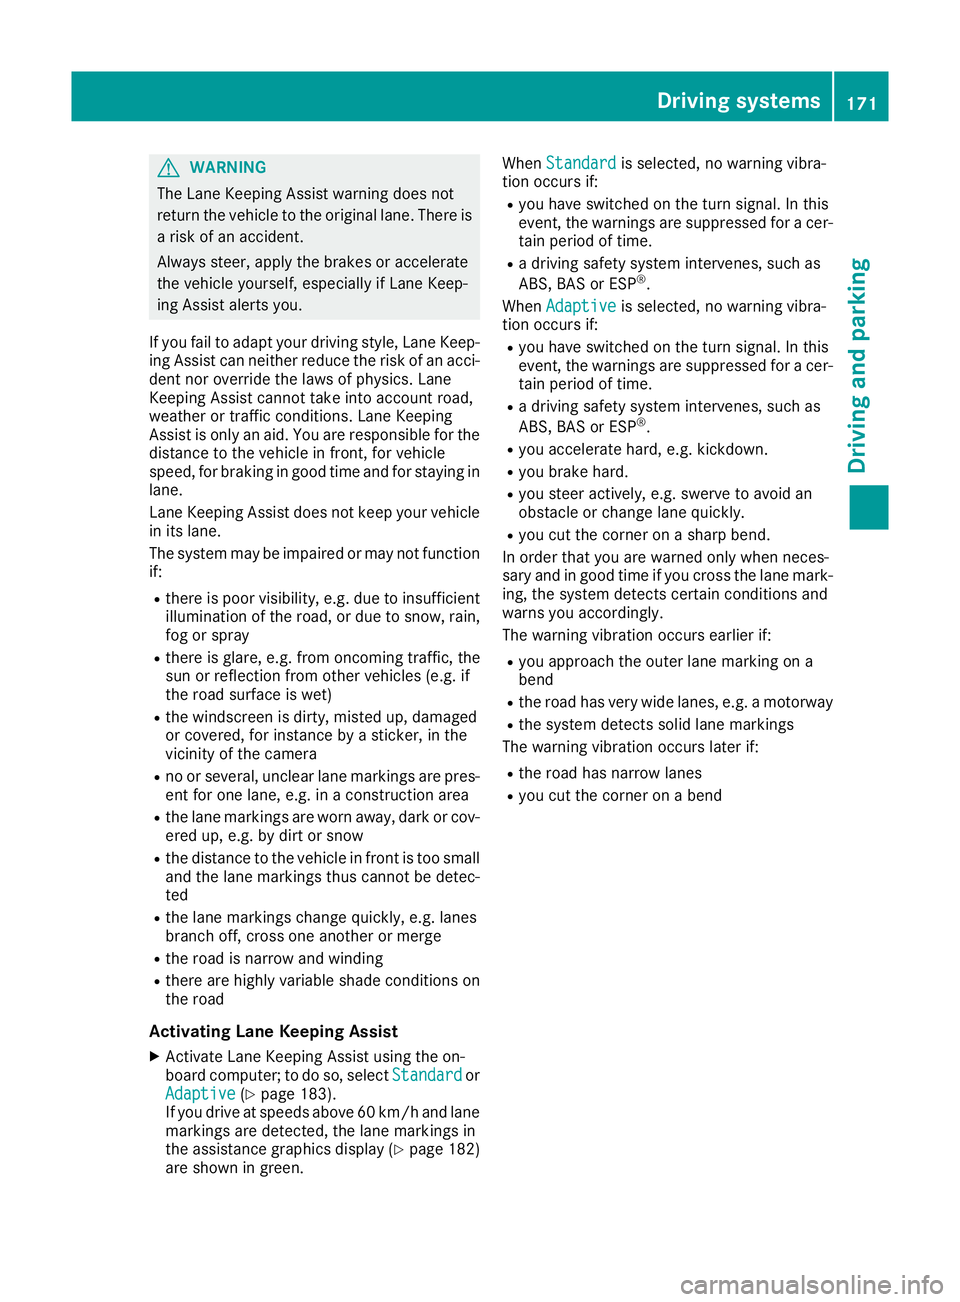
Lane Keeping Assist monitors the area in front of
your vehicle by means of multifunction cam-
era :attached at the top of the windscreen.
Lane Keeping Assist detects lane markings on
the road and can warn you before you leave your lane unintentionally.
This function is available in a speed range
between 60 km/h and 200 km/h.
A warning may be given if a front wheel passes
over a lane marking. It will warn you by means of intermittent vibration through the steering
wheel for up to 1.5 seconds.
Important safety notes G
WARNING
Lane Keeping Assist cannot always clearly
identify lane markings.
In these cases, Lane Keeping Assist may:
R give an unnecessary warning
R not give a warning
There is a risk of an accident.
Always pay particular attention to the traffic
situation and keep in lane, especially if Lane
Keeping Assist alerts you. 170
Driving systemsDriving and parking
Page 174 of 293
G
WARNING
The Lane Keeping Assist warning does not
return the vehicle to the original lane. There is a risk of an accident.
Always steer, apply the brakes or accelerate
the vehicle yourself, especially if Lane Keep-
ing Assist alerts you.
If you fail to adapt your driving style, Lane Keep-
ing Assist can neither reduce the risk of an acci-
dent nor override the laws of physics. Lane
Keeping Assist cannot take into account road,
weather or traffic conditions. Lane Keeping
Assist is only an aid. You are responsible for the distance to the vehicle in front, for vehicle
speed, for braking in good time and for staying in
lane.
Lane Keeping Assist does not keep your vehicle
in its lane.
The system may be impaired or may not function if:
R there is poor visibility, e.g. due to insufficient
illumination of the road, or due to snow, rain,fog or spray
R there is glare, e.g. from oncoming traffic, the
sun or reflection from other vehicles (e.g. if
the road surface is wet)
R the windscreen is dirty, misted up, damaged
or covered, for instance by a sticker, in the
vicinity of the camera
R no or several, unclear lane markings are pres-
ent for one lane, e.g. in a construction area
R the lane markings are worn away, dark or cov-
ered up, e.g. by dirt or snow
R the distance to the vehicle in front is too small
and the lane markings thus cannot be detec-
ted
R the lane markings change quickly, e.g. lanes
branch off, cross one another or merge
R the road is narrow and winding
R there are highly variable shade conditions on
the road
Activating Lane Keeping Assist
X Activate Lane Keeping Assist using the on-
board computer; to do so, select Standard
Standard or
Adaptive
Adaptive (Ypage 183).
If you drive at speeds above 60 km/h and lane
markings are detected, the lane markings in
the assistance graphics display (Y page 182)
are shown in green. When
Standard
Standard is selected, no warning vibra-
tion occurs if:
R you have switched on the turn signal. In this
event, the warnings are suppressed for a cer-
tain period of time.
R a driving safety system intervenes, such as
ABS, BAS or ESP ®
.
When Adaptive Adaptive is selected, no warning vibra-
tion occurs if:
R you have switched on the turn signal. In this
event, the warnings are suppressed for a cer-
tain period of time.
R a driving safety system intervenes, such as
ABS, BAS or ESP ®
.
R you accelerate hard, e.g. kickdown.
R you brake hard.
R you steer actively, e.g. swerve to avoid an
obstacle or change lane quickly.
R you cut the corner on a sharp bend.
In order that you are warned only when neces-
sary and in good time if you cross the lane mark-
ing, the system detects certain conditions and
warns you accordingly.
The warning vibration occurs earlier if:
R you approach the outer lane marking on a
bend
R the road has very wide lanes, e.g. a motorway
R the system detects solid lane markings
The warning vibration occurs later if:
R the road has narrow lanes
R you cut the corner on a bend Driving systems
171Driving and parking Z
Page 175 of 293
Useful information
i This Owner's Manual describes all models,
series and optional equipment for your vehi-
cle that were available at the time of going to
press. National variations are possible. Note
that your vehicle may not be equipped with all
of the functions described. This is also the
case for systems and functions relevant to
safety.
i Read the information on qualified specialist
workshops: (Y page 23). Important safety notes
G
WARNING
Operating the integrated information systems and communications equipment in the vehicle
while driving will distract you from traffic con-
ditions. You could then lose control of the
vehicle. There is a risk of an accident.
Only operate these devices if road traffic con-
ditions permit. If you are unsure about the
surrounding conditions, pull over to a safe
location and make entries only while the vehi-
cle is stationary.
You must observe the legal requirements for the country in which you are currently driving whenoperating the on-board computer. G
WARNING
If the instrument cluster has failed or mal-
functioned, you may not recognise function
restrictions relevant to safety. The operating
safety of your vehicle may be impaired. There is a risk of an accident.
Drive on carefully. Have the vehicle checked
at a qualified specialist workshop immedi-
ately.
The on-board computer only shows messages or warnings from certain systems in the multifunc-tion display. You should therefore make sure
your vehicle is operating safely at all times.
If the operating safety of your vehicle is
impaired, park the vehicle safely as soon as pos- sible. Contact a qualified specialist workshop. For an overview, see the instrument panel illus-
tration (Y page 27). Displays and operation
Instrument cluster lighting
The light sensor in the instrument cluster auto-
matically controls the brightness of the multi-
function display. In daylight, the displays in the
instrument cluster are not illuminated.
The lighting in the instrument cluster, in the dis- plays and the controls in the vehicle interior can
be adjusted using the brightness control knob.
The brightness control knob is located on the
bottom left of the instrument cluster
(Y page 27).
X Turn the brightness control knob clockwise or
anti-clockwise.
If the light switch is set to the Ã,Tor
L position, the brightness is dependent
upon the brightness of the ambient light. READY indicator
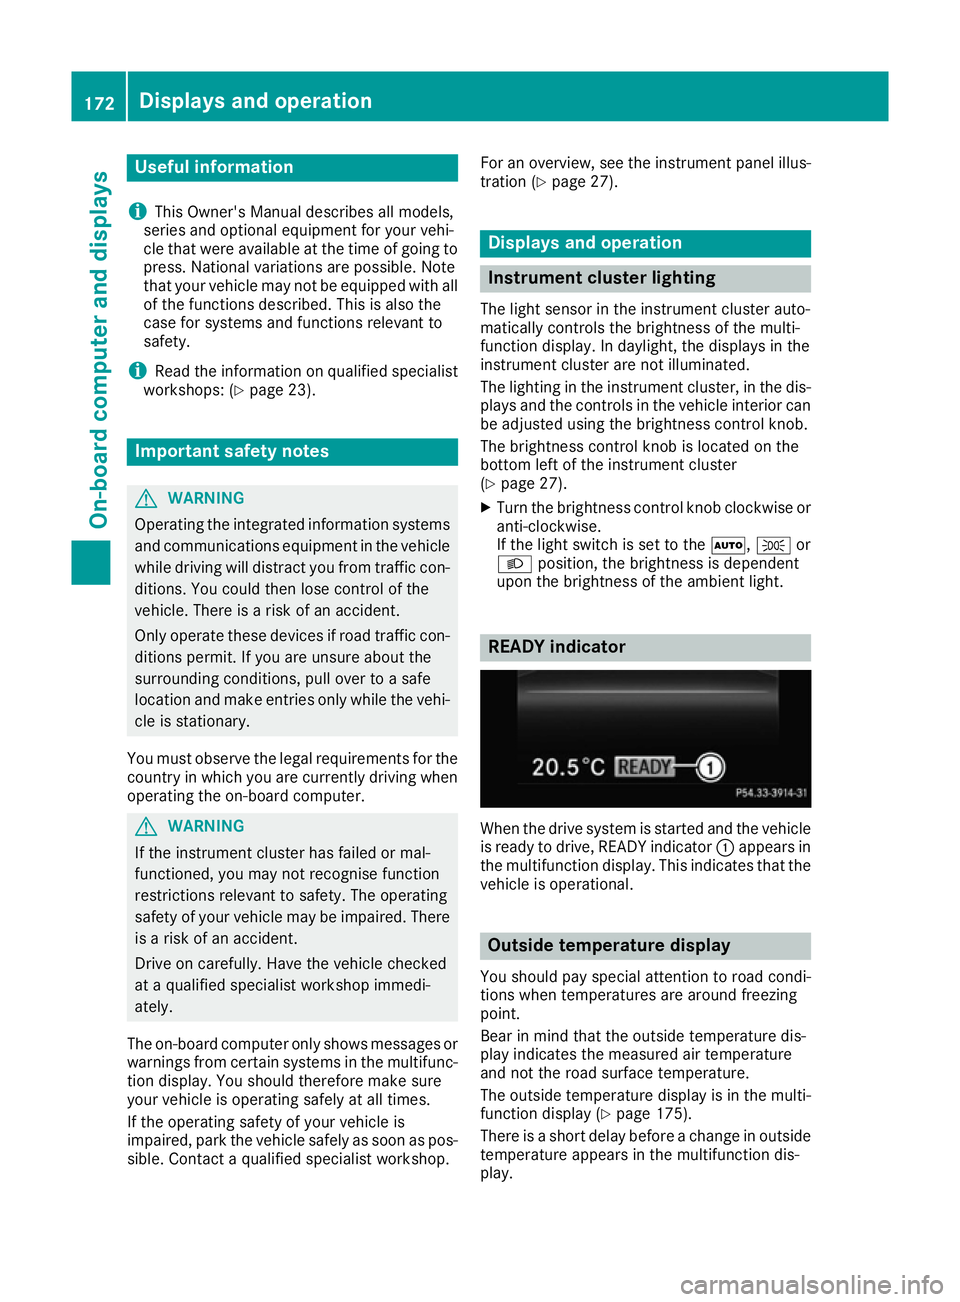
When the drive system is started and the vehicle
is ready to drive, READY indicator :appears in
the multifunction display. This indicates that the vehicle is operational. Outside temperature display
You should pay special attention to road condi-
tions when temperatures are around freezing
point.
Bear in mind that the outside temperature dis-
play indicates the measured air temperature
and not the road surface temperature.
The outside temperature display is in the multi-
function display (Y page 175).
There is a short delay before a change in outside
temperature appears in the multifunction dis-
play. 172
Displays and operationOn-board computer and displays
Page 176 of 293
E-CELL display
G
WARNING
There is a risk of an accident if you accelerate or overtake when the power output of the
drive system is reduced.
You should therefore adapt your driving style
and drive particularly carefully. Charge the
high-voltage battery at a charge station imme- diately. X
Start the drive system (Y page 128).
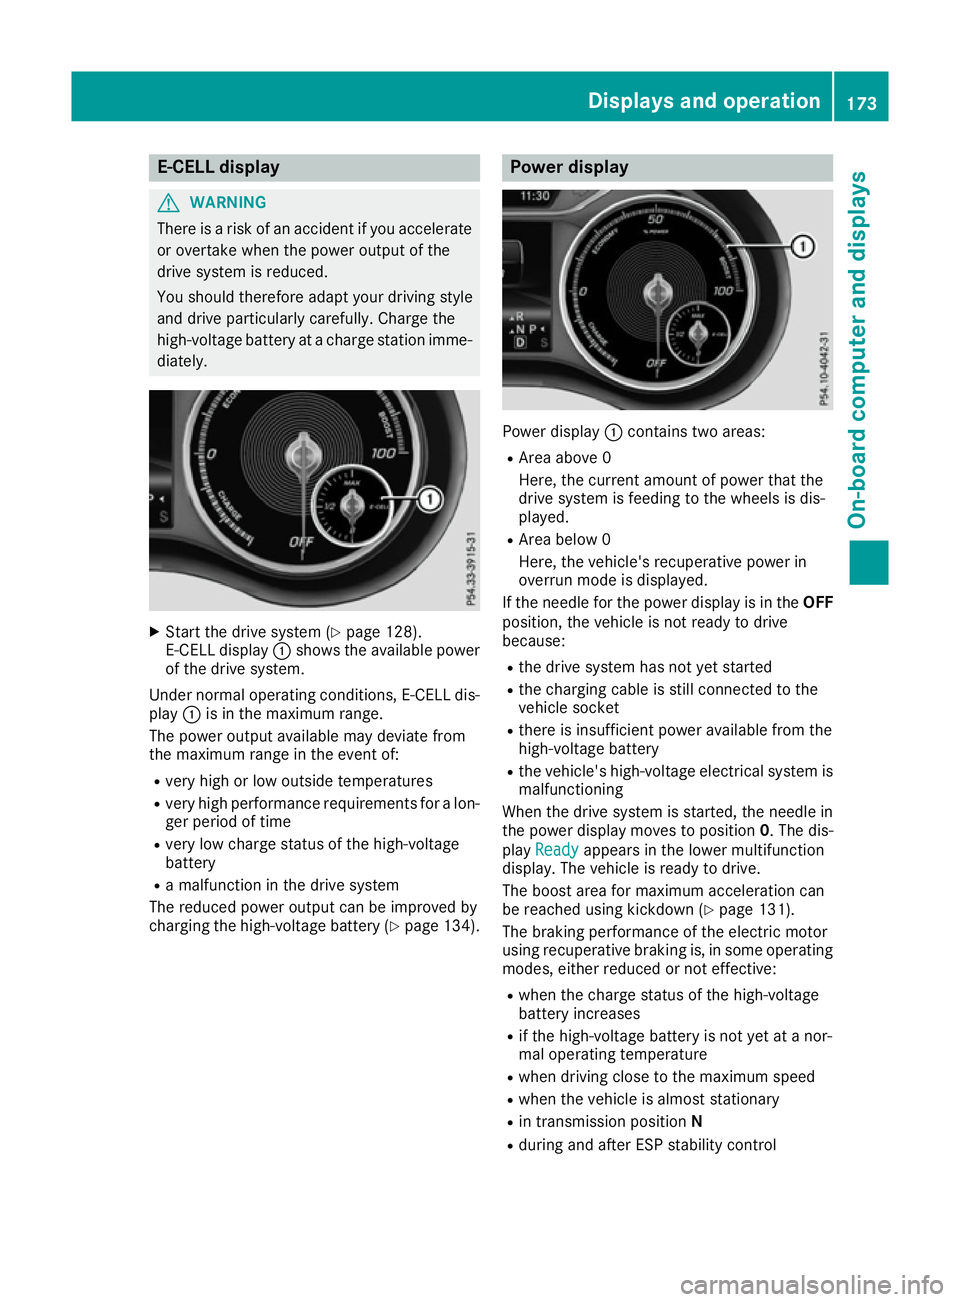
E-CELL display :shows the available power
of the drive system.
Under normal operating conditions, E-CELL dis-
play :is in the maximum range.
The power output available may deviate from
the maximum range in the event of:
R very high or low outside temperatures
R very high performance requirements for a lon-
ger period of time
R very low charge status of the high-voltage
battery
R a malfunction in the drive system
The reduced power output can be improved by
charging the high-voltage battery (Y page 134). Power display
Power display
:contains two areas:
R Area above 0
Here, the current amount of power that the
drive system is feeding to the wheels is dis-
played.
R Area below 0
Here, the vehicle's recuperative power in
overrun mode is displayed.
If the needle for the power display is in the OFF
position, the vehicle is not ready to drive
because:
R the drive system has not yet started
R the charging cable is still connected to the
vehicle socket
R there is insufficient power available from the
high-voltage battery
R the vehicle's high-voltage electrical system is
malfunctioning
When the drive system is started, the needle in
the power display moves to position 0. The dis-
play Ready
Ready appears in the lower multifunction
display. The vehicle is ready to drive.
The boost area for maximum acceleration can
be reached using kickdown (Y page 131).
The braking performance of the electric motor
using recuperative braking is, in some operating
modes, either reduced or not effective:
R when the charge status of the high-voltage
battery increases
R if the high-voltage battery is not yet at a nor-
mal operating temperature
R when driving close to the maximum speed
R when the vehicle is almost stationary
R in transmission position N
R during and after ESP stability control Displays and operation
173On-board computer and displays Z
Page 177 of 293
If necessary, counteract the reduced regenera-
tive braking effect by applying the brake your-
self. Charge level display
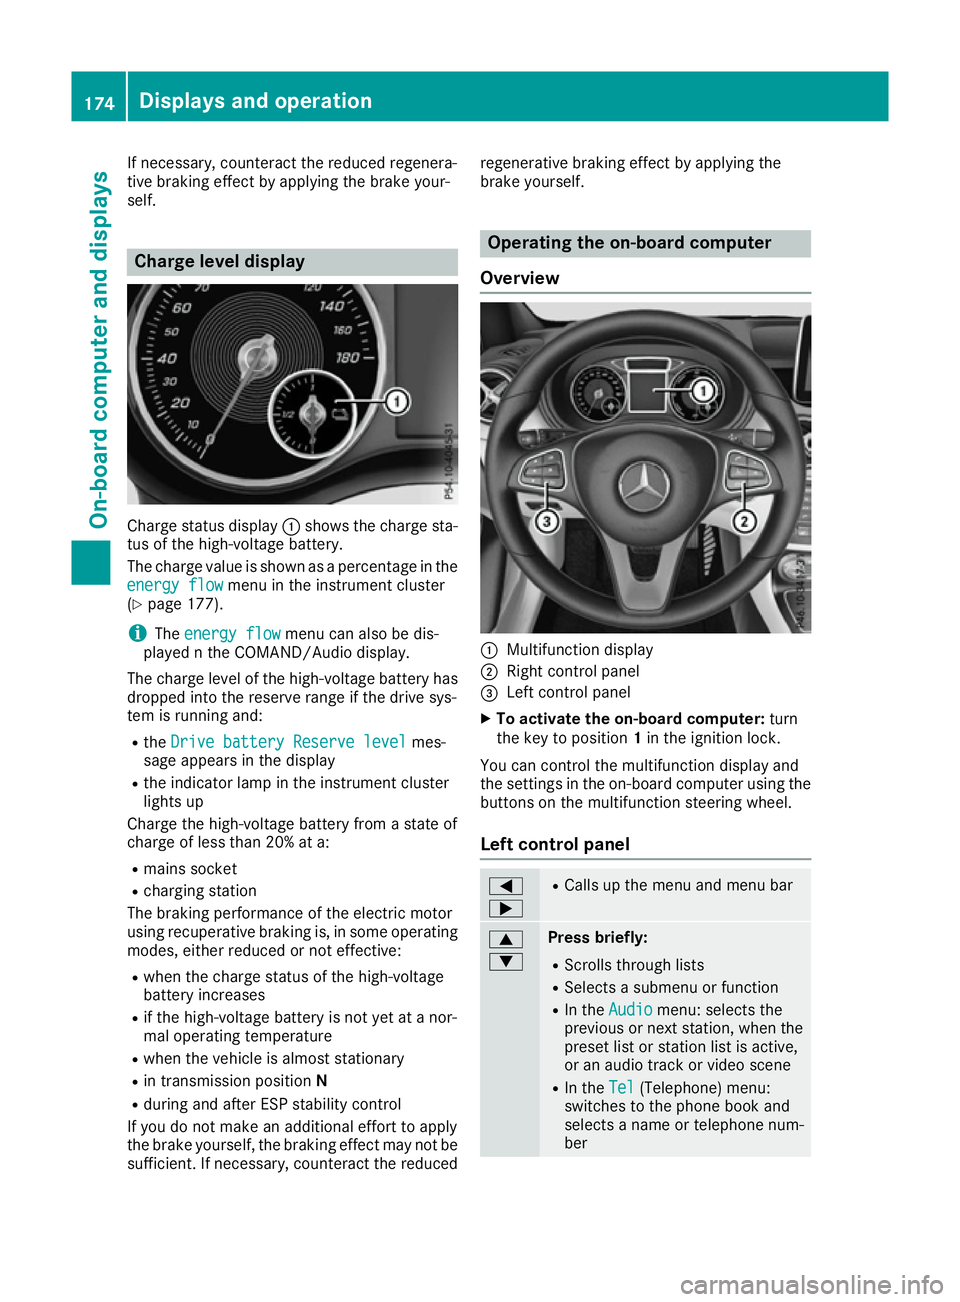
Charge status display
:shows the charge sta-
tus of the high-voltage battery.
The charge value is shown as a percentage in the
energy flow
energy flow menu in the instrument cluster
(Y page 177).
i The
energy flow
energy flow menu can also be dis-
played n the COMAND/Audio display.
The charge level of the high-voltage battery has dropped into the reserve range if the drive sys-
tem is running and:
R the Drive battery Reserve level Drive battery Reserve level mes-
sage appears in the display
R the indicator lamp in the instrument cluster
lights up
Charge the high-voltage battery from a state of
charge of less than 20% at a:
R mains socket
R charging station
The braking performance of the electric motor
using recuperative braking is, in some operating
modes, either reduced or not effective:
R when the charge status of the high-voltage
battery increases
R if the high-voltage battery is not yet at a nor-
mal operating temperature
R when the vehicle is almost stationary
R in transmission position N
R during and after ESP stability control
If you do not make an additional effort to apply
the brake yourself, the braking effect may not be sufficient. If necessary, counteract the reduced regenerative braking effect by applying the
brake yourself. Operating the on-board computer
Overview :
Multifunction display
; Right control panel
= Left control panel
X To activate the on-board computer: turn
the key to position 1in the ignition lock.
You can control the multifunction display and
the settings in the on-board computer using the buttons on the multifunction steering wheel.
Left control panel =
; R
Calls up the menu and menu bar 9
: Press briefly:
R Scrolls through lists
R Selects a submenu or function
R In the Audio Audio menu: selects the
previous or next station, when the preset list or station list is active,
or an audio track or video scene
R In the Tel Tel(Telephone) menu:
switches to the phone book and
selects a name or telephone num-
ber 174
Displays and operationOn-board computer and displays
Page 178 of 293
9
: Press and hold:
R
In the Audio Audio menu: selects a pre-
set list or a station list in the
desired frequency range or an
audio track or video scene using
rapid scrolling
R In the Tel Tel(Telephone) menu:
starts rapid scrolling if the phone
book is open a R
Confirms the selection or display
message
R In the Tel Tel(Telephone) menu:
switches to the telephone book
and starts dialling the selected
number % Press briefly:
R Back
R Vehicles with Audio 20: switches
off voice-operated control of the
navigation (see manufacturer's
operating instructions)
R Vehicles with COMAND Online:
switches off LINGUATRONIC (see
the separate operating instruc-
tions)
R Hides display messages or calls up
the last Trip Tripmenu function used
R Exits the telephone book/redial
memory % Press and hold:
R
Calls up the standard display in the
Trip
Trip menu Right control panel
ó R
Vehicles with Audio 20:
Switches on voice-operated con-
trol for navigation (see manufac-
turer's operating instructions)
R Vehicles with COMAND Online:
Switches off LINGUATRONIC (see
the separate operating instruc-
tions) 8 R
Mute W
X R
Adjusts the volume ~ R
Rejects or ends a call
R Exits the telephone book/redial
memory 6 R
Makes or accepts a call
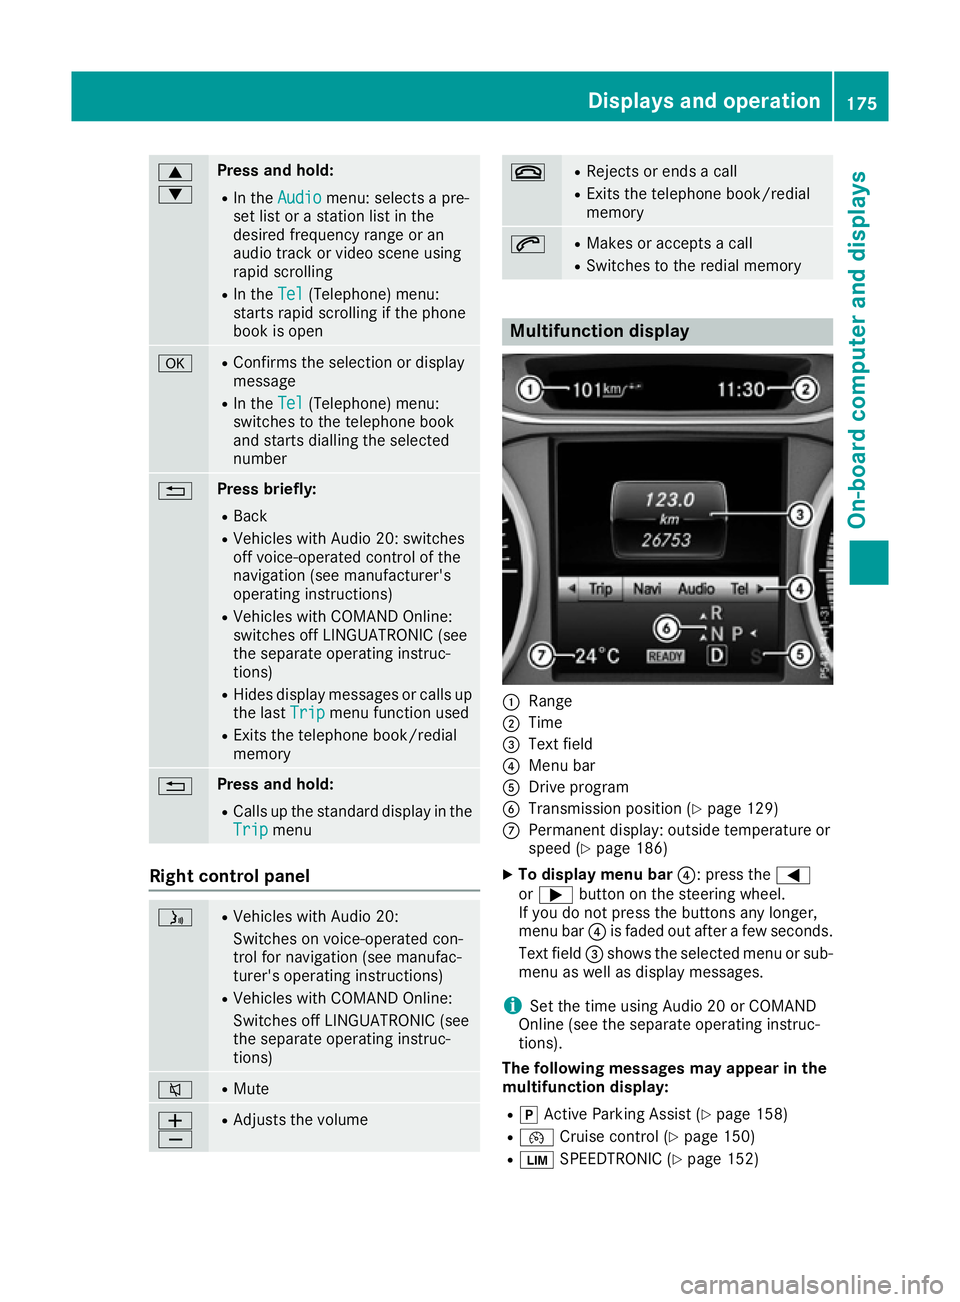
R Switches to the redial memory Multifunction display
:
Range
; Time
= Text field
? Menu bar
A Drive program
B Transmission position (Y page 129)
C Permanent display: outside temperature or
speed (Y page 186)
X To display menu bar ?: press the=
or ; button on the steering wheel.
If you do not press the buttons any longer,
menu bar ?is faded out after a few seconds.
Text field =shows the selected menu or sub-
menu as well as display messages.
i Set the time using Audio 20 or COMAND
Online (see the separate operating instruc-
tions).
The following messages may appear in the
multifunction display:
R j Active Parking Assist (Y page 158)
R ¯ Cruise control (Y page 150)
R È SPEEDTRONIC (Y page 152) Displays and operation
175On-board computer and displays Z
Page 179 of 293
R
_ Adaptive Highbeam Assist
(Y page 101)
R ë HOLD function (Y page 154)
R 120 km/h!
120 km/h! Maximum permissible speed
exceeded (only for certain countries) Menus and submenus
Menu overview
Using the =or; button on the steering
wheel, open the menu bar.
Operating the on-board computer (Y page 174).
Depending on the equipment fitted in the vehi-
cle, you can call up the following menus:
R Trip
Trip menu (Y page 176)
R Navi Navi menu (navigation instructions)
(Y page 178)
R Audio
Audio menu (Y page 180)
R Tel
Tel menu (telephone) (Y page 181)
R Assist.
Assist. menu (assistance) (Y page 182)
R Serv.
Serv. menu (Y page 184)
R Settings
Settings menu (settings) (Y page 184)
The displays for the Audio
Audio, Navi
NaviandTel
Tel menus
may differ slightly to those in your vehicle.
The examples given in this Owner's Manual
apply to vehicles equipped with COMAND
Online. Trip menu
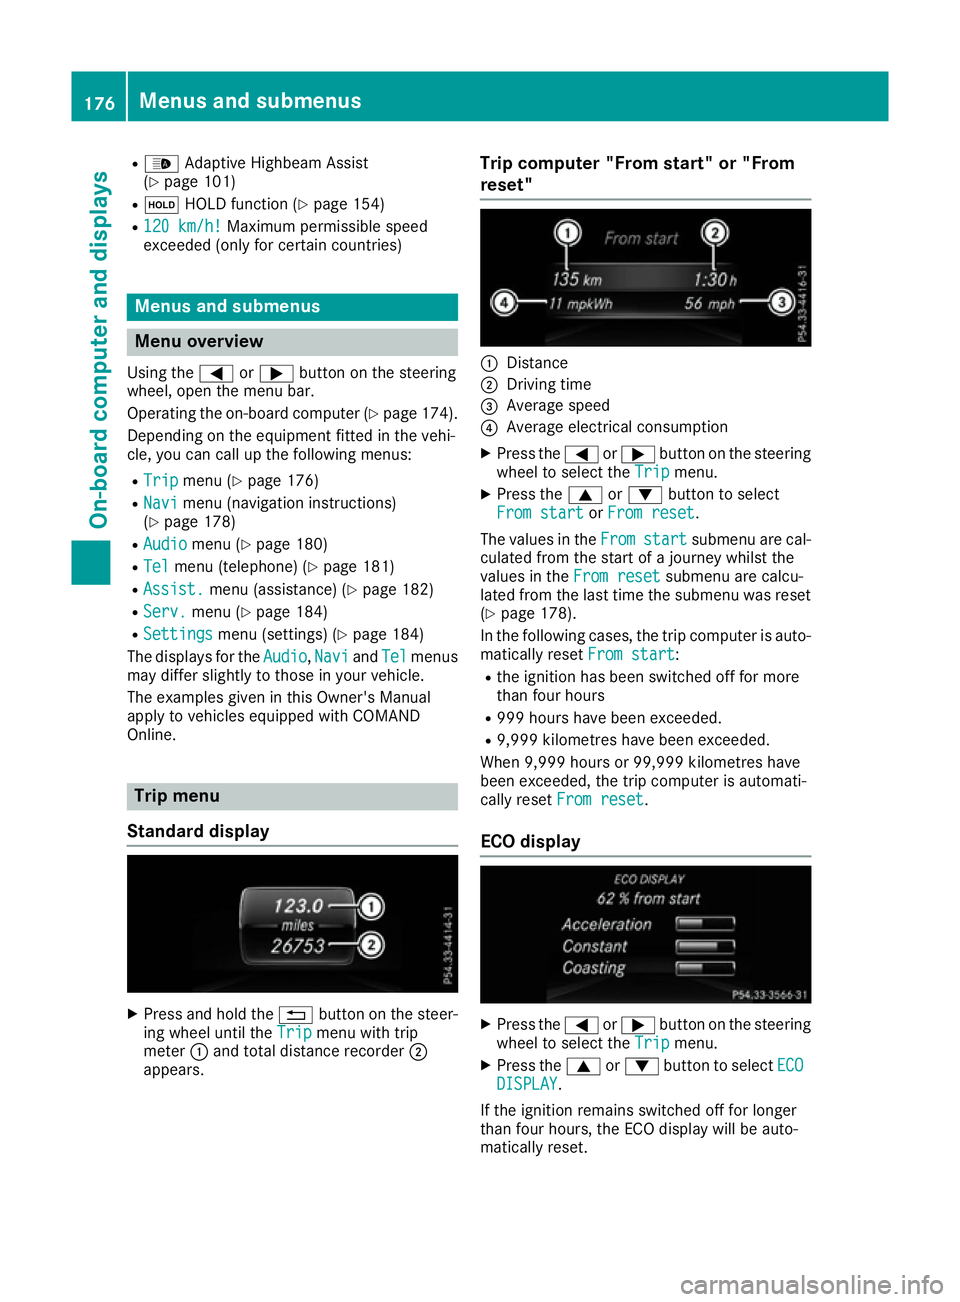
Standard display X
Press and hold the %button on the steer-
ing wheel until the Trip Tripmenu with trip
meter :and total distance recorder ;
appears. Trip computer "From start" or "From
reset" :
Distance
; Driving time
= Average speed
? Average electrical consumption
X Press the =or; button on the steering
wheel to select the Trip
Tripmenu.
X Press the 9or: button to select
From start
From start orFrom reset
From reset.
The values in the From
Fromstart
start submenu are cal-
culated from the start of a journey whilst the
values in the From reset From resetsubmenu are calcu-
lated from the last time the submenu was reset
(Y page 178).
In the following cases, the trip computer is auto-
matically reset From start From start:
R the ignition has been switched off for more
than four hours
R 999 hours have been exceeded.
R 9,999 kilometres have been exceeded.
When 9,999 hours or 99,999 kilometres have
been exceeded, the trip computer is automati-
cally reset From reset From reset.
ECO display X
Press the =or; button on the steering
wheel to select the Trip
Tripmenu.
X Press the 9or: button to select ECO
ECO
DISPLAY
DISPLAY.
If the ignition remains switched off for longer
than four hours, the ECO display will be auto-
matically reset. 176
Menus and submenusOn-board computer and displays
Page 180 of 293
Further information on the ECO display
(Y page 148).
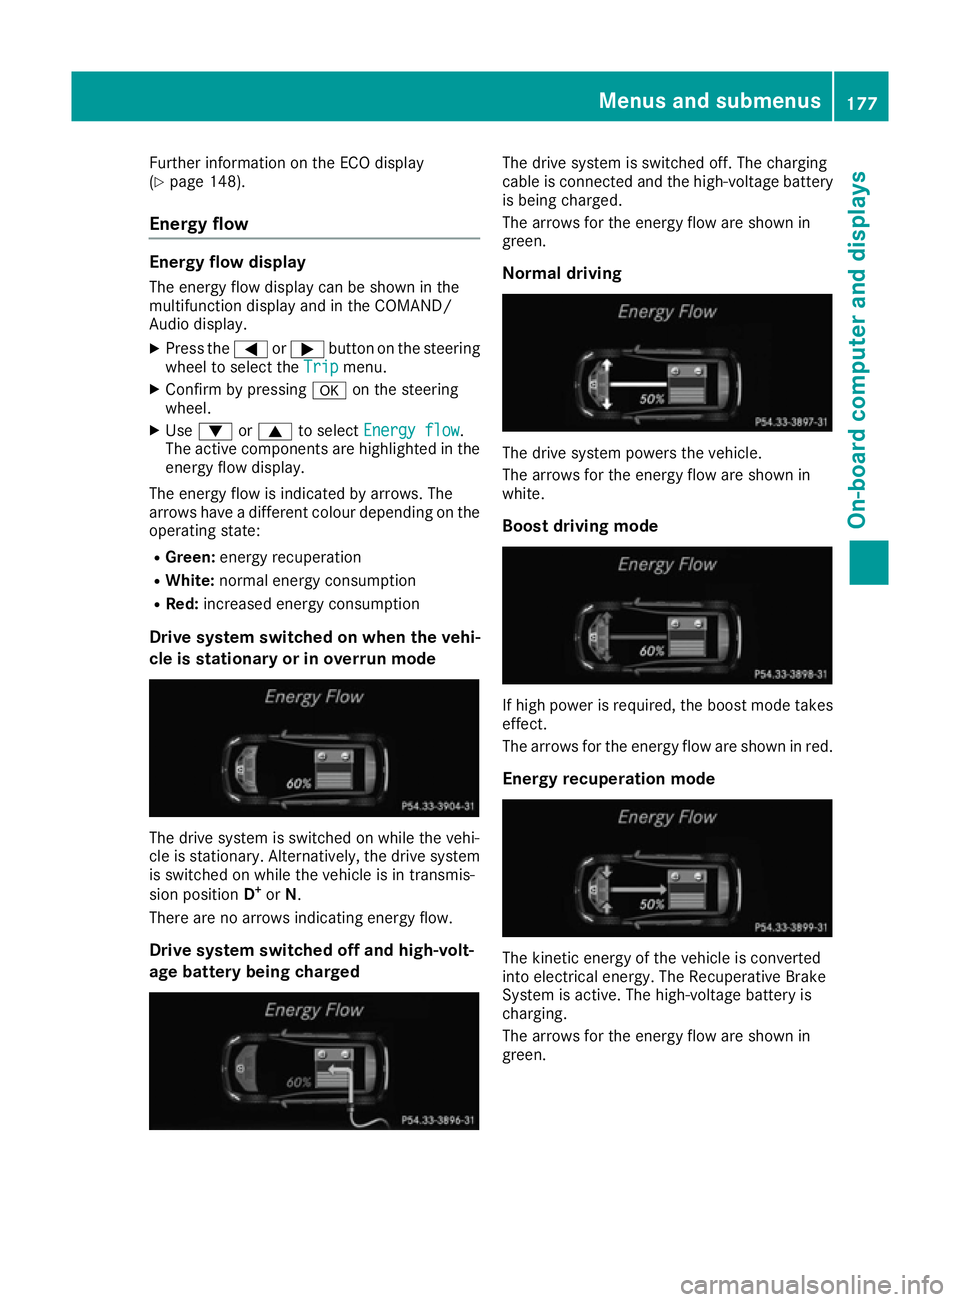
Energy flow Energy flow display
The energy flow display can be shown in the
multifunction display and in the COMAND/
Audio display. X Press the =or; button on the steering
wheel to select the Trip Tripmenu.
X Confirm by pressing aon the steering
wheel.
X Use : or9 to select Energy flow
Energy flow .
The active components are highlighted in the
energy flow display.
The energy flow is indicated by arrows. The
arrows have a different colour depending on the
operating state:
R Green: energy recuperation
R White: normal energy consumption
R Red: increased energy consumption
Drive system switched on when the vehi-
cle is stationary or in overrun mode The drive system is switched on while the vehi-
cle is stationary. Alternatively, the drive system is switched on while the vehicle is in transmis-
sion position D+
or N.
There are no arrows indicating energy flow.
Drive system switched off and high-volt-
age battery being charged The drive system is switched off. The charging
cable is connected and the high-voltage battery
is being charged.
The arrows for the energy flow are shown in
green.
Normal driving The drive system powers the vehicle.
The arrows for the energy flow are shown in
white.
Boost driving mode If high power is required, the boost mode takes
effect.
The arrows for the energy flow are shown in red.
Energy recuperation mode The kinetic energy of the vehicle is converted
into electrical energy. The Recuperative Brake
System is active. The high-voltage battery is
charging.
The arrows for the energy flow are shown in
green. Menus and submenus
177On-board computer and displays Z