indicator MERCEDES-BENZ C230 KOMPRESSOR COUPE 2002 CL203 Owner's Guide
[x] Cancel search | Manufacturer: MERCEDES-BENZ, Model Year: 2002, Model line: C230 KOMPRESSOR COUPE, Model: MERCEDES-BENZ C230 KOMPRESSOR COUPE 2002 CL203Pages: 399
Page 169 of 399
166 Automatic climate control
Te ch n i c a l
data Instruments
and controlsOperationDrivingInstrument
cluster displayPractical hints Car care Index
Defrosting
Press the P button. The indicator lamp in the button
illuminates.
Maximum heated and automatically controlled amount
of air is directed to the defroster and windshield air
outlets.
Switch off air recirculation, if selected: Press
buttonO. The indicator lamp in the button will go
out.
Pressing the P button again returns the system to
the previous setting.Windows fogged up on the inside
Switch off the economy mode, if selected:
Press buttonS. The indicator lamp in the button will
go out.
Switch off air recirculation, if selected:
Press buttonO. The indicator lamp in the button will
go out.
Set blower to the maximum blower speed.
Increase temperature setting.
Open the side air outlets and direct them onto the side
windows.
Windshield fogged up on the outside
Switch on the windshield wiper.
Close air outlet at dashboard top center (7, page 161).
Switch to manual mode.
Turn air distribution control switch to positionh
ork.
Page 170 of 399
167 Automatic climate control
Te ch n i c a l
data Instruments
and controlsOperationDrivingInstrument
cluster displayPractical hints Car care Index Air recirculation
Select air recirculation:
The indicator lamp in the button Ois not
illuminated.
Press button O briefly. The indicator lamp in the
button illuminates.
To switch off the air recirculation:
The indicator lamp in the button Ois illuminated.
Press button O briefly. The indicator lamp in the
button goes out.
Switching on air recirculation and activating
convenience closing of power windows:
The indicator lamp in the button Ois not
illuminated.
Press button O for more than 2 seconds, the side
windows will be closed. The indicator lamp in the button
illuminates.Switching off air recirculation and activating
convenience opening:
The indicator lamp in the button Ois illuminated.
Press button O for more than 2 seconds, the side
windows return to the position they were in before
closing.
A window opened manually after convenience closing
will no longer be returned to the position it was in
before closing when convenience opening is selected.
The system automatically switches from air
recirculation to fresh air:
•after 30 minutes if the outside temperature is above
about 40
°F(5
°C),
•after 5 minutes if the outside temperature is below
about 40
°F(5
°C),
•after 5 minutes if economy mode S is selected.
The system switches automatically to air recirculation at
high outside temperatures. A quantity of outside air is
added after a maximum of 30 minutes.
If the windows should fog up from the inside, switch
from recirculated air back to fresh air.
Page 171 of 399
168 Automatic climate control
Te ch n i c a l
data Instruments
and controlsOperationDrivingInstrument
cluster displayPractical hints Car care Index
Activated charcoal filter
An activated charcoal filter markedly reduces bad odors
and removes pollutants from air entering the passenger
compartment.
Select activated charcoal filter:
The indicator lamp in the button eis not
illuminated.
Press e button briefly. The indicator lamp in the
button illuminates.
Switch off activated charcoal filter:
The indicator lamp in the button eis illuminated.
Press ebriefly. The indicator lamp in the button
goes out.
The system switches automatically to the air
recirculation mode, if the carbon monoxide (CO) or
nitrogen oxides (NO
X) concentration of the outside air
increases beyond a predetermined level.
The automatic air recirculation mode does not function
if economy mode S is selected or if the outside
temperature has fallen below 40
°F(5
°C). The activated charcoal filter should be switched off
when windows fog up on the inside, or if the passenger
compartment needs to be quickly heated or cooled
down.
Switching on the activated charcoal filter and activating
convenience closing of power windows:
The indicator lamp in the e button is not
illuminated.
Press button e for more than 2 seconds, the side
windows will be closed. The indicator lamp in the button
illuminates.
Switching off activated charcoal filter and activating
convenience opening:
The indicator lamp in the e button is illuminated.
Press button e for more than 2 seconds, the side
windows return to the position they were in before
closing. The indicator lamp in the button goes out.
A window opened manually after convenience closing
will no longer be returned to the position it was in
before closing when convenience opening is selected.
Page 172 of 399
169 Automatic climate control
Te ch n i c a l
data Instruments
and controlsOperationDrivingInstrument
cluster displayPractical hints Car care Index Economy mode
The function of this setting corresponds to the
automatic mode. However, because the air conditioning
compressor will not engage (fuel savings), it is not
possible to air condition in this setting.
Press S button to activate. The indicator lamp in the
button illuminates.
Press S button once again to return to the previous
setting. The indicator lamp in the button goes out.
Important!
In the S mode the windows could fog up on the
inside. Switch off S mode.
Automatic climate control - OFF/ON
To switch the automatic climate control off, set the air
volume control switch to position 0.
The fresh air supply to the vehicle interior is shut off.
While driving, use this setting only temporarily,
otherwise the windshield could fog up.To switch the automatic climate control on again, press
the U or Pbutton, or set air volume control
switch to any speed.
Residual engine heat utilization
With the engine switched off, it is possible to continue
to heat or ventilate the interior for a short while,
dependent of the temperature set in the automatic
climate control. Air volume and distribution are
controlled automatically.
To s e l e c t :
Turn the electronic key in starter switch to position 1
or 0 or remove it altogether.
Press button T. The indicator lamp in the button
illuminates.
This function selection will not activate if the battery
level is insufficient.
The function switches off automatically:
•if the electronic key in starter switch is turned to
position 2,
•after approximately 30 minutes,
•if the battery voltage drops.
Page 173 of 399
170 Automatic climate control
Te ch n i c a l
data Instruments
and controlsOperationDrivingInstrument
cluster displayPractical hints Car care Index
Rear window defroster
Turn the electronic key in starter switch to position 2.
To select:
Press the F button in the control panel of the
automatic air conditioner. The indicator lamp in the
button illuminates.
To c a nc el:
Press the F button in the control panel of the
automatic air conditioner. The indicator lamp in the
button goes out.
Note:
Heavy accumulation of snow and ice should be removed
before activating the defroster. The rear window defroster uses a large amount of power.
To keep the battery drain to a minimum, turn off the
defroster as soon as the rear window is clear.
The defroster is automatically turned off after
approximately 6–17 minutes of operation depending on
the outside temperature and vehicle speed.
If several power consumers are turned on
simultaneously, or the battery is only partially charged,
it is possible that the defroster will automatically turn
itself off. When this happens, the indicator lamp inside
the switch starts blinking.
As soon as the battery has sufficient voltage, the
defroster automatically turns itself back on.
Page 219 of 399

216 Interior equipment
Te ch n i c a l
data Instruments
and controlsOperationDrivingInstrument
cluster displayPractical hints Car care Index
Setting up rear seat bench
Pull backrest up until it locks in its upright position.
The pop-up indicators (5) (left and right backrest
section) are visible in unlocked position. With backrest
sections in upright and locked position, the
indicators (5) are fully lowered.
Check for secure locking by pushing and pulling on the
backrest.
P68.00-2476-26
5
Wa r n i n g !
Failure to assure that backrests are locked into
place result in an increased chance of injury in an
accident.Always lock backrest in its upright position when
rear seat bench is occupied by passengers, cargo is
being carried in the trunk, or the extended cargo
area is not in use.
Page 224 of 399
221 Garage door opener
Te ch n i c a l
data Instruments
and controlsOperationDrivingInstrument
cluster displayPractical hints Car care Index Garage door opener
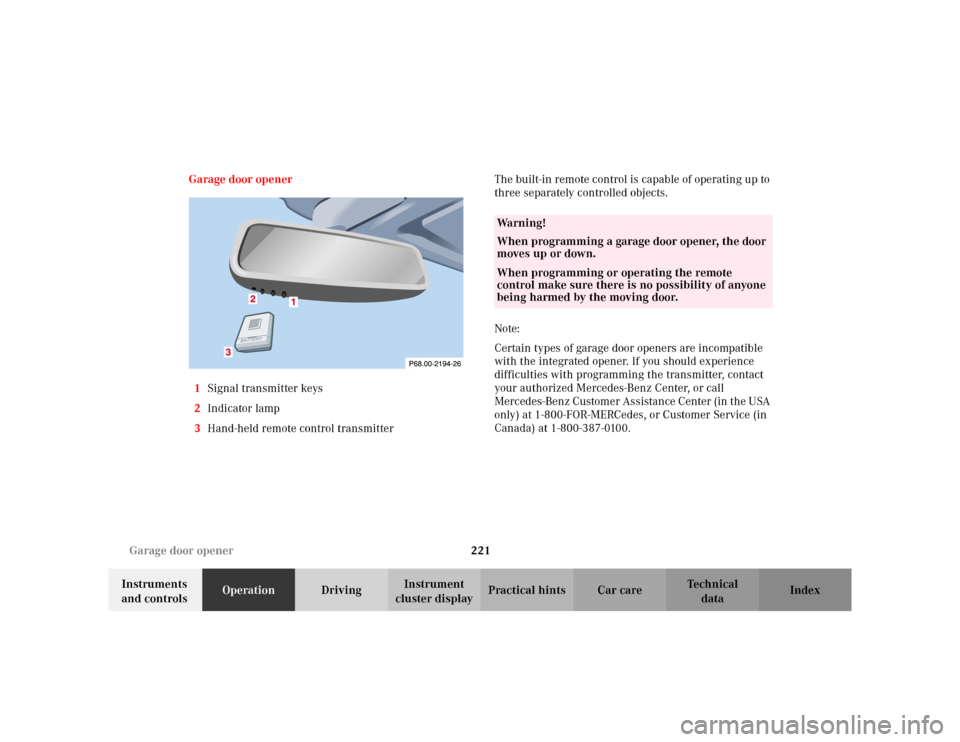
1Signal transmitter keys
2Indicator lamp
3Hand-held remote control transmitterThe built-in remote control is capable of operating up to
three separately controlled objects.
Note:
Certain types of garage door openers are incompatible
with the integrated opener. If you should experience
difficulties with programming the transmitter, contact
your authorized Mercedes-Benz Center, or call
Mercedes-Benz Customer Assistance Center (in the USA
only) at 1-800-FOR-MERCedes, or Customer Service (in
Canada) at 1-800-387-0100.
Wa r n i n g !
When programming a garage door opener, the door
moves up or down.When programming or operating the remote
control make sure there is no possibility of anyone
being harmed by the moving door.
Page 225 of 399
222 Garage door opener
Te ch n i c a l
data Instruments
and controlsOperationDrivingInstrument
cluster displayPractical hints Car care Index
For operation in the USA only: This device complies
with Part 15 of the FCC Rules. Operation is subject to
the following two conditions:
(1) This device may not cause harmful interference, and
(2) this device must accept any interference received,
including interference that may cause undesired
operation.
Any unauthorized modification to this device could void
to the user’s authority to operate the equipment.
Programming or reprogramming the integrated
remote control:
1. Turn electronic key in starter switch to position 1
or 2.
2. Hold the end of the hand-held transmitter of the
device you wish to train approximately 2 to 5 inches
(5 cm to 12 cm) away from the surface of the
integrated remote control located on the inside rear
view mirror, keeping the indicator lamp in view.3. Using both hands, simultaneously push the hand-
held transmitter button and the desired integrated
remote control button. Do not release the buttons
until completing step 4.
4. The indicator lamp on the integrated remote control
will flash, first slowly and then rapidly. When the
indicator lamp flashes rapidly, both buttons may be
released (the rapid flashing lamp indicates
successful programming of the new frequency
signal). To program the remaining two buttons,
follow steps 1 through 4.
Note:
If, after repeated attempts, you do not successfully
program the integrated remote control device to learn
the signal of the hand-held transmitter, the garage door
opener could be equipped with the “rolling code
feature”.
Page 227 of 399
224 Garage door opener
Te ch n i c a l
data Instruments
and controlsOperationDrivingInstrument
cluster displayPractical hints Car care Index
Canadian programming:
During programming, your hand-held transmitter may
automatically stop transmitting. Continue to press and
hold the integrated remote control transmitter button
(note steps 2 through 4 in the “Programming” portion)
while you press and re-press (“cycle”) your hand-held
transmitter every two seconds until the frequency
signal has been learned. The indicator lamp will flash
slowly and then rapidly after several seconds upon
successful training.Operation of remote control:
1. Turn electronic key in starter switch to position 1
or 2.
2. Select and press the appropriate button to activate
the remote control device. The integrated remote
control transmitter continues to send the signal as
long as the button is pressed – up to 20 seconds.
Erasing the remote control memory:
1. Turn electronic key in starter switch to position 1
or 2.
2. Simultaneously holding down the left and right side
buttons for approximately 20 seconds, or until the
control lamp blink rapidly, will erase the codes of all
three channels.
Page 231 of 399
228 Tele Aid
Te ch n i c a l
data Instruments
and controlsOperationDrivingInstrument
cluster displayPractical hints Car care Index
Tele Aid (optional)
Important!
The initial activation of the Tele Aid system may only be
performed by completing the subscriber agreement and
placing an acquaintance call using the “SOS” button.
Failure to complete either of these steps will result in a
system that is not activated. If the system is not
activated the indicator lamp in the “SOS” button stays
on after turning electronic key in starter switch to
position 2 and the message “TELE AID – NOT
ACTIVATED” will be shown in the multifunction display
for approx. 10 seconds.
If you have any questions regarding activation, please
call the Response Center at 1-800-756-9018 (in the USA)
or 1-888-923-8367 (in Canada).
(Te l ematic Alarm Identification on Demand)
The Tele Aid system consists of three types of response;
automatic and manual emergency, roadside assistance
and information.
The Tele Aid system is operational providing that the
vehicle’s battery is charged, properly connected, not
damaged and cellular and GPS coverage is available.The speaker volume of a Tele Aid call can be adjusted
when using the volume control on the multifunction
steering wheel, for raising press buttonæand for
lowering press buttonç.
To activate, press the “SOS” button, the Roadside
Assistance button or the Information button¡,
depending on the type of response required.
Shortly after the completion of your Acquaintance Call,
you will receive a user ID and password via first call
mail. By visiting www.mbusa.com and selecting “Tele
Aid” (USA only), you will have access to account
information, remote door unlock, Info Services
* profile
and more.
* Optional (available only with COMAND)System self-check
Initially, after turning the electronic key in starter
switch to position 2, malfunctions are detected and
indicated (the indicator lamps in the “SOS” button, the
Roadside Assistance button and the Information
button¡ stay on longer than 10 seconds or do not
come on). The message “TELE AID – VISIT
WORKSHOP” appears for approx. 10 seconds in the
multifunction display.