key MERCEDES-BENZ CL CLASS 2010 Owner's Manual
[x] Cancel search | Manufacturer: MERCEDES-BENZ, Model Year: 2010, Model line: CL CLASS, Model: MERCEDES-BENZ CL CLASS 2010Pages: 500, PDF Size: 9.32 MB
Page 67 of 500
Anti-theft systems
Immobilizer
The immobilizer prevents unauthorized
persons from starting your vehicle.
When leaving the vehicle, always take the
SmartKey with you and lock the vehicle. The
engine can be started by anyone with a valid
SmartKey that is left inside the vehicle.
Activating X
With SmartKey: Remove the SmartKey
from the starter switch.
X With KEYLESS-GO: Turn off the engine and
open the driver’s door.
Deactivating X
Switch on the ignition.
i Starting the engine will also deactivate
the immobilizer.
In the event that the engine cannot be
started (yet the vehicle’s battery is
charged), the system is not operational.
Contact an authorized Mercedes-Benz
Center or call 1-800-FOR-MERCedes (in the
USA) or 1-800-387-0100 (in Canada). Anti-theft alarm system
Once the alarm system has been armed, a
visual and audible alarm is triggered when
someone opens
R a door
R the trunk
R the hood
The alarm will stay on even if the activating
element, a door, for example, is closed
immediately.
The alarm system will also be triggered when
R the vehicle is opened with the mechanical
key
R a door is opened from the inside To cancel the alarm after it has been
triggered, see “Canceling the alarm”
(Y page 66).
i
If the alarm stays on for more than
30 seconds, the Tele Aid system initiates a
call to the Customer Assistance Center
automatically. The Tele Aid system will
initiate the call provided that
R you have subscribed to the Tele Aid
service
R the Tele Aid service has been activated
properly
R the necessary mobile phone, power
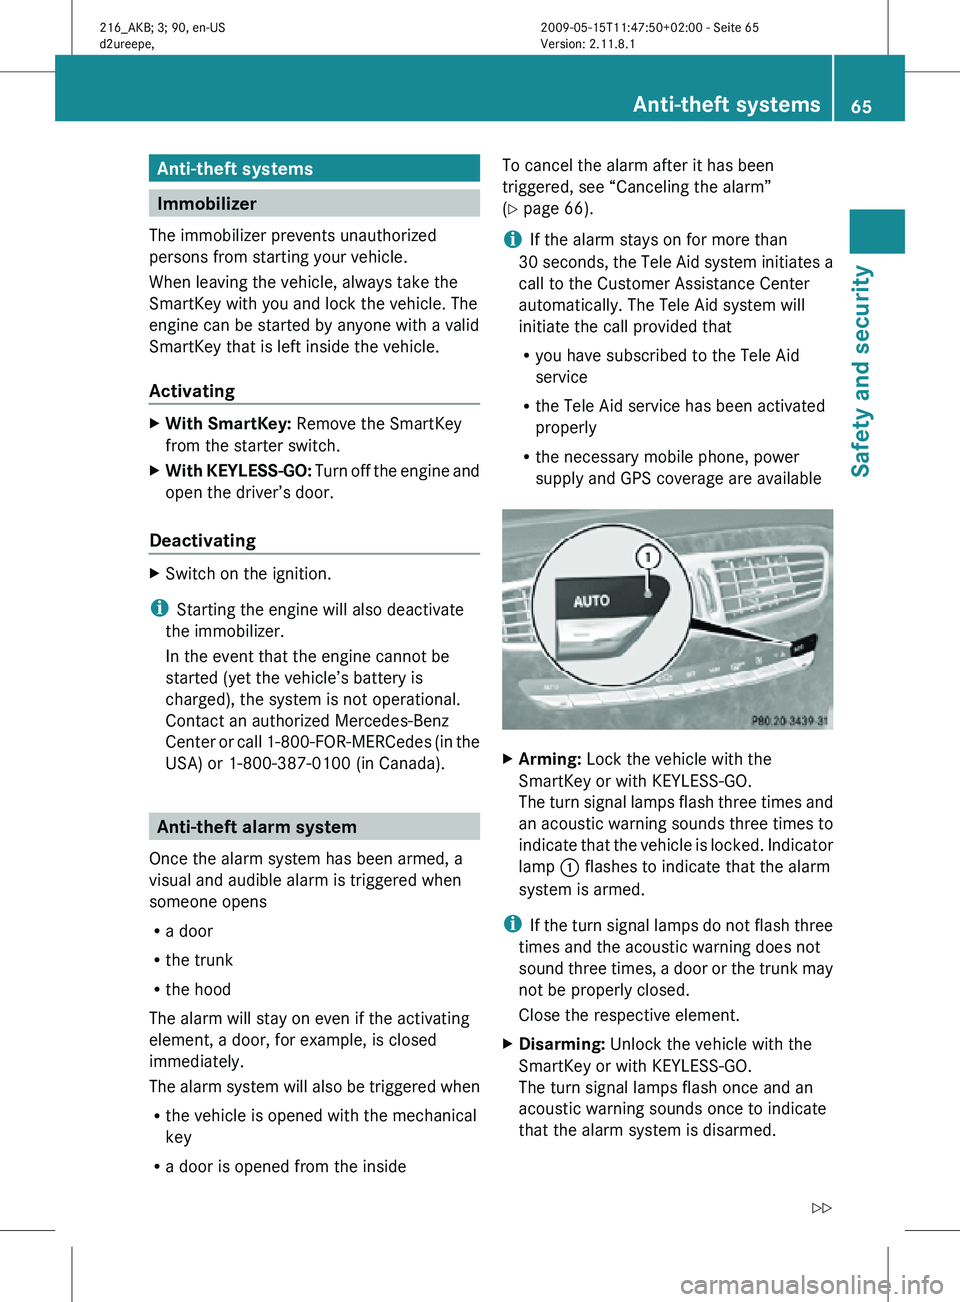
supply and GPS coverage are available X
Arming: Lock the vehicle with the
SmartKey or with KEYLESS-GO.
The turn signal lamps flash three times and
an acoustic warning sounds three times to
indicate that the vehicle is locked. Indicator
lamp : flashes to indicate that the alarm
system is armed.
i If the turn signal lamps do not flash three
times and the acoustic warning does not
sound three times, a door or the trunk may
not be properly closed.
Close the respective element.
X Disarming: Unlock the vehicle with the
SmartKey or with KEYLESS-GO.
The turn signal lamps flash once and an
acoustic warning sounds once to indicate
that the alarm system is disarmed. Anti-theft systems
65Safety and security
216_AKB; 3; 90, en-US
d2ureepe, Version: 2.11.8.1 2009-05-15T11:47:50+02:00 - Seite 65 Z
Page 68 of 500
i
Unless you open a door or the trunk within
approximately 40 seconds after unlocking
the vehicle:
R The vehicle will be locked again.
R The anti-theft alarm system will be
rearmed. Canceling the alarm
To cancel the alarm, do one of the following:
X Insert the SmartKey into the starter switch.
X Press button % or & on the
SmartKey.
In vehicles with KEYLESS-GO:
X Grasp an outside door handle.
The SmartKey must be within 3 ft (1 m) of
the vehicle.
X Press the KEYLESS-GO start/stop button.
The SmartKey must be inside the vehicle. 66
Anti-theft systemsSafety and security
216_AKB; 3; 90, en-US
d2ureepe,
Version: 2.11.8.1 2009-05-15T11:47:50+02:00 - Seite 66
Page 71 of 500
COMAND components
COMAND can be used to operate:
R Audio functions
R Navigation system
R Telephone
R External audio and video sources
R Video DVD
R Various vehicle settings
COMAND consists of the following:
R COMAND shortcut buttons
R COMAND display
R Telephone keypad
R COMAND controller
R Built-in USB socket to connect USB storage
devices
R Optional media interface in the glove box
to connect external devices via iPod ®
cable, jack plug, or USB cable
i For information about cleaning and care
of displays, see ( Y page 409).
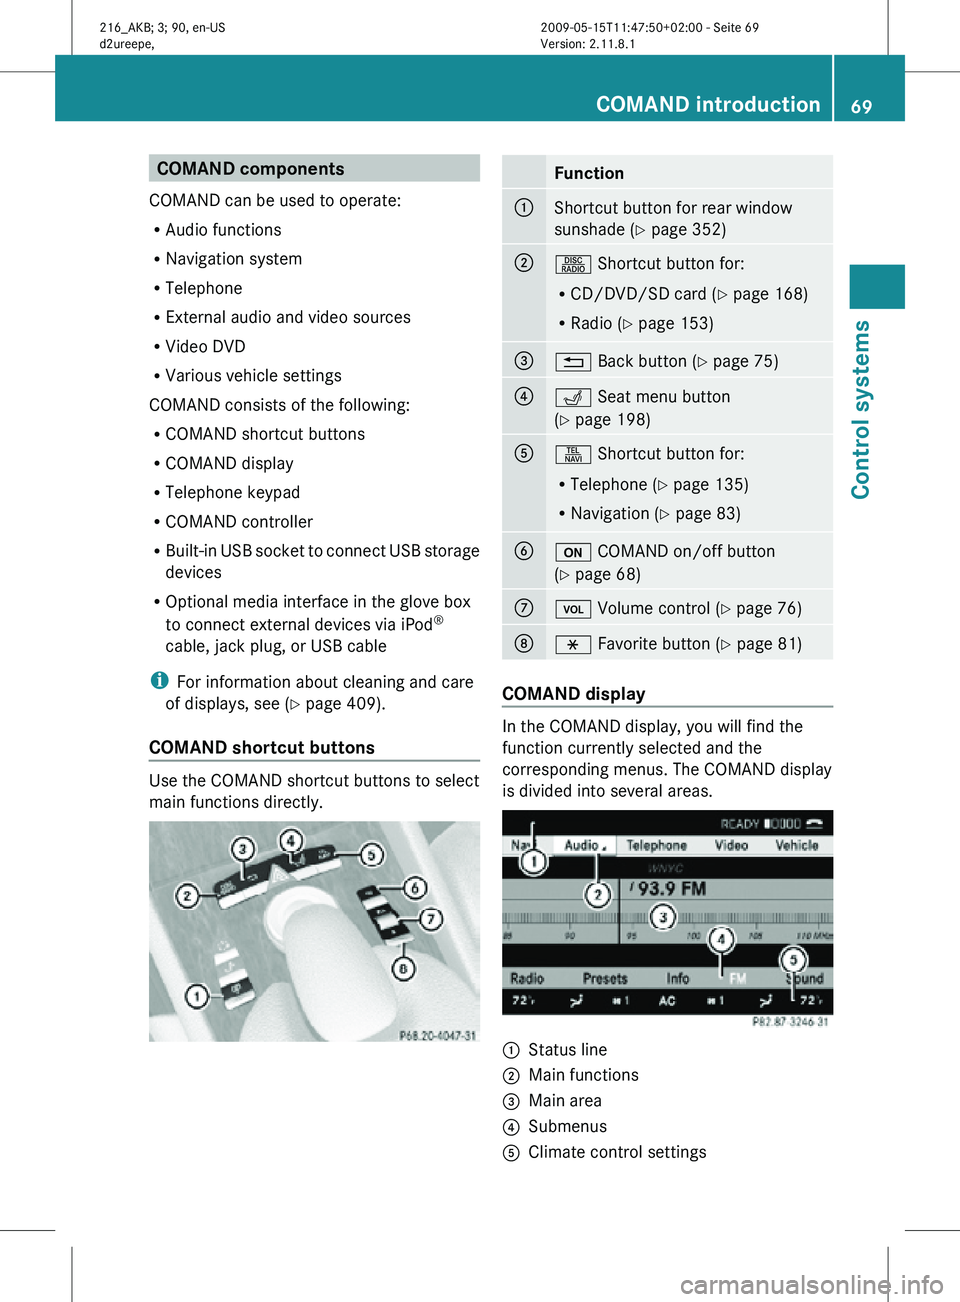
COMAND shortcut buttons Use the COMAND shortcut buttons to select
main functions directly. Function
:
Shortcut button for rear window
sunshade (
Y page 352) ;
R Shortcut button for:
R
CD/DVD/SD card (Y page 168)
R Radio ( Y page 153) =
% Back button (Y page 75)
?
T Seat menu button
(Y page 198)
A
S Shortcut button for:
R
Telephone ( Y page 135)
R Navigation ( Y page 83) B
u COMAND on/off button
(Y page 68)
C
H Volume control (Y page 76)
D
h Favorite button (
Y page 81) COMAND display
In the COMAND display, you will find the
function currently selected and the
corresponding menus. The COMAND display
is divided into several areas.
:
Status line
; Main functions
= Main area
? Submenus
A Climate control settings COMAND introduction
69Control systems
216_AKB; 3; 90, en-US
d2ureepe, Version: 2.11.8.1 2009-05-15T11:47:50+02:00 - Seite 69 Z
Page 72 of 500

The currently selected main function is
highlighted.
Once you have selected a main function, main
area
= is active.
i The layout of the menus may vary
depending on your vehicle’s equipment.
This manual shows the menus for a fully
equipped vehicle.
Adjusting COMAND display illumination X
Increasing the illumination: Turn
knob : clockwise.
X Dimming the illumination: Turn knob :
counterclockwise.
Swiveling COMAND display With button
: or ; you can swivel the
COMAND display to the left or right. Instrument cluster multifunction
display This section describes features and controls
via the COMAND controller, display and
shortcut buttons only.
Related COMAND features are described in
the “Instrument cluster control system”
section (
Y page 201). It contains function
descriptions and operation of the instrument
cluster multifunction display and the
multifunction steering wheel buttons.
Telephone keypad X
Flip up cover ;.
With telephone keypad : you can
R enter and clear numbers and special
characters
R reject, answer, connect and end calls
(Y page 135)
R select preset radio stations and enter the
frequency manually ( Y page 155)
R select preset satellite radio stations and
enter the channel number (Y page 161)
R select a storage medium from the DVD
changer (Y page 170)
R select a track directly in CD mode, DVD
audio mode or MP3 mode (Y page 170), or
from a device connected to the media
interface (Y page 187) 70
COMAND introductionControl systems
216_AKB; 3; 90, en-US
d2ureepe,
Version: 2.11.8.1 2009-05-15T11:47:50+02:00 - Seite 70
Page 78 of 500
X
Switching to the next higher menu:
Press back button % briefly.
COMAND switches to the next higher menu
level within the currently active operating
mode.
X Switching to the main menu: Press and
hold back button %.
COMAND switches to the main menu of the
currently active operating mode. Basic functions
i The components and operating principles
of COMAND can be found on ( Y page 68).
Sound X
Muting: Press button 8 on the
multifunction steering wheel
(Y page 202).
The sound of the current audio source is
switched on or is muted.
i When the sound is muted, symbol 8
appears in the status line. When you
change the audio source, the sound is
switched on automatically. Navigation
announcements will be audible even when
the sound is muted.
Switching navigation announcements off
X Press button 8 on the multifunction
steering wheel during an announcement.
i The announcements remain switched off
even when you start a new route guidance
or switch COMAND off/on with the u
button. When you switch COMAND off by
removing the SmartKey from the starter
switch and then switch the ignition back on
after more than 3 minutes, the
announcements are switched back on
automatically.
X Switching navigation announcements
back on manually: Select Navi Q RPT
(Y page 122). Adjusting volume
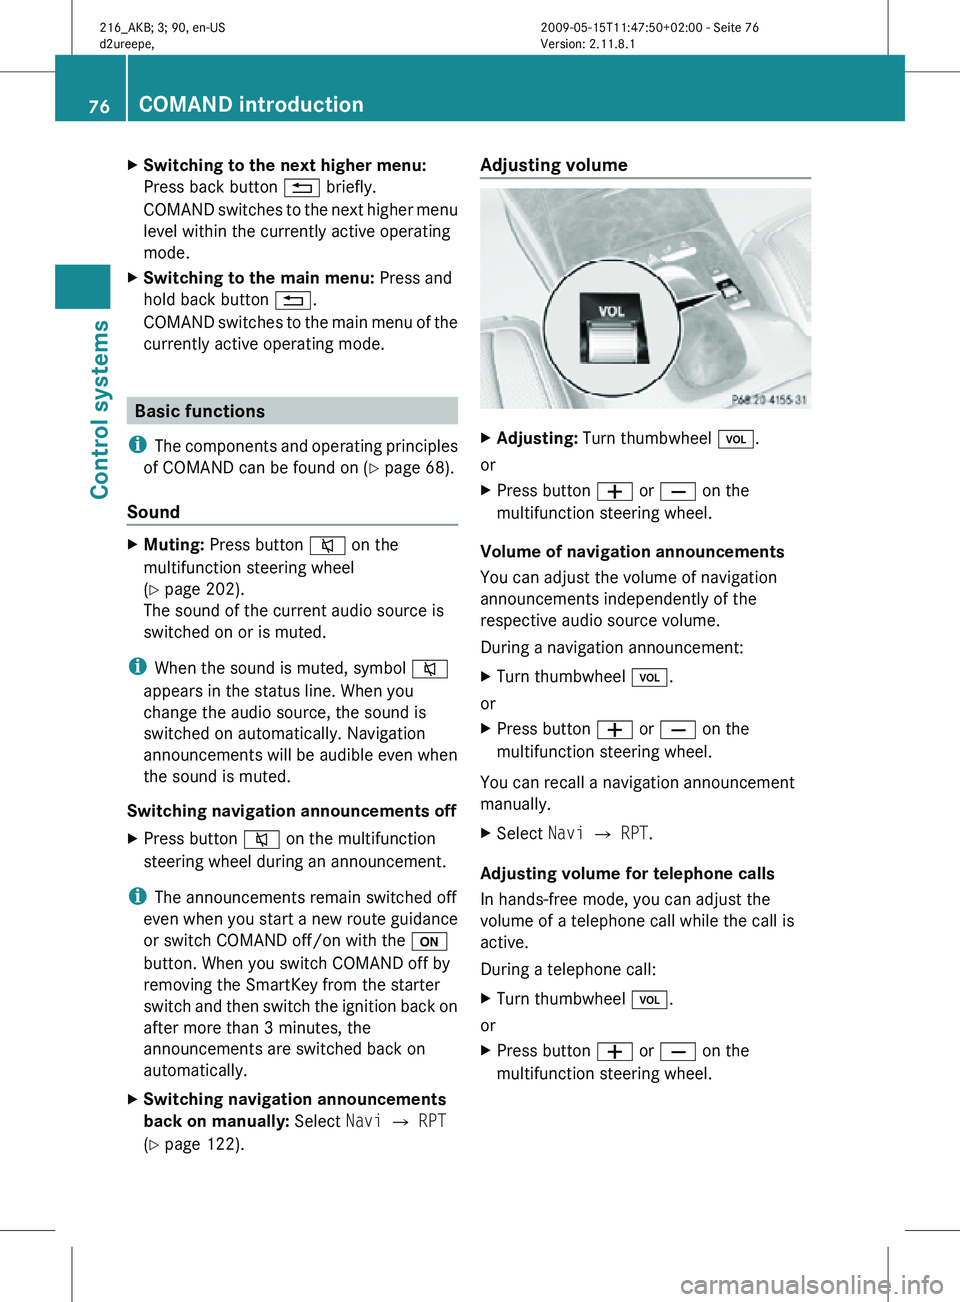
X
Adjusting: Turn thumbwheel H.
or
X Press button W or X on the
multifunction steering wheel.
Volume of navigation announcements
You can adjust the volume of navigation
announcements independently of the
respective audio source volume.
During a navigation announcement:
X Turn thumbwheel H.
or
X Press button W or X on the
multifunction steering wheel.
You can recall a navigation announcement
manually.
X Select Navi Q RPT.
Adjusting volume for telephone calls
In hands-free mode, you can adjust the
volume of a telephone call while the call is
active.
During a telephone call:
X Turn thumbwheel H.
or
X Press button W or X on the
multifunction steering wheel. 76
COMAND introductionControl systems
216_AKB; 3; 90, en-US
d2ureepe,
Version: 2.11.8.1 2009-05-15T11:47:50+02:00 - Seite 76
Page 86 of 500
When reinstalling a map software that has
been installed in that vehicle already, an
activation code is not required.
Installation process
i
The installation process can take
between 10 and 120 minutes, depending
on the
size of the map software. If the radio
is switched on when you start the
installation process, you can still adjust the
volume. During the installation process,
some COMAND functions are suspended.
Still available are the COMAND functions
for automatic air conditioning operation
and canceling the installation process.
If possible, carry out the installation when
the vehicle is stationary. When the vehicle
is stationary, the reading rate of the DVD
drive is higher than in a moving vehicle and
the installation process requires less time. G
Observe Safety notes, see page 68.
i COMAND may switch off during the
installation process automatically in order
to protect the battery. This may happen
when the engine is switched off and the
vehicle battery has insufficient power. If
this occurs,
restart the installation with the
engine running. Similarly, if the SmartKey
position is unintentionally switched to 0,
restart the installation. G
Warning!
Inhalation of exhaust gas is hazardous to your
health. All exhaust gas contains carbon
monoxide (CO), and inhaling it can cause
unconsciousness and lead to death. Do not
run the engine in confined areas (such as a
garage) which are not properly ventilated. Installing
Notes about handling DVDs (Y page 165). X
Load the map software DVD into the DVD
changer (Y page 165).
The COMAND
system verifies the DVD and
a respective message appears in the
COMAND display.
Map software incompatible with
navigation system A message indicates that installation of the
map software is not possible.
X
Confirming message: Press W.
The DVD is ejected.
X Remove the DVD from the slot.
X Insert a DVD that is compatible with the
navigation system of the vehicle.
Map software incompatible with the
current system software A message indicates that the system
software and the map software are
incompatible.
X
Confirming message: Press W.
The DVD is ejected.
X Remove the DVD from the slot.
X Have the system software updated at an
authorized Mercedes-Benz Center.
The system software must be updated before
you can install the map software.
Map software compatible with
navigation software and current
system software The COMAND system verifies whether the
map data on the DVD have been installed
already.
Map data installed already
A message that indicates that the map data
have been installed already appears. Also,
you
are
being asked if you would like to install
the map software anyhow. 84
COMAND navigation (introduction)
Control systems
216_AKB; 3; 90, en-US
d2ureepe,
Version: 2.11.8.1 2009-05-15T11:47:50+02:00 - Seite 84
Page 99 of 500
You can only enter those zip codes/postal
codes which are saved on the digital map.
The available zip codes/postal codes
depend on the state (USA) or province
(Canada) currently entered.
X In the address input menu, select Zip
Code. A list of zip codes/postal codes
appears with the predictive speller.
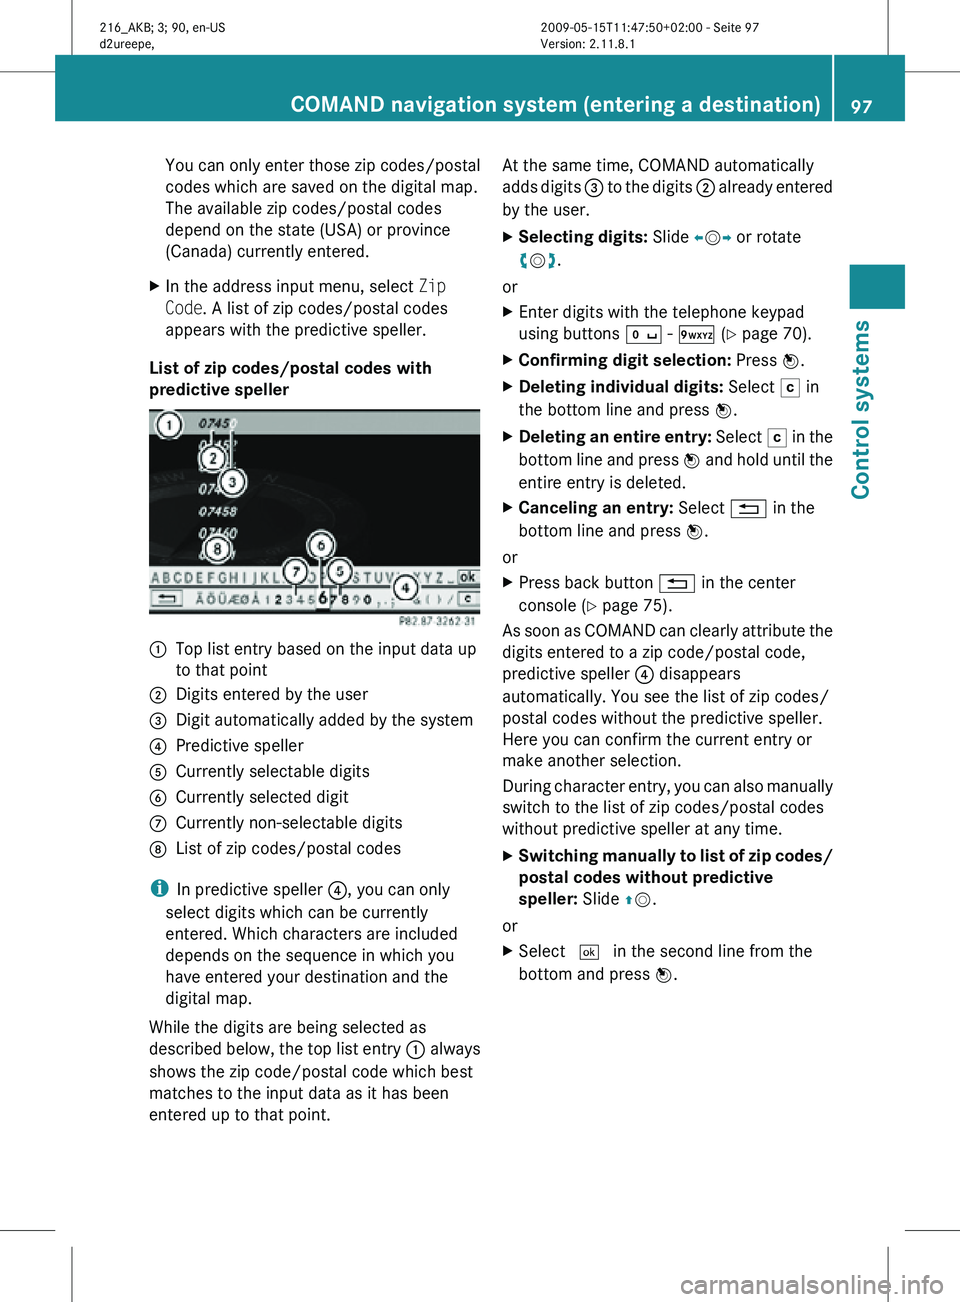
List of zip codes/postal codes with
predictive speller :
Top list entry based on the input data up
to that point
; Digits entered by the user
= Digit automatically added by the system
? Predictive speller
A Currently selectable digits
B Currently selected digit
C Currently non-selectable digits
D List of zip codes/postal codes
i In predictive speller ?, you can only
select digits which can be currently
entered. Which characters are included
depends on the sequence in which you
have entered your destination and the
digital map.
While the digits are being selected as
described below, the top list entry : always
shows the zip code/postal code which best
matches to the input data as it has been
entered up to that point. At the same time, COMAND automatically
adds digits
= to the digits ; already entered
by the user.
X Selecting digits: Slide XVY or rotate
cVd.
or
X Enter digits with the telephone keypad
using buttons Å - Ã (Y page 70).
X Confirming digit selection: Press W.
X Deleting individual digits: Select F in
the bottom line and press W.
X Deleting an entire entry: Select F in the
bottom line and press W and hold until the
entire entry is deleted.
X Canceling an entry: Select % in the
bottom line and press W.
or
X Press back button % in the center
console (Y page 75).
As soon as COMAND can clearly attribute the
digits entered to a zip code/postal code,
predictive speller ? disappears
automatically. You see the list of zip codes/
postal codes without the predictive speller.
Here you can confirm the current entry or
make another selection.
During character entry, you can also manually
switch to the list of zip codes/postal codes
without predictive speller at any time.
X Switching manually to list of zip codes/
postal codes without predictive
speller: Slide ZV.
or
X Select ¬ in the second line from the
bottom and press W. COMAND navigation system (entering a destination)
97Control systems
216_AKB; 3; 90, en-US
d2ureepe,Version: 2.11.8.1 2009-05-15T11:47:50+02:00 - Seite 97 Z
Page 104 of 500
X
Switching manually to the street list
without predictive speller: Slide ZV.
or
X Select ¬ in the second line from the
bottom and press W.
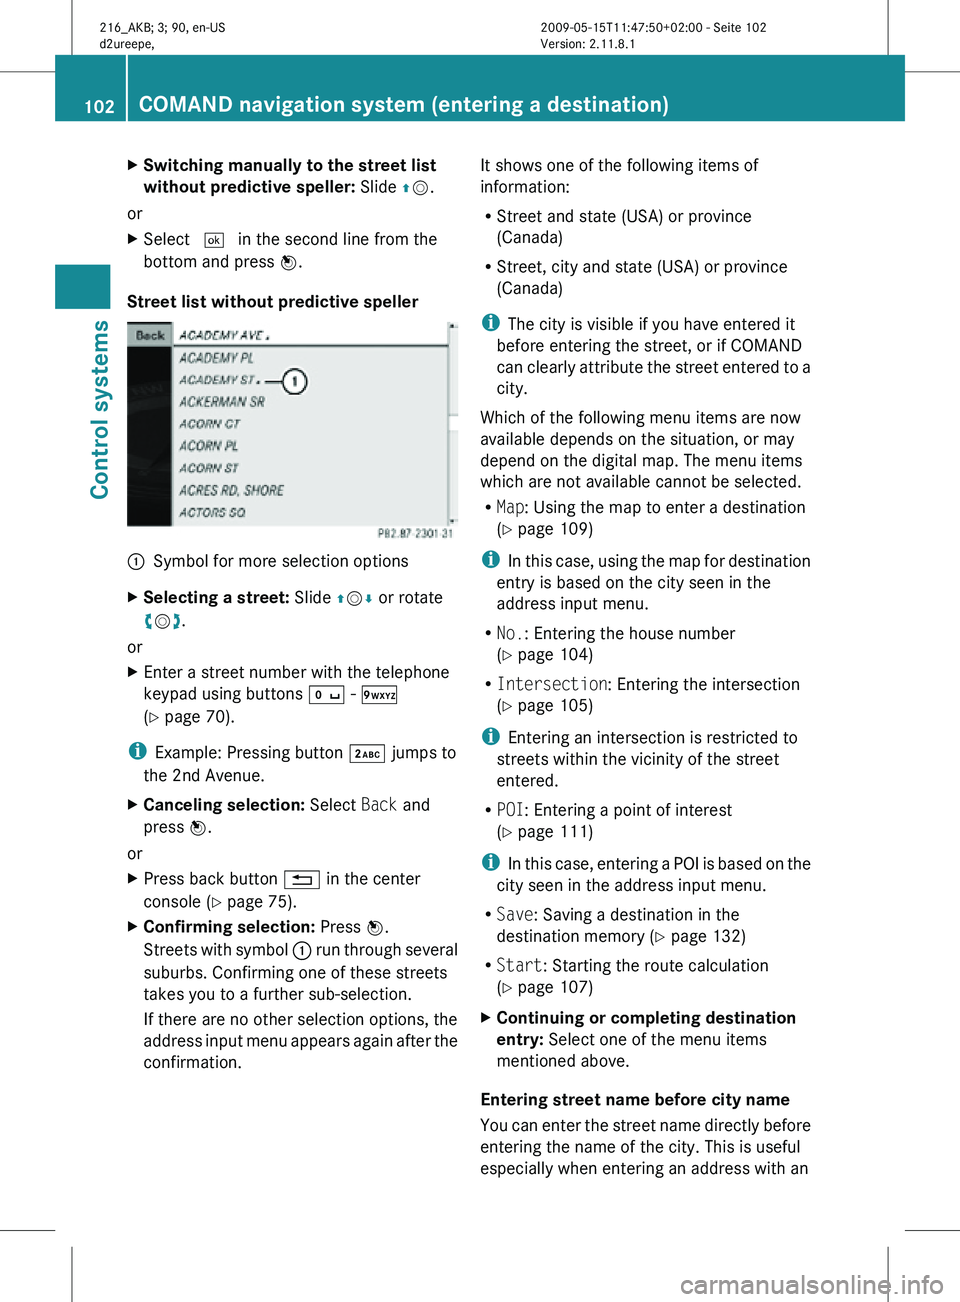
Street list without predictive speller :
Symbol for more selection options
X Selecting a street: Slide ZVÆ or rotate
cVd.
or
X Enter a street number with the telephone
keypad using buttons Å - Ã
(Y page 70).
i Example: Pressing button · jumps to
the 2nd Avenue.
X Canceling selection: Select Back and
press W.
or
X Press back button % in the center
console (Y page 75).
X Confirming selection: Press W.
Streets with symbol : run through several
suburbs. Confirming one of these streets
takes you to a further sub-selection.
If there are no other selection options, the
address input menu appears again after the
confirmation. It shows one of the following items of
information:
R
Street and state (USA) or province
(Canada)
R Street, city and state (USA) or province
(Canada)
i The city is visible if you have entered it
before entering the street, or if COMAND
can clearly attribute the street entered to a
city.
Which of the following menu items are now
available depends on the situation, or may
depend on the digital map. The menu items
which are not available cannot be selected.
R Map: Using the map to enter a destination
(Y page 109)
i In this case, using the map for destination
entry is based on the city seen in the
address input menu.
R No.: Entering the house number
(Y page 104)
R Intersection: Entering the intersection
(Y page 105)
i Entering an intersection is restricted to
streets within the vicinity of the street
entered.
R POI: Entering a point of interest
(Y page 111)
i In this case, entering a POI is based on the
city seen in the address input menu.
R Save: Saving a destination in the
destination memory (Y page 132)
R Start: Starting the route calculation
(Y page 107)
X Continuing or completing destination
entry: Select one of the menu items
mentioned above.
Entering street name before city name
You can enter the street name directly before
entering the name of the city. This is useful
especially when entering an address with an 102
COMAND navigation system (entering a destination)Control systems
216_AKB; 3; 90, en-US
d2ureepe,
Version: 2.11.8.1 2009-05-15T11:47:50+02:00 - Seite 102
Page 107 of 500
X
Selecting numbers: Slide XVY or rotate
cVd.
X Confirming number selection: Press W.
or
X Entering a number with the telephone
keypad using buttons Å - Ã
(Y page 70).
X Deleting individual numbers: Select F
in the bottom line and press W.
X Deleting an entire entry: Select F in the
bottom line and press W and hold until the
entire entry is deleted.
X Canceling an entry: Select % in the
bottom line and press W.
or
X Press back button % in the center
console (Y page 75).
X Confirming entry: Select ¬ in the
second line from the bottom and press W.
If COMAND cannot clearly attribute the
house number to a city, the city input menu
appears.
Entering city: Proceed as described in the
“Entering a city” section (Y page 98).
After the city has been entered, the address
input menu appears again.
If COMAND can clearly attribute the house
number to a city, the address input menu
also appears.
In both cases, the address input menu
shows the house number, street, city and
state (USA) or province (Canada).
Which of the following menu items are now
available may depend on the data version of
the digital map. The menu items which are not
available cannot be selected.
R Map: Using the map to enter a destination
(Y page 109)
i In this case, using the map for destination
entry is based on the city seen in the
address input menu.
R POI: Entering a point of interest
(Y page 111) i
In this case, entering a POI is based on the
city seen in the address input menu.
R Save: Saving a destination in the
destination memory (Y page 132)
R Start: Starting the route calculation
(Y page 107)
X Continuing or completing destination
entry: Select one of the menu items
mentioned above.
Entering an intersection i
The intersection can only be entered after
the street has been entered.
You can only enter intersections which are
available on the digital map.
X In the address input menu, select
Intersection.
The list of intersections appears either with
or without the predictive speller
(Y page 106). Whether or not the
predictive speller appears depends on how
many intersections are available for the
selected street.
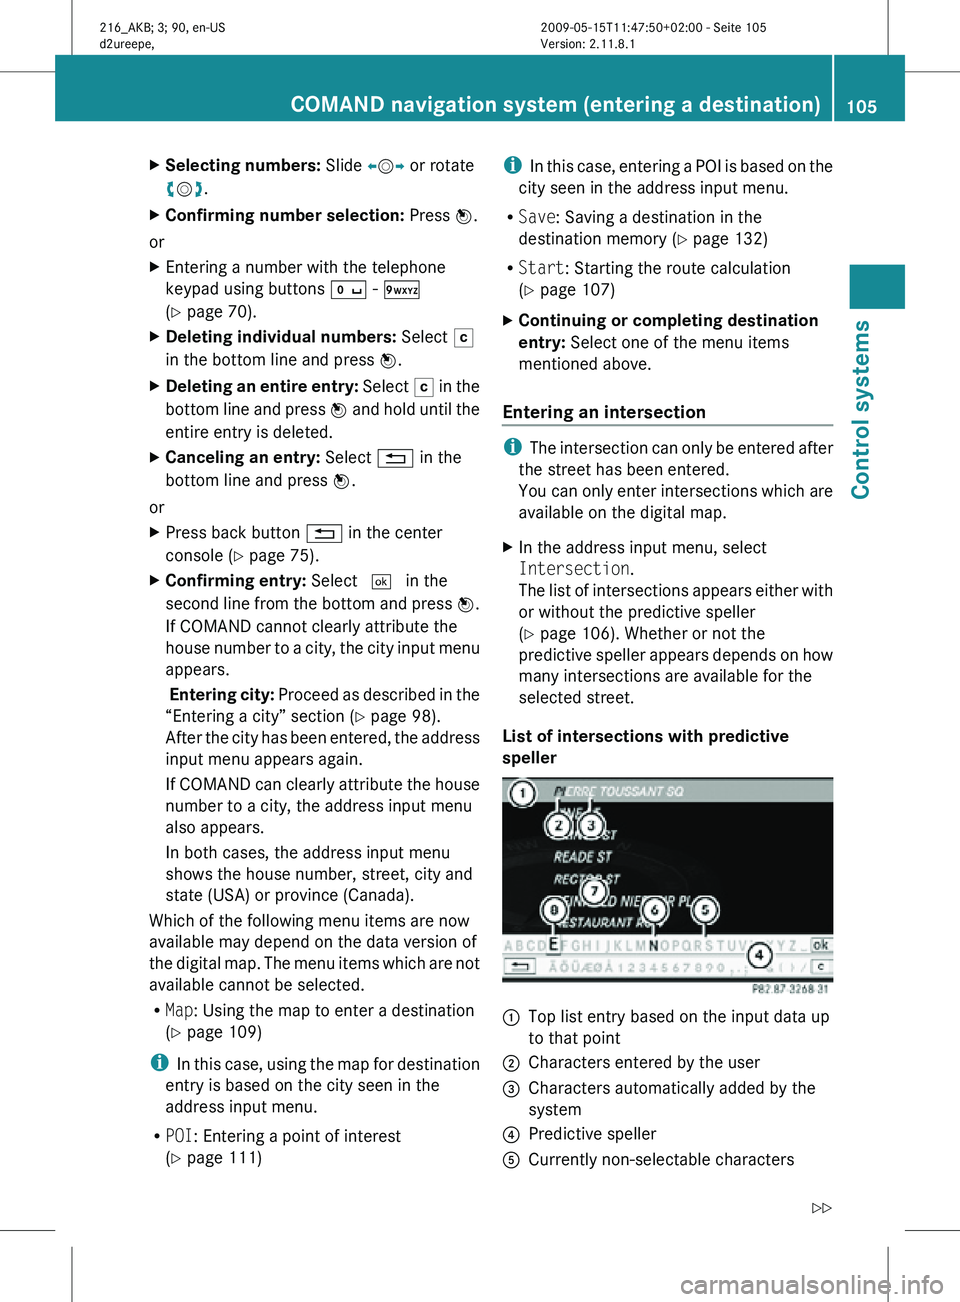
List of intersections with predictive
speller :
Top list entry based on the input data up
to that point
; Characters entered by the user
= Characters automatically added by the
system
? Predictive speller
A Currently non-selectable characters COMAND navigation system (entering a destination)
105Control systems
216_AKB; 3; 90, en-US
d2ureepe,Version: 2.11.8.1 2009-05-15T11:47:50+02:00 - Seite 105 Z
Page 118 of 500
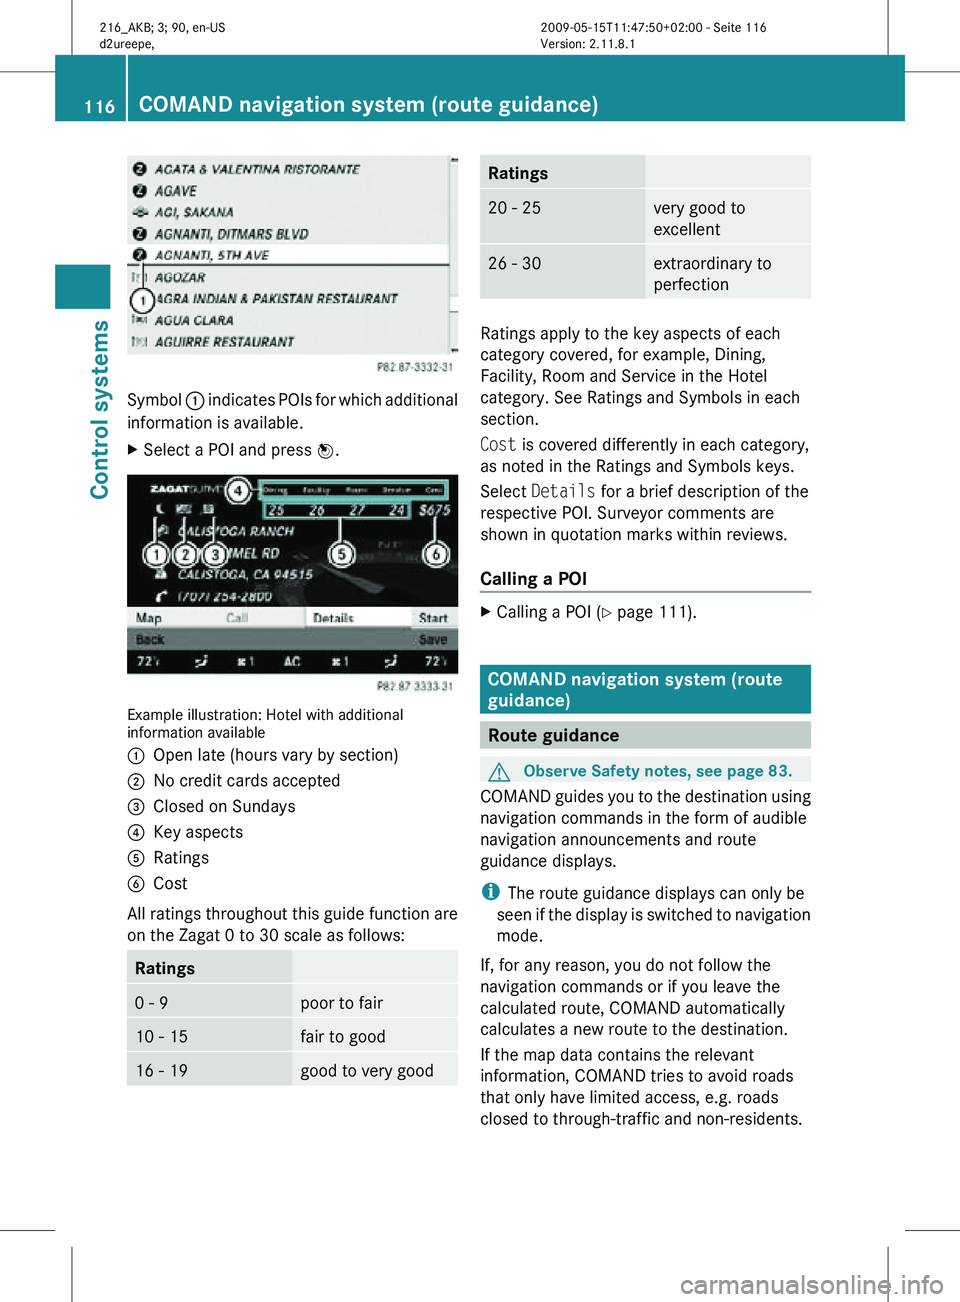
Symbol
: indicates POIs for which additional
information is available.
X Select a POI and press W. Example illustration: Hotel with additional
information available
:
Open late (hours vary by section)
; No credit cards accepted
= Closed on Sundays
? Key aspects
A Ratings
B Cost
All ratings throughout this guide function are
on the Zagat 0 to 30 scale as follows: Ratings
0 - 9 poor to fair
10 - 15 fair to good
16 - 19 good to very good Ratings
20 - 25 very good to
excellent
26 - 30 extraordinary to
perfection
Ratings apply to the key aspects of each
category covered, for example, Dining,
Facility, Room and Service in the Hotel
category. See Ratings and Symbols in each
section.
Cost is covered differently in each category,
as noted in the Ratings and Symbols keys.
Select
Details for a brief description of the
respective POI. Surveyor comments are
shown in quotation marks within reviews.
Calling a POI X
Calling a POI ( Y page 111). COMAND navigation system (route
guidance)
Route guidance
G
Observe Safety notes, see page 83.
COMAND guides you to the destination using
navigation commands in the form of audible
navigation announcements and route
guidance displays.
i The route guidance displays can only be
seen if the display is switched to navigation
mode.
If, for any reason, you do not follow the
navigation commands or if you leave the
calculated route, COMAND automatically
calculates a new route to the destination.
If the map data contains the relevant
information, COMAND tries to avoid roads
that only have limited access, e.g. roads
closed to through-traffic and non-residents. 116
COMAND navigation system (route guidance)Control systems
216_AKB; 3; 90, en-US
d2ureepe,
Version: 2.11.8.1 2009-05-15T11:47:50+02:00 - Seite 116