key MERCEDES-BENZ CL CLASS 2010 Workshop Manual
[x] Cancel search | Manufacturer: MERCEDES-BENZ, Model Year: 2010, Model line: CL CLASS, Model: MERCEDES-BENZ CL CLASS 2010Pages: 500, PDF Size: 9.32 MB
Page 191 of 500
USB storage device
i
This function is available for
alphabetically ordered directories. The
function is
not available within playlists for
example.
X Within a folder, press the respective button
on the telephone keypad once or more to
enter the first character of the desired
artist name. For example, press button
l three
times for an artist whose name
starts with a “C”.
The available characters are displayed on
the bottom of the display.
When the directory contains folders only,
COMAND will search for folders. Selecting active partition (USB
storage devices only)
You can
select this function with USB storage
devices when the storage space is
partitioned. The system supports up to 4
partitions (primary or logical, FAT formatted).
i The Windows formatting program
supports FAT partitions of up to 32 gigabyte
by default.
X Select Media Interface Q Select
Active Partition. Playback options
The following options are available:
R Normal Track Sequence
Tracks are
played back in regular order (e.g.
in numerical or in alphabetical order).
R Random Tracks
All available tracks on the current medium
are played back in random order.
R Category Mix or Random Folder (with
USB devices when Folder was selected) Tracks of the currently active category or
folder
and
its subfolders are played back in
random order.
X Selecting playback options: Select
Media Interface in the basic display.
The list of options appears. The dot
#
indicates the currently selected option.
X Select an option. COMAND vehicle menu
Introduction
In this menu, you can program the following
vehicle functions: Function
Multi-function Contour Seat
Settings (Y page 198)
Rear Window Sunshade (Y page 190)
Easy Entry/Exit Feature
(Y page 190)
Exterior Lighting Delayed Shut-off
(Y page 191)
Interior Lighting Delayed Shut-off
(Y page 191)
Ambient Lighting (Y page 192)
Automatic Mirror Folding
(Y page 192)
Locator Lighting (Y page 192)
Automatic Locking (Y page 193)
Trunk Opening-height Restriction
(Y page 193)
You can select the individual vehicle
functions in two ways. COMAND vehicle menu
189
Control systems
216_AKB; 3; 90, en-US
d2ureepe, Version: 2.11.8.1 2009-05-15T11:47:50+02:00 - Seite 189 Z
Page 193 of 500
To stop seat/steering wheel movement, do
one of the following:
R
Press seat adjustment switch.
R Move steering wheel adjustment stalk.
R Press one of the memory position buttons
or the memory button M.
Do not leave children unattended in the
vehicle, or with access to an unlocked vehicle.
Children could open the driver’s door and
unintentionally activate the easy-entry/exit
feature, which could result in an accident
and/or serious personal injury.
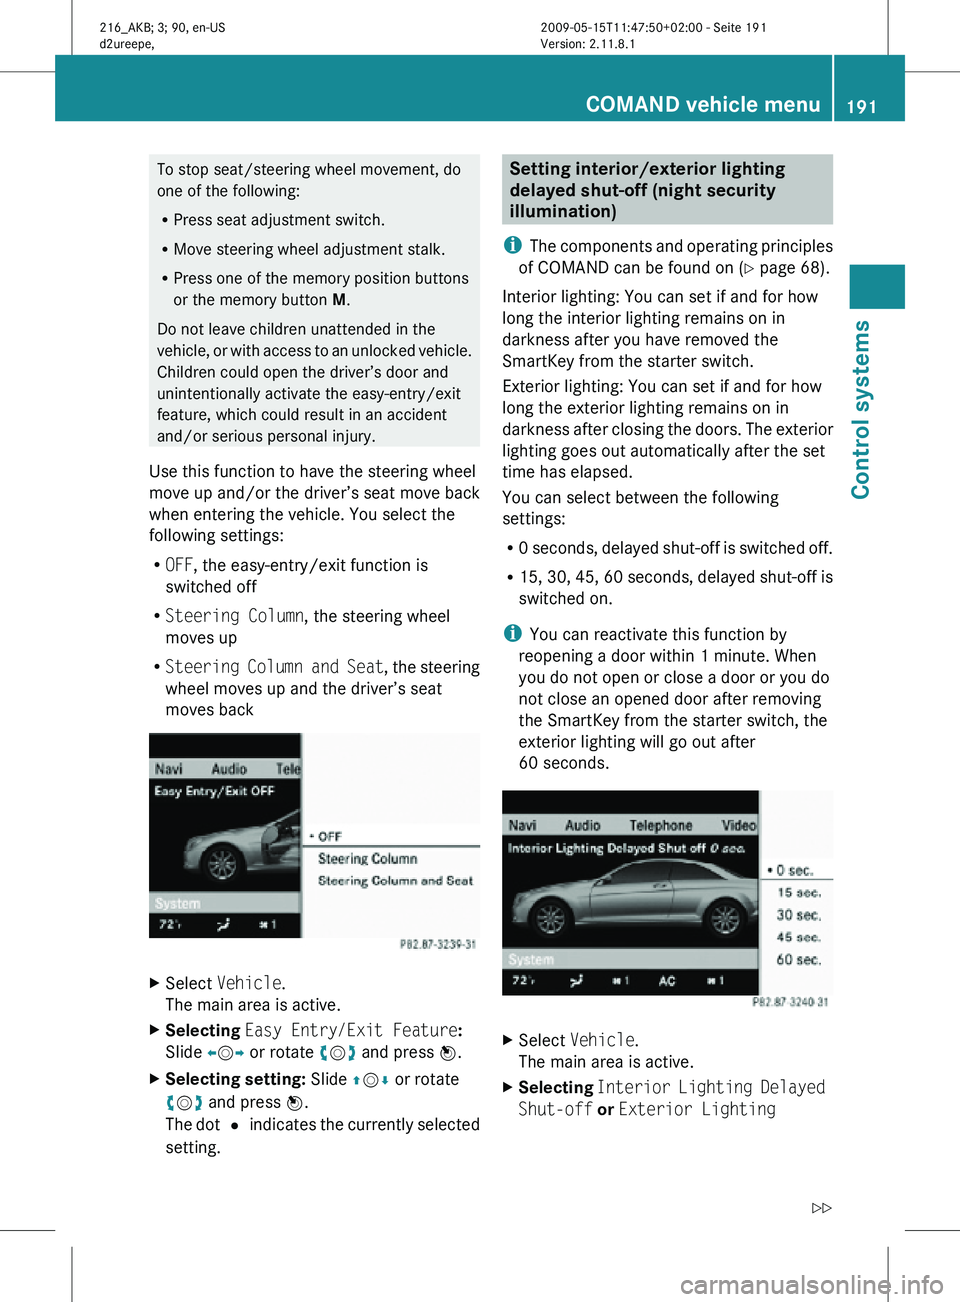
Use this function to have the steering wheel
move up and/or the driver’s seat move back
when entering the vehicle. You select the
following settings:
R OFF, the easy-entry/exit function is
switched off
R Steering Column, the steering wheel
moves up
R Steering Column and Seat , the steering
wheel moves up and the driver’s seat
moves back X
Select Vehicle.
The main area is active.
X Selecting Easy Entry/Exit Feature:
Slide XVY or rotate cVd and press W.
X Selecting setting: Slide ZVÆ or rotate
cVd and press W.
The dot # indicates the currently selected
setting. Setting interior/exterior lighting
delayed shut-off (night security
illumination)
i The components and operating principles
of COMAND can be found on ( Y page 68).
Interior lighting: You can set if and for how
long the interior lighting remains on in
darkness after you have removed the
SmartKey from the starter switch.
Exterior lighting: You can set if and for how
long the exterior lighting remains on in
darkness after closing the doors. The exterior
lighting goes out automatically after the set
time has elapsed.
You can select between the following
settings:
R 0 seconds, delayed shut-off is switched off.
R 15, 30, 45, 60 seconds, delayed shut-off is
switched on.
i You can reactivate this function by
reopening a door within 1 minute. When
you do not open or close a door or you do
not close an opened door after removing
the SmartKey from the starter switch, the
exterior lighting will go out after
60 seconds. X
Select Vehicle.
The main area is active.
X Selecting Interior Lighting Delayed
Shut-off or Exterior Lighting COMAND vehicle menu
191Control systems
216_AKB; 3; 90, en-US
d2ureepe, Version: 2.11.8.1 2009-05-15T11:47:50+02:00 - Seite 191 Z
Page 195 of 500
R
Parking lamps 25
R Front fog lamps
R Door entry lamps in the mirror
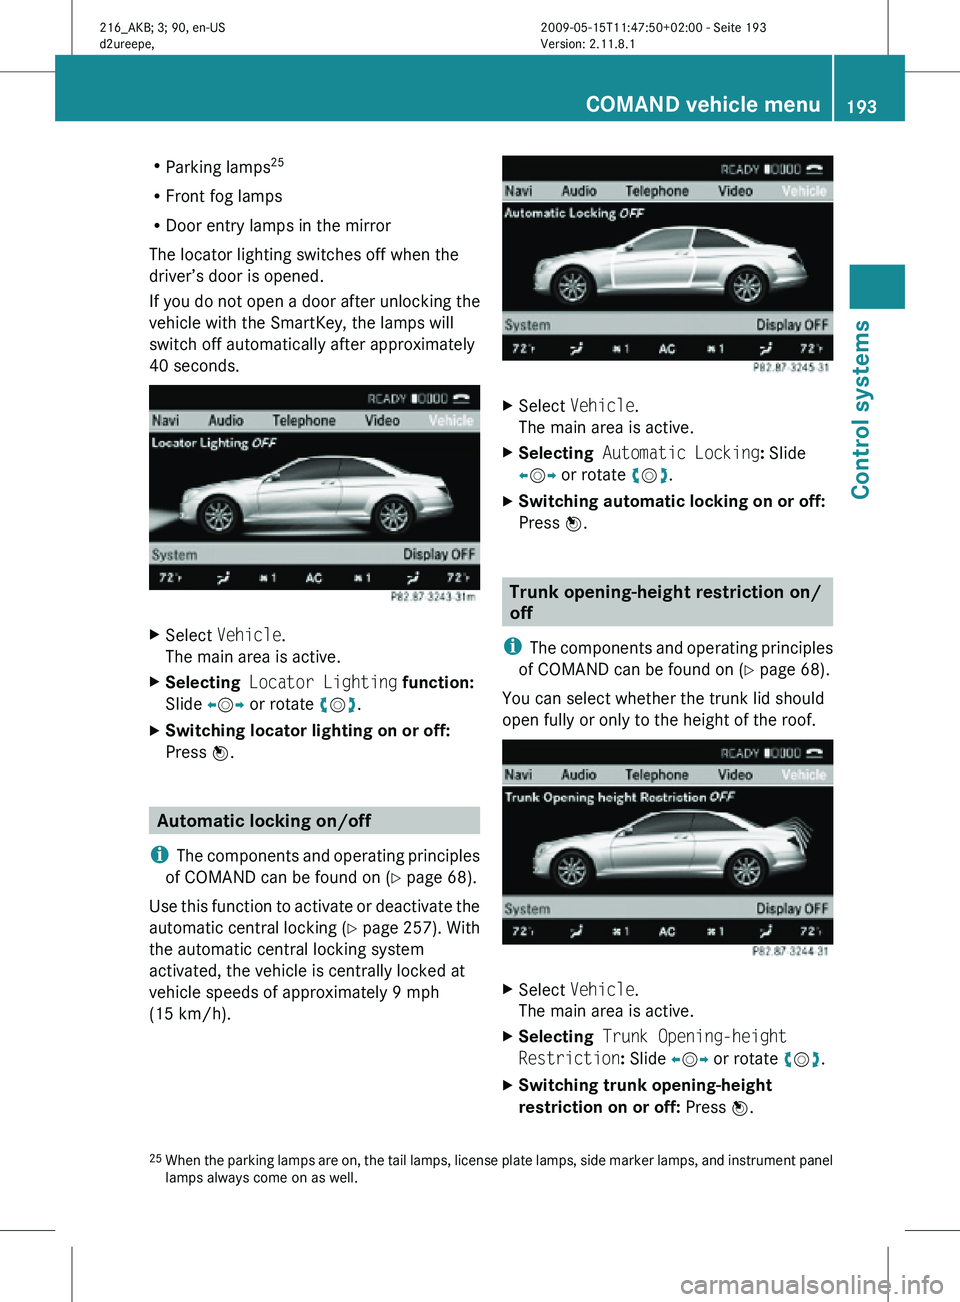
The locator lighting switches off when the
driver’s door is opened.
If you do not open a door after unlocking the
vehicle with the SmartKey, the lamps will
switch off automatically after approximately
40 seconds. X
Select Vehicle.
The main area is active.
X Selecting Locator Lighting function:
Slide XVY or rotate cVd.
X Switching locator lighting on or off:
Press W. Automatic locking on/off
i The components and operating principles
of COMAND can be found on ( Y page 68).
Use this function to activate or deactivate the
automatic central locking (Y page 257). With
the automatic central locking system
activated, the vehicle is centrally locked at
vehicle speeds of approximately 9 mph
(15 km/h). X
Select Vehicle.
The main area is active.
X Selecting Automatic Locking: Slide
XVY or rotate cVd.
X Switching automatic locking on or off:
Press W. Trunk opening-height restriction on/
off
i The components and operating principles
of COMAND can be found on ( Y page 68).
You can select whether the trunk lid should
open fully or only to the height of the roof. X
Select Vehicle.
The main area is active.
X Selecting Trunk Opening-height
Restriction: Slide XVY or rotate cVd.
X Switching trunk opening-height
restriction on or off: Press W.
25 When the parking lamps are on, the tail lamps, license plate lamps, side marker lamps, and instrument panel
lamps always come on as well. COMAND vehicle menu
193Control systems
216_AKB; 3; 90, en-US
d2ureepe, Version: 2.11.8.1 2009-05-15T11:47:50+02:00 - Seite 193 Z
Page 206 of 500
Function
:
Trip
menu (Y page 204) ;
Navi menu (Y page 206)
=
Audio
menu (Y page 207) ?
AMG
28
menu (Y page 208) A
Telephone
menu (Y page 211) B
Assistance
menu (Y page 212) C
Service
menu (Y page 214) D
Settings menu (Y page 214)
Trip menu
In the Trip menu, you can show an additional
display for the speedometer and call up or
reset your vehicle’s statistical data.
The following information is available:
R Standard display ( Y page 204)
R Fuel consumption statistics since start
(Y page 204)
R Fuel consumption statistics since last reset
(Y page 205)
R Resetting values ( Y page 205)
R Remaining driving range and current fuel
consumption (Y page 205)
R Digital Speedometer ( Y page 205)
Standard display X
Press button = or ; to select the
Trip menu. In the standard display, the main
odometer : and the trip odometer ;
appear in the multifunction display.
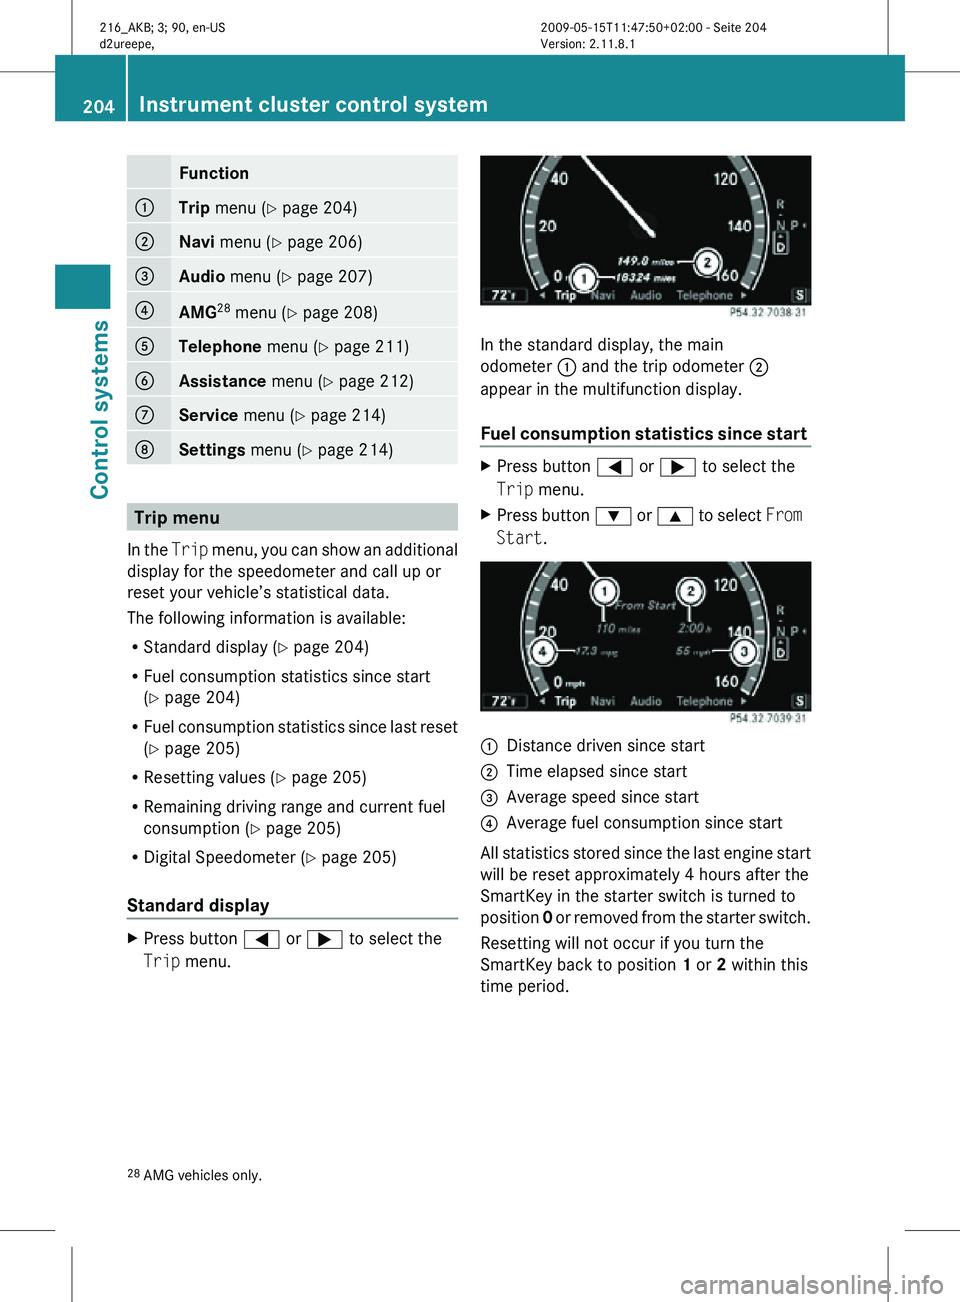
Fuel consumption statistics since start
X
Press button = or ; to select the
Trip menu.
X Press button : or 9 to select From
Start. :
Distance driven since start
; Time elapsed since start
= Average speed since start
? Average fuel consumption since start
All statistics stored since the last engine start
will be reset approximately 4 hours after the
SmartKey in the starter switch is turned to
position 0 or removed from the starter switch.
Resetting will not occur if you turn the
SmartKey back to position 1 or 2 within this
time period.
28 AMG vehicles only. 204
Instrument cluster control systemControl systems
216_AKB; 3; 90, en-US
d2ureepe,
Version: 2.11.8.1 2009-05-15T11:47:50+02:00 - Seite 204
Page 211 of 500
The engine oil temperature will be shown in
blue if the engine oil temperature has not yet
reached 176‡ (80†). During this time, avoid
driving at full engine speed.
If the engine reaches the overspeed range in
the manual shift program, you will see
up next
to gear indicator : as a reminder to upshift.
Use buttons : or 9 to select the
following functions in the AMG menu:
R RACETIMER (Y page 209)
R Overall analysis ( Y page 210)
R Lap analysis (Y page 210)
RACETIMER G
Warning!
The RACETIMER feature is only for use on
roads and in conditions where high speed
driving is permitted. Racing on public roads is
prohibited under all circumstances. The driver
is and must always remain responsible for
following posted speed limits.
The RACETIMER allows you to time and save
driving stretches.
X Press button = or ; to select the
AMG menu.
X Press button 9 to select the
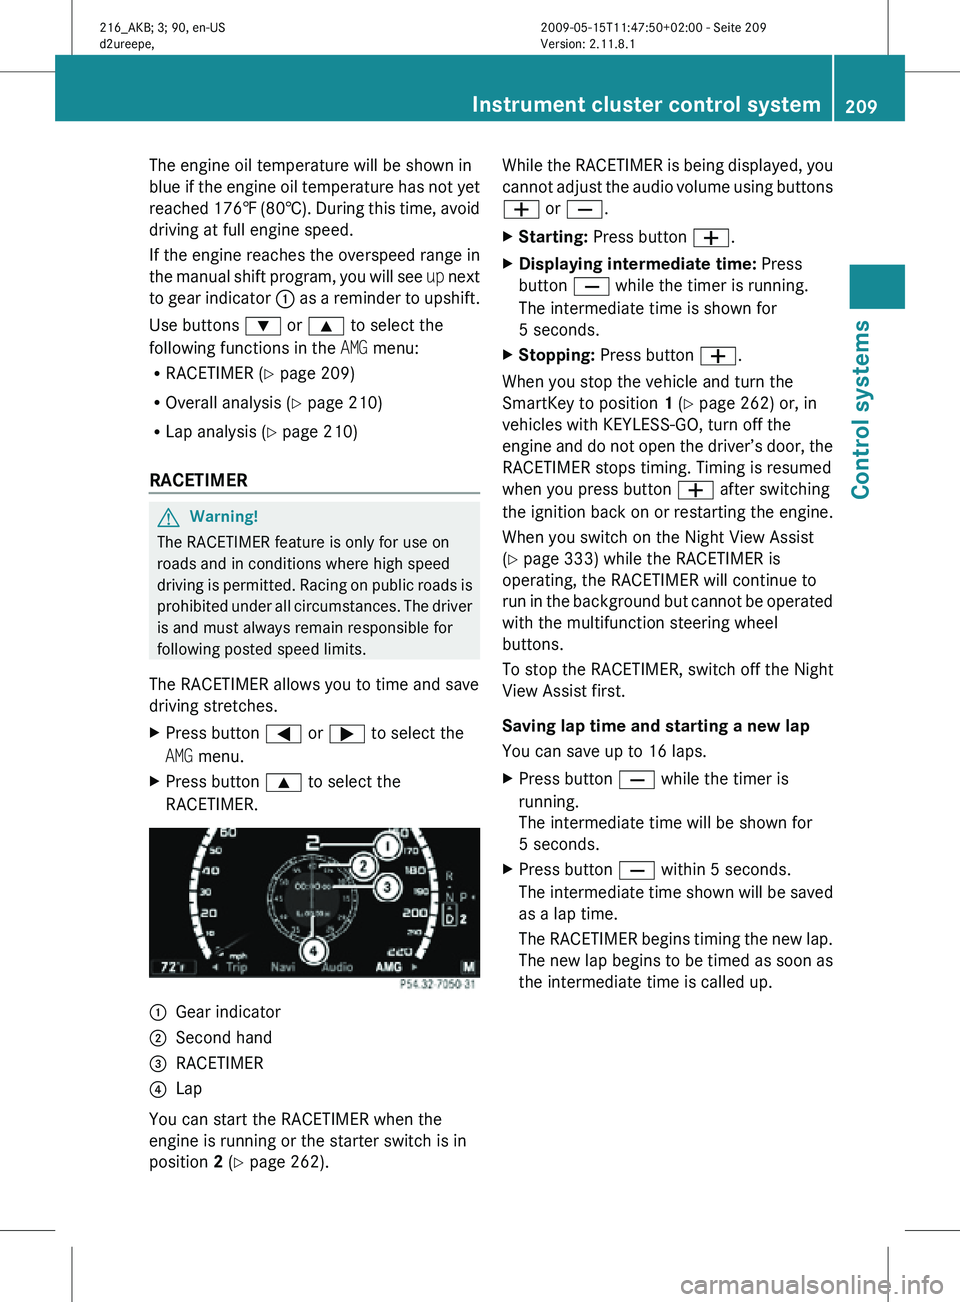
RACETIMER. :
Gear indicator
; Second hand
= RACETIMER
? Lap
You can start the RACETIMER when the
engine is running or the starter switch is in
position 2 (Y page 262). While the RACETIMER is being displayed, you
cannot adjust the audio volume using buttons
W or X.
X
Starting: Press button W.
X Displaying intermediate time: Press
button X while the timer is running.
The intermediate time is shown for
5 seconds.
X Stopping: Press button W.
When you stop the vehicle and turn the
SmartKey to position 1 (Y page 262) or, in
vehicles with KEYLESS-GO, turn off the
engine and do not open the driver’s door, the
RACETIMER stops timing. Timing is resumed
when you press button W after switching
the ignition back on or restarting the engine.
When you switch on the Night View Assist
(Y page 333) while the RACETIMER is
operating, the RACETIMER will continue to
run in the background but cannot be operated
with the multifunction steering wheel
buttons.
To stop the RACETIMER, switch off the Night
View Assist first.
Saving lap time and starting a new lap
You can save up to 16 laps.
X Press button X while the timer is
running.
The intermediate time will be shown for
5 seconds.
X Press button X within 5 seconds.
The intermediate time shown will be saved
as a lap time.
The RACETIMER begins timing the new lap.
The new lap begins to be timed as soon as
the intermediate time is called up. Instrument cluster control system
209Control systems
216_AKB; 3; 90, en-US
d2ureepe, Version: 2.11.8.1 2009-05-15T11:47:50+02:00 - Seite 209 Z
Page 216 of 500

X
Press button a again if you would like
to change the current status.
Depending on the previous status, Blind
Spot Assist will be Enabled or Disabled
For more information on Blind Spot Assist,
see ( Y page 335). Service menu
In the Service menu the following functions
are available:
R Vehicle status message memory
(Y page 214)
R Checking tire inflation pressure
electronically with the Advanced TPMS
(Y page 377)
R Calling up the maintenance service
indicator display ( Y page 402)
R Checking engine oil level (CL 600 and
CL 65 AMG) ( Y page 370)
Vehicle status message memory Use the vehicle status message memory
function to scan malfunction and warning
messages that may be stored in the system.
Such messages appear in the multifunction
display and are based on conditions or
system status the vehicle’s system has
recorded.
The vehicle status message memory function
only appears if there are any messages
stored.
G
Warning!
Malfunction and warning messages are only
indicated for certain systems and are
intentionally not very detailed. The
malfunction and warning messages are
simply a reminder with respect to the
operation of certain systems. They do not
replace the owner’s and/or driver’s
responsibility to maintain the vehicle’s
operating safety. Have all required
maintenance and safety checks performed on the vehicle. Bring the vehicle to an authorized
Mercedes-Benz Center to address the
malfunction and warning messages.
X Press button = or ; to select the
Service menu.
If conditions have occurred causing status
messages to be recorded, the number of
messages appears in the multifunction
display: 2 Messages.
X Press button : or 9 to select the
Messages function.
X Press button a to confirm.
For malfunction and warning messages,
see “Vehicle status messages in the
multifunction display” ( Y page 414).
X Use button : or 9 to scroll through
the messages.
If you turn the SmartKey in the starter switch
to position 0 and then back to position 2, all
messages will be deleted from the message
memory. Settings menu
In the
Settings menu the following functions
are available:
R Switching daytime running lamp mode on
or off (USA only) (Y page 215)
R Showing or hiding additional speedometer
(Y page 215)
R Selecting speedometer display mode
(Y page 215)
R Switching the radar sensors on or off
(Y page 216) 214
Instrument cluster control systemControl systems
216_AKB; 3; 90, en-US
d2ureepe,
Version: 2.11.8.1 2009-05-15T11:47:50+02:00 - Seite 214
Page 227 of 500
“Enter intersection”, “Enter crossing”
Use the command “Enter intersection” or
“Enter crossing” to enter an intersection.
Sample dialog:
\
Enter intersection.
^ Please say the name of the first street.
\ Forest Drive.
^ Forest Drive accepted.
^ Please say the name of the
intersecting street.
\ Dudley Street.
^ Dudley Street accepted.
The intersection is adopted for route
guidance.
“Enter house number” Use the command “Enter house number” to
enter a house number for the street
previously selected.
Sample dialog:
\
Enter house number.
^ Please say the house number.
\ Thirty-two.
^ House number accepted.
The house number is adopted for route
guidance.
“Correction” If you have entered a city or street, you can
use the “Correction” command to enter the
city or street again.
Voice Control System telephone
Safety notes
i For more information on telephone, see
(Y page 135). Safety notes for using the Voice Control
System G
Observe Safety notes, see page 217.
Safety notes for using the telephone G
Observe Safety notes, see page 135. Telephone operation
You can use the Voice Control System to
R dial phone number
R store names
and numbers in the COMAND
address book
R dial a phone number directly from the
COMAND address book
R delete the voice name of an address book
entry
R have the system read out the phone book
of the address book entry by entry
R manage and access an automated
answering system/voice mail box 29
R redial
The Voice Control System detects whether
R your telephone is switched on
R your telephone is connected via Bluetooth ®
R the corresponding mobile network is
logged in
R it is possible to dial
If dialing is not possible, the Voice Control
System will advise you accordingly.
i You can continue operating your mobile
phone using the telephone keypad or the
keypad on your phone. Telephone commands
For a list of commands, see ( Y page 237).
29 Only when supported by the mobile phone. Voice Control System telephone
225
Control systems
216_AKB; 3; 90, en-US
d2ureepe, Version: 2.11.8.1 2009-05-15T11:47:50+02:00 - Seite 225 Z
Page 254 of 500
Vehicle equipment
i This Operator’s Manual describes all
features, standard or optional, potentially
available for your vehicle at the time of
purchase. Please be aware that your
vehicle might not be equipped with all
features described in this manual. Locking and unlocking
Notes
G
Observe Safety notes, see page 51.
When unlocking or locking the vehicle with
the SmartKey an acoustic signal sounds. The
acoustic signal is activated at the factory. If
you wish to deactivate the feature, or adjust
its signal volume, contact an authorized
Mercedes-Benz Center.
When unlocking the vehicle, all turn signal
lamps flash once. An acoustic signal sounds
once, and the locking knobs in the doors
move up. The anti-theft alarm system is
disarmed.
When locking the vehicle, all turn signal lamps
flash three times. An acoustic signal sounds
three times, and the locking knobs in the
doors move down. The anti-theft alarm
system is armed.
All doors and the trunk must be closed.
If you cannot lock or unlock the vehicle with
the SmartKey, the batteries in the SmartKey
are discharged, the SmartKey is
malfunctioning, or the vehicle battery is
drained.
X Check the batteries in the SmartKey
(Y page 255) and replace them if
necessary.
X Use the mechanical key to unlock the
driver’s door and the trunk (Y page 460). X
Use the mechanical key to lock the vehicle
(Y page 461).
X Have the vehicle battery and the vehicle
battery connections checked at an
authorized Mercedes-Benz Center.
If the SmartKey is malfunctioning, contact
Roadside Assistance or an authorized
Mercedes-Benz Center. SmartKey
Your vehicle comes supplied with two
SmartKeys, each with remote control and a
removable mechanical key.
The SmartKey centrally locks and unlocks
R the doors
R the trunk lid
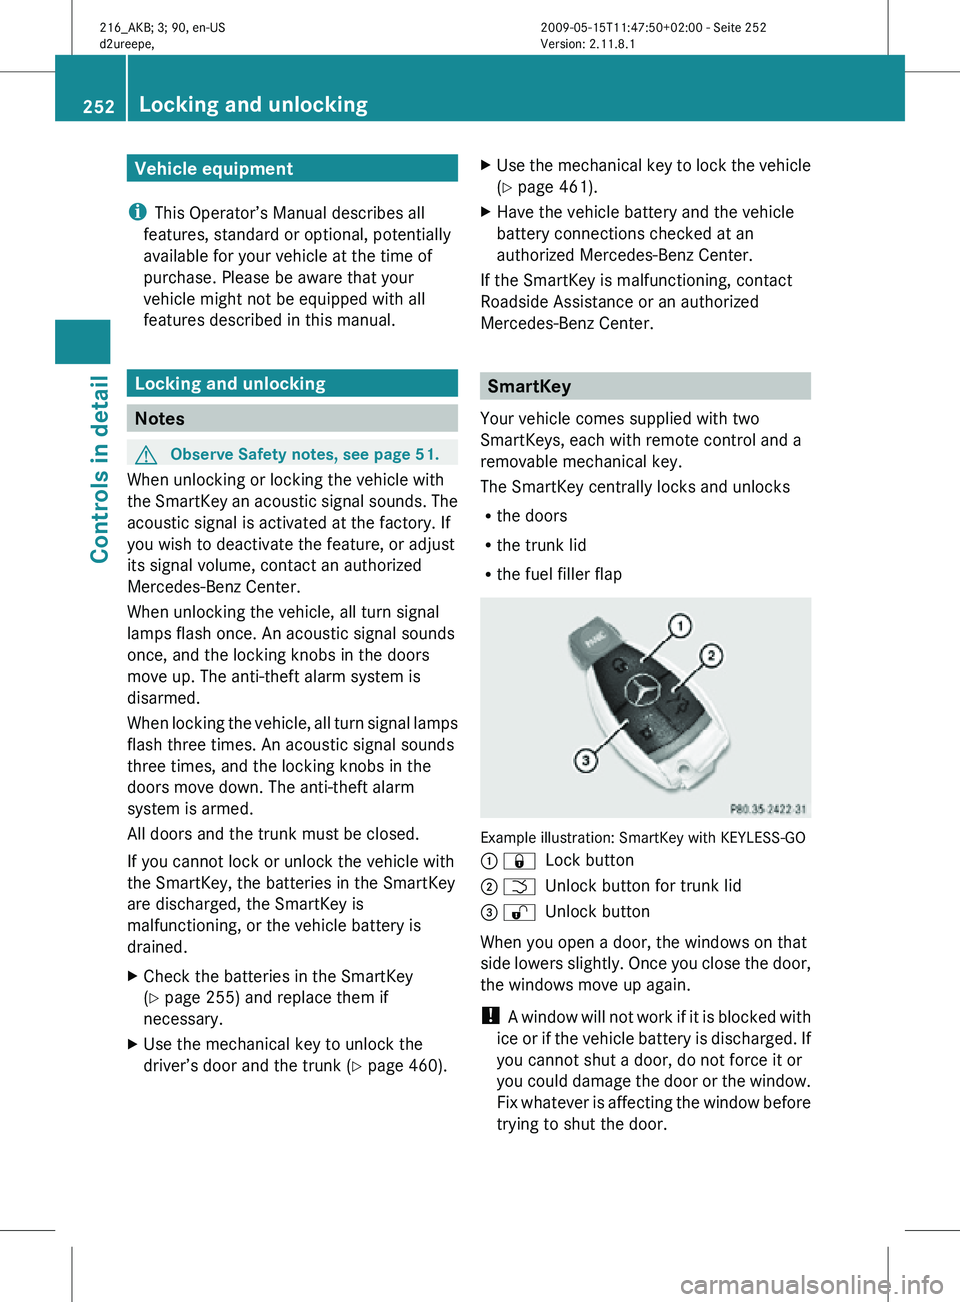
R the fuel filler flap Example illustration: SmartKey with KEYLESS-GO
: &
Lock button
; F Unlock button for trunk lid
= % Unlock button
When you open a door, the windows on that
side lowers slightly. Once you close the door,
the windows move up again.
! A window will not work if it is blocked with
ice or if the vehicle battery is discharged. If
you cannot shut a door, do not force it or
you could damage the door or the window.
Fix whatever is affecting the window before
trying to shut the door. 252
Locking and unlockingControls in detail
216_AKB; 3; 90, en-US
d2ureepe,
Version: 2.11.8.1 2009-05-15T11:47:50+02:00 - Seite 252
Page 255 of 500
i
USA only:
This device complies with Part 15 of the
FCC Rules. Operation is subject to the
following two conditions:
1. This device may not cause harmful
interference, and
2.
this device must accept anyinterference received, including
interference that may cause undesired
operation.
Any unauthorized modification to this
device could void the user’s authority to
operate the equipment.
i Canada only:
This device complies with RSS-210 of
Industry Canada. Operation is subject to
the following two conditions:
1. This device may not cause interference, and
2. this device must accept any interference received, including
interference that may cause undesired
operation of the device.
Any unauthorized modification to this
device could void the user’s authority to
operate the equipment.
Factory setting X
Global unlocking: Press button %.
Unless you open a door or the trunk within
approximately 40 seconds after unlocking
the vehicle:
R The vehicle will be locked again.
R The anti-theft alarm system will be
rearmed.
X Global locking: Press button &.
Selective setting If you frequently travel alone, you may wish
to reprogramm the SmartKey. Pressing button
% will then only unlock the driver’s
door and the fuel filler flap.
X Switching on/off: Press
and hold buttons
% and & simultaneously for
approximately 6 seconds until the battery
check lamp (Y page 255) flashes twice.
The SmartKey will then function as follows:
X Unlocking driver’s door and fuel filler
flap: Press button % once.
X Global unlocking: Press button %
twice.
X Global locking: Press button &. KEYLESS-GO
Vehicles equipped with KEYLESS-GO come
with two SmartKeys with KEYLESS-GO, each
with remote control and a removable
mechanical key.
The KEYLESS-GO function is integrated into
the SmartKey.
The validity of the SmartKey is
checked every time you grasp an outside door
handle.
When the SmartKey is valid, your vehicle
unlocks
R the doors
R the trunk lid
R the fuel filler flap
When you open a door, the windows on that
side lowers slightly. Once you close the door,
the windows move up again.
! A window will not work if it is blocked with
ice or if the vehicle battery is discharged. If
you cannot shut a door, do not force it or
you could damage the door or the window.
Fix whatever is affecting the window before
trying to shut the door. Locking and unlocking
253
Controls in detail
216_AKB; 3; 90, en-US
d2ureepe, Version: 2.11.8.1 2009-05-15T11:47:50+02:00 - Seite 253 Z
Page 256 of 500
i
USA only:
This device complies with Part 15 of the
FCC Rules. Operation is subject to the
following two conditions:
1. This device may not cause harmful
interference, and
2.
this device must accept anyinterference received, including
interference that may cause undesired
operation.
Any unauthorized modification to this
device could void the user’s authority to
operate the equipment.
i Canada only:
This device complies with RSS-210 of
Industry Canada. Operation is subject to
the following two conditions:
1. This device may not cause interference, and
2. this device must accept any interference received, including
interference that may cause undesired
operation of the device.
Any unauthorized modification to this
device could void the user’s authority to
operate the equipment.
Important notes on using KEYLESS-GO R
You can also use the SmartKey with
KEYLESS-GO like a normal SmartKey
(Y page 252).
R You can combine KEYLESS-GO functions
with normal SmartKey functions (e.g.
unlocking with KEYLESS-GO and locking
with button &).
R Always carry the SmartKey with you.
R Never store the SmartKey together with
-electronic items
such as a mobile phone
or another SmartKey
- metallic objects such as coins or metal
foil Doing so could impair the function of the
KEYLESS-GO system.
R To lock
or unlock the vehicle, the SmartKey
must be located outside the vehicle within
approximately 3 ft (1 m) of a door or the
trunk.
R When the vehicle has been parked for more
than 72 hours, the KEYLESS-GO function is
deactivated. Pull an outside door handle
and switch on the ignition once to activate
the KEYLESS-GO function.
R If the SmartKey is positioned farther away
from the vehicle, the system may no longer
recognize the SmartKey. The vehicle
cannot be locked or the engine started via
the KEYLESS-GO system.
R If the SmartKey is removed from the vehicle
(e.g. if a passenger exits the vehicle with
the SmartKey)
-when pressing the KEYLESS-GO start/
stop button or trying to lock the vehicle
with the outside door handle the
message Key Not Detected appears in
the multifunction display
- with the engine running, the red message
Key Not Detected appears in the
multifunction display while driving off
Find the SmartKey or change its present
location immediately (e.g. place it on the
front passenger seat or insert it in shirt
pocket).
R If you have started the engine with the
KEYLESS-GO start/stop button, you can
turn it off again by
-pressing the KEYLESS-GO start/stop
button
- inserting the SmartKey into the starter
switch when the vehicle is at a standstill
and the automatic transmission is in park
position P 254
Locking and unlocking
Controls in detail
216_AKB; 3; 90, en-US
d2ureepe,
Version: 2.11.8.1 2009-05-15T11:47:50+02:00 - Seite 254