ESP MERCEDES-BENZ CL CLASS 2010 Owner's Guide
[x] Cancel search | Manufacturer: MERCEDES-BENZ, Model Year: 2010, Model line: CL CLASS, Model: MERCEDES-BENZ CL CLASS 2010Pages: 500, PDF Size: 9.32 MB
Page 108 of 500
B
Currently selectable character
C List of intersections
D Currently selected character
i In predictive speller ?, you can only
select currently selectable characters.
Which characters are included depends on
the sequence in which you have entered
your destination and the digital map.
While the characters are being selected as
described below, the top list entry : always
shows the intersection which best
corresponds to the input data as it has been
entered up to that point.
At the same time, COMAND automatically
adds matching characters = to
characters ; already entered by the user.
X Selecting characters: Slide XVY or
rotate cVd.
X Confirming character selection:
Press W.
X Deleting individual characters: Select
F in the bottom line and press W.
X Deleting an entire entry: Select F in the
bottom line and press W and hold until the
entire entry is deleted.
X Canceling character entry: Select %
in the bottom line and press W.
or
X Press back button % in the center
console (Y page 75).
As soon as COMAND can clearly attribute the
characters entered to an intersection,
predictive speller ? disappears. You see the
list of intersections without the predictive
speller. Here you can confirm the current
entry or make another selection.
During character entry, you can also manually
switch to the list of intersections without
predictive speller at any time. X
Slide ZV.
or
X Select ¬ in the second line from the
bottom and press W.
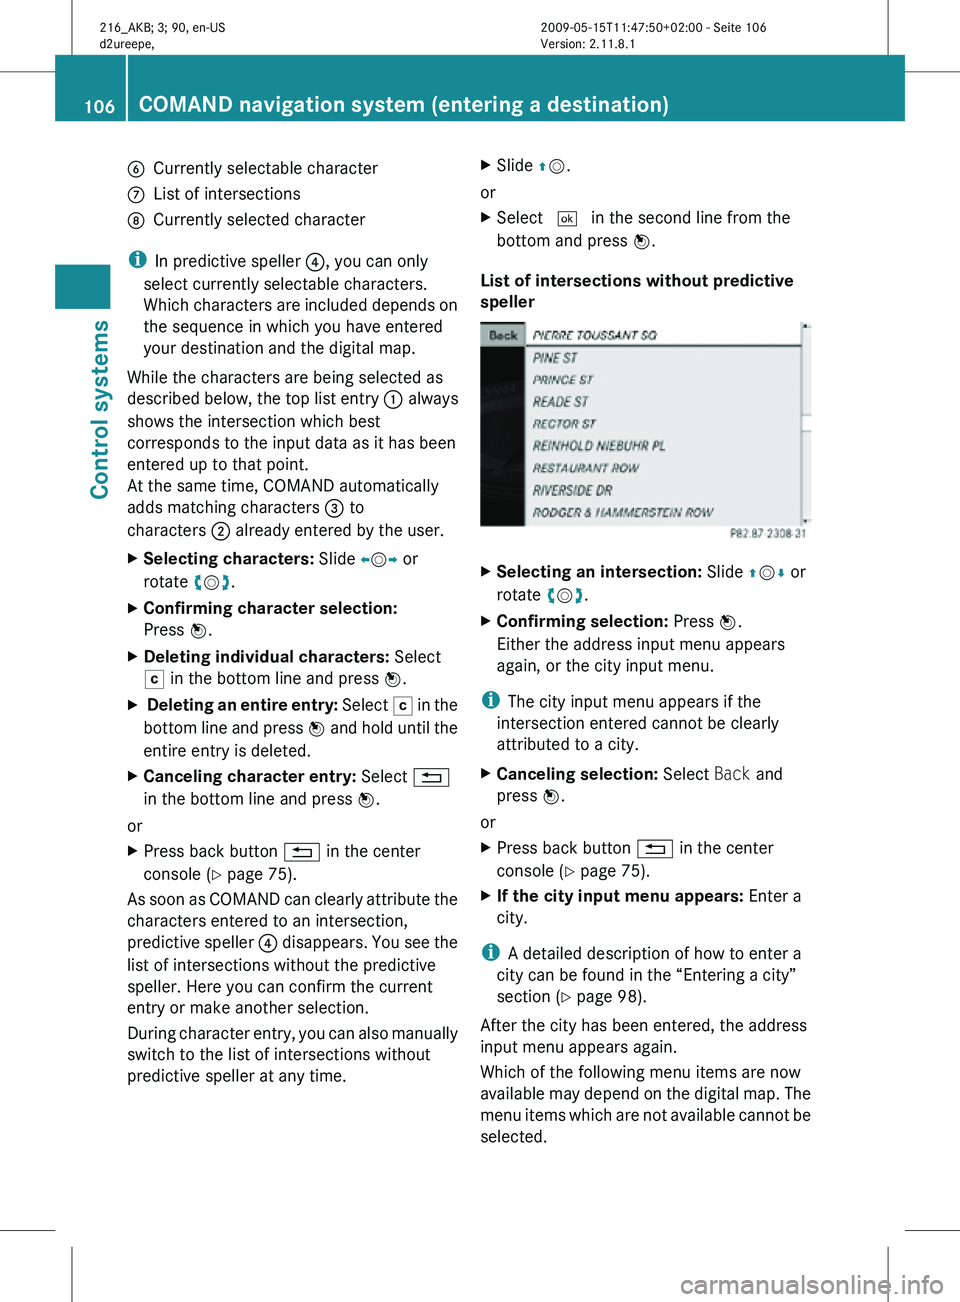
List of intersections without predictive
speller X
Selecting an intersection: Slide ZVÆ or
rotate cVd.
X Confirming selection: Press W.
Either the address input menu appears
again, or the city input menu.
i The city input menu appears if the
intersection entered cannot be clearly
attributed to a city.
X Canceling selection: Select Back and
press W.
or
X Press back button % in the center
console (Y page 75).
X If the city input menu appears: Enter a
city.
i A detailed description of how to enter a
city can be found in the “Entering a city”
section ( Y page 98).
After the city has been entered, the address
input menu appears again.
Which of the following menu items are now
available may depend on the digital map. The
menu items which are not available cannot be
selected. 106
COMAND navigation system (entering a destination)Control systems
216_AKB; 3; 90, en-US
d2ureepe,
Version: 2.11.8.1 2009-05-15T11:47:50+02:00 - Seite 106
Page 118 of 500
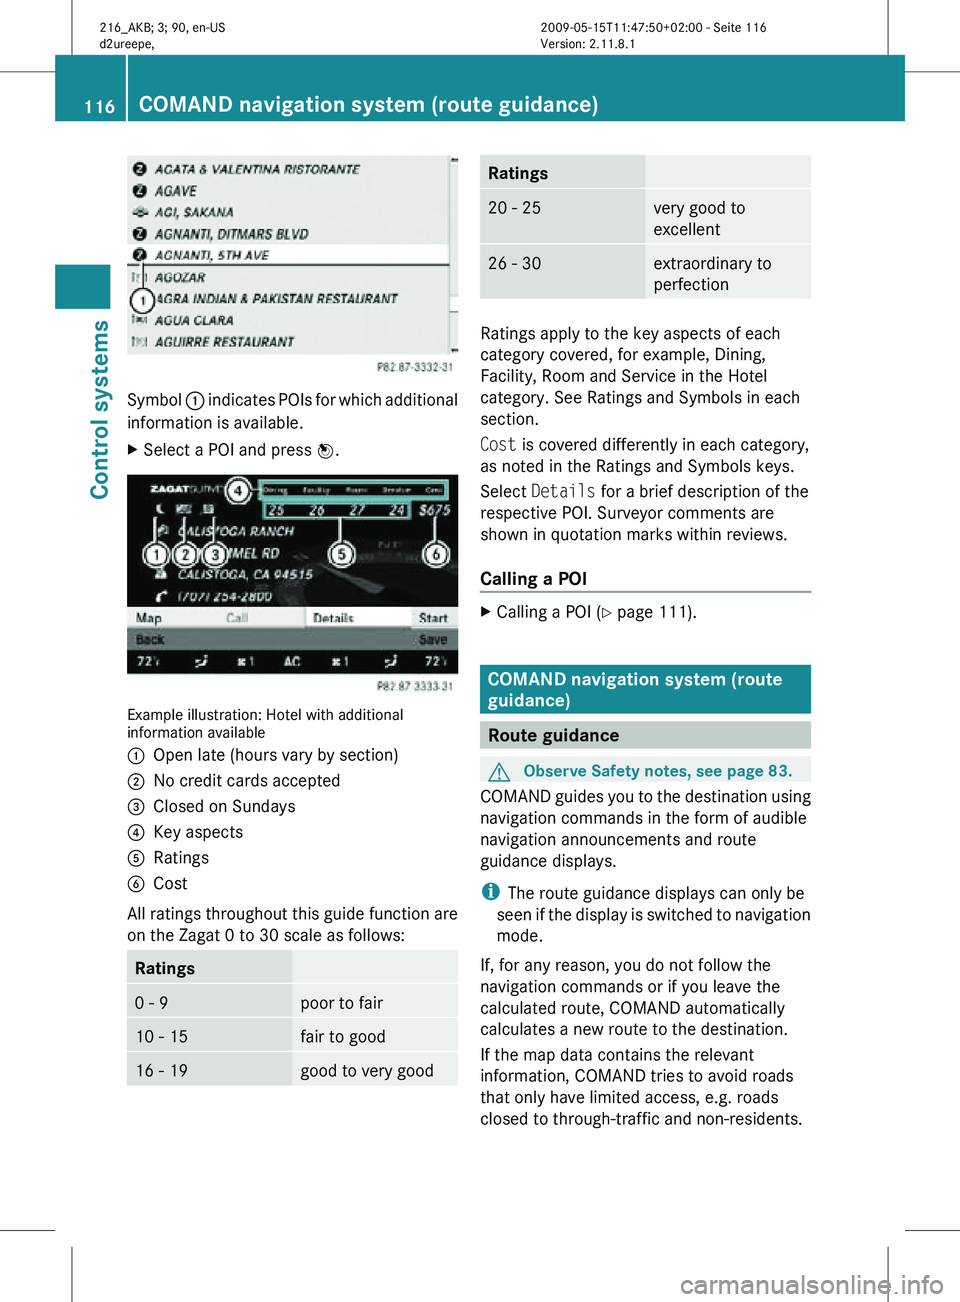
Symbol
: indicates POIs for which additional
information is available.
X Select a POI and press W. Example illustration: Hotel with additional
information available
:
Open late (hours vary by section)
; No credit cards accepted
= Closed on Sundays
? Key aspects
A Ratings
B Cost
All ratings throughout this guide function are
on the Zagat 0 to 30 scale as follows: Ratings
0 - 9 poor to fair
10 - 15 fair to good
16 - 19 good to very good Ratings
20 - 25 very good to
excellent
26 - 30 extraordinary to
perfection
Ratings apply to the key aspects of each
category covered, for example, Dining,
Facility, Room and Service in the Hotel
category. See Ratings and Symbols in each
section.
Cost is covered differently in each category,
as noted in the Ratings and Symbols keys.
Select
Details for a brief description of the
respective POI. Surveyor comments are
shown in quotation marks within reviews.
Calling a POI X
Calling a POI ( Y page 111). COMAND navigation system (route
guidance)
Route guidance
G
Observe Safety notes, see page 83.
COMAND guides you to the destination using
navigation commands in the form of audible
navigation announcements and route
guidance displays.
i The route guidance displays can only be
seen if the display is switched to navigation
mode.
If, for any reason, you do not follow the
navigation commands or if you leave the
calculated route, COMAND automatically
calculates a new route to the destination.
If the map data contains the relevant
information, COMAND tries to avoid roads
that only have limited access, e.g. roads
closed to through-traffic and non-residents. 116
COMAND navigation system (route guidance)Control systems
216_AKB; 3; 90, en-US
d2ureepe,
Version: 2.11.8.1 2009-05-15T11:47:50+02:00 - Seite 116
Page 120 of 500
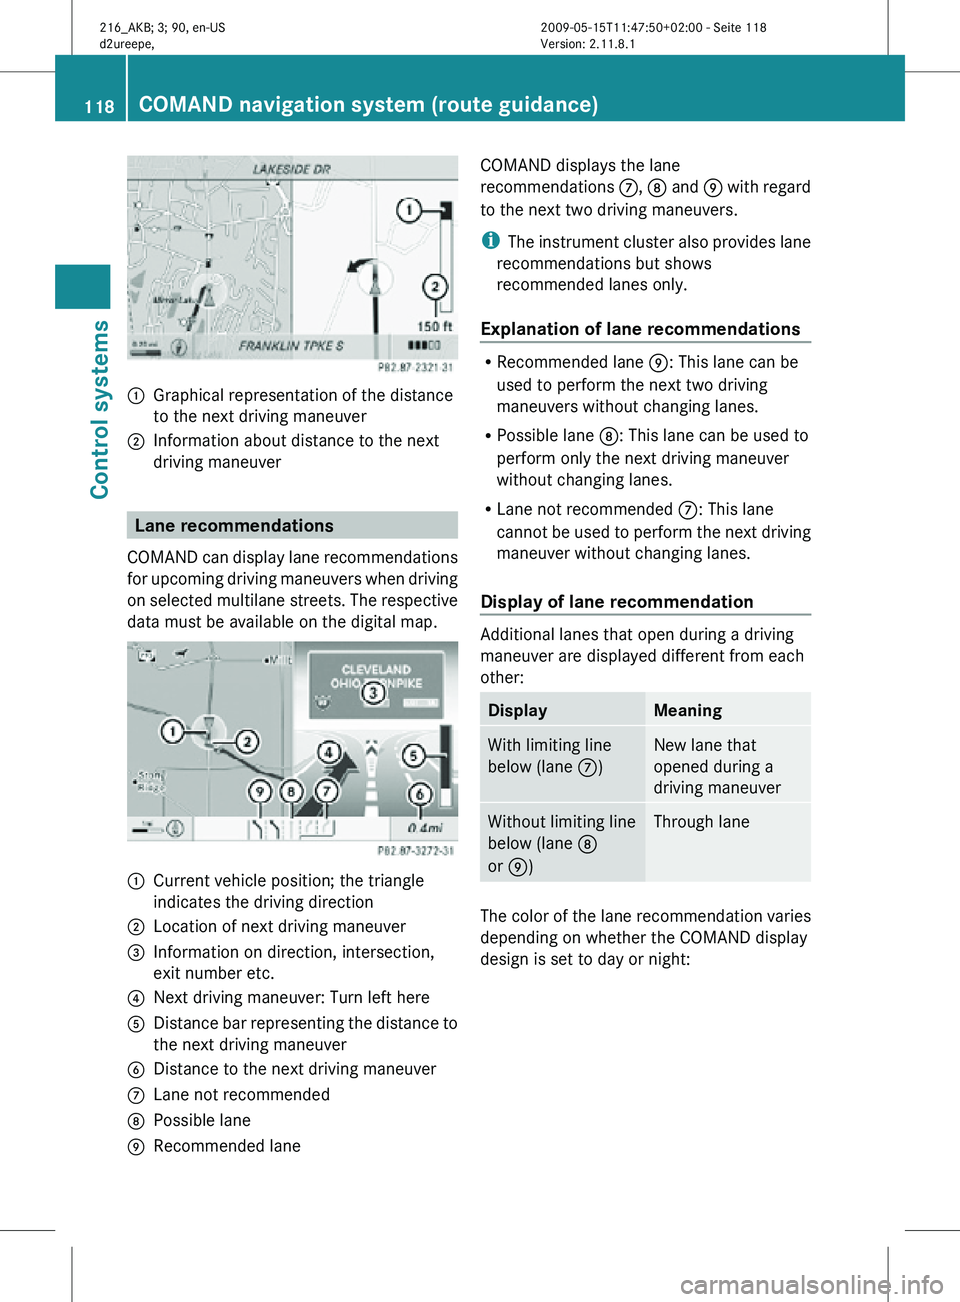
:
Graphical representation of the distance
to the next driving maneuver
; Information about distance to the next
driving maneuver Lane recommendations
COMAND can display lane recommendations
for upcoming driving maneuvers when driving
on selected multilane streets. The respective
data must be available on the digital map. :
Current vehicle position; the triangle
indicates the driving direction
; Location of next driving maneuver
= Information on direction, intersection,
exit number etc.
? Next driving maneuver: Turn left here
A Distance bar representing the distance to
the next driving maneuver
B Distance to the next driving maneuver
C Lane not recommended
D Possible lane
E Recommended lane COMAND displays the lane
recommendations
C, D and E with regard
to the next two driving maneuvers.
i The instrument cluster also provides lane
recommendations but shows
recommended lanes only.
Explanation of lane recommendations R
Recommended lane E: This lane can be
used to perform the next two driving
maneuvers without changing lanes.
R Possible lane D: This lane can be used to
perform only the next driving maneuver
without changing lanes.
R Lane not recommended C: This lane
cannot be used to perform the next driving
maneuver without changing lanes.
Display of lane recommendation Additional lanes that open during a driving
maneuver are displayed different from each
other:
Display Meaning
With limiting line
below (lane
C) New lane that
opened during a
driving maneuver
Without limiting line
below (lane
D
or E) Through lane
The color of the lane recommendation varies
depending on whether the COMAND display
design is set to day or night:118
COMAND navigation system (route guidance)Control systems
216_AKB; 3; 90, en-US
d2ureepe,
Version: 2.11.8.1 2009-05-15T11:47:50+02:00 - Seite 118
Page 121 of 500
Day mode Night mode
Recommended
lane E = deep blue Recommended
lane E = light blue
Possible lane
D =
light blue Possible lane
D =
deep blue Lane not
recommended
C: =
grey Lane not
recommended
C: =
grey Example of a display without driving
maneuvers
:
Main destination O
; Stopover P (only visible if a stopover has
been entered)
= Route (highlighted blue)
? Current vehicle position; the triangle
indicates the vehicle’s direction of travel
A Set map orientation – for an explanation
and settings, see (Y page 90)
B Set scale – for an explanation and
settings, see (Y page 89) Destination or destination area
reached
Once you have reached your destination, you
will hear the announcement You have
reached the destination. For certain
POIs (airports or highway junctions), you will
hear the announcement You have reached
the destination area . In addition, you willsee a corresponding display and route
guidance is automatically ended.
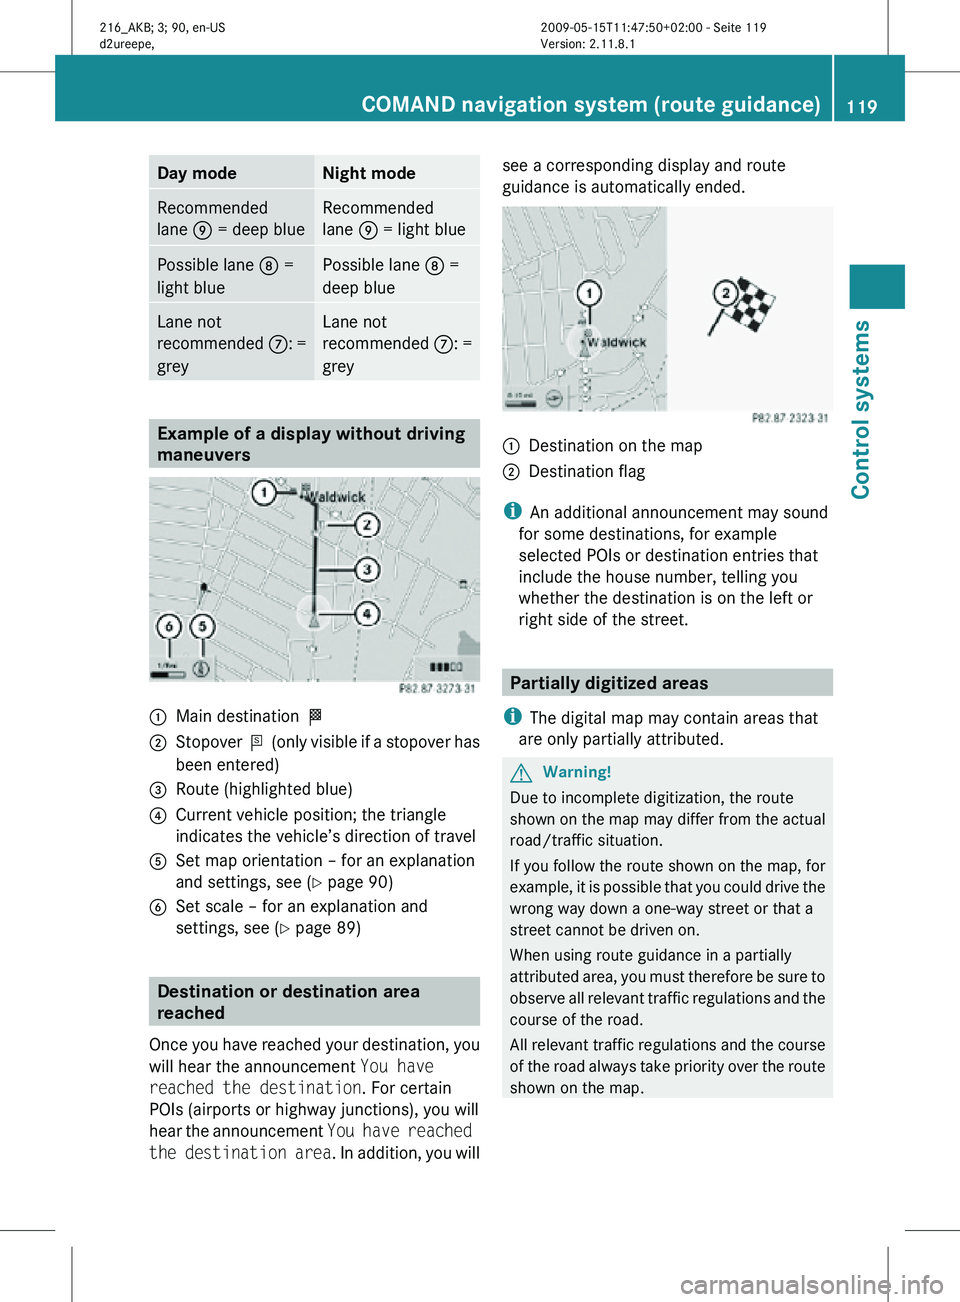
:
Destination on the map
; Destination flag
i An additional announcement may sound
for some destinations, for example
selected POIs or destination entries that
include the house number, telling you
whether the destination is on the left or
right side of the street. Partially digitized areas
i The digital map may contain areas that
are only partially attributed. G
Warning!
Due to incomplete digitization, the route
shown on the map may differ from the actual
road/traffic situation.
If you follow the route shown on the map, for
example, it is possible that you could drive the
wrong way down a one-way street or that a
street cannot be driven on.
When using route guidance in a partially
attributed area, you must therefore be sure to
observe all relevant traffic regulations and the
course of the road.
All relevant traffic regulations and the course
of the road always take priority over the route
shown on the map. COMAND navigation system (route guidance)
119Control systems
216_AKB; 3; 90, en-US
d2ureepe,Version: 2.11.8.1 2009-05-15T11:47:50+02:00 - Seite 119 Z
Page 123 of 500
Off-road and off-map
Route guidance to an off-road
destination G
Warning!
The COMAND navigation system may direct
you to off-road routes that your vehicle may
not be capable of traversing through without
damaging your tires, wheels or vehicle. It is
the driver’s sole responsibility to determine
the suitability of the route. Off-road routes
may be of varying conditions and their
appropriateness for use may be affected by
various factors such as time of day, time of
year and immediate weather conditions that
cannot be judged or taken into consideration
by the COMAND system.
COMAND can guide you to destinations
within the area covered by the digital map,
even if a destination is not located at a road
known to the system.
These destinations are shown as off-road
destinations, which you can enter using the
map, for example. In these cases, COMAND
guides you for as long as possible with
navigation announcements and displays on
roads known to the system.
Shortly before you reach the last known the
point to leave the digitized road network, you
will hear the announcement The
destination is nearby. Follow the
arrow on the display.
You will then see an arrow that indicates the
direction to the off-road destination. When
the off-road destination is close to the road,
Area of dest. reached appears in addition
below the arrow.
The section of the route from the last known
point on the map to the off-road destination
is indicated with a dashed line after a certain
length. It simply shows the direction to the
off-road destination without taking account of
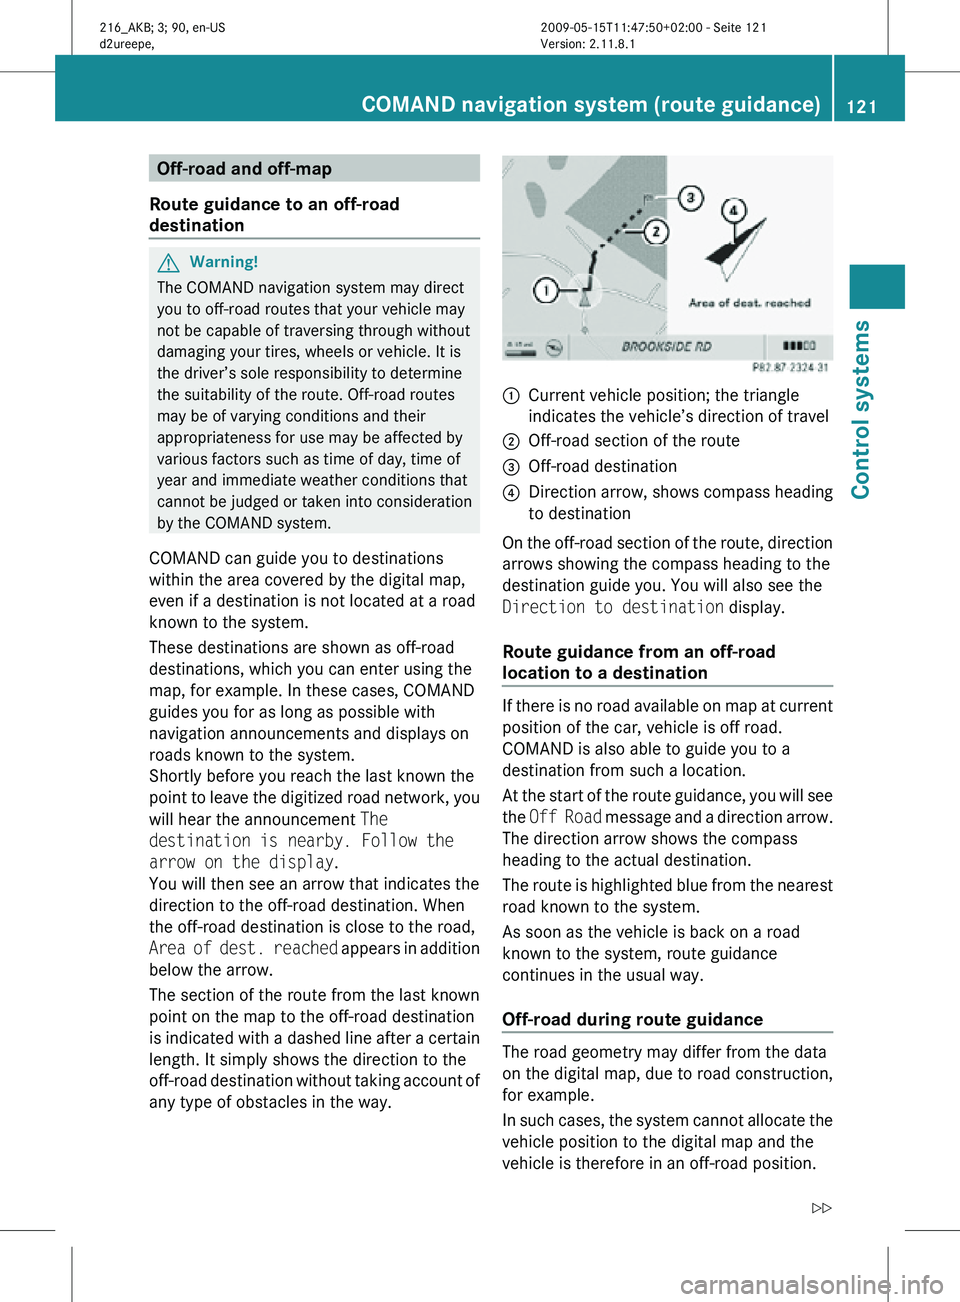
any type of obstacles in the way. :
Current vehicle position; the triangle
indicates the vehicle’s direction of travel
; Off-road section of the route
= Off-road destination
? Direction arrow, shows compass heading
to destination
On the off-road section of the route, direction
arrows showing the compass heading to the
destination guide you. You will also see the
Direction to destination display.
Route guidance from an off-road
location to a destination If there is no road available on map at current
position of the car, vehicle is off road.
COMAND is also able to guide you to a
destination from such a location.
At the start of the route guidance, you will see
the
Off Road message and a direction arrow.
The direction arrow shows the compass
heading to the actual destination.
The route is highlighted blue from the nearest
road known to the system.
As soon as the vehicle is back on a road
known to the system, route guidance
continues in the usual way.
Off-road during route guidance The road geometry may differ from the data
on the digital map, due to road construction,
for example.
In such cases, the system cannot allocate the
vehicle position to the digital map and the
vehicle is therefore in an off-road position.COMAND navigation system (route guidance)
121Control systems
216_AKB; 3; 90, en-US
d2ureepe,Version: 2.11.8.1 2009-05-15T11:47:50+02:00 - Seite 121 Z
Page 126 of 500
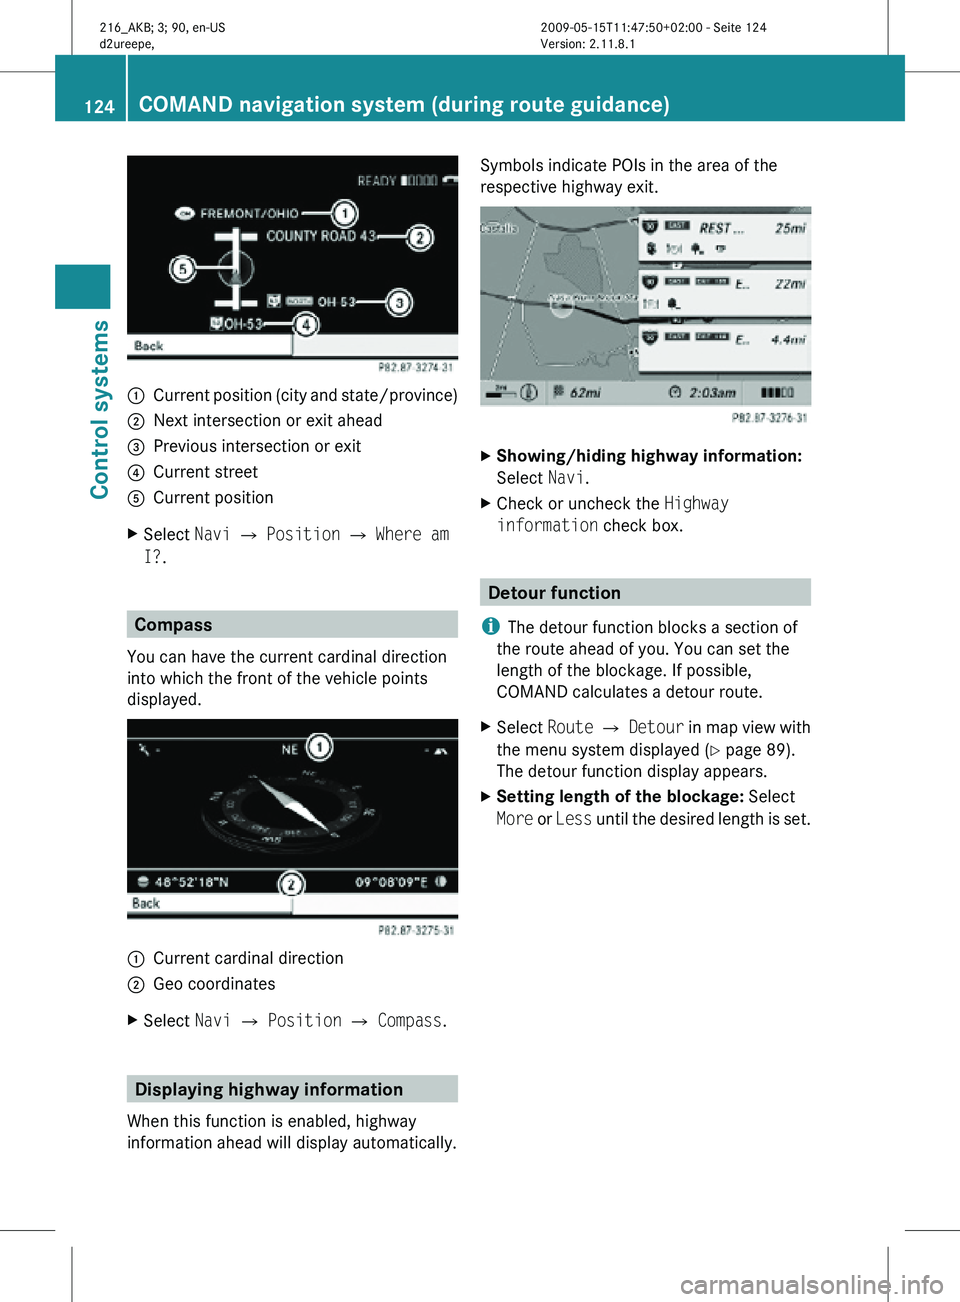
:
Current position (city and state/province)
; Next intersection or exit ahead
= Previous intersection or exit
? Current street
A Current position
X Select Navi Q Position Q Where am
I?. Compass
You can have the current cardinal direction
into which the front of the vehicle points
displayed. :
Current cardinal direction
; Geo coordinates
X Select Navi Q Position Q Compass. Displaying highway information
When this function is enabled, highway
information ahead will display automatically. Symbols indicate POIs in the area of the
respective highway exit.
X
Showing/hiding highway information:
Select Navi.
X Check or uncheck the Highway
information check box. Detour function
i The detour function blocks a section of
the route ahead of you. You can set the
length of the blockage. If possible,
COMAND calculates a detour route.
X Select Route Q Detour in map view with
the menu system displayed (Y page 89).
The detour function display appears.
X Setting length of the blockage: Select
More or Less until the desired length is set. 124
COMAND navigation system (during route guidance)Control systems
216_AKB; 3; 90, en-US
d2ureepe,
Version: 2.11.8.1 2009-05-15T11:47:50+02:00 - Seite 124
Page 136 of 500
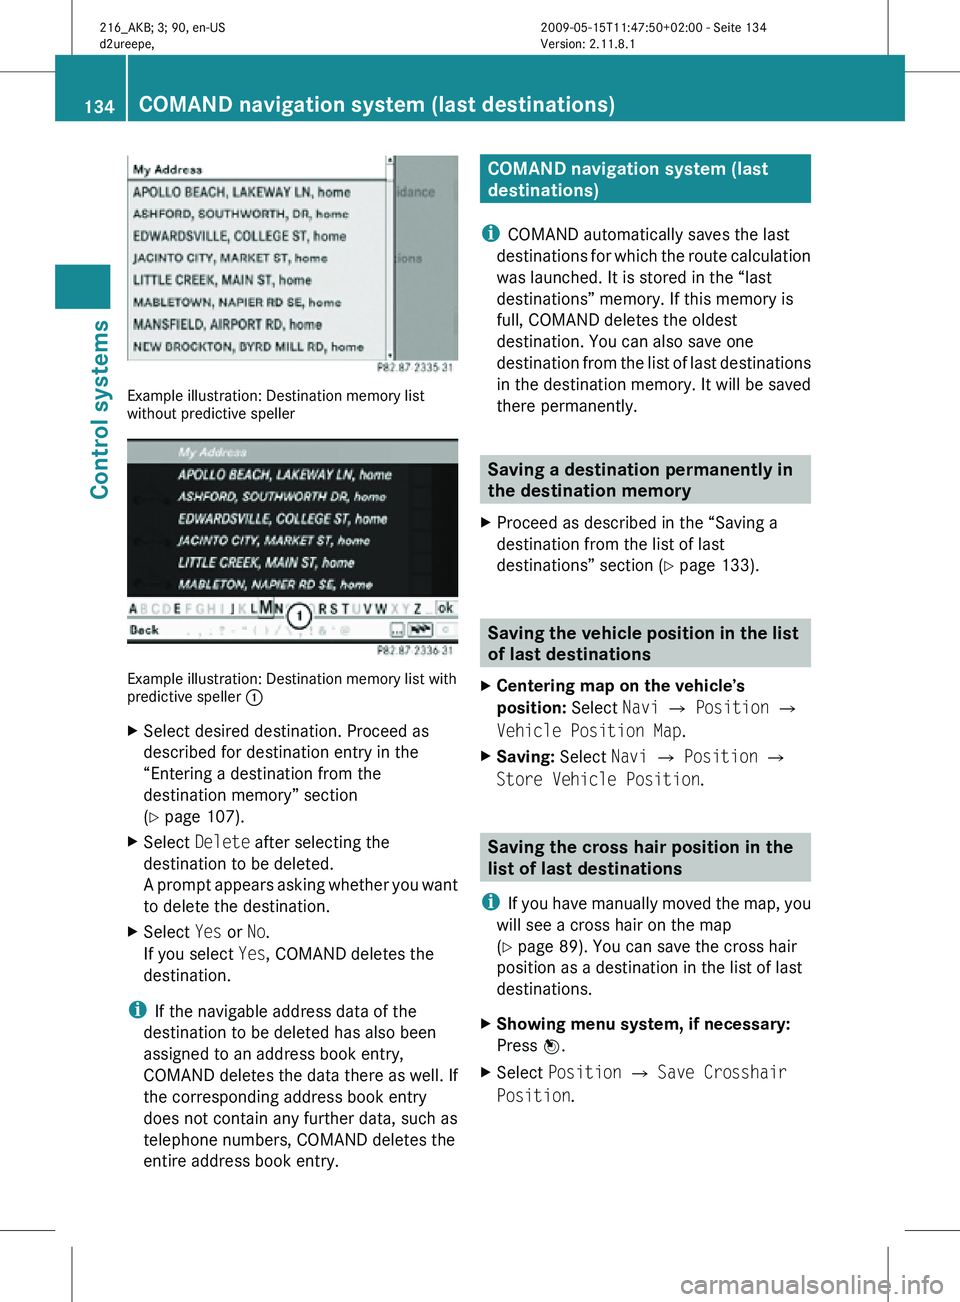
Example illustration: Destination memory list
without predictive speller
Example illustration: Destination memory list with
predictive speller
:
X Select desired destination. Proceed as
described for destination entry in the
“Entering a destination from the
destination memory” section
(Y page 107).
X Select Delete after selecting the
destination to be deleted.
A prompt appears asking whether you want
to delete the destination.
X Select Yes or No.
If you select Yes, COMAND deletes the
destination.
i If the navigable address data of the
destination to be deleted has also been
assigned to an address book entry,
COMAND deletes the data there as well. If
the corresponding address book entry
does not contain any further data, such as
telephone numbers, COMAND deletes the
entire address book entry. COMAND navigation system (last
destinations)
i COMAND automatically saves the last
destinations for which the route calculation
was launched. It is stored in the “last
destinations” memory. If this memory is
full, COMAND deletes the oldest
destination. You can also save one
destination from the list of last destinations
in the destination memory. It will be saved
there permanently. Saving a destination permanently in
the destination memory
X Proceed as described in the “Saving a
destination from the list of last
destinations” section ( Y page 133). Saving the vehicle position in the list
of last destinations
X Centering map on the vehicle’s
position: Select Navi Q Position Q
Vehicle Position Map.
X Saving: Select Navi Q Position Q
Store Vehicle Position. Saving the cross hair position in the
list of last destinations
i If you have manually moved the map, you
will see a cross hair on the map
(Y page 89). You can save the cross hair
position as a destination in the list of last
destinations.
X Showing menu system, if necessary:
Press W.
X Select Position Q Save Crosshair
Position. 134
COMAND navigation system (last destinations)Control systems
216_AKB; 3; 90, en-US
d2ureepe,
Version: 2.11.8.1 2009-05-15T11:47:50+02:00 - Seite 134
Page 140 of 500
The following conditions must be met for a
“911” emergency call via COMAND:
R
Mobile phone must be switched on.
R The corresponding mobile
communications network must be
available.
i Emergency calls may not be possible with
all telephone networks or if certain network
services and/or telephone functions are
active. Check with your local service
providers.
If you cannot make an emergency call, you
will have to initiate rescue measures yourself.
Placing a “911” emergency call using
COMAND with the mobile phone
unlocked X
Press button S to switch to telephone
mode.
X Enter 911 using the telephone keypad in
the center console.
X Press button 6 on the telephone
keypad in the center console.
or
X Select 6 in the COMAND display and
press W for dialing to begin.
Connecting call… appears in the
COMAND display while the mobile phone
establishes the connection.
X Wait until the emergency call center
answers, then describe the emergency.
i Depending on the phone type, if no SIM
card is inserted in a GSM mobile phone or
if there is no service on a CDMA mobile
phone, NO SERVICE may appear in the
COMAND display. In that case, you only can
make an emergency call on the mobile
phone itself, without the use of COMAND. Placing a “911” emergency call with the
mobile phone locked i
If the mobile phone is locked, you only can
make an emergency call on the mobile
phone itself, without the use of COMAND. Bluetooth interface
Bluetooth ®
is a technology for wireless
exchange of data over short distances of up
to approximately 33 feet (10 m). You can
connect your mobile phone to COMAND or
exchange vCards using Bluetooth ®
.
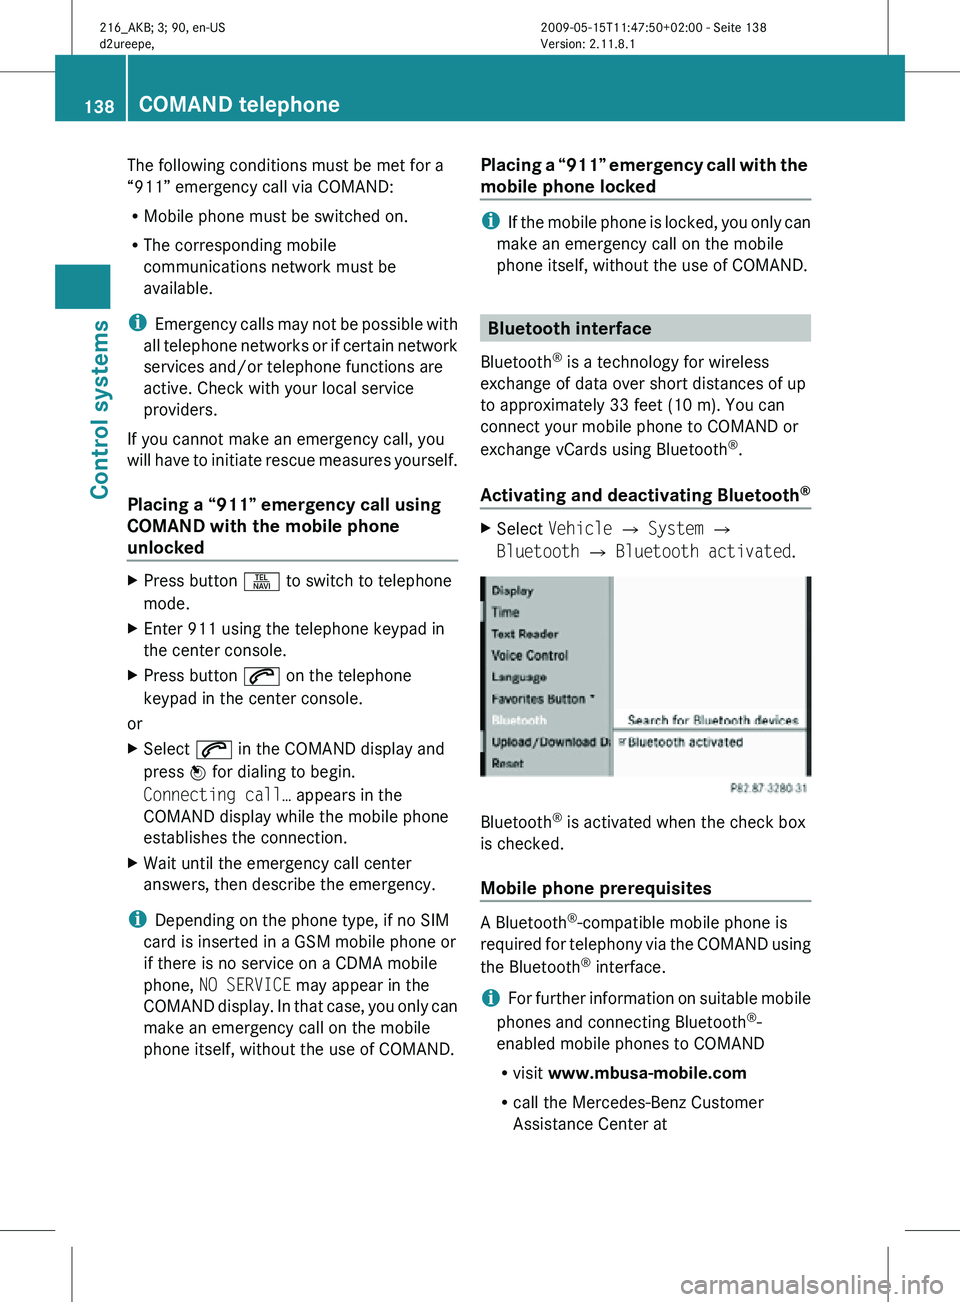
Activating and deactivating Bluetooth ® X
Select Vehicle Q System Q
Bluetooth Q Bluetooth activated. Bluetooth
®
is activated when the check box
is checked.
Mobile phone prerequisites A Bluetooth
®
-compatible mobile phone is
required for telephony via the COMAND using
the Bluetooth ®
interface.
i For further information on suitable mobile
phones and connecting Bluetooth ®
-
enabled mobile phones to COMAND
R visit www.mbusa-mobile.com
R call the Mercedes-Benz Customer
Assistance Center at 138
COMAND telephoneControl systems
216_AKB; 3; 90, en-US
d2ureepe,
Version: 2.11.8.1 2009-05-15T11:47:50+02:00 - Seite 138
Page 142 of 500
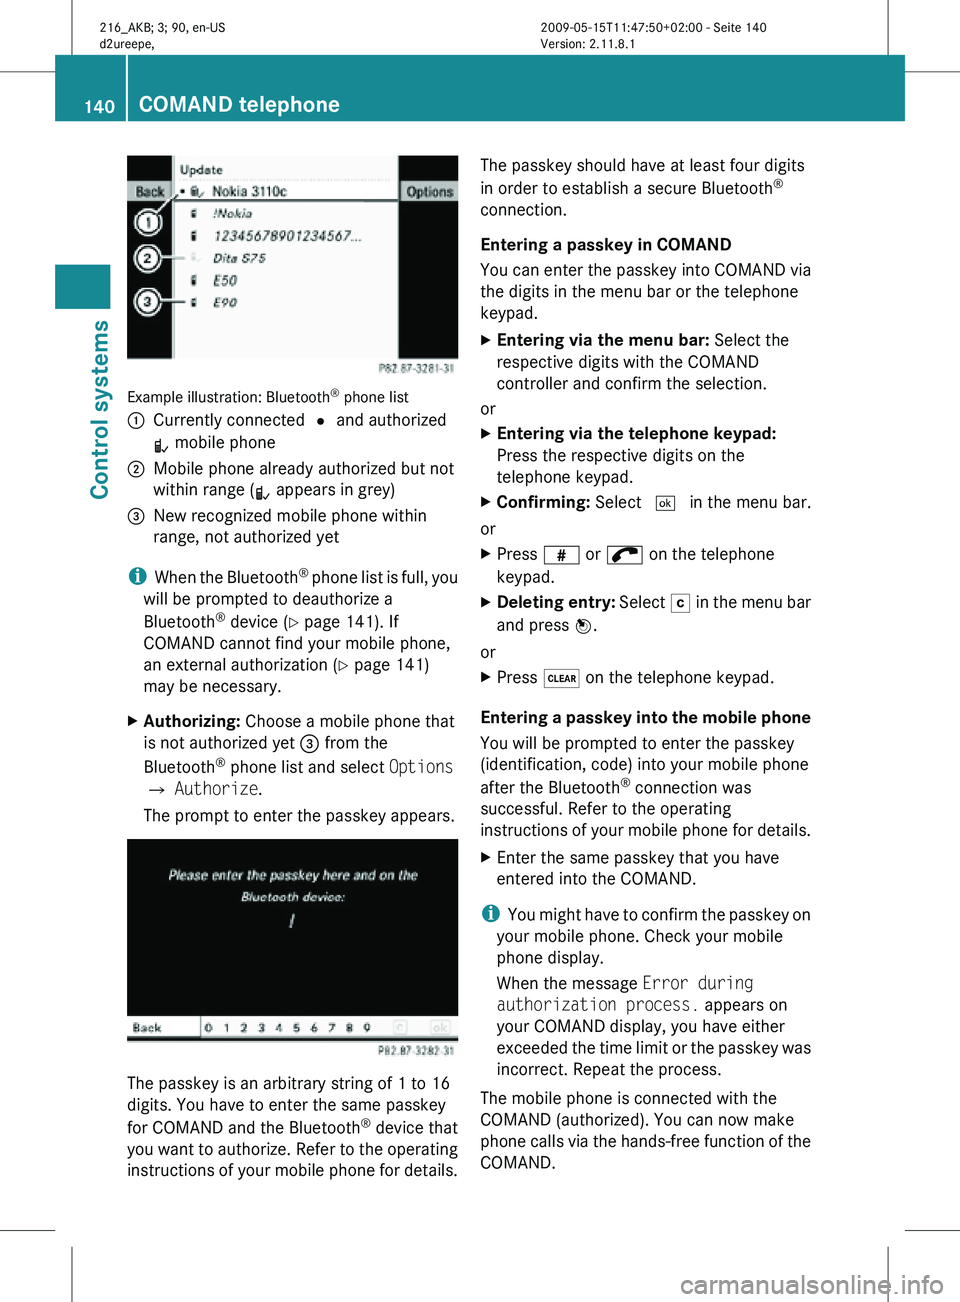
Example illustration: Bluetooth
®
phone list
: Currently connected # and authorized
L mobile phone
; Mobile phone already authorized but not
within range (L appears in grey)
= New recognized mobile phone within
range, not authorized yet
i When the Bluetooth ®
phone list is full, you
will be prompted to deauthorize a
Bluetooth ®
device ( Y page 141). If
COMAND cannot find your mobile phone,
an external authorization (Y page 141)
may be necessary.
X Authorizing: Choose a mobile phone that
is not authorized yet = from the
Bluetooth ®
phone list and select Options
Q Authorize.
The prompt to enter the passkey appears. The passkey is an arbitrary string of 1 to 16
digits. You have to enter the same passkey
for COMAND and the Bluetooth
®
device that
you want to authorize. Refer to the operating
instructions of your mobile phone for details. The passkey should have at least four digits
in order to establish a secure Bluetooth
®
connection.
Entering a passkey in COMAND
You can enter the passkey into COMAND via
the digits in the menu bar or the telephone
keypad.
X Entering via the menu bar: Select the
respective digits with the COMAND
controller and confirm the selection.
or
X Entering via the telephone keypad:
Press the respective digits on the
telephone keypad.
X Confirming: Select ¬ in the menu bar.
or
X Press z or ; on the telephone
keypad.
X Deleting entry: Select F in the menu bar
and press W.
or
X Press $ on the telephone keypad.
Entering a passkey into the mobile phone
You will be prompted to enter the passkey
(identification, code) into your mobile phone
after the Bluetooth ®
connection was
successful. Refer to the operating
instructions of your mobile phone for details.
X Enter the same passkey that you have
entered into the COMAND.
i You might have to confirm the passkey on
your mobile phone. Check your mobile
phone display.
When the message Error during
authorization process. appears on
your COMAND display, you have either
exceeded the time limit or the passkey was
incorrect. Repeat the process.
The mobile phone is connected with the
COMAND (authorized). You can now make
phone calls via the hands-free function of the
COMAND. 140
COMAND telephoneControl systems
216_AKB; 3; 90, en-US
d2ureepe,
Version: 2.11.8.1 2009-05-15T11:47:50+02:00 - Seite 140
Page 143 of 500
External authorization
Certain security settings in your mobile
phone may prevent COMAND from finding
your mobile phone. In this case, you might
want to check if your mobile phone can
recognize the COMAND. The Bluetooth
®
device name of COMAND is MB Bluetooth.
X Select Data/Connections Q
Bluetooth Telephones.
X Go to Update and select Options Q
External Authorization.
X Activate the Bluetooth ®
search on the
mobile phone. Refer to mobile phone
operating instructions for detail.
X Select MB Bluetooth
on the mobile phone.
X When prompted, enter the passkey into
COMAND and the mobile phone
(Y page 140).
Show details
Details can be displayed for each mobile
phone in the Bluetooth ®
phone list.
X Select Data/Connections Q
Bluetooth Telephones.
X Choose the mobile phone from the list and
select Options Q Details.
The following
mobile phone details appear:
R Bluetooth ®
name
R Bluetooth ®
address
R Availability status
R Authorization
R Bluetooth ®
Class (mobile phone,
notebook, etc.)
X Closing detail display: Slide XVY. Deauthorizing the mobile phone
X
Select Data/Connections Q
Bluetooth Telephones.
X Choose the mobile phone from the list and
select Options Q De-authorize.
You will be asked whether you want to
deauthorize the device.
X Select Yes.
i You should delete the device name MB
Bluetooth from the Bluetooth ®
list of the
mobile phone before authorizing that
mobile phone again.
Connecting another mobile phone
You can switch between several mobile
phones that you have authorized.
i Switching to another authorized mobile
phone is
only possible while no phone calls
are being made.
X Select Data/Connections Q
Bluetooth Telephones.
X Select the mobile phone from the
Bluetooth ®
phone list.
X Confirm the selection.
The selected mobile phone is connected
provided it is within Bluetooth ®
range and
Bluetooth ®
is activated on the respective
device.
You can
only connect one mobile phone at
a time. The currently connected mobile
phone is indicated by a dot # in the
Bluetooth ®
phone list ( Y page 140).
Main telephone menu When the connected mobile phone is ready,
the following display appears: COMAND telephone
141
Control systems
216_AKB; 3; 90, en-US
d2ureepe, Version: 2.11.8.1 2009-05-15T11:47:50+02:00 - Seite 141 Z