lock MERCEDES-BENZ CL CLASS 2013 Owners Manual
[x] Cancel search | Manufacturer: MERCEDES-BENZ, Model Year: 2013, Model line: CL CLASS, Model: MERCEDES-BENZ CL CLASS 2013Pages: 496, PDF Size: 7.5 MB
Page 407 of 496
Rear window roller sunblind
Important safety notesGWARNING
When leaving the vehicle, always remove the
SmartKey from the ignition lock. Always take
the SmartKey with you and lock the vehicle.
Do not leave children unattended in the
vehicle, even if they are secured in a child
restraint system, or with access to an
unlocked vehicle. A child's unsupervised
access to a vehicle could result in an accident
and/or serious personal injury. The children
could:
R injure themselves on parts of the vehicle
R be seriously or fatally injured through
excessive exposure to extreme heat or cold
R injure themselves or cause an accident with
vehicle equipment that can be operated
even if the SmartKey is removed from the
ignition lock or removed from the vehicle,
such as seat adjustment, steering wheel
adjustment, or the memory function
If children open a door, they could injure other
persons or get out of the vehicle and injure
themselves or be injured by following traffic.
Do not expose the child restraint system to
direct sunlight. The child restraint system's
metal parts, for example, could become very
hot, and the child could be burned on these
parts.
GWARNING
When adjusting a roller sunblind, the roller
blind moves up or down. You might become
trapped in the process.
In the event of danger, briefly press the button
for the roller sunblind to change the roller
blind's direction of movement.
Extending/retracting the roller
sunblind
! Make sure that the roller sunblind can
move freely. Otherwise, the roller sunblind
or other objects could be damaged.
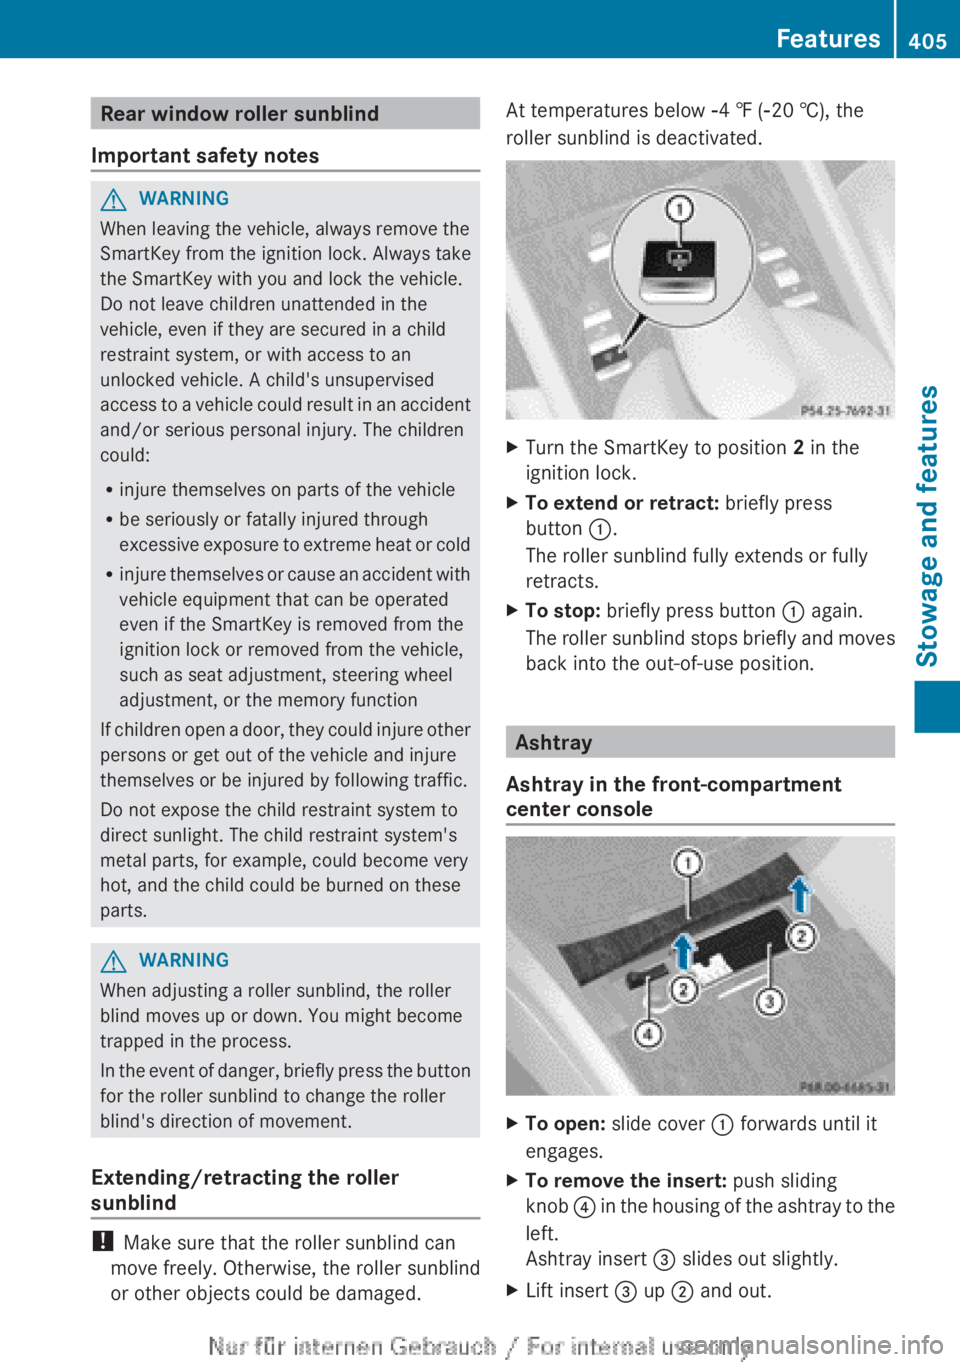
At temperatures below Ò4 ‡ ( Ò20 †), the
roller sunblind is deactivated.XTurn the SmartKey to position 2 in the
ignition lock.XTo extend or retract: briefly press
button :.
The roller sunblind fully extends or fully
retracts.XTo stop: briefly press button : again.
The roller sunblind stops briefly and moves
back into the out-of-use position.
Ashtray
Ashtray in the front-compartment
center console
XTo open: slide cover : forwards until it
engages.XTo remove the insert: push sliding
knob ? in the housing of the ashtray to the
left.
Ashtray insert = slides out slightly.XLift insert = up ; and out.Features405Stowage and featuresZ
Page 408 of 496
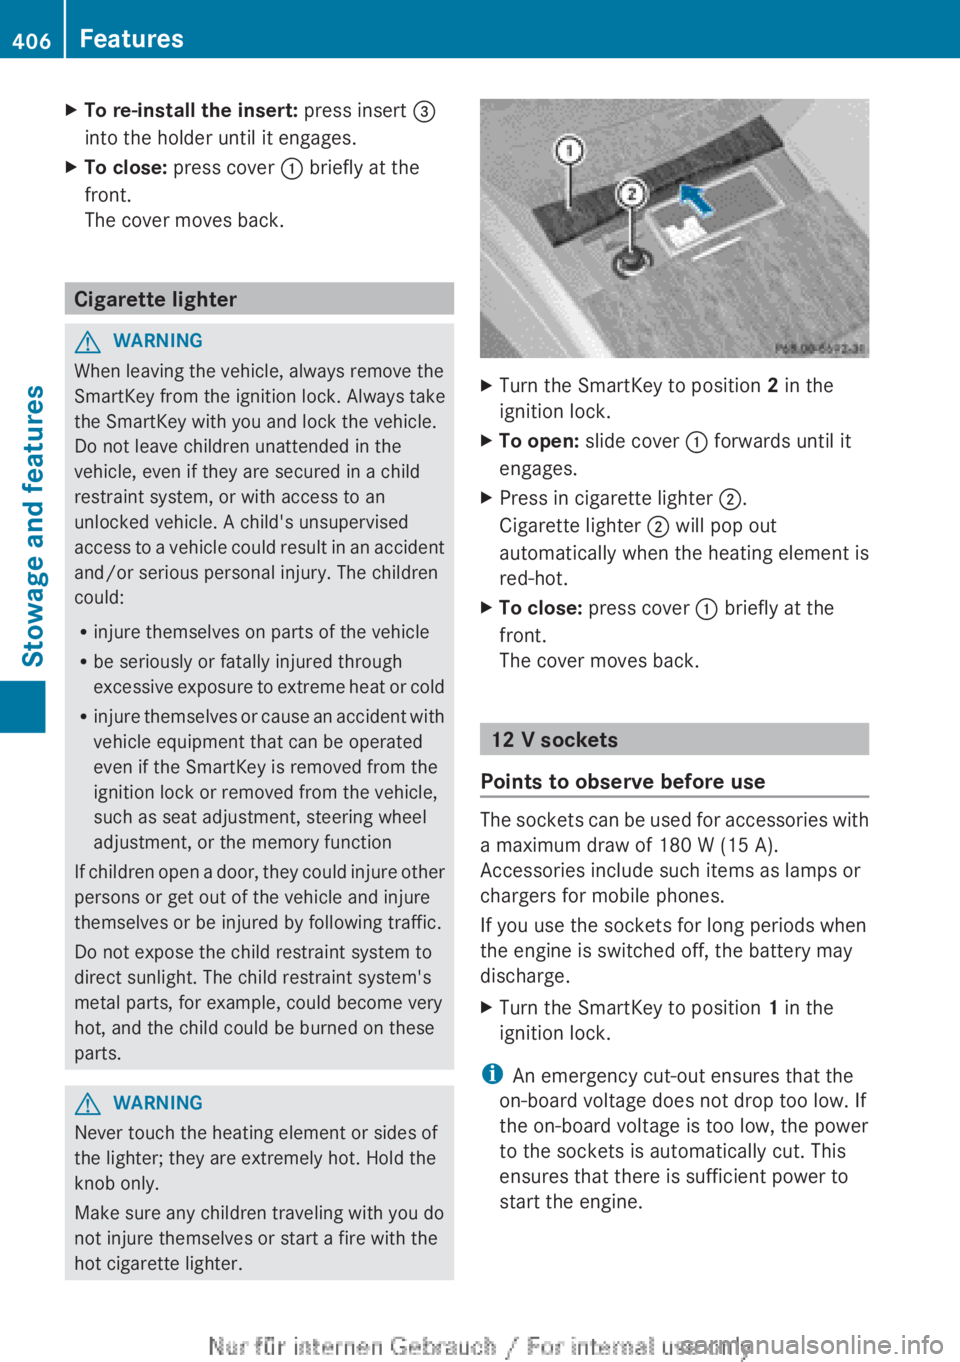
XTo re-install the insert: press insert =
into the holder until it engages.XTo close: press cover : briefly at the
front.
The cover moves back.
Cigarette lighter
GWARNING
When leaving the vehicle, always remove the
SmartKey from the ignition lock. Always take
the SmartKey with you and lock the vehicle.
Do not leave children unattended in the
vehicle, even if they are secured in a child
restraint system, or with access to an
unlocked vehicle. A child's unsupervised
access to a vehicle could result in an accident
and/or serious personal injury. The children
could:
R injure themselves on parts of the vehicle
R be seriously or fatally injured through
excessive exposure to extreme heat or cold
R injure themselves or cause an accident with
vehicle equipment that can be operated
even if the SmartKey is removed from the
ignition lock or removed from the vehicle,
such as seat adjustment, steering wheel
adjustment, or the memory function
If children open a door, they could injure other
persons or get out of the vehicle and injure
themselves or be injured by following traffic.
Do not expose the child restraint system to
direct sunlight. The child restraint system's
metal parts, for example, could become very
hot, and the child could be burned on these
parts.
GWARNING
Never touch the heating element or sides of
the lighter; they are extremely hot. Hold the
knob only.
Make sure any children traveling with you do
not injure themselves or start a fire with the
hot cigarette lighter.
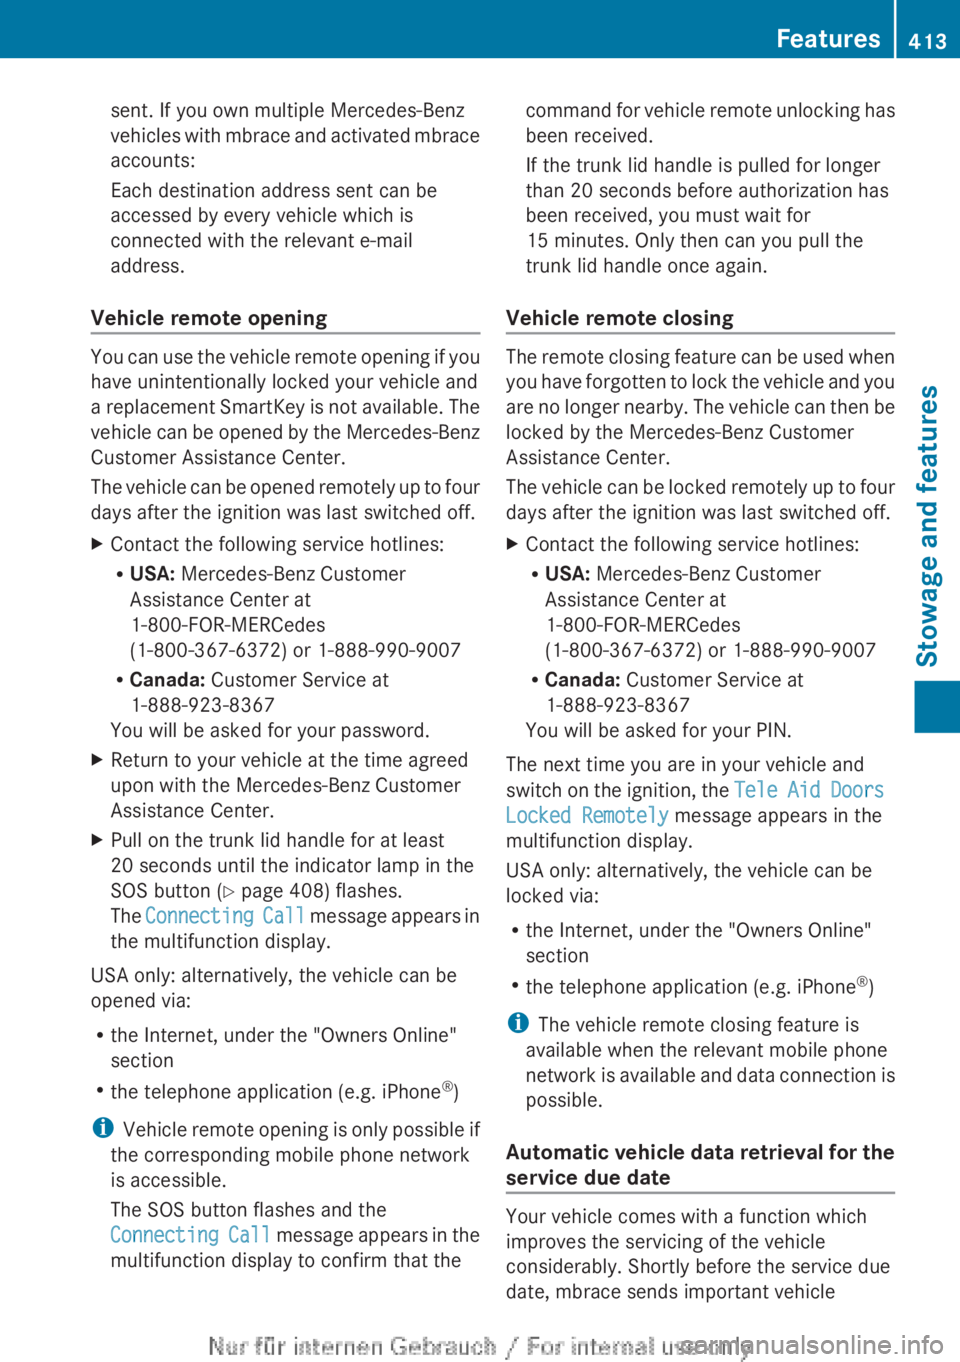
XTurn the SmartKey to position 2 in the
ignition lock.XTo open: slide cover : forwards until it
engages.XPress in cigarette lighter ;.
Cigarette lighter ; will pop out
automatically when the heating element is
red-hot.XTo close: press cover : briefly at the
front.
The cover moves back.
12 V sockets
Points to observe before use
The sockets can be used for accessories with
a maximum draw of 180 W (15 A).
Accessories include such items as lamps or
chargers for mobile phones.
If you use the sockets for long periods when
the engine is switched off, the battery may
discharge.
XTurn the SmartKey to position 1 in the
ignition lock.
i An emergency cut-out ensures that the
on-board voltage does not drop too low. If
the on-board voltage is too low, the power
to the sockets is automatically cut. This
ensures that there is sufficient power to
start the engine.
406FeaturesStowage and features
Page 415 of 496
sent. If you own multiple Mercedes-Benz
vehicles with mbrace and activated mbrace
accounts:
Each destination address sent can be
accessed by every vehicle which is
connected with the relevant e-mail
address.
Vehicle remote opening
You can use the vehicle remote opening if you
have unintentionally locked your vehicle and
a replacement SmartKey is not available. The
vehicle can be opened by the Mercedes-Benz
Customer Assistance Center.
The vehicle can be opened remotely up to four
days after the ignition was last switched off.
XContact the following service hotlines:
R USA: Mercedes-Benz Customer
Assistance Center at
1-800-FOR-MERCedes
(1-800-367-6372) or 1-888-990-9007
R Canada: Customer Service at
1-888-923-8367
You will be asked for your password.XReturn to your vehicle at the time agreed
upon with the Mercedes-Benz Customer
Assistance Center.XPull on the trunk lid handle for at least
20 seconds until the indicator lamp in the
SOS button ( Y page 408) flashes.
The Connecting Call message appears in
the multifunction display.
USA only: alternatively, the vehicle can be
opened via:
R the Internet, under the "Owners Online"
section
R the telephone application (e.g. iPhone ®
)
i Vehicle remote opening is only possible if
the corresponding mobile phone network
is accessible.
The SOS button flashes and the
Connecting Call message appears in the
multifunction display to confirm that the
command for vehicle remote unlocking has
been received.
If the trunk lid handle is pulled for longer
than 20 seconds before authorization has
been received, you must wait for
15 minutes. Only then can you pull the
trunk lid handle once again.
Vehicle remote closing
The remote closing feature can be used when
you have forgotten to lock the vehicle and you
are no longer nearby. The vehicle can then be
locked by the Mercedes-Benz Customer
Assistance Center.
The vehicle can be locked remotely up to four
days after the ignition was last switched off.
XContact the following service hotlines:
R USA: Mercedes-Benz Customer
Assistance Center at
1-800-FOR-MERCedes
(1-800-367-6372) or 1-888-990-9007
R Canada: Customer Service at
1-888-923-8367
You will be asked for your PIN.
The next time you are in your vehicle and
switch on the ignition, the Tele Aid Doors
Locked Remotely message appears in the
multifunction display.
USA only: alternatively, the vehicle can be
locked via:
R the Internet, under the "Owners Online"
section
R the telephone application (e.g. iPhone ®
)
i The vehicle remote closing feature is
available when the relevant mobile phone
network is available and data connection is
possible.
Automatic vehicle data retrieval for the
service due date
Your vehicle comes with a function which
improves the servicing of the vehicle
considerably. Shortly before the service due
date, mbrace sends important vehicle
Features413Stowage and featuresZ
Page 417 of 496
iNotes on the declaration of conformity .
USA: FCC ID: CB2HMIHL4
Canada: IC: 279B-HMIHL4
Programming the integrated garage
door opener on the rear-view mirror
Programming buttons
Observe the "Important safety notes"
( Y page 414).
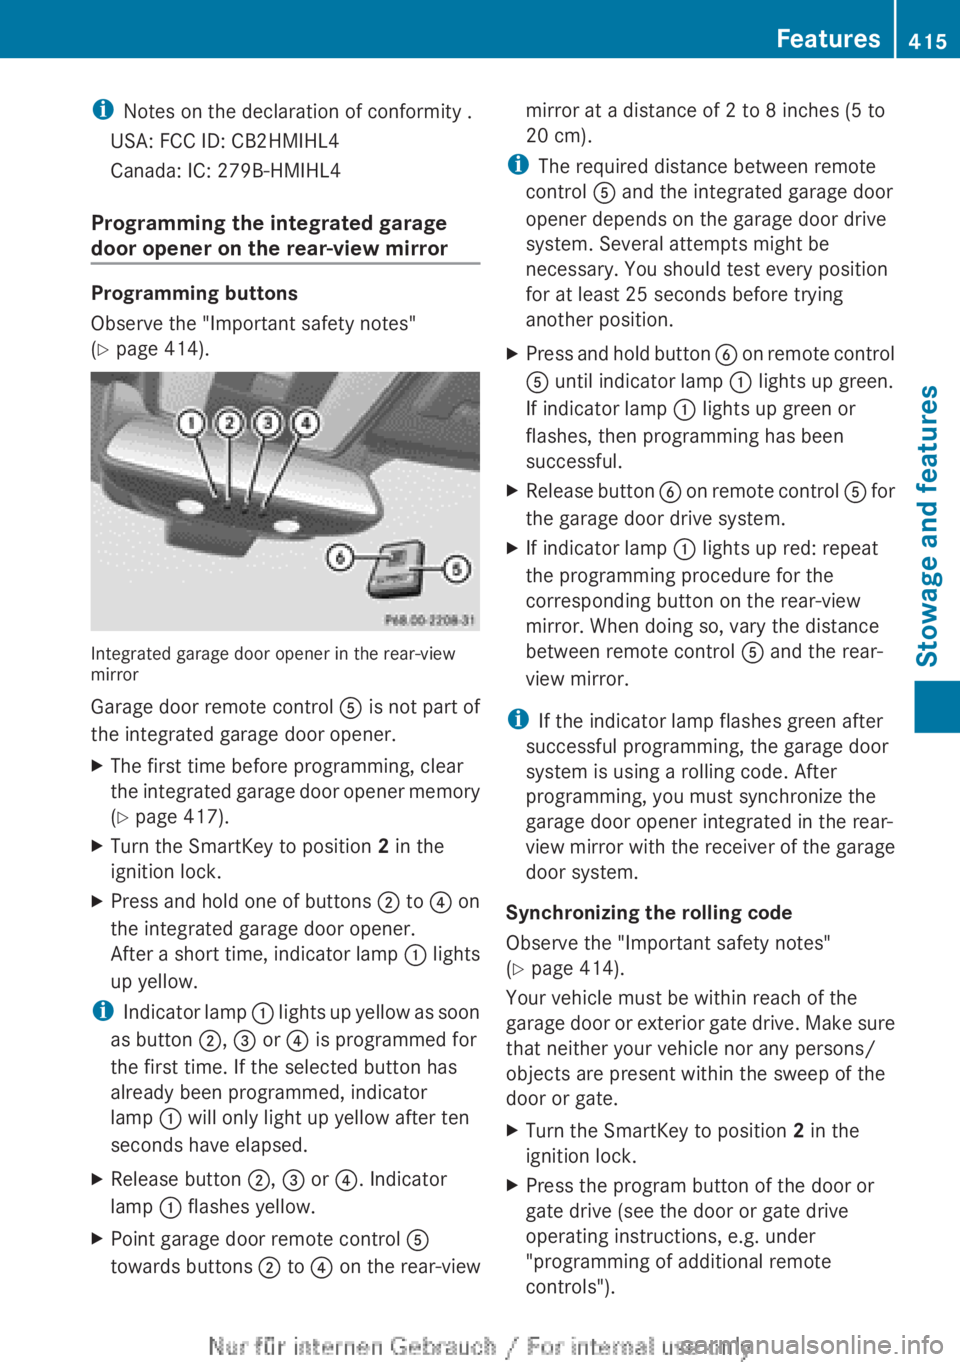
Integrated garage door opener in the rear-view
mirror
Garage door remote control A is not part of
the integrated garage door opener.
XThe first time before programming, clear
the integrated garage door opener memory
( Y page 417).XTurn the SmartKey to position 2 in the
ignition lock.XPress and hold one of buttons ; to ? on
the integrated garage door opener.
After a short time, indicator lamp : lights
up yellow.
i Indicator lamp : lights up yellow as soon
as button ;, = or ? is programmed for
the first time. If the selected button has
already been programmed, indicator
lamp : will only light up yellow after ten
seconds have elapsed.
XRelease button ;, = or ?. Indicator
lamp : flashes yellow.XPoint garage door remote control A
towards buttons ; to ? on the rear-viewmirror at a distance of 2 to 8 inches (5 to
20 cm).
i The required distance between remote
control A and the integrated garage door
opener depends on the garage door drive
system. Several attempts might be
necessary. You should test every position
for at least 25 seconds before trying
another position.
XPress and hold button B on remote control
A until indicator lamp : lights up green.
If indicator lamp : lights up green or
flashes, then programming has been
successful.XRelease button B on remote control A for
the garage door drive system.XIf indicator lamp : lights up red: repeat
the programming procedure for the
corresponding button on the rear-view
mirror. When doing so, vary the distance
between remote control A and the rear-
view mirror.
i If the indicator lamp flashes green after
successful programming, the garage door
system is using a rolling code. After
programming, you must synchronize the
garage door opener integrated in the rear-
view mirror with the receiver of the garage
door system.
Synchronizing the rolling code
Observe the "Important safety notes"
( Y page 414).
Your vehicle must be within reach of the
garage door or exterior gate drive. Make sure
that neither your vehicle nor any persons/
objects are present within the sweep of the
door or gate.
XTurn the SmartKey to position 2 in the
ignition lock.XPress the program button of the door or
gate drive (see the door or gate drive
operating instructions, e.g. under
"programming of additional remote
controls").Features415Stowage and featuresZ
Page 419 of 496
Please also read the operating instructions
for the garage door system.XTurn the SmartKey to position 2 in the
ignition lock.XPress button ;, = or ? which you have
programmed to operate the garage door.
Garage door system with a fixed code:
indicator lamp : lights up green.
Garage door system with a rolling code:
indicator lamp : flashes green.
i
The transmitter will transmit a signal as
long as the button is pressed. The
transmission is halted after a maximum of
ten seconds and indicator lamp : lights
up yellow. Press button ;, = or ? again
if necessary.
Clearing the memory of the integrated
garage door opener on the rear-view
mirror
XTurn the SmartKey to position 2 in the
ignition lock.XPress buttons ; and ?.
The indicator lamp lights up yellow.XPress and hold buttons ; and ? until the
indicator lamp turns green.
i Make sure that you clear the memory of
the integrated garage door opener before
selling the vehicle.
Floormat on the driver's side
GWARNING
Whenever you are using a floormat, make sure
there is enough clearance and that the
floormat is securely fastened.
The floormat should always be securely
fastened using the fastening equipment.
Before driving off, check that the floormat is
securely in place and adjust it if necessary. A
loose floormat could slip and hinder proper
functioning of the pedals.
Do not place several floormats on top of each
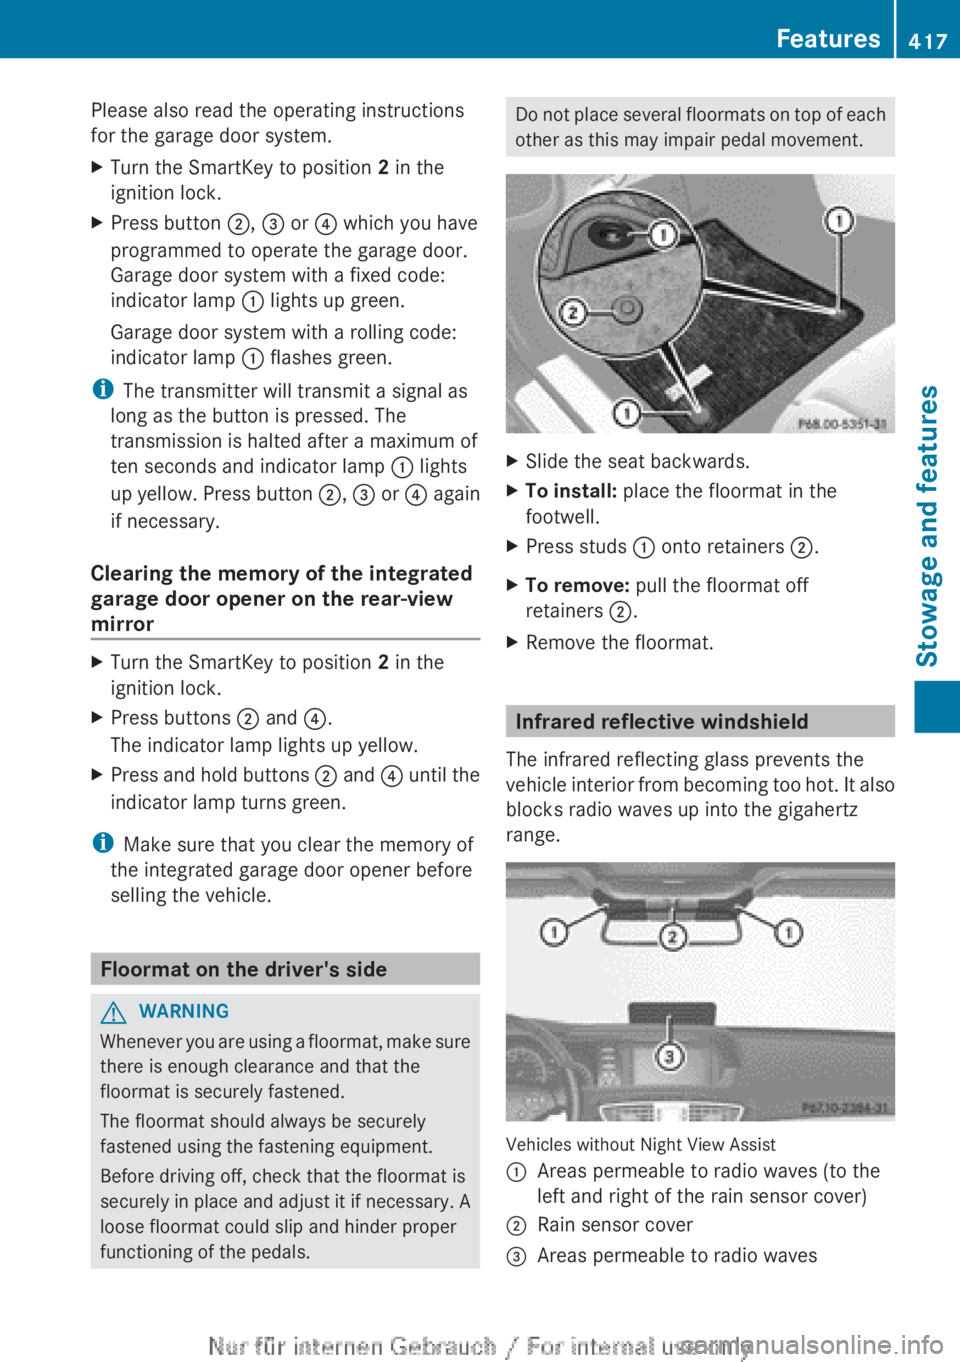
other as this may impair pedal movement.XSlide the seat backwards.XTo install: place the floormat in the
footwell.XPress studs : onto retainers ;.XTo remove: pull the floormat off
retainers ;.XRemove the floormat.
Infrared reflective windshield
The infrared reflecting glass prevents the
vehicle interior from becoming too hot. It also
blocks radio waves up into the gigahertz
range.
Vehicles without Night View Assist
:Areas permeable to radio waves (to the
left and right of the rain sensor cover);Rain sensor cover=Areas permeable to radio wavesFeatures417Stowage and featuresZ
Page 424 of 496

XSlowly slide oil dipstick : into the guide
tube to the stop, and take it out again.
If the level is between MIN mark = and
MAX mark ;, the oil level is correct.XIf the oil level has dropped to MIN mark
= or below, add 1.1 US qt (1.0 liter) of
engine oil.
Checking the oil level using the on-
board computer
Measurement
XMake sure that the SmartKey is in position
2 in the ignition lock.XPress the ; or = button to select the
Service menu.XPress the : or 9 button to select
Engine Oil Level .XPress the a button.
The multifunction display shows the
following message: Measuring Engine
Oil Level Accurate Only When
Vehicle Is Level
i If you wish to cancel the measurement,
press the % button on the multifunction
steering wheel.
422Engine compartmentMaintenance and care
Page 425 of 496

Display messages
The measurement takes a few seconds. You will see one of the following messages in the
multifunction display:ProblemPossible causes/consequences and M SolutionsEngine Oil Level OKThe oil level is correct.Add 1.0 l Engine
Oil At Next
Refueling .The oil level is too low.Xadd 1.0 l of engine oil.Add 1.5 l Engine
Oil At Next
Refueling .The oil level is too low.Xadd 1.5 l of engine oil.Add 2.0 l Engine
Oil At Next
Refueling .The oil level is too low.Xadd 2.0 l of engine oil.Engine Oil Level
Reduce Oil LevelThe engine oil level is too high.XHave excess engine oil siphoned off.For Engine Oil
Level Ignition
Must be OnThe ignition is switched off.XTurn the SmartKey to position 2 in the ignition lock.Need More Time to
Check Engine Oil
LevelThe required waiting period was not observed.XIf the engine is at normal operating temperature: repeat the
measurement after about five minutes.
If the engine is not at normal operating temperature (e.g. if the
engine was only started briefly): repeat the measurement after
about 30 minutes.Engine Oil Level
Not When Engine OnThe engine is running; oil level measurement is not possible.XSwitch off the engine.XIf the engine is at normal operating temperature: wait about five
minutes before carrying out the measurement.
If the engine is not at normal operating temperature, e.g. if the
engine was only started briefly: wait approximately
30 minutes before carrying out the measurement.Adding engine oilGWARNING
If engine oil comes into contact with hot
engine parts, it may ignite and you could burn
yourself. Do not spill any engine oil on hot
engine parts.
HEnvironmental note
When adding oil, take care not to spill any. If
oil enters the soil or waterways, it is harmful
to the environment.
! Only use engine oils and oil filters that
have been approved for vehicles with a
Engine compartment423Maintenance and careZ
Page 426 of 496
service system. You can obtain a list of the
engine oils and oil filters tested and
approved in accordance with the
Mercedes-Benz Specifications for Service
Products at any Mercedes-Benz Service
center.
Damage to the engine or exhaust system is
caused by the following:
R using engine oils and oil filters that have
not been specifically approved for the
service system
R replacing engine oil and oil filters after
the interval for replacement specified by
the service system has been exceeded
R using engine oil additives.
! Do not add too much oil. adding too much
engine oil can result in damage to the
engine or to the catalytic converter. Have
excess engine oil siphoned off.
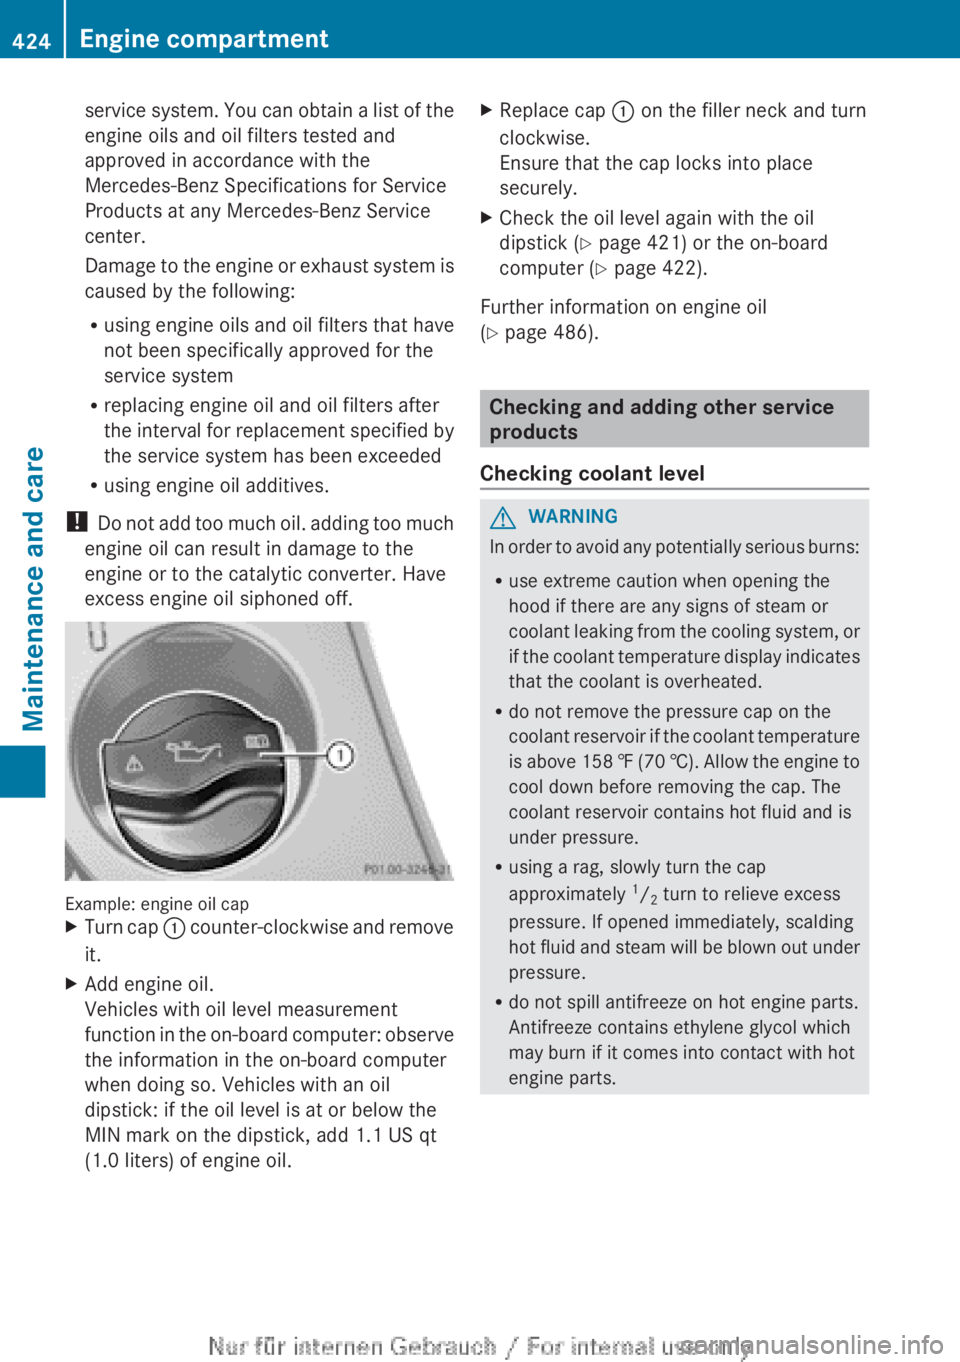
Example: engine oil cap
XTurn cap : counter-clockwise and remove
it.XAdd engine oil.
Vehicles with oil level measurement
function in the on-board computer: observe
the information in the on-board computer
when doing so. Vehicles with an oil
dipstick: if the oil level is at or below the
MIN mark on the dipstick, add 1.1 US qt
(1.0 liters) of engine oil.XReplace cap : on the filler neck and turn
clockwise.
Ensure that the cap locks into place
securely.XCheck the oil level again with the oil
dipstick ( Y page 421) or the on-board
computer ( Y page 422).
Further information on engine oil
( Y page 486).
Checking and adding other service
products
Checking coolant level
GWARNING
In order to avoid any potentially serious burns:
R use extreme caution when opening the
hood if there are any signs of steam or
coolant leaking from the cooling system, or
if the coolant temperature display indicates
that the coolant is overheated.
R do not remove the pressure cap on the
coolant reservoir if the coolant temperature
is above 158 ‡ (70 †). Allow the engine to
cool down before removing the cap. The
coolant reservoir contains hot fluid and is
under pressure.
R using a rag, slowly turn the cap
approximately 1
/ 2 turn to relieve excess
pressure. If opened immediately, scalding
hot fluid and steam will be blown out under
pressure.
R do not spill antifreeze on hot engine parts.
Antifreeze contains ethylene glycol which
may burn if it comes into contact with hot
engine parts.
424Engine compartmentMaintenance and care
Page 427 of 496

XPark the vehicle on a level surface.
Only check the coolant level when the
vehicle is on a level surface and the engine
has cooled down.XTurn the SmartKey to position 2 in the
ignition lock ( Y page 273).
On vehicles with KEYLESS-GO, press the
Start/Stop button twice ( Y page 273).XCheck the coolant temperature display in
the instrument cluster.
The coolant temperature must be below
158 ‡ (70 †).XTurn the SmartKey to position
0 (Y page 273) in the ignition lock.XSlowly turn cap : half a turn counter-
clockwise to allow excess pressure to
escape.XTurn cap : further counter-clockwise and
remove it.
If the coolant is at the level of marker bar
= in the filler neck when cold, there is
enough coolant in coolant expansion
tank ;.
If the coolant level is approximately 0.6 in
(1.5 cm) above marker bar = in the filler
neck when warm, there is enough coolant
in coolant expansion tank ;.XIf necessary, add coolant that has been
tested and approved by Mercedes-Benz.XReplace cap : and turn it clockwise as far
as it will go.
For further information on coolant, see
( Y page 487).
Adding washer fluid to the windshield
washer system/headlamp cleaning
systemGWARNING
Washer solvent/antifreeze is highly
flammable. Do not spill washer solvent/
antifreeze on hot engine parts, because it may
ignite and burn. You could be seriously
burned.
XTo open: pull cap : upwards by the tab.XAdd the premixed washer fluid.XTo close: press cap : onto the filler neck
until it engages.
The washer fluid reservoir is used for both the
windshield washer system and the headlamp
cleaning system.
Further information on windshield washer
fluid/antifreeze ( Y page 488).
Brake fluid level
! If the brake fluid level in the brake fluid
reservoir has fallen to the MIN mark or
below, check the brake system
immediately for leaks. Also check the
thickness of the brake linings. Visit a
qualified specialist workshop immediately.
Do not add brake fluid. This does not
correct the malfunction.
Only check the brake fluid level when the
vehicle is stationary and on a level surface.
Engine compartment425Maintenance and careZ
Page 429 of 496
Driving abroad
An extensive Mercedes-Benz Service network
is also available in other countries. You can
obtain further information from any
authorized Mercedes-Benz Center.
Care
Notes on care
Regular care of your vehicle is a condition for
retaining the quality in the long term.
Use care products and cleaning agents
recommended and approved by Mercedes-
Benz.
GWARNING
Many cleaning products can be hazardous.
Some are poisonous, others are flammable.
Always follow the instructions on the
particular container. Always open your
vehicle's doors or windows when cleaning the
inside.
Never use fluids or solvents that are not
designed for cleaning your vehicle.
Always lock away cleaning products and keep
them out of reach of children.
! For cleaning your vehicle, do not use any
of the following:
R dry, rough or hard cloths
R abrasive cleaning agents
R solvents
R cleaning agents containing solvents
Do not scrub.
Do not touch the surfaces or protective
films with hard objects, e.g. a ring or ice
scraper. You could otherwise scratch or
damage the surfaces and protective film.
HEnvironmental note
Dispose of empty packaging and cleaning
cloths in an environmentally responsible
manner.
! Do not park the vehicle for an extended
period straight after cleaning it, particularly
after having cleaned the wheels with wheel
cleaner. Wheel cleaners could cause
increased corrosion of the brake discs and
brake pads/linings. For this reason, you
should drive for a few minutes after
cleaning. Braking heats the brake discs and
the brake pads/linings, thus drying them.
The vehicle can then be parked.
Exterior care
Automatic car wash
GWARNING
Braking efficiency is reduced after washing
the vehicle. This could cause an accident. For
this reason, you must drive particularly
carefully after washing the vehicle until the
brakes have dried.
You can wash the vehicle in an automatic car
wash from the very start.
! It is preferable to use car washes with
adjustable 19
high-pressure precleaning. In
car washes that use high water pressures,
there is a risk that a small amount of water
may leak into the vehicle.
! Never clean your vehicle in a Touchless
Automatic Car Wash as these use special
cleaning agents. These cleaning agents can
damage the paintwork or plastic parts.
If the vehicle is very dirty, pre-wash it before
cleaning it in an automatic car wash.
! In car washes with a towing mechanism,
make sure that the automatic transmission
is in transmission position N, otherwise the
vehicle could be damaged.
R Vehicles with a SmartKey:
Do not remove the SmartKey from the
ignition lock. Do not open the driver's
door or front-passenger door when the
engine is switched off. Otherwise, the
19 Corresponds to the specification for the Cabriolet program.Care427Maintenance and careZ