buttons MERCEDES-BENZ CL CLASS 2013 Owner's Manual
[x] Cancel search | Manufacturer: MERCEDES-BENZ, Model Year: 2013, Model line: CL CLASS, Model: MERCEDES-BENZ CL CLASS 2013Pages: 496, PDF Size: 7.5 MB
Page 410 of 496

To adjust the volume during an mbrace call,
proceed as follows:XPress the W or X button on the
multifunction steering wheel.
or
XUse the H volume controller of
COMAND ( Y page 113).
You can find further information and a
description of all available features under
"Owners Online" at http://
www.mbusa.com 17
.
System self-test
After you have switched on the ignition, the
system carries out a self-diagnosis.
A malfunction in the system has been
detected if one of the following occurs:
R the indicator lamp in the SOS button does
not come on during the system self-test.
R the indicator lamp in the º Roadside
Assistance button does not light up during
self-diagnosis of the system.
R the indicator lamp in the E MB-Info call
button does not light up during self-
diagnosis of the system.
R the indicator lamp in one or more of the
following buttons continues to light up red
after the system self-diagnosis:
- SOS button
- the º Roadside Assistance call
button
- the E MB Info call button
R the Tele Aid Inoperative or Tele Aid
Not Activated message appears in the
multifunction display after the system self-
diagnosis.
If a malfunction is indicated as outlined
above, the system may not operate as
expected. In the event of an emergency,
assistance must be summoned by other
means.
Have the system checked at the nearest
authorized Mercedes-Benz Center or contact
the following service hotlines:
R USA: Mercedes-Benz Customer Assistance
Center at
1-800-FOR-MERCedes (1-800-367-6372)
or 1-888-990-9007
R Canada: Customer Service at
1-888-923-8367
Emergency call
Important safety notes
! You must have a license agreement to
activate the mbrace service. Ensure that
your system is activated and ready for use,
and press the E MB Info call button to
register. If one of these steps is not carried
out, it may not be possible to activate the
system.
If you have questions about the activation,
contact one of the following telephone
hotlines:
R USA: Mercedes-Benz Customer
Assistance Center at
1-800-FOR-MERCedes
(1-800-367-6372) or 1-888-990-9007
R Canada: Customer Service at
1-888-923-8367
An emergency call is dialed automatically if
an air bag or Emergency Tensioning Device is
triggered.
i You cannot end an automatically
triggered emergency call yourself.
An emergency call can also be initiated
manually.
As soon as the emergency call has been
initiated, the indicator lamp in the SOS button
flashes. The Connecting Call message
appears on the multifunction display.
Emergency Call Activated is shown in the
COMAND display. The audio system is muted.
17 USA only.408FeaturesStowage and features
Page 417 of 496

iNotes on the declaration of conformity .
USA: FCC ID: CB2HMIHL4
Canada: IC: 279B-HMIHL4
Programming the integrated garage
door opener on the rear-view mirror
Programming buttons
Observe the "Important safety notes"
( Y page 414).
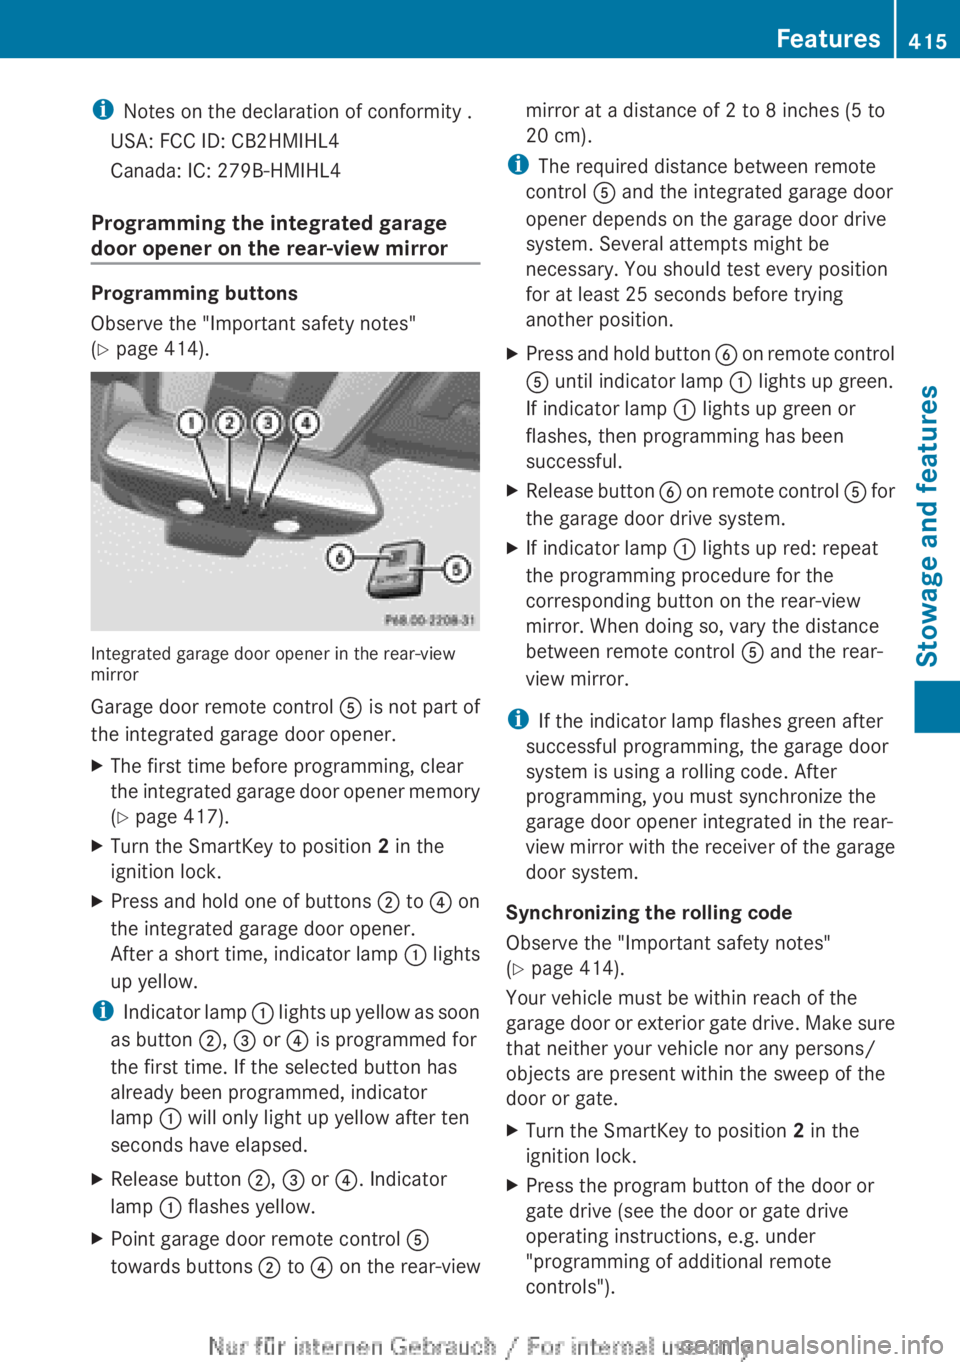
Integrated garage door opener in the rear-view
mirror
Garage door remote control A is not part of
the integrated garage door opener.
XThe first time before programming, clear
the integrated garage door opener memory
( Y page 417).XTurn the SmartKey to position 2 in the
ignition lock.XPress and hold one of buttons ; to ? on
the integrated garage door opener.
After a short time, indicator lamp : lights
up yellow.
i Indicator lamp : lights up yellow as soon
as button ;, = or ? is programmed for
the first time. If the selected button has
already been programmed, indicator
lamp : will only light up yellow after ten
seconds have elapsed.
XRelease button ;, = or ?. Indicator
lamp : flashes yellow.XPoint garage door remote control A
towards buttons ; to ? on the rear-viewmirror at a distance of 2 to 8 inches (5 to
20 cm).
i The required distance between remote
control A and the integrated garage door
opener depends on the garage door drive
system. Several attempts might be
necessary. You should test every position
for at least 25 seconds before trying
another position.
XPress and hold button B on remote control
A until indicator lamp : lights up green.
If indicator lamp : lights up green or
flashes, then programming has been
successful.XRelease button B on remote control A for
the garage door drive system.XIf indicator lamp : lights up red: repeat
the programming procedure for the
corresponding button on the rear-view
mirror. When doing so, vary the distance
between remote control A and the rear-
view mirror.
i If the indicator lamp flashes green after
successful programming, the garage door
system is using a rolling code. After
programming, you must synchronize the
garage door opener integrated in the rear-
view mirror with the receiver of the garage
door system.
Synchronizing the rolling code
Observe the "Important safety notes"
( Y page 414).
Your vehicle must be within reach of the
garage door or exterior gate drive. Make sure
that neither your vehicle nor any persons/
objects are present within the sweep of the
door or gate.
XTurn the SmartKey to position 2 in the
ignition lock.XPress the program button of the door or
gate drive (see the door or gate drive
operating instructions, e.g. under
"programming of additional remote
controls").Features415Stowage and featuresZ
Page 418 of 496

iUsually, you now have 30seconds to
initiate the next step.XPress previously programmed button ;,
= or ? of the integrated garage door
opener until the door closes.
The rolling code synchronization is then
complete.
Notes on programming the remote
control
Canadian radio frequency laws require a
"break" (or interruption) of the transmission
signals after broadcasting for a few seconds.
Therefore, these signals may not last long
enough for the integrated garage door
opener. The signal is not recognized during
programming. Comparable with Canadian
law, some U.S. garage door openers also
feature a "break".
Proceed as follows:
R if you live in Canada
R if you have difficulties programming the
garage door opener (regardless of where
you live) when using the programming
steps
XPress and hold one of buttons ; to ? on
the integrated garage door opener.
After a short time, indicator lamp : lights
up yellow.XRelease the button.
Indicator lamp : flashes yellow.XPress button B of garage door remote
control A for two seconds, then release it
for two seconds.XPress button B again for two seconds.XRepeat this sequence on button B of
remote control A until indicator lamp :
lights up green.
If indicator lamp : turns red, repeat the
process.XContinue with the other programming
steps (see above).Problems when programming
If you are experiencing problems
programming the integrated garage door
opener on the rear-view mirror, take note of
the following instructions:
R Check the transmitter frequency of garage
door drive remote control A. This can
usually be found on the back of the remote
control.
The integrated garage door opener is
compatible with devices that have units
which operate in the frequency range of
280to 433MHz.
R Replace the batteries in garage door
remote control A. This increases the
likelihood that garage door remote control
A will transmit a strong and precise signal
to the integrated garage door opener in the
rear-view mirror.
R When programming, hold remote control
A at varying distances and angles from the
button that you are programming. Try
various angles at a distance between 2and
12 inches ( 5to 30 cm) or at the same angle
but at varying distances.
R If another remote control for the same
garage door drive is available, repeat the
same programming steps with this remote
control. Before performing these steps,
make sure that new batteries have been
installed in garage door drive remote
control A.
R Note that some remote controls only
transmit for a limited amount of time (the
indicator lamp on the remote control goes
out). Press button B on remote control
A again before transmission ends.
R Align the antenna cable of the garage door
opener unit. This can improve signal
reception/transmission.
Opening/closing the garage door
After it has been programmed, the integrated
garage door opener performs the function of
the garage door system remote control.
416FeaturesStowage and features
Page 419 of 496

Please also read the operating instructions
for the garage door system.XTurn the SmartKey to position 2 in the
ignition lock.XPress button ;, = or ? which you have
programmed to operate the garage door.
Garage door system with a fixed code:
indicator lamp : lights up green.
Garage door system with a rolling code:
indicator lamp : flashes green.
i
The transmitter will transmit a signal as
long as the button is pressed. The
transmission is halted after a maximum of
ten seconds and indicator lamp : lights
up yellow. Press button ;, = or ? again
if necessary.
Clearing the memory of the integrated
garage door opener on the rear-view
mirror
XTurn the SmartKey to position 2 in the
ignition lock.XPress buttons ; and ?.
The indicator lamp lights up yellow.XPress and hold buttons ; and ? until the
indicator lamp turns green.
i Make sure that you clear the memory of
the integrated garage door opener before
selling the vehicle.
Floormat on the driver's side
GWARNING
Whenever you are using a floormat, make sure
there is enough clearance and that the
floormat is securely fastened.
The floormat should always be securely
fastened using the fastening equipment.
Before driving off, check that the floormat is
securely in place and adjust it if necessary. A
loose floormat could slip and hinder proper
functioning of the pedals.
Do not place several floormats on top of each
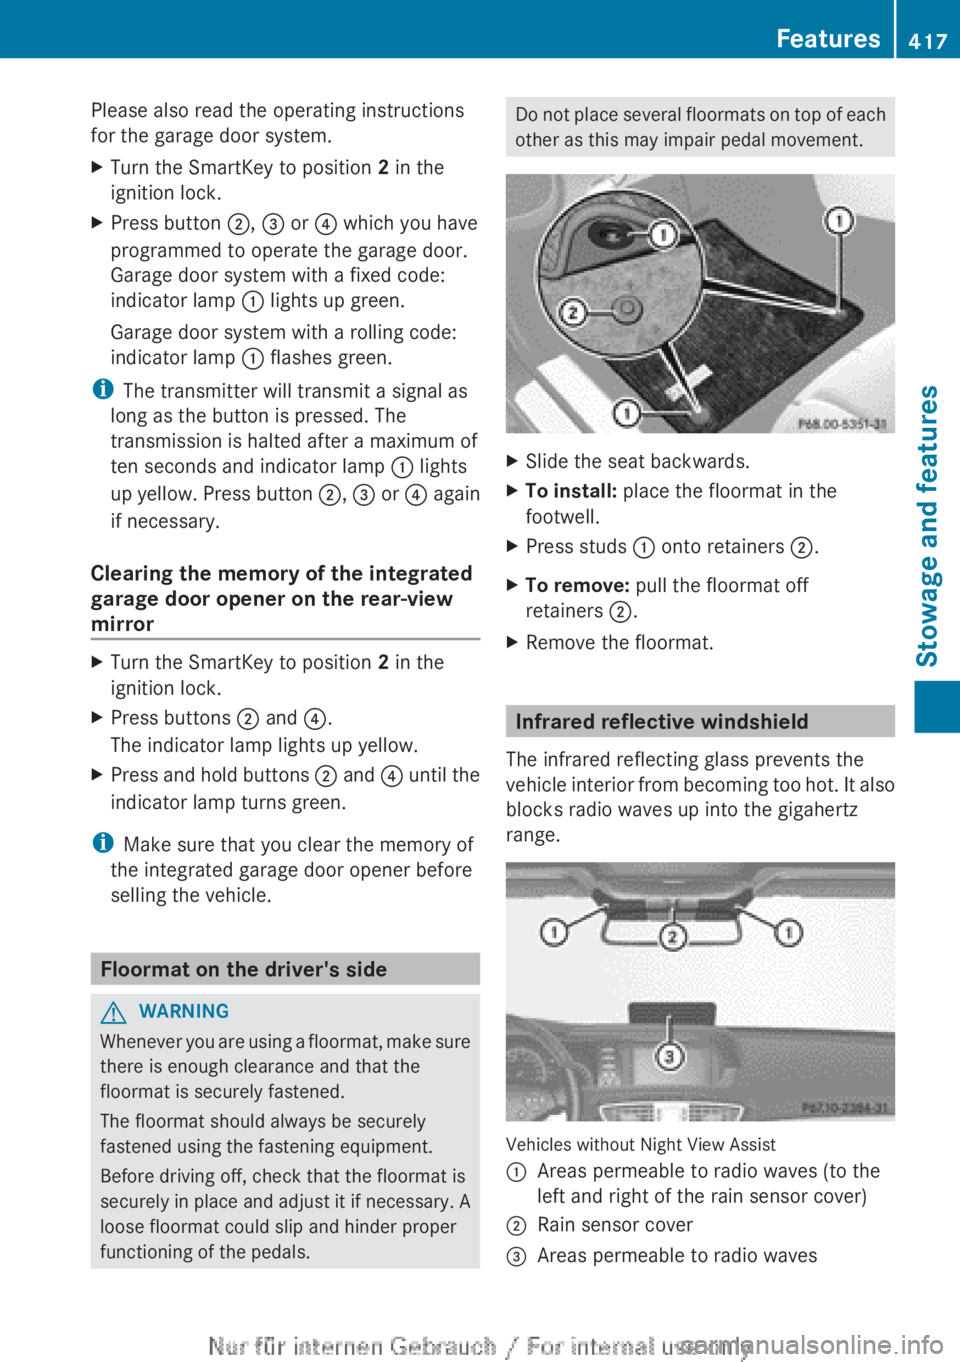
other as this may impair pedal movement.XSlide the seat backwards.XTo install: place the floormat in the
footwell.XPress studs : onto retainers ;.XTo remove: pull the floormat off
retainers ;.XRemove the floormat.
Infrared reflective windshield
The infrared reflecting glass prevents the
vehicle interior from becoming too hot. It also
blocks radio waves up into the gigahertz
range.
Vehicles without Night View Assist
:Areas permeable to radio waves (to the
left and right of the rain sensor cover);Rain sensor cover=Areas permeable to radio wavesFeatures417Stowage and featuresZ