MERCEDES-BENZ CL-Class 2014 C217 Comand Manual
Manufacturer: MERCEDES-BENZ, Model Year: 2014, Model line: CL-Class, Model: MERCEDES-BENZ CL-Class 2014 C217Pages: 274, PDF Size: 5.76 MB
Page 231 of 274
Notes on discs
! Do not affi xstickers or labels to the discs.
They could peel off and damage COMAND.
Stickers can cause the disc to bend, which
can resul tinread errors and disc
recognition problems.
! COMAND is designed to play discs that
comply with the EN 60908 standard.
Therefore, you can only use discs with a
maximum thickness of 1.3 mm.
If you insert thicker discs, e.g. those that
contain data on both sides (DVD on one
side and audio data on the other), they
cannot be ejected and can damage the
device.
Only use round discs with adiameter of
12 cm .Do not use discs with a diameter of
8 cm, even with an adapter.
Playback problems may occur when playing
copied discs. There are a large variety of
discs, DVD authoring software, writing
software and writers available. This variety
means that there is no guarantee that the
system will be able to play discs that you have
copied yourself. DVD playback conditions
If video DVDsdon ot conform to the NTSC or
PAL TV standards, they may create picture,
sound or other problems during playback.
COMAND is capable of playing back video
DVDs produced according to the following
standards:
R Region code 1orregion code 0(no region
code)
R PAL or NTSC standard
You will generally find the relevant details
either on the DVD itself or on the DVD case.
i If you insert a video DVD with a different
regio ncode, you will see a message to this
effect. i
COMAND is set to region code 1 at the
factory. This setting can be changed at an
authorized Mercedes-Benz Center. This will
allow you to play video DVDs with a
different region code, provided that they
are produced in accordance with the PAL
or NTSC standard. The region code can be
changed up to five times. Function restrictions
Depending on the DVD, it is possible that
certain functions or actions will be
temporarily blocked or may not function at all.
As soon as you try to activate these functions
or actions, you will see the 0005symbol in the
display. Inserting and removing DVDs
X Proceed as described in the "Inserting and
ejecting CDs and DVDs" section
(Y page 194). Switching to video DVD mode
Switching on automatically X
Single DVD drive: insert a video DVD.
COMAND loads the medium inserted and
starts to play it.
X DVD changer: insert a video DVD.
X Press 0007.
or
X Press the 000Aback button.
COMAND loads the medium inserted and
starts to play it. Video DVD mode
229Video Z
Page 232 of 274
Switching modes using the function
button
X
Press the 0007function button.
COMAND switches to the previous disc
operating mode.
By pressing the function button repeatedly,
you can change the operating mode in the
following order:
R Video DVD/CD/audio DVD/MP3 in the
DVD changer or DVD single drive (disc
mode)
R Memory card mode
R MUSIC REGISTER
R USB storage device
R Media Interface or audio AUX mode
R Bluetooth ®
audio mode
X DVD changer: selectMedia by sliding
00120008 and turning 003C0012003Dthe COMAND
controller and press 0037to confirm.
Single DVD drive: selectMedia by sliding
00120008 and turning 003C0012003Dthe COMAND
controller and press 0037to confirm.
X Select a ývideo DVD from the media list
(Y page 232).
Switching on with the video menu X
Select Video in the main function bar by
sliding 00360012and turning 003C0012003Dthe COMAND
controller and press 0037to confirm.
Video DVD mode is switched on. Showing/hiding the control menu
X To show: in DVD video mode, slide 003600120008
the COMAND controller.
X To hide: slide003600120008 the COMAND
controller.
or
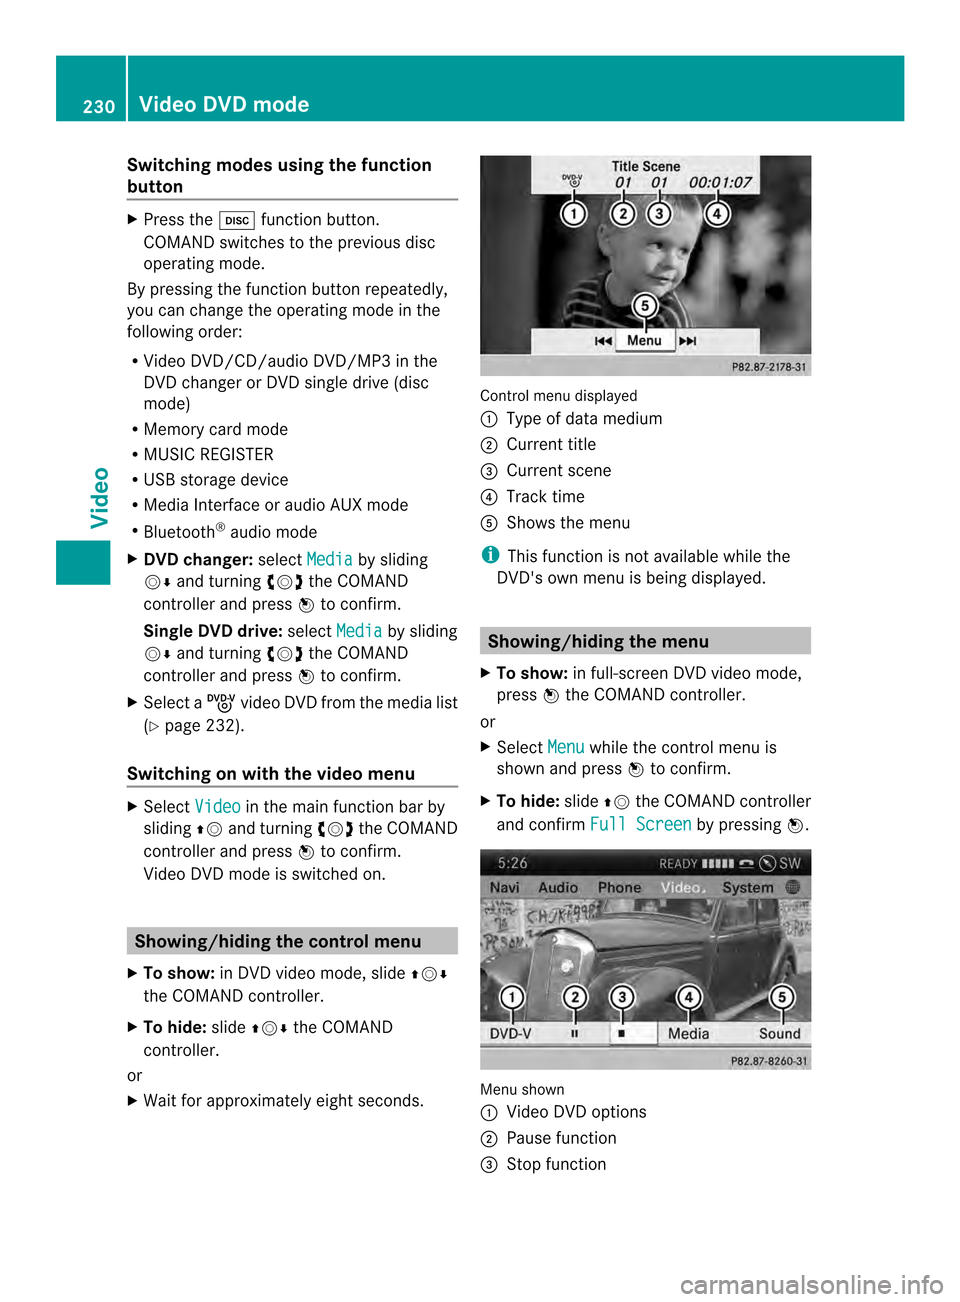
X Wait for approximately eight seconds. Control menu displayed
0001
Type of data medium
0002 Current title
0014 Current scene
0013 Track time
0011 Shows the menu
i This function is not available while the
DVD's own menu is being displayed. Showing/hiding the menu
X To show: in full-screen DVD video mode,
press 0037the COMAND controller.
or
X Select Menu while the control menu is
shown and press 0037to confirm.
X To hide: slide00360012the COMAND controller
and confirm Full Screen by pressing
0037. Menu shown
0001
Video DVD options
0002 Pause function
0014 Stop function 230
Video DVD modeVideo
Page 233 of 274
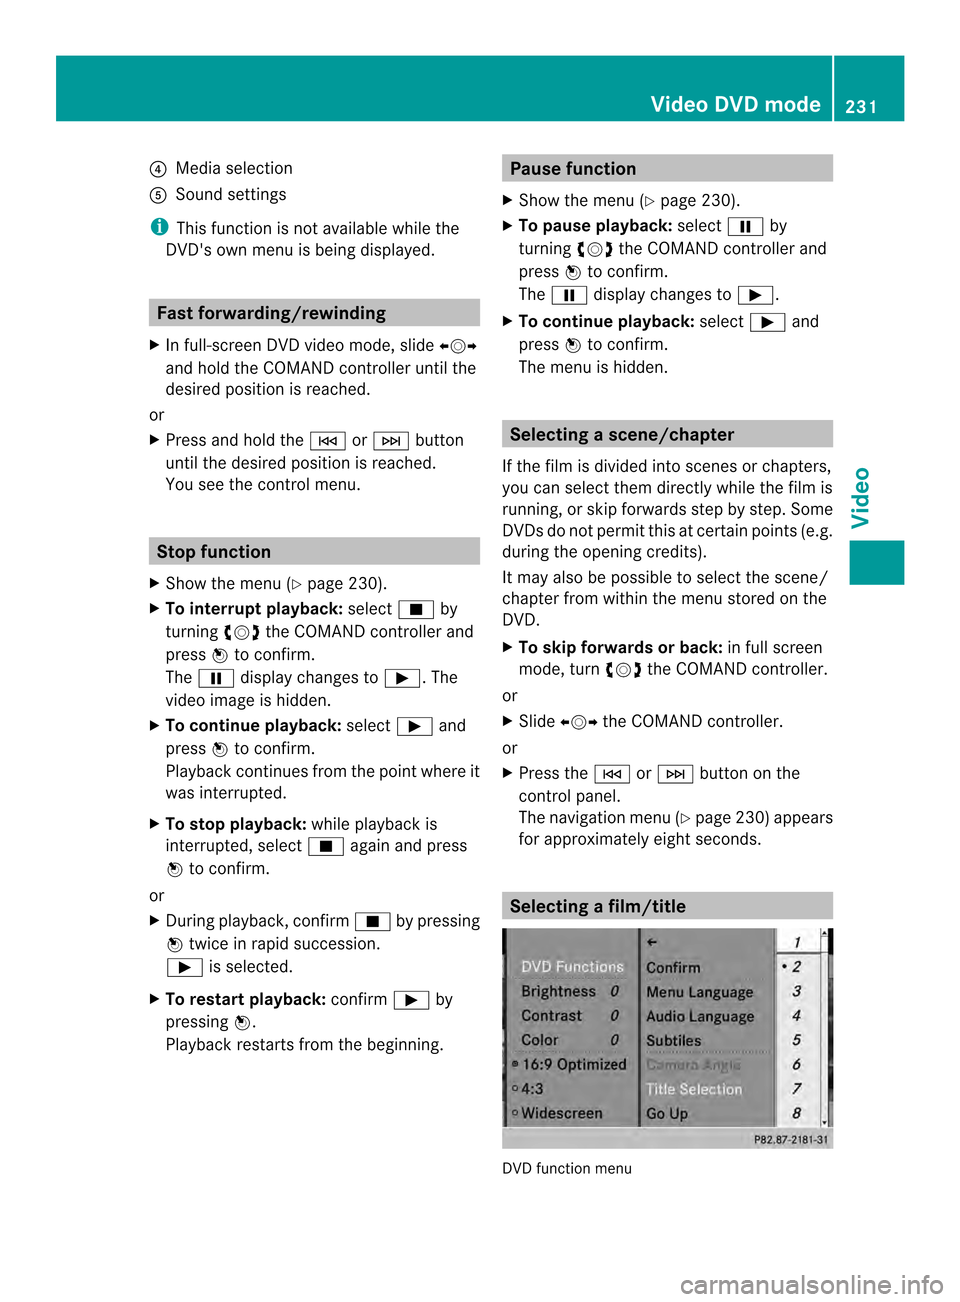
0013
Media selection
0011 Sound settings
i This function is not available while the
DVD's own menu is being displayed. Fast forwarding/rewinding
X In full-screen DVD video mode, slide 003400120035
and hold the COMAND controller until the
desired position is reached.
or
X Press and hold the 0001or0002 button
until the desired position is reached.
You see the control menu. Stop function
X Show the menu (Y page 230).
X To interrupt playback: select0014by
turning 003C0012003Dthe COMAND controller and
press 0037to confirm.
The 0009 display changes to 0004.The
video image is hidden.
X To continue playback: select0004and
press 0037to confirm.
Playback continues from the point where it
was interrupted.
X To stop playback: while playback is
interrupted, select 0014again and press
0037 to confirm.
or
X During playback, confirm 0014by pressing
0037 twice in rapid succession.
0004 is selected.
X To restart playback: confirm0004by
pressing 0037.
Playback restarts from the beginning. Pause function
X Show the menu (Y page 230).
X To pause playback: select0009by
turning 003C0012003Dthe COMAND controller and
press 0037to confirm.
The 0009 display changes to 0004.
X To continue playback: select0004and
press 0037to confirm.
The menu is hidden. Selecting
ascene/chapter
If the film is divided into scenes or chapters,
you can select them directly while the film is
running, or skip forwards step by step. Some
DVDs do no tpermit this at certain points (e.g.
during the opening credits).
It may also be possible to select the scene/
chapter from within the menu stored on the
DVD.
X To skip forwards or back: in full screen
mode, turn 003C0012003Dthe COMAND controller.
or
X Slide 003400120035 the COMAND controller.
or
X Press the 0001or0002 button on the
control panel.
The navigation menu (Y page 230)appears
for approximately eight seconds. Selecting
afilm/title DVD function menu Video DVD mode
231Video Z
Page 234 of 274
This function is only available if the DVD is
divided into several films/titles. If the DVD
contains several films, these can be selected
directly.
Afilm can be selected either when
the DV Dis being played back or when it is
stopped.
The film can also be selected from the menu
on the DVD itself.
X Show the menu (Y page 230).
X Select DVD-Video by turning
003C0012003Dthe
COMAND controller and press 0037to
confirm.
X Select DVD Functions and press
0037to
confirm.
Am enu appears.
X Select Title Selection by turning
003C0012003D
the COMAND controller and press 0037to
confirm.
X Select a film/title and press 0037to confirm. Selecting
avideo DVD from the media
list
X Show the menu (Y page 230).
X Select Media by sliding
00120008and turning
003C0012003D the COMAND controller and press
0037 to confirm.
The media list appears. The 000Fdot indicates
the current medium being played. Video
DVDs are indicated by the ýicon.
X Equipped with a DVD changer: press0037
the COMAN Dcontroller to display all
magazine trays.
X Select a video DVD by turning 003C0012003Dthe
COMAND controller and press 0037to
confirm.
COMAND loads the video DVD and begins
playing it.
i If you select a CD, an audio DVD or an
MP3 medium, you switch to the respective
audio mode.
Further information on the media list
(Y page 199). DVD menu
Calling up the DVD menu The DVD menu is the menu stored on the DVD
itself. It is structured in various ways
according to the individual DVD and permits
certain actions and settings.
In the case of multi-language DVDs, for
example, you can change the DVD language
in the DVD menu.
X
Show the menu (Y page 230).
X Select DVD-Video in the menu by turning
003C0012003D the COMAND controller and press
0037 to confirm.
X Select DVD Functions and press
0037to
confirm.
X Select Menu and press
0037to confirm.
The DVD menu appears.
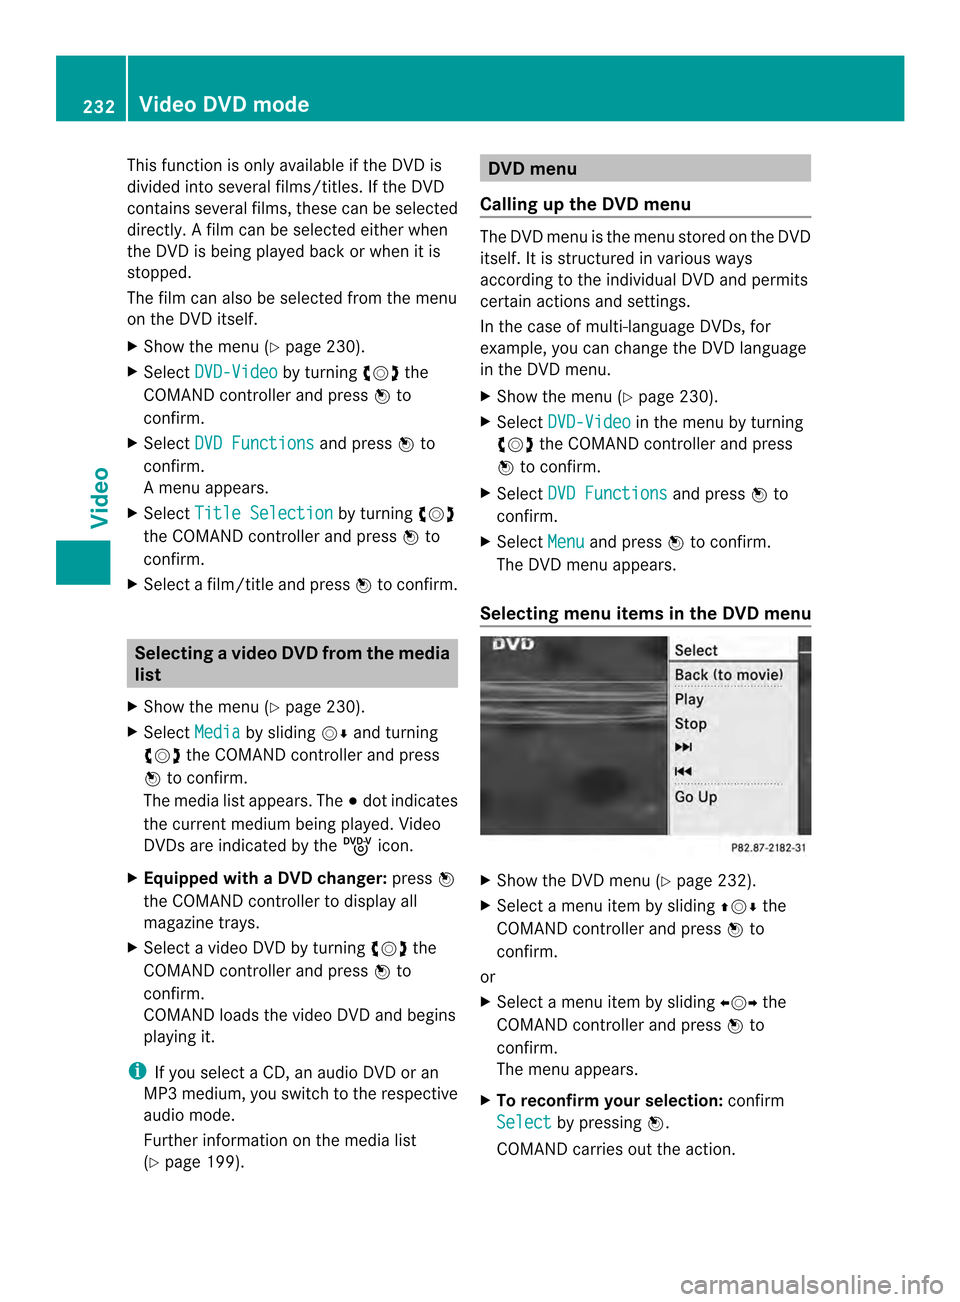
Selecting menu items in the DVD menu X
Show the DVD menu (Y page 232).
X Select a menu item by sliding 003600120008the
COMAND controller and press 0037to
confirm.
or
X Select a menu item by sliding 003400120035the
COMAND controller and press 0037to
confirm.
The menu appears.
X To reconfirm your selection: confirm
Select by pressing
0037.
COMAND carries out the action. 232
Video DVD modeVideo
Page 235 of 274
Make a selection from the further options,
if necessary.
COMAND then switches back to the DVD
menu.
i Menu items which cannot be selected are
shown in gray.
i Depending on the DVD, the menu items:
Back (to the movie) ,
Play ,
Stop ,
0003,
0004 orGo up may either not function at
all or may not function at certain points in
the DVD menu. To indicate this, the 0005
symbol appears in the display.
Moving up one level in the DVD menu X
Show the DVD menu (Y page 232).
X Select the corresponding menu item in the
DVD menu and press 0037the COMAND
controller to confirm.
or
X Select any menu item in the DVD menu and
press 0037the COMAND controller to
confirm.
X Select Go Up and press
0037to confirm.
Back to the movie X
Press the 000Aback button repeatedly
until you see the movie.
or
X Select the corresponding menu item from
the DVD menu.
X Select the Back (to the movie) menu
item in the menu and press 0037to confirm. Setting the language and audio
format
This function is not available on all DVDs. If it
is available, you can set the DVD menu
language, the audio language or the audio
format. The number of settings is determined
by the DVD content. It is possible that the
settings may also be accessed in the DVD
menu (Y page 232). X
Show the DVD menu (Y page 232).
X In full-screen mode, press 0037the COMAND
controller to show the menu.
X Select DVD-Video in the menu by turning
003C0012003D the COMAND controller and press
0037 to confirm.
X Select DVD Functions and press
0037to
confirm.
X Select Menu Language or
Audio Language and press
0037to confirm.
In both cases, a menu appears after a few
seconds. The 000Fdot in front of an entry
indicates the currently selected language.
X Select a setting by turning 003C0012003Dthe
COMAND controller and press 0037to
confirm. Subtitles and camera angle
These functions are not available on all DVDs.
The number of subtitle languages and camera
angles available depends on the content of
the DVD.Itm ay also be possible to access
the settings from the DVD menu.
X Show the DVD men u(Ypage 232).
X Select DVD-Video in the menu by turning
003C0012003D the COMAND controller and press
0037 to confirm.
X Select DVD Functions and press
0037to
confirm.
X Select Subtitles or
Camera Angle and
press 0037to confirm.
In both cases, a menu appears. The 000Fdot
in front of an entry indicates the current
setting.
X Select a setting by turning 003C0012003Dthe
COMAND controller and press 0037to
confirm. Interactive content
DVDs can contain interactive content (e.g. a
video game). In a video game, for example, Video DVD mode
233Video Z
Page 236 of 274
you may be able to influence events by
selecting and triggering actions. The type and
number of actions depend on the DVD.
X
Selec tanaction by sliding 003600120008or003400120035 the
COMAND controlle rand press 0037to
execute it.
A menu appears and the first entry,
Select , is highlighted.
X Press 0037the COMAND controller. AUX video mode
Connecting external video sources
External video sources may have different
volumes, which can mea nthat system
messages such as traffic announcements and
navigation system announcements are much
louder. If necessary, deactivate the system
messages or adjust their volume manually.
If your vehicle is equipped with Media
Interface, you can connect an external video
source (AUX video) (Y page 219).
The 1/8 inch audio/video jacks are in the
center console stowage compartment.
i In vehicles with a rear view camera, the
AUX video jack cannot be used for external
video sources. Switching to AUX video mode
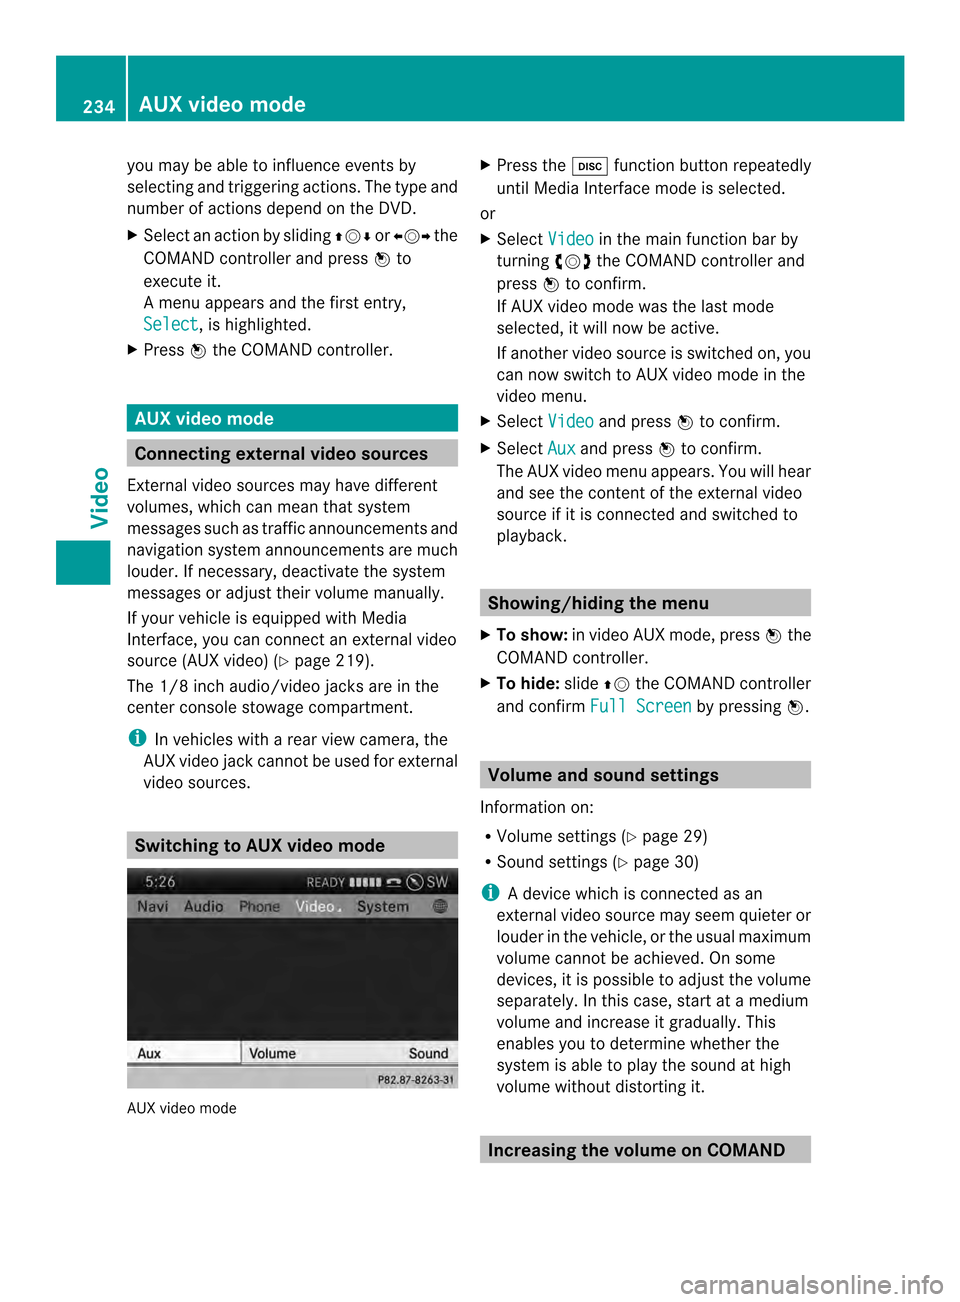
AUX video mode X
Press the 0007function button repeatedly
until Media Interface mode is selected.
or
X Select Video in the main function bar by
turning 003C0012003Dthe COMAND controller and
press 0037to confirm.
If AUX video mode was the last mode
selected, it will now be active.
If another video source is switched on, you
can now switch to AUX video mode in the
video menu.
X Select Video and press
0037to confirm.
X Select Aux and press
0037to confirm.
The AUX video menu appears. You will hear
and see the content of the external video
source if it is connected and switched to
playback. Showing/hiding the menu
X To show: in video AUX mode, press 0037the
COMAND controller.
X To hide: slide00360012the COMAND controller
and confirm Full Screen by pressing
0037. Volume and sound settings
Information on:
R Volume settings (Y page 29)
R Sound settings (Y page 30)
i Adevice which is connected as an
external video source may seem quieter or
louder in the vehicle, or the usual maximum
volume cannot be achieved. On some
devices, it is possible to adjust the volume
separately. In this case, start at a medium
volume and increase it gradually .This
enables you to determine whether the
system is able to play the sound at high
volume without distorting it. Increasing the volume on COMAND234
AUX video modeVideo
Page 237 of 274
X
Show the video AUX menu (Y page 234).
X Select Volume by turning
003C0012003Dthe
COMAND controlle rand press 0037to
confirm.
Am enu appears. The 000Fdot indicates the
current setting.
X Select Standard or
Boost and press
0037to
confirm.
Standard :t
he volume of the external video
source is adjusted to a standard value.
Boost : the volume of the external video
source is raised by approximately 10 dB. Picture viewer
Introduction
If there are pictures on the active data
medium, you can look at them. You can
display pictures with a resolution of up to 20
megapixels. Data medium Supported picture
formats
CD/DVD with
picture files bmp, jpeg, jpg, png
USB devices (sticks,
hard drives)
SD memory card bmp, jpeg, jpg, png
Calling up
acategory list
X Select a data medium with pictures (e.g. a
memory card):
R in the Audio menu (Y page 184)
R in the media lis t(Ypage 199)
X Select Search in the basic display by
sliding 00120008and turning 003C0012003Dthe COMAND
controller and press 0037to confirm.
The category list appears ( Ypage 206). Displaying pictures
X Select (Y page 206)Photos in the category
list by turning 003C0012003Dthe COMAND controller
and press 0037to confirm.
Af older directory appears.
X Select a folder with photos and press 0037to
confirm.
The folder displays the existing picture files
(example). X
Select a photo and press 0037to confirm.
The photo is displayed and the music is
stopped. Picture viewer
235Video Z
Page 238 of 274
Changing the picture view
X
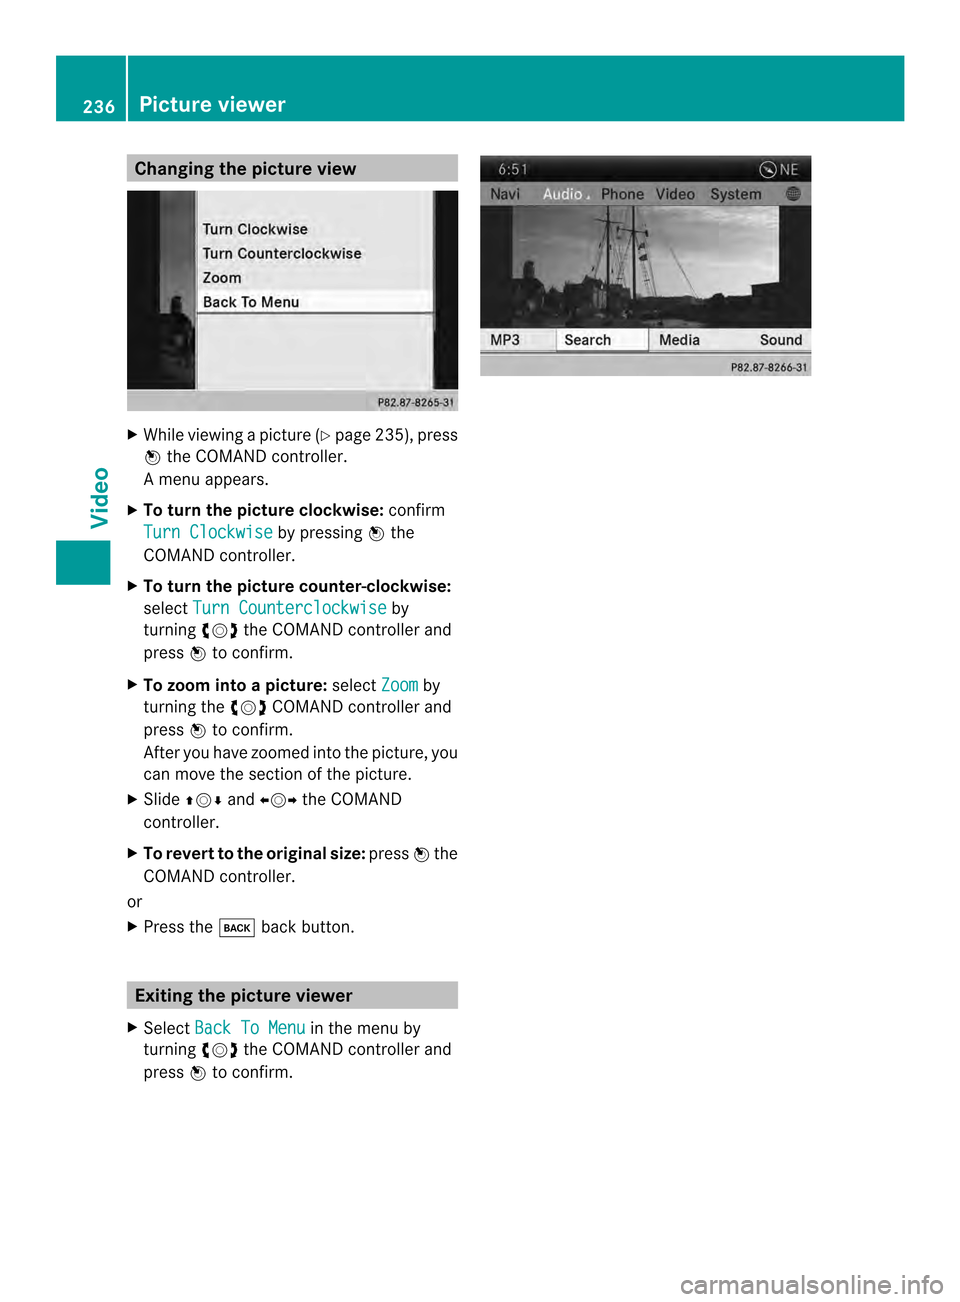
While viewing a picture (Y page 235), press
0037 the COMAND controller.
Am enu appears.
X To turn the picture clockwise: confirm
Turn Clockwise by pressing
0037the
COMAND controller.
X To turn the picture counter-clockwise:
select Turn Counterclockwise by
turning 003C0012003Dthe COMAND controller and
press 0037to confirm.
X To zoom into a picture: selectZoom by
turning the 003C0012003DCOMAND controller and
press 0037to confirm.
After you have zoomed into the picture, you
can move the section of the picture.
X Slide 003600120008 and003400120035 the COMAND
controller.
X To revert to the original size: press0037the
COMAND controller.
or
X Press the 000Aback button. Exiting the picture viewer
X Select Back To Menu in the menu by
turning 003C0012003Dthe COMAND controller and
press 0037to confirm. 236
Picture viewerVideo
Page 239 of 274
Your COMAND equipment
................238
Overview ............................................ 238
Basic functions ................................. 244
System settings ................................ 245
CD/audio DVD and MP3 mode ........246
Video DVD mode ............................... 251
Operation with an active COMAND
source ................................................ 256
AUX mode .......................................... 258 237Rear Seat Entertainment System
Page 240 of 274
Your COMAND equipment
These operating instructions describe all the
standard and optional equipmen tfor your
COMAND system, as available at the time of
going to print. Country-specific differences
are possible. Please note that your COMAND
system may not be equipped with all the
features described. Overview
Important safety notes
G
WARNING
The CD/DVD drive is a class 1laser product.
If you open the CD/DV Ddrive housing, you
could be exposed to invisible laser radiation.
This laser radiation could damage yourr etina.
There is a risk of injury.
Never open the housing. Always have
maintenance and repair work carried out at a
qualified specialist workshop. G
WARNING
If objects such as headphones/headsets or
external audio/video sources are not secured
in the passenger compartment, they can be
flung around and hit vehicle occupants. There
is a risk of injury, for example in the event of
sudden braking or a sudden change in
direction.
Always stow these items or similar objects
carefully so that they cannot be flung around,
for example in a lockable vehicle stowage
compartment. Components
The Rear Seat Entertainment System
includes:
R two screens for the rear behind the front-
seat head restraints
R two remote controls
R a CD/DVD drive R
AUX jacks on both screens (AUX display)
and on the CD/DVD drive (AUX drive)
R two sets of cordless headphones 238
OverviewRear Seat Entertainment System