MERCEDES-BENZ CL-Class 2014 C217 Comand Manual
Manufacturer: MERCEDES-BENZ, Model Year: 2014, Model line: CL-Class, Model: MERCEDES-BENZ CL-Class 2014 C217Pages: 274, PDF Size: 5.76 MB
Page 191 of 274
R
locations inside or nex tto buildings
R locations in the vicinit yofother
structures
i SIRIUS XM Radio offers more than 130
radio stations in digital quality, for example
100% commercial-free music, sports, news
and entertainment.
SIRIUS XM Radio employs a flee tofhigh-
performance satellites to broadcast around
the clock in the contiguous USA and
Canada.
The satellite radio program is available for
a monthly fee. Details are available from
the SIRIUS XM Service Center and at
http://www.sirius.com (USA) or
http://www.siriuscanada.com
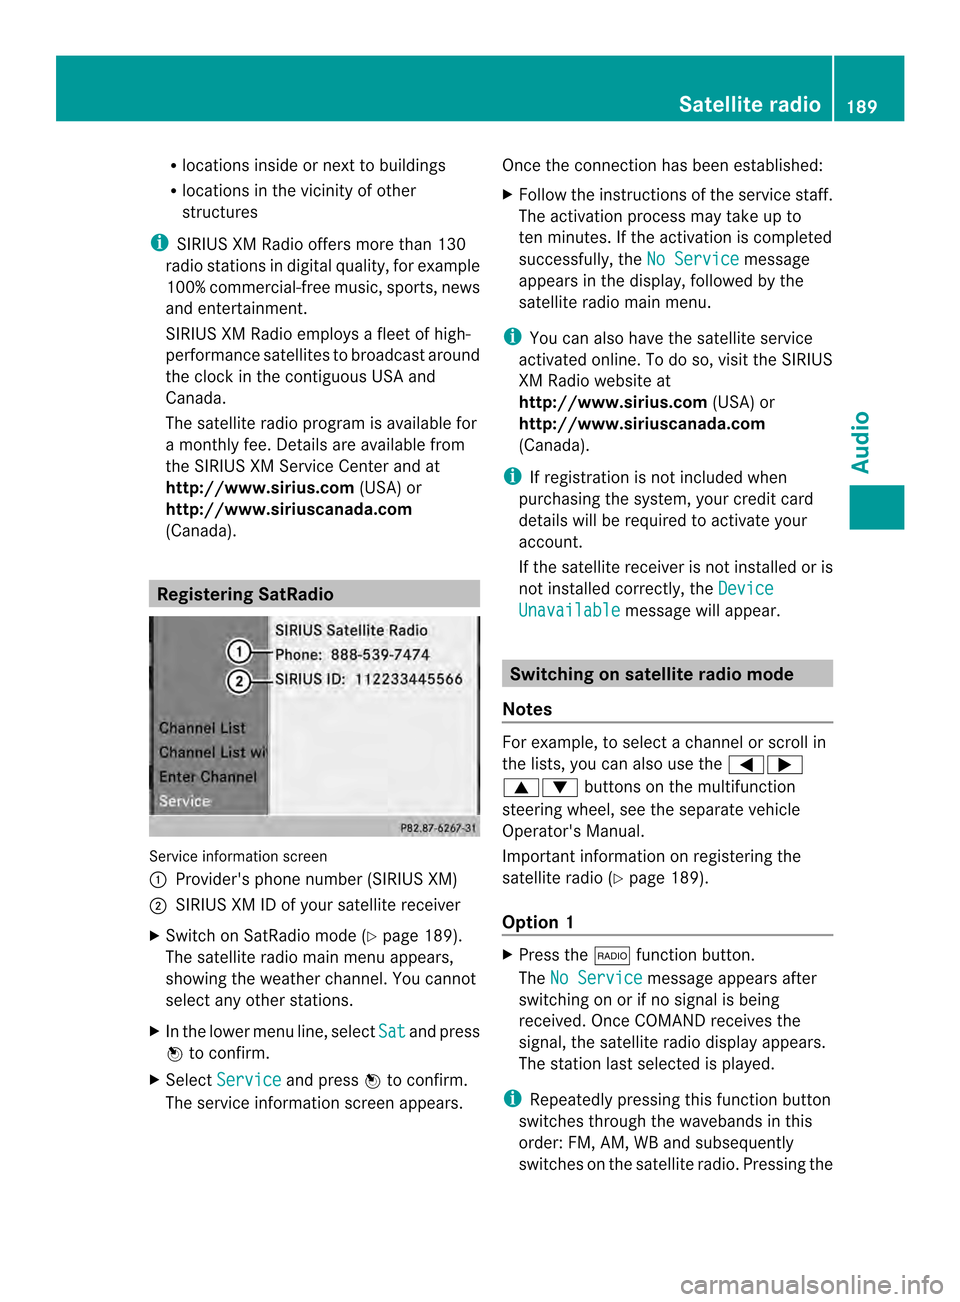
(Canada). Registering SatRadio
Service information screen
0001
Provider's phone number (SIRIUS XM)
0002 SIRIUS XM ID of your satellite receiver
X Switch on SatRadio mode (Y page 189).
The satellite radio main men uappears,
showing the weather channel. You cannot
select any other stations.
X In the lower menu line, select Sat and press
0037 to confirm.
X Select Service and press
0037to confirm.
The service information scree nappears. Once the connection has been established:
X
Follow the instructions of the service staff.
The activation process may take up to
ten minutes. If the activation is completed
successfully, the No Service message
appears in the display, followed by the
satellite radio main menu.
i You can also have the satellite service
activated online. To do so, visit the SIRIUS
XM Radio website at
http://www.sirius.com (USA) or
http://www.siriuscanada.com
(Canada).
i If registration is not included when
purchasing the system, your credit card
details will be required to activate your
account.
If the satellite receiver is not installed or is
not installed correctly, the Device Unavailable message will appear.
Switching on satellite radio mode
Notes For example, to select
achannel or scroll in
the lists, you can also use the 0006000A
00080009 buttons on the multifunction
steering wheel, see the separate vehicle
Operator's Manual.
Important information on registering the
satellite radio (Y page 189).
Option 1 X
Press the 0006function button.
The No Service message appears after
switching on or if no signal is being
received. Once COMAND receives the
signal, the satellite radio display appears.
The station last selected is played.
i Repeatedly pressing this function button
switches through the wavebands in this
order: FM, AM, WB and subsequently
switches on the satellite radio. Pressing the Satellite radio
189Audio
Page 192 of 274
button again takes you back to FM radio
mode.
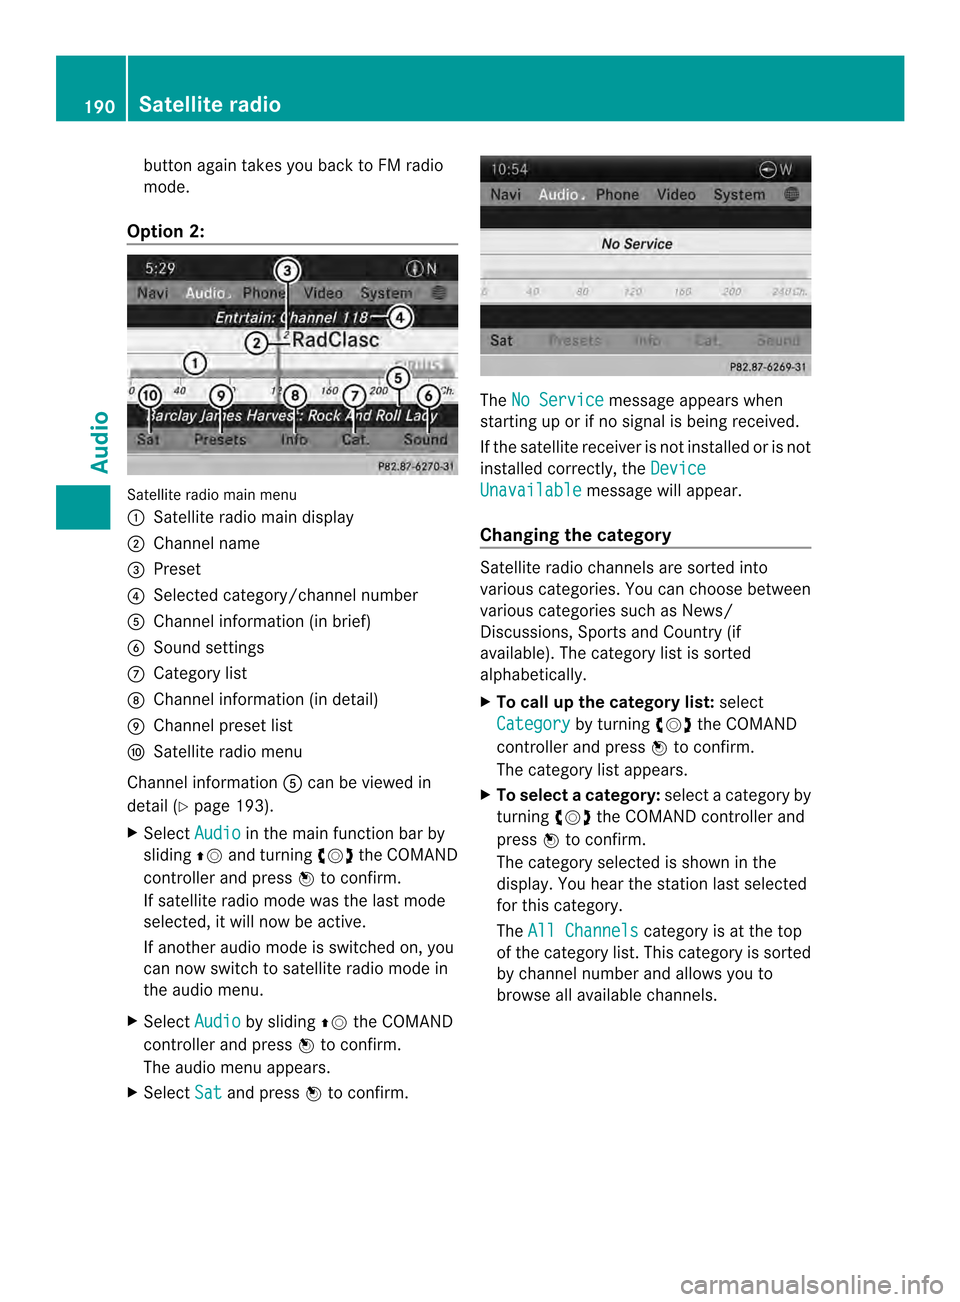
Option 2: Satellite radio main menu
0001
Satellite radio main display
0002 Channel name
0014 Preset
0013 Selected category/channel number
0011 Channel information (in brief)
0012 Sound settings
0005 Category list
0006 Channel information (in detail)
0007 Channel preset list
0008 Satellite radio menu
Channel information 0011can be viewed in
detail ( Ypage 193).
X Select Audio in the main function bar by
sliding 00360012and turning 003C0012003Dthe COMAND
controller and press 0037to confirm.
If satellite radio mode was the last mode
selected, it will now be active.
If another audio mode is switched on, you
can now switch to satellite radio mode in
the audio menu.
X Select Audio by sliding
00360012the COMAND
controller and press 0037to confirm.
The audio menu appears.
X Select Sat and press
0037to confirm. The
No Service message appears when
starting up or if no signal is being received.
If the satellite receiver is not installed or is not
installed correctly, the Device Unavailable message will appear.
Changing the category Satellite radio channels are sorted into
various categories. You can choose between
various categories such as News/
Discussions, Sports and Country (if
available). The category list is sorted
alphabetically.
X To call up the category list: select
Category by turning
003C0012003Dthe COMAND
controller and press 0037to confirm.
The category list appears.
X To select acategory: select a category by
turning 003C0012003Dthe COMAND controller and
press 0037to confirm.
The category selected is show ninthe
display. You hear the station last selected
for this category.
The All Channels category is at the top
of the category list. This category is sorted
by channel number and allows you to
browse all available channels. 190
Satellite radioAudio
Page 193 of 274
Selecting
achannel Channel search
X
Turn 003C0012003D or slide 003400120035the COMAND
controlle rwhile the display/selection
window in the SatRadio displayi s active.
or
X Press the 0001or0002 button.
COMAND searches in both directions
(ascending and descending) and stops at
the next channel found in the selected
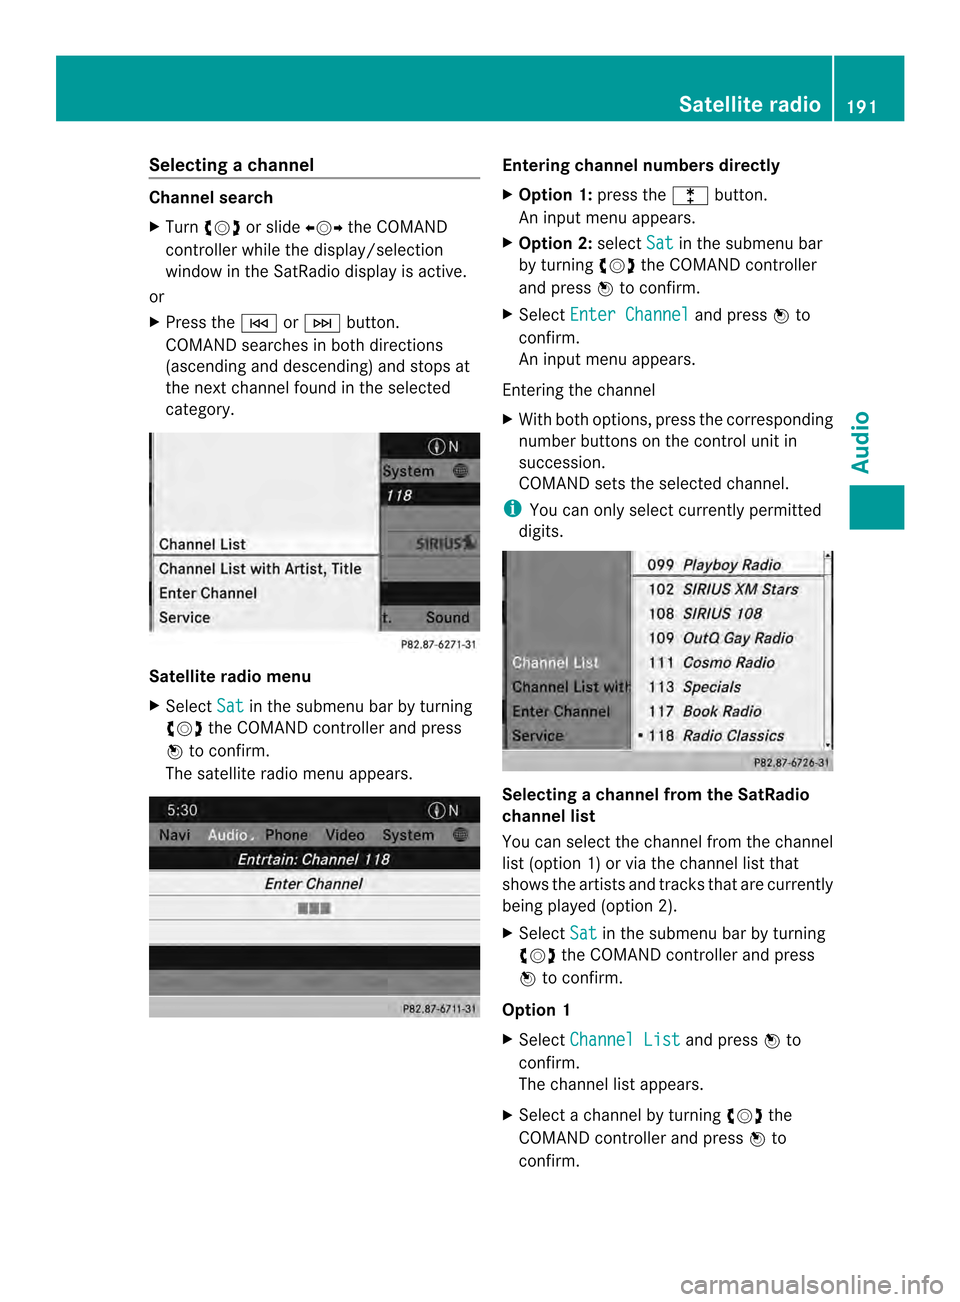
category. Satellite radio menu
X
Select Sat in the submenu bar by turning
003C0012003D the COMAND controller and press
0037 to confirm.
The satellite radio menu appears. Entering channel numbers directly
X
Option 1: press the000Dbutton.
An input menu appears.
X Option 2: selectSat in the submenu bar
by turning 003C0012003Dthe COMAND controller
and press 0037to confirm.
X Select Enter Channel and press
0037to
confirm.
An input menu appears.
Entering the channel
X With both options, press the corresponding
number buttons on the control unit in
succession.
COMAND sets the selected channel.
i You can only select currently permitted
digits. Selecting a channel from the SatRadio
channel list
You can select the channel from the channel
list (option 1) or via the channel list that
shows the artists and tracks that are currently
being played (option 2).
X
Select Sat in the submenu bar by turning
003C0012003D the COMAND controller and press
0037 to confirm.
Option 1
X Select Channel List and press
0037to
confirm.
The channel list appears.
X Select a channel by turning 003C0012003Dthe
COMAND controller and press 0037to
confirm. Satellite radio
191Audio
Page 194 of 274
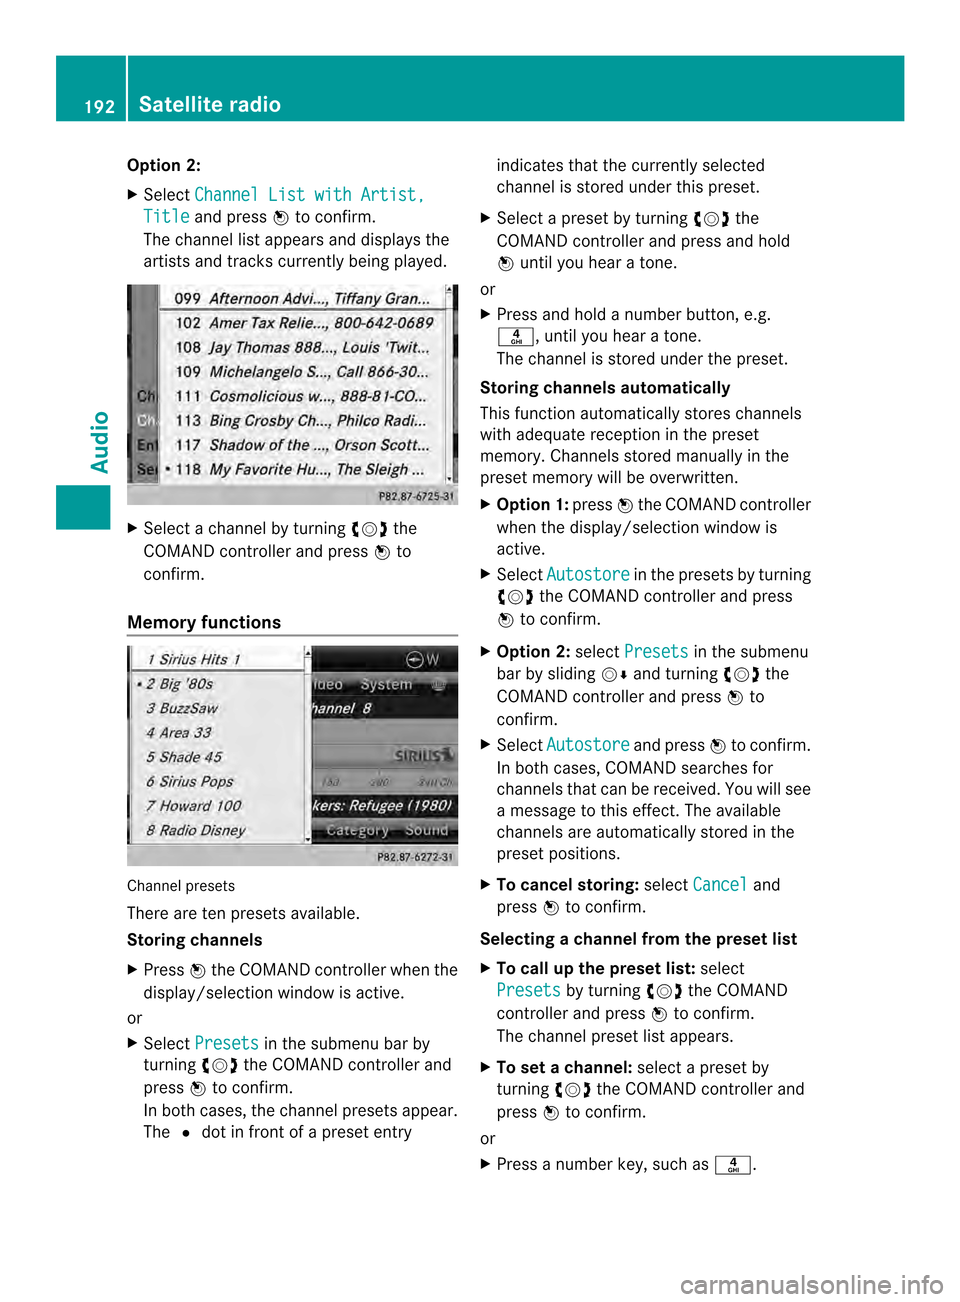
Option 2:
X
Select Channel List with Artist, Title and press
0037to confirm.
The channel list appears and displays the
artists and tracks currently being played. X
Select a channel by turning 003C0012003Dthe
COMAND controller and press 0037to
confirm.
Memory functions Channel presets
There are ten presets available.
Storing channels
X Press 0037the COMAND controller when the
display/selection window is active.
or
X Select Presets in the submenu bar by
turning 003C0012003Dthe COMAND controller and
press 0037to confirm.
In both cases, the channel presets appear.
The 0027dot in front of a preset entry indicates that the currently selected
channel is stored under this preset.
X Select a preset by turning 003C0012003Dthe
COMAND controller and press and hold
0037 until you hear a tone.
or
X Press and hold a number button, e.g.
002C, until you hear a tone.
The channel is stored under the preset.
Storing channels automatically
This function automatically stores channels
with adequate reception in the preset
memory. Channels stored manually in the
preset memory will be overwritten.
X Option 1: press0037the COMAND controller
when the display/selection window is
active.
X Select Autostore in the presets by turning
003C0012003D the COMAND controller and press
0037 to confirm.
X Option 2: selectPresets in the submenu
bar by sliding 00120008and turning 003C0012003Dthe
COMAND controller and press 0037to
confirm.
X Select Autostore and press
0037to confirm.
In both cases, COMAND searches for
channels that can be received. You will see
a message to this effect. The available
channels are automatically stored in the
preset positions.
X To cancel storing: selectCancel and
press 0037to confirm.
Selecting achannel from the preset list
X To call up the preset list: select
Presets by turning
003C0012003Dthe COMAND
controlle rand press 0037to confirm.
The channel preset list appears.
X To se tachannel: select a prese tby
turning 003C0012003Dthe COMAND controller and
press 0037to confirm.
or
X Press a numbe rkey, such as 002C.192
Satellite radioAudio
Page 195 of 274
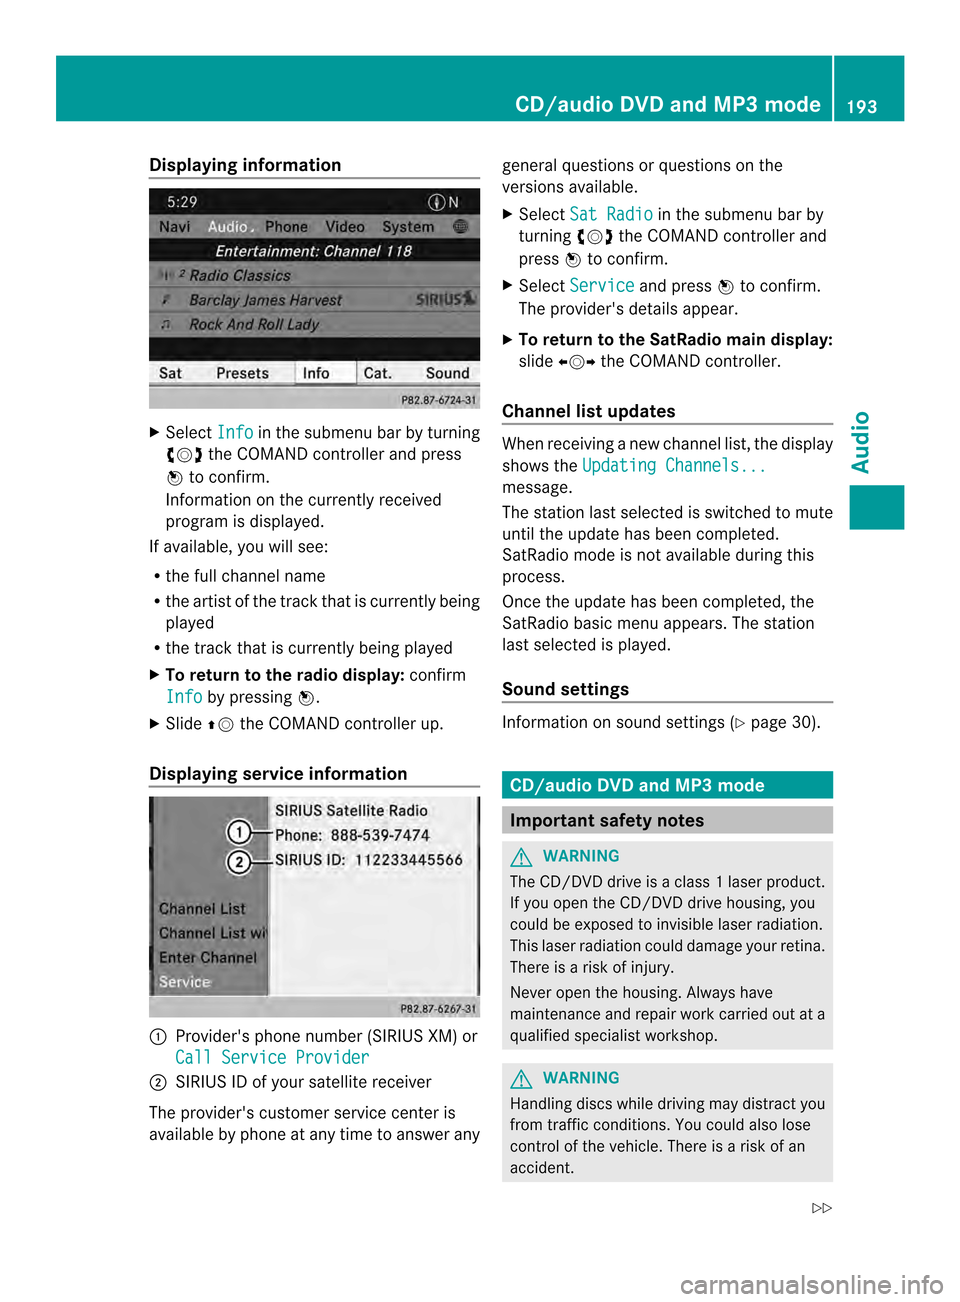
Displaying information
X
Select Info in the submenu bar by turning
003C0012003D the COMAND controller and press
0037 to confirm.
Information on the currently received
program is displayed.
If available, you will see:
R the full channel name
R the artist of the track that is currently being
played
R the track that is currently being played
X To return to the radio display: confirm
Info by pressing
0037.
X Slide 00360012the COMAND controller up.
Displaying service information 0001
Provider's phone number (SIRIUS XM) or
Call Service Provider 0002
SIRIUS ID of your satellite receiver
The provider's customer service center is
available by phone at any time to answer any general questions or questions on the
versions available.
X
Select Sat Radio in the submenu bar by
turning 003C0012003Dthe COMAND controller and
press 0037to confirm.
X Select Service and press
0037to confirm.
The provider's details appear.
X To return to the SatRadio main display:
slide 003400120035 the COMAND controller.
Channel list updates Whe
nreceiving a new channel list, the display
shows the Updating Channels... message.
The station last selected is switched to mute
until the update has been completed.
SatRadio mode is not available during this
process.
Once the update has been completed, the
SatRadio basic menu appears. The station
last selected is played.
Sound settings
Information on sound settings (Y
page 30). CD/audio DVD and MP3 mode
Important safety notes
G
WARNING
The CD/DVD drive is a class 1laser product.
If you open the CD/DV Ddrive housing, you
could be exposed to invisible laser radiation.
This laser radiation could damage yourr etina.
There is a risk of injury.
Never open the housing. Always have
maintenance and repair work carried out at a
qualified specialist workshop. G
WARNING
Handling discs while driving may distrac tyou
from traffic conditions. You could also lose
control of the vehicle. There is a risk of an
accident. CD/audio DVD and MP3 mode
193Audio
Z
Page 196 of 274
Handle discs only whe
nthe vehicle is
stationary.
Bear in mind that at a speed of just 30 mph
(approximately 50 km/h), your vehicle is
covering a distance of 44 feet (approximately
14 m) every second. Inserting/ejecting CDs/DVDs
Notes If the CD/DVDh
as a printed side, this must
face upwards when the CD/DV Dis inserted.
If neither side is printed, the side to be played
should face downwards. The system may not
be able to play CDs/DVDsw ith copy
protection.
i If a medium contains other files in
additio nto music files, the loading time
before the first track starts to play may be
longer.
Inserting adisc into the single DVD
drive X
Press the 0007eject button.
If there is a disc already inserted, it will be
ejected.
X Take the disc out of the slot.
X Insert a disc into the slot.
If the disc is correctly inserted and is a
suitable disc, it is drawn in by the drive and
played.
Ejecting adisc from the single DVD
drive X
Press the 0007eject button.
X Take the disc out of the slot.
If you do not take the disc out of the slot, it
is drawn in again automatically after a short
while and reloaded. Inserting discs into the DVD changer The DVD changer has a fixed magazine with
six trays.
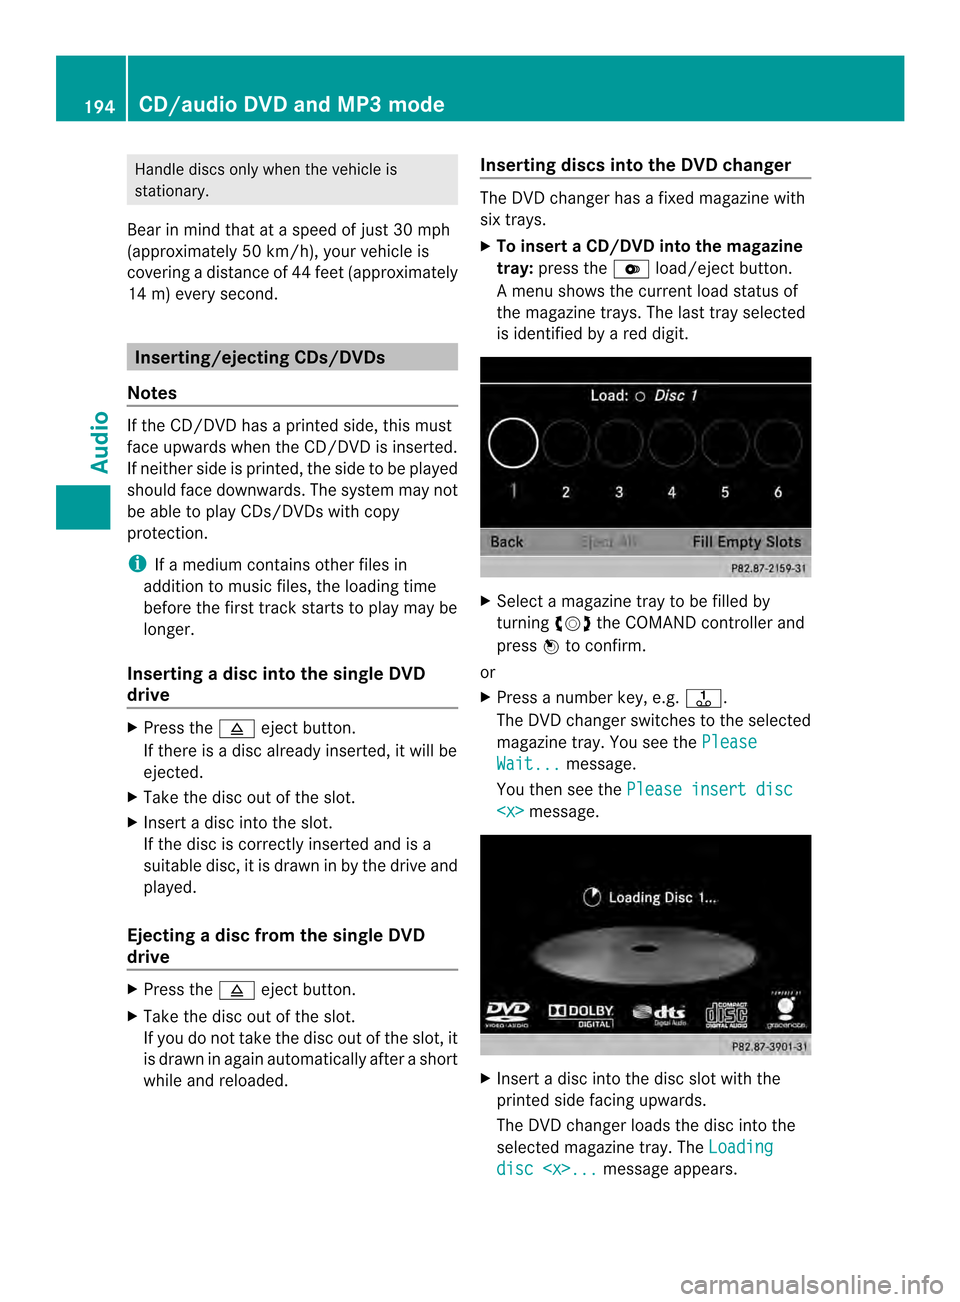
X
To insert aCD/DVD into the magazine
tray: press the 0009load/ejec tbutton.
Am enu shows the curren tload status of
the magazine trays. The last tray selected
is identified by a red digit. X
Select a magazine tray to be filled by
turning 003C0012003Dthe COMAND controller and
press 0037to confirm.
or
X Press a number key, e.g. 0029.
The DVD changer switches to the selected
magazine tray. You see the Please Wait... message.
You then see the Please insert disc
X
Insert a disc into the disc slot with the
printed side facing upwards.
The DVD changer loads the disc into the
selected magazine tray. The Loading disc
CD/audio DVD and MP3 modeAudio
Page 197 of 274
i
It may take some time for the disc to be
loaded, depending on the type of disc. If no
disc is inserted for approximately 20
seconds, the display returns to the
magazine menu.
The DVD changer plays the disc if:
R it has been inserted correctly.
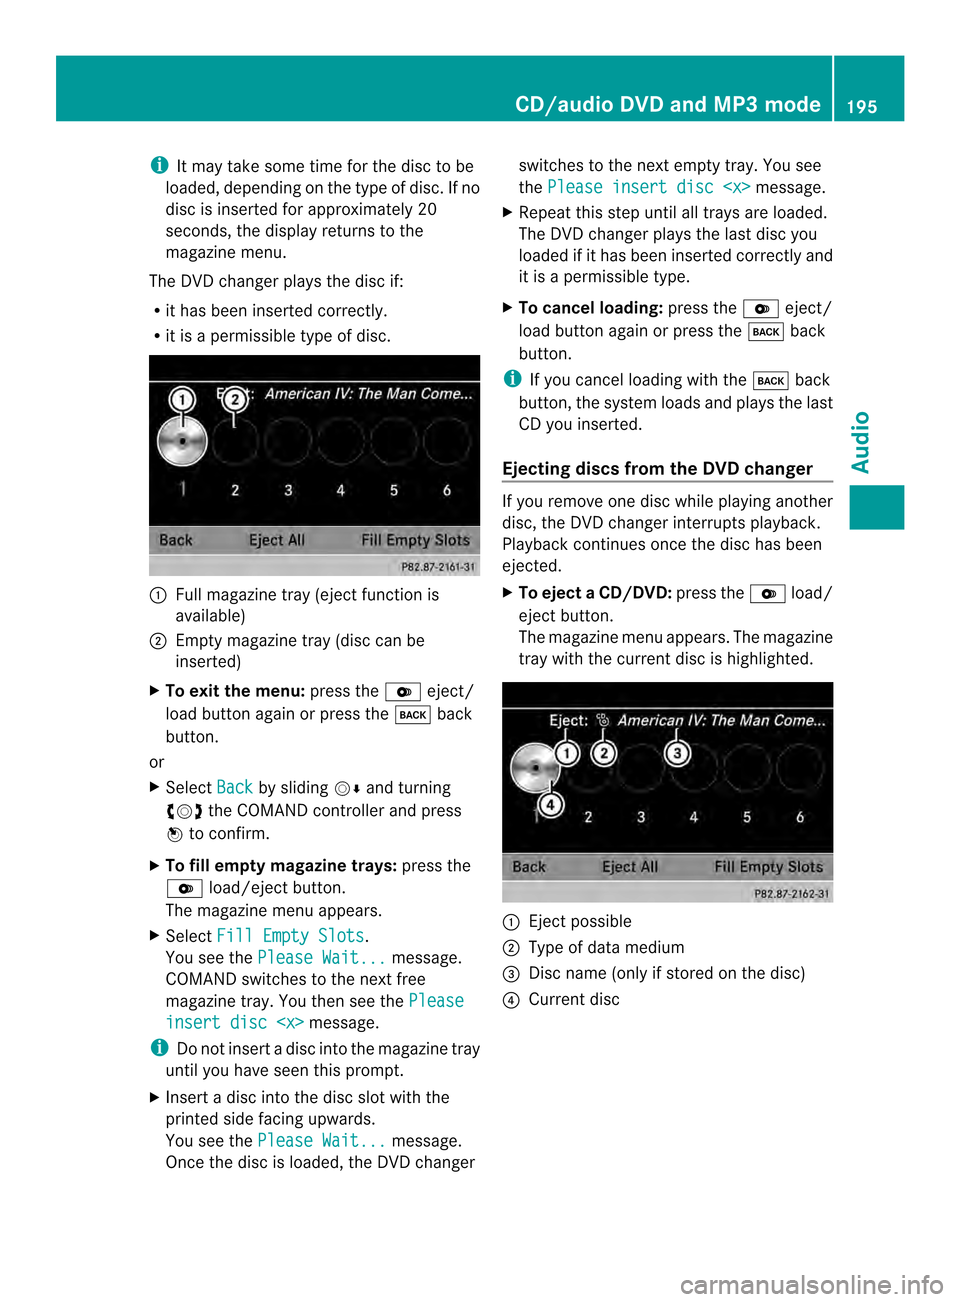
R it is a permissible type of disc. 0001
Full magazine tray (eject function is
available)
0002 Empty magazine tray (disc can be
inserted)
X To exit the menu: press the0009eject/
load button again or press the 000Aback
button.
or
X Select Back by sliding
00120008and turning
003C0012003D the COMAND controller and press
0037 to confirm.
X To fill empty magazine trays: press the
0009 load/eject button.
The magazine menu appears.
X Select Fill Empty Slots .
You see the Please Wait... message.
COMAND switches to the next free
magazine tray. You then see the Pleaseinsert disc
i Do not insert a disc into the magazine tray
until you have seen this prompt.
X Insert a disc into the disc slot with the
printed side facing upwards.
You see the Please Wait... message.
Once the disc is loaded, the DVD changer switches to the next empty tray. You see
the
Please insert disc
X Repeat this step until all trays are loaded.
The DVD changer plays the last disc you
loaded if it has been inserted correctly and
it is a permissible type.
X To cancel loading: press the0009eject/
load button again or press the 000Aback
button.
i If you cancel loading with the 000Aback
button, the system loads and plays the last
CD you inserted.
Ejecting discs from the DVD changer If you remove one disc while playing another
disc, the DVD changer interrupts playback.
Playback continues once the disc has been
ejected.
X
To eject aCD/DVD: press the 0009load/
eject button.
The magazine menu appears .The magazine
tray with the current disc is highlighted. 0001
Ejectp ossible
0002 Type of data medium
0014 Disc name (only if stored on the disc)
0013 Current disc CD/audio DVD and MP3 mode
195Audio Z
Page 198 of 274
X
Select a magazine tray containing a disc by
turning 003C0012003Dthe COMAND controller and
press 0037to confirm.
or
X Press a number key, e.g. 0029.
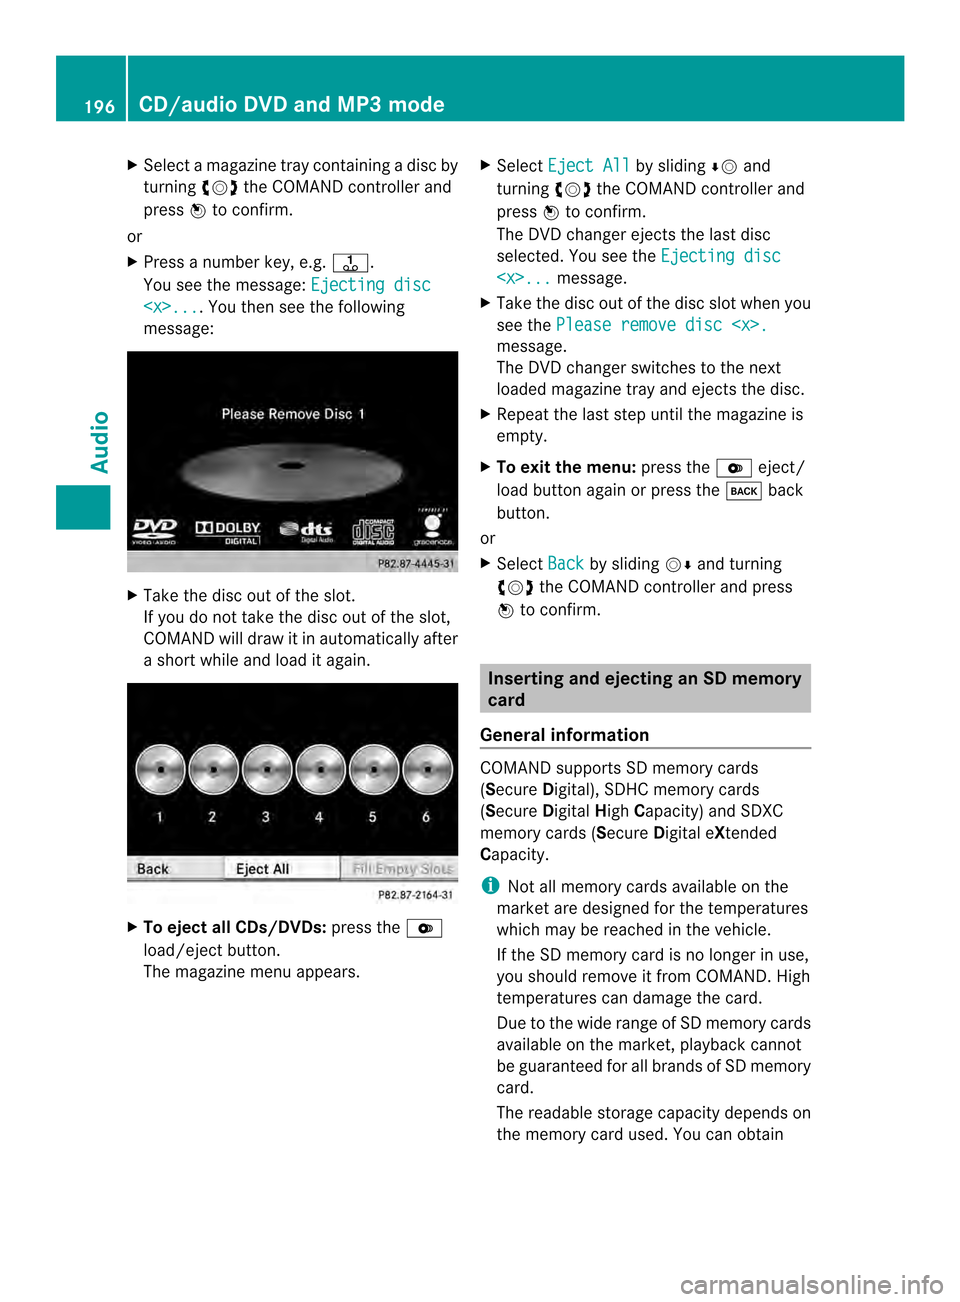
You see the message: Ejecting disc
ou then see the following
message: X
Take the disc out of the slot.
If you do not take the disc out of the slot,
COMAND will draw it in automatically after
a short while and load it again. X
To eject all CDs/DVDs: press the0009
load/eject button.
The magazine menu appears. X
Select Eject All by sliding
00080012and
turning 003C0012003Dthe COMAND controller and
press 0037to confirm.
The DVD changer ejects the last disc
selected. You see the Ejecting disc
X Take the disc out of the disc slot when you
see the Please remove disc
The DVD changer switches to the next
loaded magazine tray and ejects the disc.
X Repeat the last step until the magazine is
empty.
X To exit the menu: press the0009eject/
load button again or press the 000Aback
button.
or
X Select Back by sliding
00120008and turning
003C0012003D the COMAND controller and press
0037 to confirm. Inserting and ejecting an SD memory
card
General information COMAND supports SD memory cards
(Secure
Digital), SDHC memory cards
(Secure DigitalHighCapacity) and SDXC
memory cards (Secure Digital eXtended
Capacity.
i Not all memory cards available on the
market are designed for the temperatures
which may be reached in the vehicle.
If the SD memory card is no longer in use,
you should remove it from COMAND. High
temperatures can damage the card.
Due to the wide range of SD memory cards
available on the market, playback cannot
be guaranteed for all brands of SD memory
card.
The readable storage capacity depends on
the memory card used. You can obtain 196
CD/audio DVD and MP3 modeAudio
Page 199 of 274
further information at any authorized
Mercedes-Benz Center.
Insert an SD memory card X
Insert the memory card into the slot on the
control panel until it engages in place. The
side with the contacts must face
downwards and point towards the slot.
If no MP3 tracks can be found, you will see
a message to this effect.
The first 100 MP3 tracks are loaded. The
first MP3 track is then played. Further
tracks are loaded in the background; this is
indicated by an hourglass symbol.
Ejecting an SD memory card X
Press the memory card.
The memory card is ejected.
X Remove the memory card from slot. Connecting
aUSB device
The USB port is located in the stowage
compartment in the center console.
Electrical consumption at this connection
must not exceed a continuous current of
500 mA. If the electrical consumption is
higher, use a separate source to provide
power for the USB device (e.g.
12 Vp ower supply).
X Connect the USB device (e.g. USB stick)to
the USB port.
If no MP 3tracks can be found, you will see
a message to this effect.
The first 100 MP3 tracks are loaded. The
first MP3 track is then played. Further
tracks are loaded in the background; this is
indicated by an hourglass symbol.
i Due to the wide range of USB devices
available on the market, playback cannot
be guaranteed for all brands of USB device.
Information about suitable USB devices
can be obtained from an authorized
Mercedes-Benz Center. MP3 players must support Media Transfer
Protocol (MTP). The MTP mode must be
active. Switching to audio CD/DVD or MP3
mode
Inserting or connecting amedium X
Insert CDs/DVD s(Ypage 194)
or
X Insert an SD memory card (Y page 197)
or
X Connect a USB device (Y page 197).
COMAND loads the medium inserted and
starts to play it.
Switching modes using the function
button X
Press the 0007function button one or more
times.
By pressing the function button repeatedly,
you can change the operating mode in the
following order:
R CD/audio DVD/video DVD/MP3 CD/MP3
DVD in the DVD changer or single DVD
drive (disc mode)
R Memory card mode
R MUSIC REGISTER
R USB storage device
R Media Interface or audio AUX mode
R Bluetooth ®
audio mode
X Select an audio medium from the media list
(Y page 199).
Switching modes via the audio menu X
Select Audio in the main function bar by
sliding 00360012and turning 003C0012003Dthe COMAND
controller and press 0037to confirm.
The last active audio source is now
activated.
You can activate a differen taudio source
using the audio menu. CD/audio DVD and MP3 mode
197Audio Z
Page 200 of 274
X
Select Audio by sliding
00360012and turning
003C0012003D the COMAND controller and press
0037 to confirm.
The audio menu appears.
X Select Disc ,
Memory Card ,
Music Register ,
USB Storage or
Media Interface and press
0037to confirm.
This switches to the desired audio source.
X Select an audio mediu mfrom the media list
(Y page 199).
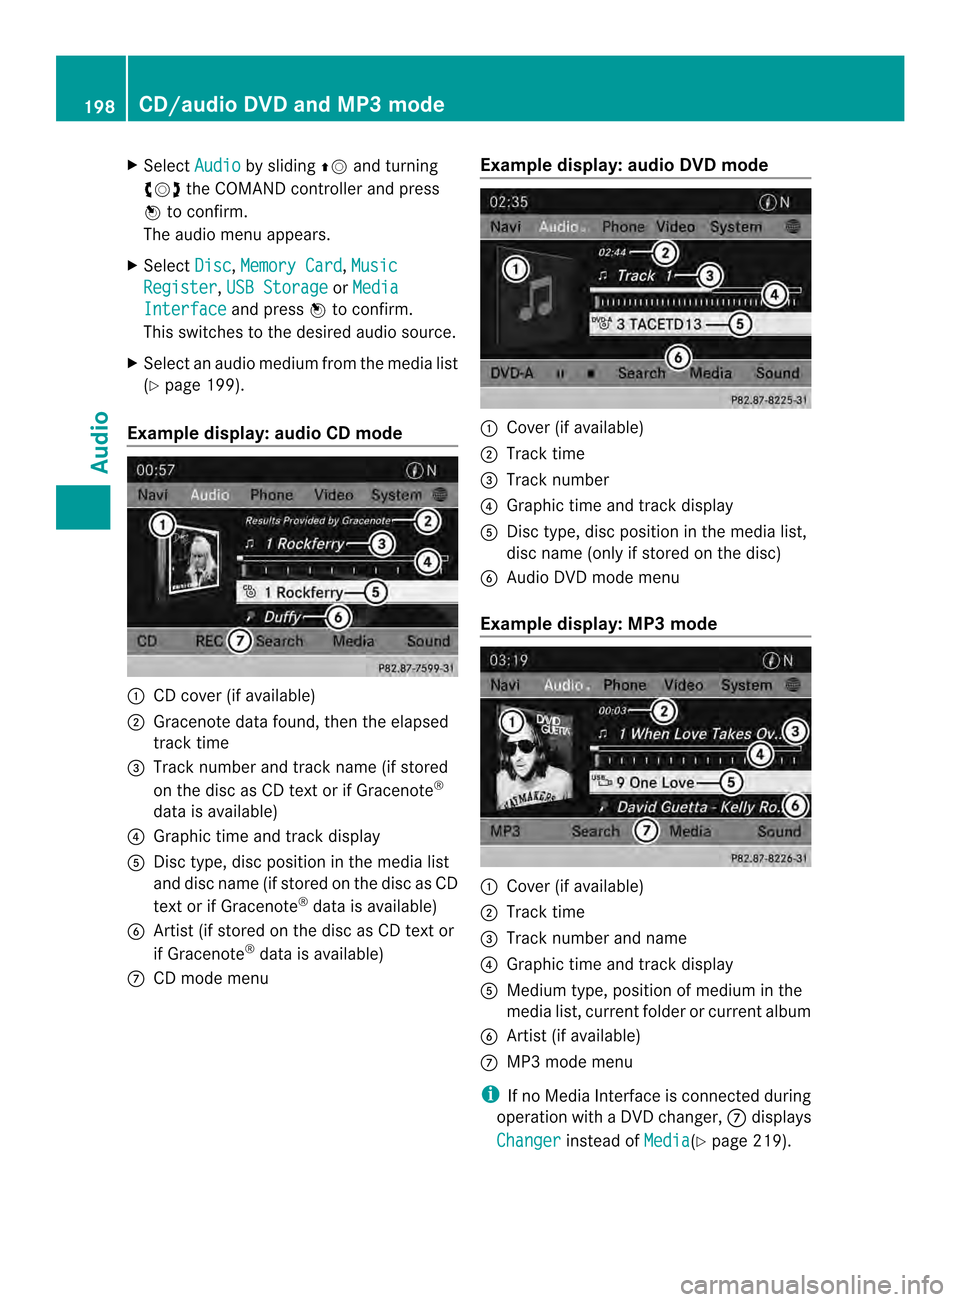
Example display: audio CD mode 0001
CD cover (if available)
0002 Gracenote data found, then the elapsed
track time
0014 Track number and track name (if stored
on the disc as CD text or if Gracenote ®
data is available)
0013 Graphic time and track display
0011 Disc type, disc position in the media list
and disc name (if stored on the disc as CD
text or if Gracenote ®
data is available)
0012 Artist (if stored on the disc as CD text or
if Gracenote ®
data is available)
0005 CD mode menu Example display: audio DVD mode 0001
Cove r(if available)
0002 Track time
0014 Track number
0013 Graphic time and track display
0011 Disc type, disc position in the media list,
disc name (only if stored on the disc)
0012 Audio DVD mode menu
Example display: MP3 mode 0001
Cover (if available)
0002 Track time
0014 Track number and name
0013 Graphic time and track display
0011 Medium type, position of medium in the
media list, current folder or current album
0012 Artis t(if available)
0005 MP3 mode menu
i If no Media Interface is connected during
operation with a DV Dchanger, 0005displays
Changer instead of
Media (Y
page 219). 198
CD/audio DVD and MP3 modeAudio