check engine MERCEDES-BENZ CL-Class 2014 C217 Owner's Guide
[x] Cancel search | Manufacturer: MERCEDES-BENZ, Model Year: 2014, Model line: CL-Class, Model: MERCEDES-BENZ CL-Class 2014 C217Pages: 494, PDF Size: 13.55 MB
Page 288 of 494
Problems with the transmission
Problem Possible causes/consequences and
M Solutions
The transmission has
problems shifting gear. The transmission is losing oil.
X
Have the transmission checked at a qualified specialist
workshop immediately. The acceleration ability
is deteriorating.
The transmission no
longer changes gear. The transmission is in emergency mode.
It is only possible to shift into
secondgear and reverse gear.
X Stop the vehicle.
X Shift the transmission to position P.
X Switch off the engine.
X Wait at least 10seconds before restarting the engine.
X Shift the transmission to position Dor R.
If D is selected, the transmission shifts into secondgear; ifRis
selected, the transmission shifts into reverse gear.
X Have the transmission checked at a qualified specialist
workshop immediately. Transfer case
This section is only valid for vehicles with 4-
wheel drive (4MATIC). Power is always
transmitted to both axles.
! Performance tests may only be carried
out on a 2-axle dynamometer. The brake
system or transfer case could otherwise be
damaged. Contact a qualified specialist
workshop for a performance test.
! To prevent ESP ®
from intervening, the
ignition must be switched off (SmartKey or
the Start/Stop button in position 0or 1) if:
R the electric parking brake is being tested
on a brake dynamometer.
R the vehicle is being towed with only one
axle raised (not permitted for vehicles
with 4MATIC).
The brake system could otherwise be
damaged.
! Vehicles with 4MATIC must not be towed
with either the front or the rear axle raised,
as doing so will damage the transmission. Refueling
Important safety notes
G
WARNING
Gasoline is highly flammable and poisonous.
It burns violently and can cause serious
personal injury.
Never allow sparks, flames or smoking
materials near gasoline.
Turn off the engine before refueling.
Whenever you are around gasoline, avoid
inhaling fumes and any skin or clothing
contact.
Direct skin contact with fuels and the
inhalation of fuel vapors are damaging to your
health. G
WARNING
Overfilling of the fuel tank may create
pressure in the system which could cause a
gas discharge. This could cause the gasoline
to spray back out when removing the fuel
pump nozzle, which could cause personal
injury. 286
RefuelingDriving and parking
Page 289 of 494
!
Do not use diesel to refuel vehicles with a
gasoline engine. Even small amounts of the
wrong fuel result in damage to the fuel
system and engine.
! Do not switch on the ignition if you
accidentally refuel with the wrong fuel.
Otherwise, the fuel will enter the fuel lines.
Notify a qualified specialist workshop and
have the fuel tank and fuel lines drained
completely.
! Overfilling the fuel tank could damage the
fuel system.
! Take care not to spill any fuel on painted
surfaces. You could otherwise damage the
paintwork.
! Use a filter when refueling from a fuel can.
Otherwise, the fuel lines and/or injection
system could be blocked by particles from
the fuel can.
Further information on fuel and on fuel grades
can be found in the "Fuel" section
(Y page 484). Refueling
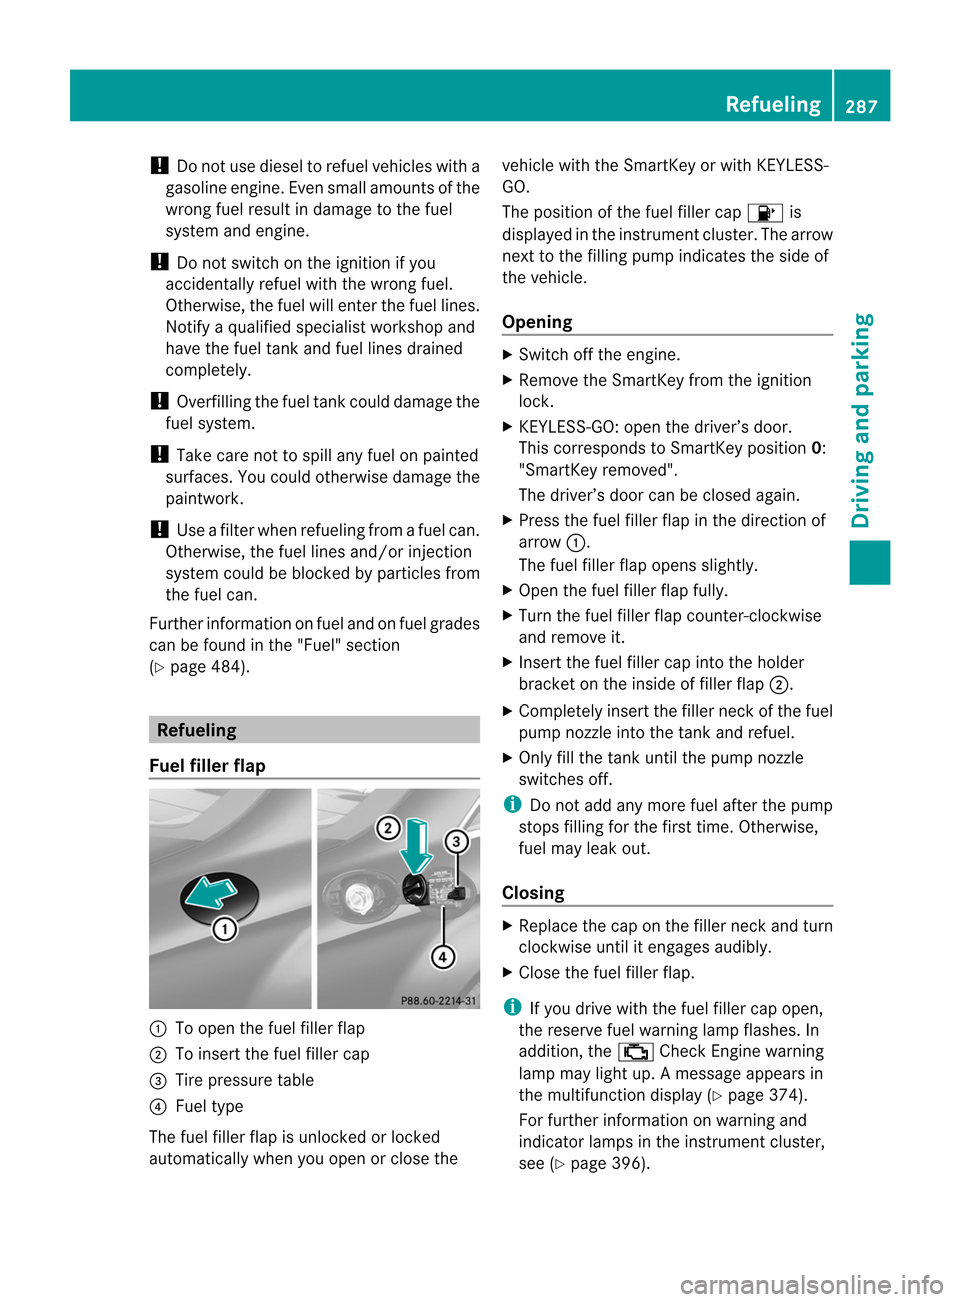
Fuel fillerf lap :
To open the fuel filler flap
; To inser tthe fuel filler cap
= Tire pressure table
? Fuel type
The fuel filler flap is unlocked or locked
automatically when you open or close the vehicle with the SmartKey or with KEYLESS-
GO.
The position of the fuel filler cap
8is
displayed in the instrumentc luster.The arrow
next to the filling pump indicates the side of
the vehicle.
Opening X
Switch off the engine.
X Remove the SmartKey from the ignition
lock.
X KEYLESS-GO: open the driver’s door.
This corresponds to SmartKey position 0:
"SmartKey removed".
The driver’s door can be closed again.
X Press the fuel filler flap in the direction of
arrow :.
The fuel filler flap opens slightly.
X Open the fuel filler flap fully.
X Turn the fuel filler flap counter-clockwise
and remove it.
X Insert the fuel filler cap into the holder
bracket on the inside of filler flap ;.
X Completely insert the filler neck of the fuel
pump nozzle into the tank and refuel.
X Only fill the tank until the pump nozzle
switches off.
i Do not add any more fuel after the pump
stops filling for the first time. Otherwise,
fuel may leak out.
Closing X
Replace the cap on the filler neck and turn
clockwise until it engages audibly.
X Close the fuel filler flap.
i If you drive with the fuel filler cap open,
the reserve fuel warning lamp flashes. In
addition, the ;Check Engine warning
lamp may light up. Amessage appears in
the multifunction display (Y page 374).
For further information on warning and
indicator lamps in the instrument cluster,
see (Y page 396). Refueling
287Driving and parking Z
Page 295 of 494
Steering and braking requires significantly
more effort and you could lose control of the
vehicle and cause an accident as a result.
Do not turn off the engine while the vehicle is
in motion.
Exhaust check G
WARNING
Inhalation of exhaus tgas is hazardous to your
health. All exhaust gas contains carbon
monoxide (CO), and inhaling it can cause
unconsciousness and possible death.
Do no trun the engin einconfined areas (such
as a garage) which are not properly ventilated.
If you think that exhaust gas fumes are
entering the vehicle while driving, have the
cause determined and corrected
immediately. If you must drive under these
conditions, drive only with at least one
window fully open at all times.
Certain engine systems are designed to keep
the level of poisonous components in exhaust
fumes within legal limits.
These systems only work at peak efficiency if
they are serviced exactly in accordance with
the manufacturer's specifications. For this
reason, all work on the engine should only be
carried out by qualified and authorized
Mercedes-Benz technicians.
The engine settings must not be changed
under any circumstances. Furthermore, all
specific service work must be carried out at
regular intervals and in accordance with the
Mercedes-Benz service requirements. Details
can be found in the Maintenance Booklet. Braking
Important safety notes G
WARNING
On slippery road surfaces, never downshift in
order to obtain braking action. This could
result in drive wheel slip and reduced vehicle control. Your vehicle's ABS will not prevent
this type of loss of control.
G
WARNING
Make sure that you do not endanger other
road users when you apply the brakes.
Downhill gradients !
On long and steep gradients, you must
reduce the load on the brakes by shifting
early to a lower gear. This allows you to take
advantage of the engine braking effect and
helps avoid overheating and excessive
wear of the brakes.
When you take advantage of the engine
braking effect, a drive wheel may not turn
for some time, e.g. on a slippery road
surface. This could cause damage to the
drive train. This type of damage is not
covered by the Mercedes-Benz warranty.
Heavy and light loads G
WARNING
Depressing the brake pedal constantly results
in excessive and premature wear to the brake
pads.
It may also cause the brakes to overheat,
seriously impairing their effectiveness. It may
then not be possible to stop the vehicle in
sufficient time to avoid an accident.
If the brakes have been subjected to a heavy
load, do not stop the vehicle immediately, but
drive on for a short while. This allows the
airflow to cool the brakes more quickly.
Wet roads G
WARNING
After driving in heavy rain for some time
without applying the brakes or through water
deep enough to wet brake components, the
first braking action may be somewhat
reduced. You have to depress the brake pedal Driving tips
293Driving and parking
Z
Page 296 of 494
more firmly. Maintain a safe distance from
vehicles in front.
After driving on a wet road or having the
vehicle washed, brake firmly while paying
attention to the traffic conditions. This will
warm up the brake discs, thereby drying them
more quickly and protecting them against
corrosion.
Limited braking performance on salt-
treated roads G
WARNING
The layer of saltont he brake discs and the
brake pads/linings may cause a delay in the
braking effect, resulting in a significantly
longer braking distance, which could lead to
an accident.
To avoid this danger, you should:
R occasionally brake carefully, without
putting other road users at risk, when you
are driving on salted roads. This helps to
remove any salt that may have started to
build up on the brake discs and the brake
pads/linings.
R maintain a greater distance to the vehicle
ahead and drive with particular care.
R carefully apply the brakes at the end of a
trip and immediately after commencing a
new trip, so that salt residues are removed
from the brake discs.
Servicing the brakes !
If the red brake warning lamp lights up in
the instrumentc luster and you hear a
warning tone while the engine is running,
the brake fluid level may be too low.
Observe additional warning messages in
the multifunction display.
The brake fluid level may be too low due to
brake pad wear or leaking brake lines.
Have the brake system checked
immediately. This work should be carried
out at a qualified specialist workshop. All checks and maintenance work on the
brake system must be carried out at a
qualified specialist workshop. Consult a
qualified specialist workshop to arrange this.
Have brake pads installed and brake fluid
replaced at a qualified specialist workshop. G
WARNING
If brake pads or brake fluid other than those
recommended are used, the braking
properties of the vehicle can be degraded to
an extent that safe braking is substantially
impaired. This could result in an accident.
! Vehicles with 4MATIC: function or
performance tests may only be carried out
on a 2-axle dynamometer. If you are
planning to have the vehicle tested on such
a dynamometer, contact an authorized
Mercedes-Benz Center to obtain further
information first. Otherwise, you could
damage the drive train or the brake system.
! Vehicles with 4MATIC: as the ESP®
system operates automatically, the engine
and the ignition must be switched off
(SmartKey in position 0or 1in the ignition
lock or Start/Stop button in position 0or
1) when the electric parking brake is being
tested on a brake dynamometer.
Braking maneuvers triggere dautomatically
by ESP ®
may seriously damage the brake
system.
! Vehicles with 4MATIC: as the ESP®
system operates automatically, the engine
and the ignition system must be switched
off (SmartKey in position 0or 1in the
ignition lock or Start/Stop button in
position 0or 1) when:
R testing the electric parking brake on a
brake dynamometer.
R you intend to have the vehicle towed with
one of the axles raised.
Braking maneuvers triggered automatically
by ESP ®
may seriously damage the brake
system. 294
Driving tipsDriving and pa
rking
Page 297 of 494
If the brake system has only been subject to
moderate loads, you should test the
functionality of yourb rakes at regular
intervals. To do so, press firmly on the brake
pedal when driving at a high speed. This
improves the grip of the brake pads. G
WARNING
Make sure that you do not endange rother
road users when you apply the brakes.
You can find a description of Brake Assist
(BAS) on ( Ypage 65) or of BAS PLUS on
(Y page 66).
High-performance brake system for
AM Gvehicles The high-performance brake system is
installed only on the CL 63 AMG and
CL 65 AMG. G
WARNING
New vehicle brake pads and discs, and
replacemen tbrake pads and discs may take
several hundred miles of driving until they
provide optimu mbraking efficiency. Until that
time, you may need to use increased brake
pedal pressure while braking. Please be aware
of this and adjust yourd riving and braking
accordingly during this break-in period.
Excessive high-demand braking will cause
correspondingly high brake wear. Please be
attentive to the brake warning lamp in the
instrument cluster and brake condition
messages in the multifunction display.
Especially for high performance driving, it is
important to maintain and have the brake
system checked regularly.
The high-performance brake system is
designed for heavy loads. This may lead to
noise when braking. This willd epend on:
R speed
R braking force
R environmental conditions, such as
temperature and humidity The wear of individual components of the
brake system, such as the brake pads/linings
or brake discs, depends on the individual
driving style and operatin
gconditions.
For this reason, it is impossible to state a
mileage that will be valid under all
circumstances. An aggressive driving style
will lead to high wear. You can obtain further
information about this from your authorized
Mercedes-Benz Center. Driving on wet roads
Hydroplaning If water has accumulated to a certain depth
on the road surface, there is a danger of
hydroplaning occurring, even if:
R
you drive at low speeds.
R the tires have adequate tread depth.
For this reason, in the event of heavy rain or
in conditions in which hydroplaning can
occur, you must drive in the following
manner:
R lower your speed.
R avoid ruts.
R brake carefully.
Driving on flooded roads !
Do not drive through flooded areas.
Check the depth of any water before driving
through it. Drive slowly through standing
water. Otherwise, water may enter the
vehicle interior or the engine compartment.
This can damage the electronic
components in the engine or the automatic
transmission. Water can also be drawn in
by the engine's air suction nozzles and this
can cause engine damage. Driving tips
295Driving and parking Z
Page 338 of 494
Useful information
i This Operator's Manual describes all
models and all standard and optional
equipment of your vehicle available at the
time of publication of the Operator's
Manual. Country-specific differences are
possible. Please note that your vehicle may
not be equipped with all features
described. This also applies to safety-
related systems and functions.
i Please read the information on qualified
specialist workshops (Y page 29).Important safety notes
You will find an illustration of the instrument
cluster in the "At a glance" section
(Y page 35). G
WARNING
The driver's concentration must always be
directed primarily at road traffic.
For your safety and the safety of others,
selecting features through the multifunction
steering wheel should only be done by the
driver when traffic and road conditions permit
it to be done safely.
Bear in mind that at a speed of only 30 mph
(approximately 50 km/h), the vehicle covers
a distance of 44 feet (approximately 14 m) per
second. G
WARNING
No messages will be displayed if either the
instrument cluster or the multifunction
display is inoperative.
As a result, you will not be able to see
information about your driving conditions,
such as
R speed
R outside temperature
R warning/indicato rlamps R
malfunction/warning messages
R failure of any systems
Driving characteristics may be impaired.
If you must continue to drive, do so with added
caution .Contactana uthorized Mercedes-
Ben zCenter as soon as possible. G
WARNING
Malfunction and warning messages are only
indicated for certain systems and are
intentionally not very detailed. The
malfunction and warning messages are
simply a reminder with respect to the
operation of certain systems. They do not
replace the owner's and/or driver's
responsibility to maintain the vehicle's
operating safety. Have all required
maintenance and safety checks performed on
the vehicle. Bring the vehicle to an authorized
Mercedes-Benz Center to address the
malfunction and warning messages. Displays and operation
Coolant temperature display
G
WARNING
Driving when your engine is overheated can
cause some fluids which may have leaked into
the engine compartment to catch fire. You
could be seriously burned.
Steam from an overheated engine can cause
serious burns which can occur just by opening
the engine hood. Stay away from the engine
if you see or hear steam coming from it.
Stop the vehicle in a safe location away from
other traffic. Turn off the engine, get out of the
vehicle and do not stand near the vehicle until
the engine has cooled down.
The coolant temperature gauge is in the
instrument cluster on the left-hand side.
Under normal operating conditions and with
the specified coolant level, the coolant
temperature may rise to 248 ‡ (120 †). 336
Displays and operationOn-board computer and displays
Page 351 of 494
X
Press the =or; button on the
steering wheel to select the DriveAssistmenu.
X Press 9or: to select Blind Spot
Assist .
X Press the abutton.
The curren tselection is displayed.
X To activate/deactivate: press thea
button again.
Activating/deactivating Active Lane
Keeping Assist You can use the
Lane Keeping Assist function to activat
eor deactivate Active Lane
Keeping Assist (Y page 330).
X Press the =or; button on the
steering wheel to select the DriveAssistmenu.
X Press 9or: to select Lane Keeping Assist .
X Press the abutton.
The current selection is displayed.
X To activate/deactivate: press thea
button again.
When Active Lane Keeping Assist is activated,
the à symbol appears in the multifunction
display when the ignitio nis on. Maintenance menu
In the Service menu, you have the following
options:
R calling up display messages (Y page 352)
R checking the tire pressure electronically
(Y page 461)
R calling up a service due date
(Y page 426)
R checking the oil level (Y page 421) Settings menu
Introduction The
Settings menu can be used for:
R Switching the daytime running lamps on/
off
R switching Adaptive Highbeam Assist on/
off
R showing or hiding the additional
speedometer
R selecting the units for speed and distance
R activating/deactivating the radar sensor
system
Switching the daytime running lamps
on/off This function is not available in Canada.
If you have activated the
Daytime running
lights function and the light switch is in the
$ orc position, the daytime running
lamps are automatically switched on when
the engine is running.
Depending on the ambient light, the following
will additionally light up:
R parking lamps
R tail lamps
R license plate lamp
R side marker lamps
If you turn the light switch to a different
position, the corresponding lights are
switched on. If you switch off the daytime
running lamps at night, make sure that the
light switch is set to Lorc.
The factory setting is On .
X Press the =or; button on the
steering wheel to select the Settings menu.
X Press the 9or: button to select
daytime running lamps .
X Press the abutton to confirm.
X To activate/deactivate: pressa
again. Menus and submenus
349On-board computer and displays Z
Page 373 of 494
Engine
Display messages Possible causes/consequences and
M Solutions
+
Check Coolant
Level See Oper.
Manual The coolant level is too low.
!
Avoid making long journeys with too little coolant in the engine
cooling system. The engine will otherwise be damaged.
X Add coolant, observing the warning notes before doing so
(Y page 424).
X If coolant needs to be added more often than usual, have the
engine coolant system checked at a qualified specialist
workshop. Displa
ymessages
371On-board computer and displays Z
Page 375 of 494
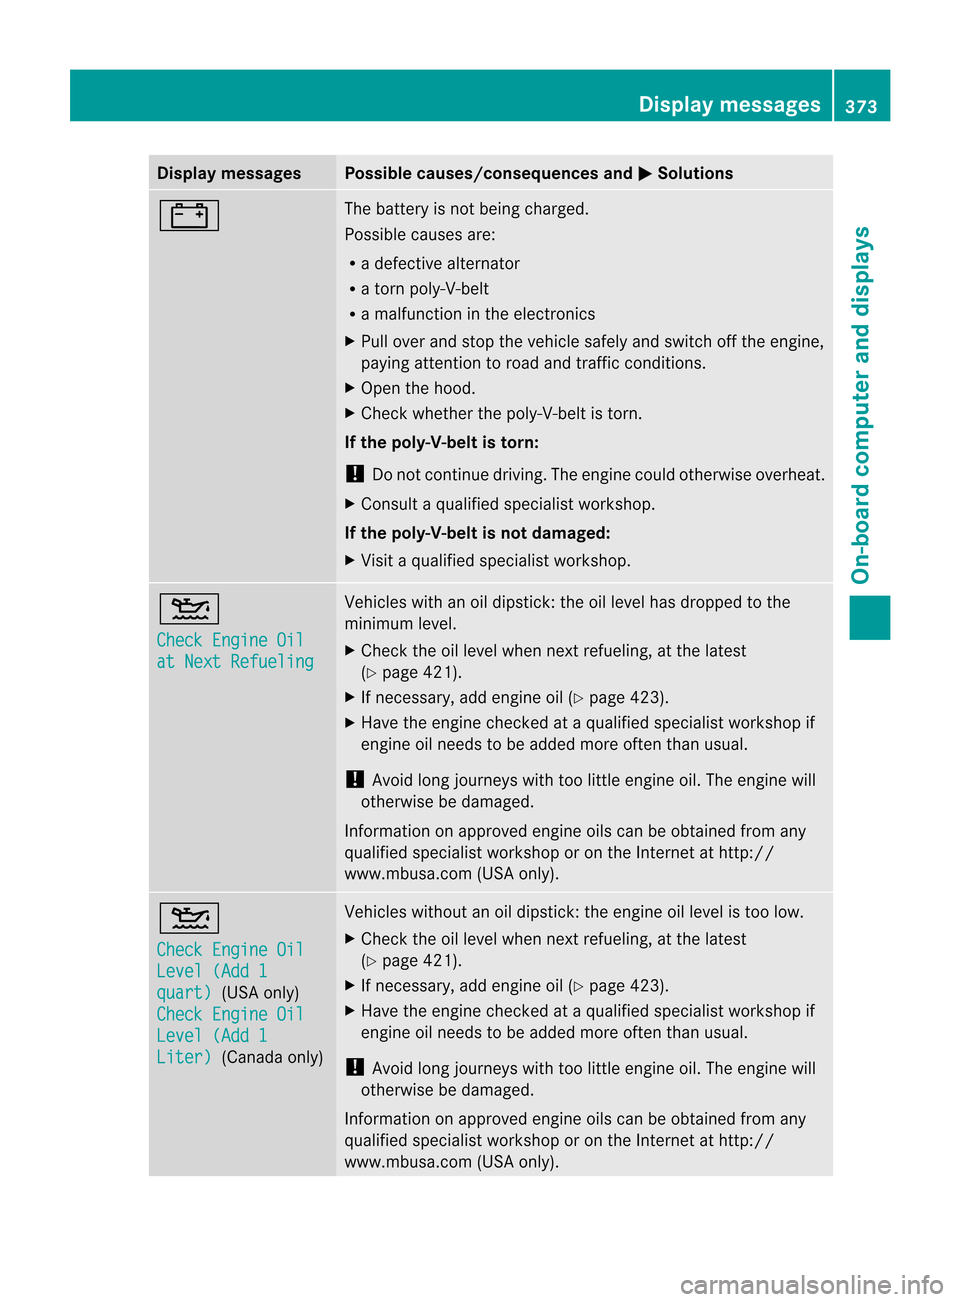
Display messages Possible causes/consequences and
M Solutions
# The battery is no
tbeing charged.
Possible causes are:
R a defective alternator
R a torn poly-V-belt
R a malfunction in the electronics
X Pull over and stop the vehicle safely and switch off the engine,
paying attention to road and traffic conditions.
X Open the hood.
X Check whether the poly-V-belt is torn.
If the poly-V-belt is torn:
! Do not continue driving. The engine could otherwise overheat.
X Consult a qualified specialist workshop.
If the poly-V-belt is not damaged:
X Visit a qualified specialist workshop. 4
Check Engine Oil
at Next Refueling Vehicles with an oil dipstick
:the oil level has dropped to the
minimum level.
X Check the oil level when next refueling, at the latest
(Y page 421).
X If necessary, add engine oil (Y page 423).
X Have the engine checked at a qualified specialist workshop if
engine oil needs to be added more often than usual.
! Avoid long journeys with too little engine oil. The engine will
otherwise be damaged.
Information on approved engine oils can be obtained from any
qualified specialist workshop or on the Internet at http://
www.mbusa.com (USA only). 4
Check Engine Oil
Level (Add 1
quart) (USA only)
Check Engine Oil Level (Add 1
Liter) (Canada only) Vehicles without an oil dipstick: the engine oil level is too low.
X
Check the oil level when next refueling, at the latest
(Y page 421).
X If necessary, add engine oil (Y page 423).
X Have the engine checked at a qualified specialist workshop if
engine oil needs to be added more often than usual.
! Avoid long journeys with too little engine oil. The engine will
otherwise be damaged.
Information on approved engine oils can be obtained from any
qualified specialist workshop or on the Internet at http://
www.mbusa.com (USA only). Display messages
373On-board computer and displays Z
Page 376 of 494
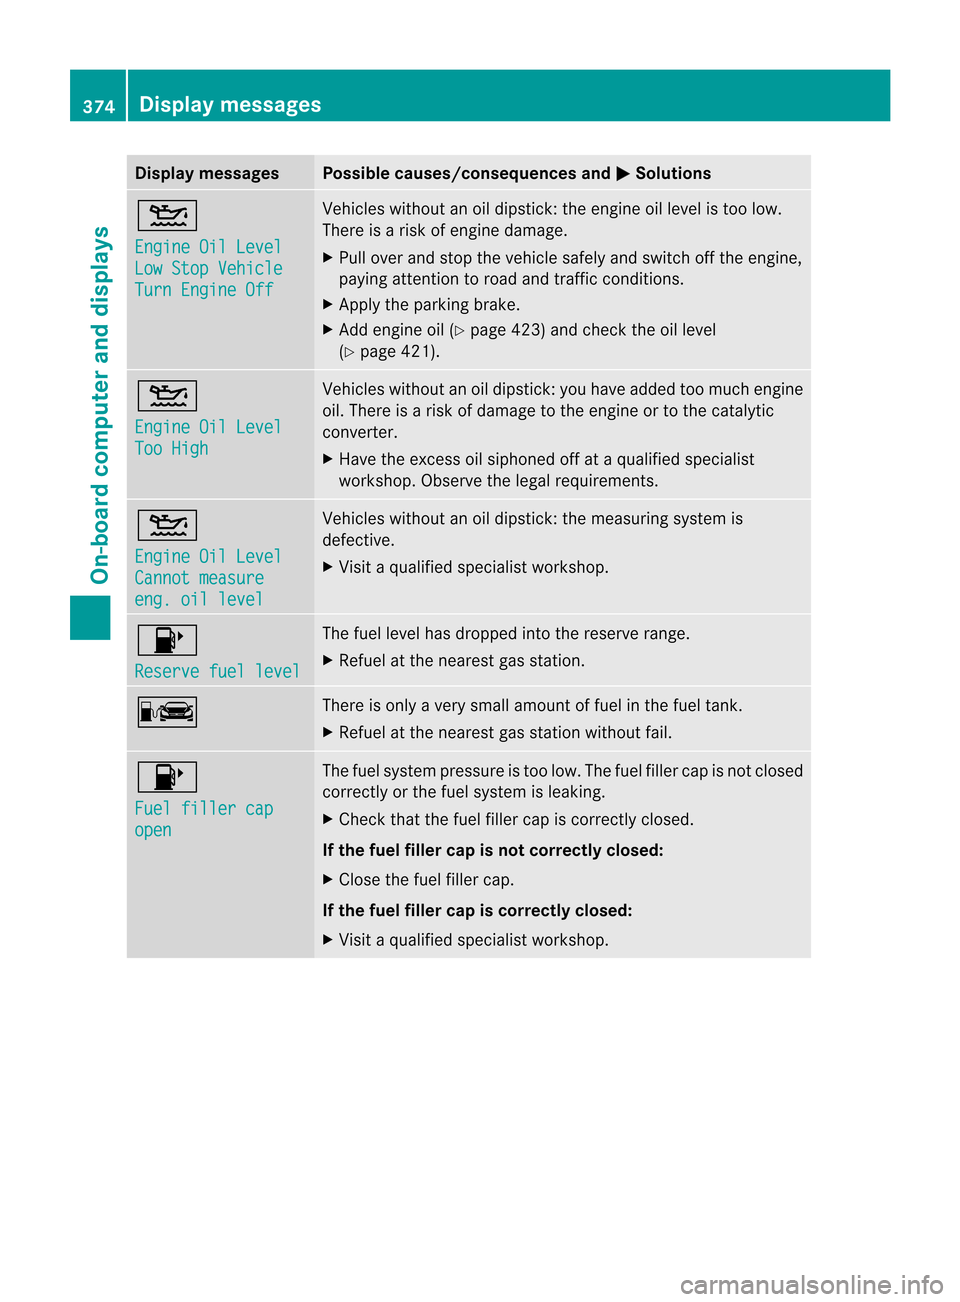
Display messages Possible causes/consequences and
M Solutions
4
Engine Oil Level
Low Stop Vehicle
Turn Engine Off Vehicles without an oil dipstick
:the engine oil level is too low.
There is a risk of engine damage.
X Pull over and stop the vehicle safely and switch off the engine,
paying attention to road and traffic conditions.
X Apply the parking brake.
X Add engine oil (Y page 423) and check the oil level
(Y page 421). 4
Engine Oil Level
Too High Vehicles without an oil dipstick: you have added too much engine
oil. There is a risk of damage to the engine or to the catalytic
converter.
X
Have the excess oil siphoned off at a qualified specialist
workshop. Observe the legal requirements. 4
Engine Oil Level
Cannot measure
eng. oil level Vehicles without an oil dipstick: the measuring system is
defective.
X
Visit a qualified specialist workshop. 8
Reserve fuel level The fuel level has dropped into the reserve range.
X
Refuel at the nearest gas station. C There is only a very small amount of fuel in the fuel tank.
X
Refuel at the nearest gas station without fail. 8
Fuel filler cap
open The fuel system pressure is too low. The fuel filler cap is not closed
correctly or the fuel system is leaking.
X
Check that the fuel filler cap is correctly closed.
If the fuel filler cap is not correctly closed:
X Close the fuel filler cap.
If the fuel filler cap is correctly closed:
X Visit a qualified specialist workshop. 374
Display messagesOn-board computer and displays