MERCEDES-BENZ CL COUPE 2009 Owners Manual
Manufacturer: MERCEDES-BENZ, Model Year: 2009, Model line: CL COUPE, Model: MERCEDES-BENZ CL COUPE 2009Pages: 421, PDF Size: 10.78 MB
Page 251 of 421
The
AIRMATIC COMFORT message appears
in the multi-function display. Active Body Control (ABC)
Vehicle level Your vehicle automatically adjusts its ride
height to reduce petrol consumption and
improve driving safety.
Depending on the vehicle height that has
been set, the vehicle automatically adjusts its
height dependent on the current speed. The
vehicle is lowered by up to 10 mm as the
speed increases. As the speed is reduced, the
vehicle is raised up to the set vehicle height. G
Risk of injury
The vehicle is lowered when the engine is
switched off. Therefore, make sure that
nobody is in the vicinity of the wheel housing
or under the vehicle when you switch off the
engine. Otherwise, limbs could become trap-
ped.
! The vehicle is lowered by about 5 mm
when the engine is switched off. When
parking, make sure that you stop your vehi-
cle so that it does not make contact with
the kerb as it is lowered. Otherwise, the
vehicle could be damaged.
Setting the vehicle level manually
Select the "Normal" setting for normal road
surfaces and "Raised" for driving with snow
chains or on particularly poor road surfaces. G
Risk of injury
Make sure that nobody is in the vicinity of the
wheel housing or under the vehicle while low-
ering the vehicle when it is stationary. Other-
wise, limbs could become trapped. X
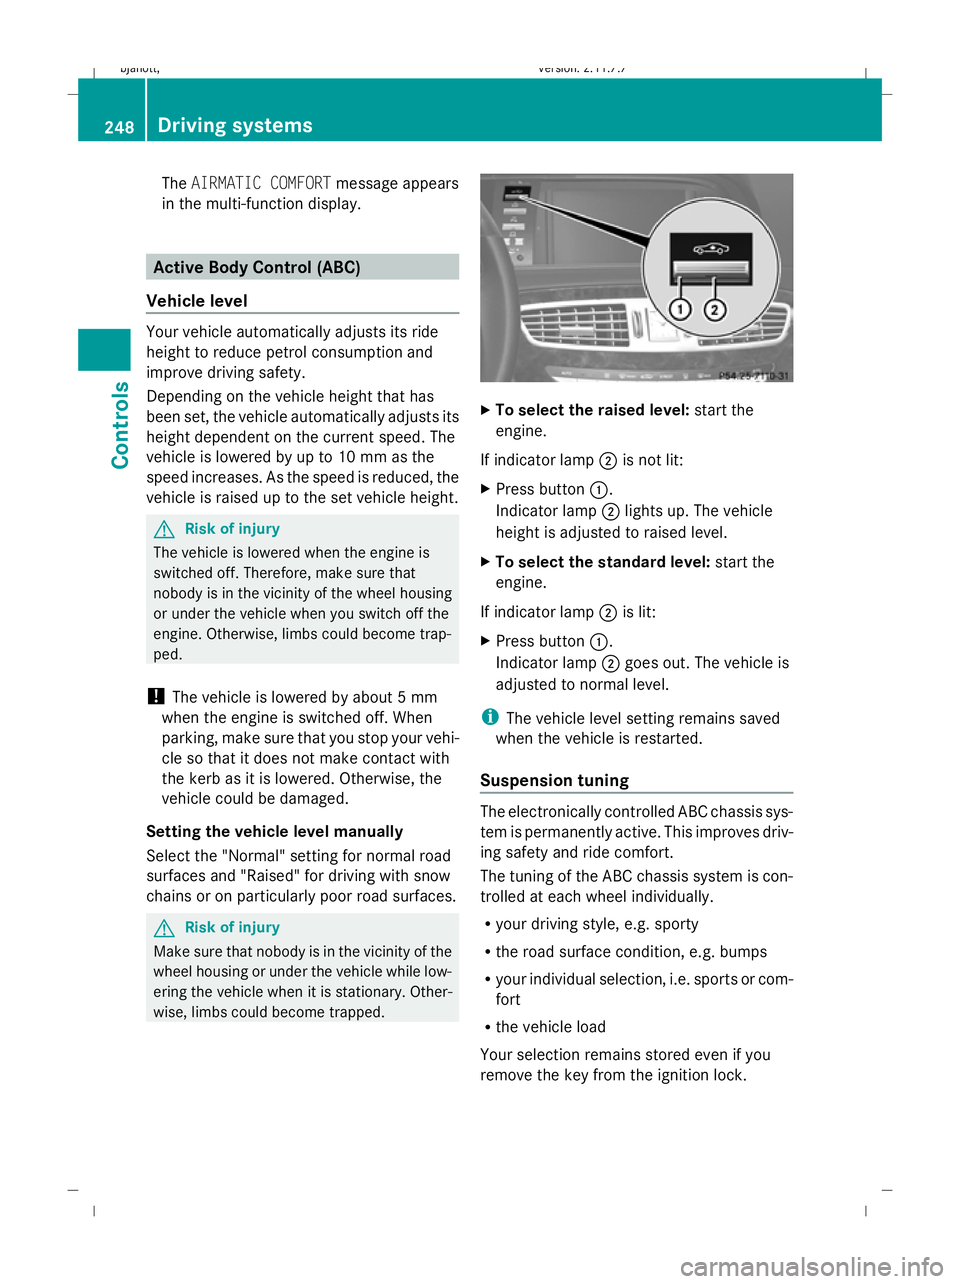
To select the raised level: start the
engine.
If indicator lamp ;is not lit:
X Press button :.
Indicator lamp ;lights up. The vehicle
height is adjusted to raised level.
X To select the standard level: start the
engine.
If indicator lamp ;is lit:
X Press button :.
Indicator lamp ;goes out. The vehicle is
adjusted to normal level.
i The vehicle level setting remains saved
when the vehicle is restarted.
Suspension tuning The electronically controlled ABC chassis sys-
tem is permanently active. This improves driv-
ing safety and ride comfort.
The tuning of the ABC chassis system is con-
trolled at each wheel individually.
R your driving style, e.g. sporty
R the road surface condition, e.g. bumps
R your individual selection, i.e. sports or com-
fort
R the vehicle load
Your selection remains stored even if you
remove the key from the ignition lock. 248
Driving systemsControls
216_AKB; 2; 3, en-GB
bjanott,
Version: 2.11.7.7 2009-02-27T14:54:17+01:00 - Seite 248
Dateiname: 6515230602_buchblock.pdf; erzeugt am 04. Mar 2009 11:16:02; WK
Page 252 of 421
Sports tuning
The firmer suspension tuning in sports mode
ensures even better contact with the road.
Select this mode if you prefer firm suspension
tuning.
X
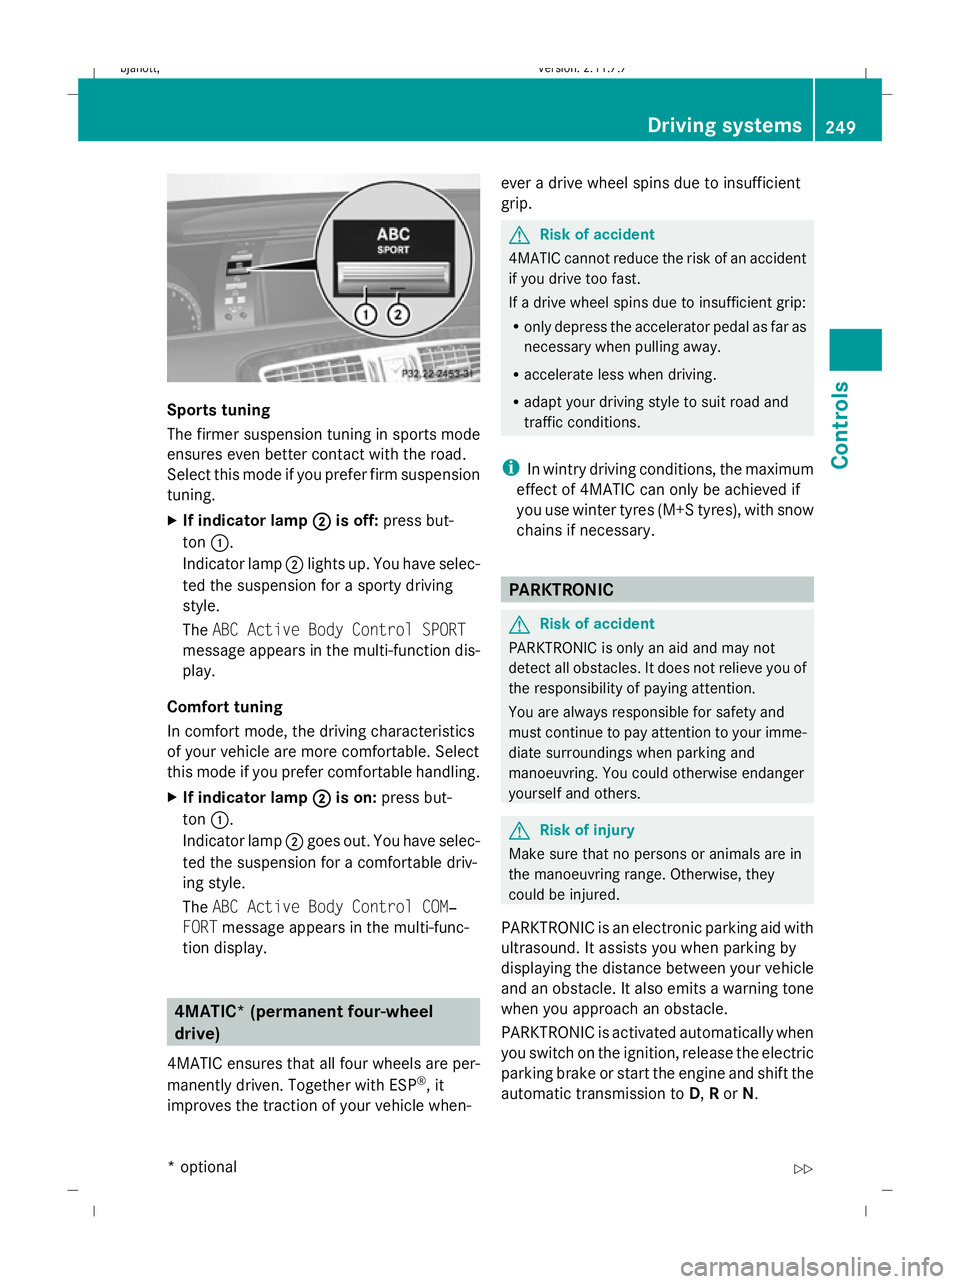
If indicator lamp ;
; is off: press but-
ton :.
Indicator lamp ;lights up. You have selec-
ted the suspension for a sporty driving
style.
The ABC Active Body Control SPORT
message appears in the multi-function dis-
play.
Comfort tuning
In comfort mode, the driving characteristics
of your vehicle are more comfortable. Select
this mode if you prefer comfortable handling.
X If indicator lamp ; ;is on: press but-
ton :.
Indicator lamp ;goes out. You have selec-
ted the suspension for a comfortable driv-
ing style.
The ABC Active Body Control COM‐
FORT message appears in the multi-func-
tion display. 4MATIC* (permanent four-wheel
drive)
4MATIC ensures that all four wheels are per-
manently driven. Together with ESP ®
, it
improves the traction of your vehicle when- ever a drive wheel spins due to insufficient
grip. G
Risk of accident
4MATIC cannot reduce the risk of an accident
if you drive too fast.
If a drive wheel spins due to insufficient grip:
R only depress the accelerator pedal as far as
necessary when pulling away.
R accelerate less when driving.
R adapt your driving style to suit road and
traffic conditions.
i In wintry driving conditions, the maximum
effect of 4MATIC can only be achieved if
you use winter tyres (M+S tyres), with snow
chains if necessary. PARKTRONIC
G
Risk of accident
PARKTRONIC is only an aid and may not
detect all obstacles. It does not relieve you of
the responsibility of paying attention.
You are always responsible for safety and
must continue to pay attention to your imme-
diate surroundings when parking and
manoeuvring. You could otherwise endanger
yourself and others. G
Risk of injury
Make sure that no persons or animals are in
the manoeuvring range. Otherwise, they
could be injured.
PARKTRONIC is an electronic parking aid with
ultrasound. It assists you when parking by
displaying the distance between your vehicle
and an obstacle. It also emits a warning tone
when you approach an obstacle.
PARKTRONIC is activated automatically when
you switch on the ignition, release the electric
parking brake or start the engine and shift the
automatic transmission to D,Ror N. Driving systems
249Controls
* optional
216_AKB; 2; 3, en-GB
bjanott,
Version: 2.11.7.7 2009-02-27T14:54:17+01:00 - Seite 249 Z
Dateiname: 6515230602_buchblock.pdf; erzeugt am 04. Mar 2009 11:16:02; WK
Page 253 of 421
PARKTRONIC is deactivated at speeds above
18 km/h. PARKTRONIC is reactivated at
lower speeds. PARKTRONIC is deactivated
when you shift the automatic transmission to
P or engage the electric parking brake and
switch off the engine.
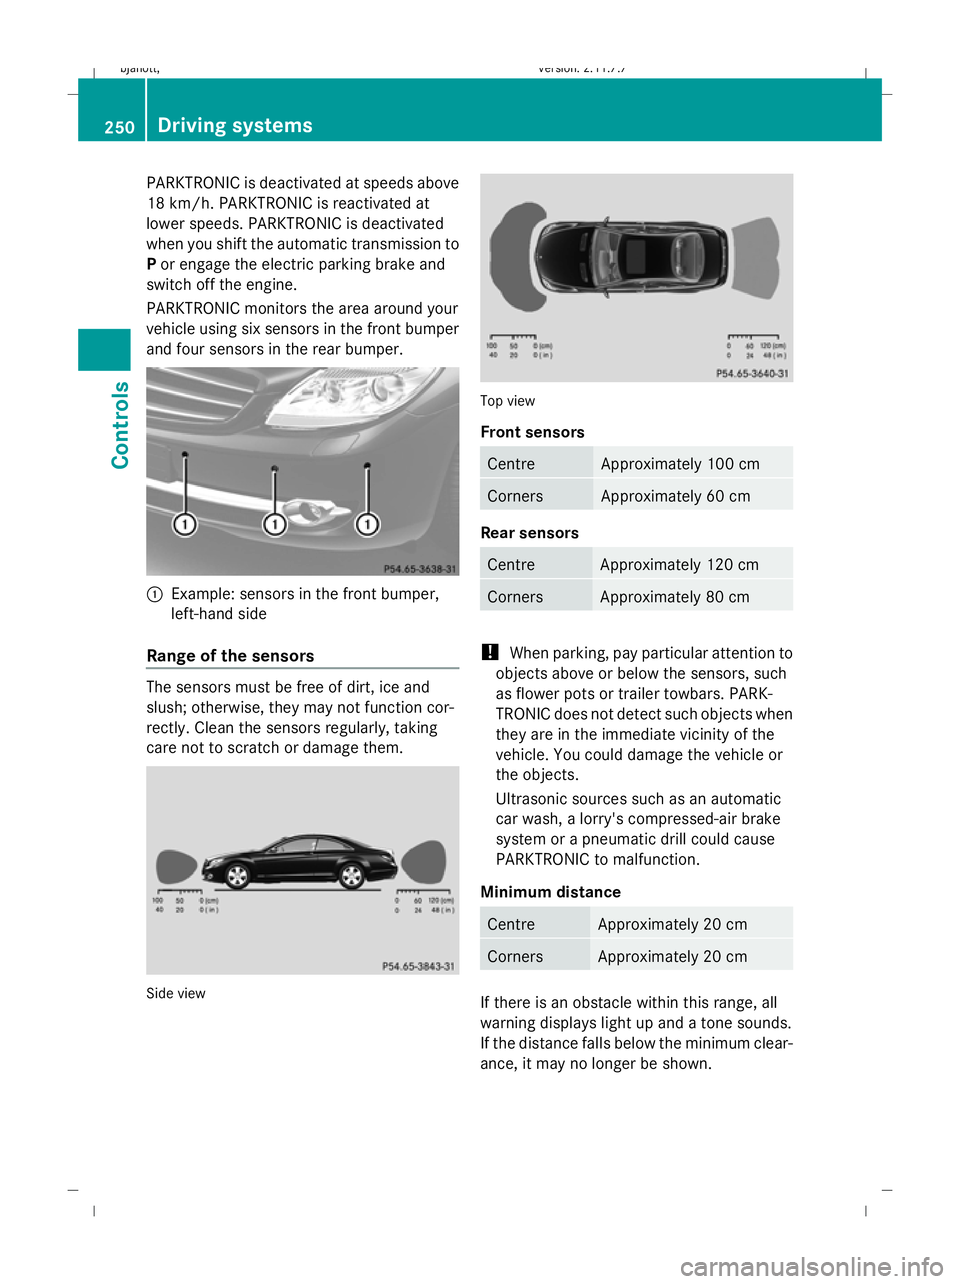
PARKTRONIC monitors the area around your
vehicle using six sensors in the front bumper
and four sensors in the rear bumper. :
Example: sensors in the front bumper,
left-hand side
Range of the sensors The sensors must be free of dirt, ice and
slush; otherwise, they may not function cor-
rectly. Clean the sensors regularly, taking
care not to scratch or damage them. Side view Top view
Front sensors
Centre Approximately 100 cm
Corners Approximately 60 cm
Rear sensors
Centre Approximately 120 cm
Corners Approximately 80 cm
!
When parking, pay particular attention to
objects above or below the sensors, such
as flower pots or trailer towbars. PARK-
TRONIC does not detect such objects when
they are in the immediate vicinity of the
vehicle. You could damage the vehicle or
the objects.
Ultrasonic sources such as an automatic
car wash, a lorry's compressed-air brake
system or a pneumatic drill could cause
PARKTRONIC to malfunction.
Minimum distance Centre Approximately 20 cm
Corners Approximately 20 cm
If there is an obstacle within this range, all
warning displays light up and a tone sounds.
If the distance falls below the minimum clear-
ance, it may no longer be shown.250
Driving systemsControls
216_AKB; 2; 3, en-GB
bjanott,
Version: 2.11.7.7 2009-02-27T14:54:17+01:00 - Seite 250
Dateiname: 6515230602_buchblock.pdf; erzeugt am 04. Mar 2009 11:16:03; WK
Page 254 of 421
Warning displays
The warning displays show the distance
between the sensors and the obstacle. The
warning display for the front area is in the
instrument cluster. The warning display for
the rear area is located on the roof lining in
the rear compartment.
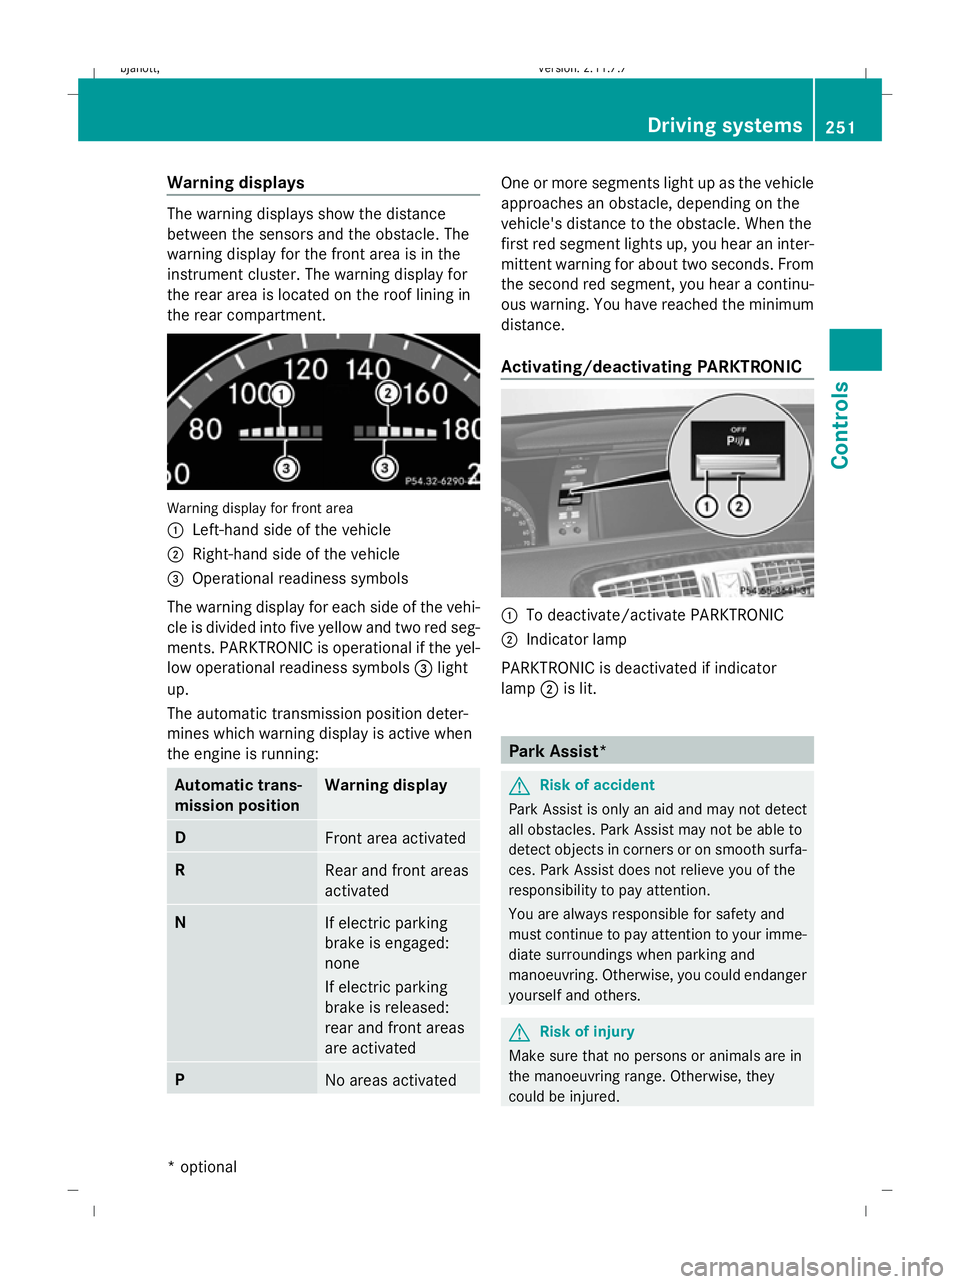
Warning display for front area
:
Left-hand side of the vehicle
; Right-hand side of the vehicle
= Operational readiness symbols
The warning display for each side of the vehi-
cle is divided into five yellow and two red seg-
ments. PARKTRONIC is operational if the yel-
low operational readiness symbols =light
up.
The automatic transmission position deter-
mines which warning display is active when
the engine is running: Automatic trans-
mission position Warning display
D
Front area activated
R
Rear and front areas
activated
N
If electric parking
brake is engaged:
none
If electric parking
brake is released:
rear and front areas
are activated
P
No areas activated One or more segments light up as the vehicle
approaches an obstacle, depending on the
vehicle's distance to the obstacle. When the
first red segment lights up, you hear an inter-
mittent warning for about two seconds. From
the second red segment, you hear a continu-
ous warning. You have reached the minimum
distance.
Activating/deactivating PARKTRONIC
:
To deactivate/activate PARKTRONIC
; Indicator lamp
PARKTRONIC is deactivated if indicator
lamp ;is lit. Park Assist*
G
Risk of accident
Park Assist is only an aid and may not detect
all obstacles. Park Assist may not be able to
detect objects in corners or on smooth surfa-
ces. Park Assist does not relieve you of the
responsibility to pay attention.
You are always responsible for safety and
must continue to pay attention to your imme-
diate surroundings when parking and
manoeuvring. Otherwise, you could endanger
yourself and others. G
Risk of injury
Make sure that no persons or animals are in
the manoeuvring range. Otherwise, they
could be injured. Driving systems
251Controls
* optional
216_AKB; 2; 3, en-GB
bjanott,
Version: 2.11.7.7 2009-02-27T14:54:17+01:00 - Seite 251 Z
Dateiname: 6515230602_buchblock.pdf; erzeugt am 04. Mar 2009 11:16:03; WK
Page 255 of 421
!
You must deactivate the radar sensor sys-
tem in certain countries and near radio
telescope facilities. Further information
can be found in the index under "Radar
sensor system".
Vehicles with COMAND and navigation sys-
tem*: the radar sensor system is automati-
cally deactivated near radio telescope facili-
ties (Y page 411).
If you want Park Assist to assist you, the radar
sensor system must be activated and opera-
tional.
Park Assist is an electronic parking aid with
radar sensors. It assists you when parking by
displaying the distance between your vehicle
and an obstacle, and by emitting a warning
tone when you approach an obstacle.
Park Assist is automatically activated when
you shift the automatic transmission to D,R
or Nwhile the engine is running.
Park Assist is deactivated at speeds above
18 km/h. It is reactivated at lower speeds.
Park Assist is also deactivated when you shift
the automatic transmission to Por switch off
the engine.
Park Assist is deactivated when the transmis-
sion is in position Nif you use the electric
parking brake to secure the vehicle.
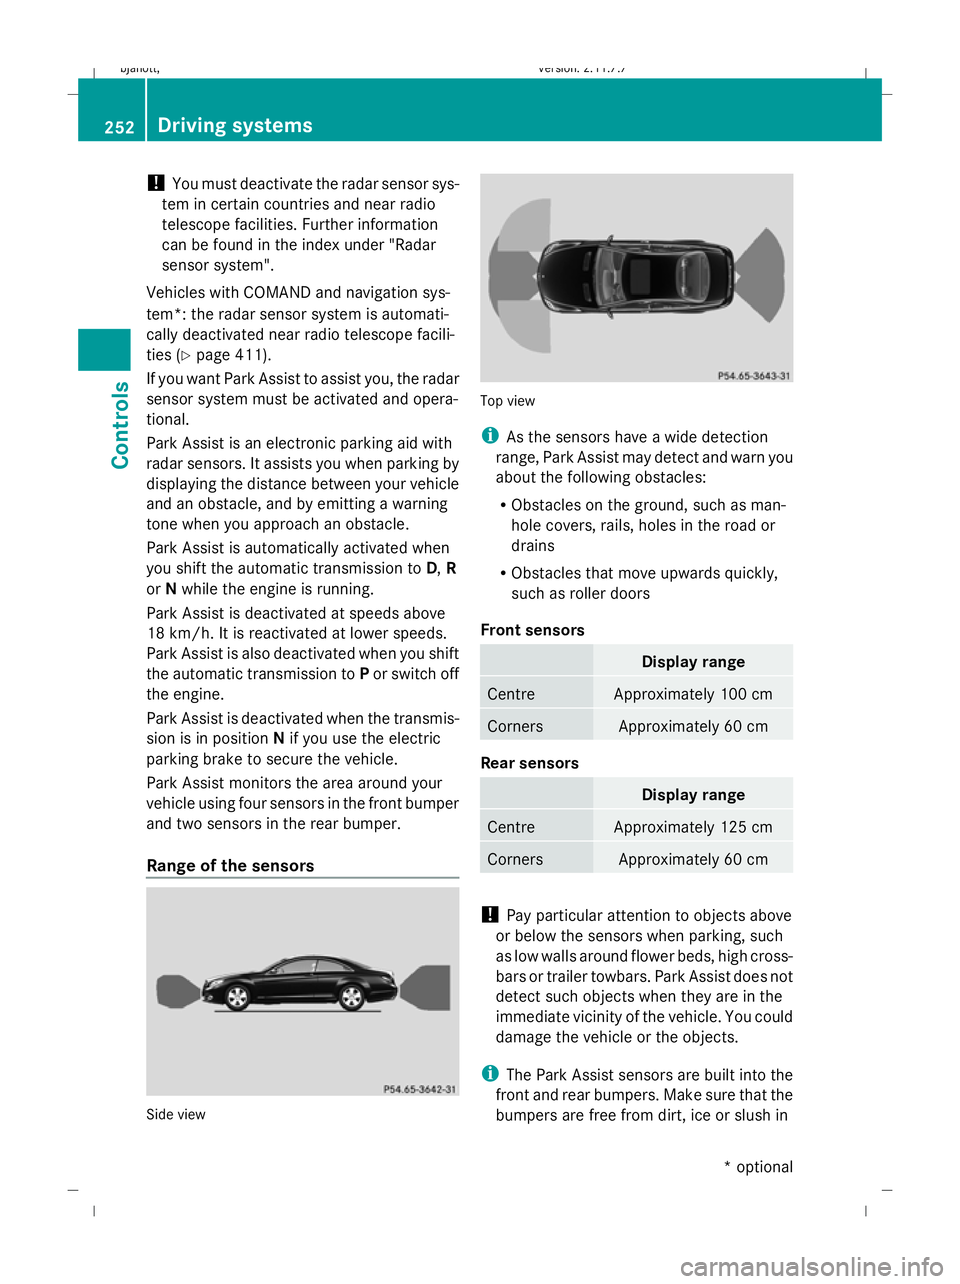
Park Assist monitors the area around your
vehicle using four sensors in the front bumper
and two sensors in the rear bumper.
Range of the sensors Side view Top view
i
As the sensors have a wide detection
range, Park Assist may detect and warn you
about the following obstacles:
R Obstacles on the ground, such as man-
hole covers, rails, holes in the road or
drains
R Obstacles that move upwards quickly,
such as roller doors
Front sensors Display range
Centre Approximately 100 cm
Corners Approximately 60 cm
Rear sensors
Display range
Centre Approximately 125 cm
Corners Approximately 60 cm
!
Pay particular attention to objects above
or below the sensors when parking, such
as low walls around flower beds, high cross-
bars or trailer towbars. Park Assist does not
detect such objects when they are in the
immediate vicinity of the vehicle. You could
damage the vehicle or the objects.
i The Park Assist sensors are built into the
front and rear bumpers. Make sure that the
bumpers are free from dirt, ice or slush in 252
Driving systemsControls
* optional
216_AKB; 2; 3, en-GB
bjanott,
Version: 2.11.7.7 2009-02-27T14:54:17+01:00 - Seite 252
Dateiname: 6515230602_buchblock.pdf; erzeugt am 04. Mar 2009 11:16:04; WK
Page 256 of 421
the area around the sensors, as Park Assist
may not work properly otherwise.
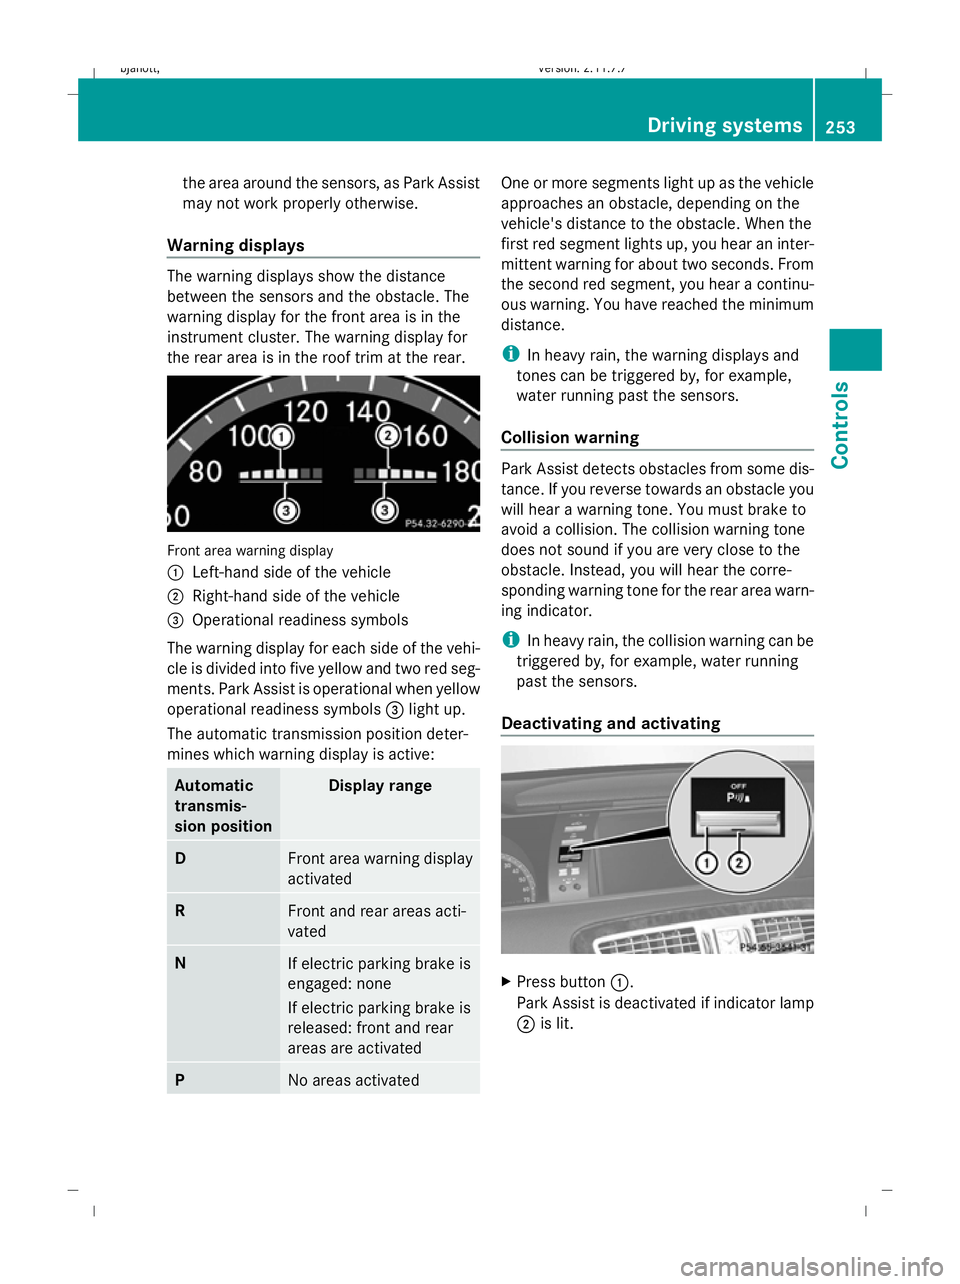
Warning displays The warning displays show the distance
between the sensors and the obstacle. The
warning display for the front area is in the
instrument cluster. The warning display for
the rear area is in the roof trim at the rear. Front area warning display
1
Left-hand side of the vehicle
2 Right-hand side of the vehicle
3 Operational readiness symbols
The warning display for each side of the vehi-
cle is divided into five yellow and two red seg-
ments. Park Assist is operational when yellow
operational readiness symbols 3light up.
The automatic transmission position deter-
mines which warning display is active: Automatic
transmis-
sion position Display range
D
Front area warning display
activated
R
Front and rear areas acti-
vated
N
If electric parking brake is
engaged: none
If electric parking brake is
released: front and rear
areas are activated P
No areas activated One or more segments light up as the vehicle
approaches an obstacle, depending on the
vehicle's distance to the obstacle. When the
first red segment lights up, you hear an inter-
mittent warning for about two seconds. From
the second red segment, you hear a continu-
ous warning. You have reached the minimum
distance.
i
In heavy rain, the warning displays and
tones can be triggered by, for example,
water running past the sensors.
Collision warning Park Assist detects obstacles from some dis-
tance. If you reverse towards an obstacle you
will hear a warning tone. You must brake to
avoid a collision. The collision warning tone
does not sound if you are very close to the
obstacle. Instead, you will hear the corre-
sponding warning tone for the rear area warn-
ing indicator.
i In heavy rain, the collision warning can be
triggered by, for example, water running
past the sensors.
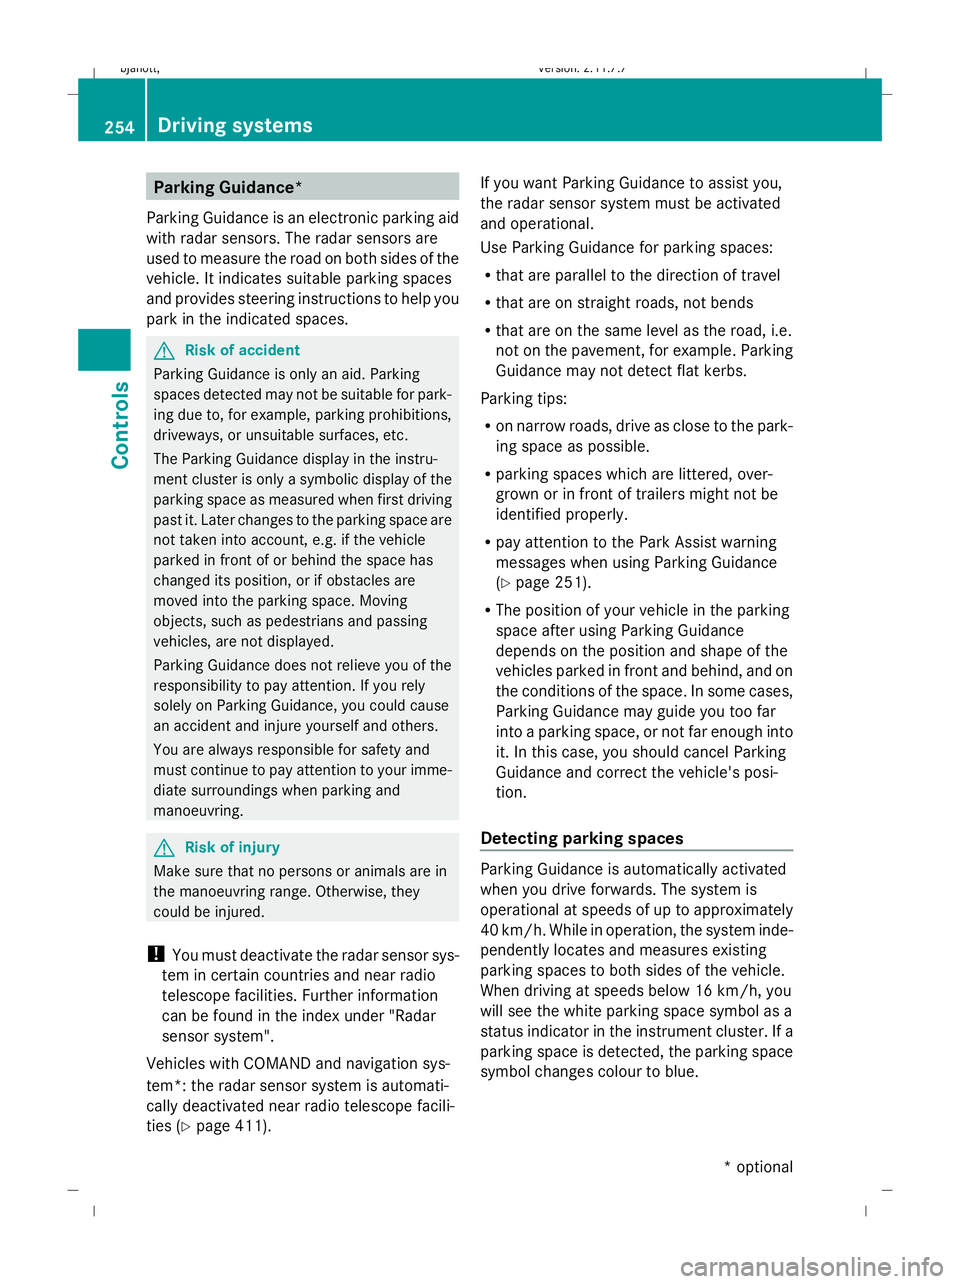
Deactivating and activating X
Press button 1.
Park Assist is deactivated if indicator lamp
2 is lit. Driving systems
253Controls
216_AKB; 2; 3, en-GB
bjanott, Version: 2.11.7.7 2009-02-27T14:54:17+01:00 - Seite 253 Z
Dateiname: 6515230602_buchblock.pdf; erzeugt am 04. Mar 2009 11:16:04; WK
Page 257 of 421
Parking Guidance*
Parking Guidance is an electronic parking aid
with radar sensors. The radar sensors are
used to measure the road on both sides of the
vehicle. It indicates suitable parking spaces
and provides steering instructions to help you
park in the indicated spaces. G
Risk of accident
Parking Guidance is only an aid. Parking
spaces detected may not be suitable for park-
ing due to, for example, parking prohibitions,
driveways, or unsuitable surfaces, etc.
The Parking Guidance display in the instru-
ment cluster is only a symbolic display of the
parking space as measured when first driving
past it. Later changes to the parking space are
not taken into account, e.g. if the vehicle
parked in front of or behind the space has
changed its position, or if obstacles are
moved into the parking space. Moving
objects, such as pedestrians and passing
vehicles, are not displayed.
Parking Guidance does not relieve you of the
responsibility to pay attention. If you rely
solely on Parking Guidance, you could cause
an accident and injure yourself and others.
You are always responsible for safety and
must continue to pay attention to your imme-
diate surroundings when parking and
manoeuvring. G
Risk of injury
Make sure that no persons or animals are in
the manoeuvring range. Otherwise, they
could be injured.
! You must deactivate the radar sensor sys-
tem in certain countries and near radio
telescope facilities. Further information
can be found in the index under "Radar
sensor system".
Vehicles with COMAND and navigation sys-
tem*: the radar sensor system is automati-
cally deactivated near radio telescope facili-
ties (Y page 411). If you want Parking Guidance to assist you,
the radar sensor system must be activated
and operational.
Use Parking Guidance for parking spaces:
R
that are parallel to the direction of travel
R that are on straight roads, not bends
R that are on the same level as the road, i.e.
not on the pavement, for example. Parking
Guidance may not detect flat kerbs.
Parking tips:
R on narrow roads, drive as close to the park-
ing space as possible.
R parking spaces which are littered, over-
grown or in front of trailers might not be
identified properly.
R pay attention to the Park Assist warning
messages when using Parking Guidance
(Y page 251).
R The position of your vehicle in the parking
space after using Parking Guidance
depends on the position and shape of the
vehicles parked in front and behind, and on
the conditions of the space. In some cases,
Parking Guidance may guide you too far
into a parking space, or not far enough into
it. In this case, you should cancel Parking
Guidance and correct the vehicle's posi-
tion.
Detecting parking spaces Parking Guidance is automatically activated
when you drive forwards. The system is
operational at speeds of up to approximately
40 km/h. While in operation, the system inde-
pendently locates and measures existing
parking spaces to both sides of the vehicle.
When driving at speeds below 16 km/h, you
will see the white parking space symbol as a
status indicator in the instrument cluster. If a
parking space is detected, the parking space
symbol changes colour to blue.254
Driving systemsControls
* optional
216_AKB; 2; 3, en-GB
bjanott,V
ersion: 2.11.7.7
2009-02-27T14:54:17+01:00 - Seite 254
Dateiname: 6515230602_buchblock.pdf; erzeugt am 04. Mar 2009 11:16:04; WK
Page 258 of 421
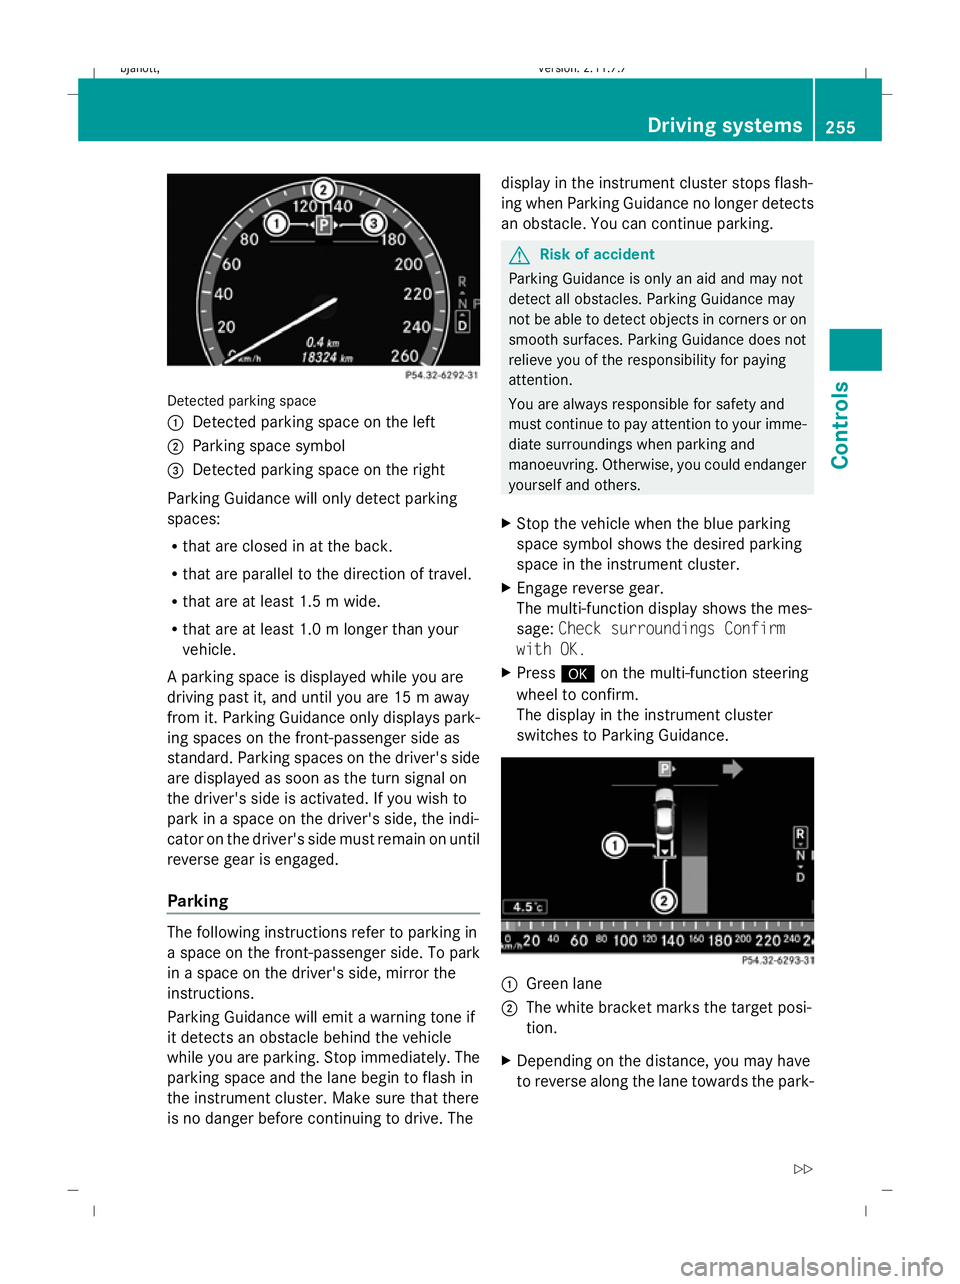
Detected parking space
1
Detected parking space on the left
2 Parking space symbol
3 Detected parking space on the right
Parking Guidance will only detect parking
spaces:
R that are closed in at the back.
R that are parallel to the direction of travel.
R that are at least 1.5 m wide.
R that are at least 1.0 m longer than your
vehicle.
A parking space is displayed while you are
driving past it, and until you are 15 m away
from it. Parking Guidance only displays park-
ing spaces on the front-passenger side as
standard. Parking spaces on the driver's side
are displayed as soon as the turn signal on
the driver's side is activated. If you wish to
park in a space on the driver's side, the indi-
cator on the driver's side must remain on until
reverse gear is engaged.
Parking The following instructions refer to parking in
a space on the front-passenger side. To park
in a space on the driver's side, mirror the
instructions.
Parking Guidance will emit a warning tone if
it detects an obstacle behind the vehicle
while you are parking. Stop immediately. The
parking space and the lane begin to flash in
the instrument cluster. Make sure that there
is no danger before continuing to drive. The display in the instrument cluster stops flash-
ing when Parking Guidance no longer detects
an obstacle. You can continue parking. G
Risk of accident
Parking Guidance is only an aid and may not
detect all obstacles. Parking Guidance may
not be able to detect objects in corners or on
smooth surfaces. Parking Guidance does not
relieve you of the responsibility for paying
attention.
You are always responsible for safety and
must continue to pay attention to your imme-
diate surroundings when parking and
manoeuvring. Otherwise, you could endanger
yourself and others.
X Stop the vehicle when the blue parking
space symbol shows the desired parking
space in the instrument cluster.
X Engage reverse gear.
The multi-function display shows the mes-
sage: Check surroundings Confirm
with OK.
X Press #on the multi-function steering
wheel to confirm.
The display in the instrument cluster
switches to Parking Guidance. 1
Green lane
2 The white bracket marks the target posi-
tion.
X Depending on the distance, you may have
to reverse along the lane towards the park- Driving systems
255Controls
216_AKB; 2; 3, en-GB
bjanott, Version: 2.11.7.7 2009-02-27T14:54:17+01:00 - Seite 255 Z
Dateiname: 6515230602_buchblock.pdf; erzeugt am 04. Mar 2009 11:16:05; WK
Page 259 of 421
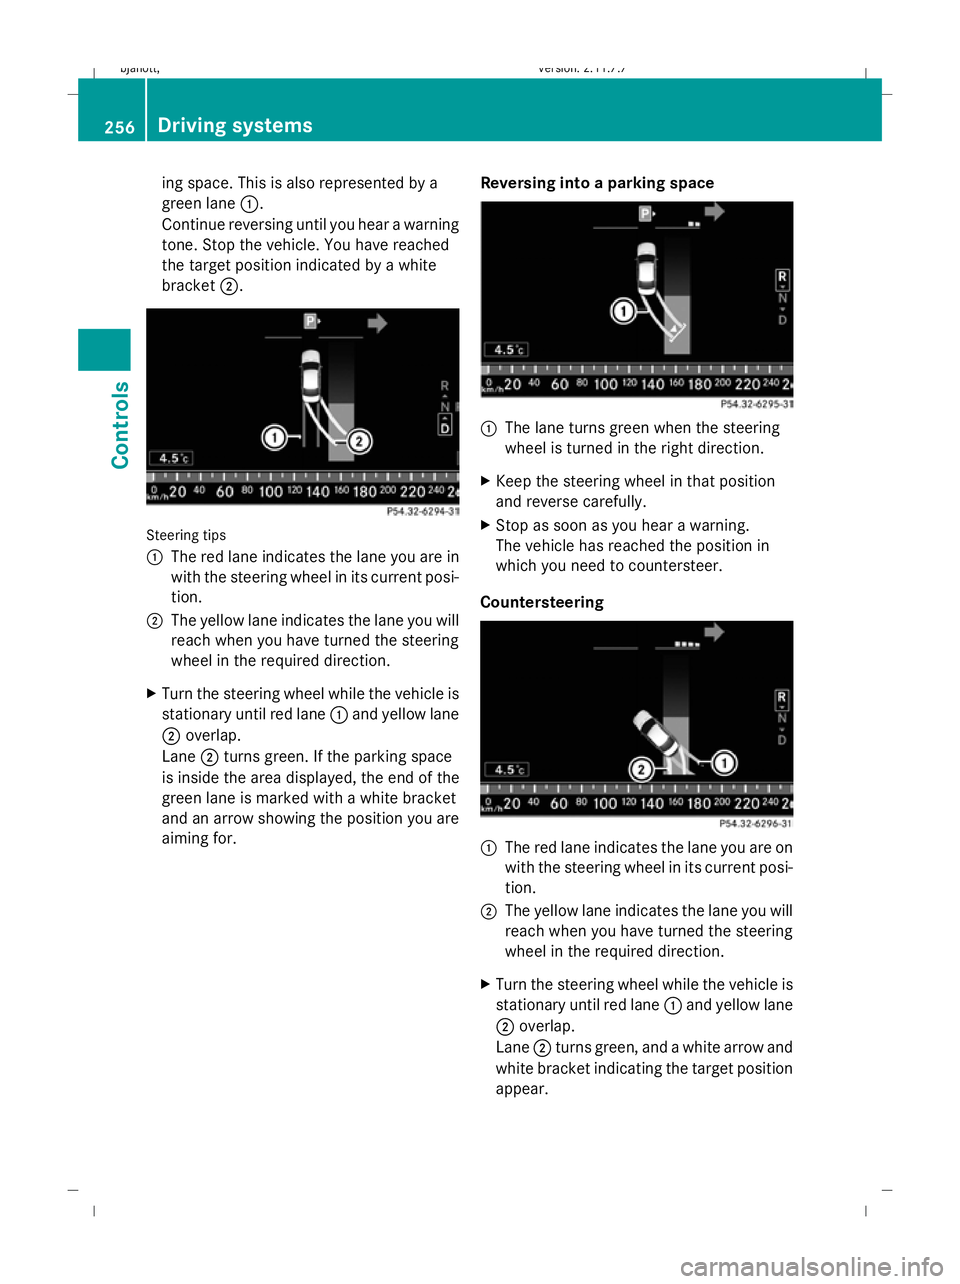
ing space. This is also represented by a
green lane 1.
Continue reversing until you hear a warning
tone. Stop the vehicle. You have reached
the target position indicated by a white
bracket 2. Steering tips
1
The red lane indicates the lane you are in
with the steering wheel in its current posi-
tion.
2 The yellow lane indicates the lane you will
reach when you have turned the steering
wheel in the required direction.
X Turn the steering wheel while the vehicle is
stationary until red lane 1and yellow lane
2 overlap.
Lane 2turns green. If the parking space
is inside the area displayed, the end of the
green lane is marked with a white bracket
and an arrow showing the position you are
aiming for. Reversing into a parking space 1
The lane turns green when the steering
wheel is turned in the right direction.
X Keep the steering wheel in that position
and reverse carefully.
X Stop as soon as you hear a warning.
The vehicle has reached the position in
which you need to countersteer.
Countersteering 1
The red lane indicates the lane you are on
with the steering wheel in its current posi-
tion.
2 The yellow lane indicates the lane you will
reach when you have turned the steering
wheel in the required direction.
X Turn the steering wheel while the vehicle is
stationary until red lane 1and yellow lane
2 overlap.
Lane 2turns green, and a white arrow and
white bracket indicating the target position
appear. 256
Driving systemsCont
rols
216_AKB; 2; 3, en-GB
bjanott, Version: 2.11.7.7 2009-02-27T14:54:17+01:00 - Seite 256
Dateiname: 6515230602_buchblock.pdf; erzeugt am 04. Mar 2009 11:16:05; WK
Page 260 of 421
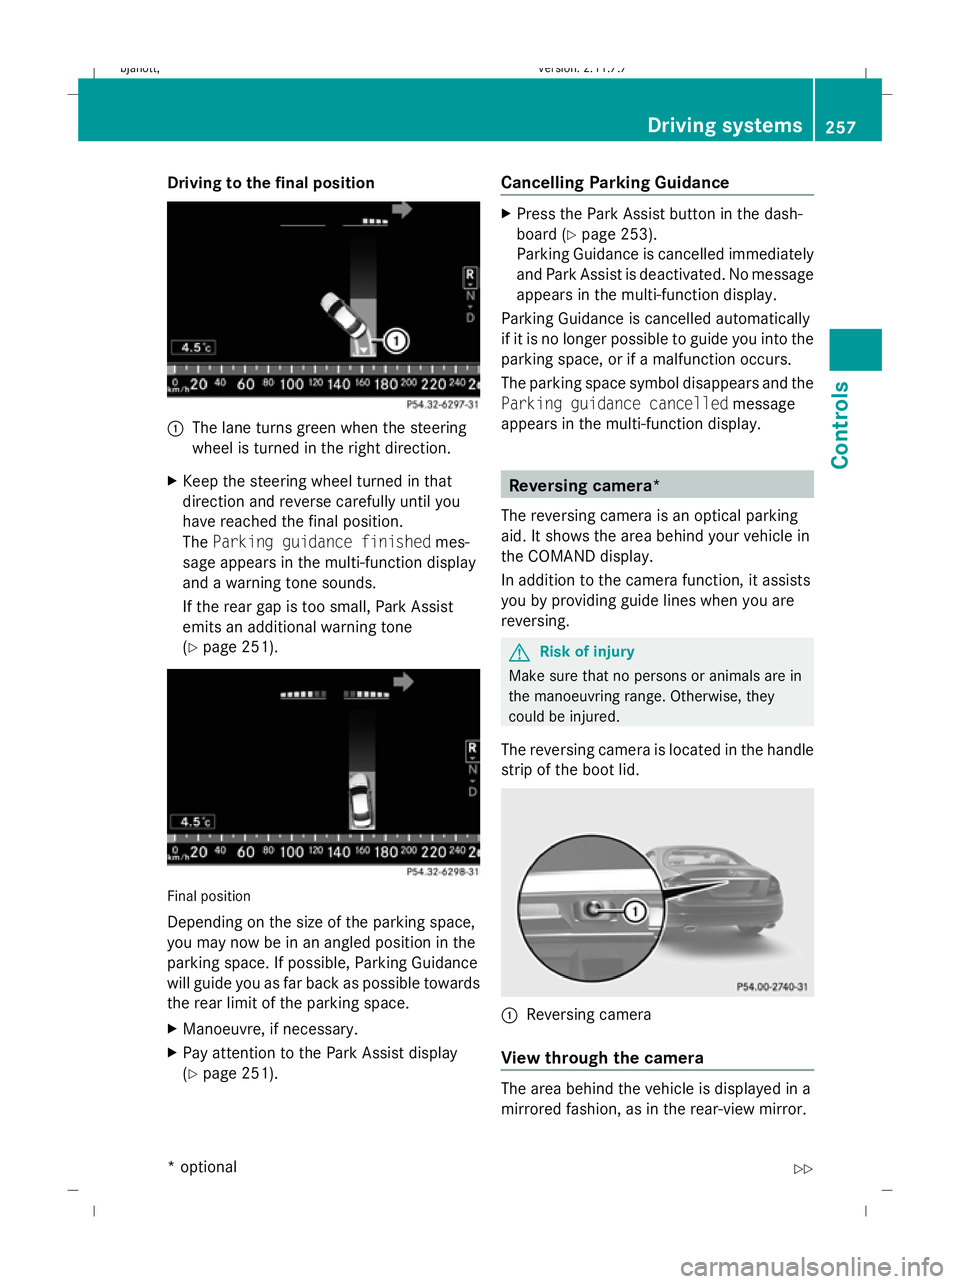
Driving to the final position
1
The lane turns green when the steering
wheel is turned in the right direction.
X Keep the steering wheel turned in that
direction and reverse carefully until you
have reached the final position.
The Parking guidance finished mes-
sage appears in the multi-function display
and a warning tone sounds.
If the rear gap is too small, Park Assist
emits an additional warning tone
(Y page 251). Final position
Depending on the size of the parking space,
you may now be in an angled position in the
parking space. If possible, Parking Guidance
will guide you as far back as possible towards
the rear limit of the parking space.
X
Manoeuvre, if necessary.
X Pay attention to the Park Assist display
(Y page 251). Cancelling Parking Guidance X
Press the Park Assist button in the dash-
board ( Ypage 253).
Parking Guidance is cancelled immediately
and Park Assist is deactivated. No message
appears in the multi-function display.
Parking Guidance is cancelled automatically
if it is no longer possible to guide you into the
parking space, or if a malfunction occurs.
The parking space symbol disappears and the
Parking guidance cancelled message
appears in the multi-function display. Reversing camera*
The reversing camera is an optical parking
aid. It shows the area behind your vehicle in
the COMAND display.
In addition to the camera function, it assists
you by providing guide lines when you are
reversing. G
Risk of injury
Make sure that no persons or animals are in
the manoeuvring range. Otherwise, they
could be injured.
The reversing camera is located in the handle
strip of the boot lid. :
Reversing camera
View through the camera The area behind the vehicle is displayed in a
mirrored fashion, as in the rear-view mirror. Driving syste
ms
257Controls
* option al
216_AKB; 2; 3, en-GB
bjanott
,V ersion: 2.11.7.7
2009-02-27T14:54:17+01:00 - Seite 257 Z
Dateiname: 6515230602_buchblock.pdf; erzeugt am 04. Mar 2009 11:16:06; WK