MERCEDES-BENZ CL COUPE 2009 Owners Manual
Manufacturer: MERCEDES-BENZ, Model Year: 2009, Model line: CL COUPE, Model: MERCEDES-BENZ CL COUPE 2009Pages: 421, PDF Size: 10.78 MB
Page 261 of 421
G
Risk of accident
The reversing camera is only an aid and may
display obstacles in a distorted or incorrect
manner, or may not even display them at all.
The reversing camera does not relieve you of
the responsibility to pay attention. The cam-
era cannot show objects:
R very near to the rear bumper
R below the rear bumper
R in the area immediately above the boot lid
handle
You are always responsible for safety and
must continue to pay attention to your imme-
diate surroundings when parking and
manoeuvring. This applies to the areas
behind, in front of and next to the vehicle. You
could otherwise endanger yourself and oth-
ers. G
Risk of accident
Under the following circumstances, the
reversing camera will not function, or function
in a limited manner:
R if the boot lid is open
R in heavy rain, snow or fog
R at night or in very dark places
R if the camera is exposed to very bright light
R if the area is lit by fluorescent light (the dis-
play may flicker)
R if there is a sudden change in temperature,
e.g. when driving into a heated garage in
winter
R if the camera lens is dirty or obstructed
R if the rear of your vehicle is damaged. In this
event have the camera position and setting
checked at a qualified specialist workshop.
Mercedes-Benz recommends that you use
a Mercedes-Benz Service Centre for this
purpose.
Do not use the reversing camera in these
types of situation. You could otherwise injure others or damage objects and your vehicle
while you are parking.
Activating the reversing camera X
Make sure that the key is in position 2in
the ignition lock.
X Engage reverse gear.
The area behind the vehicle is shown in the
COMAND display with guide lines. G
Risk of accident
Please note that objects not on ground level
may appear to be further away than they
actually are. These include:
R the bumper of the vehicle parked behind
R trailer tow bars
R the tail-end of a lorry
R slanted posts
The lines are only guides, not accurate meas-
urements of the distance to an obstacle.
Therefore, you should never pass the red line
when approaching an obstacle. You could oth-
erwise cause an accident and injure yourself
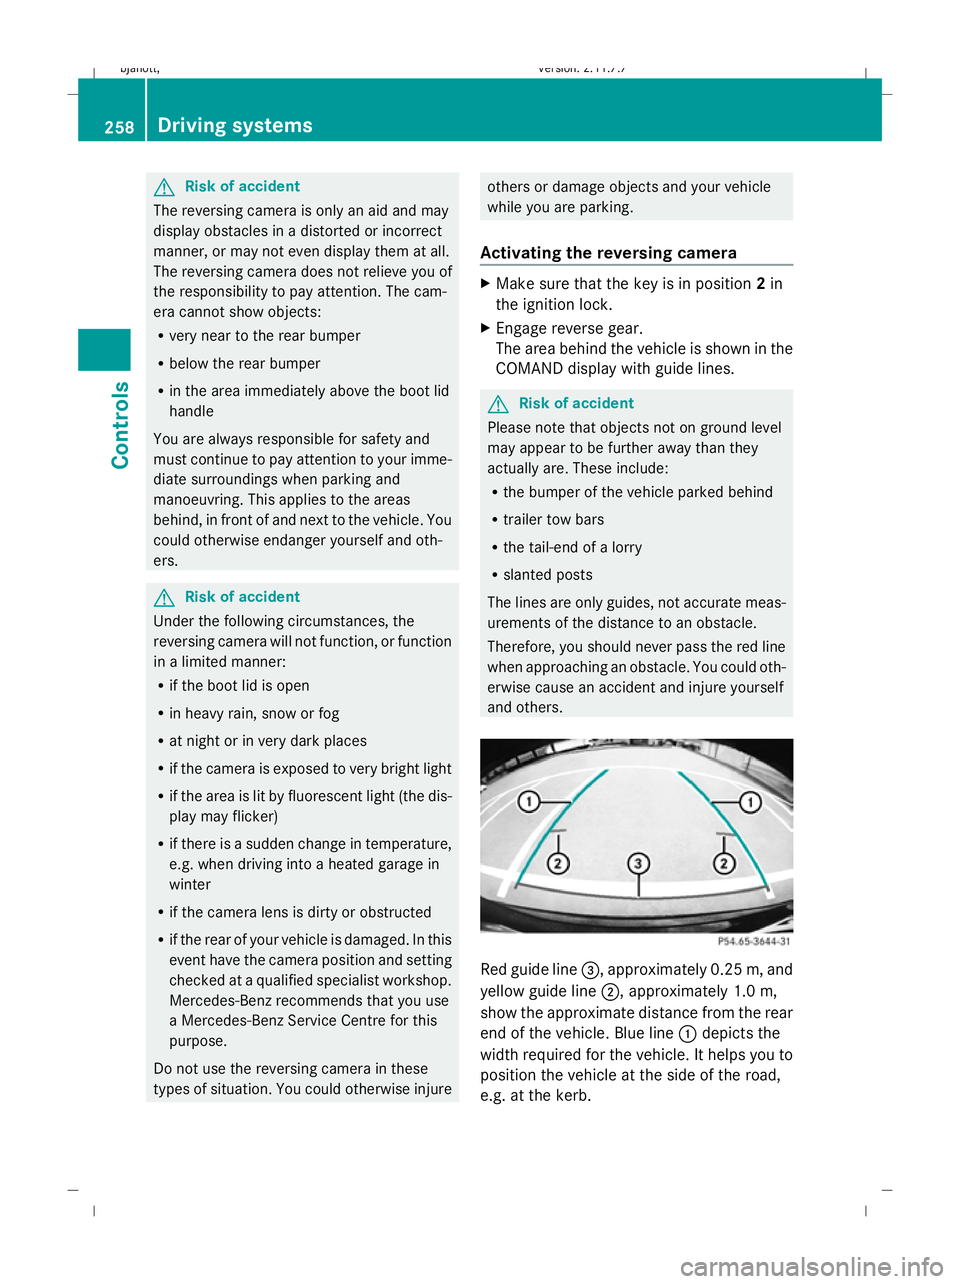
and others. Red guide line
=, approximately 0.25 m, and
yellow guide line ;, approximately 1.0 m,
show the approximate distance from the rear
end of the vehicle. Blue line :depicts the
width required for the vehicle. It helps you to
position the vehicle at the side of the road,
e.g. at the kerb. 258
Driving systemsControls
216_AKB; 2; 3, en-GB
bjanott,
Version: 2.11.7.7 2009-02-27T14:54:17+01:00 - Seite 258
Dateiname: 6515230602_buchblock.pdf; erzeugt am 04. Mar 2009 11:16:07; WK
Page 262 of 421
Night View Assist*
Night View Assist uses infrared as well as the
normal headlamps to light up the road. A
camera at the top of the windscreen picks up
the infrared light and displays a black and
white image in the multi-function display. The
image shown in the multi-function display
corresponds to a road lit up by main-beam
headlamps. This enables you to see the road's
course and any obstacles in good time. G
Risk of accident
Night View Assist is only an aid designed to
assist driving and does not relieve you of the
responsibility to pay attention. Continue to
look through the windscreen instead of rely-
ing on the Night View Assist display. You are
responsible for safety and must drive in
accordance with traffic conditions. You could
otherwise endanger yourself and others.
The system may be impaired or may not func-
tion if:
R there is poor visibility, e.g. due to snow,
rain, fog or spray.
R the windscreen is dirty, misted up or cov-
ered, for instance by a sticker, in the vicinity
of the camera.
R you drive around a bend or up or down an
incline.
Light from the headlamps of oncoming vehi-
cles does not affect the Night View Assist dis-
play. This is also the case if you cannot switch
on the main-beam headlamps because of
oncoming traffic. G
Risk of accident
Night View Assist does not detect objects in
the immediate vicinity of the vehicle. Look
through the windscreen when manoeuvring.
Make sure that there are no people or animals
in the area in which you are manoeuvring.
i Infrared light cannot be seen by the
human eye and therefore does not dazzle. Night View Assist can always remain on,
even if there is oncoming traffic.
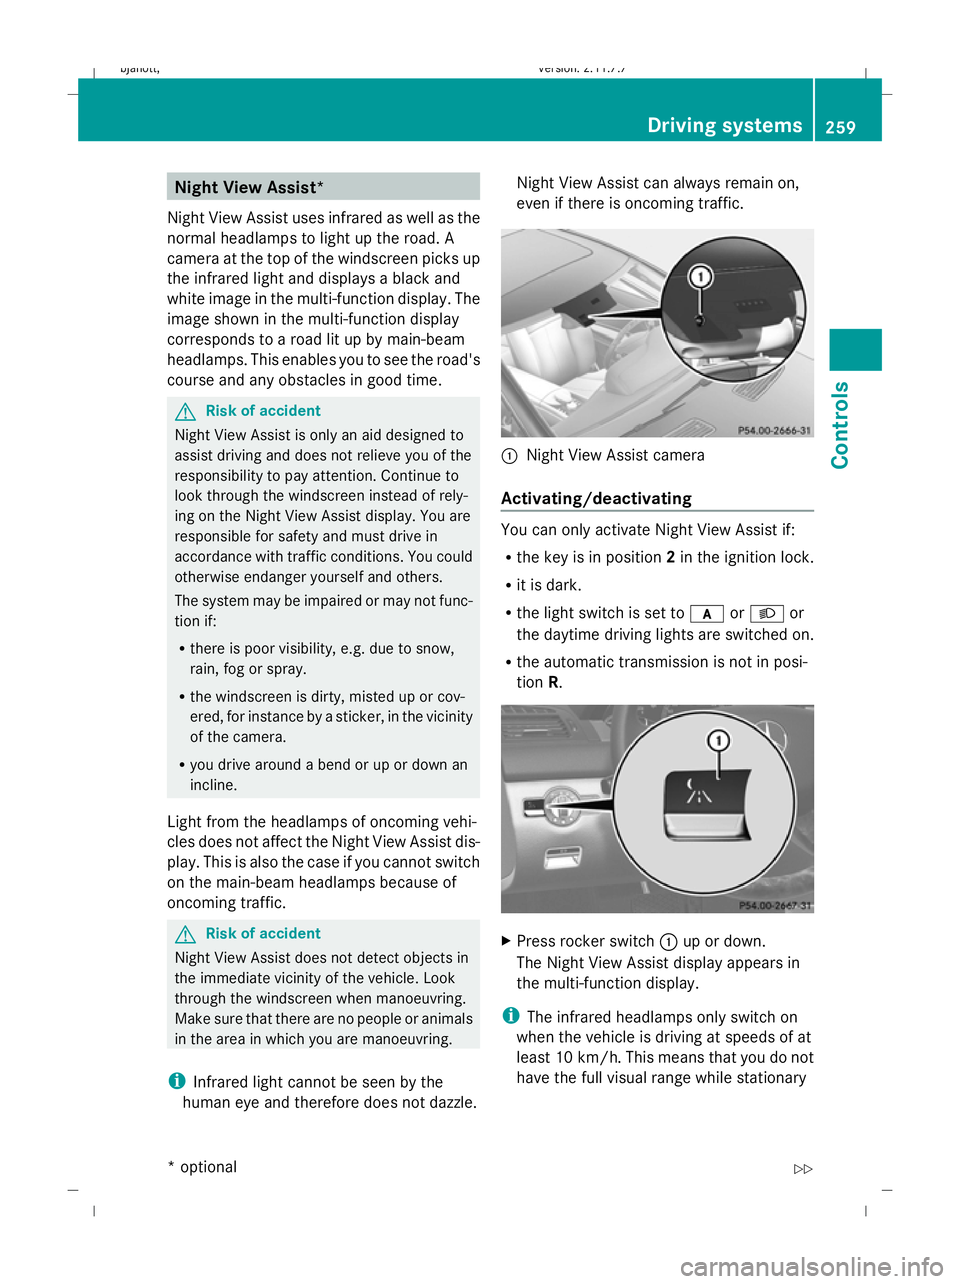
:
Night View Assist camera
Activating/deactivating You can only activate Night View Assist if:
R
the key is in position 2in the ignition lock.
R it is dark.
R the light switch is set to corL or
the daytime driving lights are switched on.
R the automatic transmission is not in posi-
tion R. X
Press rocker switch :up or down.
The Night View Assist display appears in
the multi-function display.
i The infrared headlamps only switch on
when the vehicle is driving at speeds of at
least 10 km/h. This means that you do not
have the full visual range while stationary Driving systems
259Controls
* option al
216_AKB; 2; 3, en-GB
bjanott
,V ersion: 2.11.7.7
2009-02-27T14:54:17+01:00 - Seite 259 Z
Dateiname: 6515230602_buchblock.pdf; erzeugt am 04. Mar 2009 11:16:08; WK
Page 263 of 421
and cannot check whether Night View
Assist is working.
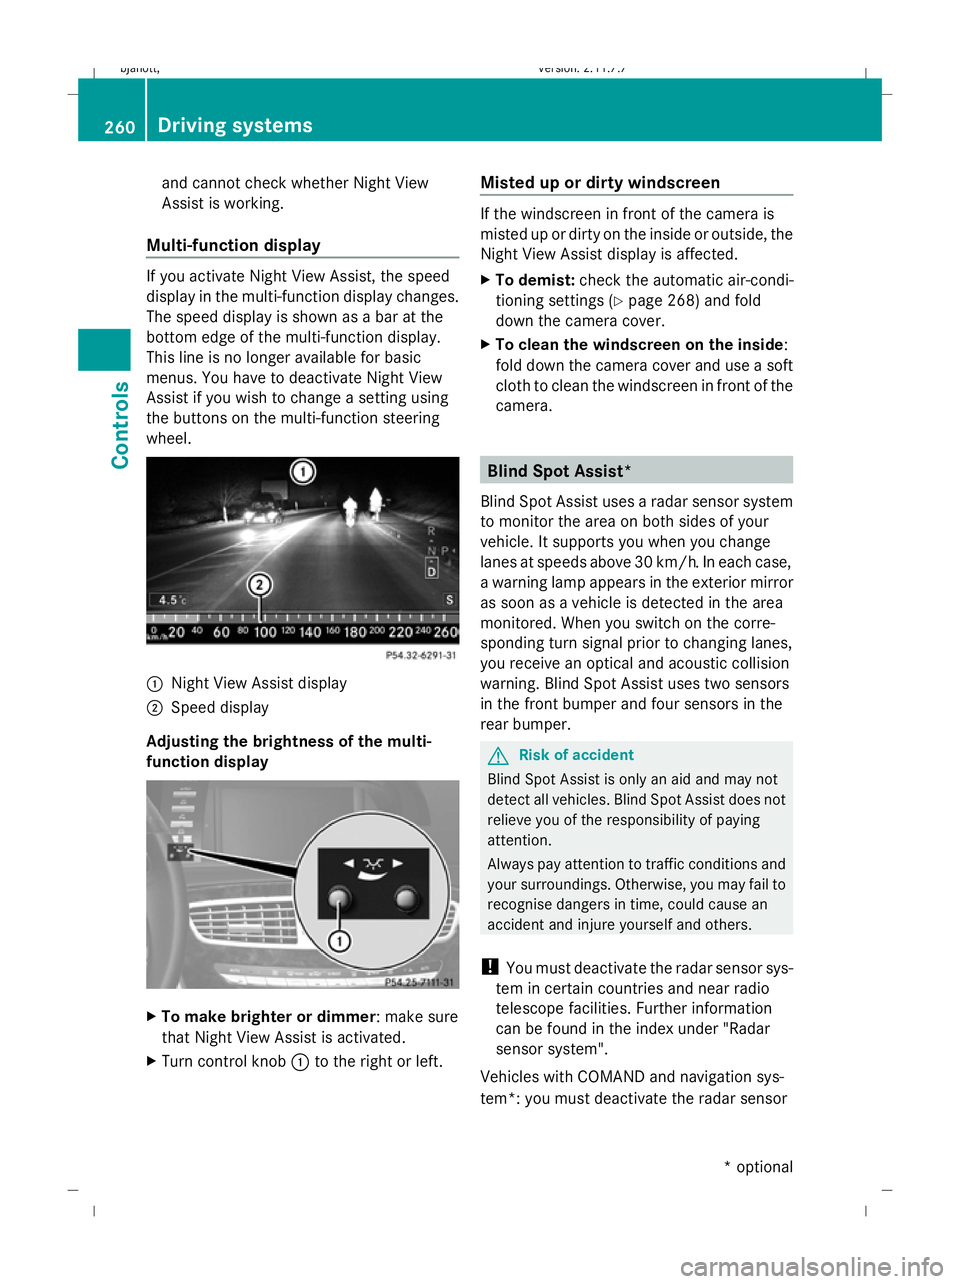
Multi-function display If you activate Night View Assist, the speed
display in the multi-function display changes.
The speed display is shown as a bar at the
bottom edge of the multi-function display.
This line is no longer available for basic
menus. You have to deactivate Night View
Assist if you wish to change a setting using
the buttons on the multi-function steering
wheel. :
Night View Assist display
; Speed display
Adjusting the brightness of the multi-
function display X
To make brighter or dimmer : make sure
that Night View Assist is activated.
X Turn control knob :to the right or left. Misted up or dirty windscreen If the windscreen in front of the camera is
misted up or dirty on the inside or outside, the
Night View Assist display is affected.
X
To demist: check the automatic air-condi-
tioning settings (Y page 268) and fold
down the camera cover.
X To clean the windscreen on the inside:
fold down the camera cover and use a soft
cloth to clean the windscreen in front of the
camera. Blind Spot Assist*
Blind Spot Assist uses a radar sensor system
to monitor the area on both sides of your
vehicle. It supports you when you change
lanes at speeds above 30 km/h. In each case,
a warning lamp appears in the exterior mirror
as soon as a vehicle is detected in the area
monitored. When you switch on the corre-
sponding turn signal prior to changing lanes,
you receive an optical and acoustic collision
warning. Blind Spot Assist uses two sensors
in the front bumper and four sensors in the
rear bumper. G
Risk of accident
Blind Spot Assist is only an aid and may not
detect all vehicles. Blind Spot Assist does not
relieve you of the responsibility of paying
attention.
Always pay attention to traffic conditions and
your surroundings. Otherwise, you may fail to
recognise dangers in time, could cause an
accident and injure yourself and others.
! You must deactivate the radar sensor sys-
tem in certain countries and near radio
telescope facilities. Further information
can be found in the index under "Radar
sensor system".
Vehicles with COMAND and navigation sys-
tem*: you must deactivate the radar sensor 260
Driving systemsCont
rols
* option al
216_AKB; 2; 3, en-GB
bjanott
,V ersion: 2.11.7.7
2009-02-27T14:54:17+01:00 - Seite 260
Dateiname: 6515230602_buchblock.pdf; erzeugt am 04. Mar 2009 11:16:08; WK
Page 264 of 421

system near radio telescope facilities
(Y
page 411).
For Blind Spot Assist to help you when driving,
the radar sensor system must be switched on
and operational. G
Risk of accident
Blind Spot Assist cannot detect road and traf-
fic conditions.
Blind Spot Assist may not detect narrow vehi-
cles, such as motorcycles or bicycles, or only
detect them too late.
Monitoring may be affected by dirty sensors,
strong spray or poor visibility caused by snow,
rain or mist, for example. In this case, vehicles
are detected late or not at all.
Always pay attention to traffic conditions and
your surroundings. Otherwise, you may fail to
recognise dangers in time, could cause an
accident and injure yourself and others.
Monitoring range of the sensors Blind Spot Assist monitors the area up to
three metres behind your vehicle and directly
next to your vehicle as shown in the diagram. G
Risk of accident
Blind Spot Assist monitors certain areas in the
immediate vicinity of your vehicle. Vehicles
that approach and drive past at high speeds are not detected. There is no display and no
warning.
If the lanes are very wide, it may not be pos-
sible to monitor the complete width of the
neighbouring lane. For this reason, vehicles in
the next lane may not be detected, especially
if they are driving in a staggered formation in
different lanes. This may be the case if vehi-
cles are driving at the edge of their lane that
is furthest away from your vehicle.
Always pay attention to traffic conditions and
your surroundings. Otherwise, you may fail to
recognise dangers in time, could cause an
accident and injure yourself and others.
If the lanes are narrow, the system may be
unable to distinguish the neighbouring lane
from the one beyond it. For this reason, vehi-
cles in the farther lane may be indicated,
especially if the vehicles are driving in a stag-
gered formation in different lanes. This may
be the case if vehicles are driving at the edge
of the lane that is nearest your vehicle.
The Blind Spot Assist sensors are integrated
into the front and rear bumpers. Make sure
that the bumpers are free from dirt, ice or
slush around the sensors. The radar sensors
must not be covered, for example by cycle
racks or overhanging loads. Following a
severe impact or in the event of damage to
the bumpers, have the function of the radar
sensors checked at a qualified specialist
workshop, e.g. a Mercedes-Benz Service
Centre. Otherwise, Blind Spot Assist may not
work properly. Driving systems
261Controls
216_AKB; 2; 3, en-GB
bjanott, Version: 2.11.7.7 2009-02-27T14:54:17+01:00 - Seite 261 Z
Dateiname: 6515230602_buchblock.pdf; erzeugt am 04. Mar 2009 11:16:09; WK
Page 265 of 421
Information and warning display
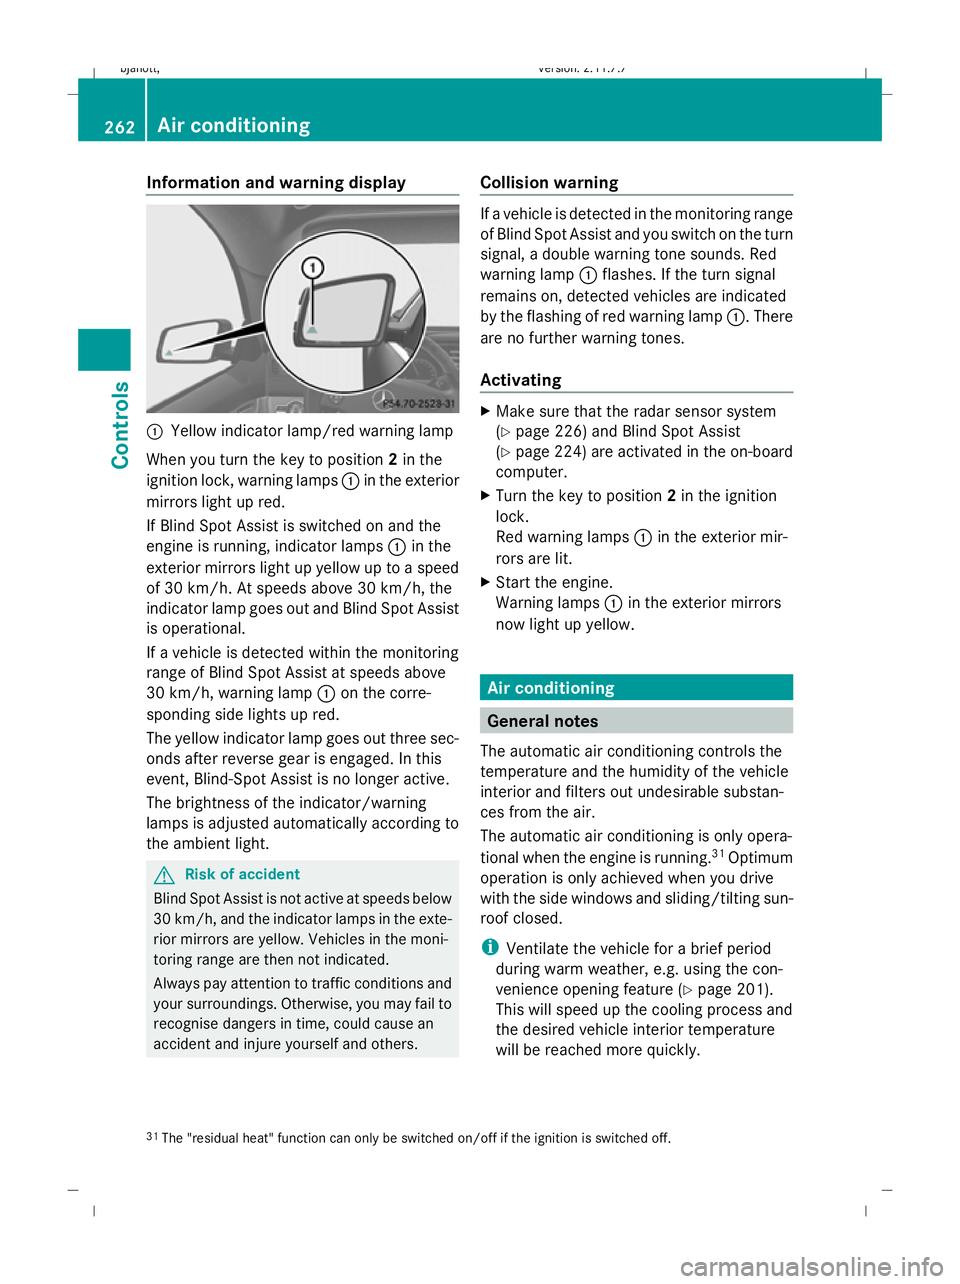
:
Yellow indicator lamp/red warning lamp
When you turn the key to position 2in the
ignition lock, warning lamps :in the exterior
mirrors light up red.
If Blind Spot Assist is switched on and the
engine is running, indicator lamps :in the
exterior mirrors light up yellow up to a speed
of 30 km/h. At speeds above 30 km/h, the
indicator lamp goes out and Blind Spot Assist
is operational.
If a vehicle is detected within the monitoring
range of Blind Spot Assist at speeds above
30 km/h, warning lamp :on the corre-
sponding side lights up red.
The yellow indicator lamp goes out three sec-
onds after reverse gear is engaged. In this
event, Blind-Spot Assist is no longer active.
The brightness of the indicator/warning
lamps is adjusted automatically according to
the ambient light. G
Risk of accident
Blind Spot Assist is not active at speeds below
30 km/h, and the indicator lamps in the exte-
rior mirrors are yellow. Vehicles in the moni-
toring range are then not indicated.
Always pay attention to traffic conditions and
your surroundings. Otherwise, you may fail to
recognise dangers in time, could cause an
accident and injure yourself and others. Collision warning If a vehicle is detected in the monitoring range
of Blind Spot Assist and you switch on the turn
signal, a double warning tone sounds. Red
warning lamp
:flashes. If the turn signal
remains on, detected vehicles are indicated
by the flashing of red warning lamp :. There
are no further warning tones.
Activating X
Make sure that the radar sensor system
(Y page 226) and Blind Spot Assist
(Y page 224) are activated in the on-board
computer.
X Turn the key to position 2in the ignition
lock.
Red warning lamps :in the exterior mir-
rors are lit.
X Start the engine.
Warning lamps :in the exterior mirrors
now light up yellow. Air conditioning
General notes
The automatic air conditioning controls the
temperature and the humidity of the vehicle
interior and filters out undesirable substan-
ces from the air.
The automatic air conditioning is only opera-
tional when the engine is running. 31
Optimum
operation is only achieved when you drive
with the side windows and sliding/tilting sun-
roof closed.
i Ventilate the vehicle for a brief period
during warm weather, e.g. using the con-
venience opening feature (Y page 201).
This will speed up the cooling process and
the desired vehicle interior temperature
will be reached more quickly.
31 The "residual heat" function can only be switched on/off if the ignition is switched off. 262
Air conditioningCont
rols
216_AKB; 2; 3, en-GB
bjanott, Version: 2.11.7.7 2009-02-27T14:54:17+01:00 - Seite 262
Dateiname: 6515230602_buchblock.pdf; erzeugt am 04. Mar 2009 11:16:09; WK
Page 266 of 421
i
The integrated filter can filter out most
particles of dust and completely filters out
pollen. A clogged filter reduces the amount
of air supplied to the vehicle interior. For
this reason, you should always observe the
interval for replacing the filter, which is
specified in the Service Booklet. As it
depends on environmental conditions, e.g.
heavy air pollution, the interval may be
shorter than stated in the Service Booklet. G
Risk of accident
Observe the settings recommended on the
following pages. Otherwise, the windows
could mist up. This may obstruct your view of
the traffic situation and, as a result, you may
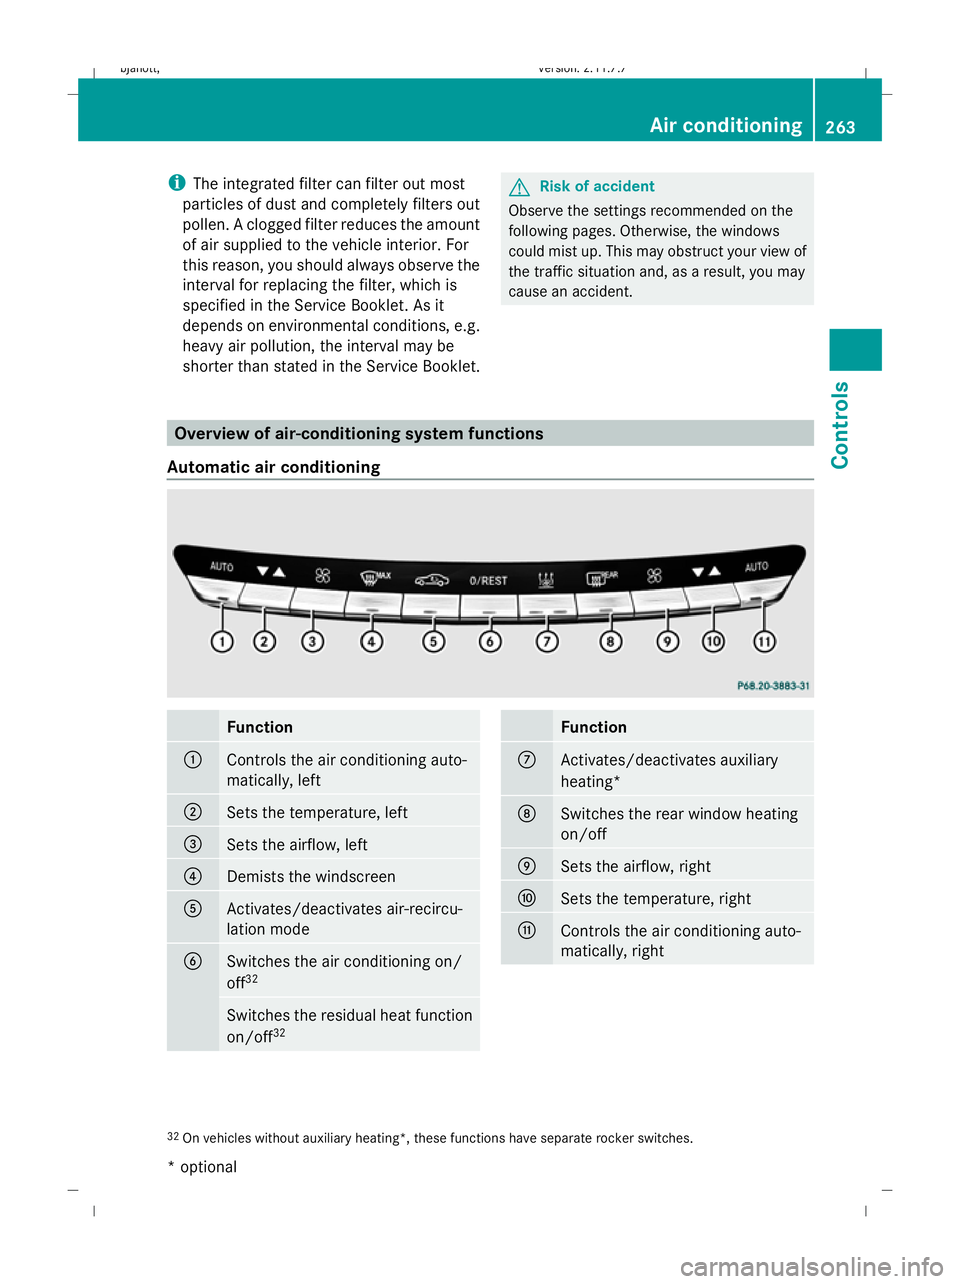
cause an accident. Overview of air-conditioning system functions
Automatic air conditioning Function
:
Controls the air conditioning auto-
matically, left
;
Sets the temperature, left
=
Sets the airflow, left
?
Demists the windscreen
A
Activates/deactivates air-recircu-
lation mode
B
Switches the air conditioning on/
off
32 Switches the residual heat function
on/off
32 Function
C
Activates/deactivates auxiliary
heating*
D
Switches the rear window heating
on/off
E
Sets the airflow, right
F
Sets the temperature, right
G
Controls the air conditioning auto-
matically, right
32
On vehicles without auxiliary heating*, these functions have separate rocker switches. Air conditioning
263Controls
* optional
216_AKB; 2; 3, en-GB
bjanott,
Version: 2.11.7.7 2009-02-27T14:54:17+01:00 - Seite 263 Z
Dateiname: 6515230602_buchblock.pdf; erzeugt am 04. Mar 2009 11:16:09; WK
Page 267 of 421
i
Instructions and recommendations for
optimum air conditioning:
R activate the air conditioning using the
à rocker switch. The indicator lamp
in the Ãrocker switch comes on.
R set the temperature to 22 †.
R only use the "demisting" function briefly,
until the windscreen is clear again.
R only use the "air-recirculation" mode
briefly, e.g. if there are unpleasant out-
side odours or when in a tunnel. Other-
wise, the windows could mist up due to
a lack of fresh air.
R use the "residual heat" function if you
want to heat or ventilate the vehicle inte-
rior when the ignition is switched off. The
"residual heat" function can only be acti-
vated or deactivated with the ignition
switched off. Switching the air conditioning on/off
i When the air conditioning is switched off,
the air supply and air circulation are also
switched off. Only select this setting briefly,
otherwise the windows may mist up.
i Activate the air conditioning primarily
using the Ãrocker switch
(Y page 264).
X Turn the key to position 2in the ignition
lock.
X To activate: press theÇrocker switch
up or down.
The indicator lamp in the rocker switch
goes out. The previously selected settings
come into effect again.
X To deactivate: press theÇrocker
switch up or down.
The indicator lamp in the rocker switch
comes on. Switching cooling with air dehumidi-
fication on/off
The "cooling with air dehumidification" func-
tion is only available when the engine is run-
ning. The air inside the vehicle is cooled and
dehumidified according to the temperature
selected. G
Risk of accident
If the "cooling with air dehumidification" func-
tion is deactivated, the air inside the vehicle
will not be cooled (during warm weather) or
dehumidified. The windows could mist up
more quickly. This may prevent you from
observing the traffic conditions, thereby caus-
ing an accident.
Condensation may drip from the underside of
the vehicle when Thermatic is in cooling
mode.
You can activate or deactivate the "cooling
with air dehumidification" function via
COMAND (Y page 170). Controlling the air conditioning auto-
matically
In automatic mode, the set temperature is
maintained automatically at a constant level.
The system automatically regulates the tem-
perature of the dispensed air, the airflow and
the air distribution.
The automatic air conditioning will achieve
optimal operation if "cooling with air dehu-
midification" is also activated. If necessary,
cooling with air dehumidification can be deac-
tivated.
X Turn the key to position 2in the ignition
lock.
X Set the desired temperature.
X To activate: press theÃrocker switch
up or down.
The indicator lamp in the Ãrocker
switch comes on. 264
Air conditioningControls
216_AKB; 2; 3, en-GB
bjanott,
Version: 2.11.7.7 2009-02-27T14:54:17+01:00 - Seite 264
Dateiname: 6515230602_buchblock.pdf; erzeugt am 04. Mar 2009 11:16:10; WK
Page 268 of 421
X
To deactivate: press theKrocker
switch up or down.
The indicator lamp in the Ãrocker
switch goes out.
or
X Set the air distribution using COMAND
(Y page 169).
The indicator lamp in the Ãrocker
switch goes out. Setting the temperature
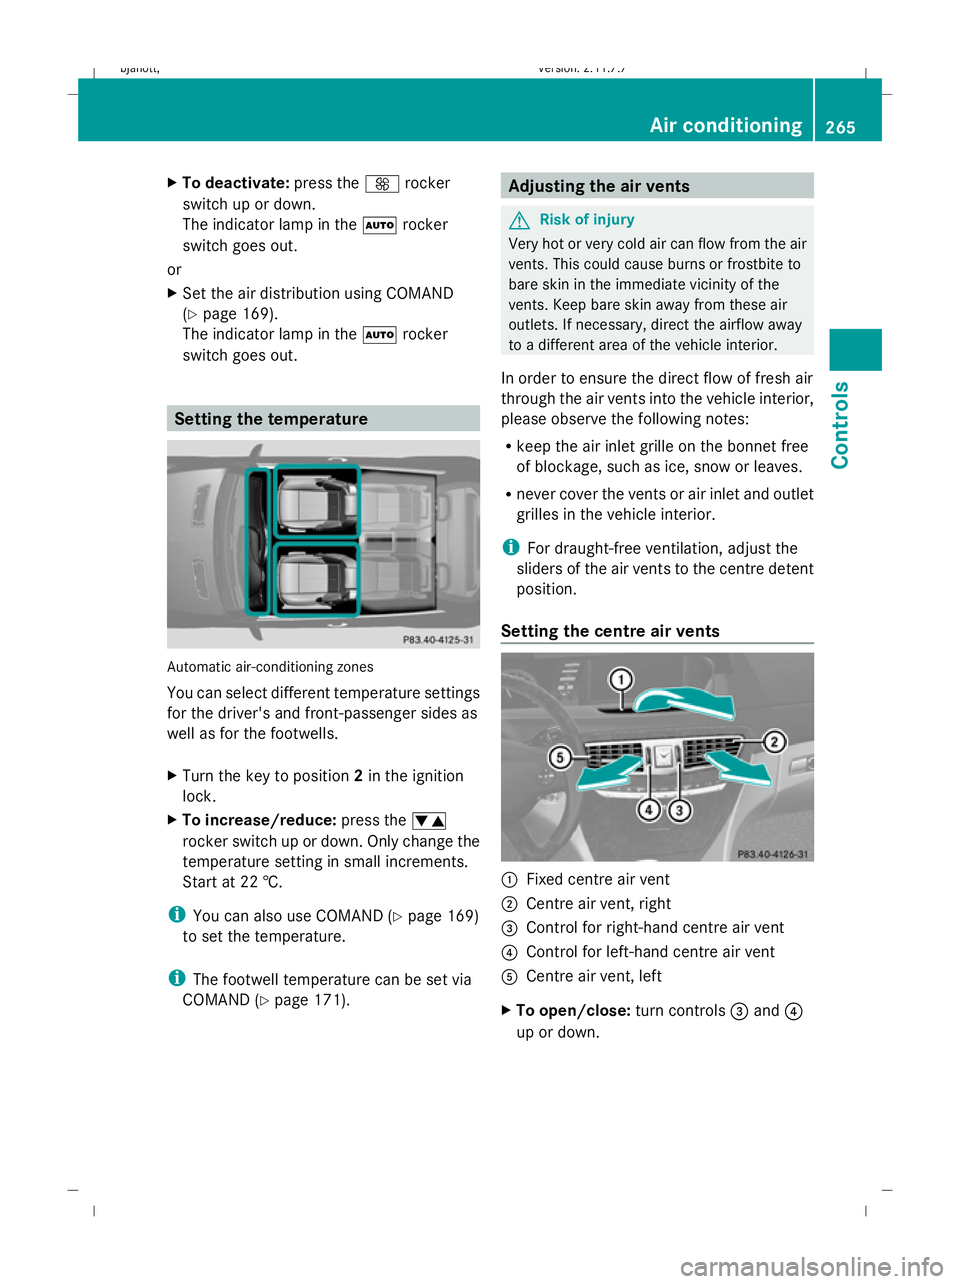
Automatic air-conditioning zones
You can select different temperature settings
for the driver's and front-passenger sides as
well as for the footwells.
X Turn the key to position 2in the ignition
lock.
X To increase/reduce: press thew
rocker switch up or down. Only change the
temperature setting in small increments.
Start at 22 †.
i You can also use COMAND (Y page 169)
to set the temperature.
i The footwell temperature can be set via
COMAND (Y page 171). Adjusting the air vents
G
Risk of injury
Very hot or very cold air can flow from the air
vents. This could cause burns or frostbite to
bare skin in the immediate vicinity of the
vents. Keep bare skin away from these air
outlets. If necessary, direct the airflow away
to a different area of the vehicle interior.
In order to ensure the direct flow of fresh air
through the air vents into the vehicle interior,
please observe the following notes:
R keep the air inlet grille on the bonnet free
of blockage, such as ice, snow or leaves.
R never cover the vents or air inlet and outlet
grilles in the vehicle interior.
i For draught-free ventilation, adjust the
sliders of the air vents to the centre detent
position.
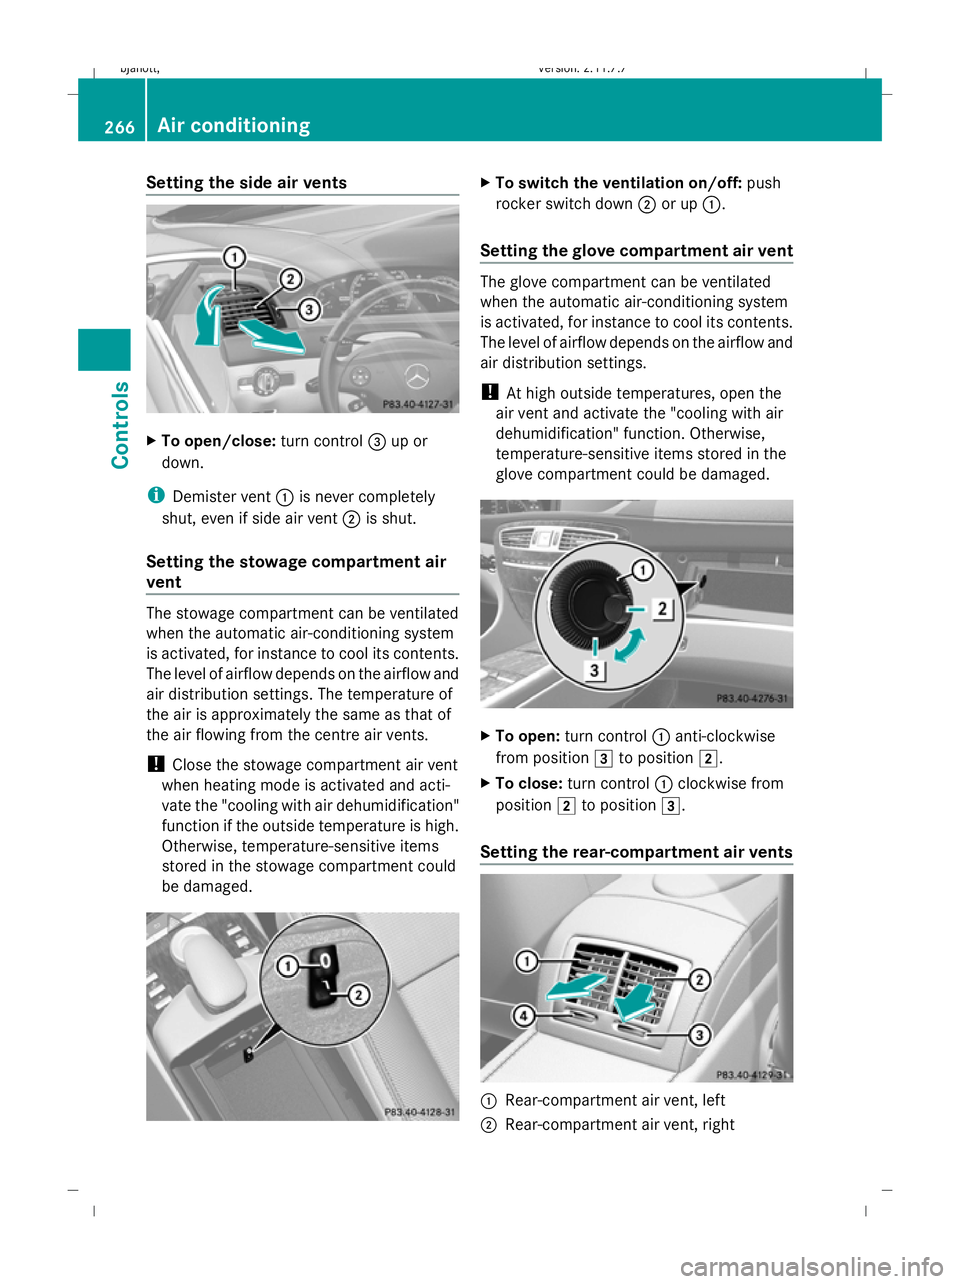
Setting the centre air vents :
Fixed centre air vent
; Centre air vent, right
= Control for right-hand centre air vent
? Control for left-hand centre air vent
A Centre air vent, left
X To open/close: turn controls=and ?
up or down. Air conditioning
265Controls
216_AKB; 2; 3, en-GB
bjanott, Version: 2.11.7.7 2009-02-27T14:54:17+01:00 - Seite 265 Z
Dateiname: 6515230602_buchblock.pdf; erzeugt am 04. Mar 2009 11:16:10; WK
Page 269 of 421
Setting the side air vents
X
To open/close: turn control=up or
down.
i Demister vent :is never completely
shut, even if side air vent ;is shut.
Setting the stowage compartment air
vent The stowage compartment can be ventilated
when the automatic air-conditioning system
is activated, for instance to cool its contents.
The level of airflow depends on the airflow and
air distribution settings. The temperature of
the air is approximately the same as that of
the air flowing from the centre air vents.
! Close the stowage compartment air vent
when heating mode is activated and acti-
vate the "cooling with air dehumidification"
function if the outside temperature is high.
Otherwise, temperature-sensitive items
stored in the stowage compartment could
be damaged. X
To switch the ventilation on/off: push
rocker switch down ;or up :.
Setting the glove compartment air vent The glove compartment can be ventilated
when the automatic air-conditioning system
is activated, for instance to cool its contents.
The level of airflow depends on the airflow and
air distribution settings.
! At high outside temperatures, open the
air vent and activate the "cooling with air
dehumidification" function. Otherwise,
temperature-sensitive items stored in the
glove compartment could be damaged. X
To open: turn control :anti-clockwise
from position 3to position 2.
X To close: turn control :clockwise from
position 2to position 3.
Setting the rear-compartment air vents :
Rear-compartment air vent, left
; Rear-compartment air vent, right 266
Air conditioningControls
216_AKB; 2; 3, en-GB
bjanott
,V ersion: 2.11.7.7
2009-02-27T14:54:17+01:00 - Seite 266
Dateiname: 6515230602_buchblock.pdf; erzeugt am 04. Mar 2009 11:16:12; WK
Page 270 of 421
=
Control for right-hand rear-compartment
air vent
? Control for left-hand rear-compartment
air vent
X To open/close: turn controls=or? to
the right or left.
i Close the rear-compartment air vents
when heating mode is activated, as no
warm air flows through the rear-compart-
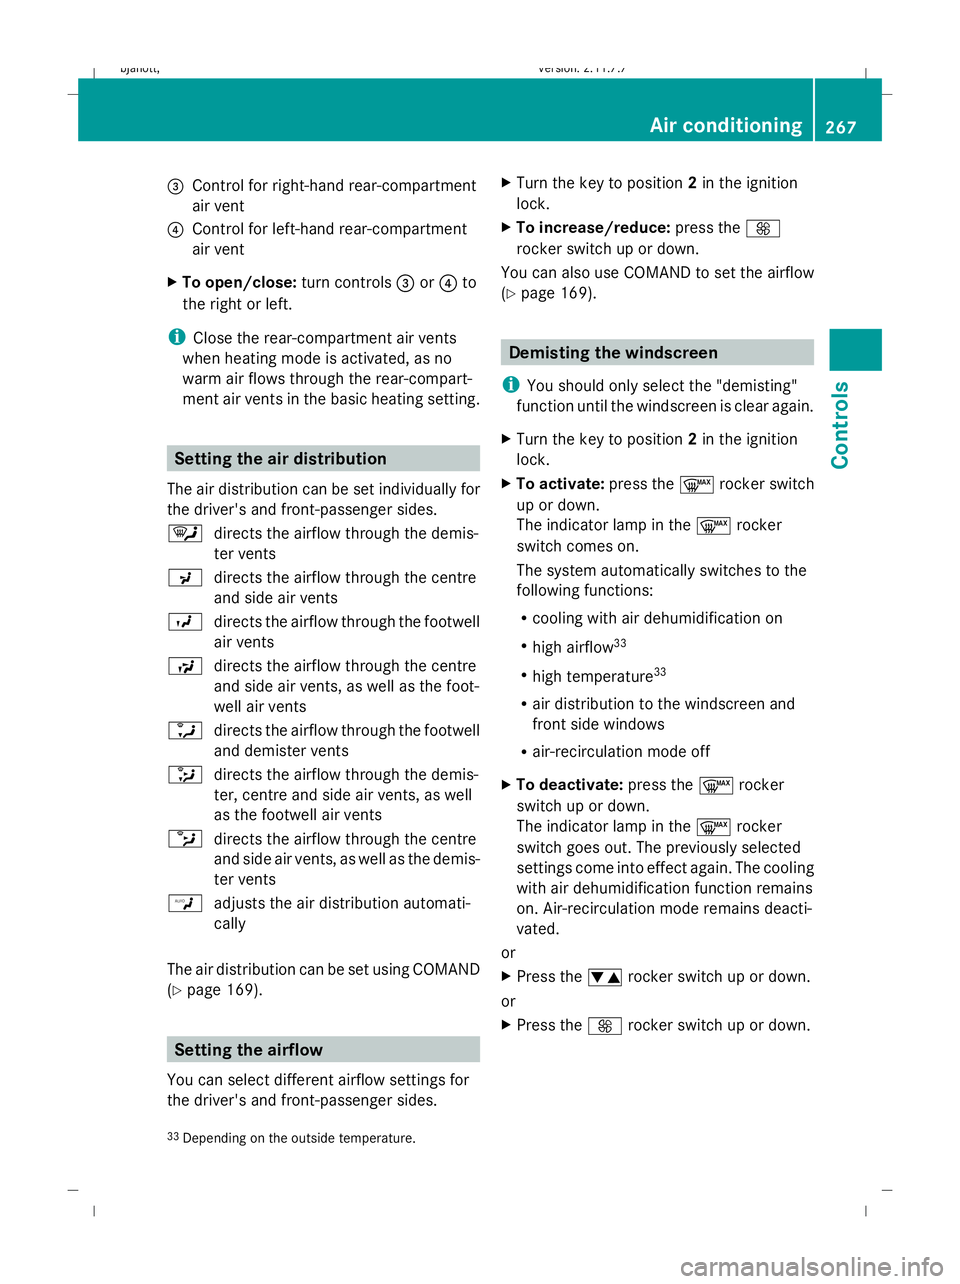
ment air vents in the basic heating setting. Setting the air distribution
The air distribution can be set individually for
the driver's and front-passenger sides.
¯ directs the airflow through the demis-
ter vents
P directs the airflow through the centre
and side air vents
O directs the airflow through the footwell
air vents
S directs the airflow through the centre
and side air vents, as well as the foot-
well air vents
a directs the airflow through the footwell
and demister vents
_ directs the airflow through the demis-
ter, centre and side air vents, as well
as the footwell air vents
b directs the airflow through the centre
and side air vents, as well as the demis-
ter vents
W adjusts the air distribution automati-
cally
The air distribution can be set using COMAND
(Y page 169). Setting the airflow
You can select different airflow settings for
the driver's and front-passenger sides. X
Turn the key to position 2in the ignition
lock.
X To increase/reduce: press theK
rocker switch up or down.
You can also use COMAND to set the airflow
(Y page 169). Demisting the windscreen
i You should only select the "demisting"
function until the windscreen is clear again.
X Turn the key to position 2in the ignition
lock.
X To activate: press the¬rocker switch
up or down.
The indicator lamp in the ¬rocker
switch comes on.
The system automatically switches to the
following functions:
R cooling with air dehumidification on
R high airflow 33
R high temperature 33
R air distribution to the windscreen and
front side windows
R air-recirculation mode off
X To deactivate: press the¬rocker
switch up or down.
The indicator lamp in the ¬rocker
switch goes out. The previously selected
settings come into effect again. The cooling
with air dehumidification function remains
on. Air-recirculation mode remains deacti-
vated.
or
X Press the wrocker switch up or down.
or
X Press the Krocker switch up or down.
33 Depending on the outside temperature. Air conditioning
267Controls
216_AKB; 2; 3, en-GB
bjanott, Version: 2.11.7.7 2009-02-27T14:54:17+01:00 - Seite 267 Z
Dateiname: 6515230602_buchblock.pdf; erzeugt am 04. Mar 2009 11:16:12; WK