MERCEDES-BENZ CL COUPE 2009 Owners Manual
Manufacturer: MERCEDES-BENZ, Model Year: 2009, Model line: CL COUPE, Model: MERCEDES-BENZ CL COUPE 2009Pages: 421, PDF Size: 10.78 MB
Page 291 of 421

288 216_AKB; 2; 3, en-GB
bjanott,
Version: 2.11.7.7 2009-02-27T14:54:17+01:00 - Seite 288Dateiname: 6515230602_buchblock.pdf; erzeugt am 04. Mar 2009 11:16:24; WK
Page 292 of 421
Running-in notes
............................... 290
Refuelling ........................................... 290
Engine compartment ........................292
Tyres and wheels .............................. 296
Winter driving ................................... 302
Driving tips ........................................ 304
Driving abroad ................................... 306
Service ............................................... 306
Care .................................................... 307 289Operation
216_AKB; 2; 3, en-GB
bjanott,
Version: 2.11.7.7 2009-02-27T14:54:17+01:00 - Seite 289
Dateiname: 6515230602_buchblock.pdf; erzeugt am 04. Mar 2009 11:16:25; WK
Page 293 of 421
Running-in notes
The first 1,500 km
G
Risk of accident
New brake pads/linings only have optimal
braking performance after several hundred
kilometres. Until then, compensate for this by
applying greater force to the brake pedal. This
also applies when brake pads/linings or
brake discs have been changed.
If you treat the engine with sufficient care
from the very start, you will be rewarded with
excellent performance for the remainder of
the engine's life.
R Therefore, you should drive at varying road
and engine speeds for the first 1,500 km.
R Avoid heavy loads, e.g. driving at full throt-
tle, during this time. Do not exceed 2
/ 3 of
the maximum permissible engine speed for
each gear.
R Change gear in good time.
R Do not shift down a gear manually in order
to brake.
R try to avoid depressing the accelerator
pedal beyond the pressure point (kick-
down).
R only use ranges 3,2or 1for slow driving,
e.g. in mountainous terrain.
After 1,500 km, you may gradually bring the
vehicle up to full road and engine speeds.
Additional notes on running in AMG vehicles:
R do not drive faster than 140 km/h for the
first 1,500 km.
R only bring the engine up to a maximum
speed of 4,500 rpm for a brief period.
i You should also observe these notes on
running in if the engine or the axle gear on
your vehicle have been replaced. Refuelling
Refuelling
G
Risk of explosion
Fuel is highly flammable. Fire, naked flames
and smoking are therefore prohibited when
handling fuels.
Before refuelling, turn off the engine and the
auxiliary heating *. G
Risk of injury
Avoid any contact with fuels.
You can damage your health if your skin
comes into direct contact with fuel or if you
inhale fuel vapours.
! Do not use diesel to refuel vehicles with a
petrol engine. Even a small quantity of die-
sel will damage the injection system. Dam-
age caused by using diesel to refuel vehi-
cles with a petrol engine or mixing petrol
with diesel is not covered by the warranty.
! Do not start the engine if you accidentally
refuel with the wrong fuel. Otherwise, the
fuel could enter the fuel lines. This would
require draining of the fuel tank and fuel
lines. Notify a qualified specialist workshop
and have the fuel tank and fuel lines
drained completely.
When you open or close the vehicle with the
key or KEYLESS GO*, the fuel filler flap is
automatically unlocked or locked.
The position of the fuel filler cap is to the rear
on the right. The position of the fuel filler cap
is displayed in the instrument cluster 8.290
RefuellingOperation
* optional
216_AKB; 2; 3, en-GB
bjanott,
Version: 2.11.7.7 2009-02-27T14:54:17+01:00 - Seite 290
Dateiname: 6515230602_buchblock.pdf; erzeugt am 04. Mar 2009 11:16:25; WK
Page 294 of 421
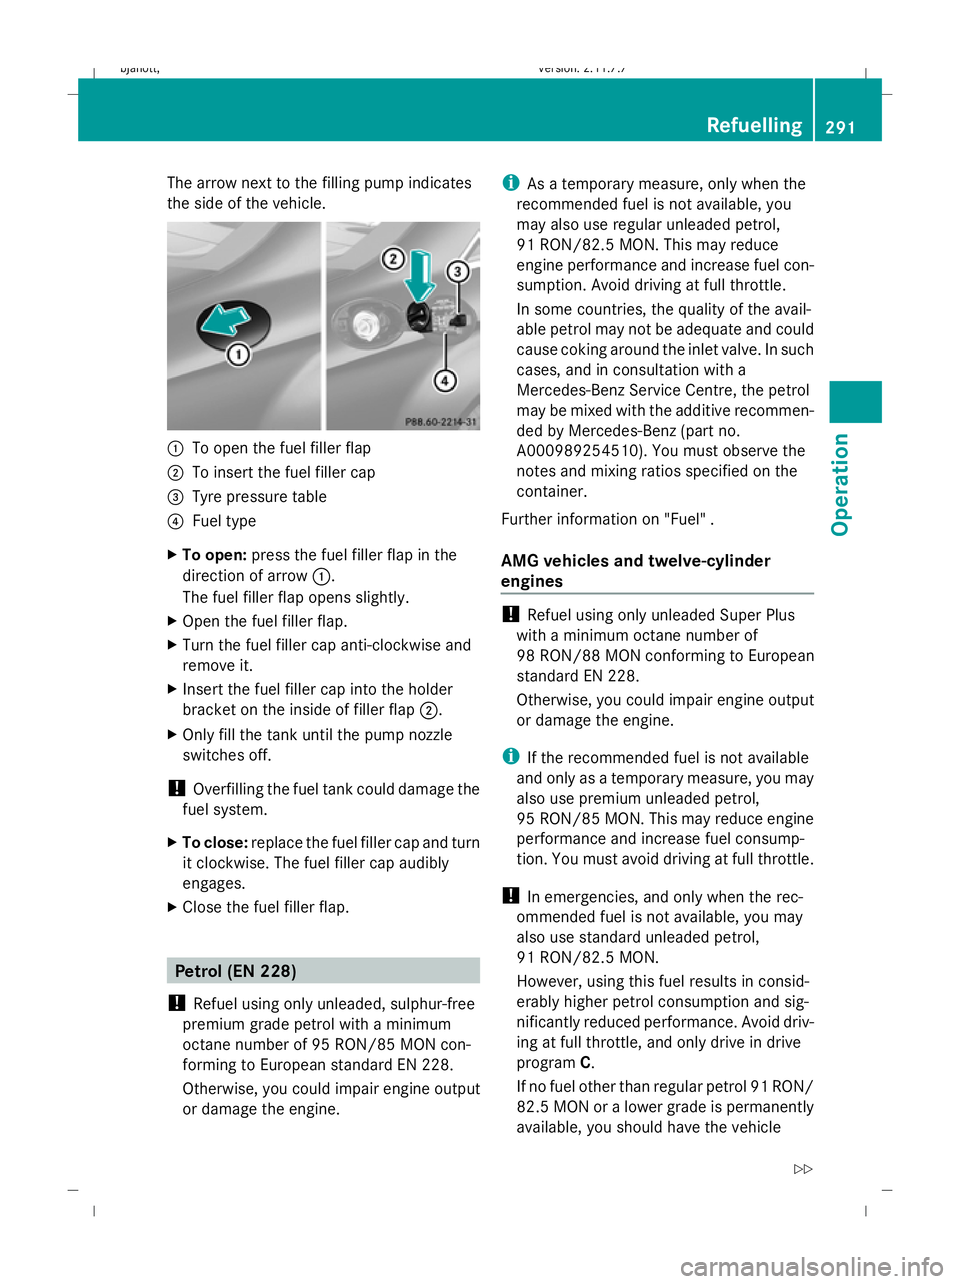
The arrow next to the filling pump indicates
the side of the vehicle.
:
To open the fuel filler flap
; To insert the fuel filler cap
= Tyre pressure table
? Fuel type
X To open: press the fuel filler flap in the
direction of arrow :.
The fuel filler flap opens slightly.
X Open the fuel filler flap.
X Turn the fuel filler cap anti-clockwise and
remove it.
X Insert the fuel filler cap into the holder
bracket on the inside of filler flap ;.
X Only fill the tank until the pump nozzle
switches off.
! Overfilling the fuel tank could damage the
fuel system.
X To close: replace the fuel filler cap and turn
it clockwise. The fuel filler cap audibly
engages.
X Close the fuel filler flap. Petrol (EN 228)
! Refuel using only unleaded, sulphur-free
premium grade petrol with a minimum
octane number of 95 RON/85 MON con-
forming to European standard EN 228.
Otherwise, you could impair engine output
or damage the engine. i
As a temporary measure, only when the
recommended fuel is not available, you
may also use regular unleaded petrol,
91 RON/82.5 MON. This may reduce
engine performance and increase fuel con-
sumption. Avoid driving at full throttle.
In some countries, the quality of the avail-
able petrol may not be adequate and could
cause coking around the inlet valve. In such
cases, and in consultation with a
Mercedes-Benz Service Centre, the petrol
may be mixed with the additive recommen-
ded by Mercedes-Benz (part no.
A000989254510). You must observe the
notes and mixing ratios specified on the
container.
Further information on "Fuel" .
AMG vehicles and twelve-cylinder
engines !
Refuel using only unleaded Super Plus
with a minimum octane number of
98 RON/88 MON conforming to European
standard EN 228.
Otherwise, you could impair engine output
or damage the engine.
i If the recommended fuel is not available
and only as a temporary measure, you may
also use premium unleaded petrol,
95 RON/85 MON. This may reduce engine
performance and increase fuel consump-
tion. You must avoid driving at full throttle.
! In emergencies, and only when the rec-
ommended fuel is not available, you may
also use standard unleaded petrol,
91 RON/82.5 MON.
However, using this fuel results in consid-
erably higher petrol consumption and sig-
nificantly reduced performance. Avoid driv-
ing at full throttle, and only drive in drive
program C.
If no fuel other than regular petrol 91 RON/
82.5 MON or a lower grade is permanently
available, you should have the vehicle Refuelling
291Operation
216_AKB; 2; 3, en-GB
bjanott, Version: 2.11.7.7 2009-02-27T14:54:17+01:00 - Seite 291 Z
Dateiname: 6515230602_buchblock.pdf; erzeugt am 04. Mar 2009 11:16:25; WK
Page 295 of 421
adapted to run on this fuel by the local
after-sales service.
Engine compartment
Bonnet
G
Risk of accident
Do not pull the release lever while the vehicle
is in motion. If you do so, the bonnet may open
up and block your view.
Opening G
Risk of injury
There is a risk of injury if the bonnet is open,
even if the engine is not running.
Some engine components can become very
hot.
To avoid the risk of burns, only touch those
components described in the Owner’s Manual
and observe the relevant safety notes. G
Risk of injury
The radiator fan between the radiator and the
engine can start automatically, even if the key
has been removed from the ignition lock. For
this reason, you must not reach into the fan
rotation area. Otherwise, you could be
injured.
The electronic ignition system uses high volt-
age. For this reason, you must never touch
components of the ignition system (ignition
coil, ignition cable, spark plug connector or
test socket) when:
R the engine is running.
R the engine is being started.
R the ignition is switched on and the engine
is being cranked by hand.
X Make sure that the windscreen wipers are
switched off. G
Risk of injury
The windscreen wipers and wiper linkage
could be set in motion.
When the bonnet is open, you or others could
be injured by the wiper rods.
Make sure that the windscreen wiper is
switched off. Remove the key or make sure
that no ignition level has been selected on
KEYLESS GO*. In the instrument cluster, all of
the indicator lamps must be out.
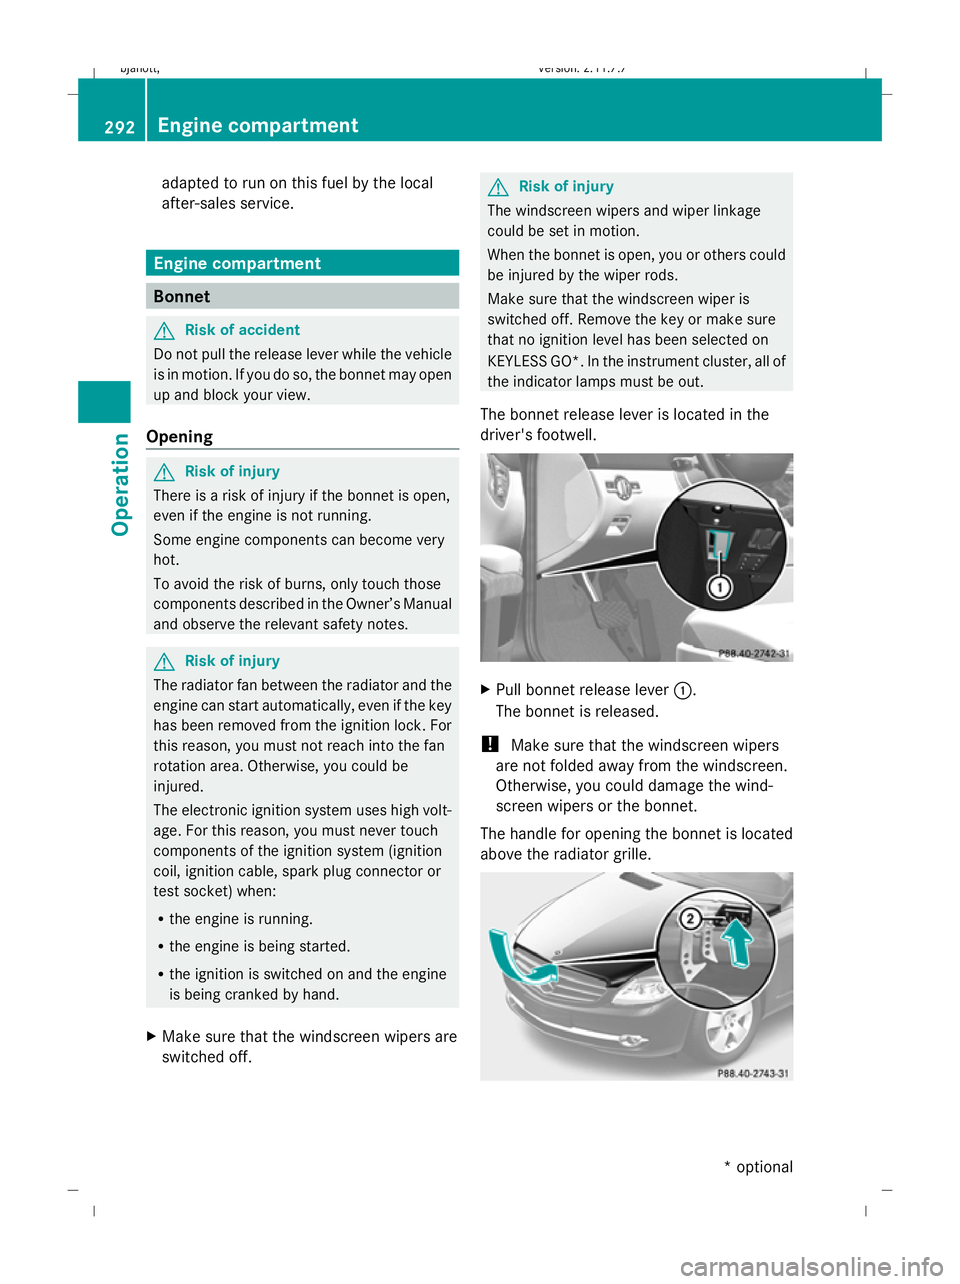
The bonnet release lever is located in the
driver's footwell. X
Pull bonnet release lever :.
The bonnet is released.
! Make sure that the windscreen wipers
are not folded away from the windscreen.
Otherwise, you could damage the wind-
screen wipers or the bonnet.
The handle for opening the bonnet is located
above the radiator grille. 292
Engine compartmentOperation
* optional
216_AKB; 2; 3, en-GB
bjanott
,V ersion: 2.11.7.7
2009-02-27T14:54:17+01:00 - Seite 292
Dateiname: 6515230602_buchblock.pdf; erzeugt am 04. Mar 2009 11:16:26; WK
Page 296 of 421
X
Reach into the gap, pull bonnet catch han-
dle ;up and lift the bonnet.
Closing G
Risk of injury
Make sure that nobody can become trapped
as you close the bonnet.
X Lower the bonnet and let it fall from a
height of approximately 20 cm.
X Check that the bonnet has engaged prop-
erly.
i If the bonnet can be raised slightly, it is
not properly engaged. Open it again and
close it with a little more force. Engine oil
Depending on driving style, the vehicle con-
sumes up to 0.8 l oil per 1,000 km. The oil
consumption may be higher than this when
the vehicle is new or if you frequently drive at
high engine speeds.
Checking the engine oil level When doing so:
R
the vehicle should be parked on level
ground.
R the engine should be switched off for at
least five minutes if the engine is at normal
operating temperature.
R the engine should be switched off for at
least 30 minutes if the engine is not at
operating temperature (i.e. if you only start
the engine briefly).
Using the on-board computer*
i Only possible on the CL 600 and
CL 65 AMG. On the CL 500 and CL 63 AMG,
a dipstick is used to check the engine oil
level ( Ypage 294). X
Make sure that the key is in position
2(Y page 182) in the ignition lock.
X Press the ;or= button to select the
Service menu.
X Press the :or9 button to select
Engine oil level.
X Press the abutton.
The multi-function display shows the fol-
lowing message: Engine oil level
Measuring now Measurement correct
only if vehicle level
The measurement takes a few seconds. You
will see one of the following messages in the
multi-function display:
R Engine oil level OK
R Add 1.0 l engine oil when next
refuelling
R Add 1.5 l engine oil when next
refuelling
R Add 2.0 l engine oil when next
refuelling
X Top up the oil if necessary ( Ypage 294).
Other messages in the multi-function dis-
play
If the engine is at normal operating tempera-
ture and there is too much oil, you will see the
following message:
Eng. oil level
Reduce oil level
X Have excess oil siphoned off.
! There is a risk of damage to the engine or
the catalytic converter if there is excess oil
in the engine.
If the Turn on ignition to see engine
oil level message appears:
X Turn the key to position 2(Y page 182) in
the ignition lock.
You will see the following message if you did
not observe the required waiting period:
Waiting period for engine oil level
not observed Engine compa
rtment
293Operation
* optional
216_AKB; 2; 3, en-GB
bjanott
,V ersion: 2.11.7.7
2009-02-27T14:54:17+01:00 - Seite 293 Z
Dateiname: 6515230602_buchblock.pdf; erzeugt am 04. Mar 2009 11:16:26; WK
Page 297 of 421
X
Repeat the measurement after about five
minutes if the engine is at normal operating
temperature.
X Repeat the measurement after about
30 minutes if the engine is not at normal
operating temperature (if the engine was
only started briefly).
The following message appears if the engine
is running:
Engine oil level Not when engine on
X Switch off the engine and wait for five
minutes if the engine is at normal operating
temperature, or for about 30 minutes if the
engine is not at normal operating temper-
ature (if you had started the engine only
briefly), before measuring.
i If you wish to cancel the measurement,
press the %button on the multi-func-
tion steering wheel.
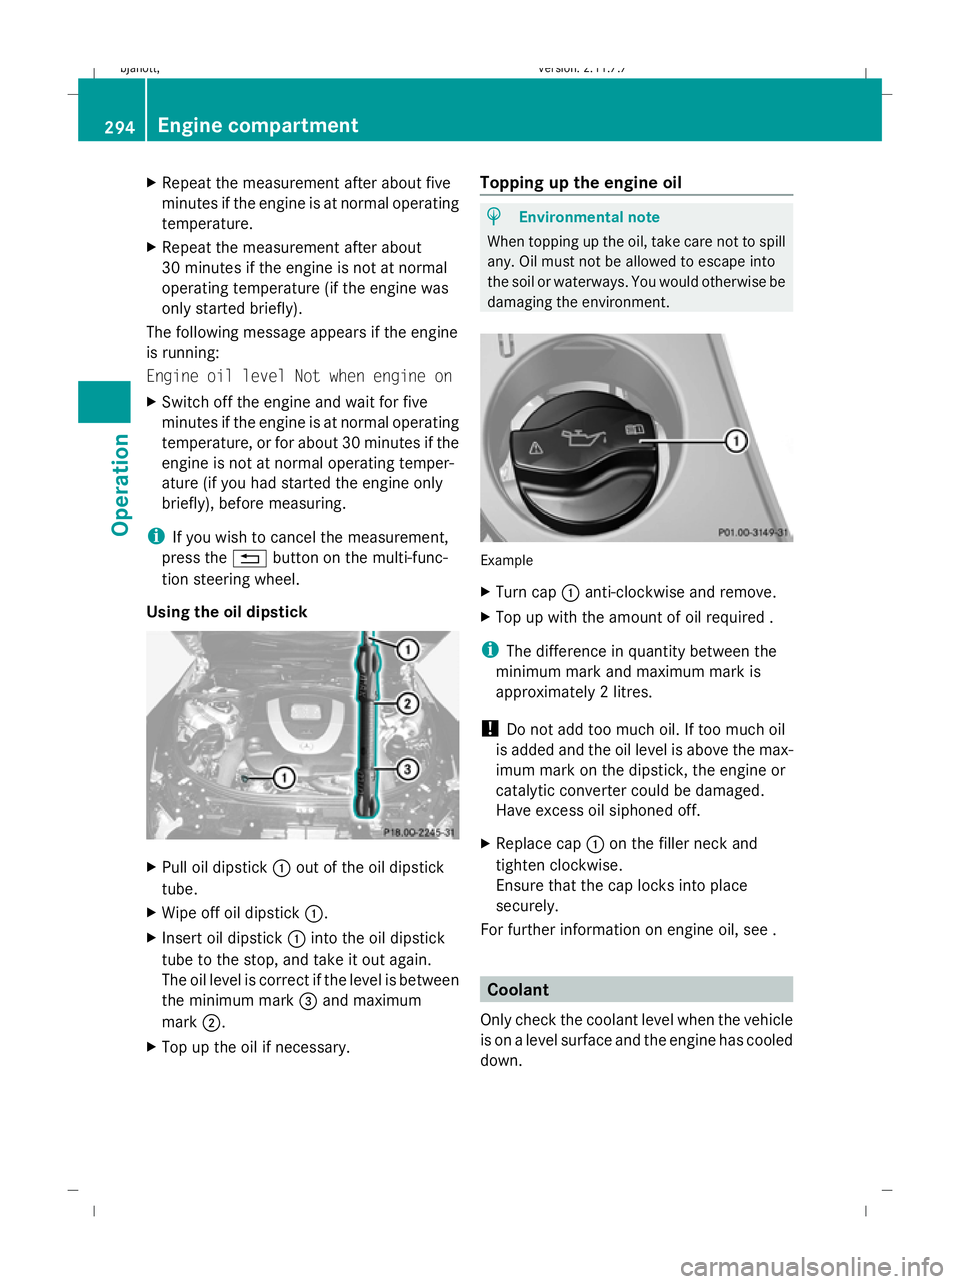
Using the oil dipstick X
Pull oil dipstick :out of the oil dipstick
tube.
X Wipe off oil dipstick :.
X Insert oil dipstick :into the oil dipstick
tube to the stop, and take it out again.
The oil level is correct if the level is between
the minimum mark =and maximum
mark ;.
X Top up the oil if necessary. Topping up the engine oil H
Environmental note
When topping up the oil, take care not to spill
any. Oil must not be allowed to escape into
the soil or waterways. You would otherwise be
damaging the environment. Example
X
Turn cap :anti-clockwise and remove.
X Top up with the amount of oil required .
i The difference in quantity between the
minimum mark and maximum mark is
approximately 2 litres.
! Do not add too much oil. If too much oil
is added and the oil level is above the max-
imum mark on the dipstick, the engine or
catalytic converter could be damaged.
Have excess oil siphoned off.
X Replace cap :on the filler neck and
tighten clockwise.
Ensure that the cap locks into place
securely.
For further information on engine oil, see . Coolant
Only check the coolant level when the vehicle
is on a level surface and the engine has cooled
down. 294
Engine compartmentOperation
216_AKB; 2; 3, en-GB
bjanott
,V ersion: 2.11.7.7
2009-02-27T14:54:17+01:00 - Seite 294
Dateiname: 6515230602_buchblock.pdf; erzeugt am 04. Mar 2009 11:16:26; WK
Page 298 of 421
X
Turn the key to position 2(Y page 182) in
the ignition lock.
X Check the coolant temperature gauge in
the instrument cluster. G
Risk of injury
The cooling system is pressurised. Therefore,
only unscrew the cap once the engine has
cooled down. The coolant temperature gauge
must display less than 70 †. Otherwise, you
could be scalded if hot coolant escapes.
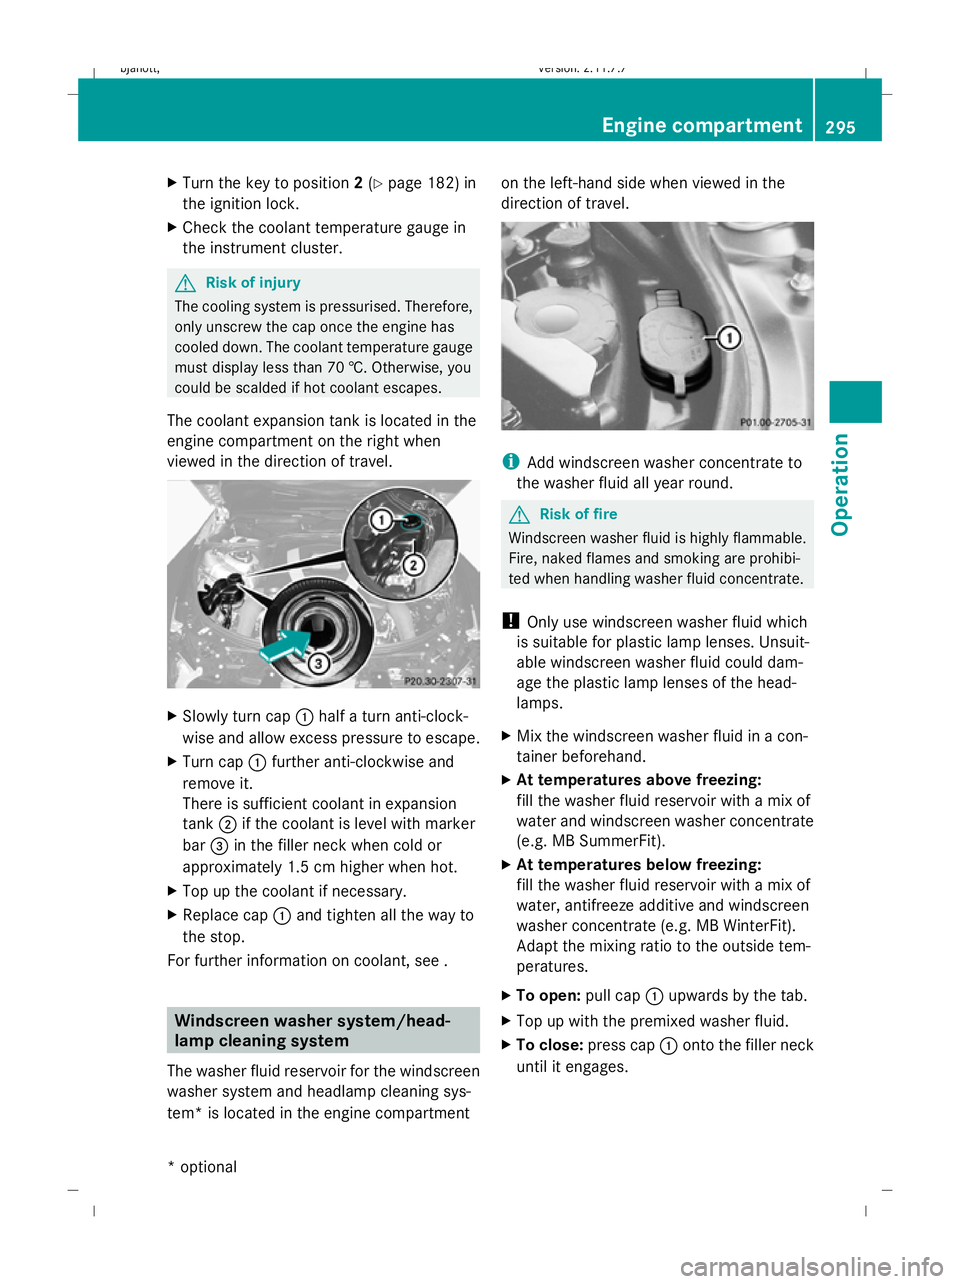
The coolant expansion tank is located in the
engine compartment on the right when
viewed in the direction of travel. X
Slowly turn cap :half a turn anti-clock-
wise and allow excess pressure to escape.
X Turn cap :further anti-clockwise and
remove it.
There is sufficient coolant in expansion
tank ;if the coolant is level with marker
bar =in the filler neck when cold or
approximately 1.5 cm higher when hot.
X Top up the coolant if necessary.
X Replace cap :and tighten all the way to
the stop.
For further information on coolant, see . Windscreen washer system/head-
lamp cleaning system
The washer fluid reservoir for the windscreen
washer system and headlamp cleaning sys-
tem* is located in the engine compartment on the left-hand side when viewed in the
direction of travel.
i
Add windscreen washer concentrate to
the washer fluid all year round. G
Risk of fire
Windscreen washer fluid is highly flammable.
Fire, naked flames and smoking are prohibi-
ted when handling washer fluid concentrate.
! Only use windscreen washer fluid which
is suitable for plastic lamp lenses. Unsuit-
able windscreen washer fluid could dam-
age the plastic lamp lenses of the head-
lamps.
X Mix the windscreen washer fluid in a con-
tainer beforehand.
X At temperatures above freezing:
fill the washer fluid reservoir with a mix of
water and windscreen washer concentrate
(e.g. MB SummerFit).
X At temperatures below freezing:
fill the washer fluid reservoir with a mix of
water, antifreeze additive and windscreen
washer concentrate (e.g. MB WinterFit).
Adapt the mixing ratio to the outside tem-
peratures.
X To open: pull cap:upwards by the tab.
X Top up with the premixed washer fluid.
X To close: press cap :onto the filler neck
until it engages. Engine compartment
295Operation
* optional
216_AKB; 2; 3, en-GB
bjanott,
Version: 2.11.7.7 2009-02-27T14:54:17+01:00 - Seite 295 Z
Dateiname: 6515230602_buchblock.pdf; erzeugt am 04. Mar 2009 11:16:27; WK
Page 299 of 421
Tyres and wheels
Points to remember
! For safety reasons, Mercedes-Benz rec-
ommends that you only use tyres and
wheels which have been approved by
Mercedes-Benz specifically for your vehi-
cle. These tyres have been specially adap-
ted for use with the control systems, such
as ABS or ESP ®
, and are marked as follows:
R MO = Mercedes-Benz Original
R MOE = Mercedes-Benz Original Exten-
ded* (with run-flat characteristics)
Mercedes-Benz Original Extended tyres*
should only be used on wheels that have
been specifically approved by Mercedes-
Benz.
If you use other tyres, wheels or accesso-
ries Mercedes-Benz cannot accept any
responsibility for damage that may result.
Further information about tyres, wheels
and approved combinations can be
obtained from any Mercedes-Benz Service
Centre.
If you use tyres other than those tested and
recommended for Mercedes-Benz vehi-
cles, characteristics such as handling, vehi-
cle noise emissions and fuel consumption
may be adversely affected. In addition, the
wheels may come into contact with the
body or axle components when heavily loa-
ded or when driving with snow chains. This
could result in damage to the tyres or the
vehicle.
! Retreaded tyres are neither tested nor
recommended by Mercedes-Benz, since
previous damage cannot always be detec-
ted on retreaded tyres. As a result,
Mercedes-Benz cannot guarantee vehicle
safety if retreaded tyres are fitted. Do not
fit used tyres if you have no information
about their previous usage. G
Risk of accident
Tyres, wheels or accessories which have not
been approved by Mercedes-Benz for your
vehicle or are not used as they should be, can
impair driving safety. As a result, you could
cause an accident. Before purchasing and
using them, enquire about their suitability,
legal stipulations and factory recommenda-
tions at a Mercedes-Benz Service Centre.
Modification work on the brake system and
wheels is not permitted, nor is the use of
spacer plates or brake dust shields. This inva-
lidates the General Operating Permit for the
vehicle.
Notes on selecting, fitting and replac-
ing tyres R
Only fit tyres and wheels of the same type
and make.
R Only fit tyres of the correct size onto the
wheels.
R After fitting new tyres, run them in at mod-
erate speeds for the first 100 km as they
only reach their full performance after this
distance.
R Fit new tyres on the front wheels first if
tyres of the same size are required on the
front and rear wheels.
R Replace the tyres after six years at the lat-
est, regardless of wear. This also applies to
the spare wheel*.
R Do not drive with tyres which have too little
tread depth, as this significantly reduces
the traction on wet roads (aquaplaning).
! Store tyres that are not being used in a
cool, dry and preferably dark place. Protect
the tyres against oil, grease, petrol and die-
sel.
Notes on regularly inspecting wheels
and tyres R
Regularly check the wheels and tyres of
your vehicle for damage (e.g. cuts, punctu- 296
Tyres and wheelsOperation
* optional
216_AKB; 2; 3, en-GB
bjanott,
Version: 2.11.7.7 2009-02-27T14:54:17+01:00 - Seite 296
Dateiname: 6515230602_buchblock.pdf; erzeugt am 04. Mar 2009 11:16:27; WK
Page 300 of 421
res, tears, bulges on tyres and deformation,
cracks or severe corrosion on wheels), at
least every 14 days, as well as after driving
off-road or on rough roads. Damaged
wheels can cause a loss of tyre pressure.
R Regularly check the tyre tread depth and
the condition of the tread across the whole
width of the tyre (Y page 298). If neces-
sary, turn the front wheels to full lock in
order to inspect the inner side of the tyre
surface.
R All wheels must have a valve cap to protect
the valve against dirt and moisture. Do not
fit anything onto the valve (such as tyre
pressure monitoring systems) other than
the standard valve cap or other valve caps
approved by Mercedes-Benz for your vehi-
cle.
R Regularly check the pressure of all the tyres
including the spare tyre*, particularly prior
to long trips, and correct the pressure as
necessary (Y page 298).
Notes on driving R
While driving, pay attention to vibrations,
noises and unusual handling characteris-
tics, e.g. pulling to one side. This may indi-
cate that the wheels or tyres are damaged.
If you suspect that a tyre is defective,
reduce your speed and stop the vehicle as
soon as possible to check the wheels and
tyres for damage. Hidden tyre damage
could also be causing the unusual handling
characteristics. If you find no signs of dam-
age, have the wheels and tyres examined
at a specialist workshop, for example at a
Mercedes-Benz Service Centre.
R When parking your vehicle, make sure that
the tyres do not get deformed by the kerb
or other obstacles. If it is necessary to drive
over kerbs, speed humps or similar eleva-
tions, try to do so slowly and at an obtuse angle. Otherwise, the tyres, particularly the
sidewalls, can get damaged. Direction of rotation
Tyres with a specified direction of rotation
have additional benefits, e.g. if there is a risk
of aquaplaning. You will only gain these ben-
efits if the correct direction of rotation is
observed.
An arrow on the sidewall of the tyre indicates
its correct direction of rotation.
i You may fit a spare tyre* against the
direction of rotation. MOExtended run-flat system*
The MOExtended run-flat system allows you
to continue driving the vehicle even when one
or more tyres lose all air pressure.
The MOExtended run-flat system may only be
used in conjunction with the tyre pressure
loss warning system or with the tyre pressure
monitor* and on wheels specifically tested by
Mercedes-Benz.
i Vehicles with the MOExtended run-flat
system are not equipped with the TIREFIT
kit. 34
It is therefore recommended to additionally
equip your vehicle with the TIREFIT kit when
fitting tyres that do not feature run-flat
properties, e.g. winter tyres.
i A TIREFIT kit is available from any quali-
fied specialist workshop, e.g. a Mercedes-
Benz Service Centre.
You will find notes on driving with a flat tyre
in the "Practical advice" section
(Y page 381).
34 Only for certain countries. Tyres and wheels
297Operation
* optional
216_AKB; 2; 3, en-GB
bjanott,
Version: 2.11.7.7 2009-02-27T14:54:17+01:00 - Seite 297 Z
Dateiname: 6515230602_buchblock.pdf; erzeugt am 04. Mar 2009 11:16:27; WK