MERCEDES-BENZ CL COUPE 2009 Owners Manual
Manufacturer: MERCEDES-BENZ, Model Year: 2009, Model line: CL COUPE, Model: MERCEDES-BENZ CL COUPE 2009Pages: 421, PDF Size: 10.78 MB
Page 341 of 421
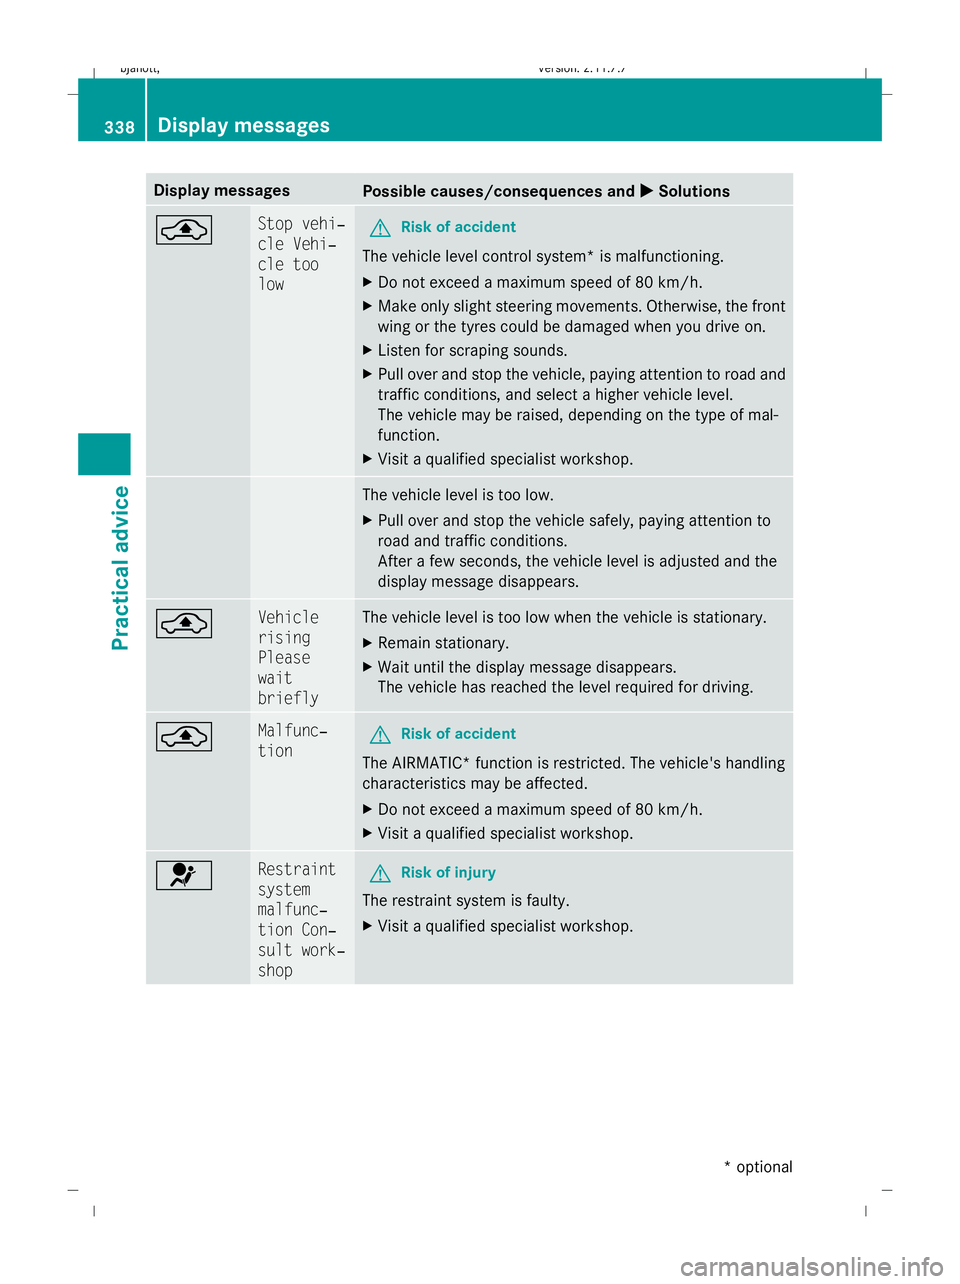
Display messages
Possible causes/consequences and
X
X Solutions ¨ Stop vehi‐
cle Vehi‐
cle too
low
G
Risk of accident
The vehicle level control system* is malfunctioning.
X Do not exceed a maximum speed of 80 km/h.
X Make only slight steering movements. Otherwise, the front
wing or the tyres could be damaged when you drive on.
X Listen for scraping sounds.
X Pull over and stop the vehicle, paying attention to road and
traffic conditions, and select a higher vehicle level.
The vehicle may be raised, depending on the type of mal-
function.
X Visit a qualified specialist workshop. The vehicle level is too low.
X
Pull over and stop the vehicle safely, paying attention to
road and traffic conditions.
After a few seconds, the vehicle level is adjusted and the
display message disappears. ¨ Vehicle
rising
Please
wait
briefly The vehicle level is too low when the vehicle is stationary.
X
Remain stationary.
X Wait until the display message disappears.
The vehicle has reached the level required for driving. ¨ Malfunc‐
tion
G
Risk of accident
The AIRMATIC* function is restricted. The vehicle's handling
characteristics may be affected.
X Do not exceed a maximum speed of 80 km/h.
X Visit a qualified specialist workshop. 6 Restraint
system
malfunc‐
tion Con‐
sult work‐
shop
G
Risk of injury
The restraint system is faulty.
X Visit a qualified specialist workshop. 338
Display
messagesPractical advice
* optional
216_AKB; 2; 3, en-GB
bjanott
,V ersion: 2.11.7.7
2009-02-27T14:54:17+01:00 - Seite 338
Dateiname: 6515230602_buchblock.pdf; erzeugt am 04. Mar 2009 11:16:38; WK
Page 342 of 421
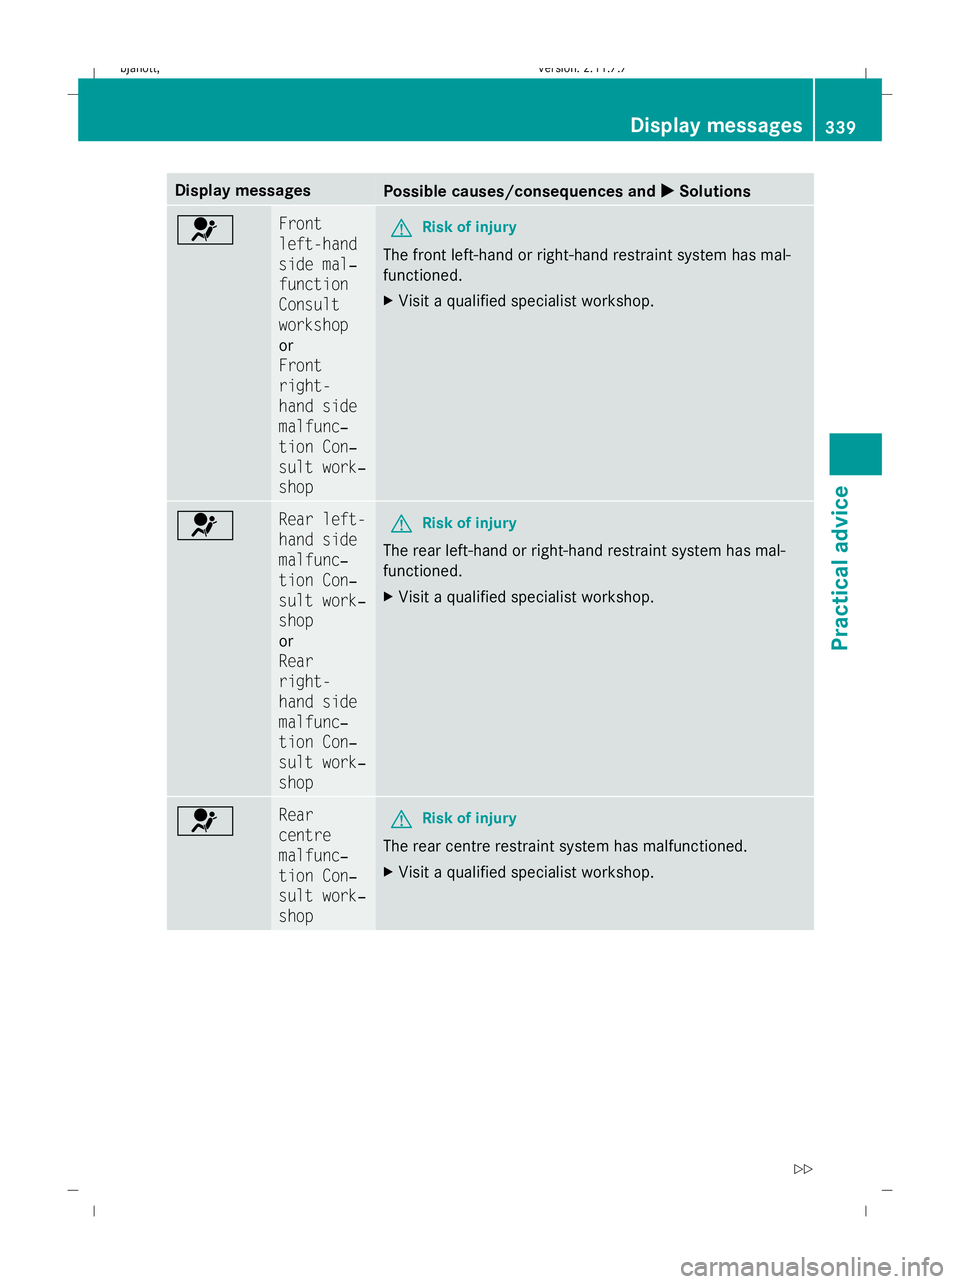
Display messages
Possible causes/consequences and
X
X Solutions 6 Front
left-hand
side mal‐
function
Consult
workshop
or
Front
right-
hand side
malfunc‐
tion Con‐
sult work‐
shop
G
Risk of injury
The front left-hand or right-hand restraint system has mal-
functioned.
X Visit a qualified specialist workshop. 6 Rear left-
hand side
malfunc‐
tion Con‐
sult work‐
shop
or
Rear
right-
hand side
malfunc‐
tion Con‐
sult work‐
shop
G
Risk of injury
The rear left-hand or right-hand restraint system has mal-
functioned.
X Visit a qualified specialist workshop. 6 Rear
centre
malfunc‐
tion Con‐
sult work‐
shop
G
Risk of injury
The rear centre restraint system has malfunctioned.
X Visit a qualified specialist workshop. Display
messages
339Practical advice
216_AKB; 2; 3, en-GB
bjanott ,V ersion: 2.11.7.7
2009-02-27T14:54:17+01:00 - Seite 339 Z
Dateiname: 6515230602_buchblock.pdf; erzeugt am 04. Mar 2009 11:16:38; WK
Page 343 of 421
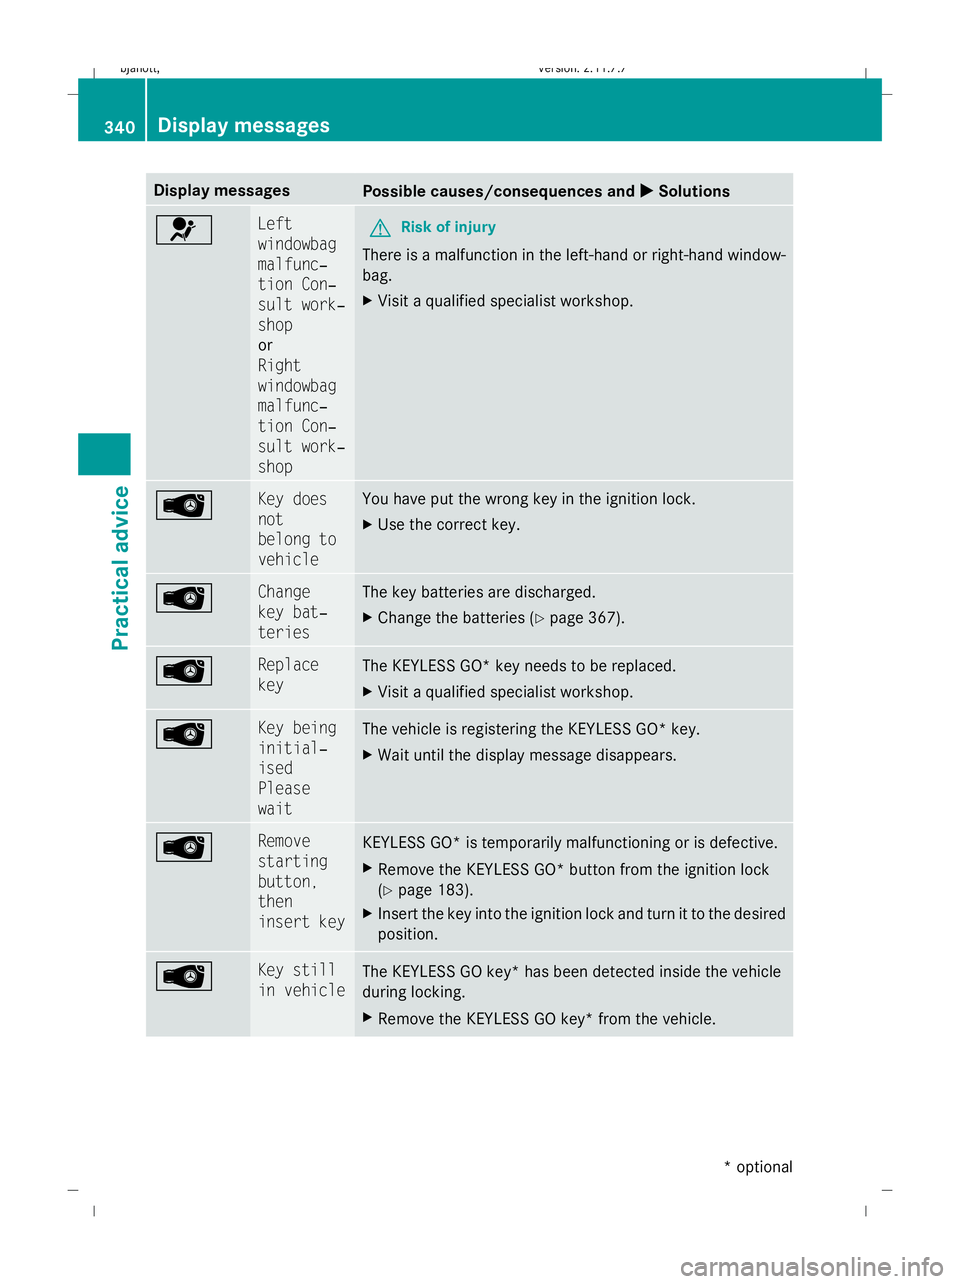
Display messages
Possible causes/consequences and
X
X Solutions 6 Left
windowbag
malfunc‐
tion Con‐
sult work‐
shop
or
Right
windowbag
malfunc‐
tion Con‐
sult work‐
shop
G
Risk of injury
There is a malfunction in the left-hand or right-hand window-
bag.
X Visit a qualified specialist workshop. Â Key does
not
belong to
vehicle You have put the wrong key in the ignition lock.
X
Use the correct key. Â Change
key bat‐
teries The key batteries are discharged.
X
Change the batteries (Y page 367). Replace
key
The KEYLESS GO* key needs to be replaced.
X
Visit a qualified specialist workshop. Â Key being
initial‐
ised
Please
wait
The vehicle is registering the KEYLESS GO* key.
X
Wait until the display message disappears. Â Remove
starting
button,
then
insert key
KEYLESS GO* is temporarily malfunctioning or is defective.
X
Remove the KEYLESS GO* button from the ignition lock
(Y page 183).
X Insert the key into the ignition lock and turn it to the desired
position. Â Key still
in vehicle
The KEYLESS GO key* has been detected inside the vehicle
during locking.
X
Remove the KEYLESS GO key* from the vehicle. 340
Display
messagesPractical advice
* optional
216_AKB; 2; 3, en-GB
bjanott
,V ersion: 2.11.7.7
2009-02-27T14:54:17+01:00 - Seite 340
Dateiname: 6515230602_buchblock.pdf; erzeugt am 04. Mar 2009 11:16:38; WK
Page 344 of 421
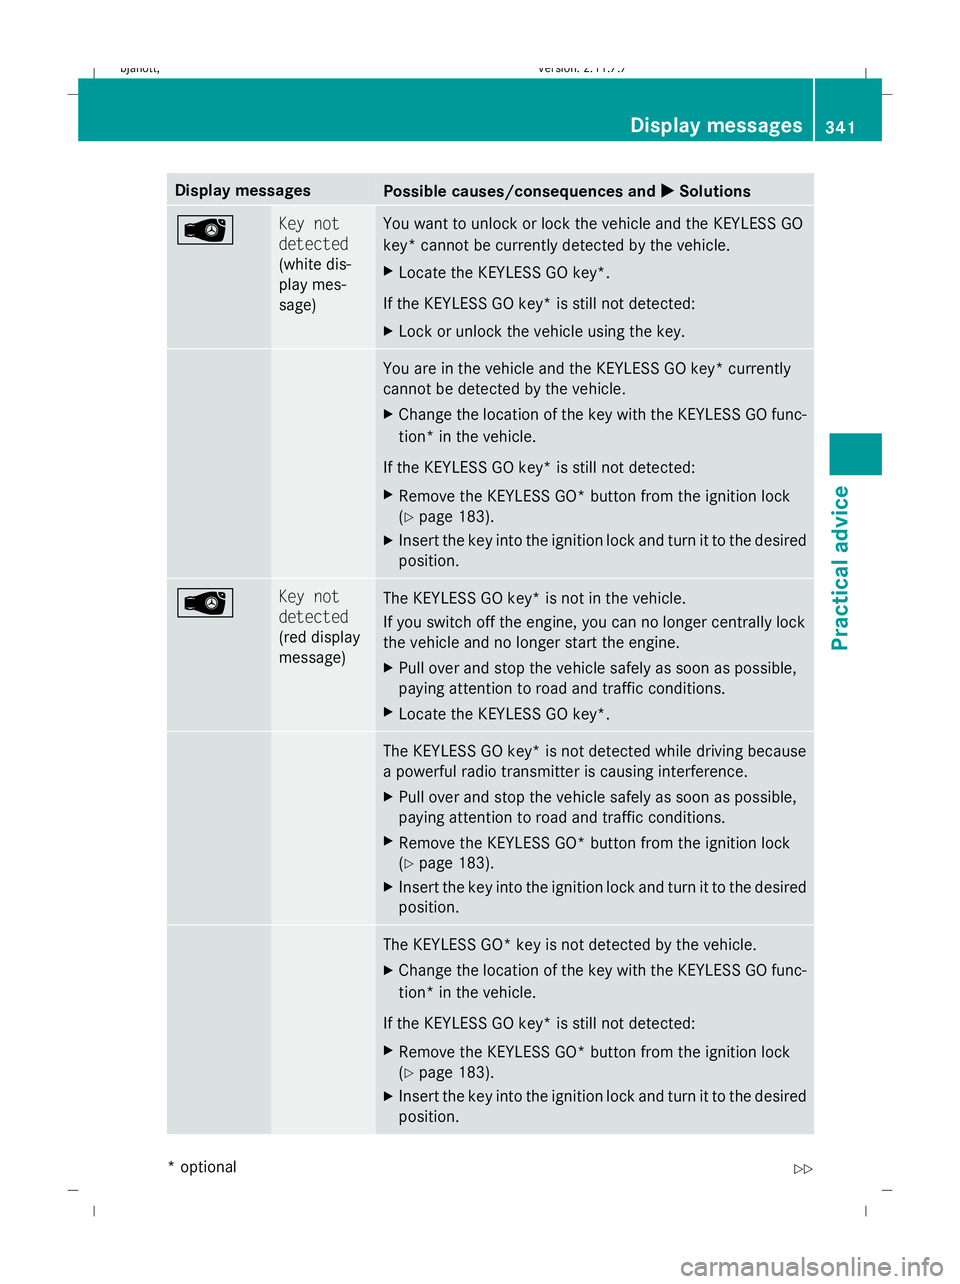
Display messages
Possible causes/consequences and
X
X Solutions  Key not
detected
(white dis-
play mes-
sage) You want to unlock or lock the vehicle and the KEYLESS GO
key* cannot be currently detected by the vehicle.
X
Locate the KEYLESS GO key*.
If the KEYLESS GO key* is still not detected:
X Lock or unlock the vehicle using the key. You are in the vehicle and the KEYLESS GO key* currently
cannot be detected by the vehicle.
X
Change the location of the key with the KEYLESS GO func-
tion* in the vehicle.
If the KEYLESS GO key* is still not detected:
X Remove the KEYLESS GO* button from the ignition lock
(Y page 183).
X Insert the key into the ignition lock and turn it to the desired
position. Â Key not
detected
(red display
message)
The KEYLESS GO key* is not in the vehicle.
If you switch off the engine, you can no longer centrally lock
the vehicle and no longer start the engine.
X
Pull over and stop the vehicle safely as soon as possible,
paying attention to road and traffic conditions.
X Locate the KEYLESS GO key*. The KEYLESS GO key* is not detected while driving because
a powerful radio transmitter is causing interference.
X
Pull over and stop the vehicle safely as soon as possible,
paying attention to road and traffic conditions.
X Remove the KEYLESS GO* button from the ignition lock
(Y page 183).
X Insert the key into the ignition lock and turn it to the desired
position. The KEYLESS GO* key is not detected by the vehicle.
X
Change the location of the key with the KEYLESS GO func-
tion* in the vehicle.
If the KEYLESS GO key* is still not detected:
X Remove the KEYLESS GO* button from the ignition lock
(Y page 183).
X Insert the key into the ignition lock and turn it to the desired
position. Display
messages
341Practical advice
* optional
216_AKB; 2; 3, en-GB
bjanott
,V ersion: 2.11.7.7
2009-02-27T14:54:17+01:00 - Seite 341 Z
Dateiname: 6515230602_buchblock.pdf; erzeugt am 04. Mar 2009 11:16:38; WK
Page 345 of 421
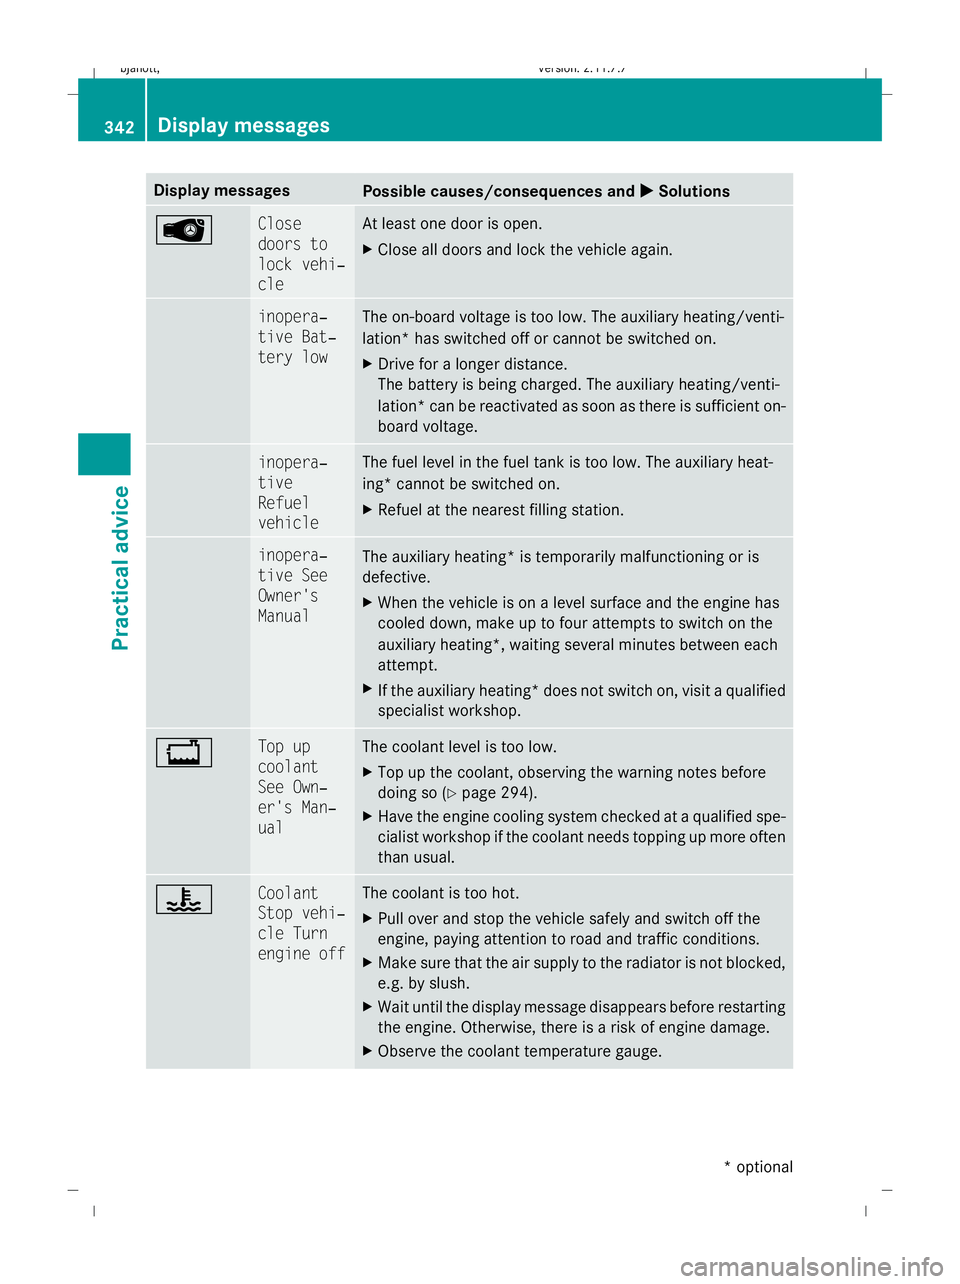
Display messages
Possible causes/consequences and
X
X Solutions  Close
doors to
lock vehi‐
cle At least one door is open.
X
Close all doors and lock the vehicle again. & inopera‐
tive Bat‐
tery low The on-board voltage is too low. The auxiliary heating/venti-
lation* has switched off or cannot be switched on.
X
Drive for a longer distance.
The battery is being charged. The auxiliary heating/venti-
lation *can be reactivated as soon as there is sufficient on-
board voltage. & inopera‐
tive
Refuel
vehicle The fuel level in the fuel tank is too low. The auxiliary heat-
ing* cannot be switched on.
X
Refuel at the nearest filling station. & inopera‐
tive See
Owner's
Manual
The auxiliary heating
*is temporarily malfunctioning or is
defective.
X When the vehicle is on a level surface and the engine has
cooled down, make up to four attempts to switch on the
auxiliary heating*, waiting several minutes between each
attempt.
X If the auxiliary heating* does not switch on, visit a qualified
specialist workshop. + Top up
coolant
See Own‐
er's Man‐
ual The coolant level is too low.
X
Top up the coolant, observing the warning notes before
doing so (Y page 294).
X Have the engine cooling system checked at a qualified spe-
cialist workshop if the coolant needs topping up more often
than usual. ? Coolant
Stop vehi‐
cle Turn
engine off The coolant is too hot.
X
Pull over and stop the vehicle safely and switch off the
engine, paying attention to road and traffic conditions.
X Make sure that the air supply to the radiator is not blocked,
e.g. by slush.
X Wait until the display message disappears before restarting
the engine. Otherwise, there is a risk of engine damage.
X Observe the coolant temperature gauge. 342
Display messagesPractical advice
* optional
216_AKB; 2; 3, en-GB
bjanott
,V ersion: 2.11.7.7
2009-02-27T14:54:17+01:00 - Seite 342
Dateiname: 6515230602_buchblock.pdf; erzeugt am 04. Mar 2009 11:16:38; WK
Page 346 of 421
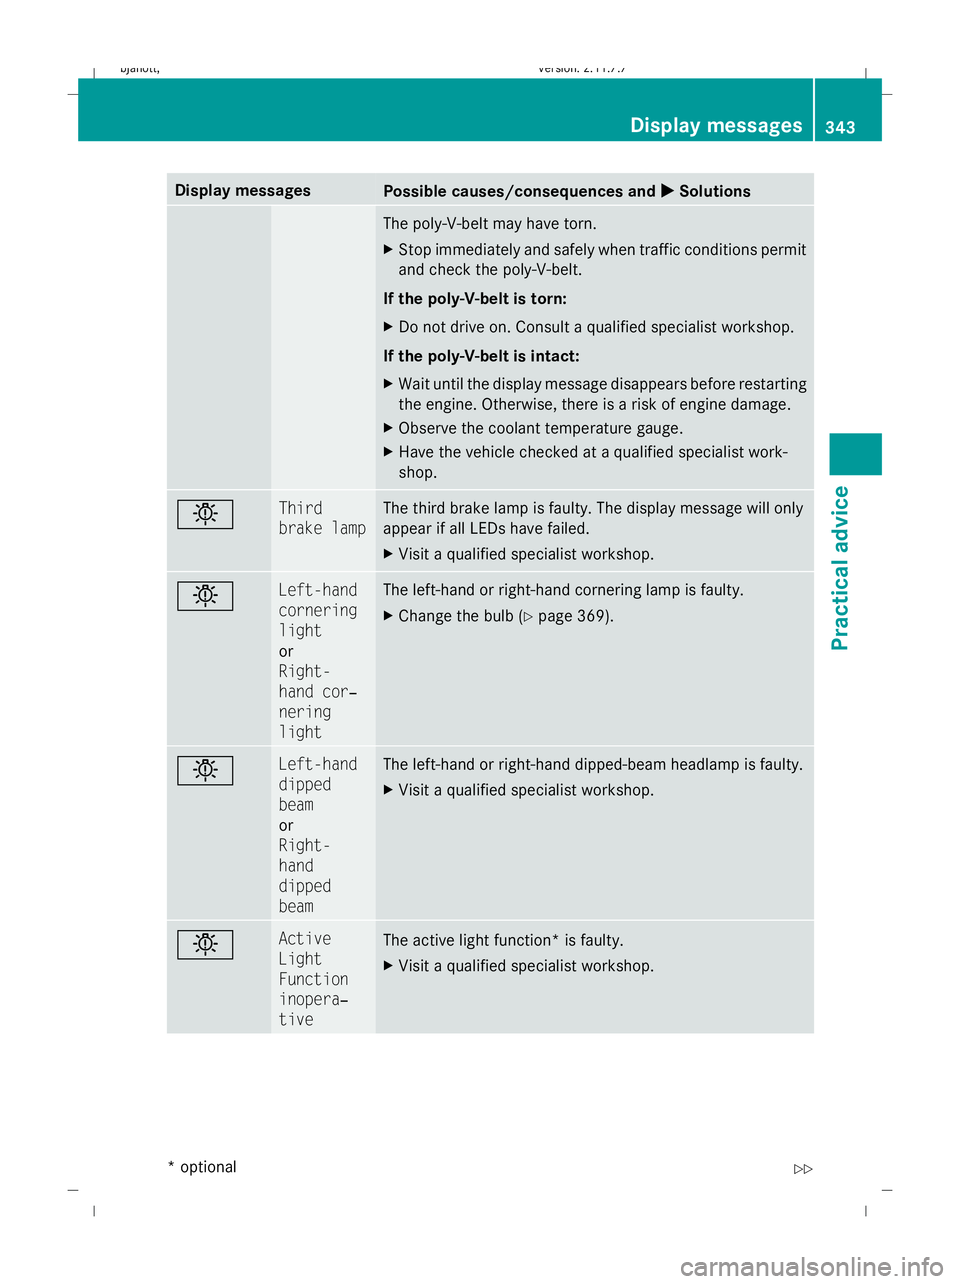
Display messages
Possible causes/consequences and
X
X Solutions The poly-V-belt may have torn.
X
Stop immediately and safely when traffic conditions permit
and check the poly-V-belt.
If the poly-V-belt is torn:
X Do not drive on. Consult a qualified specialist workshop.
If the poly-V-belt is intact:
X Wait until the display message disappears before restarting
the engine. Otherwise, there is a risk of engine damage.
X Observe the coolant temperature gauge.
X Have the vehicle checked at a qualified specialist work-
shop. b Third
brake lamp The third brake lamp is faulty. The display message will only
appear if all LEDs have failed.
X
Visit a qualified specialist workshop. b Left-hand
cornering
light
or
Right-
hand cor‐
nering
light The left-hand or right-hand cornering lamp is faulty.
X
Change the bulb (Y page 369). b Left-hand
dipped
beam
or
Right-
hand
dipped
beam The left-hand or right-hand dipped-beam headlamp is faulty.
X
Visit a qualified specialist workshop. b Active
Light
Function
inopera‐
tive
The active light function* is faulty.
X
Visit a qualified specialist workshop. Display
messages
343Practical advice
* optional
216_AKB; 2; 3, en-GB
bjanott
,V ersion: 2.11.7.7
2009-02-27T14:54:17+01:00 - Seite 343 Z
Dateiname: 6515230602_buchblock.pdf; erzeugt am 04. Mar 2009 11:16:39; WK
Page 347 of 421
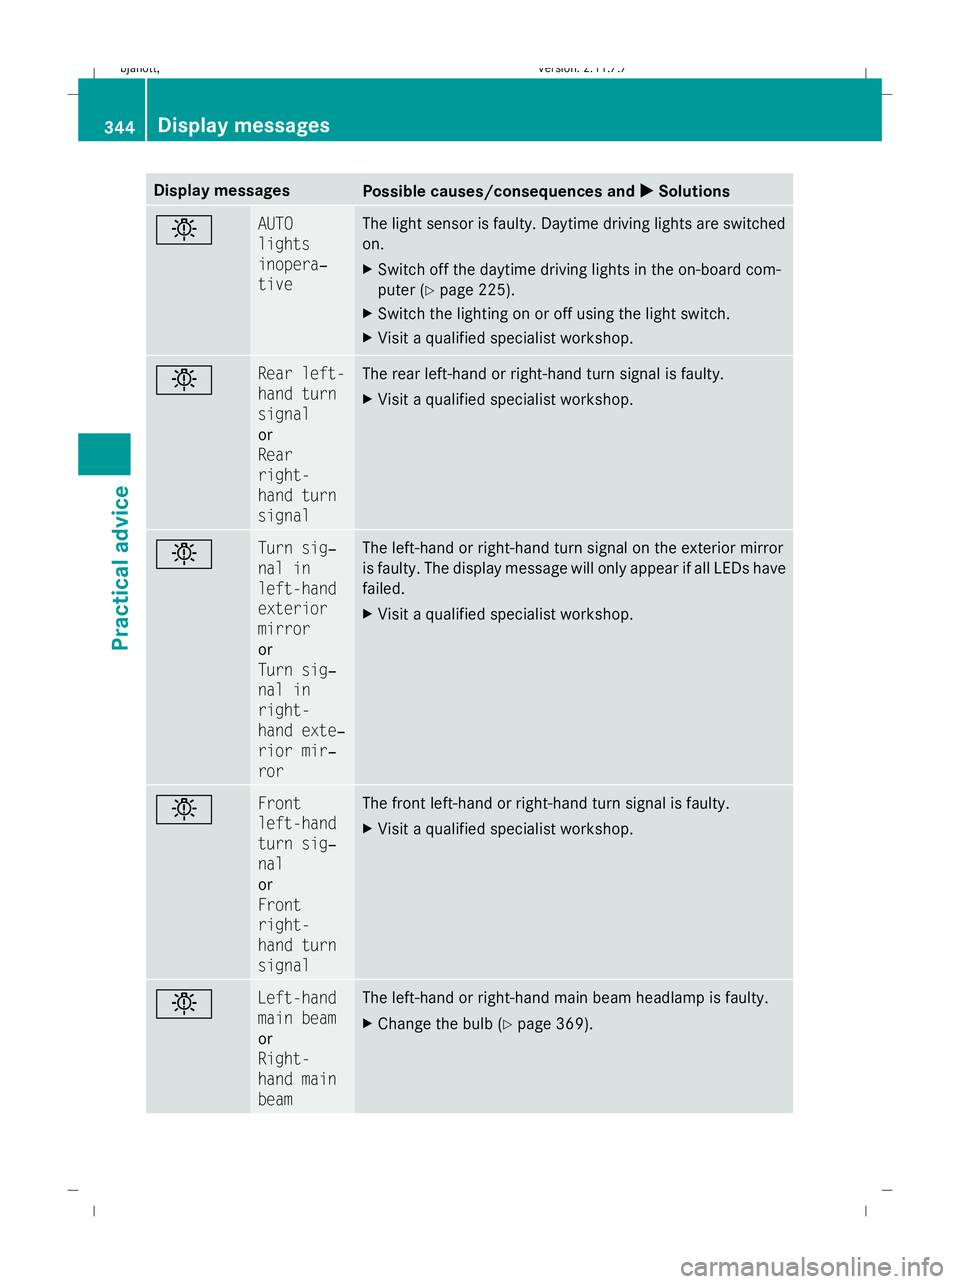
Display messages
Possible causes/consequences and
X
X Solutions b AUTO
lights
inopera‐
tive The light sensor is faulty. Daytime driving lights are switched
on.
X
Switch off the daytime driving lights in the on-board com-
puter (Y page 225).
X Switch the lighting on or off using the light switch.
X Visit a qualified specialist workshop. b Rear left-
hand turn
signal
or
Rear
right-
hand turn
signal The rear left-hand or right-hand turn signal is faulty.
X
Visit a qualified specialist workshop. b Turn sig‐
nal in
left-hand
exterior
mirror
or
Turn sig‐
nal in
right-
hand exte‐
rior mir‐
ror The left-hand or right-hand turn signal on the exterior mirror
is faulty. The display message will only appear if all LEDs have
failed.
X
Visit a qualified specialist workshop. b Front
left-hand
turn sig‐
nal
or
Front
right-
hand turn
signal The front left-hand or right-hand turn signal is faulty.
X
Visit a qualified specialist workshop. b Left-hand
main beam
or
Right-
hand main
beam The left-hand or right-hand main beam headlamp is faulty.
X
Change the bulb (Y page 369).344
Display
messagesPractical advice
216_AKB; 2; 3, en-GB
bjanott ,V ersion: 2.11.7.7
2009-02-27T14:54:17+01:00 - Seite 344
Dateiname: 6515230602_buchblock.pdf; erzeugt am 04. Mar 2009 11:16:39; WK
Page 348 of 421
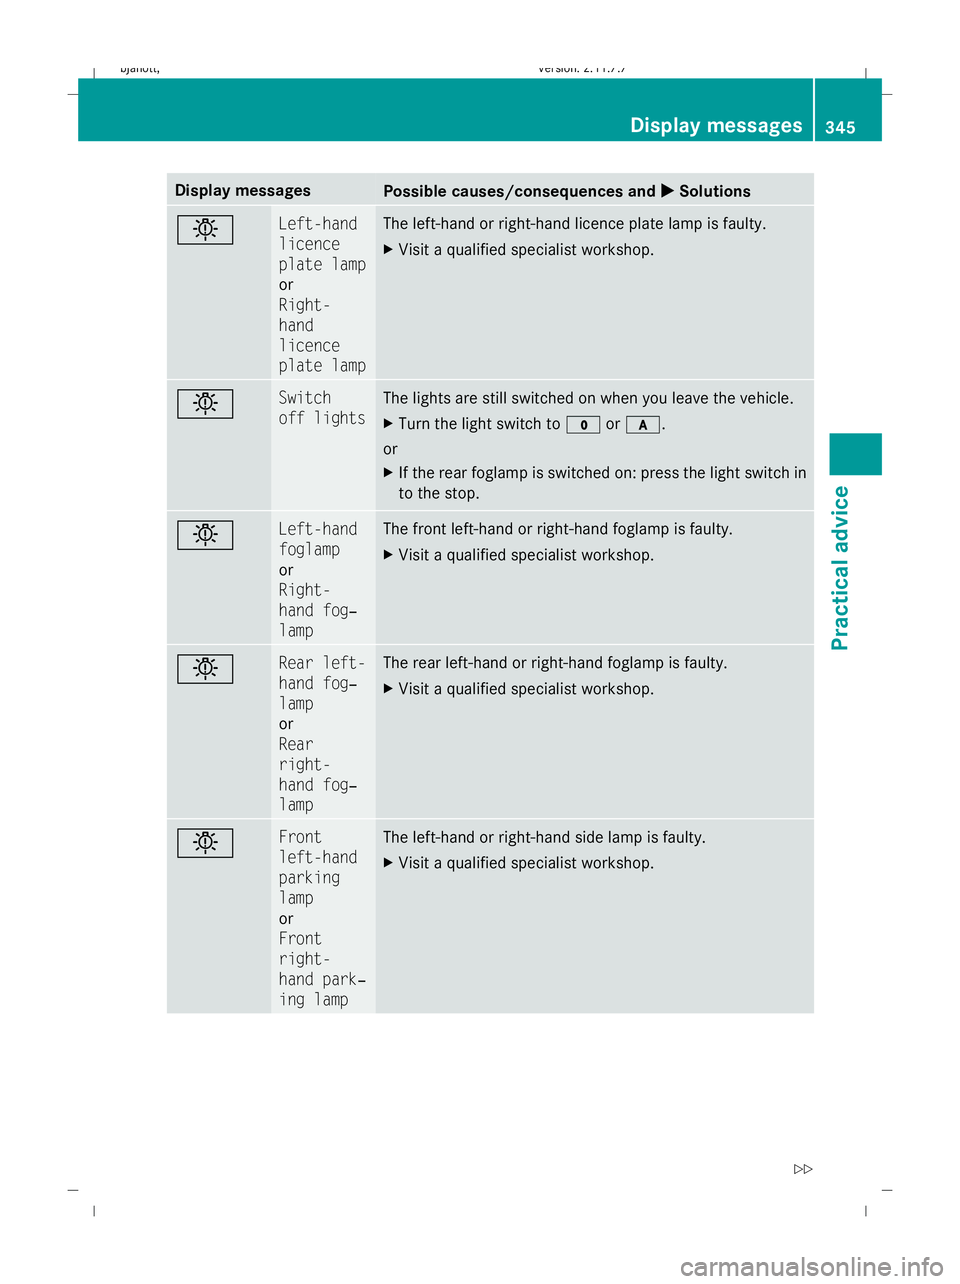
Display messages
Possible causes/consequences and
X
X Solutions b Left-hand
licence
plate lamp
or
Right-
hand
licence
plate lamp The left-hand or right-hand licence plate lamp is faulty.
X
Visit a qualified specialist workshop. b Switch
off lights The lights are still switched on when you leave the vehicle.
X
Turn the light switch to $orc.
or
X If the rear foglamp is switched on: press the light switch in
to the stop. b Left-hand
foglamp
or
Right-
hand fog‐
lamp The front left-hand or right-hand foglamp is faulty.
X
Visit a qualified specialist workshop. b Rear left-
hand fog‐
lamp
or
Rear
right-
hand fog‐
lamp The rear left-hand or right-hand foglamp is faulty.
X
Visit a qualified specialist workshop. b Front
left-hand
parking
lamp
or
Front
right-
hand park‐
ing lamp The left-hand or right-hand side lamp is faulty.
X
Visit a qualified specialist workshop. Display
messages
345Practical advice
216_AKB; 2; 3, en-GB
bjanott ,V ersion: 2.11.7.7
2009-02-27T14:54:17+01:00 - Seite 345 Z
Dateiname: 6515230602_buchblock.pdf; erzeugt am 04. Mar 2009 11:16:39; WK
Page 349 of 421
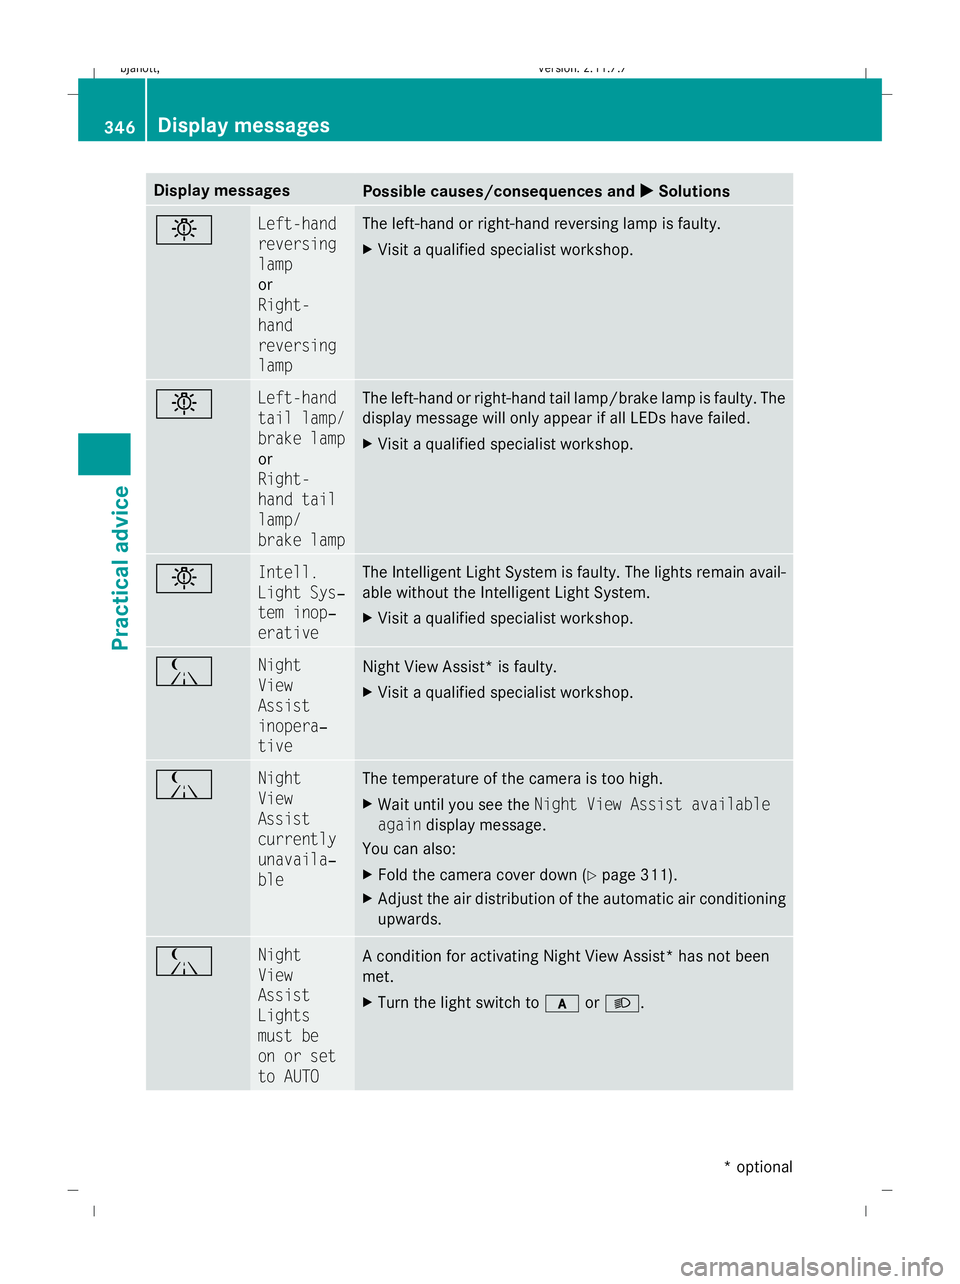
Display messages
Possible causes/consequences and
X
X Solutions b Left-hand
reversing
lamp
or
Right-
hand
reversing
lamp The left-hand or right-hand reversing lamp is faulty.
X
Visit a qualified specialist workshop. b Left-hand
tail lamp/
brake lamp
or
Right-
hand tail
lamp/
brake lamp The left-hand or right-hand tail lamp/brake lamp is faulty. The
display message will only appear if all LEDs have failed.
X
Visit a qualified specialist workshop. b Intell.
Light Sys‐
tem inop‐
erative The Intelligent Light System is faulty. The lights remain avail-
able without the Intelligent Light System.
X
Visit a qualified specialist workshop. Á Night
View
Assist
inopera‐
tive
Night View Assist* is faulty.
X
Visit a qualified specialist workshop. Á Night
View
Assist
currently
unavaila‐
ble The temperature of the camera is too high.
X
Wait until you see the Night View Assist available
again display message.
You can also:
X Fold the camera cover down (Y page 311).
X Adjust the air distribution of the automatic air conditioning
upwards. Á Night
View
Assist
Lights
must be
on or set
to AUTO
A condition for activating Night View Assist* has not been
met.
X
Turn the light switch to corL. 346
Display
messagesPractical advice
* optional
216_AKB; 2; 3, en-GB
bjanott
,V ersion: 2.11.7.7
2009-02-27T14:54:17+01:00 - Seite 346
Dateiname: 6515230602_buchblock.pdf; erzeugt am 04. Mar 2009 11:16:39; WK
Page 350 of 421
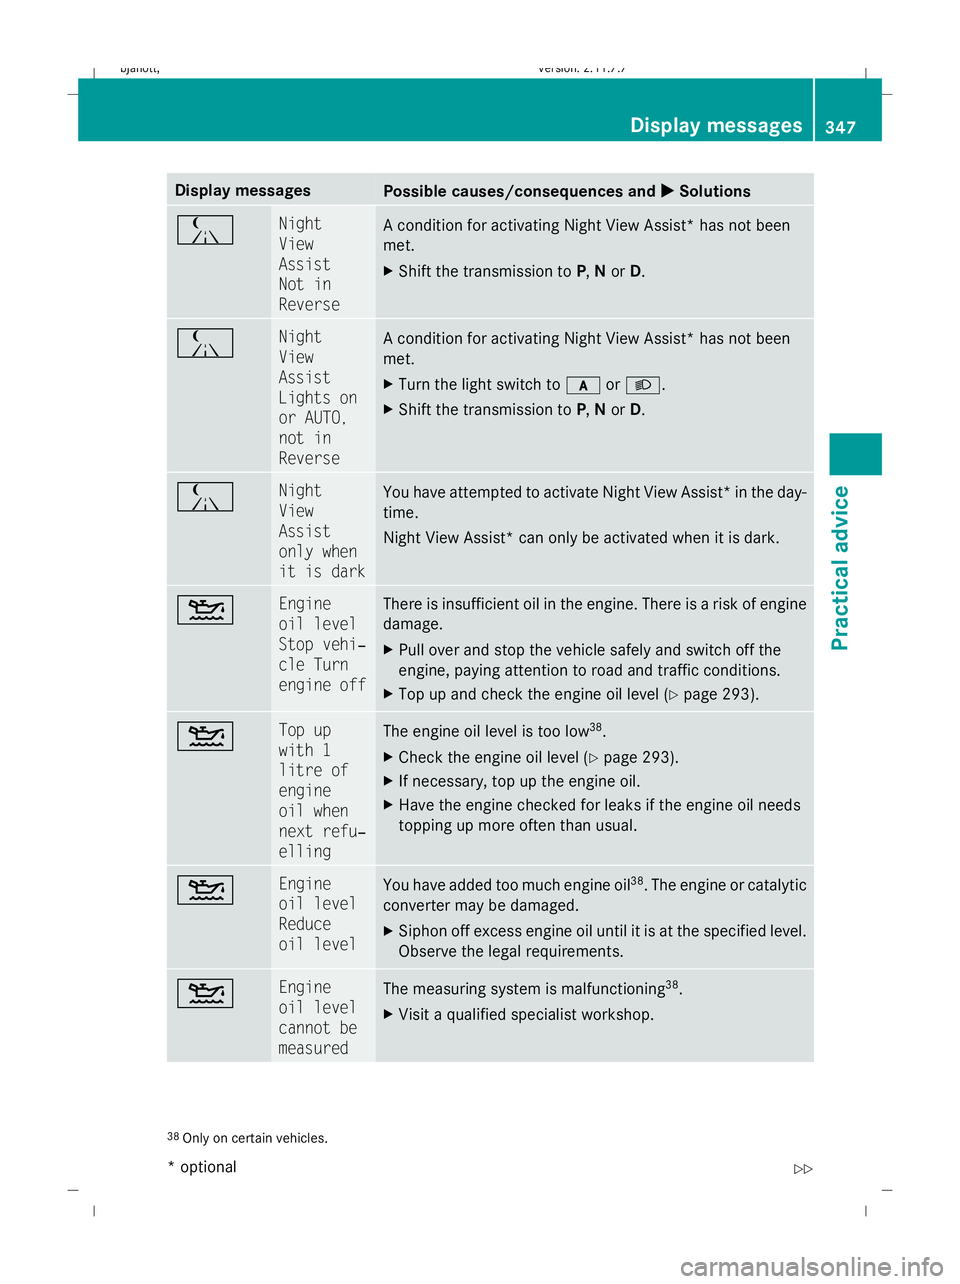
Display messages
Possible causes/consequences and
X
X Solutions Á Night
View
Assist
Not in
Reverse
A condition for activating Night View Assist* has not been
met.
X
Shift the transmission to P,Nor D. Á Night
View
Assist
Lights on
or AUTO,
not in
Reverse
A condition for activating Night View Assist* has not been
met.
X
Turn the light switch to corL.
X Shift the transmission to P,Nor D. Á Night
View
Assist
only when
it is dark
You have attempted to activate Night View Assist* in the day-
time.
Night View Assist* can only be activated when it is dark.
4 Engine
oil level
Stop vehi‐
cle Turn
engine off There is insufficient oil in the engine. There is a risk of engine
damage.
X
Pull over and stop the vehicle safely and switch off the
engine, paying attention to road and traffic conditions.
X Top up and check the engine oil level (Y page 293).4 Top up
with 1
litre of
engine
oil when
next refu‐
elling
The engine oil level is too low
38
.
X Check the engine oil level ( Ypage 293).
X If necessary, top up the engine oil.
X Have the engine checked for leaks if the engine oil needs
topping up more often than usual. 4 Engine
oil level
Reduce
oil level
You have added too much engine oil
38
. The engine or catalytic
converter may be damaged.
X Siphon off excess engine oil until it is at the specified level.
Observe the legal requirements. 4 Engine
oil level
cannot be
measured
The measuring system is malfunctioning
38
.
X Visit a qualified specialist workshop. 38
Only on certain vehicles. Display
messages
347Practical advice
* optional
216_AKB; 2; 3, en-GB
bjanott
,V ersion: 2.11.7.7
2009-02-27T14:54:17+01:00 - Seite 347 Z
Dateiname: 6515230602_buchblock.pdf; erzeugt am 04. Mar 2009 11:16:40; WK