change time MERCEDES-BENZ CLA 2016 Owners Manual
[x] Cancel search | Manufacturer: MERCEDES-BENZ, Model Year: 2016, Model line: CLA, Model: MERCEDES-BENZ CLA 2016Pages: 374, PDF Size: 9.97 MB
Page 3 of 374
Welcome to the world of Mercedes-Benz
We urge you to read this Operator's Manual
carefully and familiarize yourself with the
vehicle before driving. For your own safety
and a longer vehicle life, follow the instruc-
tions and warning notices in this manual.
Ignoring them could result in damage to the
vehicle or personal injury to you or others.
Vehicle damage caused by failure to follow
instructions is not covered by the Mercedes-
Benz Limited Warranty.
The equipment or product designation of your
vehicle may vary depending on: R
model R
order R
country specification R
availability
Mercedes-Benz therefore reserves the right
to introduce changes in the following areas: R
design R
equipment R
technical features
The equipment in your vehicle may therefore
differ from that shown in the descriptions and
illustrations.
The following are integral components of the
vehicle: R
Operator's Manual R
Maintenance Booklet R
Equipment-dependent supplements
Keep these documents in the vehicle at all
times. If you sell the vehicle, always pass all
documents on to the new owner.
You can also use the Mercedes-Benz Guides
App:
Apple ®
iOS Android™
Please note that the Mercedes-Benz Guides
App may not yet be available in your country.
The technical documentation team at
Daimler AG wishes you safe and pleasant
motoring.
Mercedes-Benz USA, LLC
Mercedes-Benz Canada, Inc.
A Daimler Company
1175848801
É1175848801yËÍ
Page 23 of 374
Protection of the environment
General notes
H Environmental note
Daimler's declared policy is one of compre-
hensive environmental protection.
The objectives are for the natural resources
that form the basis of our existence on this
planet to be used sparingly and in a manner
that takes the requirements of both nature
and humanity into account.
You too can help to protect the environment
by operating your vehicle in an environmen-
tally responsible manner.
Fuel consumption and the rate of engine,
transmission, brake and tire wear are affected
by these factors: R
operating conditions of your vehicle R
your personal driving style
You can influence both factors. You should
bear the following in mind:
Operating conditions: R
avoid short trips as these increase fuel con-
sumption. R
always make sure that the tire pressures
are correct. R
do not carry any unnecessary weight. R
remove roof racks once you no longer need
them. R
a regularly serviced vehicle will contribute
to environmental protection. You should
therefore adhere to the service intervals. R
always have service work carried out at a
qualified specialist workshop.
Personal driving style: R
do not depress the accelerator pedal when
starting the engine. R
do not warm up the engine when the vehicle
is stationary. R
drive carefully and maintain a safe distance
from the vehicle in front. R
avoid frequent, sudden acceleration and
braking. R
change gear in good time and use each gear
only up to �
Page 25 of 374
Information for customers in Califor-
nia Under Califo rn ia law you may be entitled to a
replacement of your vehicle or a refund of the
purchase pric e or lease price, if after a rea-
son able number of repair attempts
Mercedes-Benz USA, LLC and/or it s author-
iz ed repair or service facilities fail to fix one or
more substantial defects or malfunctions in
the vehicle that are covered by it s express
warranty. During the period of 18 months
from original delivery of the vehicle or the
accumulation of 18,000 mile s (approximately
29,000 km) on the odometer of the vehicle,
whic hever occurs first, a reason able number
of repair attempts is presumed for a retail
buyer or lessee if one or more of the fol lowin g
occurs:
(1) the same substantial defect or malfunc-
tion results in a cond it ion that is likely to
cause death or serious bodily injury if the
vehicle is driven, that defect or malfunc-
tion has been subject to repair two or
more times, and you have directly noti-
fied Mercedes-Benz USA, LLC in writing
of the need for its repair,
(2) the same substantial defect or malfunc-
tion of a less serious nature than cate-
gory (1) has been subject to repair four or
more times and you hav e direct l y notified
us in writ ing of the need for it s repair, or
(3) the vehicle is out of service by reason of
repair of the same or different substantial
defects or malfunctions for a cumulative
total of more than 30 calendar days.
Please send your written notice to:
Mercedes-Benz USA, LLC
Customer Assistance Center
One Mercedes Drive
Montvale, NJ 07645-0350 Maintenance The Se rvice and Warranty Booklet describes
all the necessary maintenance work which
should be done at regular intervals.
Always have the Se rvice and Warranty Book-
let wit h you when you bring the vehicle to an
authorized Mercedes-Benz Center. The ser-
vic e advisor will record every ser vic e for you
in the Se rvice and Warranty Booklet.
Breakdown assistance The Mercedes-Benz Roads ide Assistance
Program offers technical help in the event of a
breakdown. Calls to the toll-free Roads ide
Assistance Hotline are answered by our
agents 24 hours a day, 365 days a year.
1-800-FOR-MERCedes(1- 800-367-6372 )
(USA)
1-800- 387-0100 (Canada)
For additional information, refer to the
Mercedes-Benz Roads ide Assistance Pro-
gram brochure (USA) or the "Roads ide Assis-
tance" section in the Se rvice and Warranty
booklet (Canada). You will find both in your
vehicle literature portfolio.
Change of address or change of own-
ership
In the event of a change of address, please
send us the "Notification of Address Change"
in the Se rvice and Guarantee booklet or sim-
ply call the Mercedes-Benz Customer Assis-
tance Center (USA) at the hotline number
1-800-FOR-MERCedes(1-800-367-6372) or
Customer Service Center (Canada) at
1-800-387-0100. This will assist us in con-
tacting you in a timely manner should the
need arise.
If you sell your Mercedes, please leave the
entire literature in the vehicle so that it is
available to the next owner.
If you have purchased a used car, please send
us the "Notification of Used Car Purchase" in Introduction 23
Z
Page 80 of 374
Deactivating an d activatingIf you do no t intend to use th e vehicle fo r a
longer period of time, you can deactivat e KEY-
LESS-GO . The SmartKey will then use ver y lit -
tl e power, thereby conservin g battery power.
Fo r th e purposes of activation/deactivation ,
th e vehicle mus t no t be nearby.X
To deactivate : press th e �7 butto n on
th e SmartKey twic e in rapid succession .
The battery chec k lamp of th e SmartKey
flashes twic e briefly and lights up once ,
then KEYLESS-GO is deactivated
( Y
page 79) .X
To activate : press any butto n on th e
SmartKey.
or X
Inser t th e SmartKey into th e ignition lock.
KEYLESS-GO and all of it s associated fea-
tures are available again .
KEYLESS-G O star t function
General notes
Bear in min d that th e engin e can be started by
any of th e vehicle occupant s if there is a
SmartKey in th e vehicle.
Changin g th e settings of th e locking
syste m
You can chang e th e setting s of th e locking
system. Thi s means that only th e driver's doo r
and th e fue l filler flap are unlocke d when th e
vehicle is unlocked. Thi s is useful if you fre-
quentl y trave l on your own .X
To change th e setting: press and hol d th e
�6 and �7 buttons simultaneousl y fo r approximately six seconds until th e battery
indicator lamp flashes twic e ( Y
page 79) .
If th e setting of th e locking system is changed
within th e signal range of th e vehicle, press-
in g th e �7 or �6 button: R
locks or R
unlocks th e vehicle
The SmartKey no w function s as follows :X
To unlock : press th e �6 butto n once .X
To unlock centrally : press th e �6 but -
to n twice. X
To lock centrally : press th e �7 button.
The KEYLESS-GO function is changed as fol-
lows : X
To unlock th e driver's door: touch th e
inne r surfac e of th e doo r handle on th e
driver's door. X
To unlock centrally : touch th e inne r sur -
fac e of th e doo r handle on th e front-
passenger doo r or th e rea r door.X
To lock centrally : touch th e outer sensor
surfac e on on e of th e doo r handles .X
To restor e th e factory settings: press
and hol d th e �6 and �7 buttons simul-
taneousl y fo r approximately six seconds
until th e battery chec k lamp flashes twic e
( Y
page 79).
Mechanica l key
General notes
If th e vehicle can no longer be locke d or
unlocke d wit h th e SmartKey or KEYLESS-GO ,
use th e mechanical key.
If you use th e mechanical ke y to unloc k and
ope n th e driver's doo r or th e trunk lid, th e
anti-thef t alar m system will be triggere d
( Y
page 73).
There are severa l ways to turn of f th e alarm:X
To deactivate th e alarm wit h th e key :
press th e �6 or �7 butto n on th e key.
or78
SmartKey
Opening and closing
Page 81 of 374
X
Insert the SmartKey into the ignition lock.
or X
To deactivate the alarm with KEYLESS-
GO: press the Start/Stop button in the igni-
tion lock. The SmartKey must be in the
vehicle.
or X
Lock or unlock the vehicle using KEYLESS-
GO. The SmartKey must be outside the
vehicle.
If you unlock the vehicle using the mechanical
key, the fuel filler flap will not be unlocked
automatically. X
To unlock the fuel filler flap: insert the
SmartKey into the ignition lock.
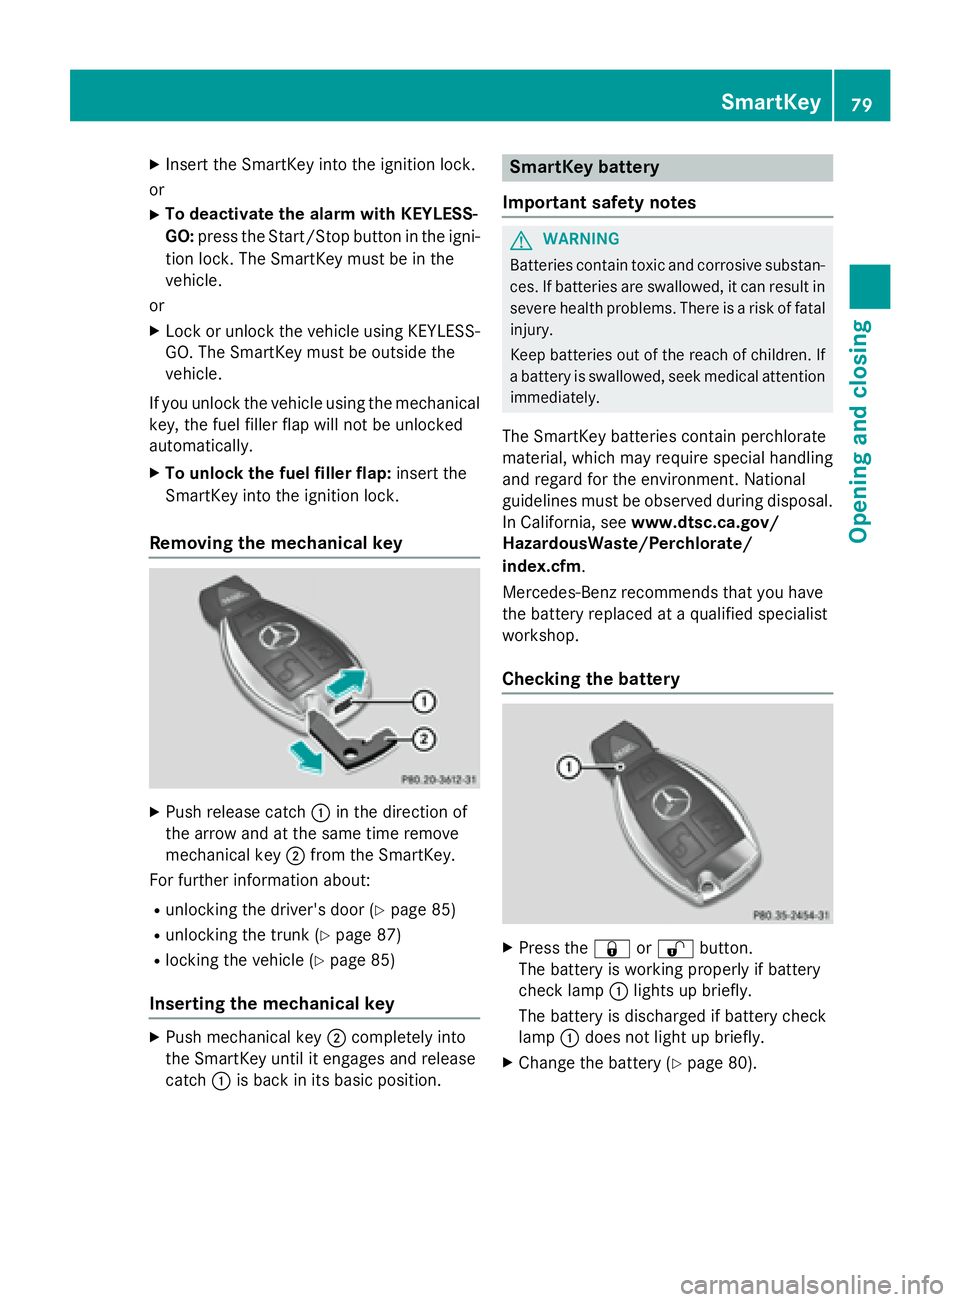
Removing the mechanical key
X
Push release catch �C in the direction of
the arrow and at the same time remove
mechanical key �D from the SmartKey.
For further information about: R
unlocking the driver's door ( Y
page 85)R
unlocking the trunk ( Y
page 87)R
locking the vehicle ( Y
page 85)
Inserting the mechanical key X
Push mechanical key �D completely into
the SmartKey until it engages and release
catch �C is back in its basic position. SmartKey battery
Important safety notes
G WARNING
Batteries contain toxic and corrosive substan-
ces. If batteries are swallowed, it can result in
severe health problems. There is a risk of fatal
injury.
Keep batteries out of the reach of children. If
a battery is swallowed, seek medical attention
immediately.
The SmartKey batteries contain perchlorate
material, which may require special handling
and regard for the environment. National
guidelines must be observed during disposal.
In California, see www.dtsc.ca.gov/
HazardousWaste/Perchlorate/
index.cfm .
Mercedes-Benz recommends that you have
the battery replaced at a qualified specialist
workshop.
Checking the battery
X
Press the �7 or �6 button.
The battery is working properly if battery
check lamp �C lights up briefly.
The battery is discharged if battery check
lamp �C does not light up briefly. X
Change the battery ( Y
page 80).SmartKey 79
Opening and closing Z
Page 123 of 374
Do not use a bulb that has been dropped or if
its glass tube has been scratched.
The bulb may explode if: R
you touch it R
it is hot R
you drop it R
you scratch it
Only operate bulbs in enclosed lamps
designed for that purpose. Only install spare
bulbs of the same type and the specified volt-
age.
Marks on the glass tube reduce the service
life of the bulbs. Do not touch the glass tube
with your bare hands. If necessary, clean the
glass tube when cold with alcohol or spirit and
rub it off with a lint-free cloth.
Protect bulbs from moisture during opera-
tion. Do not allow bulbs to come into contact
with liquids.
There are bulbs other than the Xenon bulbs
that you cannot replace. Only replace the
bulbs listed ( Y
page 121). Have the bulbs that
you cannot replace yourself changed at a
qualified specialist workshop.
If you require assistance replacing bulbs, con-
sult a qualified specialist workshop.
If the new bulb still does not light up, consult
a qualified specialist workshop.
Bulbs and lamps are an important aspect of
vehicle sa
fety. Y ou must therefore make sure
th at these function correctly at all times.
Have the headlamp setting checked regularly.
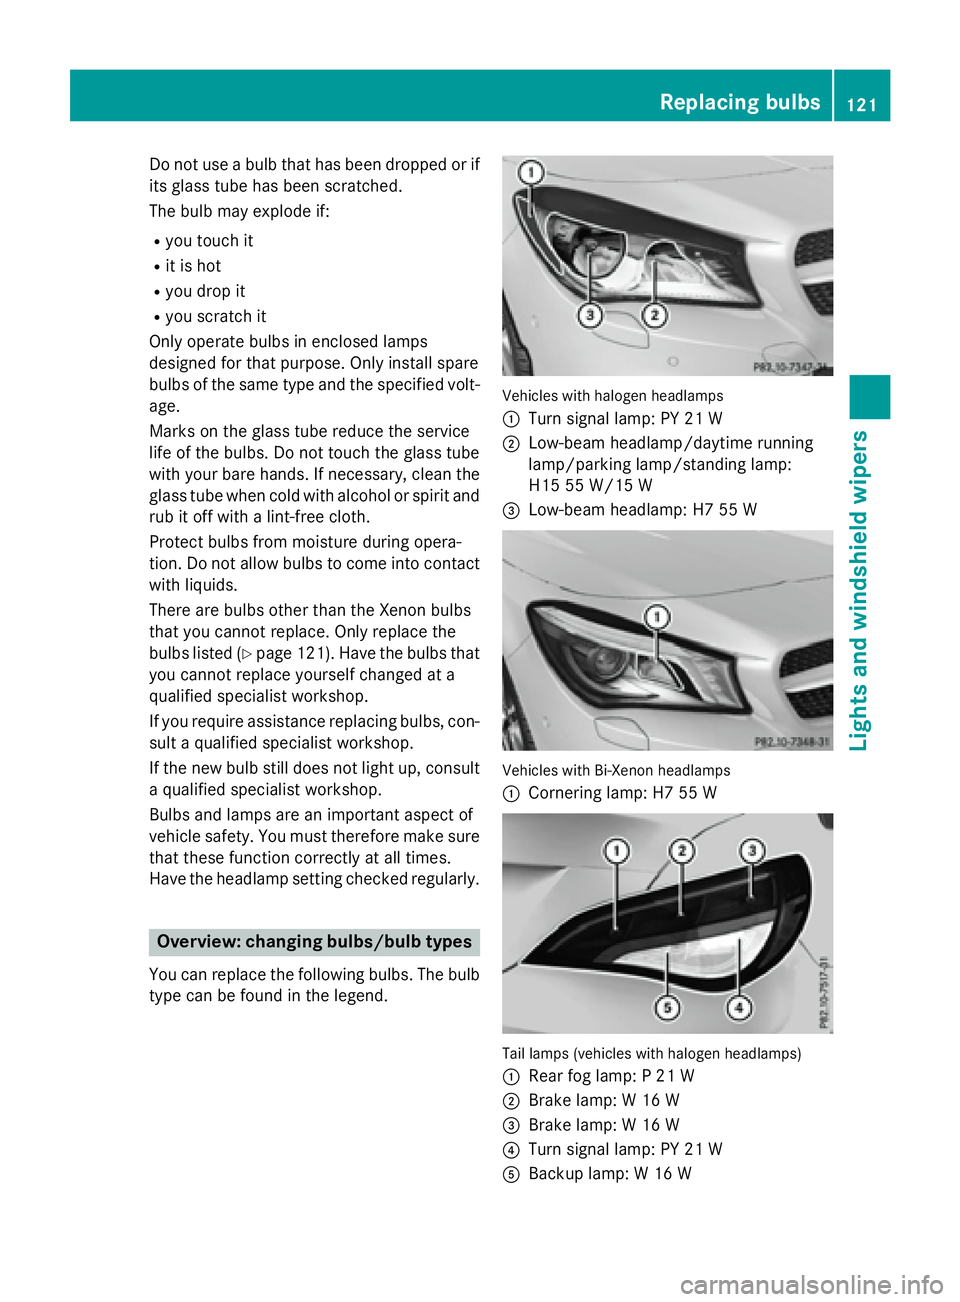
Overview: changing bulbs/bulb types
You can replace the following bulbs. The bulb
type can be found in the legend. Vehicles with halogen headlamps
�C
Turn signal lamp: PY 21 W �D
Low-beam headlamp/daytime running
lamp/parking lamp/standing lamp:
H15 55 W/15 W �
Page 124 of 374
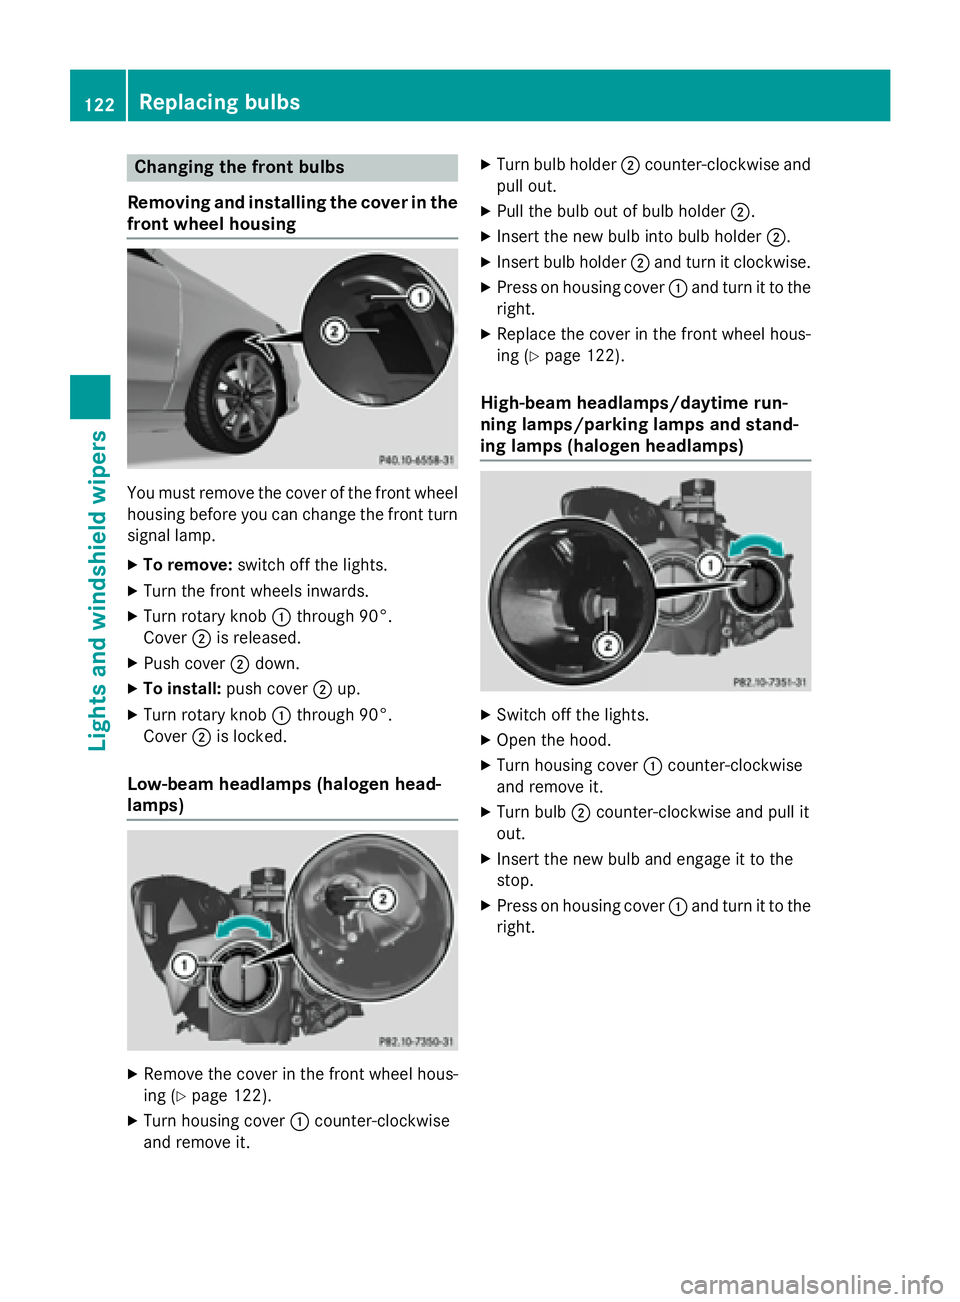
Changing the front bulbs
Removing and installing the cover in the
front wheel housing
You must remove the cover of the front wheel
housing before you can change the front turn
signal lamp. X
To remove: switch off the lights.X
Turn the front wheels inwards. X
Turn rotary knob �C through 90°.
Cover �D is released.X
Push cover �D down.X
To install: push cover �D up.X
Turn rotary knob �C through 90°.
Cover �D is locked.
Low-beam headlamps (halogen head-
lamps)
X
Remove the cover in the front wheel hous-
ing ( Y
page 122).X
Turn housing cover �C counter-clockwise
and remove it. X
Turn bulb holder �D counter-clockwise and
pull out. X
Pull the bulb out of bulb holder �D .X
Insert the new bulb into bulb holder �D .X
Insert bulb holder �D and turn it clockwise.X
Press on housing cover �C and turn it to the
right. X
Replace the cover in the front wheel hous-
ing ( Y
page 122).
High-beam headlamps/daytime run-
ning lamps/parking lamps and stand-
ing lamps (halogen headlamps)
X
Switch off the lights. X
Open the hood. X
Turn housing cover �C counter-clockwise
and remove it. X
Turn bulb �D counter-clockwise and pull it
out. X
Insert the new bulb and engage it to the
stop. X
Press on housing cover �C and turn it to the
right.122
Replacing bulbs
Lights and windshield wipers
Page 137 of 374
R
Use the residual heat function if you want to
heat or ventilate the vehicle interior when
the ignition is switched off. The residual
heat function can only be activated or deac-
tivated with the ignition switched off. R
If you change the settings of the climate
control system, the climate status display
appears for approximately three seconds
at the bottom of the screen in the Audio/
COMAND display (see separate operating
instructions). You will see the current set-
tings of the various climate control func-
tions.
DYNAMIC SELECT button (except
Mercedes-AMG vehicles) You can choose between various drive pro-
grams with the DYNAMIC SELECT button
( Y
page 155).
If you have selected drive program E :R
when heating, the electrical heater booster
is deactivated and in the warming-up phase
heat output is reduced R
the rear window defroster running time is
reduced
Depending on the configuration, the climate
settings can also be influenced in drive pro-
gram I .
If you have selected drive program C or S , the
climate settings are not affected.
ECO start/stop function
During automatic engine switch-off, the cli-
mate control system only operates at a
reduced capacity. If you require the full cli-
mate control output, you can switch off the
ECO start/stop function by pressing the ECO
button ( Y
page 153). Operating the climate control sys-
tems
Activating/deactivating climate con-
trol
General notes When the climate control is switched off, the
air supply and air circulation are also
switched off. The windows could fog up.
Therefore, switch off climate control only
briefly
Air-conditioning system X
Turn the SmartKey to position 2 in the igni-
tion lock ( Y
page 147). X
To switch on: turn control �
Page 148 of 374
Useful information
i This Operator's Manual describes all
models and all standard and optional equip-
ment of your vehicle available at the time of
publication of the Operator's Manual.
Country-specific differences are possible.
Please note that your vehicle may not be
equipped with all features described. This
also applies to safety-related systems and
functions.
i Read the information on qualified special-
ist workshops ( Y
page 25).
Notes on breaking-in a new vehicle
Important safety notesThe sensor system of some driving and driv-
ing safety systems adjusts automatically
while a certain distance is being driven after
the vehicle has been delivered or after
repairs. Full system effectiveness is not
reached until the end of this teach-in proce-
dure.
New and replaced brake pads and discs only
reach their optimum braking effect after sev-
eral hundred kilometers of driving. Compen-
sate for this by applying greater force to the
brake pedal.
The first 1000 miles (1500 km)
The more you look after the engine when it is
new, the more satisfied you will be with its
performance in the future. R
You should therefore drive at varying vehi-
cle and engine speeds for the first
1000 miles (1500 km). R
Avoid heavy loads, e.g. driving at full throt-
tle, during this period. R
Change gear in good time, before the tach-
ometer needle is �
Page 151 of 374
You can only switch between Start/Stop but-
ton mode and SmartKey operation when the
vehicle is stationary.
You must also engage park position P .X
Remove Start/Stop button �C from ignition
lock �D .
You do not have to remove the Start/Stop
button from the ignition lock when you leave
the vehicle. You should, however, always take
the SmartKey with you when leaving the vehi-
cle. As long as the SmartKey is in the vehicle: R
the vehicle can be started using the Start/
Stop button R
the electrically powered equipment can be
operated
Starting the engine
Important safety notes
G WARNING
If children are left unsupervised in the vehicle,
they could: R
open the doors, thus endangering other
people or road users. R
get out and disrupt traffic. R
operate the vehicle's equipment.
Additionally, children could set the vehicle in
motion if, for example, they: R
release the parking brake. R
shifting the automatic transmission out of
park position PR
Start the engine.
There is a risk of an accident and injury.
When leaving the vehicle, always take the
SmartKey with you and lock the vehicle. Never
leave children or animals unattended in the
vehicle. Always keep the SmartKey out of
reach of children.
G WARNING
Combustion engines emit poisonous exhaust
gases such as carbon monoxide. Inhaling these exhaust gases leads to poisoning. There
is a risk of fatal injury. Therefore never leave
the engine running in enclosed spaces with-
out sufficient ventilation.
G WARNING
Flammable materials introduced through
environmental influence or by animals can
ignite if in contact with the exhaust system or
parts of the engine that heat up. There is a risk
of fire.
Carry out regular checks to make sure that
there are no flammable foreign materials in
the engine compartment or in the exhaust
system.
! Do not depress the accelerator when
starting the engine.
General notes During a cold start, the engine runs at higher
speeds to enable the catalytic converter to
reach its operating temperature. The sound of
the engine may change during this time.
Automatic transmission X
Shift the transmission to position P
( Y
page 157).
The transmission position display in the
multifunction display shows
P ( Y
page 157).
i You can start the engine in transmission
position P and N .
Starting procedure with the SmartKey
To start the engine using the SmartKey
instead of the Start/Stop button, pull the
Start/Stop button out of the ignition lock. X
Turn the SmartKey to position 3 in the igni-
tion lock and release it as soon as the
engine is running ( Y
page 147).Driving 149
Driving and parking Z