warning light MERCEDES-BENZ CLA-Class 2014 C117 Owner's Guide
[x] Cancel search | Manufacturer: MERCEDES-BENZ, Model Year: 2014, Model line: CLA-Class, Model: MERCEDES-BENZ CLA-Class 2014 C117Pages: 358, PDF Size: 6.6 MB
Page 70 of 358
keep the vehicle on the desired course within
physical limits. ESP ®
assists the driver when
pulling away on wet or slippery roads. ESP ®
can also stabilize the vehicle during braking.
ETS/4ETS (Electronic Traction System) i
Observe the "Important safety notes" sec-
tion (Y page 63).
ETS/4ETS traction control is part of ESP ®
.
ETS brakes the drive wheels individually if
they spin. This enables you to pull away and
accelerate on slippery surfaces, for example
if the road surface is slippery on one side. In
addition, more drive torque is transferred to
the wheel or wheels with traction.
ETS remains active when you deactivate
ESP ®
.
Important safety notes G
WARNING
If ESP ®
is malfunctioning, ESP ®
is unable to
stabilize the vehicle. Additionally, further driv- ing safety systems are deactivated. This
increases the risk of skidding and an accident.
Drive on carefully. Have ESP ®
checked at a
qualified specialist workshop.
! When testing the electric parking brake
on a braking dynamometer, switch off the
ignition. Application of the brakes by ESP ®
may otherwise destroy the brake system.
! Vehicles with 4MATIC: switch off the igni-
tion when the electric parking brake is
being tested on a brake dynamometer.
Application of the brakes by ESP ®
may oth-
erwise destroy the brake system.
! Vehicles with 4MATIC: function or per-
formance tests may only be carried out on
a 2-axle dynamometer. Before you operate the vehicle on such a dynamometer, please
consult a qualified workshop. You could
otherwise damage the drive train or the
brake system. !
Do not tow vehicles with 4MATIC with the
front or rear axle raised.
Vehicles without 4MATIC: when towing your
vehicle with the front axle raised, it is impor-
tant that you observe the notes on ESP ®
(Y page 309).
Vehicles with 4MATIC: when towing your
vehicle with both axles on the ground, it is
important that you observe the notes on ESP ®
(Y page 309).
ESP ®
is deactivated if the 00BBESP®
OFF
warning lamp in the instrument cluster lights
up continuously when the engine is running.
If the 00E5 ESP®
warning lamp and the 00BB
ESP ®
OFF warning lamp are lit continuously,
ESP ®
is not available due to a malfunction.
Observe the information on warning lamps
(Y page 247) and display messages which
may be shown in the instrument cluster
(Y page 214).
i Only use wheels with the recommended
tire sizes. Only then will ESP ®
function
properly.
Characteristics of ESP ® General information
If the
00E5 ESP warning lamp goes out before
beginning the journey, ESP ®
is automatically
active.
If ESP ®
intervenes, the 00E5ESP®
warning
lamp flashes in the instrument cluster.
If ESP ®
intervenes:
X Do not deactivate ESP ®
under any circum-
stances.
X Only depress the accelerator pedal as far as
necessary when pulling away.
X Adapt your driving style to suit the prevail-
ing road and weather conditions.
ECO start/stop function
The ECO start/stop function switches the
engine off automatically when the vehicle
stops moving. The engine starts automati- 68
Driving safety systemsSafety
Page 71 of 358
cally when the driver wants to pull away again.
ESP ®
remains in its previously selected sta-
tus. Example: if ESP®
was deactivated before
the engine was switched off, ESP ®
remains
deactivated when the engine is switched on
again.
Deactivating/activating ESP ®
(except
AMG vehicles) Important safety notes
You can select between the following states
of ESP
®
:
R ESP ®
is activated.
R ESP ®
is deactivated. G
WARNING
If you deactivate ESP ®
, ESP ®
no longer sta-
bilizes the vehicle. There is an increased risk
of skidding and an accident.
Only deactivate ESP ®
in the situations descri-
bed in the following.
It may be best to deactivate ESP ®
in the fol-
lowing situations:
R when using snow chains
R in deep snow
R on sand or gravel
i Activate ESP ®
as soon as the situations
described above no longer apply. ESP ®
will
otherwise not be able to stabilize the vehi-
cle if the vehicle starts to skid or a wheel
starts to spin.
! Avoid spinning the driven wheels for an
extended period with ESP ®
deactivated.
You could otherwise damage the drivetrain.
Deactivating/activating ESP ®
You can deactivate or activate ESP ®
via the
on-board computer.
X To deactivate:(Y page 205).
The 00BB ESP®
OFF warning lamp in the
instrument cluster lights up. X
To activate:(Y page 205).
The 00BB ESP®
OFF warning lamp in the
instrument cluster goes out.
Characteristics when ESP ®
is deactivated
If ESP ®
is deactivated and one or more wheels
start to spin, the 00E5ESP®
warning lamp in
the instrument cluster flashes. In such situa-
tions, ESP ®
will not stabilize the vehicle.
If you deactivate ESP ®
:
R ESP ®
no longer improves driving stability.
R engine torque is no longer limited and the
drive wheels are able to spin.
The spinning of the wheels results in a cut-
ting action for better traction on loose sur-faces.
R traction control is still activated.
R ESP ®
still provides support when you
brake.
Deactivating/activating ESP ®
(AMG
vehicles) Important safety notes
i Observe the "Important safety notes" sec-
tion (Y page 63).
You can select between the following states
of ESP ®
:
R ESP ®
is activated.
R SPORT handling mode is activated.
R ESP ®
is deactivated. G
WARNING
When SPORT handling mode is activated,
there is a greater risk of skidding and acci-
dents.
Only activate SPORT handling mode in the sit- uations described in the following. G
WARNING
If you deactivate ESP ®
, ESP ®
no longer sta-
bilizes the vehicle. There is an increased risk
of skidding and an accident. Driving safety systems
69Safety
Z
Page 72 of 358
Only deactivate ESP
®
in the situations descri-
bed in the following.
In the following situations, it may be better to activate SPORT handling mode or deactivate
ESP ®
:
R when using snow chains
R in deep snow
R on sand or gravel
R on designated roads when the vehicle's
own oversteering and understeering char-
acteristics are desired
Driving in SPORT handling mode or without
ESP ®
requires an extremely qualified and
experienced driver.
i Activate ESP ®
as soon as the situations
described above no longer apply. ESP ®
will
otherwise not be able to stabilize the vehi-
cle if the vehicle starts to skid or a wheel
starts to spin.
! Avoid spinning the driven wheels for an
extended period with ESP ®
deactivated.
You could otherwise damage the drivetrain.
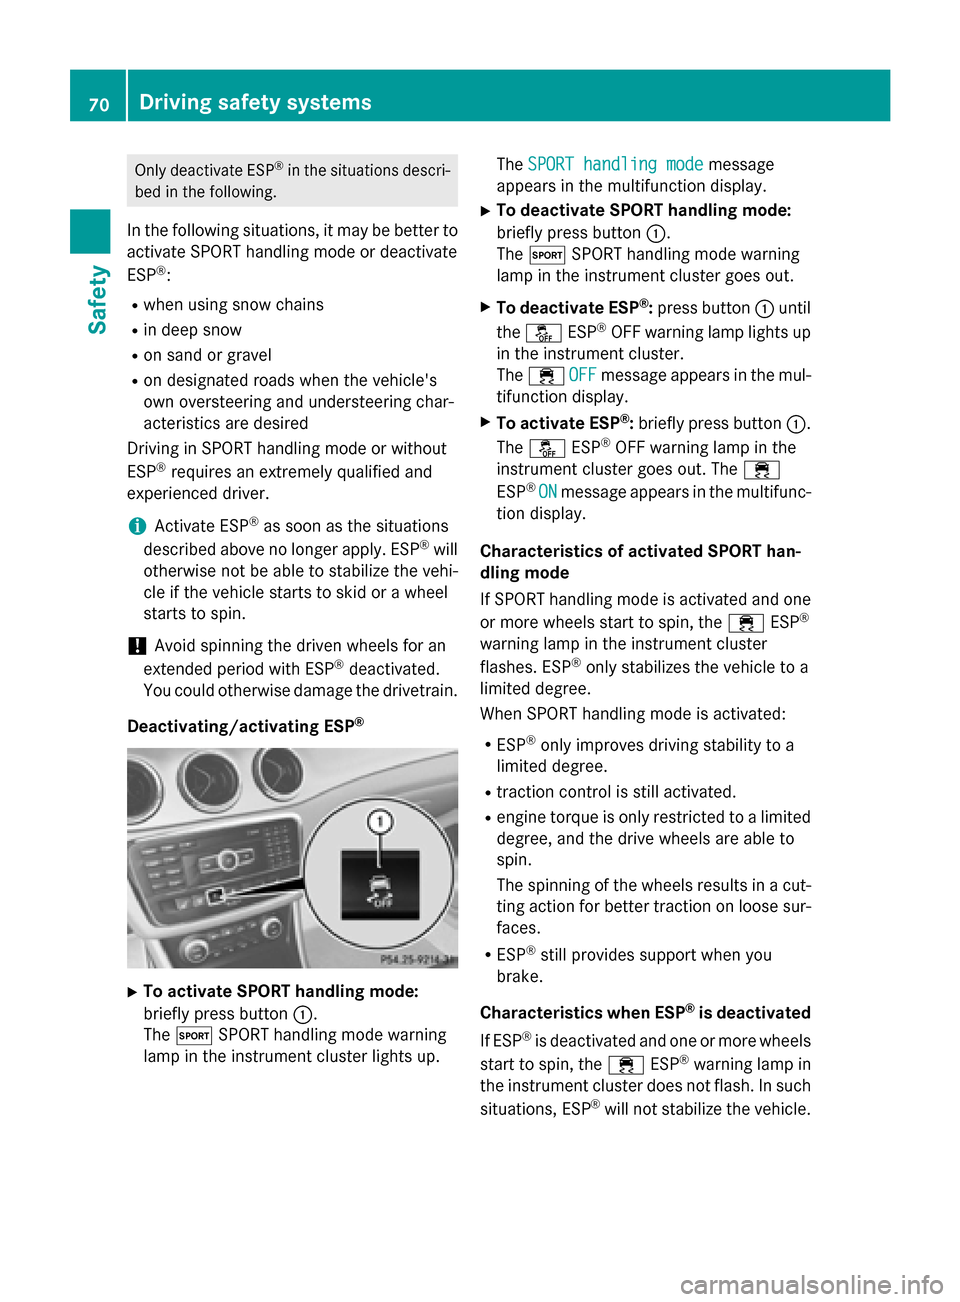
Deactivating/activating ESP ®X
To activate SPORT handling mode:
briefly press button 0043.
The 0074 SPORT handling mode warning
lamp in the instrument cluster lights up. The
SPORT handling mode SPORT handling mode message
appears in the multifunction display.
X To deactivate SPORT handling mode:
briefly press button 0043.
The 0074 SPORT handling mode warning
lamp in the instrument cluster goes out.
X To deactivate ESP ®
:press button 0043until
the 00BB ESP®
OFF warning lamp lights up
in the instrument cluster.
The 00E5 OFF OFFmessage appears in the mul-
tifunction display.
X To activate ESP ®
:briefly press button 0043.
The 00BB ESP®
OFF warning lamp in the
instrument cluster goes out. The 00E5
ESP ®
ON
ON message appears in the multifunc-
tion display.
Characteristics of activated SPORT han-
dling mode
If SPORT handling mode is activated and one
or more wheels start to spin, the 00E5ESP®
warning lamp in the instrument cluster
flashes. ESP ®
only stabilizes the vehicle to a
limited degree.
When SPORT handling mode is activated:
R ESP ®
only improves driving stability to a
limited degree.
R traction control is still activated.
R engine torque is only restricted to a limited
degree, and the drive wheels are able to
spin.
The spinning of the wheels results in a cut- ting action for better traction on loose sur-
faces.
R ESP ®
still provides support when you
brake.
Characteristics when ESP ®
is deactivated
If ESP ®
is deactivated and one or more wheels
start to spin, the 00E5ESP®
warning lamp in
the instrument cluster does not flash. In such
situations, ESP ®
will not stabilize the vehicle. 70
Driving safety systemsSafety
Page 80 of 358
For further information about:
R unlocking the driver's door (Y page 83)
R unlocking the trunk (Y page 86)
R locking the vehicle (Y page 83)
Inserting the mechanical key X
Push mechanical key 0044completely into
the SmartKey until it engages, and release
catch 0043is back in its basic position. SmartKey battery
Important safety notes G
WARNING
Batteries contain toxic and corrosive substan- ces. If batteries are swallowed, it can result in
severe health problems. There is a risk of fatal injury.
Keep batteries out of the reach of children. If
a battery is swallowed, seek medical attention immediately.
The SmartKey batteries contain perchlorate
material, which may require special handling
and regard for the environment. National
guidelines must be observed during disposal.
In California, see www.dtsc.ca.gov/
HazardousWaste/Perchlorate/
index.cfm.
Mercedes-Benz recommends that you have
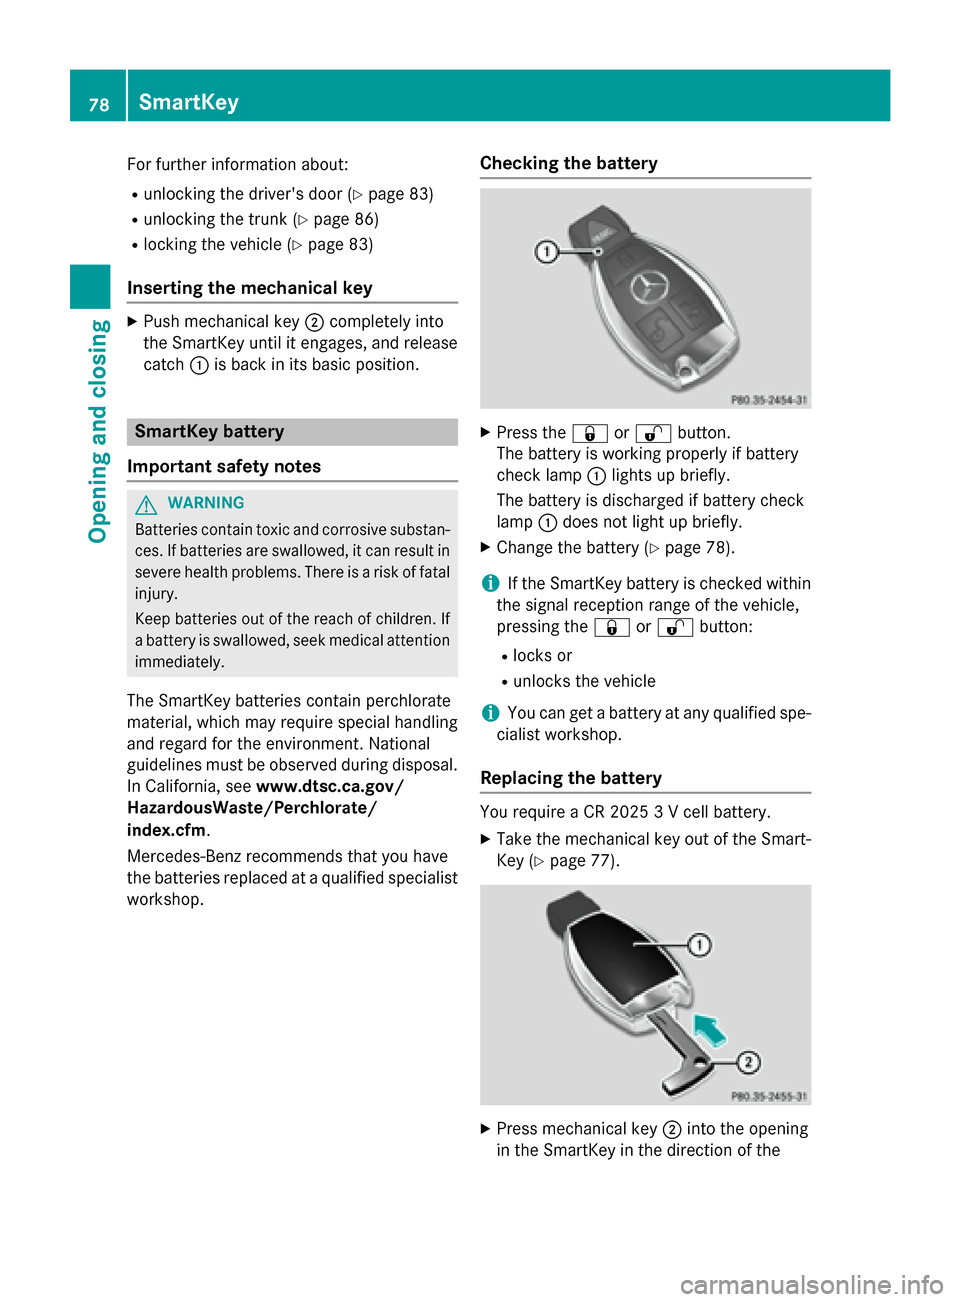
the batteries replaced at a qualified specialist workshop. Checking the battery X
Press the 0037or0036 button.
The battery is working properly if battery
check lamp 0043lights up briefly.
The battery is discharged if battery check
lamp 0043does not light up briefly.
X Change the battery (Y page 78).
i If the SmartKey battery is checked within
the signal reception range of the vehicle,
pressing the 0037or0036 button:
R locks or
R unlocks the vehicle
i You can get a battery at any qualified spe-
cialist workshop.
Replacing the battery You require a CR 2025 3 V cell battery.
X Take the mechanical key out of the Smart-
Key (Y page 77). X
Press mechanical key 0044into the opening
in the SmartKey in the direction of the 78
SmartKeyOpening and closing
Page 83 of 358
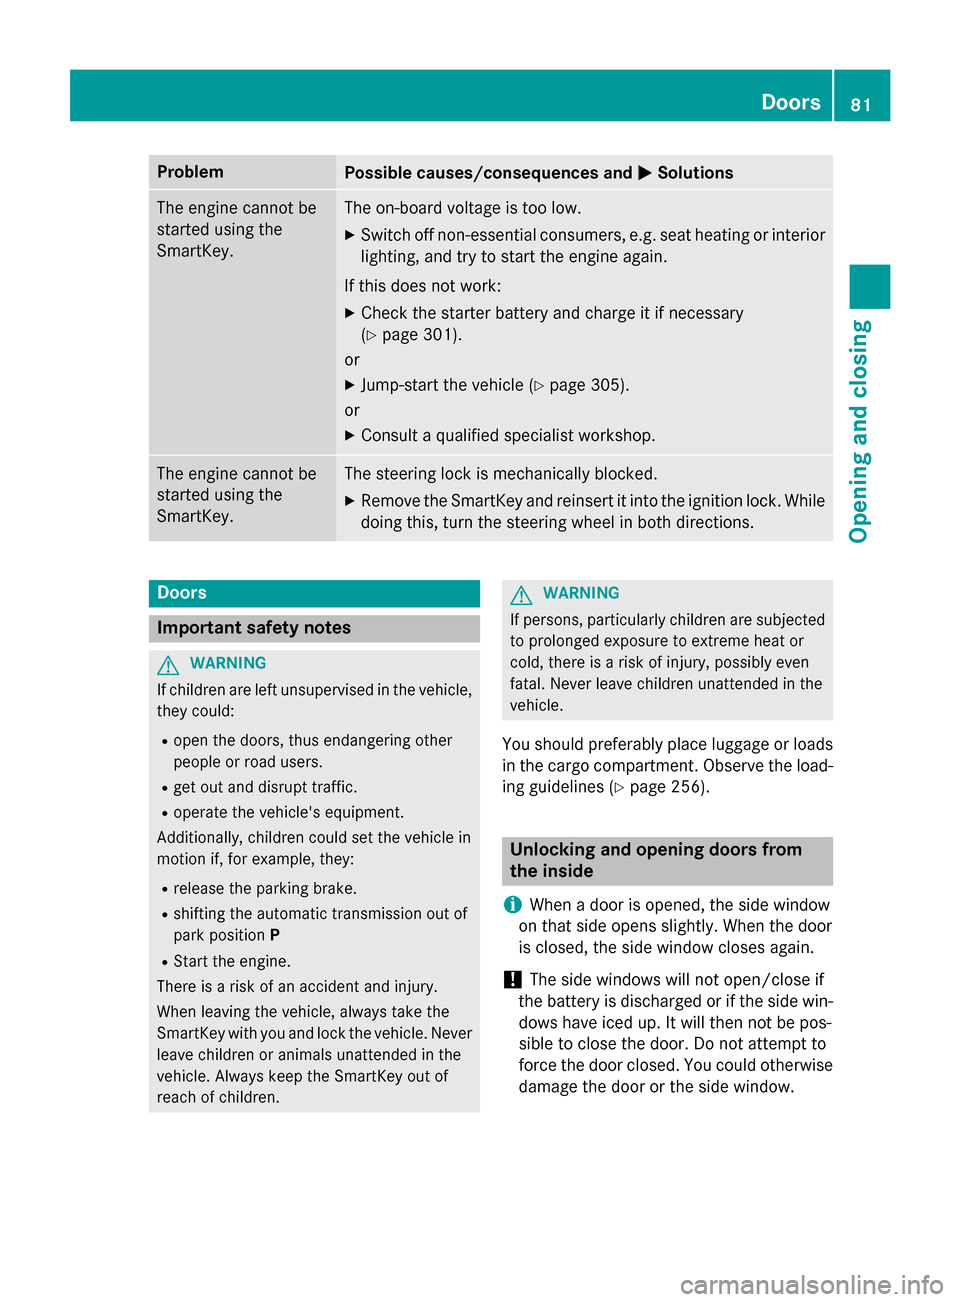
Problem
Possible causes/consequences and
0050
0050Solutions The engine cannot be
started using the
SmartKey. The on-board voltage is too low.
X Switch off non-essential consumers, e.g. seat heating or interior
lighting, and try to start the engine again.
If this does not work:
X Check the starter battery and charge it if necessary
(Y page 301).
or
X Jump-start the vehicle (Y page 305).
or
X Consult a qualified specialist workshop. The engine cannot be
started using the
SmartKey. The steering lock is mechanically blocked.
X Remove the SmartKey and reinsert it into the ignition lock. While
doing this, turn the steering wheel in both directions. Doors
Important safety notes
G
WARNING
If children are left unsupervised in the vehicle, they could:
R open the doors, thus endangering other
people or road users.
R get out and disrupt traffic.
R operate the vehicle's equipment.
Additionally, children could set the vehicle in
motion if, for example, they:
R release the parking brake.
R shifting the automatic transmission out of
park position P
R Start the engine.
There is a risk of an accident and injury.
When leaving the vehicle, always take the
SmartKey with you and lock the vehicle. Never
leave children or animals unattended in the
vehicle. Always keep the SmartKey out of
reach of children. G
WARNING
If persons, particularly children are subjected to prolonged exposure to extreme heat or
cold, there is a risk of injury, possibly even
fatal. Never leave children unattended in the
vehicle.
You should preferably place luggage or loads
in the cargo compartment. Observe the load- ing guidelines (Y page 256). Unlocking and opening doors from
the inside
i When a door is opened, the side window
on that side opens slightly. When the door
is closed, the side window closes again.
! The side windows will not open/close if
the battery is discharged or if the side win- dows have iced up. It will then not be pos-
sible to close the door. Do not attempt to
force the door closed. You could otherwise
damage the door or the side window. Doors
81Opening and closing Z
Page 88 of 358
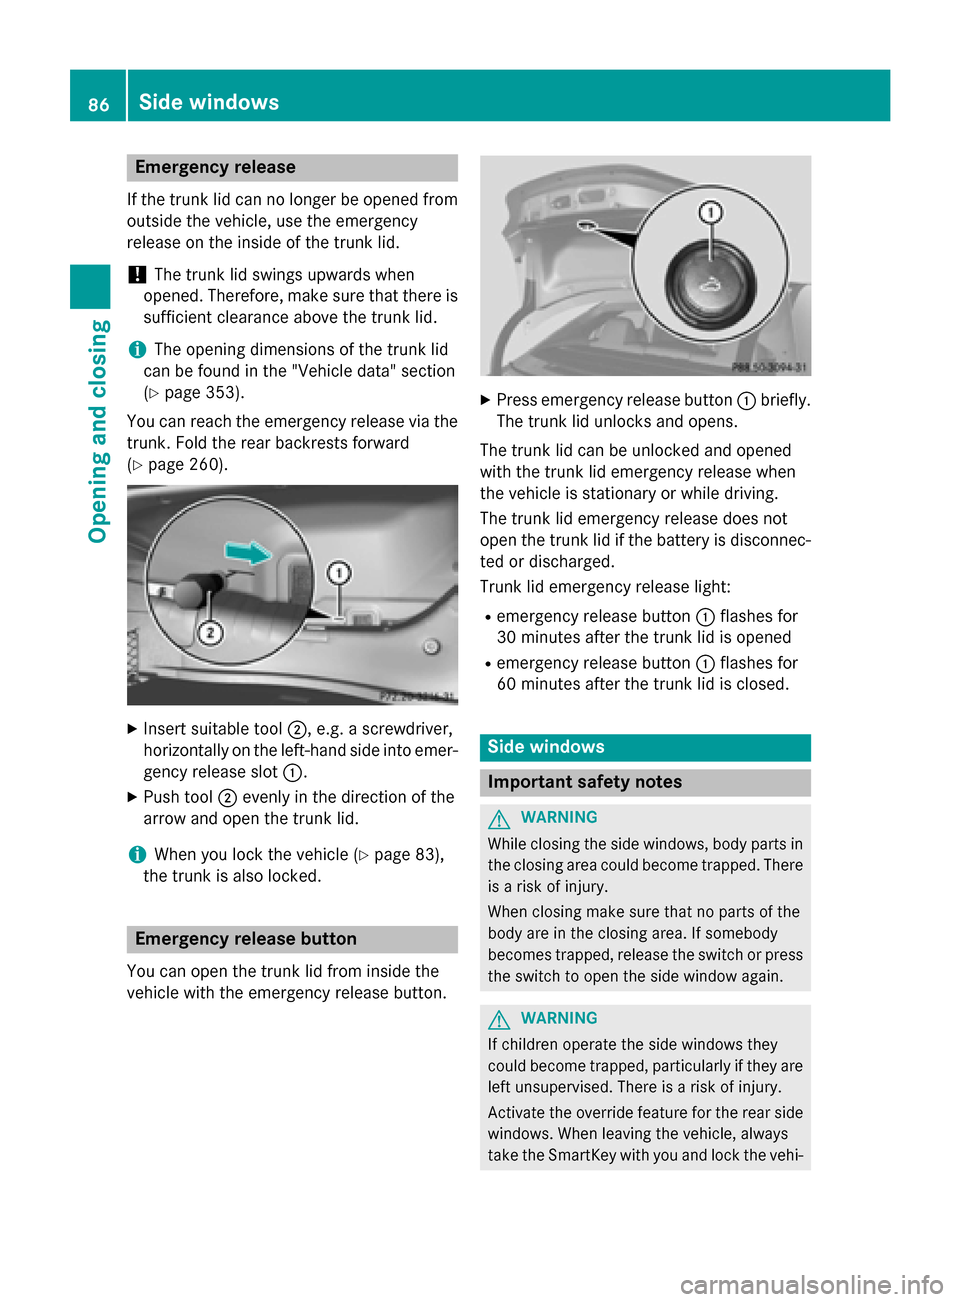
Emergency release
If the trunk lid can no longer be opened from
outside the vehicle, use the emergency
release on the inside of the trunk lid.
! The trunk lid swings upwards when
opened. Therefore, make sure that there is
sufficient clearance above the trunk lid.
i The opening dimensions of the trunk lid
can be found in the "Vehicle data" section
(Y page 353).
You can reach the emergency release via the
trunk. Fold the rear backrests forward
(Y page 260). X
Insert suitable tool 0044, e.g. a screwdriver,
horizontally on the left-hand side into emer- gency release slot 0043.
X Push tool 0044evenly in the direction of the
arrow and open the trunk lid.
i When you lock the vehicle (Y
page 83),
the trunk is also locked. Emergency release button
You can open the trunk lid from inside the
vehicle with the emergency release button. X
Press emergency release button 0043briefly.
The trunk lid unlocks and opens.
The trunk lid can be unlocked and opened
with the trunk lid emergency release when
the vehicle is stationary or while driving.
The trunk lid emergency release does not
open the trunk lid if the battery is disconnec- ted or discharged.
Trunk lid emergency release light:
R emergency release button 0043flashes for
30 minutes after the trunk lid is opened
R emergency release button 0043flashes for
60 minutes after the trunk lid is closed. Side windows
Important safety notes
G
WARNING
While closing the side windows, body parts in the closing area could become trapped. There is a risk of injury.
When closing make sure that no parts of the
body are in the closing area. If somebody
becomes trapped, release the switch or press
the switch to open the side window again. G
WARNING
If children operate the side windows they
could become trapped, particularly if they are left unsupervised. There is a risk of injury.
Activate the override feature for the rear side
windows. When leaving the vehicle, always
take the SmartKey with you and lock the vehi- 86
Side windowsOpening and closing
Page 89 of 358
cle. Never leave children unsupervised in the
vehicle. Side window reversing feature
The side windows are equipped with an auto- matic reversing feature. If a solid object
blocks or restricts a side window from trav-
eling upwards during the automatic closing
process, the side window opens again auto-
matically. During the manual closing process,
the side window only opens again automati-
cally after the corresponding switch is
released. The automatic reversing feature is
only an aid and is no substitute for your atten- tion when closing a side window. G
WARNING
The reversing feature does not react:
R to soft, light and thin objects, e.g. small fin-
gers
R while resetting
This means that the reversing feature cannot
prevent someone being trapped in these sit-
uations. There is a risk of injury.
Make sure that no body parts are in close
proximity during the closing procedure. If
someone becomes trapped, press the switch
to open the side window again. Opening and closing the side win-
dows
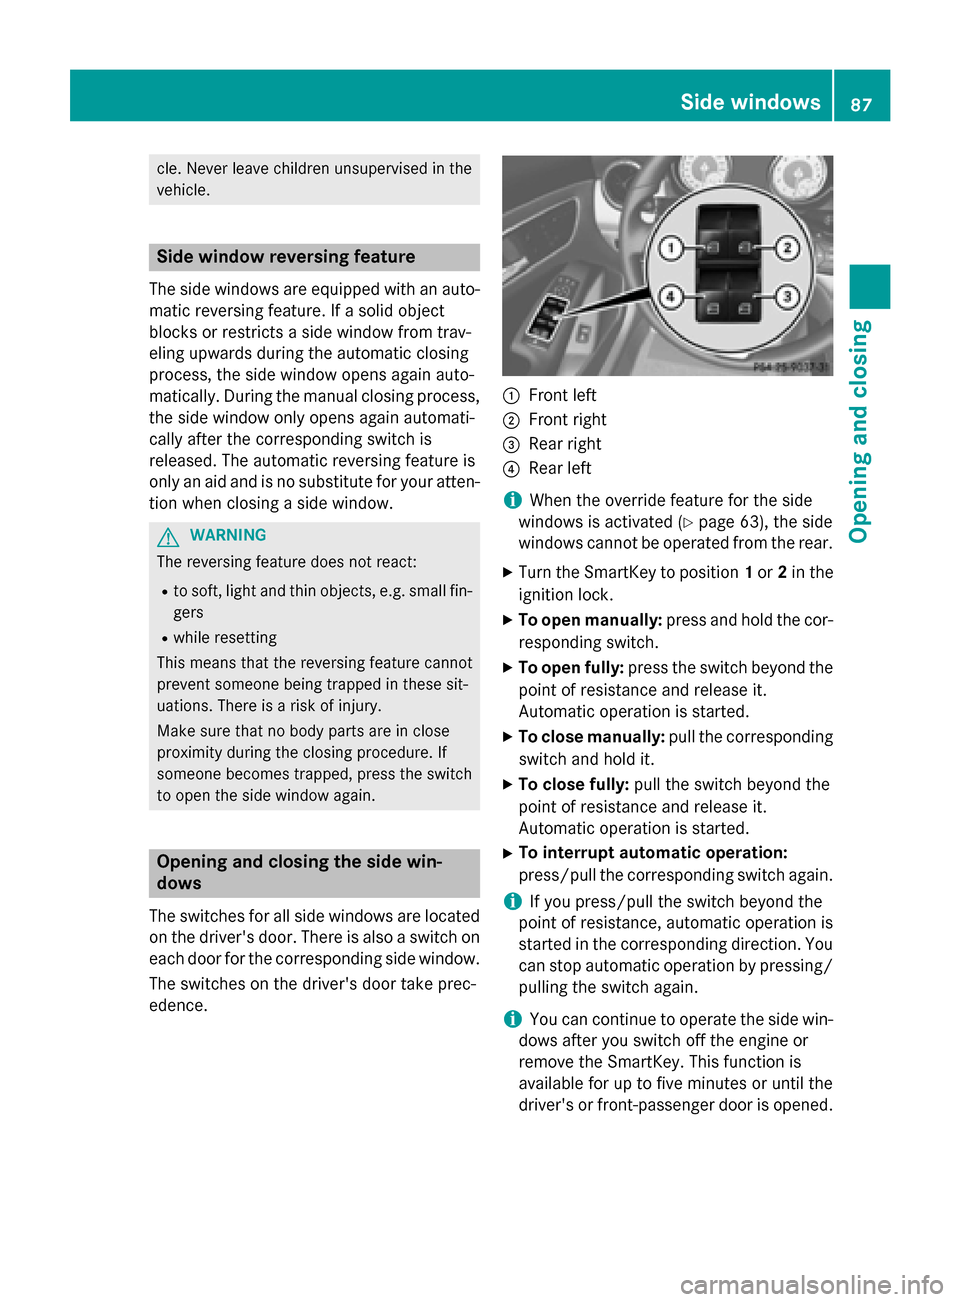
The switches for all side windows are located on the driver's door. There is also a switch on
each door for the corresponding side window.
The switches on the driver's door take prec-
edence. 0043
Front left
0044 Front right
0087 Rear right
0085 Rear left
i When the override feature for the side
windows is activated (Y page 63), the side
windows cannot be operated from the rear.
X Turn the SmartKey to position 1or 2in the
ignition lock.
X To open manually: press and hold the cor-
responding switch.
X To open fully: press the switch beyond the
point of resistance and release it.
Automatic operation is started.
X To close manually: pull the corresponding
switch and hold it.
X To close fully: pull the switch beyond the
point of resistance and release it.
Automatic operation is started.
X To interrupt automatic operation:
press/pull the corresponding switch again.
i If you press/pull the switch beyond the
point of resistance, automatic operation is
started in the corresponding direction. You
can stop automatic operation by pressing/ pulling the switch again.
i You can continue to operate the side win-
dows after you switch off the engine or
remove the SmartKey. This function is
available for up to five minutes or until the
driver's or front-passenger door is opened. Side windows
87Opening and closing Z
Page 90 of 358
Convenience opening
You can ventilate the vehicle before you start driving. To do this, the SmartKey is used to
carry out the following functions simultane-
ously:
R unlock the vehicle
R open the side windows
R open the panorama roof with power tilt/
sliding panel and the roller sunblinds
i The convenience opening feature can
only be operated using the SmartKey. The
SmartKey must be close to the driver's
door handle.
X Point the tip of the SmartKey at the driver's
door handle.
X Press and hold the 0036button until the
side windows and the panorama sunroof
are in the desired position.
If the roller sunblinds of the panorama roof
with power tilt/sliding panel are closed, the roller sunblinds are opened first.
X Press and hold the 0036button again until
the panorama roof with power tilt/sliding
panel is in the desired position.
X To interrupt convenience opening:
release the 0036button. Convenience closing feature
G
WARNING
When the convenience closing feature is oper- ating, parts of the body could become trapped
in the closing area of the side window and the
sliding sunroof. There is a risk of injury.
Observe the complete closing procedure
when the convenience closing feature is oper-
ating. Make sure that no body parts are in
close proximity during the closing procedure. When you lock the vehicle, you can simulta-
neously:
R close the side windows
R close the panorama roof with power tilt/
sliding panel
On vehicles with a panorama roof with power tilt/sliding panel, you can then close the
roller sunblinds.
i The SmartKey must be close to the driv-
er's door handle.
X Press and hold the 0037button until the
side windows and the panorama roof with
power tilt/sliding panel are fully closed.
X Make sure that all the side windows and the
panorama roof with power tilt/sliding
panel are closed.
On vehicles with a panorama roof with power
tilt/sliding panel:
X Press and hold the 0037button again until
the roller sunblinds of the panorama roof
with power tilt/sliding panel close.
X To interrupt convenience closing:
release the 0037button. Resetting the side windows
You must reset each side window if: R the side window opens again slightly after
being closed fully.
R the side window can no longer be fully
opened or closed.
X Close all the doors.
X Turn the SmartKey to position 1or 2in the
ignition lock.
X Pull the corresponding switch on the door
control panel until the side window is com-
pletely closed (Y page 87).
X Hold the switch for an additional second. 88
Side windowsOpening and closing
Page 92 of 358
Problems with the side windows
G
WARNING
If you close a side window again immediately after it has been blocked or reset, the side window
closes with increased or maximum force. The reversing feature is then not active. Parts of the
body could be trapped in the closing area in the process. This poses an increased risk of injury or even fatal injury.
Make sure that no parts of the body are in the closing area. To stop the closing process, releasethe switch or push the switch again to reopen the side window. Problem
Possible causes/consequences and
0050 0050Solutions A side window cannot
be closed because it is
blocked by objects, e.g.
leaves in the window
guide. X
Remove the objects.
X Close the side window. A side window cannot
be closed and you can-
not see the cause. If a side window is obstructed during closing and reopens again
slightly:
X Immediately after the window blocks, pull the corresponding
switch again until the side window has closed.
The side window is closed with increased force.
If a side window is obstructed again during closing and reopens
again slightly: X Immediately after the window blocks, pull the corresponding
switch again until the side window has closed.
The side window is closed without the anti-entrapment feature. Panorama roof with power tilt/sliding
panel Important safety notes
In the following section, the term "sliding sun- roof" refers to the panorama roof with powertilt/sliding panel. G
WARNING
While opening and closing the sliding sunroof, body parts in close proximity could become
trapped. There is a risk of injury.
Make sure that no body parts are in close
proximity during the opening and closing pro- cedures. If somebody becomes trapped:
R release the switch immediately, or
R during automatic operation, push the
switch briefly in any direction
The opening or closing procedure will be stop-
ped. G
WARNING
If children operate the sliding sunroof they
could become trapped, particularly if they are left unsupervised. There is a risk of injury.
When leaving the vehicle, always take the
SmartKey with you and lock the vehicle. Never
leave children unsupervised in the vehicle. 90
Panorama roof with power tilt/sliding panelOpening and closing
Page 93 of 358
G
WARNING
At high speeds the raised sliding sunroof auto- matically lowers slightly at the rear. This could
trap you or other persons. There is a risk of
injury. Make sure that nobody reaches into
the sweep of the sliding sunroof whilst the
vehicle is in motion.
If somebody becomes trapped, immediately
pull back the sliding sunroof switch. The slid- ing sunroof lifts during opening.
! Only open the sliding sunroof if it is free of
snow and ice. Otherwise, malfunctions may
occur.
Do not allow anything to protrude from the
sliding sunroof. Otherwise, the seals could
be damaged.
! The weather can change abruptly. It could
start to rain or snow. Make sure that the
sliding sunroof is closed when you leave the
vehicle. The vehicle electronics can be
damaged if water enters the vehicle inte-
rior.
i Resonance noises can occur in addition to
the usual airflow noises when the sliding
sunroof is open. They are caused by minor
pressure fluctuations in the vehicle interior.
Change the position of the sliding sunroof
or open a side window slightly to reduce or
eliminate these noises. Sliding sunroof reversing feature
The sliding sunroof is equipped with an auto- matic reversing feature. If a solid object
blocks or restricts the sliding sunroof during
the closing process, the sliding sunroof opens
again automatically. The automatic reversing feature is only an aid and is no substitute for
your attention when closing the sliding roof. G
WARNING
The reversing feature does not react:
R to soft, light and thin objects, e.g. small fin-
gers
R over the last 1/6 in(4 mm) of the closing
movement
R during resetting
R when closing the sliding sunroof again man-
ually immediately after automatic reversing
This means that the reversing feature cannot
prevent someone being trapped in these sit-
uations. There is a risk of injury.
Make sure that no body parts are in close
proximity during the closing procedure.
If somebody becomes trapped:
R release the switch immediately, or
R during automatic operation, push the
switch briefly in any direction
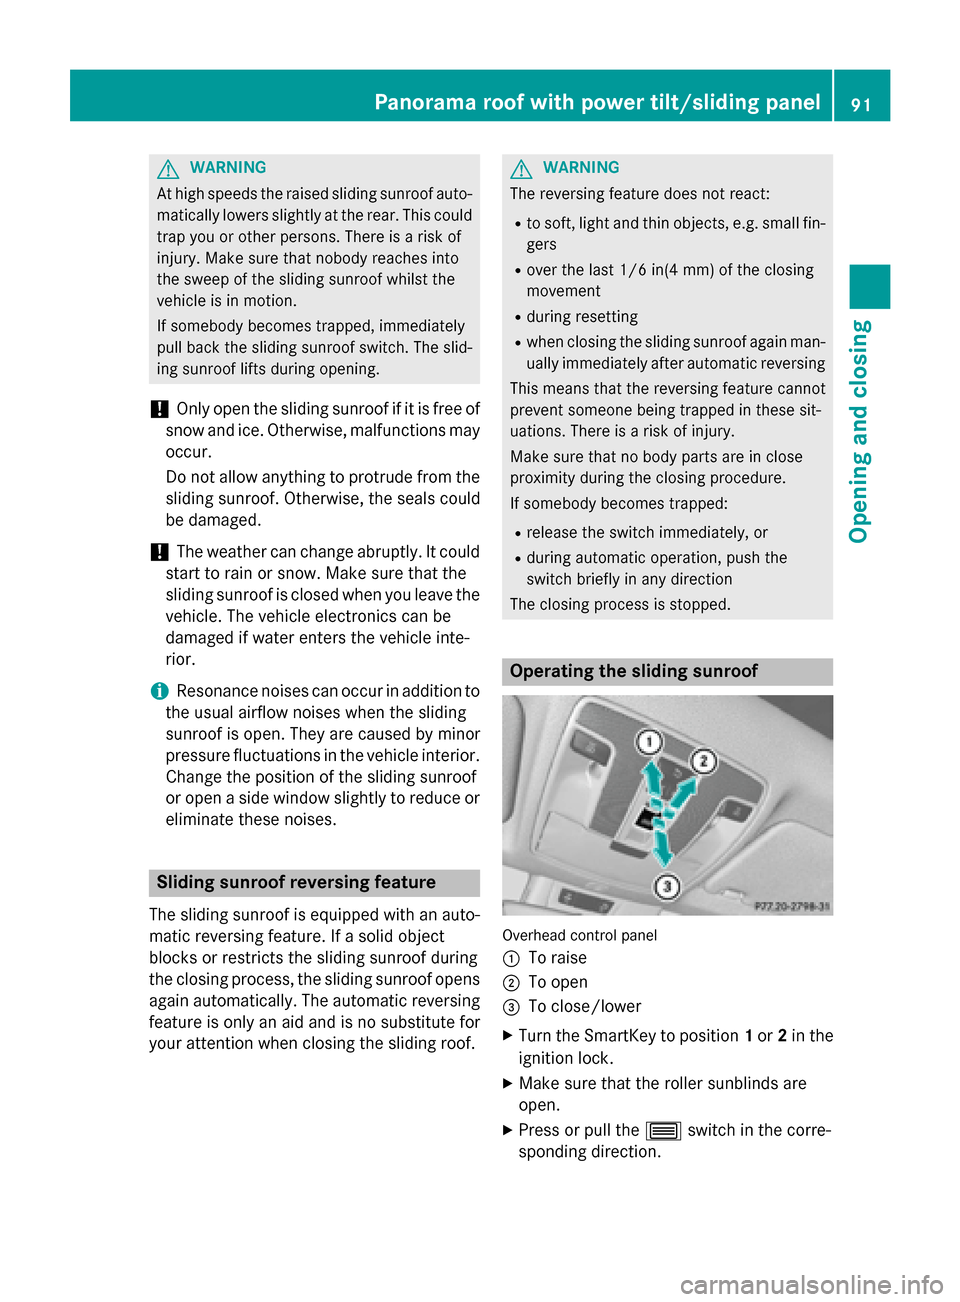
The closing process is stopped. Operating the sliding sunroof
Overhead control panel
0043
To raise
0044 To open
0087 To close/lower
X Turn the SmartKey to position 1or 2in the
ignition lock.
X Make sure that the roller sunblinds are
open.
X Press or pull the 0057switch in the corre-
sponding direction. Panorama roof with power tilt/sliding panel
91Opening and closing Z