tow MERCEDES-BENZ CLA-Class 2017 C117 Owner's Guide
[x] Cancel search | Manufacturer: MERCEDES-BENZ, Model Year: 2017, Model line: CLA-Class, Model: MERCEDES-BENZ CLA-Class 2017 C117Pages: 318, PDF Size: 8.02 MB
Page 148 of 318

Limited braking performance on salt-
treated roads
If you drive on salted roads, a layer of salt resi-
due may form on the brake discs and brake
pads. This can result in a significantly longer
braking distance.
RIn order to prevent any salt build-up, apply the
brakes occasionally while paying attention to the traffic conditions.
RCarefully depress the brake pedal and the
beginning and end of a journey.
RMaintain a greater distance to the vehicle
ahead.
Servicing the brakes
!The brake fluid level may be too low, if:
Rif the red brake warning lamp lights up in
the instrument cluster and
Ryou hear a warning tone while the engine is
running
Observe additional warning messages in the
multifunction display.
The brake fluid level may be too low due to
brake pad wear or leaking brake lines.
Have the brake system checked immediately.
Consult a qualified specialist workshop to
arrange this.
!A function or performance test should only
be carried out on a 2-axle dynamometer. If
you wish to operate the vehicle on such a
dynamometer, please consult a qualified spe- cialist workshop in advance. You could oth-
erwise damage the drive train or the brake
system.
!As the ESP®system operates automatically,
the engine and the ignition must be switched
off (the SmartKey must be in position 0or 1in
the ignition lock) if:
Rthe electric parking brake is tested on a
brake dynamometer (for a maximum of
ten seconds)
Rthe vehicle is towed with the front axle
raised.
Braking triggered automatically by ESP
®may
seriously damage the brake system.
All checks and maintenance work on the brake
system must be carried out at a qualified spe-
cialist workshop. Have brake pads installed and brake fluid
replaced at a qualified specialist workshop.
If the brake system has only been subject to
moderate loads, you should test the functional-
ity
of your brakes at regular in
tervals.
You can find a description of Brake Assist (BAS)
on (
Ypage 60).
Mercedes-Benz recommends that you only have
brake pads/linings installed on your vehicle
which have been approved for Mercedes-Benz
vehicles or which correspond to an equivalent
quality standard. Brake pads/linings which have
not been approved for Mercedes-Benz vehicles
or which are not of an equivalent quality could
affect your vehicle's operating safety.
Mercedes-Benz recommends that you only use
brake fluid that has been specially approved for
your vehicle by Mercedes-Benz, or which corre-
sponds to an equivalent quality standard. Brake
fluid which has not been approved for
Mercedes-Benz vehicles or which is not of an
equivalent quality could affect your vehicle's
operating safety.
Checking brake lining thickness
You can measure the break pad/lining thick-
ness using a test gage. Color-coding (green or
red) on the test gage allows you to determine
whether the brake pad/lining thickness is still
sufficient. The test gage is in the vehicle docu-
ment wallet in the glove box.
Front wheel
146Driving tips
Driving and parking
Page 151 of 318
=Deactivates cruise control
?Activates at the current speed/last stored
speed
When you activate cruise control, the stored
speed is shown in the multifunction display for
five seconds.
Activation conditions
To activate cruise control, all of the following
activation conditions must be fulfilled:
Rthe electric parking brake must be released.
RESP®must be active, but not intervening.
Rthe transmission must be in position D.
Storing, maintaining and calling up a
speed
Storing and maintaining the current
speed
You can store the current speed if you are driv-
ing faster than 20 mph (30 km/h).
XAccelerate the vehicle to the desired speed.
XBriefly press the cruise control lever up :or
down ;.
XRemove your foot from the accelerator pedal.
Cruise control is activated. The vehicle auto-
matically maintains the stored speed.
iCruise control may be unable to maintain
the stored speed on uphill gradients. The
stored speed is resumed when the gradient
evens out. Cruise control maintains the
stored speed on downhill gradients by auto-
matically applying the brakes.
Storing the current speed or calling up the
last stored speed
GWARNING
If you call up the stored speed and it differs
from the current speed, the vehicle acceler-
ates or decelerates. If you do not know the
stored speed, the vehicle could accelerate or brake unexpectedly. There is a risk of an acci-
dent.
Pay attention to the road and traffic condi-
tions before calling up the stored speed. If you
do not know the stored speed, store the
desired speed again.
XBriefly pull the cruise control lever towards
you ?.
XRemove your foot from the accelerator pedal.
The first time cruise control is activated, it
stores the current speed or regulates the
speed of the vehicle to the previously stored
speed.
Setting a speed
Keep in mind that it may take a brief moment
until the vehicle has accelerated or braked to
the speed set.
XTo adjust the set speed in10 km/hincre-
ments: briefly press cruise control lever :up
beyond the pressure point for a higher speed,
or down ;for a lower speed.
or
XKeep the cruise control lever pressed beyond
the point of resistance until the desired speed
is set. Press cruise control lever up :for a
higher speed or down ;for a lower speed.
XTo adjust the set speed in1 km/hincre-
ments:briefly press cruise control lever up :
to the pressure point for a higher speed or
down ;for a lower speed.
or
XKeep the cruise control lever pressed to the
point of resistance until the desired speed is
set. Press cruise control lever up :for a
higher speed or down ;for a lower speed.
iCruise control is not deactivated if you
depress the accelerator pedal. For example, if
you accelerate briefly to overtake, cruise con-
trol adjusts the vehicle's speed to the last
speed stored after you have finished overtak-
ing.
Deactivating cruise control
There are several ways to deactivate cruise con-
trol:
XBriefly press the cruise control lever forwards
=.
or
XBrake.
Cruise control is automatically deactivated if:
Rthe vehicle is secured with the electric park-
ing brake
Ryou are driving at less than 20 mph (30 km/h)
Driving system s149
Driving an d parking
Z
Page 153 of 318
In such cases, Distance Pilot DISTRONIC may:
Rgive an unnecessary warning and then
brake the vehicle
Rneither give a warning nor intervene
Raccelerate or brake unexpectedly
There is a risk of an accident.
Continue to drive carefully and be ready to
brake, especially if Distance Pilot DISTRONIC
warns you.
GWARNING
Distance Pilot DISTRONIC brakes your vehicle with up to 50% of the maximum possible
deceleration. If this deceleration is not suffi-
cient, Distance Pilot DISTRONIC alerts you
with a visual and acoustic warning. There is a
risk of an accident.
Apply the brakes yourself in these situations
and try to take evasive action.
!When Distance Pilot DISTRONIC or the
HOLD function is activated, the vehicle
brakes automatically in certain situations.
To avoid damage to the vehicle, deactivate
Distance Pilot DISTRONIC and the HOLD
function in the following or similar situations:
Rwhen towing the vehicle
Rin the car wash
If you fail to adapt your driving style, Distance
Pilot DISTRONIC can neither reduce the risk of
an accident nor override the laws of physics.
Distance Pilot DISTRONIC cannot take into
account road, weather or traffic conditions. Dis-
tance Pilot DISTRONIC is only an aid. You are
responsible for the distance to the vehicle in
front, for vehicle speed, for braking in good time
and for staying in your lane.
Do not use Distance Pilot DISTRONIC:
Rin road and traffic conditions which do not
allow you to maintain a constant speed, e.g. in
heavy traffic or on winding roads
Ron slippery road surfaces. Braking or accel-
erating could cause the drive wheels to lose
traction and the vehicle could then skid
Rwhen there is poor visibility, e.g. due to fog,
heavy rain or snow Distance Pilot DISTRONIC may not detect nar-
row vehicles driving in front, e.g. motorcycles, or
vehicles driving on a different line.
In particular, the detection of obstacles can be
impaired if:
Rthere is dirt on the sensors or anything else
covering the sensors
Rthere is snow or heavy rain
Rthere is interference by other radar sources
Rthere are strong radar reflections, for exam-
ple, in parking garages
If Distance Pilot DISTRONIC no longer detects a
vehicle in front, it may unexpectedly accelerate
to the speed stored.
This speed may:
Rbe too high if you are driving in a filter lane or
an exit lane
Rbe so high when driving in the right-hand lane
that you overtake vehicles in the left-hand
lane
Rbe so high in the left lane that you pass vehi-
cles driving in the right lane
If there is a change of drivers, advise the new
driver of the speed stored.
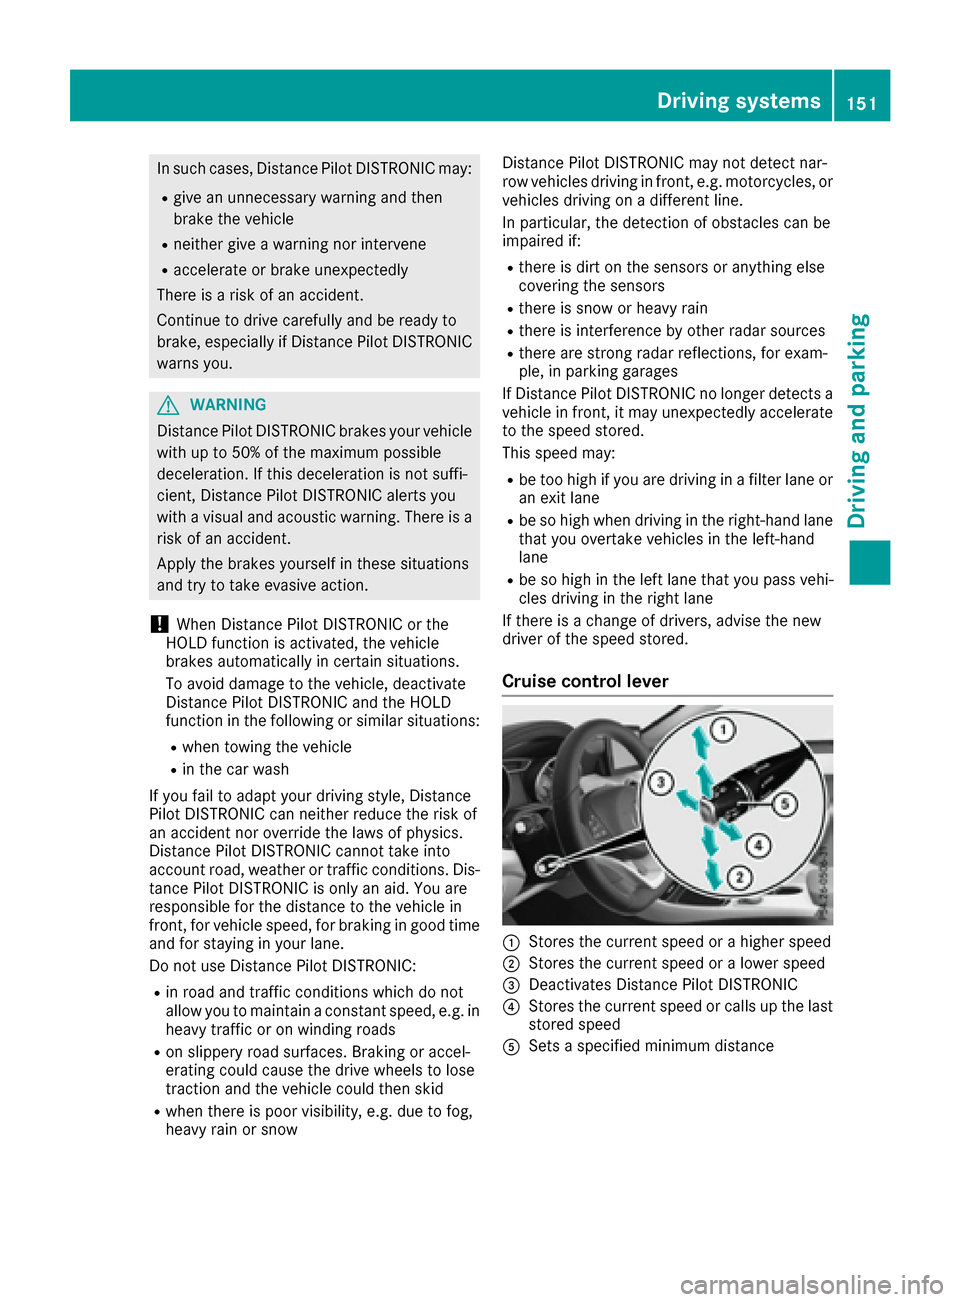
Cruise control lever
:Stores the current speed or a higher speed
;Stores the current speed or a lower speed
=Deactivates Distance Pilot DISTRONIC
?Stores the current speed or calls up the last
stored speed
ASets a specified minimum distance
Driving systems151
Driving and parking
Z
Page 154 of 318
Activating Distance Pilot DISTRONIC
Activation conditions
!When Distanc ePilo tDISTRONI Cor th e
HOLD function is activated, th evehicl e
brakes automatically in certain situations.
To avoi ddamag eto th evehicle, deactivat e
Distanc ePilo tDISTRONI Cand th eHOLD
function in th efollowin gor similar situations:
Rwhen towin gth evehicl e
Rin thecar wash
To activat eDistanc ePilo tDISTRONIC, th efol -
lowin gcondition smus tbe fulfilled :
Rtheengin emus tbe started. It may tak eup to
two minute sof drivin gbefore Distanc ePilo t
DISTRONI Cis read yfor use.
Rth eelectric parking brak emus tbe released.
RES P®mus tbe active ,but no tintervening .
RParking Pilo tmus tno tbe activated.
Rth etransmission mus tbe in position D.
Rthedriver's door mus tbe closed when you
shif tfrom Pto Dor your seat belt mus tbe
fastened.
Rth efront-passenger door mus tbe closed.
Rth evehicl emus tno tskid.
Acti vating
XBriefly pull th ecruise control lever toward s
you ?,up: or down ;.
Distanc ePilo tDISTRONI Cis activated.
XKee pth ecruise control lever presse dup : or
down ;until th edesired spee dis set .
XRemove your foo tfrom th eaccelerato rpedal .
Your vehicl eadapt sits spee dto that of th e
vehicl ein front, but only up to th edesired
store dspeed.
iIf you do no tfully release th eaccelerato r
pedal ,th eDistance Pilot Passiv emes-
sage appear sin th emultifunction display. The
set distanc eto aslower-moving vehicl ein
fron twill then no tbe maintained. You will be
drivin gat th espee dyou determine by th e
position of th eaccelerato rpedal .
You can also activat eDistanc ePilo tDISTRONI C
when stationary. The lowes tspee dthat can be
set is 20 mph (30 km/h).
Driving with Distance Pilot DISTRONIC
Acti vating at th ecurren tspeed/las t
store dspeed
GWARNIN G
If you call up th estore dspee dand it differ s
from th ecurren tspeed, th evehicl eacceler -
ate sor decelerates. If you do no tknow th e
store dspeed, th evehicl ecould accelerate or
brak eunexpectedly. There is aris kof an acci-
dent.
Pay attention to th eroad and traffic condi-
tion sbefore calling up th estore dspeed. If you
do no tknow th estore dspeed, store th e
desired spee dagain .
XBriefly pull th ecruise control lever toward s
you ?.
XRemove your foo tfrom th eaccelerato rpedal .
The first time Distanc ePilo tDISTRONI Cis
activated, it store sth ecurren tspee dor reg -
ulates th espee dof th evehicl eto th eprevi-
ously store dspeed.
Pulling awa yand drivin g
XIf you want to pull awa ywit hDistance
Pilot DISTRONIC: remove your footfrom th e
brak epedal .
XBriefly pull th ecruise control lever toward s
you ?.
or
XIf Distance Pilot DISTRONIC is activated :
accelerate briefly.
Your vehicl epulls away and adapt sits spee d
to that of th evehicl ein front. If no vehicl eis
detecte din front, your vehicl eaccelerate sto
th eset speed.
The vehicl ecan also pull away when it is facing
an unidentifie dobstacle or is drivin gon adiffer -
en t
l
in efrom another vehicle. The vehicl ethen
brakes automatically. Be read yto brak eat all
times .
If there is no vehicl ein front, Distanc ePilo t
DISTRONI Coperate sin th esam eway as cruise
control .
If Distanc ePilo tDISTRONI Cdetects aslower-
moving vehicl ein front, it brakes your vehicle. In
this way, th edistanc eyou hav eselected is main -
tained.
152Driving systems
Driving and parking
Page 156 of 318
The specified minimum distance can be
changed while Distance Pilot DISTRONIC is
switched on or off.
iMake sure that you maintain the minimum
distance to the vehicle in front as required by
law. Adjust the distance to the vehicle in front
if necessary.
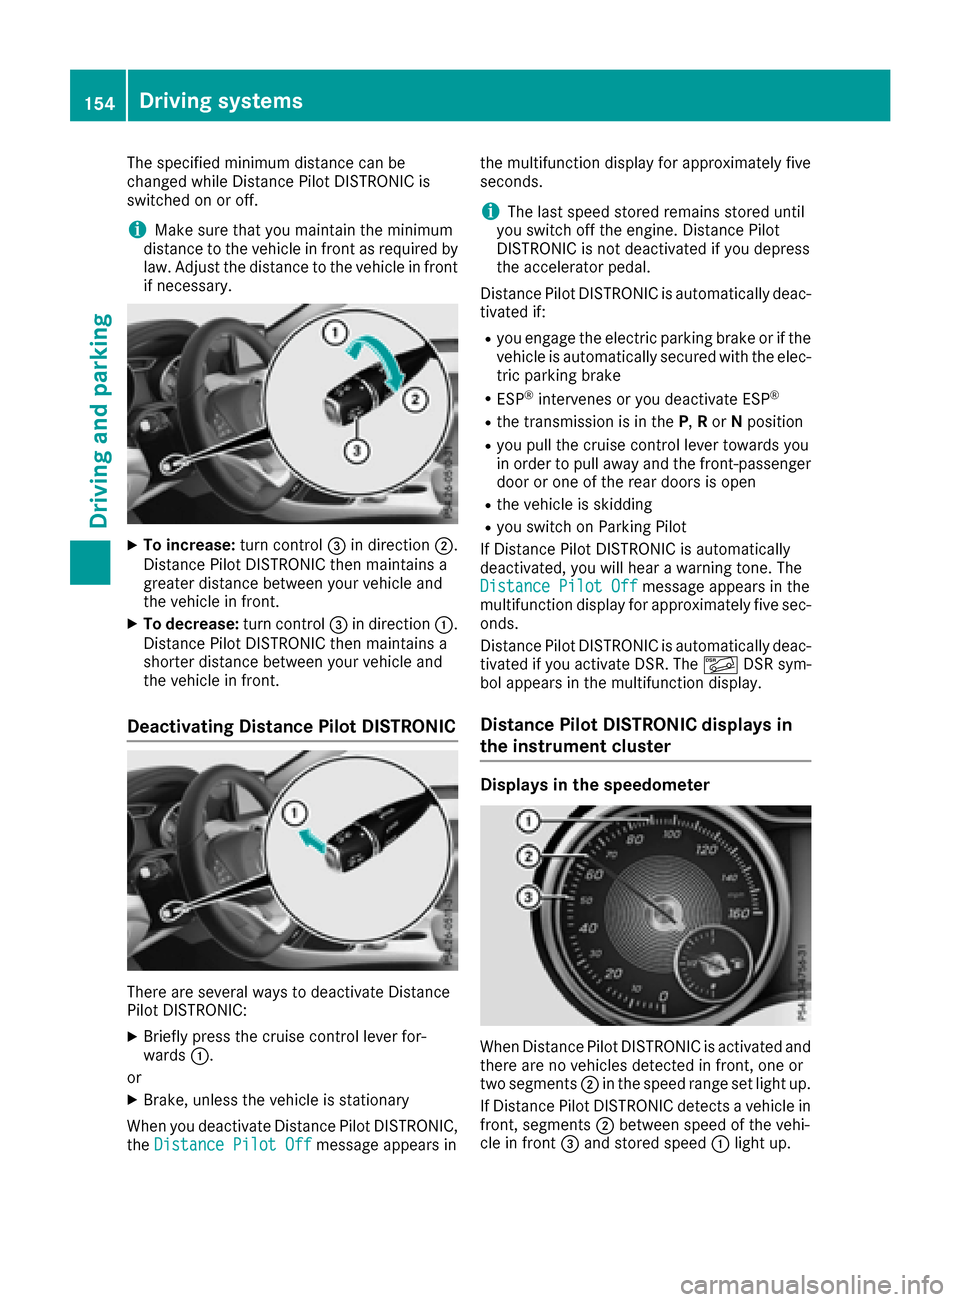
XTo increase: turn control=in direction ;.
Distance Pilot DISTRONIC then maintains a
greater distance between your vehicle and
the vehicle in front.
XTo decrease: turn control=in direction :.
Distance Pilot DISTRONIC then maintains a
shorter distance between your vehicle and
the vehicle in front.
Deactivating Distance Pilot DISTRONIC
There are several ways to deactivate Distance
Pilot DISTRONIC:
XBriefly press the cruise control lever for-
wards :.
or
XBrake, unless the vehicle is stationary
When you deactivate Distance Pilot DISTRONIC,
the Distance Pilot Off
message appears in the multifunction display for approximately five
seconds.
iThe last speed stored remains stored until
you switch off the engine. Distance Pilot
DISTRONIC is not deactivated if you depress
the accelerator pedal.
Distance Pilot DISTRONIC is automatically deac-
tivated if:
Ryou engage the electric parking brake or if the
vehicle is automatically secured with the elec-
tric parking brake
RESP®intervenes or you deactivate ESP®
Rthe transmission is in the P,Ror Nposition
Ryou pull the cruise control lever towards you
in order to pull away and the front-passenger
door or one of the rear doors is open
Rthe vehicle is skidding
Ryou switch on Parking Pilot
If Distance Pilot DISTRONIC is automatically
deactivated, you will hear a warning tone. The
Distance Pilot Off
message appears in the
multifunction display for approximately five sec- onds.
Distance Pilot DISTRONIC is automatically deac-
tivated if you activate DSR. The ÃDSR sym-
bol appears in the multifunction display.
Distance Pilot DISTRONIC displays in
the instrument cluster
Displays in the speedometer
When Distance Pilot DISTRONIC is activated and
there are no vehicles detected in front, one or
two segments ;in the speed range set light up.
If Distance Pilot DISTRONIC detects a vehicle in
front, segments ;between speed of the vehi-
cle in front =and stored speed :light up.
154Driving systems
Driving and parking
Page 158 of 318
HOLD function
General notes
The HOLD function can assist the driver in the
following situations:
Rwhen pulling away, especially on steep slopes
Rwhen maneuvering on steep slopes
Rwhen waiting in traffic
The vehicle is kept stationary without the driver having to depress the brake pedal.
The braking effect is canceled and the HOLD
function deactivated when you depress the
accelerator pedal to pull away.
Important safety notes
GWARNING
When leaving the vehicle, it can still roll away despite being braked by the HOLD function if:
Rthere is a malfunction in the system or in
the voltage supply.
Rthe HOLD function has been deactivated by
pressing the accelerator pedal or the brake
pedal, e.g. by a vehicle occupant.
Rthe electrical system in the engine com-
partment, the battery or the fuses have
been tampered with.
Rthe battery is disconnected
There is a risk of an accident.
If you wish to exit the vehicle, always turn off the HOLD function and secure the vehicle
against rolling away.
!When Distance Pilot DISTRONIC or the
HOLD function is activated, the vehicle
brakes automatically in certain situations.
To avoid damage to the vehicle, deactivate
Distance Pilot DISTRONIC and the HOLD
function in the following or similar situations:
Rwhen towing the vehicle
Rin the car wash
Deactivating the HOLD function (
Ypage 156).
Activation conditions
You can activate the HOLD function if:
Rthe vehicle is stationary
Rthe engine is running or if it has been auto-
matically switched off by the ECO start/stop
function
Rthe driver's door is closed or your seat belt is
fastened
Rthe electric parking brake is released
RDistance Pilot DISTRONIC is deactivated
Rthe transmission position D,R or Nis engaged
while driving a vehicle with an automatic
transmission
Activating the HOLD function
XMake sure that the activation conditions are
met.
XDepress the brake pedal.
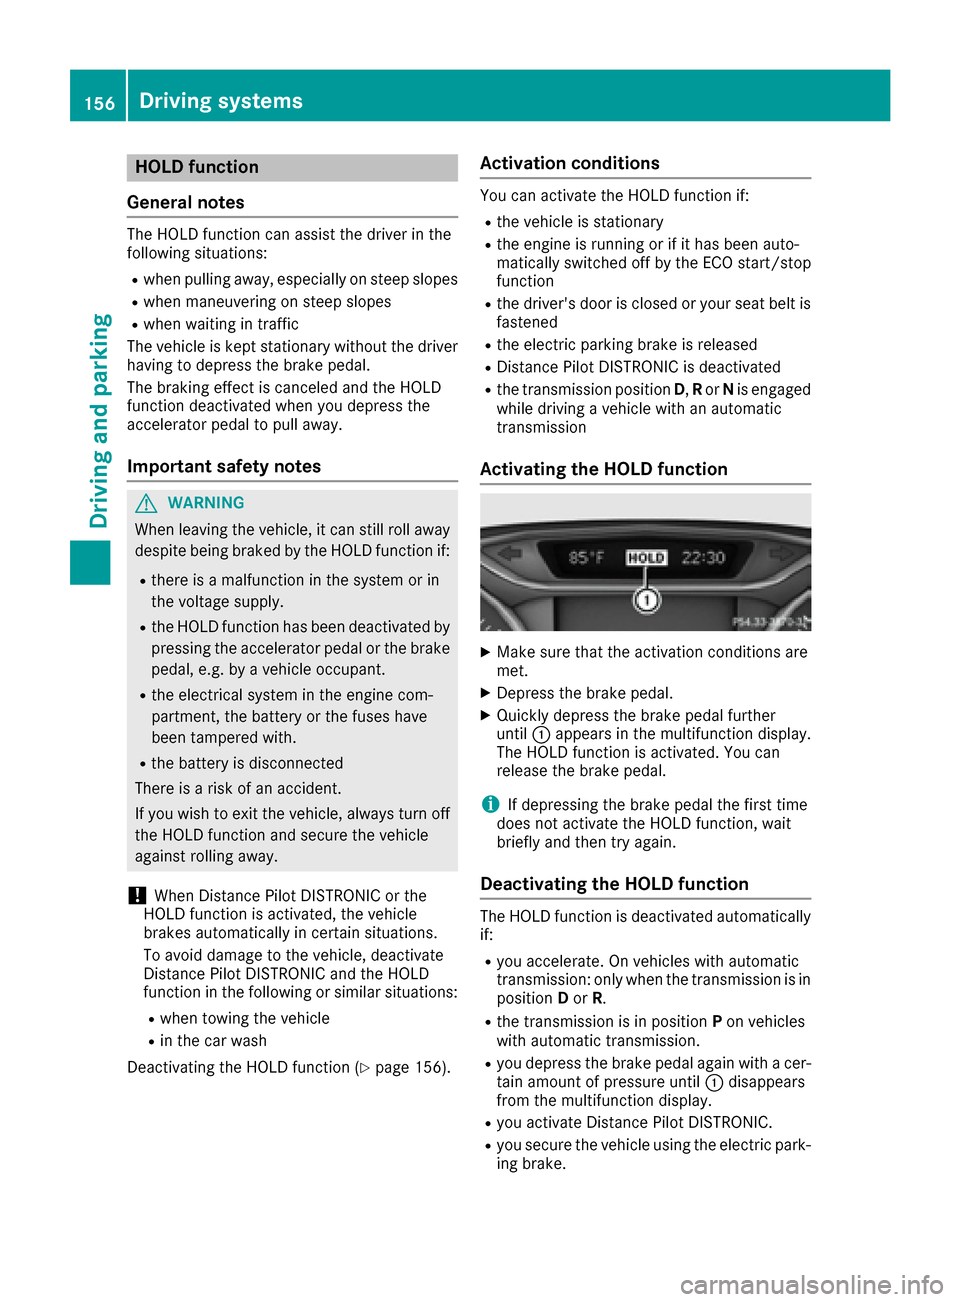
XQuickly depress the brake pedal further
until :appears in the multifunction display.
The HOLD function is activated. You can
release the brake pedal.
iIf depressing the brake pedal the first time
does not activate the HOLD function, wait
briefly and then try again.
Deactivating the HOLD function
The HOLD function is deactivated automatically
if:
Ryou accelerate. On vehicles with automatic
transmission: only when the transmission is in
position Dor R.
Rthe transmission is in position Pon vehicles
with automatic transmission.
Ryou depress the brake pedal again with a cer-
tain amount of pressure until :disappears
from the multifunction display.
Ryou activate Distance Pilot DISTRONIC.
Ryou secure the vehicle using the electric park- ing brake.
156Driving systems
Driving and parking
Page 161 of 318
The firmer setting of the suspension tuning in
Sport mode ensures even better contact with
the road. Select this mode when employing a
sporty driving style, e.g. on winding country
roads.
XPress button:.
Indicator lamp ;lights up. You have selected
Sport mode.
The AMG Suspension System SPORT
mes-
sage appears in the multifunction display.
Comfort mode
In Comfort mode, the driving characteristics of
your vehicle are more comfortable. Select this
mode if you favor a more comfortable driving
style, but also when driving fast on straight
roads, e.g. highways.
XPress button :again so that indicator
lamp ;goes out.
You have selected Comfort mode.
The AMG
SuspensionSystemCOMFORTmes-
sage appears in the multifunction display.
4MATIC
!
Never tow the vehicle with one axle raised.
This may damage the differential. Damage of
this sort is not covered by the Mercedes-Benz
Limited Warranty. All wheels must remain
either on the ground or be fully raised.
Observe the instructions for towing the vehi-
cle with all wheels in full contact with the
ground.
4MATIC, together with ESP
®, improves the trac-
tion of your vehicle whenever a drive wheel
spins due to insufficient grip.
If you fail to adapt your driving style, 4MATIC can neither reduce the risk of accident nor override
the laws of physics. 4MATIC cannot take
account of road, weather and traffic conditions.
4MATIC is only an aid. You are responsible for
the distance to the vehicle in front, for vehicle
speed, for braking in good time and for staying in
your lane.
If a drive wheel spins due to insufficient grip:
ROnly depress the accelerator pedal as far as
necessary when pulling away.
RAccelerate less when driving.
iIn wintry driving conditions, the maximum
effect of 4MATIC can only be achieved if you
use winter tires (M+S tires), with snow chains
if necessary.
Suspension with Adaptive Damping
System
General notes
A suspension with the Adaptive Damping Sys-
tem provides improved driving comfort and con-
tinuously controls the calibration of the damp-
ers. The damping characteristics adapt to the
current operating and driving situation.
The damping is tuned individually to each wheel
and depends on:
Ryour driving style, e.g. sporty
Rthe road surface conditions
Rthe drive program selected
The drive program can be set using the
DYNAMIC SELECT button (
Ypage 127).
Selecting Comfort mode
In the Comfort drive program, the driving char-
acteristics of your vehicle are more comforta-
ble. Therefore, select this drive program if you
prefer a more comfortable driving style. Also
select the Comfortdrive program when driving
fast on straight roads, e.g. on straight stretches of highway.
XPress DYNAMIC SELECT button (Ypage 127)
as many times as necessary until the Com-
fort drive program is selected.
Selecting Sport mode
The firmer setting of the suspension tuning in
theSport drive program ensures even better
contact with the road. Select this drive program
when employing a sporty driving style, e.g. on
winding country roads.
XPress DYNAMIC SELECT button (Ypage 127)
as many times as necessary until the Sport
drive program is selected.
Driving systems159
Driving and parking
Z
Page 166 of 318
Rthat are parallel to the direction of travel andat least 39.5 in (1.0 m)longer than your vehi-
cle
Rthat are at right angles to the direction of
travel and at least 39.5 in (1.0 m) wider than
your vehicle
iNote that Parking Pilot cannot measure the
length of a parking space if it is at right angles to the direction of travel. You will need to
judge whether your vehicle will fit into the
parking space.
When driving at speeds below 19 mph
(30 km/h), you will see parking symbol ;as a
status indicator in the instrument cluster. When
a parking space has been detected, an arrow
towards the right or the left also appears. Park-
ing Pilot only displays parking spaces on the
front-passenger side as standard. Parking
spaces on the driver's side are displayed as
soon as the turn signal on the driver's side is
activated. When parking on the driver's side,
this must remain activated until you confirm the
use of Parking Pilot by pressing the abutton
on the multifunction steering wheel. The system
automatically determines whether the parking
space is parallel or at right-angles to the direc-
tion of travel.
A parking space is displayed while you are driv-
ing past it, and until you are approximately 50 ft
(15 m) away from it.
Parking
GWARNING
If you leave the vehicle when it is only being
braked by Parking Pilot, it could roll away if:
Rthere is a malfunction in the system or in
the voltage supply.
Rthe electrical system in the engine com-
partment, the battery or the fuses are tam-
pered with.
Rthe battery is disconnected.
Rthe vehicle is accelerated, e.g. by a vehicle
occupant.
There is a risk of an accident.
Before leaving the vehicle, always secure it
against rolling away.
iIf Parking Assist PARKTRONIC detects
obstacles, Parking Pilot brakes automatically whilst the vehicle is parking. You are respon-
sible for braking in good time.
XStop the vehicle when the parking space sym-
bol shows the desired parking space in the
instrument cluster.
XShift the transmission to position
R.
The Start Parking Pilot?
Yes: OKNo:% message appears in the multifunction
display.
XTo cancel the procedure: press the%
button on the multifunction steering wheel or
pull away.
or
XTo park using Parking Pilot: press thea
button on the multifunction steering wheel.
The Parking Pilot Active Accelerate
and BrakeObserve Surroundingsmes-
sage appears in the multifunction display.
XLet go of the multifunction steering wheel.
XBack up the vehicle, being ready to brake at all
times. When backing up, drive at a speed
below approximately 6 mph (10 km/h). Oth-
erwise Parking Pilot is canceled.
Parking Pilot brakes the vehicle to a standstill
when the vehicle approaches the rear border
of the parking space.
Maneuvering may be required in tight parking
spaces.
The Parking Pilot Active Select D
Observe Surroundingsmessage appears in
the multifunction display.
XShift the transmission to position Dwhile the
vehicle is stationary.
Parking Pilot immediately steers in the other
direction.
The Parking Pilot Active Accelerate
and BrakeObserve Surroundingsmes-
sage appears in the multifunction display.
iYou will achieve the best results by waiting
for the steering procedure to complete before
pulling away.
XDrive forwards and be ready to brake at all
times.
Parking Pilot brakes the vehicle to a standstill when the vehicle approaches the front border
of the parking space.
Maneuvering may be required in tight parking spaces.
The Parking Pilot Active Select R
Observe Surroundingsmessage appears in
the multifunction display.
164Driving systems
Driving and parking
Page 169 of 318
Rif the camera lens is dirty or obstructed
Observe the notes on cleaning
(
Ypage 262)
Rif the rear of your vehicle is damaged. In this
case, have the camera position and setting
checked at a qualified specialist workshop
The field of vision and other functions of the rear
view camera may be restricted due to additional
accessories on the rear of the vehicle (e.g.
license plate holder, bicycle rack).
Activating/deactivating the rear view
camera
XTo activate: make sure that the SmartKey is
in position 2in the ignition lock.
XMake sure that the Activation by R gearfunction is selected in the multimedia system;
see the Digital Operator's Manual.
XEngage reverse gear.
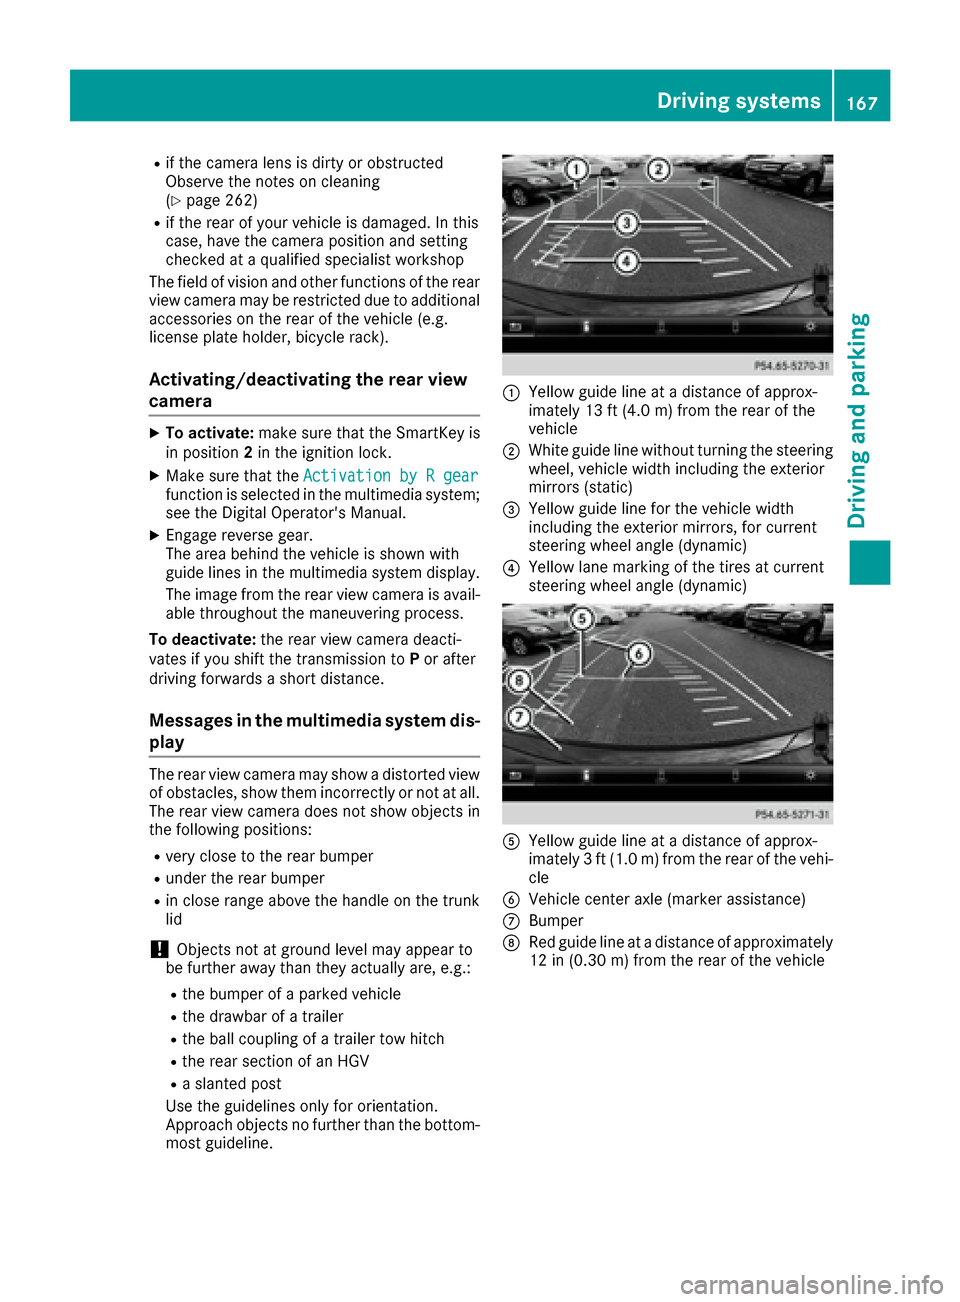
The area behind the vehicle is shown with
guide lines in the multimedia system display.
The image from the rear view camera is avail-
able throughout the maneuvering process.
To deactivate: the rear view camera deacti-
vates if you shift the transmission to Por after
driving forwards a short distance.
Messages in the multimedia system dis- play
The rear view camera may show a distorted view
of obstacles, show them incorrectly or not at all.
The rear view camera does not show objects in
the following positions:
Rvery close to the rear bumper
Runder the rear bumper
Rin close range above the handle on the trunk
lid
!Objects not at ground level may appear to
be further away than they actually are, e.g.:
Rthe bumper of a parked vehicle
Rthe drawbar of a trailer
Rthe ball coupling of a trailer tow hitch
Rthe rear section of an HGV
Ra slanted post
Use the guidelines only for orientation.
Approach objects no further than the bottom-
most guideline.
:Yellow guide line at a distance of approx-
imately 13 ft (4.0 m) from the rear of the
vehicle
;White guide line without turning the steering
wheel, vehicle width including the exterior
mirrors (static)
=Yellow guide line for the vehicle width
including the exterior mirrors, for current
steering wheel angle (dynamic)
?Yellow lane marking of the tires at current
steering wheel angle (dynamic)
AYellow guide line at a distance of approx-
imately 3 ft (1.0 m) from the rear of the vehi-
cle
BVehicle center axle (marker assistance)
CBumper
DRed guide line at a distance of approximately
12 in (0.30 m) from the rear of the vehicle
Driving systems167
Driving and parking
Z
Page 181 of 318
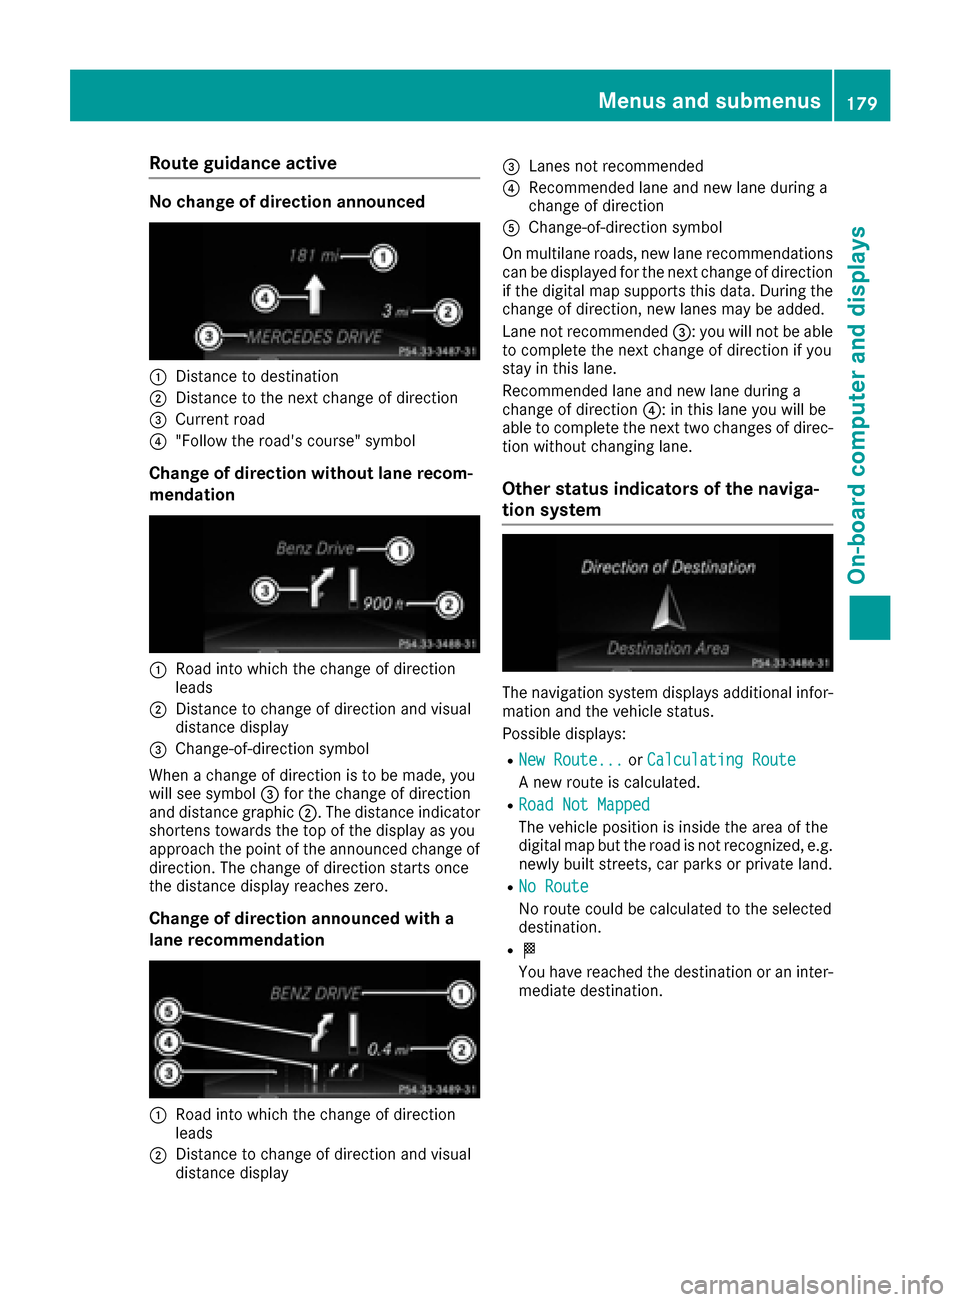
Route guidance active
No change of direction announced
:Distance to destination
;Distance to the next change of direction
=Current road
?"Follow the road's course" symbol
Change of direction without lane recom-
mendation
:Road into which the change of direction
leads
;Distance to change of direction and visual
distance display
=Change-of-direction symbol
When a change of direction is to be made, you
will see symbol =for the change of direction
and distance graphic ;. The distance indicator
shortens towards the top of the display as you
approach the point of the announced change of
direction. The change of direction starts once
the distance display reaches zero.
Change of direction announced with a
lane recommendation
:Road into which the change of direction
leads
;Distance to change of direction and visual
distance display
=Lanes not recommended
?Recommended lane and new lane during a
change of direction
AChange-of-direction symbol
On multilane roads, new lane recommendations can be displayed for the next change of direction
if the digital map supports this data. During the
change of direction, new lanes may be added.
Lane not recommended =: you will not be able
to complete the next change of direction if you
stay in this lane.
Recommended lane and new lane during a
change of direction ?: in this lane you will be
able to complete the next two changes of direc-
tion without changing lane.
Other status indicators of the naviga-
tion system
The navigation system displays additional infor-
mation and the vehicle status.
Possible displays:
RNew Route...or Calculating Route
A new route is calculated.
RRoad Not Mapped
The vehicle position is inside the area of the
digital map but the road is not recognized, e.g.
newly built streets, car parks or private land.
RNo Route
No route could be calculated to the selected
destination.
RO
You have reached the destination or an inter-
mediate destination.
Menus and submenus179
On-board computer and displays
Z