MERCEDES-BENZ CLS COUPE 2011 Owners Manual
Manufacturer: MERCEDES-BENZ, Model Year: 2011, Model line: CLS COUPE, Model: MERCEDES-BENZ CLS COUPE 2011Pages: 337, PDF Size: 7.37 MB
Page 141 of 337
A
Neutral
Do not shift the transmission to
N
while driving. Otherwise, the auto-
matic transmission could be dam-
aged.
If ESP ®
is deactivated or faulty:
only shift the transmission to posi-
tion Nif the vehicle is in dange rof
skidding, e.g. on icy roads.
If you switch off the engine using
the key or the Start/Stop button,
the automatic transmission shifts
to neutral Nautomatically.
! Rolling in neutral Ncan lead to
damage to the transmission. 7
Drive
The automatic transmission
changes gear automatically. All
forward gears are available.
Changing gears
The automatic transmission shifts to the indi-
vidual gears automatically when it is in trans-
mission position D.This automatic gearshift-
ing behaviouri s determined by:
R a shift range restriction, if selected
R the selected drive program (Y page 138)
R the position of the accelerator pedal
R the road speed Driving tips
Accelerator pedal position Your style of driving influences how the auto-
matic transmission shifts gear:
R little throttle: early upshifts
R more throttle: late upshifts AMG vehicles When shifting down, the double-clutch func-
tion is active regardless of the currently selec-
ted drive program. The double-clutch function
reduces load change reactions and is condu-
cive to a sporty driving style. The sound gen-
erated by the double-clutch function depends
on the drive program selected.
Kickdown
Use kickdown for maximum acceleration.
X
Depress the accelerator pedal beyond the
pressure point.
The transmission shifts to a lower gear
depending on the engine speed.
X Ease off the accelerator pedal once the
desired speed is reached.
The automatic transmission shifts back up. Program selector button
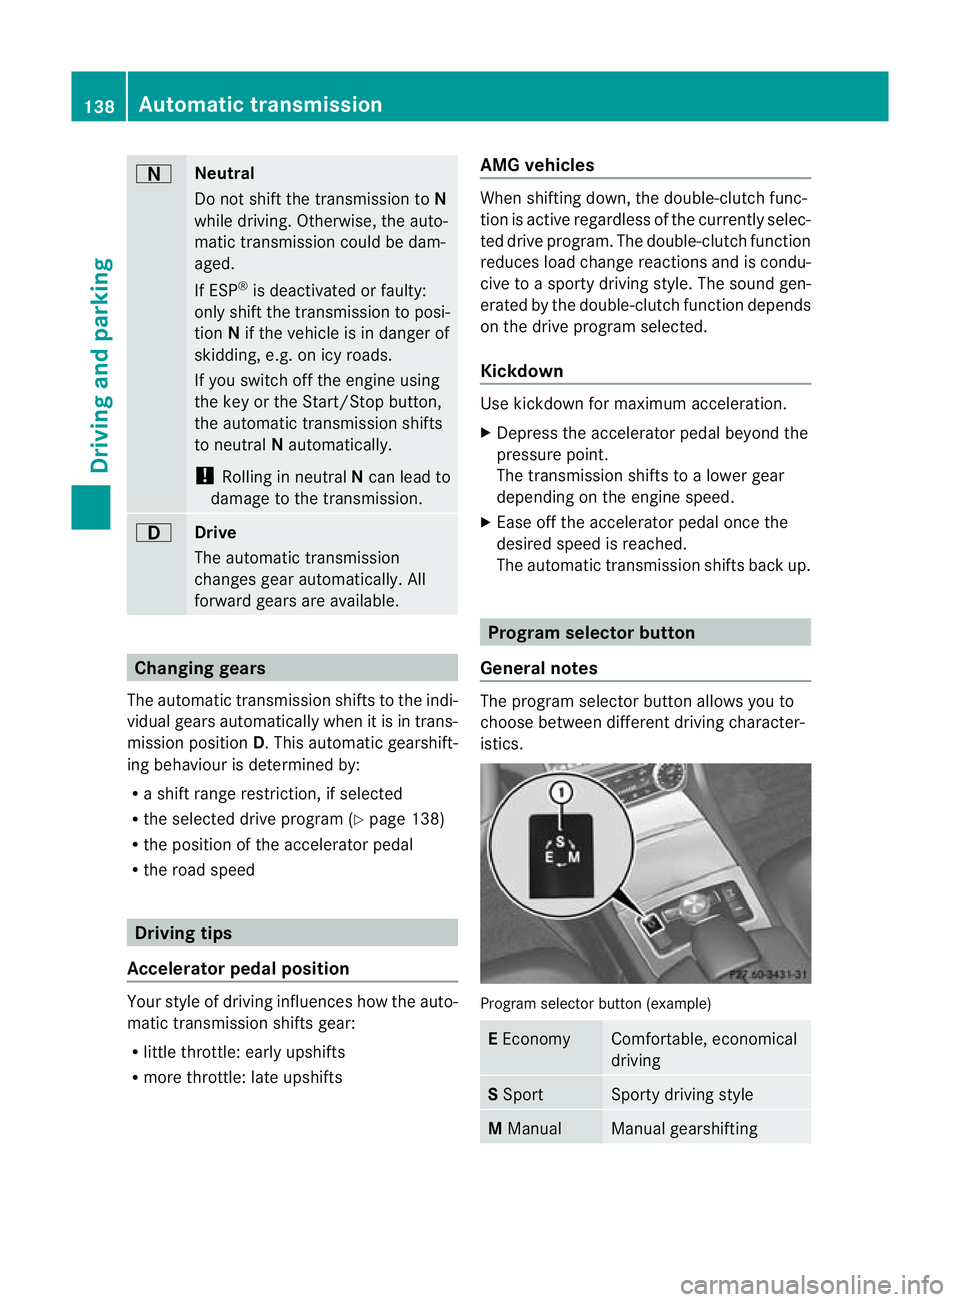
General notes The program selector button allows you to
choose between different driving character-
istics.
Program selector button (example)
E
Economy Comfortable, economical
driving
S
Sport Sporty driving style
M
Manual Manual gearshifting138
Automatic transmissionDriving and parking
Page 142 of 337
i
Further information on the "Automatic
drive program" (Y page 139).
X Press program selector button :repeat-
edly until the letter for the desired gearshift
program appears in the multifunction dis-
play.
i The automatic transmission switches to
automatic drive program Eeach time the
engine is started.
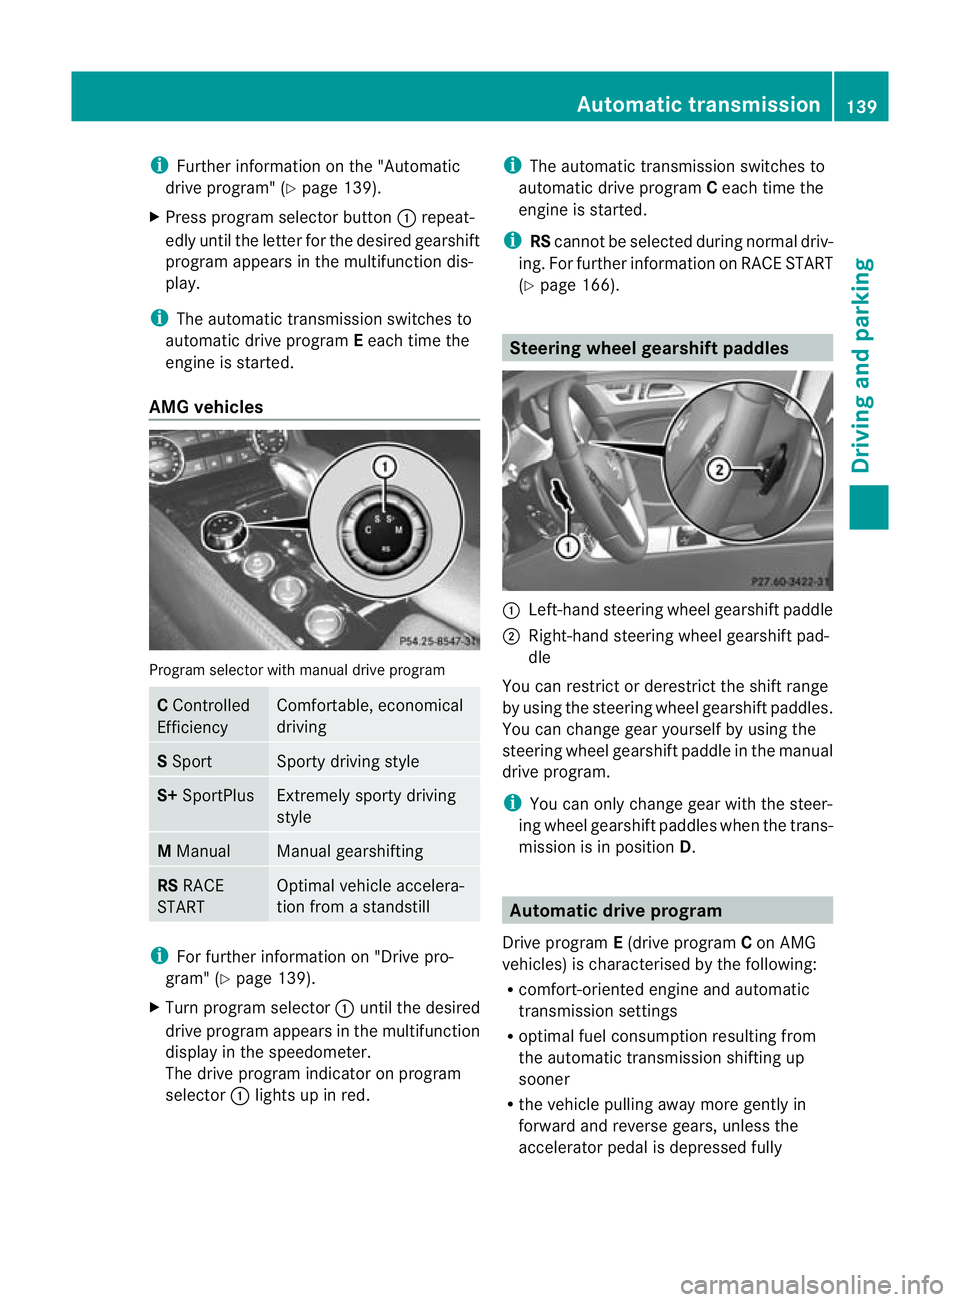
AMG vehicles Program selector with manual drive program
C
Controlled
Efficiency Comfortable, economical
driving
S
Sport Sporty driving style
S+
SportPlus Extremely sporty driving
style
M
Manual Manual gearshifting
RS
RACE
START Optimal vehicle accelera-
tion from a standstill
i
For further information on "Drive pro-
gram" (Y page 139).
X Turn program selector :until the desired
drive program appears in the multifunction
display in the speedometer.
The drive program indicator on program
selector :lights up in red. i
The automatic transmission switches to
automatic drive program Ceach time the
engine is started.
i RScannot be selected during normal driv-
ing. For further information on RACE START
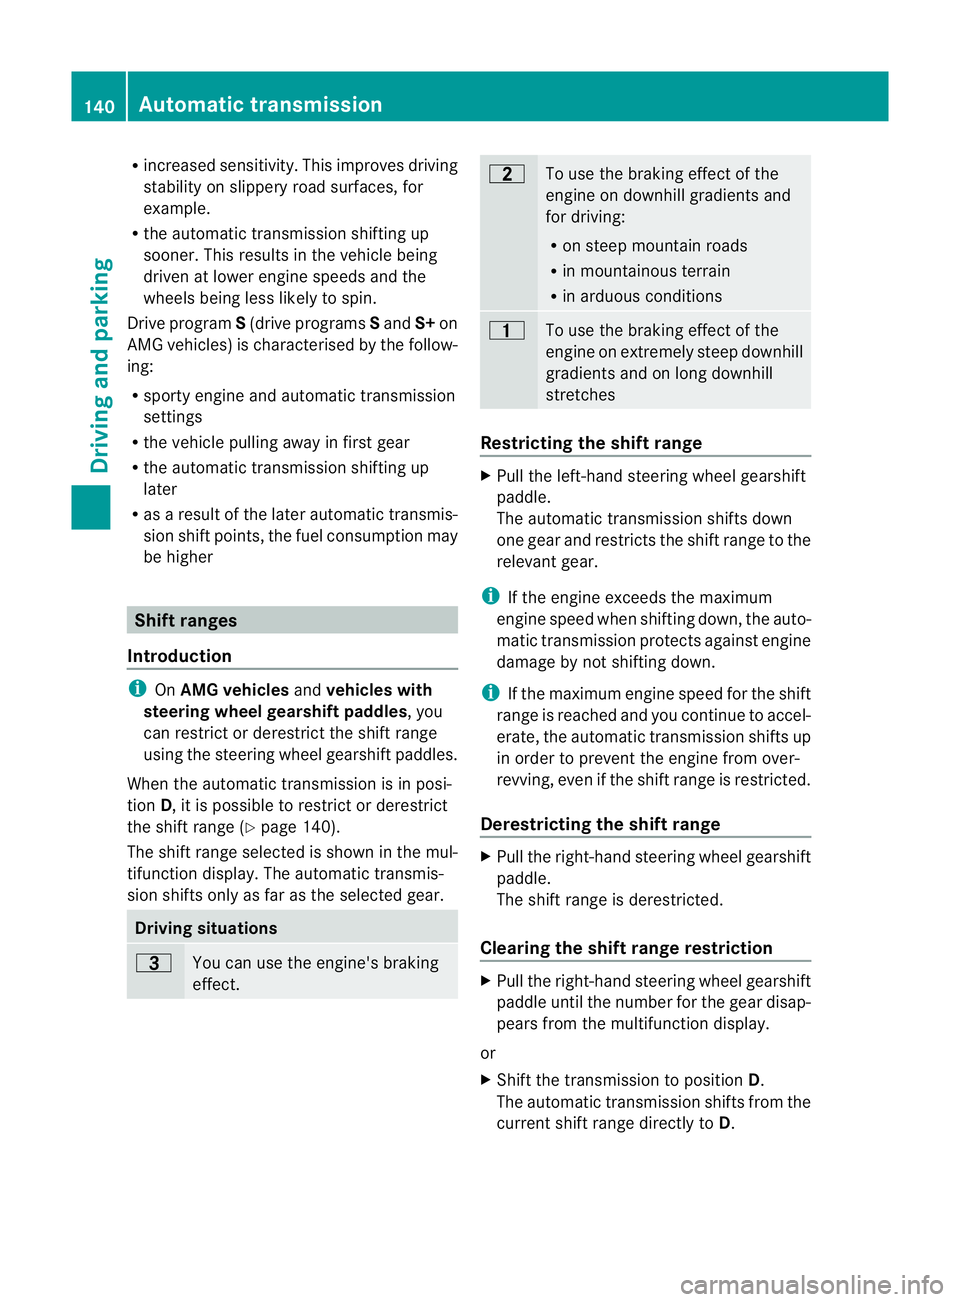
(Y page 166). Steering wheel gearshif
tpaddles :
Left-hand steering wheel gearshift paddle
; Right-hand steering wheel gearshift pad-
dle
You can restrict or derestrict the shift range
by using the steering wheel gearshift paddles.
You can change gea ryourself by using the
steering wheel gearshift paddle in the manual
drive program.
i You can only change gear with the steer-
ing wheel gearshift paddles when the trans-
mission is in position D. Automatic drive program
Drive program E(drive program Con AMG
vehicles) is characterised by the following:
R comfort-oriented engine and automatic
transmission settings
R optimal fuel consumption resulting from
the automatic transmission shifting up
sooner
R the vehicle pulling away more gently in
forward and reverse gears, unless the
accelerator pedal is depressed fully Automatic transmission
139Driving and parking Z
Page 143 of 337
R
increased sensitivity. This improves driving
stability on slippery road surfaces, for
example.
R the automatic transmission shifting up
sooner. This results in the vehicle being
drive natl ower engine speeds and the
wheels being less likely to spin.
Drive program S(drive programs Sand S+on
AMG vehicles) is characterised by the follow-
ing:
R sporty engine and automatic transmission
settings
R the vehicle pulling away in first gear
R the automatic transmission shifting up
later
R as a result of the later automatic transmis-
sion shift points, the fuel consumption may
be higher Shift ranges
Introduction i
OnAMG vehicles andvehicles with
steering wheel gearshift paddles, you
can restrict or derestrict the shift range
using the steering wheel gearshift paddles.
When the automatic transmission is in posi-
tion D, it is possible to restrict or derestrict
the shift range (Y page 140).
The shift range selected is shown in the mul-
tifunction display .The automatic transmis-
sion shifts only as far as the selected gear. Driving situations
=
You can use the engine's braking
effect. 5
To use the braking effect of the
engine on downhill gradients and
for driving:
R
on steep mountain roads
R in mountainous terrain
R in arduous conditions 4
To use the braking effect of the
engine on extremely steep downhill
gradients and on long downhill
stretches
Restricting the shift range
X
Pull the left-hand steering wheel gearshift
paddle.
The automatic transmission shifts down
one gear and restricts the shift range to the
relevant gear.
i If the engine exceeds the maximum
engine speed when shifting down, the auto-
matic transmission protects against engine
damage by not shifting down.
i If the maximum engine speed for the shift
range is reached and you continue to accel-
erate, the automatic transmission shifts up
in order to prevent the engine from over-
revving, even if the shift range is restricted.
Derestricting the shift range X
Pull the right-hand steering wheel gearshift
paddle.
The shift range is derestricted.
Clearing the shift range restriction X
Pull the right-hand steering wheel gearshift
paddle until the number for the gear disap-
pears from the multifunction display.
or
X Shift the transmission to position D.
The automatic transmission shifts from the
current shift range directly to D.140
Automatic transmissionDriving and parking
Page 144 of 337
Selecting the ideal shift range
X
Pull the left-hand steering wheel gearshift
paddle and hold it in position.
The automatic transmission shifts to the
gear which allows optimum acceleration
and deceleration. To do this, the automatic
transmission shifts down one or more
gears. Manual drive program
Switching on the manual drive program AMG vehicles and vehicles with
aDIRECT
SELECT lever: you can select manual drive
program Musing the program selector or the
program selector button. In manual drive pro-
gram M, you can change gear yourself using
the steering wheel gearshif tpaddles if the
transmission is in position D.
X Press the program selecto rbutton
(Y page 138) repeatedly until Mappears in
the multifunction display.
X AMG vehicles: turn the program selector
(Y page 139) until Mappears in the multi-
function display.
The indicator Mon the program selector
lights up in red.
Upshifting X
Pull the right-hand steering wheel gearshift
paddle (Y page 139).
The automatic transmission shifts up to the
next gear.
Vehicles with AMG engines
! In manual gearshif tprogram M, the auto-
matic transmission does not shift up auto-
matically even when the engine limiting
speed for the current geari s reached.
When the engine limiting speed is reached,
the fuel supply is cut to prevent the engine
from overrevving. You must make sure that
the engine speed does not reach the red area of the rev counter. Otherwise, there is
a risk of engine damage.
X Shift up a gear if the colour in the multi-
function display in the speedometer
changes to red and UP appears in the rev
counter.
Downshifting X
Pull the left-hand steering wheel gearshift
paddle (Y page 139).
The automatic transmission shifts down to
the next gear.
i If you slow down or stop without shifting
down, the automatic transmission auto-
matically shifts down.
i For maximum acceleration, pull the left-
hand steering wheel gearshift paddle until
the transmission selects the optimum gear
for the current speed.
Kickdown i
Vehicles with an AMG engine: it is not
possible to use kickdown in manual drive
program M.
You can also use kickdown for maximum
acceleration in manual drive program M.
X Depress the accelerator pedal beyond the
pressure point.
The transmission shifts to a lower gear
depending on the engine speed.
X Shift back up once the desired speed is
reached.
Switching off the manual drive program X
Standard vehicles with the DIRECT
SELECT lever: press the program selector
button (Y page 138) until Eor Sis shown
in the multifunction display.
X AMG vehicles: turn the program selector
(Y page 139) until C,Sor S+ appears in the
multifunction display. Automatic transmission
141Driving and parking Z
Page 145 of 337
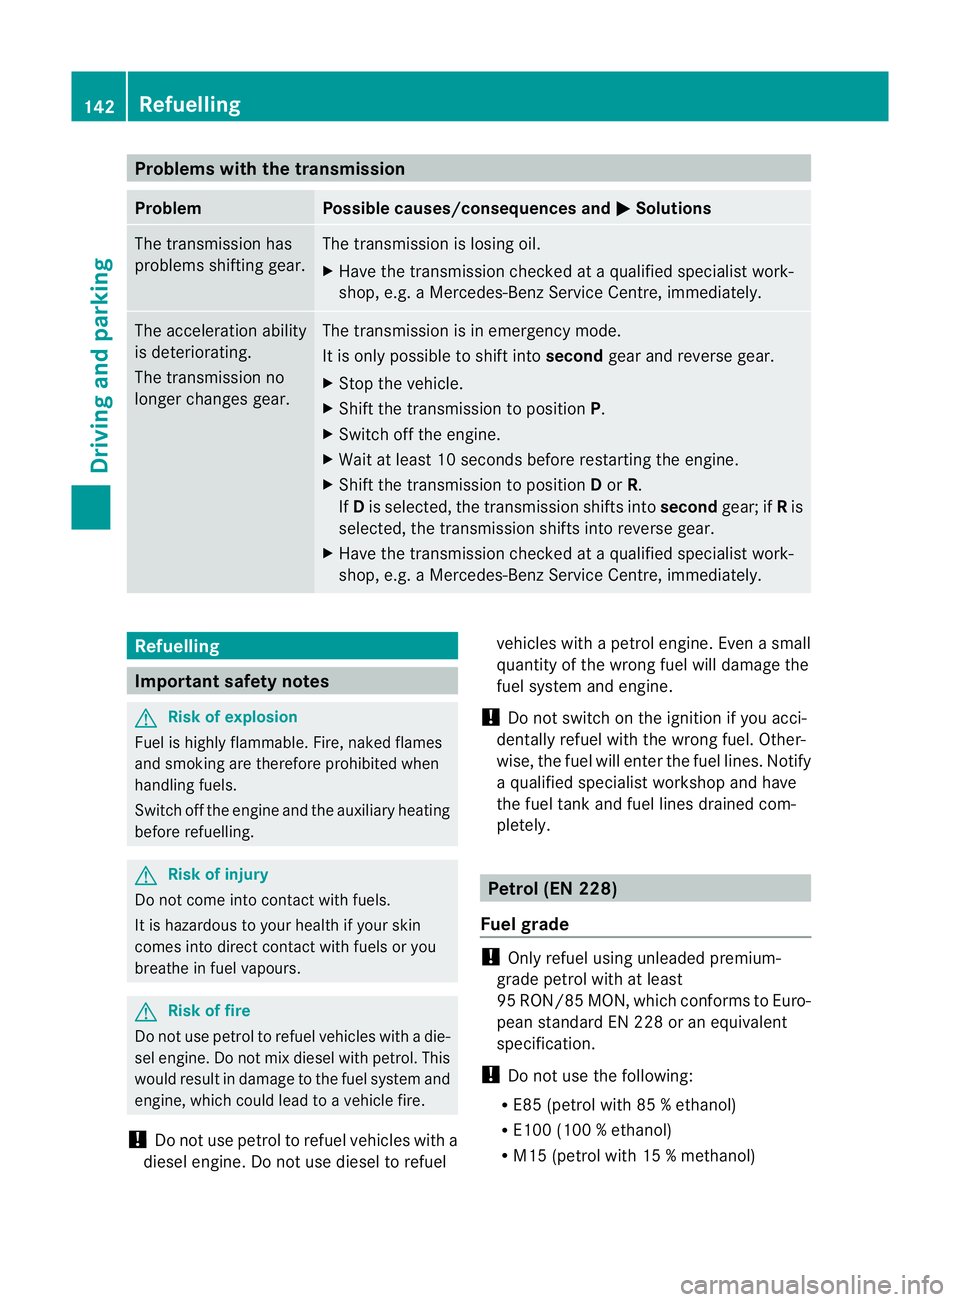
Problems with the transmission
Problem Possible causes/consequences and
M Solutions
The transmission has
problems shifting gear. The transmission is losing oil.
X
Have the transmission checked at a qualified specialist work-
shop, e.g. a Mercedes-Benz Service Centre, immediately. The acceleration ability
is deteriorating.
The transmission no
longer changes gear. The transmission is in emergency mode.
It is only possible to shift into
secondgear and reverse gear.
X Stop the vehicle.
X Shift the transmission to position P.
X Switch off the engine.
X Wait at least 10 seconds before restarting the engine.
X Shift the transmission to position Dor R.
If D is selected, the transmission shifts into secondgear; ifRis
selected, the transmission shifts into reverse gear.
X Have the transmission checked at a qualified specialist work-
shop, e.g. a Mercedes-Benz Service Centre, immediately. Refuelling
Important safety notes
G
Risk of explosion
Fuel is highly flammable. Fire, naked flames
and smoking are therefore prohibited when
handling fuels.
Switch off the engine and the auxiliary heating
before refuelling. G
Risk of injury
Do not come into contact with fuels.
It is hazardous to your health if your skin
comes into direct contact with fuels or you
breathe in fuel vapours. G
Risk of fire
Do not use petrol to refuel vehicles with a die-
sel engine. Do not mix diesel with petrol. This
would result in damage to the fuel system and
engine, which could lead to a vehicle fire.
! Do not use petrol to refuel vehicles with a
diesel engine. Do not use diesel to refuel vehicles with a petrol engine. Even a small
quantity of the wrong fuel will damage the
fuel system and engine.
! Do not switch on the ignition if you acci-
dentally refuel with the wrong fuel. Other-
wise, the fuel will enter the fuel lines. Notify
a qualified specialist workshop and have
the fuel tank and fuel lines drained com-
pletely. Petrol (EN 228)
Fuel grade !
Only refuel using unleaded premium-
grade petrol with at least
95 RON/85 MON, which conforms to Euro-
pean standard EN 228 or an equivalent
specification.
! Do not use the following:
R E85 (petrol with 85 % ethanol)
R E100 (100 % ethanol)
R M15 (petrol with 15 % methanol) 142
RefuellingDriving and parking
Page 146 of 337
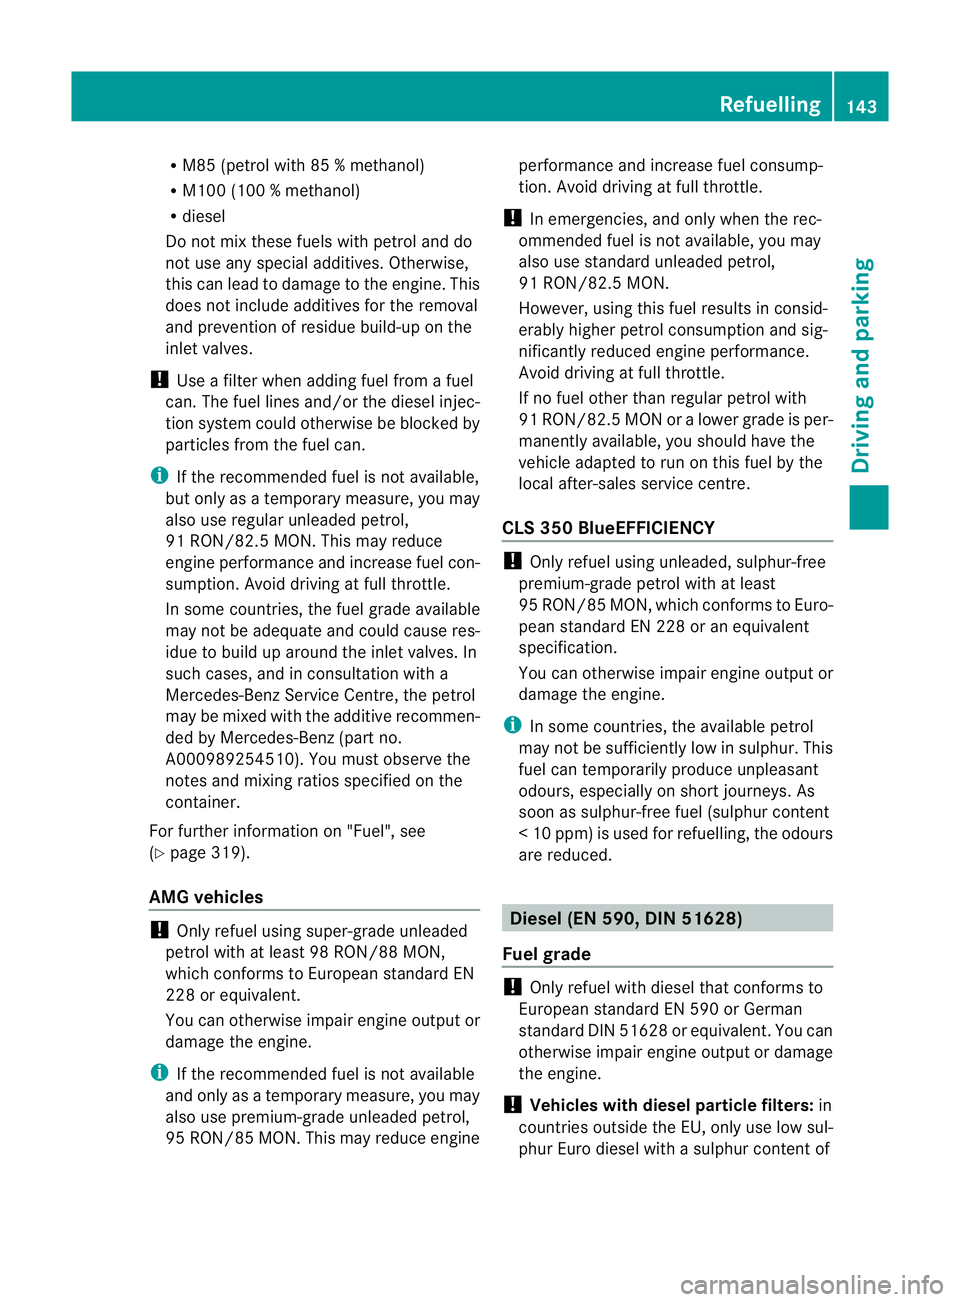
R
M85 (petrol with 85 % methanol)
R M100 (100 % methanol)
R diesel
Do not mix these fuels with petrol and do
not use any special additives. Otherwise,
this can lead to damage to the engine. This
does not include additives for the removal
and prevention of residue build-up on the
inlet valves.
! Use a filter when adding fuel from a fuel
can. The fuel lines and/or the diesel injec-
tion system could otherwise be blocked by
particles from the fuel can.
i If the recommended fuel is not available,
but only as a temporary measure, you may
also use regular unleaded petrol,
91 RON/82.5 MON. This may reduce
engine performance and increase fuel con-
sumption. Avoid driving at full throttle.
In some countries, the fuel grade available
may not be adequate and could cause res-
idue to build up around the inlet valves. In
such cases, and in consultation with a
Mercedes-Benz Service Centre, the petrol
may be mixed with the additive recommen-
ded by Mercedes-Ben z(part no.
A000989254510). You must observe the
notes and mixing ratios specified on the
container.
For further information on "Fuel", see
(Y page 319).
AMG vehicles !
Only refuel using super-grade unleaded
petrol with at least 98 RON/88 MON,
which conforms to European standard EN
228 or equivalent.
You can otherwise impair engine output or
damage the engine.
i If the recommended fuel is not available
and only as a temporary measure, you may
also use premium-grade unleaded petrol,
95 RON/85 MON. This may reduce engine performance and increase fuel consump-
tion. Avoid driving at full throttle.
! In emergencies, and only when the rec-
ommended fuel is not available, you may
also use standard unleaded petrol,
91 RON/82.5 MON.
However, using this fuel results in consid-
erably higher petrol consumption and sig-
nificantly reduced engine performance.
Avoid driving at full throttle.
If no fuel other than regular petrol with
91 RON/82.5 MON or a lower grade is per-
manently available, you should have the
vehicle adapted to run on this fuel by the
local after-sales service centre.
CLS 350 BlueEFFICIENCY !
Only refuel using unleaded, sulphur-free
premium-grade petrol with at least
95 RON/85 MON, which conform stoEuro-
pean standard EN 228 or an equivalent
specification.
You can otherwise impai rengine outpu tor
damage the engine.
i In some countries, the available petrol
may not be sufficiently low in sulphur. This
fuel can temporarily produce unpleasant
odours, especially on short journeys. As
soon as sulphur-free fuel (sulphur content
<10p pm) is used for refuelling, the odours
are reduced. Diesel (EN 590, DIN 51628)
Fuel grade !
Only refuel with diesel that conforms to
European standard EN 590 or German
standard DIN 51628 or equivalent. You can
otherwise impair engine output or damage
the engine.
! Vehicles with diesel particle filters: in
countries outside the EU, only use low sul-
phur Euro diesel with a sulphur conten tof Refuelling
143Driving and parking Z
Page 147 of 337
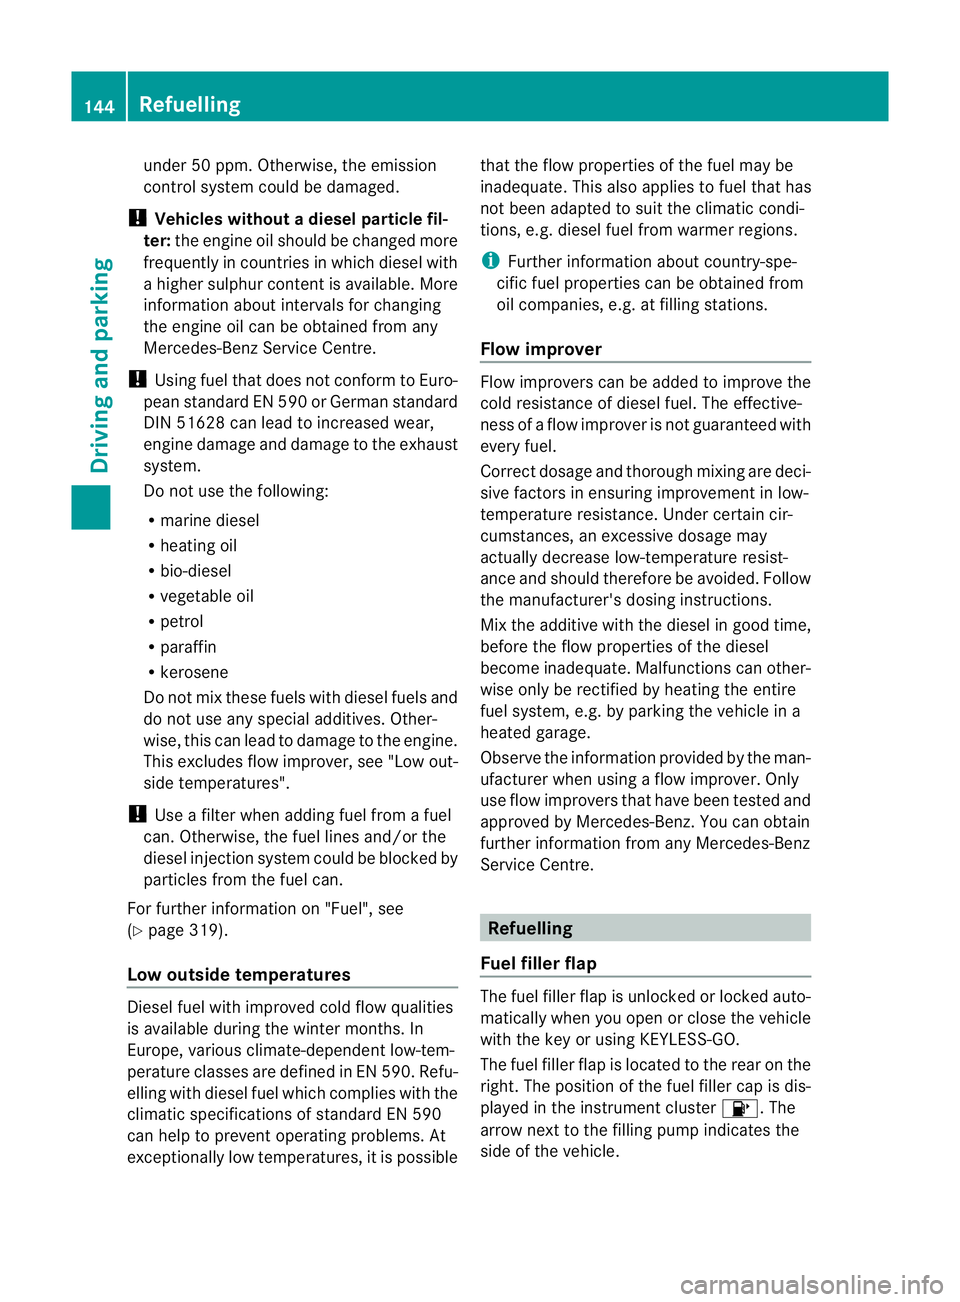
under 50 ppm
.Otherwise, the emission
control syste mcould be damaged.
! Vehicles without adiesel particle fil-
ter: the engine oil should be changed more
frequently in countries in which diesel with
a higher sulphur conten tis available. More
information about intervals for changing
the engine oil can be obtained from any
Mercedes-Benz Service Centre.
! Using fuel that does not conform to Euro-
pean standard EN 590 or German standard
DIN 51628 can lead to increased wear,
engine damage and damage to the exhaust
system.
Do not use the following:
R marine diesel
R heating oil
R bio-diesel
R vegetable oil
R petrol
R paraffin
R kerosene
Do not mix these fuels with diesel fuels and
do not use any special additives. Other-
wise, this can lead to damage to the engine.
This excludes flow improver, see "Low out-
side temperatures".
! Use a filter when adding fuel from a fuel
can. Otherwise, the fuel lines and/or the
diesel injection system could be blocked by
particles from the fuel can.
For further information on "Fuel", see
(Y page 319).
Low outside temperatures Diesel fuel with improved cold flow qualities
is available during the winter months. In
Europe, various climate-dependent low-tem-
perature classes are defined in EN 590. Refu-
elling with diesel fuel which complies with the
climatic specifications of standard EN 590
can help to prevent operating problems. At
exceptionally low temperatures, it is possible that the flow properties of the fuel may be
inadequate. This also applies to fuel that has
not been adapted to suit the climatic condi-
tions, e.g. diesel fuel from warmer regions.
i
Further information about country-spe-
cific fuel properties can be obtained from
oil companies, e.g. at filling stations.
Flow improver Flow improvers can be added to improve the
cold resistance of diesel fuel. The effective-
ness of a flow improver is not guaranteed with
every fuel.
Correct dosage and thorough mixing are deci-
sive factors in ensuring improvement in low-
temperature resistance. Under certain cir-
cumstances, an excessive dosage may
actually decrease low-temperature resist-
ance and should therefore be avoided.F ollow
the manufacturer's dosing instructions.
Mix the additive with the diesel in good time,
before the flow properties of the diesel
become inadequate. Malfunctions can other-
wise only be rectified by heating the entire
fuel system, e.g. by parking the vehicle in a
heated garage.
Observe the information provided by the man-
ufacturer when using a flow improver. Only
use flow improvers that have been tested and
approved by Mercedes-Benz. You can obtain
further information from any Mercedes-Benz
Service Centre. Refuelling
Fuel filler flap The fuel filler flap is unlocked or locked auto-
matically when you open or close the vehicle
with the key or using KEYLESS-GO.
The fuel filler flap is located to the rear on the
right. The position of the fuel filler cap is dis-
played in the instrument cluster
8.The
arrow next to the filling pump indicates the
side of the vehicle. 144
RefuellingDriving and parking
Page 148 of 337
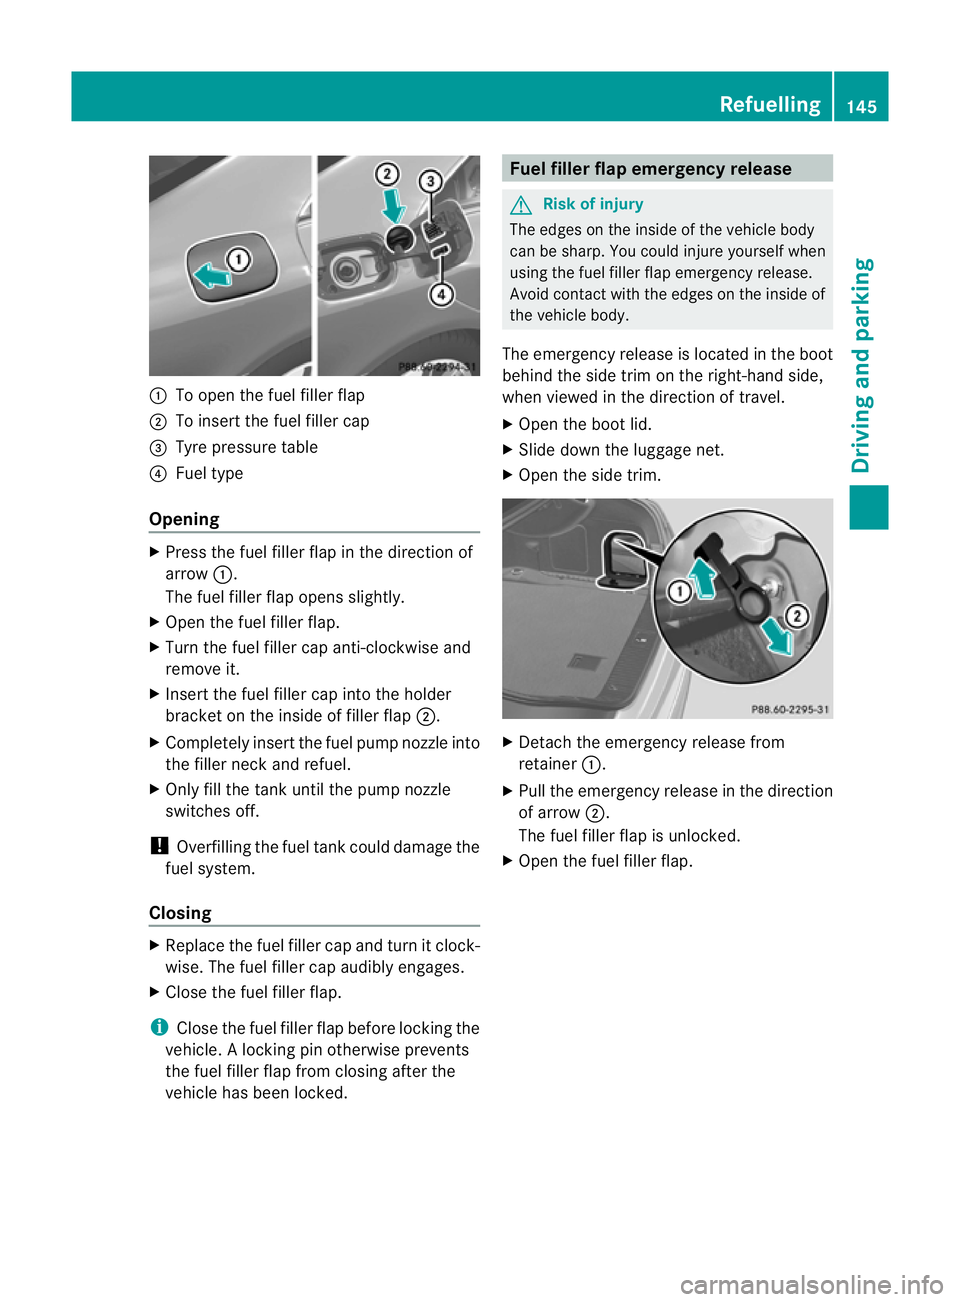
:
To open the fuel filler flap
; To insert the fuel filler cap
= Tyre pressure table
? Fuel type
Opening X
Press the fuel filler flap in the direction of
arrow :.
The fuel filler flap opens slightly.
X Open the fuel filler flap.
X Turn the fuel filler cap anti-clockwise and
remove it.
X Insert the fuel filler cap into the holder
bracket on the inside of filler flap ;.
X Completely insert the fuel pump nozzle into
the filler neck and refuel.
X Only fill the tank until the pump nozzle
switches off.
! Overfilling the fuel tank could damage the
fuel system.
Closing X
Replace the fuel filler cap and turn it clock-
wise. The fuel filler cap audibly engages.
X Close the fuel filler flap.
i Close the fuel filler flap before locking the
vehicle. Alocking pin otherwise prevents
the fuel filler flap from closing after the
vehicle has been locked. Fuel filler flap emergency release
G
Risk of injury
The edges on the inside of the vehicle body
can be sharp. You could injure yourself when
using the fuel filler flap emergency release.
Avoid contact with the edges on the inside of
the vehicle body.
The emergency release is located in the boot
behind the side trim on the right-hand side,
when viewed in the direction of travel.
X Open the boot lid.
X Slide down the luggage net.
X Open the side trim. X
Detach the emergency release from
retainer :.
X Pull the emergency release in the direction
of arrow ;.
The fuel filler flap is unlocked.
X Open the fuel filler flap. Refuelling
145Driving and parking Z
Page 149 of 337
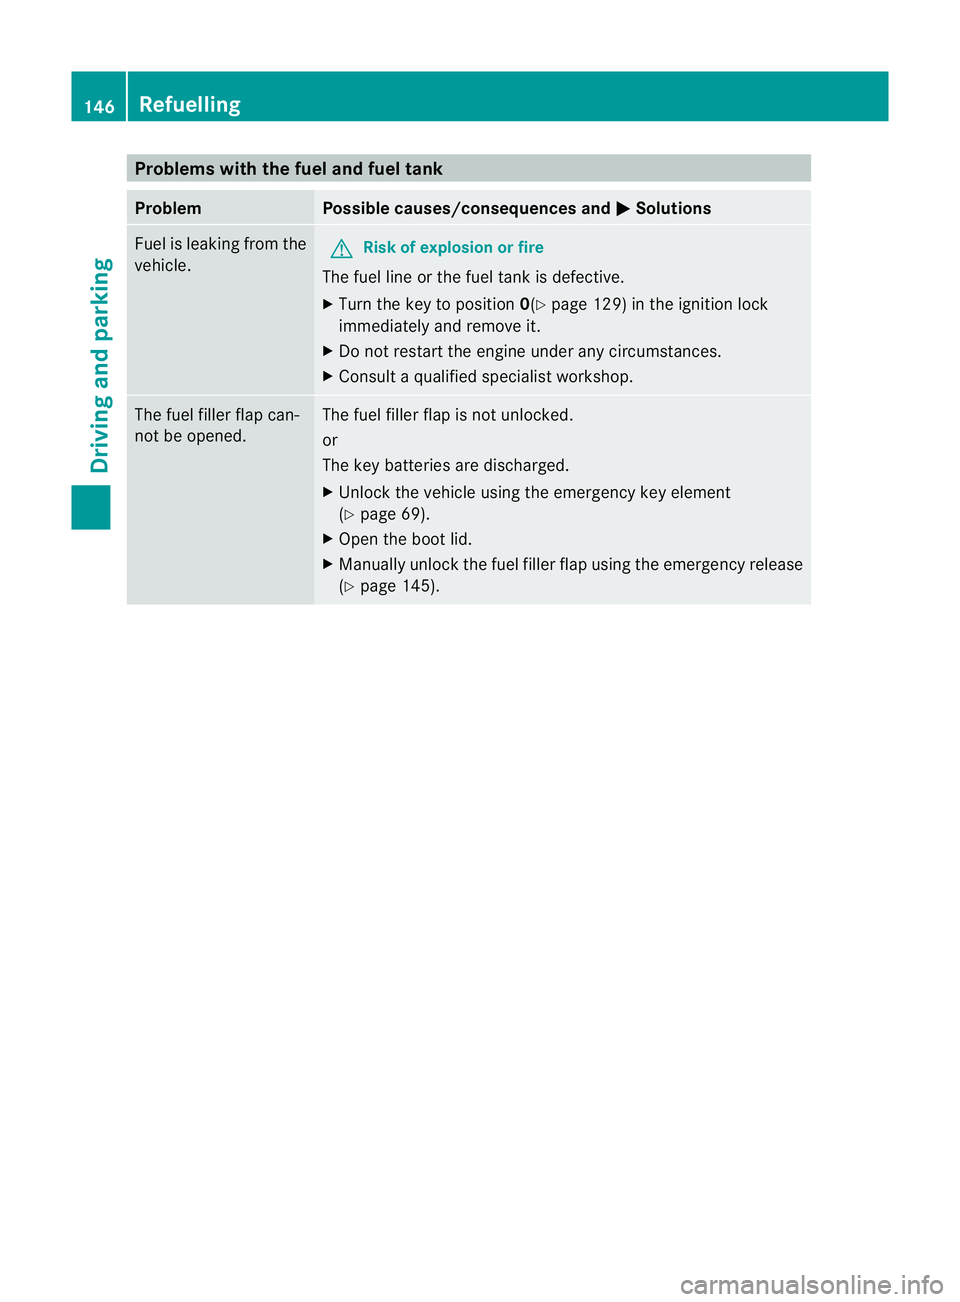
Problems with the fuel and fuel tank
Problem Possible causes/consequences and
M Solutions
Fuel is leaking from the
vehicle.
G
Risk of explosion or fire
The fuel line or the fuel tank is defective.
X Turn the key to position 0(Ypage 129) in the ignition lock
immediately and remove it.
X Do not restart the engine under any circumstances.
X Consult a qualified specialist workshop. The fuel filler flap can-
not be opened. The fuel filler flap is not unlocked.
or
The key batteries are discharged.
X
Unlock the vehicle using the emergency key element
(Y page 69).
X Open the boot lid.
X Manually unlock the fuel filler flap using the emergency release
(Y page 145). 146
RefuellingDriving and parking
Page 150 of 337
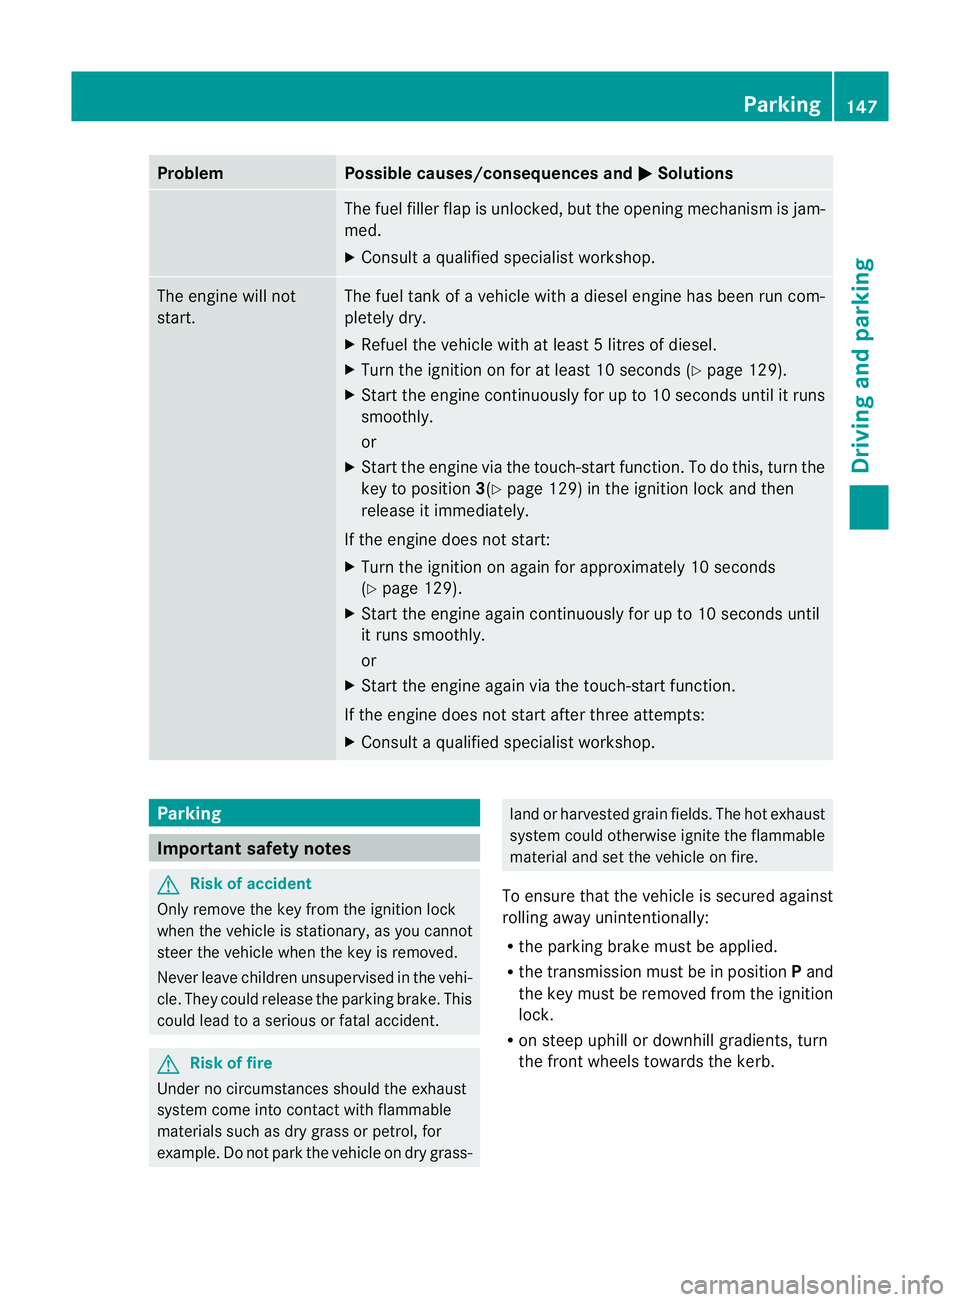
Problem Possible causes/consequences and
M Solutions
The fuel filler flap is unlocked, but the opening mechanism is jam-
med.
X
Consult a qualified specialist workshop. The engine will not
start. The fuel tank of a vehicle with a diesel engine has been run com-
pletely dry.
X Refuel the vehicle with at least 5litres of diesel.
X Turn the ignition on for at least 10 seconds (Y page 129).
X Start the engine continuously for up to 10 seconds until it runs
smoothly.
or
X Start the engine via the touch-star tfunction .To do this, turn the
key to position 3(Ypage 129) in the ignition lock and then
release it immediately.
If the engine does not start:
X Turn the ignition on again for approximately 10 seconds
(Y page 129).
X Start the engine again continuously for up to 10 seconds until
it runs smoothly.
or
X Start the engine again via the touch-start function.
If the engine does not start after three attempts:
X Consult a qualified specialist workshop. Parking
Important safety notes
G
Risk of accident
Only remove the key from the ignition lock
when the vehicle is stationary, as you cannot
steer the vehicle when the key is removed.
Never leave children unsupervised in the vehi-
cle. They could release the parking brake. This
could lead to a serious or fatal accident. G
Risk of fire
Under no circumstances should the exhaust
system come into contact with flammable
materials such as dry grass or petrol, for
example. Do not park the vehicle on dry grass- land or harvested grain fields. The hot exhaust
system could otherwise ignite the flammable
material and set the vehicle on fire.
To ensure that the vehicle is secured against
rolling away unintentionally:
R the parking brake must be applied.
R the transmission must be in position Pand
the key must be removed from the ignition
lock.
R on steep uphill or downhill gradients, turn
the front wheels towards the kerb. Parking
147Driving and parking Z