MERCEDES-BENZ CLS COUPE 2012 Owners Manual
Manufacturer: MERCEDES-BENZ, Model Year: 2012, Model line: CLS COUPE, Model: MERCEDES-BENZ CLS COUPE 2012Pages: 373, PDF Size: 9.12 MB
Page 351 of 373
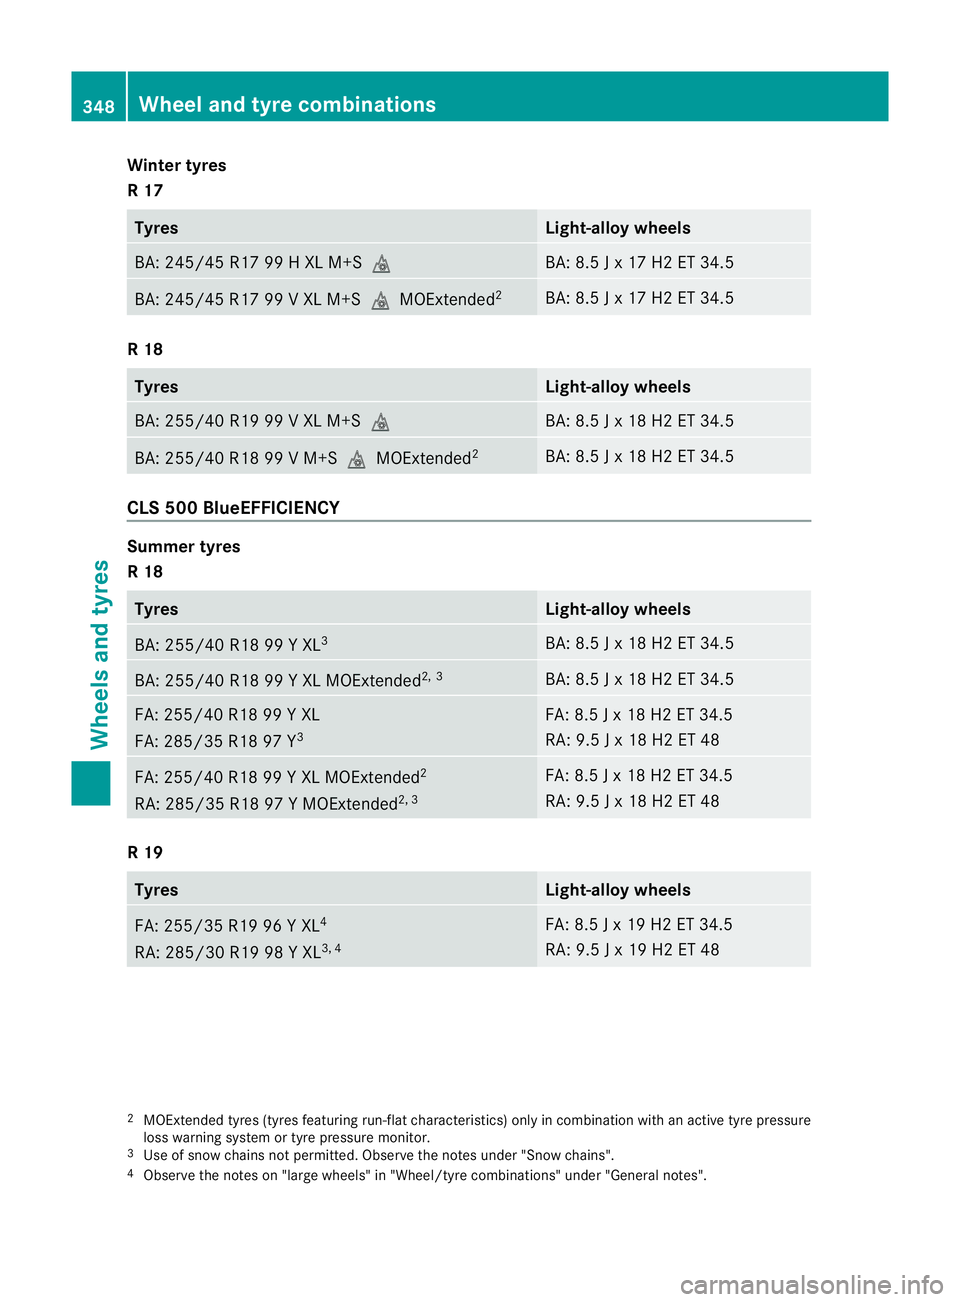
Winter tyres
R17
Tyres Light-alloy wheels
BA: 245/45 R17 99
HXLM+Si BA: 8.5
Jx17H2ET3 4.5 BA: 245/45 R17 99
VXLM +SiMOExtended 2 BA: 8.5
Jx17H2ET3 4.5 R18
Tyres Light-alloy wheels
BA: 255/40 R19 99
VXLM+Si BA: 8.5
Jx18H2ET3 4.5 BA: 255/40 R18 99
VM+SiMOExtended 2 BA: 8.5
Jx18H2ET3 4.5 CLS5
00 BlueEFFICIENCY Summer tyres
R18
Tyres Light-alloy wheels
BA: 255/40 R18 99
YXL3 BA: 8.5
Jx18H2ET3 4.5 BA: 255/40 R18 99
YXLMOExtended 2, 3 BA: 8.5
Jx18H2ET3 4.5 FA: 255/40 R18 99
YXL
FA: 285/35 R18 97 Y 3 FA: 8.5
Jx18H2ET3 4.5
RA: 9.5 Jx18H2ET48 FA: 255/40 R18 99
YXLMOExtended 2
RA: 285/35 R18 97 YMOExtended 2, 3 FA: 8.5
Jx18H2ET3 4.5
RA: 9.5 Jx18H2ET48 R19
Tyres Light-alloy wheels
FA: 255/35 R19 96
YXL4
RA: 285/30 R19 98 YXL3, 4 FA: 8.5
Jx19H2ET3 4.5
RA: 9.5 Jx19H2ET48 2
MOExtended tyres (tyres featuring run-fla tcharacteristics) only in combination with an active tyre pressure
loss warning system or tyre pressure monitor.
3 Use of snow chains not permitted. Observe the notes under "Snow chains".
4 Observe the notes on "large wheels" in "Wheel/tyre combinations" under "General notes". 348
Wheel and tyrec
ombinationsWheels and tyres
Page 352 of 373
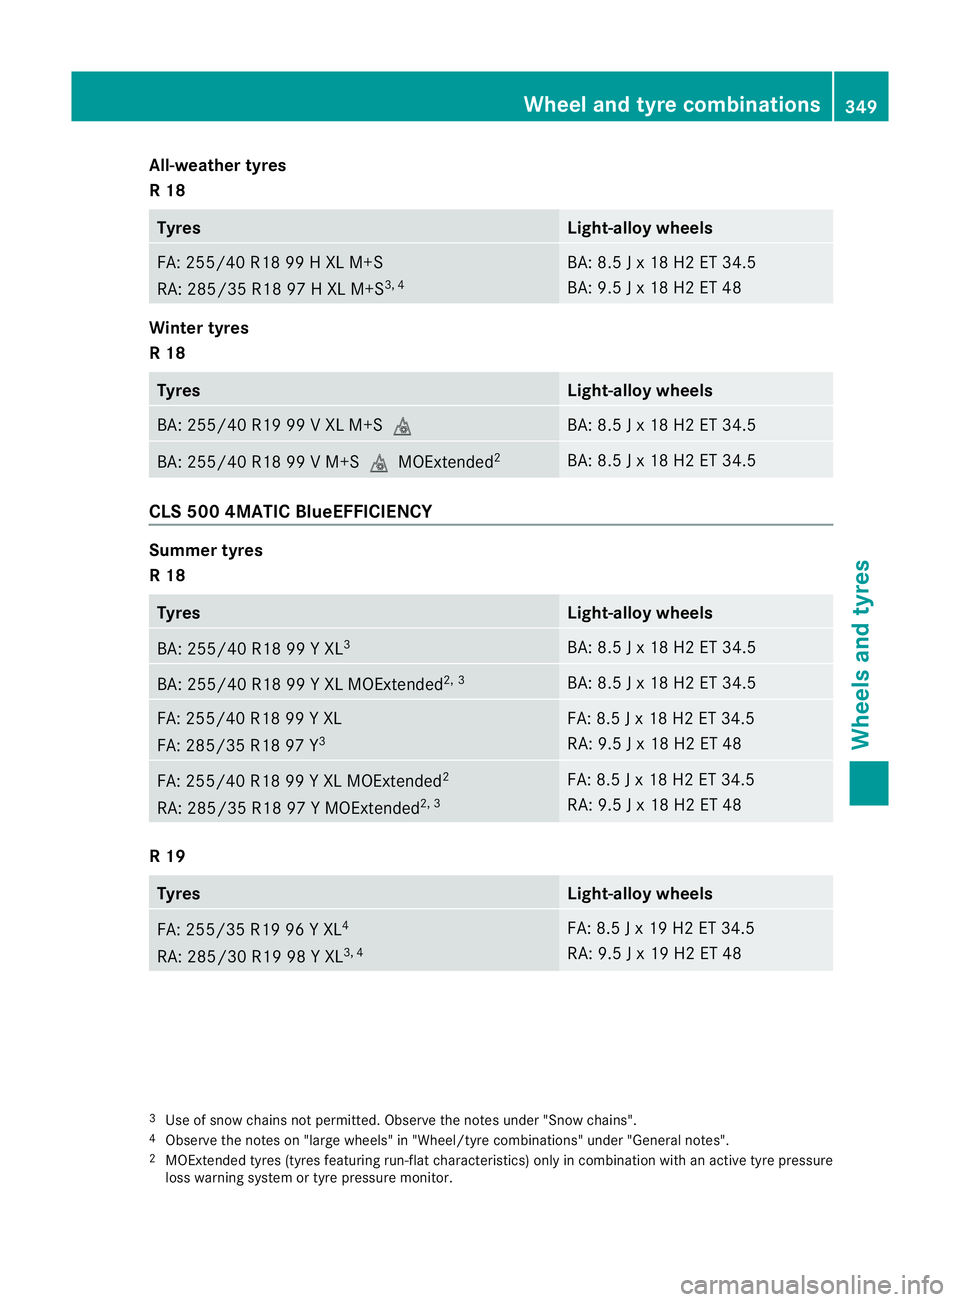
All-weather tyres
R18
Tyres Light-allo
ywheels FA: 255/40 R18 99
HXLM+S
RA: 285/35 R18 97 HXLM+S3, 4 BA: 8.5
Jx18H2ET3 4.5
BA: 9.5 Jx18H2ET48 Winter tyres
R18
Tyres Light-alloy wheels
BA: 255/40 R19 99
VXLM+Si BA: 8.5
Jx18H2ET3 4.5 BA: 255/40 R18 99
VM+SiMOExtended 2 BA: 8.5
Jx18H2ET3 4.5 CLS5
00 4MATI CBlueEFFICIENCY Summer tyres
R18
Tyres Light-alloy wheels
BA: 255/40 R18 99
YXL3 BA: 8.5
Jx18H2ET3 4.5 BA: 255/40 R18 99
YXLMOExtended 2, 3 BA: 8.5
Jx18H2ET3 4.5 FA: 255/40 R18 99
YXL
FA: 285/35 R18 97 Y 3 FA: 8.5
Jx18H2ET3 4.5
RA: 9.5 Jx18H2ET48 FA: 255/40 R18 99
YXLMOExtended 2
RA: 285/35 R18 97 YMOExtended 2, 3 FA: 8.5
Jx18H2ET3 4.5
RA: 9.5 Jx18H2ET48 R19
Tyres Light-alloy wheels
FA: 255/35 R19 96
YXL4
RA: 285/30 R19 98 YXL3, 4 FA: 8.5
Jx19H2ET3 4.5
RA: 9.5 Jx19H2ET48 3
Use of snow chains not permitted. Observ ethe notes under "Snow chains".
4 Observ ethe notes on "large wheels" in "Wheel/tyr ecombinations" under "General notes".
2 MOExtended tyres (tyre sfeaturing run-fla tcharacteristics) only in combination with an active tyre pressure
loss warning system or tyre pressure monitor. Wheel and tyrec
ombinations
349Wheels and tyres Z
Page 353 of 373
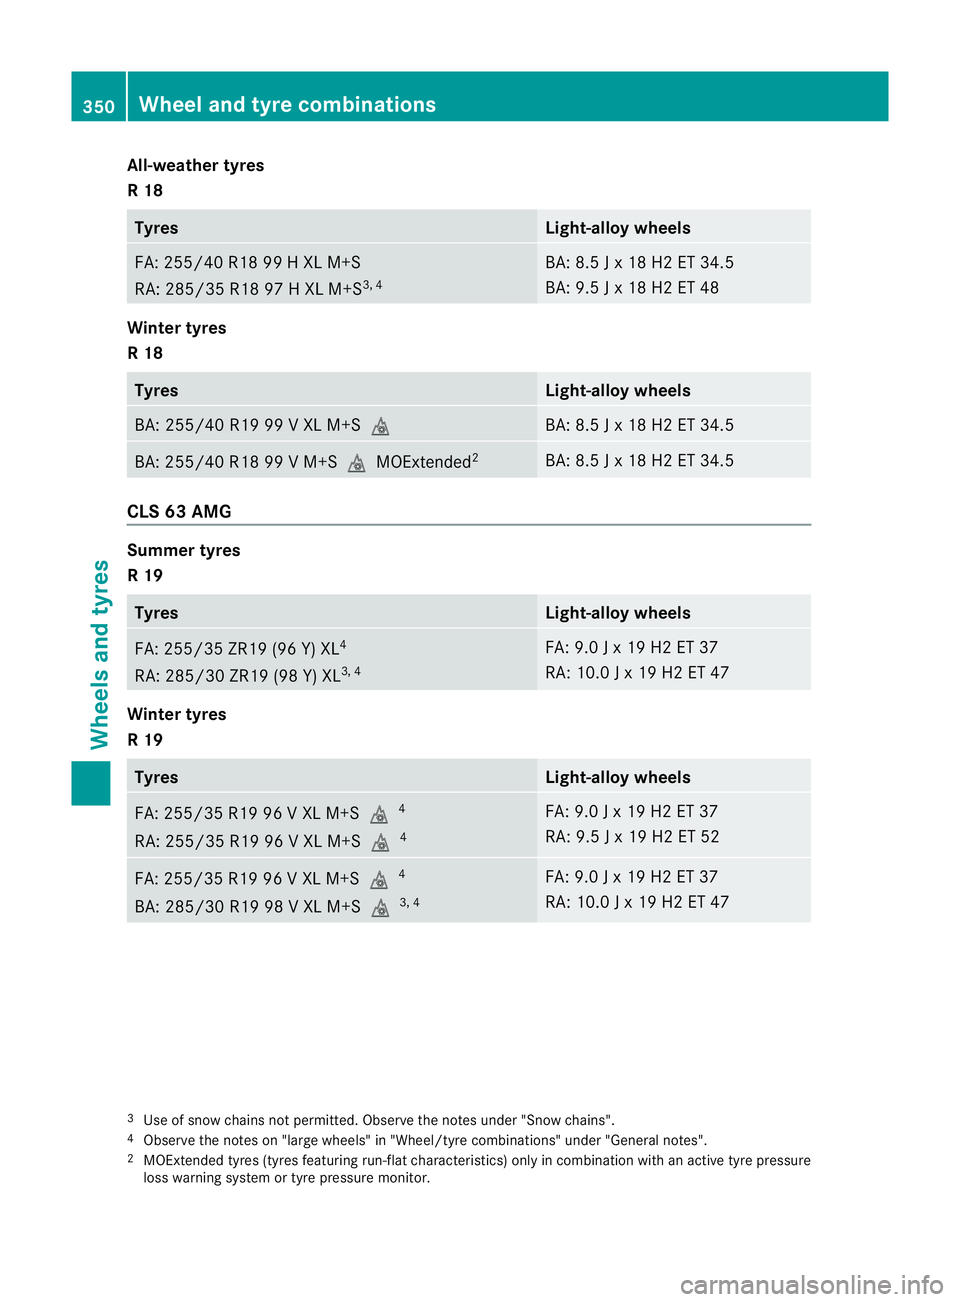
All-weather tyres
R18
Tyres Light-allo
ywheels FA: 255/40 R18 99
HXLM+S
RA: 285/35 R18 97 HXLM+S3, 4 BA: 8.5
Jx18H2ET3 4.5
BA: 9.5 Jx18H2ET48 Winter tyres
R18
Tyres Light-alloy wheels
BA: 255/40 R19 99
VXLM+Si BA: 8.5
Jx18H2ET3 4.5 BA: 255/40 R18 99
VM+SiMOExtended 2 BA: 8.5
Jx18H2ET3 4.5 CLS63A
MG Summer tyres
R19
Tyres Light-alloy wheels
FA: 255/35 ZR19 (96 Y) XL
4
RA: 285/30 ZR19 (98 Y) XL 3, 4 FA: 9.0
Jx19H2ET37
RA: 10.0 Jx19H2ET47 Winter tyres
R19
Tyres Light-alloy wheels
FA: 255/35 R19 96
VXLM+Si 4
RA: 255/35 R19 96 VXLM+Si 4 FA: 9.0
Jx19H2ET37
RA: 9.5 Jx19H2ET52 FA: 255/35 R19 96
VXLM+Si 4
BA: 285/30 R19 98 VXLM+Si 3, 4 FA: 9.0
Jx19H2ET37
RA: 10.0 Jx19H2ET47 3
Use of snow chains not permitted. Observ ethe notes under "Snow chains".
4 Observ ethe notes on "large wheels" in "Wheel/tyr ecombinations" under "General notes".
2 MOExtended tyres (tyre sfeaturing run-fla tcharacteristics) only in combination with an active tyre pressure
loss warning system or tyre pressure monitor. 350
Wheel and tyrec
ombinationsWheels and tyres
Page 354 of 373
Emergency spare wheel
Important safety notes
G
WARNING
The wheel/tyr edimension sand th etyret ype
of th espar ew heel/emergency spar ewheel
and th ewheel to be replaced may differ. Fit-
tin gas parew heel/emergency spar ewheel
may severel yimpair th edriving characteris-
tics. Ther eisarisk of accident.
To prevent hazardous situations:
R Adap tyour driving style accordingly and
drive carefully.
R Never fit more than one spare wheel/emer-
gency spare wheel if the dimesions are dif-
ferent to those of the wheel being replaced.
R Only use aspare wheel/emergency spare
wheel briefly if the dimesions are different
to those of the wheel being replaced.
R Do not switch off ESP ®
.
R Have the spare wheel/emergency spare
wheel in question replaced at the nearest
qualified specialist workshop. Make sure
that the wheel/tyre dimensions and tyre
type are correct.
When using an emergenc yspare wheel or
spare wheel of adifferent size, you must not
exceed the maximum speed of 80 km/h.
Snow chains must not be fitted to emergency
spare wheels. General notes
You should regularly check the pressure of all
your tyres, including the emergenc yspare
wheel, particularly prior to long trips, and cor-
rect the pressure as necessary (Y page 331).
The applicabl evalue is found on the wheel or
under "Technical data" (Y page 354).
An emergenc yspare wheel may also be fitted
against the direction of rotation .Observe the
time restriction on use as well as the speed
limitation specified on the emergency spare
wheel. Replace the tyres after six years at the latest,
regardless of wear. This also applies to the
emergency spare wheel.
i
When you are drivin gwith the collapsible
emergency spare wheel fitted, the tyre
pressure loss warning system or the tyre
pressure monitor cannot function reliably.
Only restart the tyre pressure loss warning
system/tyre pressure monitor when the
defective wheel has been replaced with a
new wheel.
Vehicles with tyr epressure monitor:
after mounting an emergency spare wheel,
the system may still display the tyre pres-
sure of the removed wheel for afew
minutes. The value displayed for the moun-
ted emergency spare wheel is not the same
as the curren ttyre pressure of the emer-
genc yspare wheel. Removing the "Minispare" emer-
gency spar
ewheel/collapsible emer-
gency spar ewheel
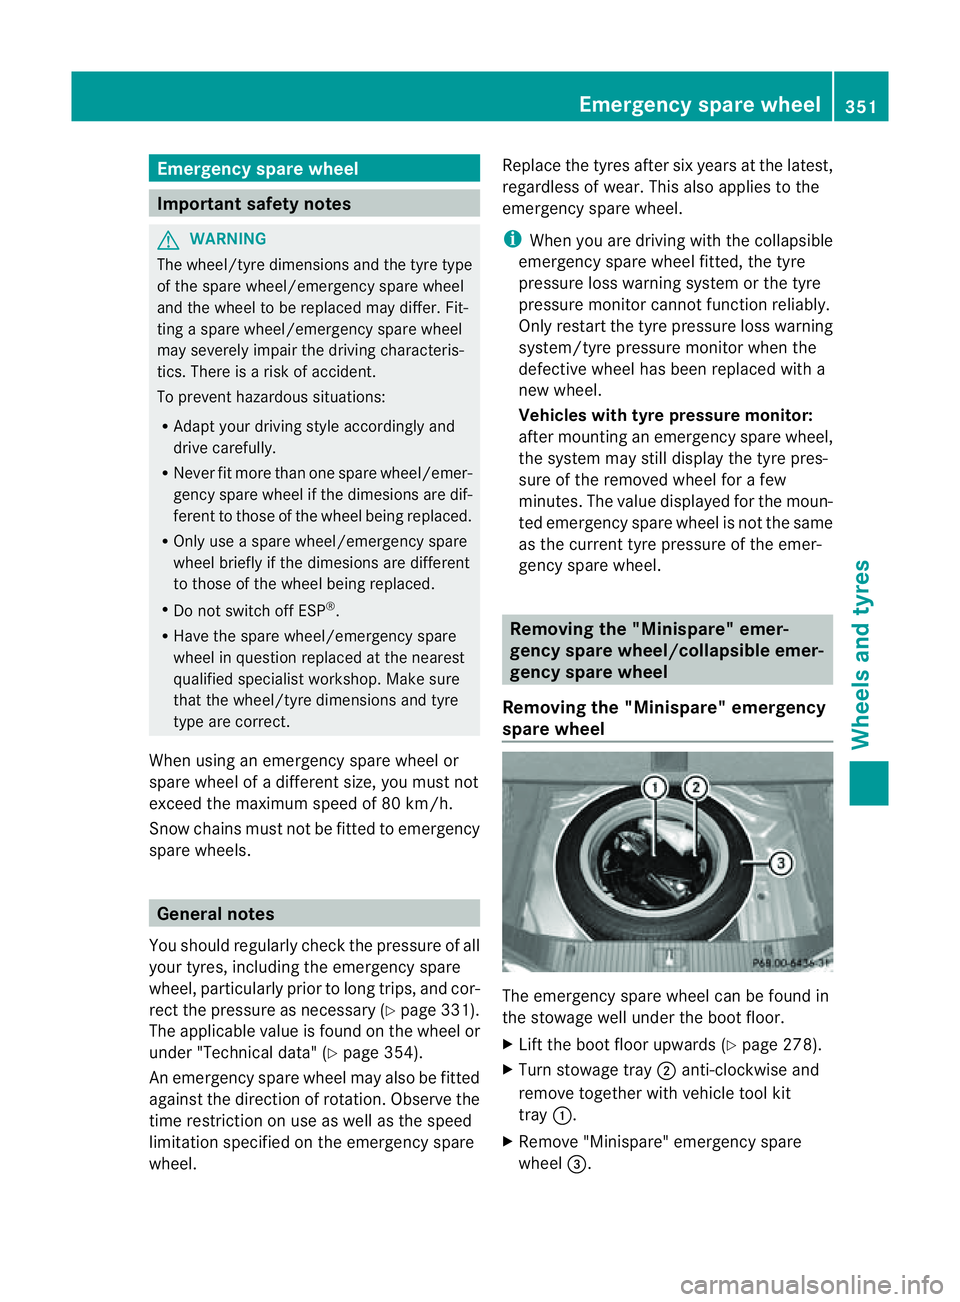
Removing the "Minispare" emergency
spar ewheel The emergency spare wheel can be found in
the stowage well under the boot floor.
X Lift the boot floor upwards (Y page 278).
X Turn stowage tray ;anti-clockwise and
remov etogether with vehicle tool kit
tray :.
X Remove "Minispare" emergency spare
wheel =. Emergency spare wheel
351Wheels and tyres Z
Page 355 of 373
Removin
gthe collapsibl eemergency
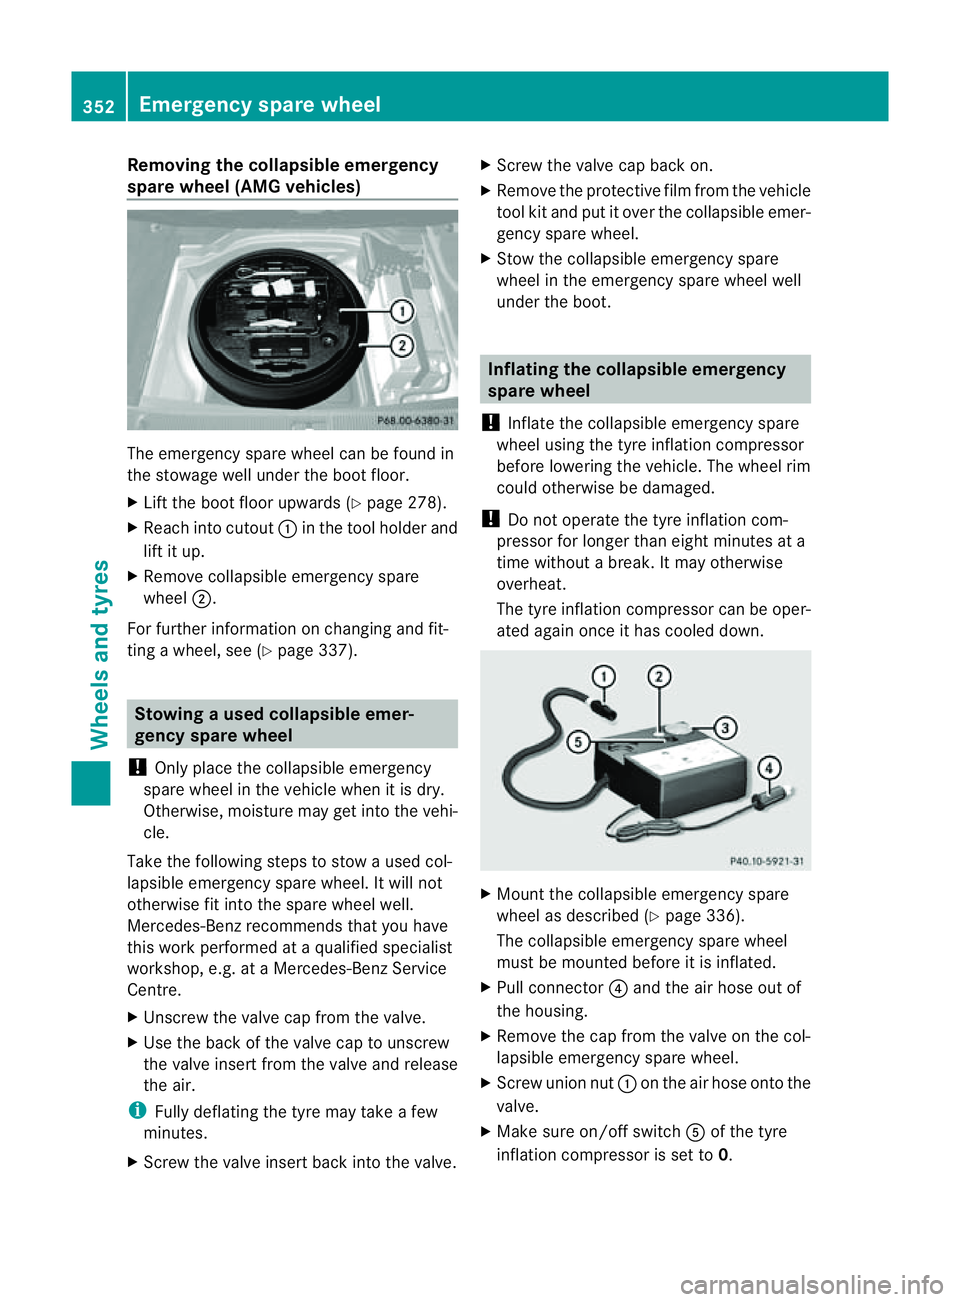
spare wheel (AMG vehicles) The emergency spare wheel can be found in
the stowag ewellu nder the boo tfloor.
X Lift the boot floor upwards ( Ypage 278).
X Reach int ocutout :in the too lholder and
lift it up.
X Remove collapsible emergency spare
wheel ;.
For further information on changing and fit-
tin gaw heel, see (Y page 337). Stowing
aused collapsible emer-
gency spar ewheel
! Only place the collapsible emergency
spare wheel in the vehicle when it is dry.
Otherwise, moisture may get into the vehi-
cle.
Take the following steps to stow aused col-
lapsible emergency spare wheel. It will not
otherwise fit into the spare wheel well.
Mercedes-Benz recommends that you have
this work performed at aqualified specialist
workshop, e.g. at aMercedes-Ben zService
Centre.
X Unscrew the valve cap from the valve.
X Use the back of the valve cap to unscrew
the valve insert from the valve and release
the air.
i Fully deflating the tyre may take afew
minutes.
X Screw the valve insert back intot he valve.X
Screw the valve cap back on.
X Remove the protective film from the vehicle
tool kit and put it over the collapsible emer-
genc yspare wheel.
X Stow the collapsible emergency spare
wheel in the emergency spare wheel well
under the boot. Inflating the collapsible emergency
spar
ewheel
! Inflate the collapsible emergency spare
wheel using the tyre inflation compressor
before lowering the vehicle. The wheel rim
could otherwise be damaged.
! Do not operate the tyre inflation com-
pressor for longer than eight minutes at a
time without abreak. It may otherwise
overheat.
The tyre inflation compressor can be oper-
ated again onceith as cooled down. X
Mount the collapsible emergency spare
wheel as described (Y page 336).
The collapsible emergency spare wheel
must be mounted before it is inflated.
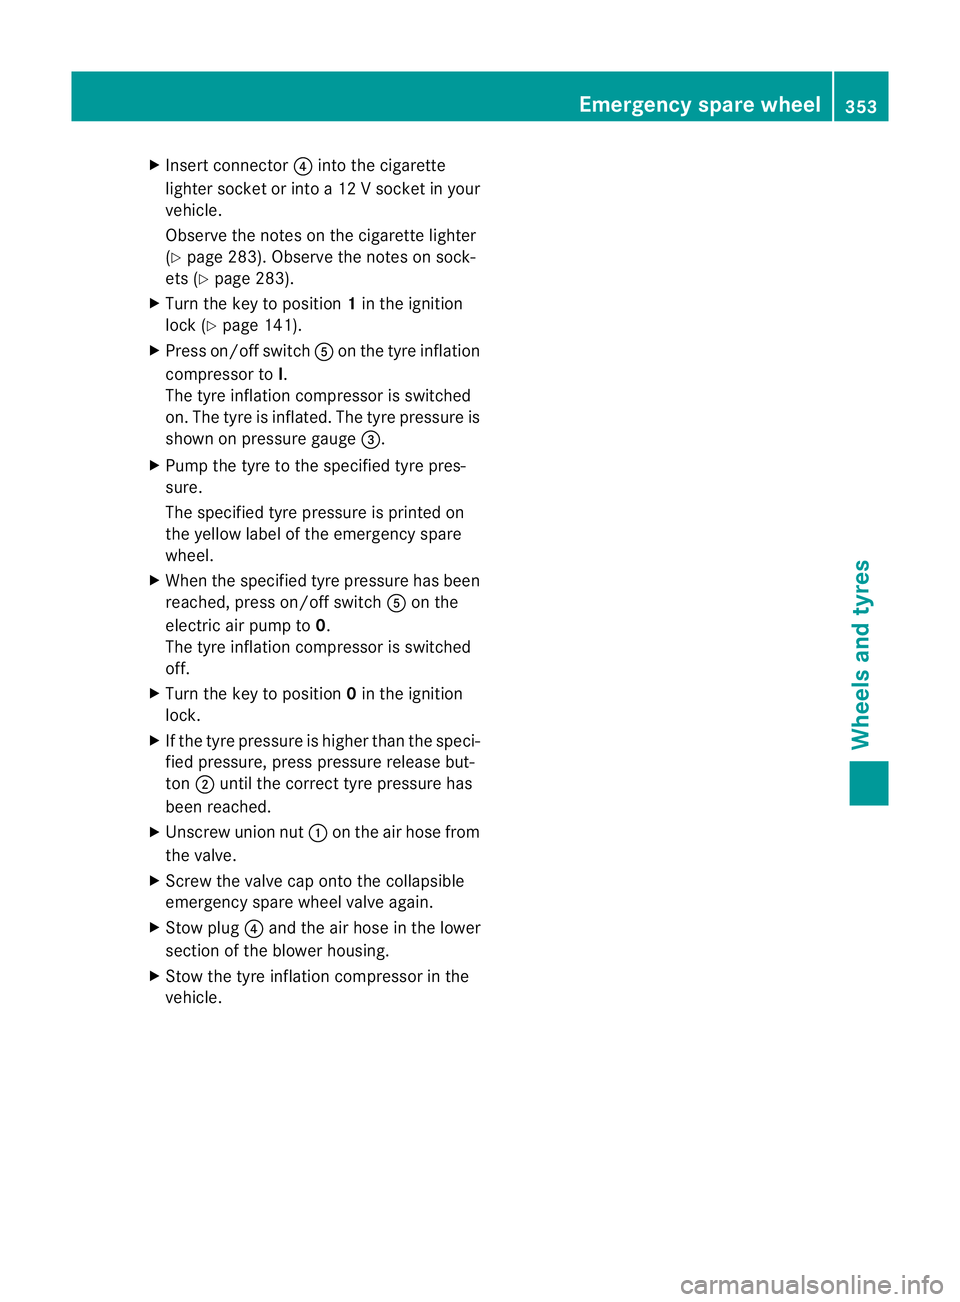
X Pull connector ?and the air hose out of
the housing.
X Remove the cap from the valve on the col-
lapsible emergency spare wheel.
X Screw union nut :on the air hose ontot he
valve.
X Make sure on/off switch Aof the tyre
inflation compressor is set to 0.352
Emergency spar
ewheelWheels and tyres
Page 356 of 373
X
Insert connector ?into the cigarette
lighter socket or into a12Vsocket in your
vehicle.
Observe the notes on the cigarette lighter
(Y page 283). Observe the notes on sock-
ets (Y page 283).
X Turn the key to position 1in the ignition
lock (Y page 141).
X Press on/off switch Aon the tyre inflation
compressor to I.
The tyre inflation compressor is switched
on. The tyre is inflated. The tyre pressure is
shown on pressure gauge =.
X Pump the tyre to the specified tyre pres-
sure.
The specified tyre pressure is printed on
the yellow label of the emergency spare
wheel.
X When the specified tyre pressure has been
reached, press on/off switch Aon the
electric air pump to 0.
The tyre inflation compressor is switched
off.
X Turn the key to position 0in the ignition
lock.
X If the tyre pressure is higher than the speci-
fied pressure, press pressure release but-
ton ;until the correct tyre pressure has
been reached.
X Unscrew union nut :on the air hose from
the valve.
X Screw the valve cap onto the collapsible
emergency spare wheel valve again.
X Stow plug ?and the air hose in the lower
section of the blower housing.
X Stow the tyre inflation compressor in the
vehicle. Emergency sparew
heel
353Wheels and tyres Z
Page 357 of 373
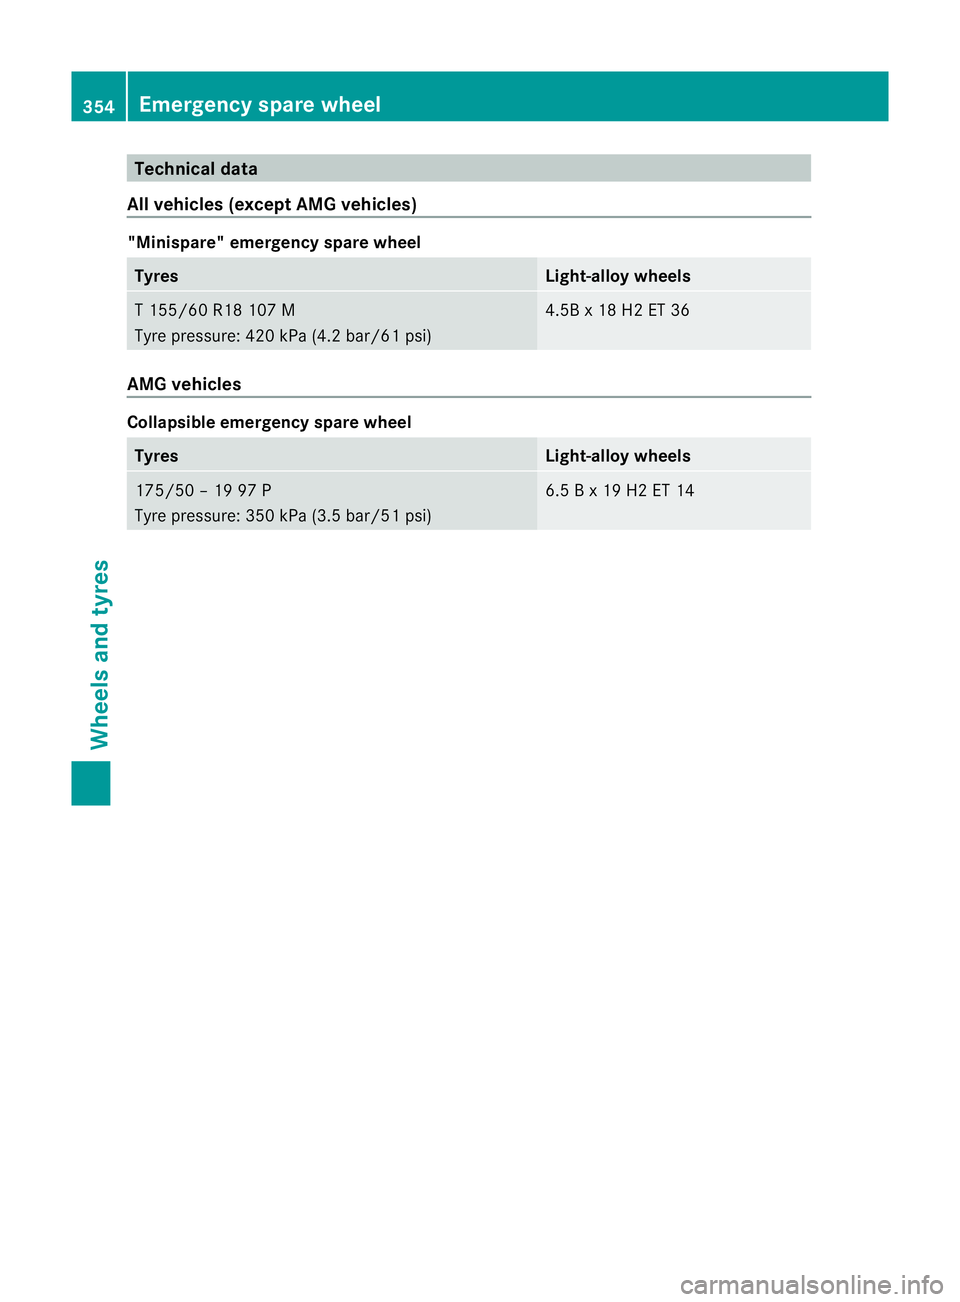
Technica
ldata
Al lv eh icle s(exce pt AM Gvehicles) "Minispare" emergency spare wheel
Tyres Light-alloy wheels
T1
55/60 R18 107M
Tyre pressure: 42 0kPa(4.2b ar/61 psi) 4.5B
x18H2ET36 AMG vehicles
Collapsible emergency spare wheel
Tyres Light-alloy wheels
175/50
–1997P
Tyre pressure: 35 0kPa(3.5b ar/51 psi) 6.
5Bx19H2ET14 354
Emergency spare wheelWheels and tyres
Page 358 of 373
Useful information
............................356
Information on technical data .........356
Genuine Mercedes-Benz parts .........356
Vehicle electronics ...........................357
Identification plates .........................359
Service products and capacities .....359
Vehicle data ...................................... 366
24 GHz radar sensor system (coun-
tryo verview) ..................................... 368 355Technical data
Page 359 of 373
Useful information
i This Owner's Manual describes all mod-
els, series and optional equipment for your
vehicle that were available at the time of
going to press. National variation sare pos-
sible. Not ethat your vehicle may not be
equipped with all of the function sdescri-
bed. This is also the case for system sand
function srelevan ttosafety.
i Read the information on qualified special-
ist workshops: (Y page 23). Information on technical data
You can find curren ttechnical data on the
Interne tat:
http://www.mercedes-benz.com
i The technical data was determined in
accordance with EC Directives .All data
applies to the vehicle' sstandard equip-
ment .The data may therefore differ for
vehicles with optional equipment .You can
obtain further information from a
Mercedes-Benz Servic eCentre. Genuine Mercedes-Benz parts
G
WARNING
Drivin gsafety may be impaired if non-
approved parts, tyres and wheels or safety-
relevant accessories are used.
This could lead to malfunctions in safety-rel-
evant systems, e.g. the brake system. This
could cause you to lose control of your vehicle
and cause an accident.
For this reason, Mercedes-Benz recommends
that you use genuine Mercedes-Benz parts or
parts of equal quality. Only use tyres, wheels
and accessories that have been specifically
approved for your vehicle. H
Environmental note
Daimler AG also supplies reconditioned
assemblies and parts which are of the same
quality as new parts. For these, the same war-
ranty applies as for new parts.
! Airbags and seat belt tensioners, as well
as control units and sensors for these
restraint systems, may be installed in the
following areas of your vehicle:
R doors
R door pillars
R door sills
R seats
R dashboard
R instrument cluster
R centre console
Do not install accessories such as audio
systems in these areas. Do not carry out
repairs or welding. You could impair the
operating efficienc yofthe restraint sys-
tems.
Have accessories retrofitted at aqualified
specialist workshop.
Mercedes-Benz testsg enuine parts and con-
version parts and accessories that have been
specifically approved for your vehicle for their
reliability, safety and suitability. Despite
ongoing market research, Mercedes-Benz is
unable to assess other parts. Mercedes-Benz
accepts no responsibility for the use of parts
that have been independently or officially
approved.
In Germany, certain parts are only officially
approved for installation or modification if
they comply with legal requirements. This
also applies to some other countries. All gen-
uine Mercedes-Benz parts meet the approval
requirements. The use of non-approved parts
may invalidate the vehicle's general operating
permit. 356
Genuine Mercedes-Benz partsTechnical data
Page 360 of 373
This is the case:
R
if they cause achange of the vehicle type
from that for which the vehicle's general
operating permit was granted
R if other road users could be endangered
R if the emission or noise levels are adversely
affected.
Always specify the vehicle identification num-
ber (VIN) (Y page 359) and the engine num-
ber (Y page 359) when ordering genuine
Mercedes-Benz parts. Vehicle electronics
Tampering with the engine electron-
ics
G
WARNING
Always have work on the engine electronics
and related components carried out at aquali-
fied specialist workshop. Otherwise, the vehi-
cle's operating safety could be affected.
! Only have work carried out on the engine
electronics and its associated parts, such
as control units, sensors and connector
leads, at aqualified specialist workshop.
Vehicle componentsm ay otherwise wear
more quickly and the vehicle's operating
permit may be invalidated. Retrofitting two-way radios and
mobile phones (RF transmitters)
G
WARNING
Incorrect retrofittin gofRFtransmitters can
cause the vehicle electronics to malfunction.
The vehicle's operating safety and thus your
own safety are impaired.
Have aftermarket radio frequency transmit-
ting equipment installed at aqualified spe-
cialist workshop. G
WARNING
Incorrect retrofittin gofRFtransmitters can
lead to increased electromagnetic radiation in
the vehicle interior. Using an exterior aerial
takes into account curren tscientific discus-
sions relating to the possible health hazards
that may result from electromagnetic fields.
Have aftermarket radio frequency transmit-
ting equipment installed at aqualified spe-
cialist workshop.
! The operating permit may be invalidated
if the instructions for installation and use of
RF transmitters are not observed.
In particular, the following conditions must
be complied with:
R only approved wavebands may be used.
R the maximum permissible output in
these wavebands must be complied with.
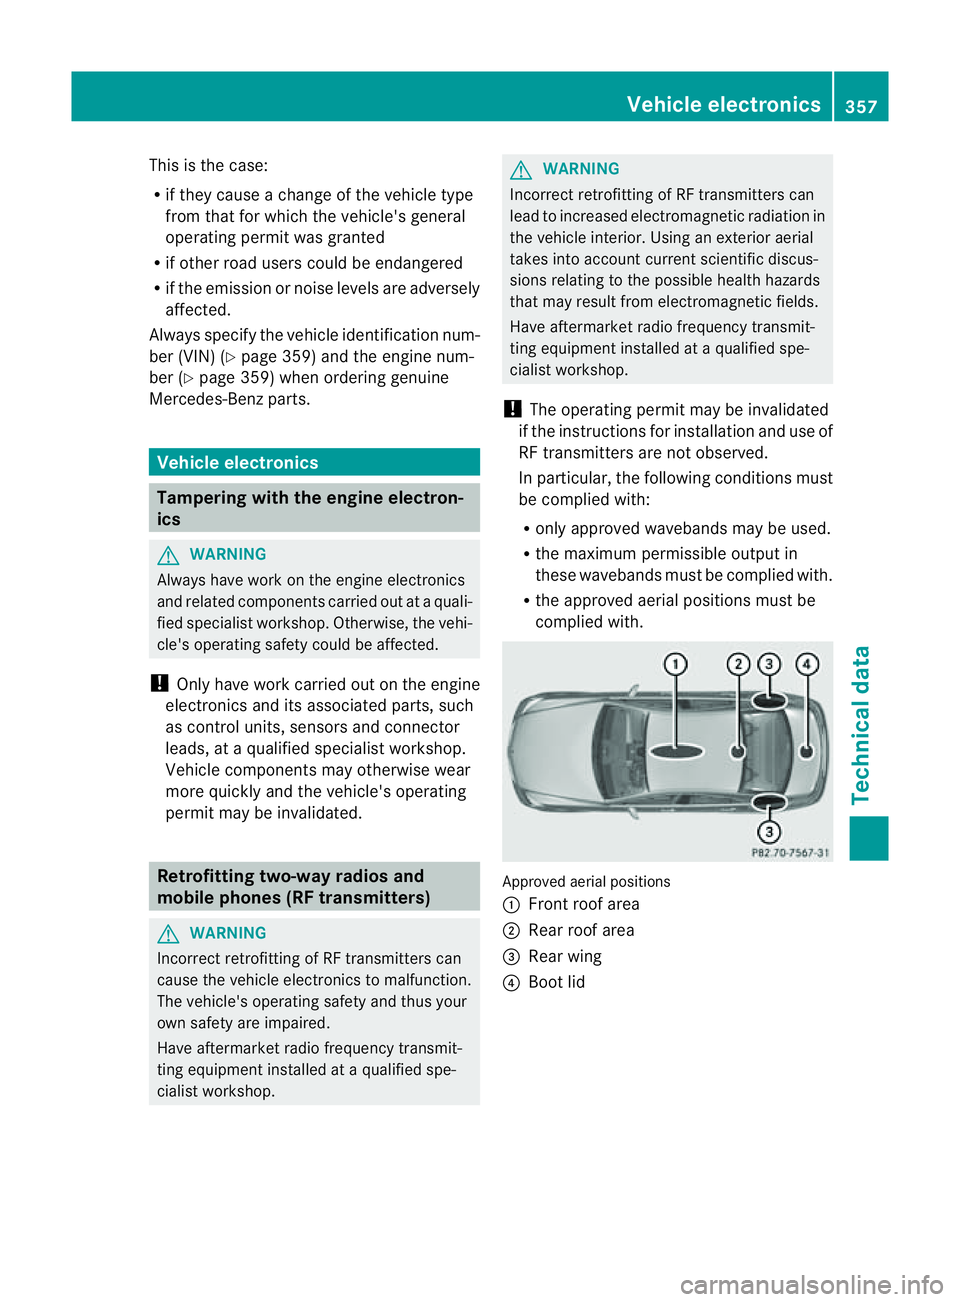
R the approved aerial positions must be
complied with. Approved aerial positions
:
Frontr oof area
; Rear roof area
= Rear wing
? Boot lid Vehicle electronics
357Technical data Z