MERCEDES-BENZ E-CLASS CABRIOLET 2010 Owners Manual
Manufacturer: MERCEDES-BENZ, Model Year: 2010, Model line: E-CLASS CABRIOLET, Model: MERCEDES-BENZ E-CLASS CABRIOLET 2010Pages: 333, PDF Size: 7.64 MB
Page 201 of 333
i
If th egearshift recommendation is shown
in the multif unctio ndisplay ,itisn ot shown
in the status bar.
Further information on gearshift recommen-
dation s(Ypage 142).
Resetting values You can reset the values of the following func-
tions:
R tripm eter
R trip computer "After start"
R trip computer "After reset"
X Press =or; on the steerin gwheel
to selec tthe Trip menu.
X Press 9or: to selec tthe function
that you wish to reset.
X Press a. Resetting the trip computer "From start" (example)
X Press the :button to select Yesand
press the abutton to confirm. Navigation menu
Displaying navigation instructions In the
Navimenu, the multifunction display
shows navigation instructions. For more
information, see the separat eoperating
instructions.
X Switch on the audio system or COMAND
APS (see the separat eoperating instruc-
tions).
X Press the =or; button on the steer-
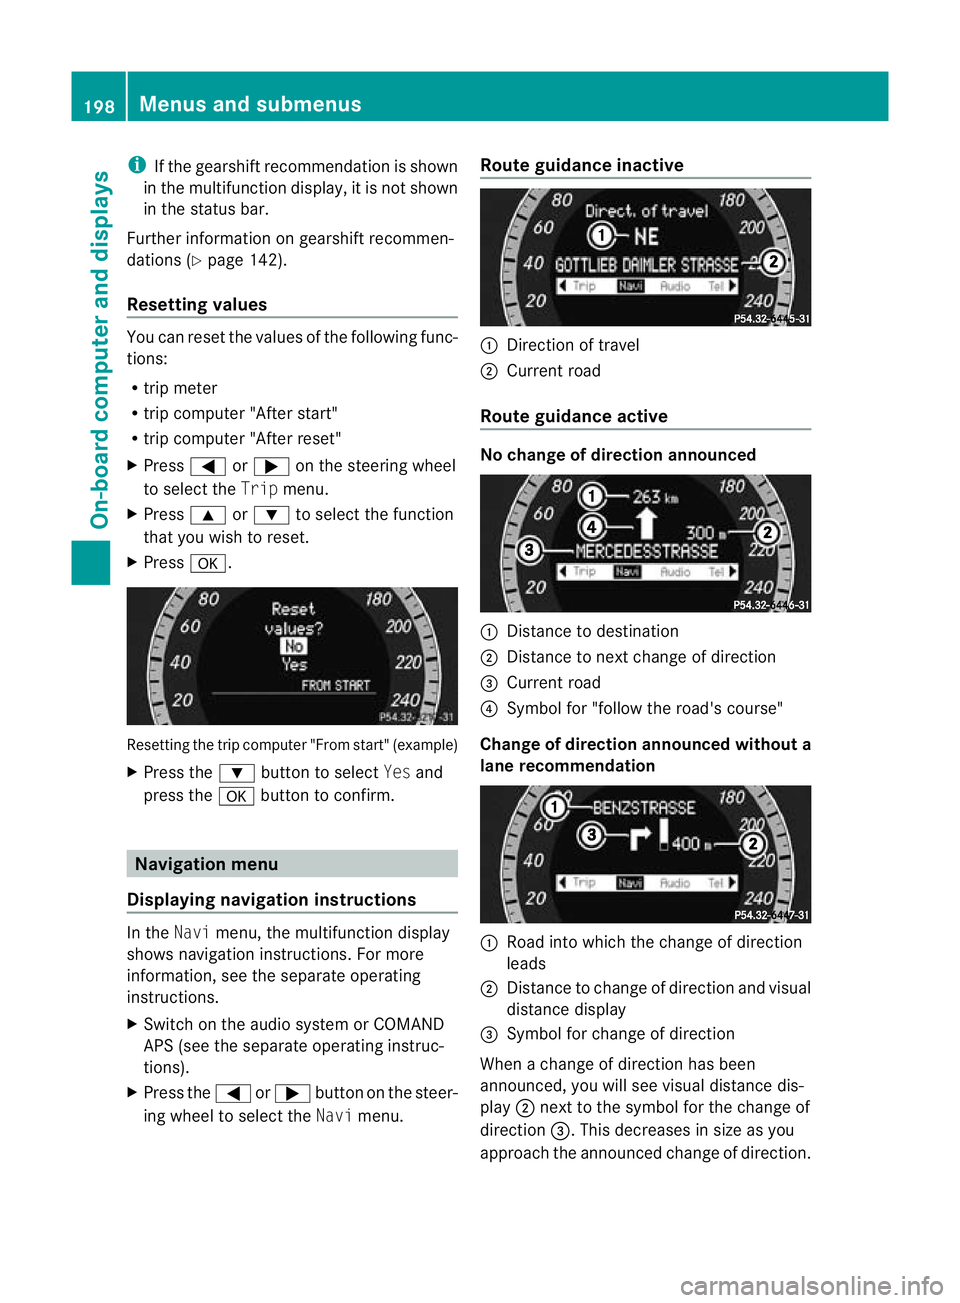
ing whee ltoselect the Navimenu. Route guidance inactive :
Direction of travel
; Curren troad
Route guidance active No change of direction announced
:
Distanc etodestination
; Distance to next change of direction
= Curren troad
? Symbol for "follow the road's course"
Change of direction announced without a
lane recommendation :
Road int owhich the change of direction
leads
; Distanc etochange of direction and visu al
distanc edisplay
= Symbol for change of direction
When achange of direction has been
announced, you will see visu al distancedis-
play ;nex ttot he symbol for the change of
direction =.This decreases in size as you
approach the announced change of direction. 198
Menu
sand submenusOn-board computer and displays
BA 20 7ECE ÄJ 2010 /1a;1;2,e n-GB
mkalafa Version: 3.0.2.11 2010-01-26T13:03:22+01:00-Seite 198
Page 202 of 333
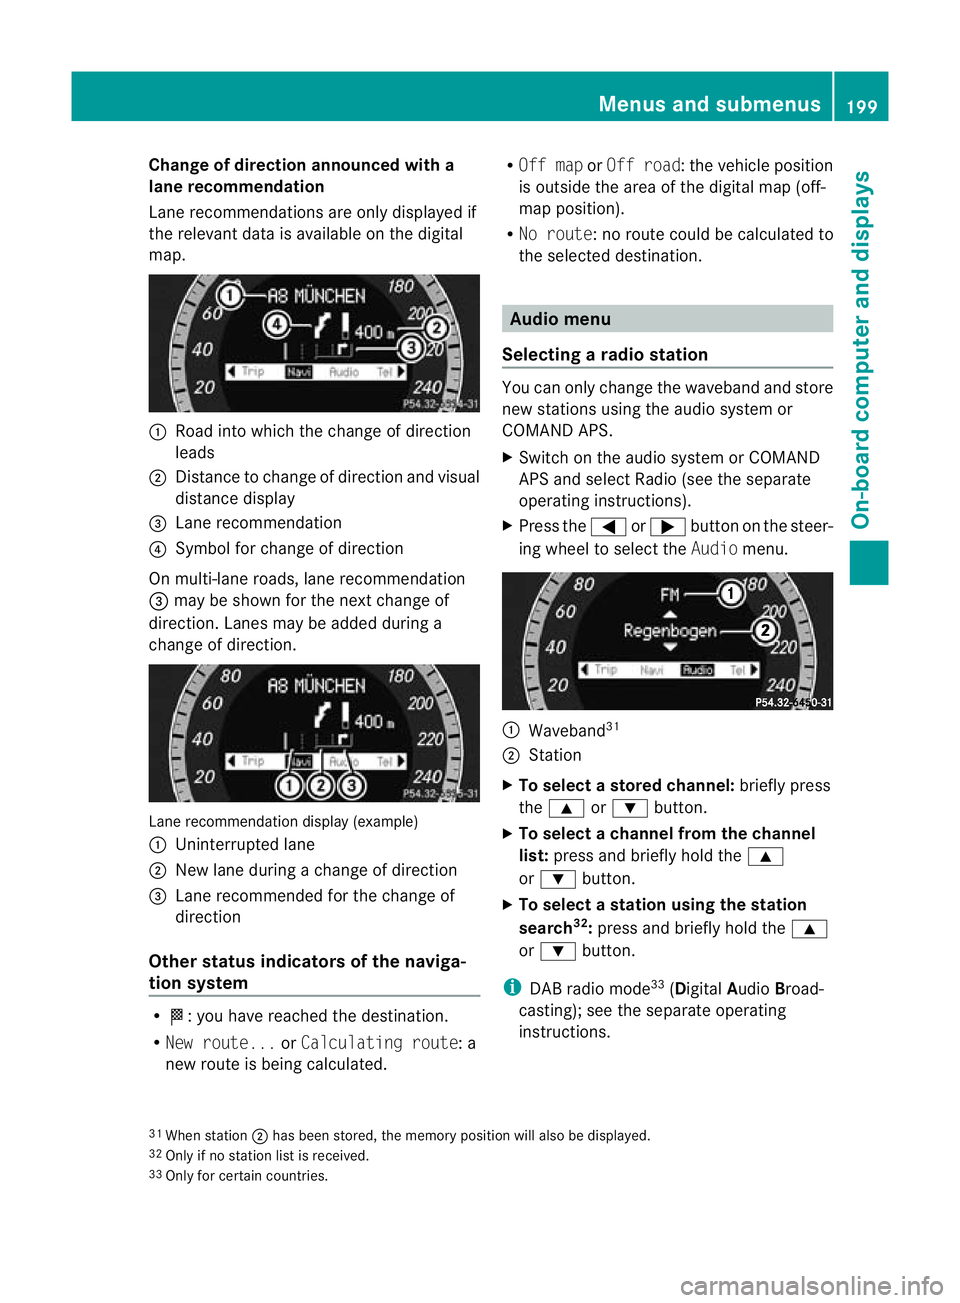
Change of direction announced with a
lane recommend
ation
Lan erecommendations are only displaye dif
the relevan tdata is available on thed igital
map. :
Road into which the change of direction
leads
; Distanc etochange of direction and visual
distanc edisplay
= Lane recommendation
? Symbol for change of direction
On multi-lane roads, lane recommendation
= may be shown for the next change of
direction. Lanes may be added during a
change of direction. Lan
erecommendation display (example)
: Uninterrupted lane
; New lane durin gachange of direction
= Lane recommended for the change of
direction
Other sta tusindicators of the naviga-
tion system R
O:y ou have reached the destination.
R Ne wr oute... orCalculating route:a
new route is being calculated. R
Off map orOff road :the vehicle position
is outside the area of the digital ma p(off-
ma pp osition).
R No route :noroute coul dbecalculated to
the selected destination. Audio menu
Selectin garadio station Yo
uc an only change the waveband and store
new stations using the audio system or
COMAND APS.
X Switch on the audio system or COMAND
APS and select Radio (se ethe separate
operating instructions).
X Press the =or; button on the steer-
ing wheel to select the Audiomenu. :
Wav eband 31
; Station
X To selec tastoredchann el:briefly press
the 9 or: button.
X To select achann elfrom the chan nel
list: press and briefly hold the 9
or : button.
X To select astatio nusing th estation
search 32
:press and briefl yholdt he 9
or : button.
i DAB radio mode 33
(Digit alAudio Broad-
castin g);s ee the separate operating
instructions.
31 Whe nstation ;hasb eens tored ,the memor yposition will also be displayed.
32 Only if no statio nlist is received.
33 Only for certain countries. Menus and submenus
199On-boardcomputer and displays
BA 20 7ECE ÄJ 2010/1a; 1; 2, en-GB
mkalaf aV ersion: 3.0.2.11
2010-01-26T13:03:22+01:00
-Seite 199 Z
Page 203 of 333
Audio player or audio media operation
Audio dat
afromv arious audio device sor
media can be played, depending on the equip-
ment fitted in the vehicle.
X Switch on the audio system or COMAND
APS and select the audi odrive or medium
(see th eseparate operating instructions).
X Press the =or; button on the steer-
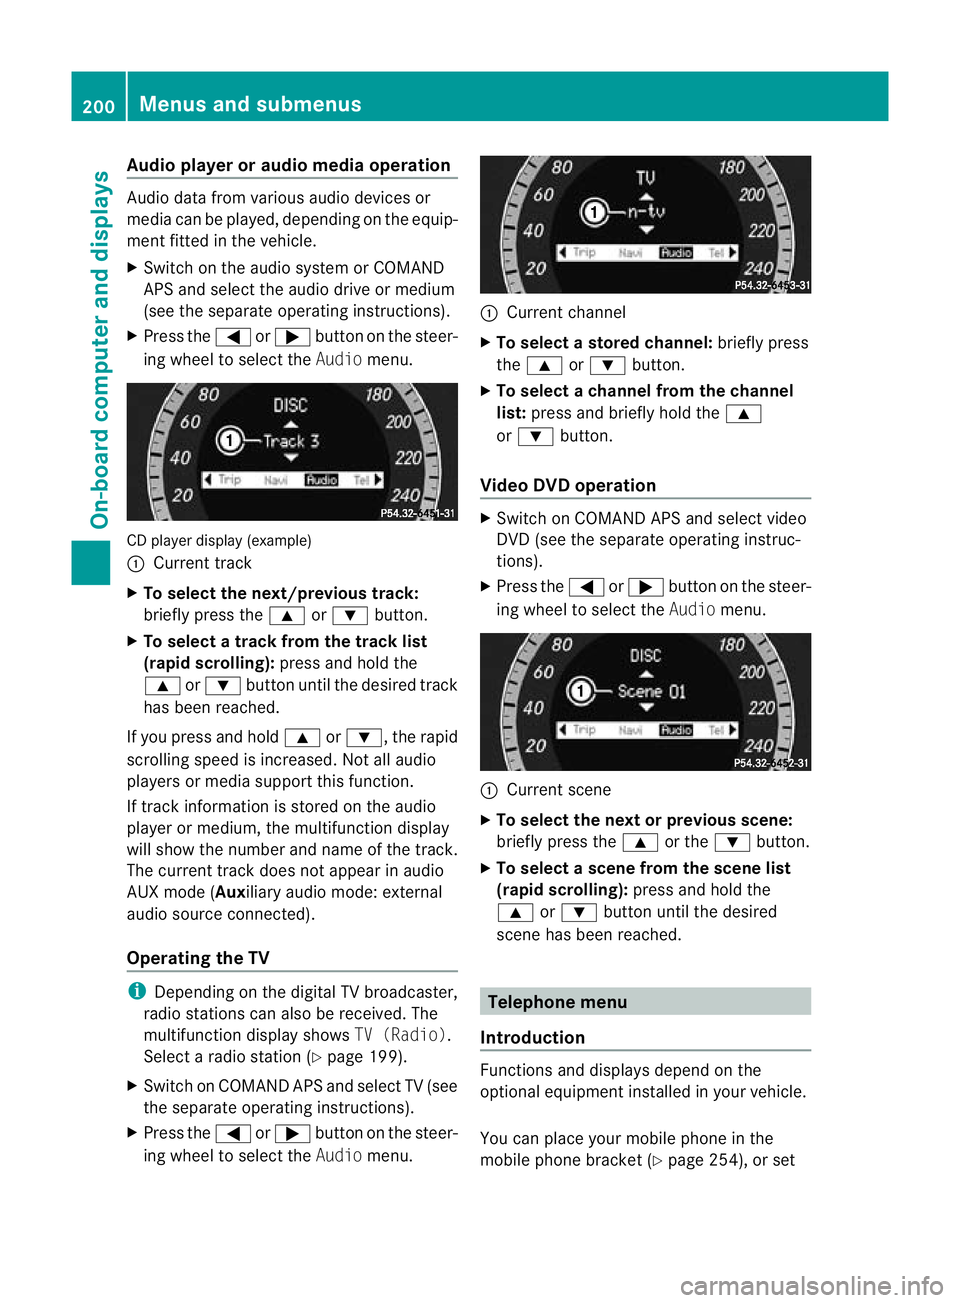
ing whee ltoselect the Audiomenu. CD player display (example)
:
Current track
X To select the next/previous track:
briefl ypress the 9or: button.
X To select atrack from the track list
(rapi dscrolling): press and hold the
9 or: button until th edesired track
ha sb eenr eached.
If yo upress and ho ld9 or:,t he rapid
scr olling speed is incre ased.Not allaudio
players or media support this function.
If track information is stored on the audio
playe rorm edium ,the multifunction display
will show the number and nam eofthe track.
The curren ttrack does not ap pear in audio
AUX mode (Auxiliar yaudi om ode: external
audio sourc econnected).
Operating th eTV i
Depending on the digital TV broadcaster,
radi ostations can als obereceived.The
multifunction display shows TV (Radio).
Select aradi ostation (Y page199).
X Switch on COMAND APS and select TV (see
the separate operating instructions).
X Press the =or; button on the steer-
ing whee ltoselect the Audiomenu. :
Curren tchannel
X To select astore dchann el:briefly press
the 9 or: button.
X To select achann elfrom the chan nel
list: press and briefly hold the 9
or : button.
Video DVD operation X
Switc honC OMAN DAPS and select video
DV D(see the separate oper ating instruc-
tions).
X Press the =or; button on the steer-
ing wheel to select the Audiomenu. :
Current scene
X To select th enext or previous scene:
briefly press the 9or the :button.
X To select ascene from th escene list
(rapid scrolling): press and hold the
9 or: button until th edesired
scene ha sbeenr eached. Telephon
emenu
Introdu ction Functions and display
sdepen dont he
optional equipment installe dinyourvehicle.
Yo uc an place your mobil ephone in the
mobil ephone bracket (Y page 254), or set200
Menus and submenusOn-board computer and displays
BA 207 ECE ÄJ 2010/1a; 1; 2, en-GB
mkalafa
Version: 3.0.2.11 2010-01-26T13:03:22+01:00-Seite 200
Page 204 of 333
up
aB luetooth ®
connection to th eaudio sys-
tem or COMAN DAPS (see the separate oper-
atin ginstructions). G
Risk of accident
Observe the legal requirements of the country
in which you are currently driving regarding
the use of mobile phones in the vehicle.
If it is permitted to use mobile phones while
the vehicle is in motion, you should only use
them whe nthe roa dand traffic conditions
allo w. Ot herwise, you may be distracte dfrom
th et raffi cconditions, cause an accident and
inj urey oursel fand others.
X Switch on the mobil ephone and audi osys-
tem or COMAND APS (see the separate
operating instructions).
X Press the =or; button on the steer-
ing whee ltoselectthe Tel men u.
Yo uw ills ee on eofthe following display mes-
sage sint he multifunctio ndisplay:
R Please ente rPIN:The mobile phone has
been placed in the mobile phone bracket
and the PIN has not been entered.
X Enter the PIN usin gthe mobile phone, LIN-
GUATRONIC ,the audio system or
COMAN DAPS.
The mobil ephone will search for anetwor k.
In the meantime, the Telephone No
Service displaymessage appears in the
multifunction display.
R Telephon eready or thename of the net-
work provider: the mobile phone has found
an etwor kand is ready to receive.
R No Service:Non etworkisa vail able.
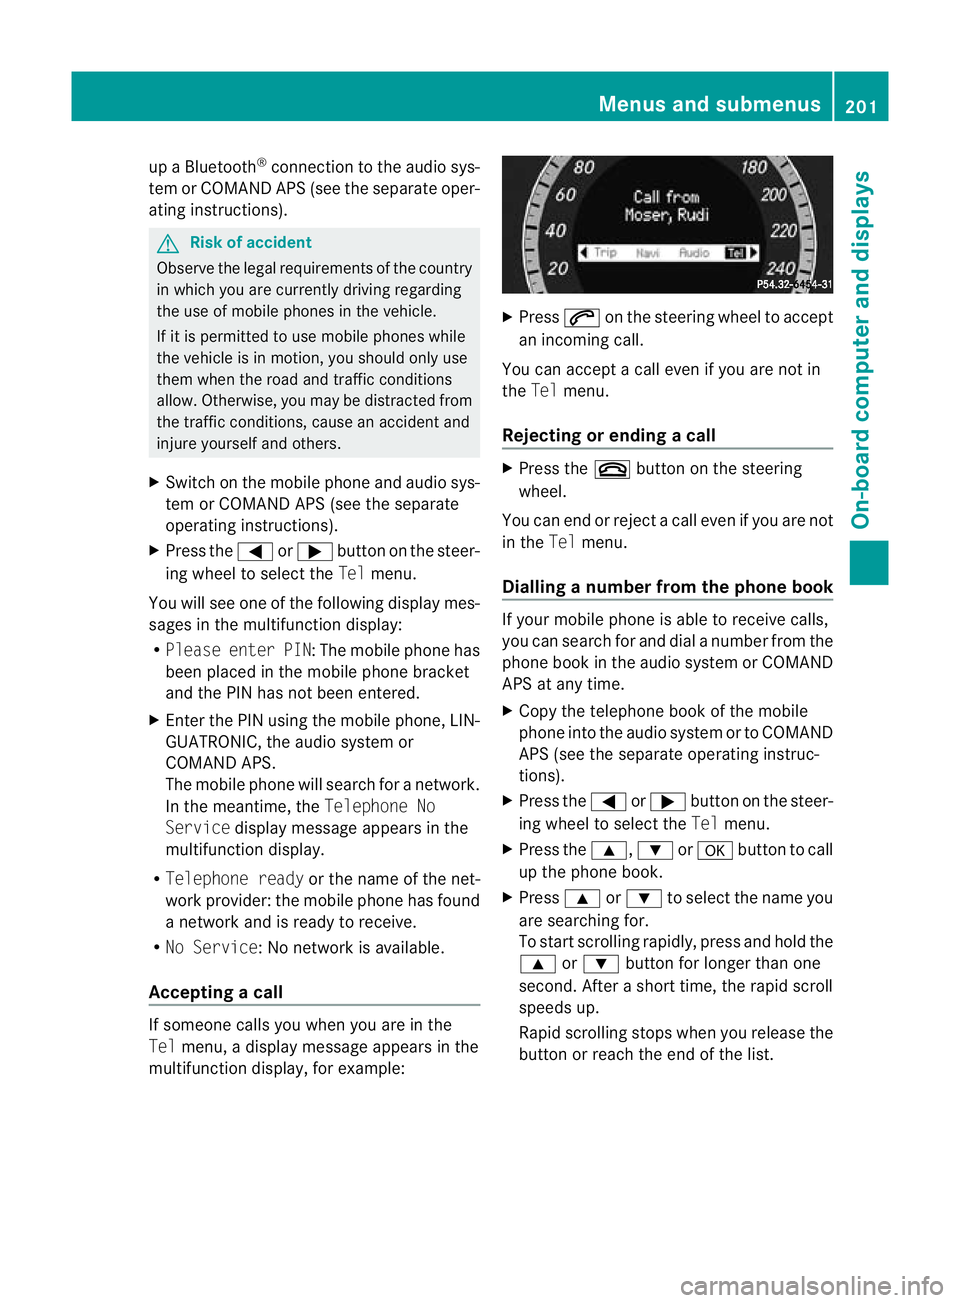
Accepting acall If someone call
syou when you are in the
Tel menu, adisplay message appears in the
multifunction display ,for example: X
Press 6on the steerin gwheel to accept
an incomi ngcall.
You can accep tacall even if you are not in
the Tel menu.
Rejectin gorending acall X
Press the ~buttonont he steering
wheel.
You can end or reject acall even if you are not
in the Telmenu.
Dialling anumbe rfrom the phone book If you
rmobile phone is able to receive calls,
you can search for and dial anumber from the
phone book in the audio system or COMAND
APS at any time.
X Copy the telephone book of the mobile
phone into the audio system or to COMAND
APS (see the separate operating instruc-
tions).
X Press the =or; button on the steer-
ing wheel to select the Telmenu.
X Press the 9,:ora button to call
up the phone book.
X Press 9or: to select the name you
are searching for.
To start scrolling rapidly ,pres sand hol dthe
9 or: button for longer than one
second. After ashort time, the rapid scroll
speeds up.
Rapid scrolling stops when you release the
button or reach the end of the list. Menu
sand submenus
201On-board computer and displays
BA 207ECE ÄJ 2010/1a; 1; 2, en-GB
mkalafa Version: 3.0.2.11 2010-01-26T13:03:22+01:00-Seite 201 Z
Page 205 of 333
X
If only one telep hone number is stored
for aname: press the 6ora button
to start dialling.
or
X If there is more than on enumbe rfor a
particula rname: press the 6ora
button to display the numbers.
X Press the 9or: button to select the
number you want to dial.
X Press the 6ora button to start dial-
ling.
or
X If you do not want to mak eacall:press
the ~ button.
Redialling Th
eo n-board compute rsaves the last names
or numbers dialle dinthe redial memory.
X Press the =or; button on the steer-
ing wheel to selec tthe Tel menu.
X Press the 6button to switc htothe
redial memory.
X Press the 9or: button to selec tthe
desired nam eornumber.
X Press the 6ora button to start dial-
ling. Assistance menu
Speed Limit Assist Displaying Speed Limit Assist
In the
SpeedLim. Asst. function,adetec-
ted speed limi tisdisplayed under certain
conditions. You can set Speed Limit Assist
(Y page 182 )todisplay adetected speed limit
automatically for fiv eseconds. Other mes-
sages in the multifunc tion display will be hid-
den for this lengt hoftime. X
Press the =or; button on the steer-
ing wheel to select the Assist.menu.
X Press the 9or: button to select
Spee dLim. Asst.
X Press a.
Th em ultifunction display shows Speed
Limit Assis t.
When alimit speed is detected, this is
shown in the multifunction display until:
R the speed limit ceases to apply.
R you pass city limits.
R the type of road changes, e.g. motorway
or country road.
R the speed limit is no longer detected
after acertain distance.
Activating/deactiva ting th eSpeed Limit
Assist message function
X Pres sthe = or; button on the steer-
ing wheel to selec tthe Assist. menu.
X Press the 9or: button to select
Spee dLim. Asst.
X Press a.
Th em ultifunction display shows Speed
Limit Assis t.
X Press :.
The curren tselection is displayed.
X To activat eordeactivate: pressa.
Ad etected speed limi tappears automati-
cally for fiv eseconds.
When Speed Limit Assist is operational and
the message fun ction is activated, the multi-
function display shows the Äsymbol
when the ignition is switched on.
Showing the distance display This function is only available with DIS-
TRONIC PLUS.202
Menus and submenusOn-boar
dcomputer and displays
BA 20 7ECE ÄJ 2010/1a; 1; 2, en-GB
mkalafa Version:3.0.2.11
2010-01-26T13:03:22+01:0
0-Seite 202
Page 206 of 333
X
Press the =or; button on the steer-
ing wheel to select the Assist.menu.
X Press the 9or: button to select
Distance display.
X Press a.
The DI STRONIC PLUS distance display
(Y page 166) appears in the multifunction
display.
Deactivating/activating ESP ®G
Risk of accident
If the ä warning lamp in the instrument
cluster flashes ,proceed as follows:
R do not deactivate ESP ®
under any circum-
stances.
R onl ydepress the accelerator pedal as far as
necessary when pullin gaway.
R adapt your driving style to suit the prevail-
ing road and weather conditions.
Otherwise, the vehicle could skid.
ESP ®
cannot reduce the risk of an accident if
you drive too fast. ESP ®
cannot override the
laws of physics.
Further information about ESP ®
(Y page 57).
X Start the engine.
X Press the =or; button on the steer-
ing wheel to select the Assist.menu.
X Press 9or: to select ESP.
X Press a.
X To deactivate: pressaagain.
The å warning lamp in the instrument
cluster comes on. G
Risk of accident
If the å warning lamp in the instrument
cluster lights up when the engine is running,
ESP ®
is deactivated or is unavailable due to a
malfunction. The risk that your vehicle may
start to skid then increases in certain situa-
tions.
Always adapt your driving style to the prevail-
ing road and weather conditions. X
To activate: pressaagain.
The å warning lamp in the instrument
cluster goes out.
Activating/deactivating the PRE-SAFE ®
Brake This function is only availabl
ewith DIS-
TRONIC PLUS.
X Press the =or; button on the steer-
ing wheel to select the Assist.menu.
X Press 9or: to select PRE-SAFE
Brake.
X Press a.
The curren tselection is displayed.
X To activate/deac tivate: press a
again.
When PRE-SAFE ®
Brak e(Ypage 59 )isacti-
vated ,the multifunction displa yshows the
Ä symbol.
Activating/deactiva ting Attention
Assist X
Press the =or; button on the steer-
ing wheel to select the Assist.menu.
X Press the 9or: button to select
Attent ionA sst.
X Press a.
Th ec urren tselection is displayed.
X To activate/deac tivate: press a
again.
When ATTENTION ASSI ST (Ypage 18 1)is
activated, the Àsymbol appears in the
multifunction display when the ignition is on.
Activating/deactivating Blind Spot
Assist You can use the
BlindSpot Asst. function
to activate or deactivate Blind Spot Assist
(Y page 184). Menus an
dsubmenus
203On-board computer and displays
BA 207 ECE ÄJ 2010/1a; 1; 2, en-GB
mkalafa Version:3.0.2.11
2010-01-26T13:03:22+01:00
-Seite 203 Z
Page 207 of 333
X
Press the =or; button on the steer-
ing wheel to select the Assist.menu.
X Press the 9or: button to select
Blin dSpot Asst..
X Press a.
Th ec urren tselection is displayed.
X To activate/deac tivate: press a
again. Servic
emenu In the
Serv. menu, you can:
R call up display messages (Y page 210)
R reset the tyre pressure loss warnin gsystem
(Y page 301)
R call up the service due date (Y page 263)Settings menu
Introduction In the
Settin gsmenu ,you have the following
options:
R Changing the instrumen tcluster settings
R Changing the time/date settings 34
R Changing the lighting settings
R Changing the vehicle settings
R Changing the convenience settings
R Restorin gthe factory settings Instr
ument cluster Selecting the unit of measurement for dis-
tance
The
Displa yunit Speed-/odometer:
functio nallows you to choose whether cer-
tain displays appear in km/ horm ph.
The selected unit of measuremen tfor dis-
tan ceapplies to:
R the digital speedometer in the Tripmenu.
R the total distance recorder and the trip
meter
R the trip computer
R the navigation instructions in the Navi
menu
R cruise control
R SPEEDTRONIC
R DISTRONIC PLUS
X Press the =or; button on the steer-
ing wheel to select the Settingsmenu.
X Press the :or9 button to select the
Inst .cluster submenu.
X Press the abuttontoc onfirm.
X Press the :or9 button to select the
Displa yunit Speed-/odometer func-
tion.
Yo uw ill see the selected setting: kmor
miles.
X Press the abutton to save the setting.
Switching the additional speedometer on
or off
Only vehicles with manual transmission have
this func tion.
i Vehicles for the United Kingdom: this
func tion is not available.
Usin gthe Dig. speedo [mph]: function,
you can select whether the multifunc tion dis-
play additionally shows the speed in mph.
34 This func tion is not available on vehicles with Audio 50 APS, Audio 55 APS or COMAN DAPS. 204
Menus and submenusOn-board computer and displays
BA 20
7ECE ÄJ 2010 /1a; 1; 2, en-GB
mkalafa Version: 3.0.2.11 2010-01-26T13:03:22+01:00 -Seite 204
Page 208 of 333
X
Press the =or; button on the steer-
ing wheel to select the Settingsmenu.
X Press the :or9 button to select the
Inst .cluster submenu.
X Press the abuttontoc onfirm.
X Press the :or9 button to select the
Dig. speedo [mph]: function.
You will see the selected setting: onor
off.
X Press the abutton to save the setting.
Selecting th epermanent display function
Only vehicles with automatic transmission
have this func tion.
i Vehicles for the United Kingdom: this
func tion is not available.
The Permanen tdisplay: function allows
yo utoc hoose whether the multifunction dis-
play always shows the outside temperature
or the speed in mph.
X Press the =or; button on the steer-
ing wheel to selec tthe Settings menu.
X Press the :or9 button to selec tthe
Inst .cluster submenu.
X Press the abuttontoc onfirm.
X Press :or9 to select the Perma‐
nent display function.
You will see the selected setting: outside
temperat ureorDig. speedo m[mph].
X Press the abuttontos ave the setting.
Time/date This submenu is only availabl
eonvehicles
with Audio 20.
In the Time/date submenu, you can set the
tim eand date.
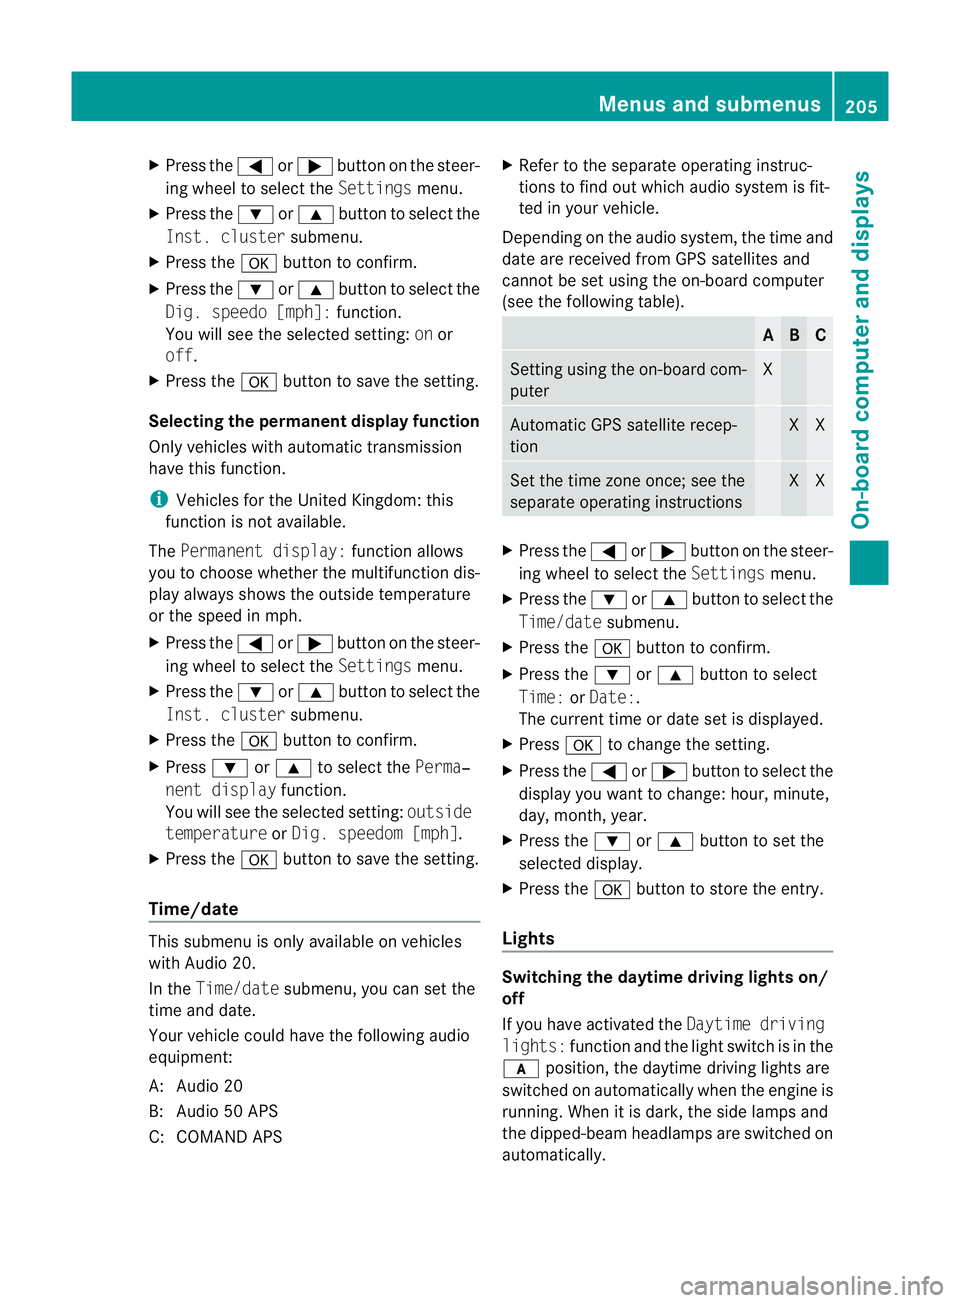
Your vehicl ecould have the following audio
equipment:
A: Audi o20
B: Audi o50A PS
C: COMAN DAPS X
Refer to the separate operating instruc-
tions to fin dout which audio system is fit-
ted in your vehicle.
Depending on the audio system, the time and
date are received from GPS satellites and
cannot be set using the on-board computer
(see the following table). A B C
Setting using the on-board com-
puter X
Automatic GPS satellite recep-
tion X X
Set the time zone once; see the
separate operating instructions X X
X
Press the =or; button on the steer-
ing wheel to select the Settingsmenu.
X Press the :or9 button to select the
Time/date submenu.
X Press the abutton to confirm.
X Press the :or9 button to select
Time: orDate:.
The curren ttime or date set is displayed.
X Press ato change the setting.
X Press the =or; button to select the
display you wan ttochange :hour ,minute,
day, month, year.
X Press the :or9 button to set the
selected display.
X Press the abutton to store the entry.
Lights Switching the day
time drivin glights on/
off
If you have activated the Daytimedriving
lights: functionand the light switch is in the
c position, the daytime driving lights are
switched on automatically whe nthe engin eis
running. When it is dark, th eside lamps and
the dipped-bea mheadlamps are switched on
automatically. Menus and submenus
205On-boardcomputer and displays
BA 20 7ECE ÄJ 2010/1a; 1; 2, en-GB
mkalafa Version:3.0.2.11
2010-01-26T13:03:22+01:0
0-Seite 205 Z
Page 209 of 333
In countries where da
ytime drivin glights are
al ega lrequirement, Onis the factory setting.
X Switch off the engine.
X Press the =or; button on the steer-
ing wheel to select the Settingsmenu.
X Press the :or9 button to select the
Light submenu.
X Press the abutton to confirm.
X Press the :or9 button to select the
Daytim edriving lights: function.
Yo uw ills ee the selected setting: onor
off.
X Press the abutton to save the setting.
Activating/deactivating th eIntelligent
Light System
When you activate the Intell.Light Sys‐
tem: function ,you activate the foll owing:
R motorwa ymode
R active light function
R cornerin glight function
R extended range foglamps
X Press the =or; buttononthe steer-
ing wheel to selec tthe Settings menu.
X Press the :or9 button to selec tthe
Light submenu.
X Press the abutton to confir m.
X Press the :or9 button to select the
Intell .Light System: function.
Yo uw ill see the selected setting: onor
off.
X Press the abutton to save the setting.
If you set the dipped-bea mheadlamps for
driving on the right/left (Y page 206),the
Light submenu of the multifunction display
shows the Intell.Light System: Sys‐
tem inoperative Inactiv efor left-
side traffic orIntell. Light System:
System inoperative Inactiv efor
right-side traffic message instead of
the Intell. Light System: function.Settin
gthe dipped-beam headl ampfor
driving on the right/left
This function is only available on vehicles with
the Intelligent Light System.
You can use this function to switch between
symmetrical and asymmetrical dipped-beam
headlamps (Y page 157).
If you set the dipped-beam headlamps for
driving on the right/left, motorway mode and
the extended range foglamps are not availa-
ble.
You can only set the dipped-beam headlamps
for driving on the right/left when stationary:
X Press the =or; button on the steer-
ing wheel to select the Settingsmenu.
X Press the :or9 buttontos elect the
Light submenu.
X Press the abutton to confirm.
X Press :or9 to select the Dipped
headl. Settin gfor: function.
Yo uw ill see the selected setting: Right-
hand drive orLeft-h andd rive.
X Press the abuttontos ave the setting.
You can also have the dipped-beam head-
lamps set for driving on the right/left at a
qualified specialis tworkshop ,e.g. a
Mercedes -Ben zS ervice Cent re.
Further information (Y page106)and
(Y pag e157).
Switching Adaptiv eHighbea mAssist on/
off
X Press the =or; button on the steer-
ing wheel to select the Settingsmenu.
X Press the :or9 buttontos elect the
Light submenu.
X Press the abutton to confirm.
X Press the :or9 button to select the
Adapti veMain-beam Assist: function.
Yo uw ill see the selected setting: Activa‐
ted orDeacti vated.
X Press the abuttontos ave the setting. 206
Menus and submenusOn-board computer and displ
ays
BA 207 ECE ÄJ 2010/1a; 1; 2, en-GB
mkalafa Version: 3.0.2.11
2010-01-26T13:03:22+01:00
-Seite 206
Page 210 of 333
Activating/deactivating th
esurround
lighting and ex terior lightin gdelayed
switch-off
The Surround lighting: function allows
yo utos et whether th eexterior lighting should
com eonw hen it is dar k:
R for 40 se conds after unlockin gthe ve hicle
with th ekey
The exterior lighting switche soff wh en you
open the driver’s door.
R for 15 seconds after switching off the
engine and closing the doors
If the engine is switched off and then none
of the doors are opened, or if an ope ndoor
is not closed, the exte rior lightin ggoes out
after 60 seconds.
If you activate the Surround lighting:
func tion, the following light up:
R the side lamps
R the foglamps 35
R the dipped-beam headlamps 36
R the daytime drivin glamps 37
R the licence plate lighting
X Press the =or; button on the steer-
ing wheel to select the Settingsmenu.
X Press the :or9 button to select the
Light submenu.
X Press the abutton to confirm.
X Press the :or9 button to select the
Surround lighting: function.
You will see the selected setting: onor
off.
X Press the abutton to save the setting. Deactivating the delayed switch-off tempora-
rily:
X
Before leaving the vehicle, turn the key to
position 0in the ignition lock.
X Turn the key to position 2in the ignition
lock and back to position 0.
The delayed switch-off is deactivated.
Delayed switch-off is reactivated the next
time you start the engine.
Activating/deactivating the interior light-
ing delayed switch-off
When you activate the Interior lighting
dela ysw. off: function and remov ethe
key from the ignition lock ,the interior lighting
remain sonfor 10 seconds.
X Press the =or; button on the steer-
ing wheel to select the Settingsmenu.
X Press the :or9 button to select the
Light submenu.
X Press the abutton to con firm.
X Press the :or9 buttontos elect the
Interior lighting dela ysw. off:
function.
Yo uw ill see the selected setting: onor
off.
X Press the abutton to save the setting.
Vehicle Setting permanent SPEEDTRONIC
You can use the func
tion Limi tspeed
(winter tyres): to setpermanen tSPEED-
TRONI C(Ypage 171).
X Press the =or; button on the steer-
ing wheel to select the Settingsmenu.
X Press the :or9 button to select the
Vehicle submenu.
X Press the abutton to confirm.
35 Only for vehicles with front foglamps.
36 Only for vehicles withou tfront foglamps.
37 Onl yvehicles with Intelligent Light System. Menus and submenus
207On-board computer and displays
BA 207ECE ÄJ 2010 /1a; 1; 2, en-GB
mkalafa Version: 3.0.2.11 2010-01-26T13:03:22+01:00 -Seite 207 Z