display MERCEDES-BENZ E-Class CABRIOLET 2011 C207 Comand Manual
[x] Cancel search | Manufacturer: MERCEDES-BENZ, Model Year: 2011, Model line: E-Class CABRIOLET, Model: MERCEDES-BENZ E-Class CABRIOLET 2011 C207Pages: 194, PDF Size: 6.42 MB
Page 181 of 194
Setting
thebrightness
X Select Settings with
the: button and
conf irmwith the9button.
X Select Brightness using
the9:
buttons andpress the9button toconf irm.
As caleap pea rs.
X Adju stthe brightne ssusing the 9:
bu ttons andpressthe 9button toconfi rm.
The brightne ssbarm oves upordown. The
picture becomes lighterordarker in
accordanc ewith thescale. Showing/hiding
thepictur e
X To hide thepictur e:select Display Off in
the system menuusingthe:;
button son the remote controland press
the 9button toconf irm.
The picture ishidden.
X To display thepictur e:press the9
button . Audio
CD/DVDand MP3 mode Safety
note G
WARNIN
G
The RSE CD/D VDplayer isaClass 1laser
prod uct.There isadanger ofinvisible laser
radiation whenyouopen ordamage thecover.
Do not remove thecover. TheRSE CD/DVD
play erdoes notcont ainany parts which can
be serviced bythe user. Forsafety reasons,
have anynecessary serviceworkperformed
by qual ified personnel. General
notes
You willfind information onthe following
topics inthe Audio section:
R notes onCDs/DV Ds(Ypage 144)
R notes onMP3 mode (Ypage 143)
R notes oncopyright (Ypage 144) Inserting
aCD/DVD
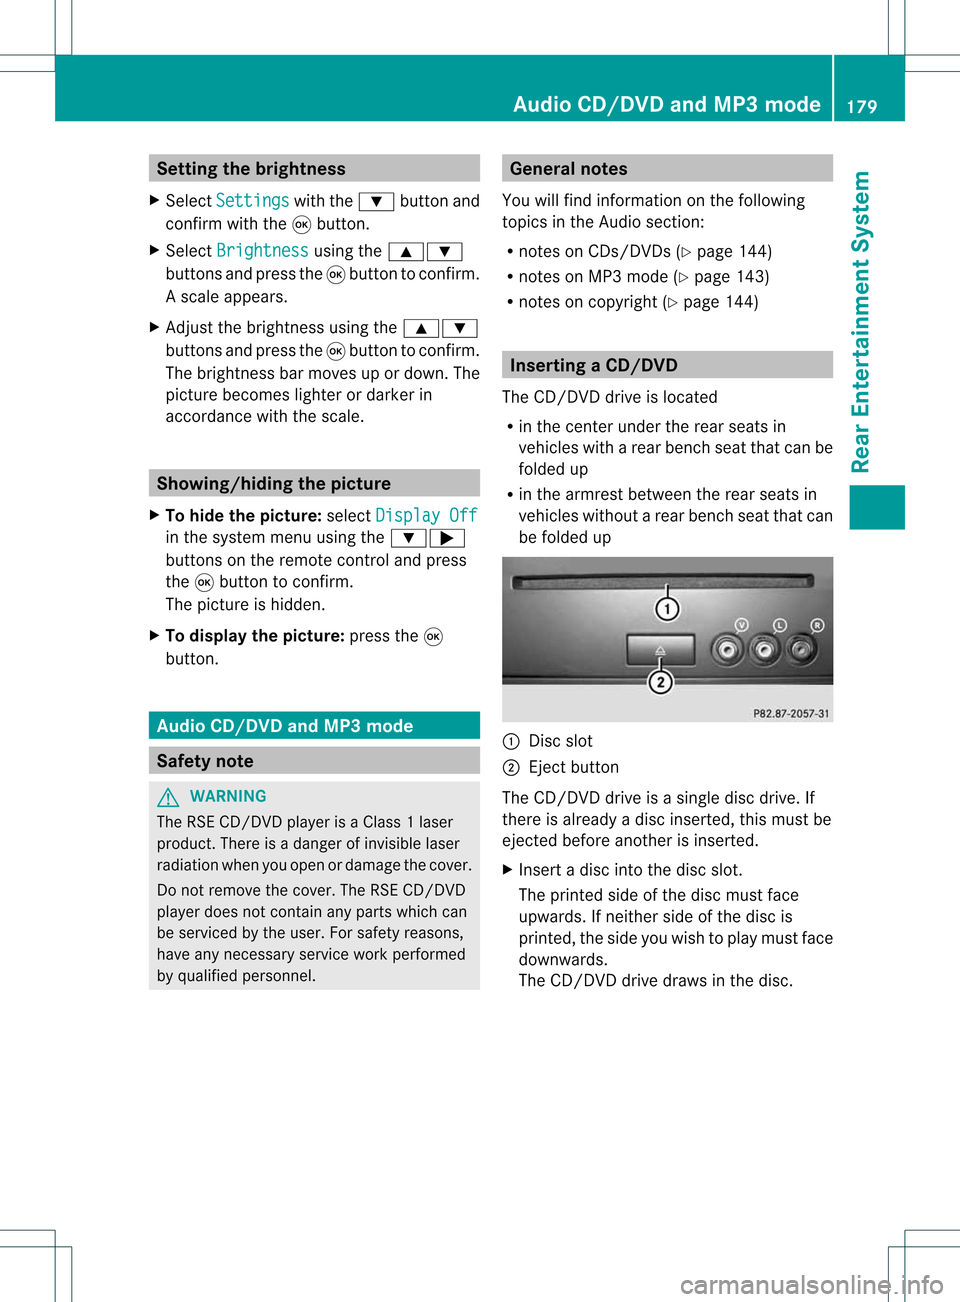
The CD/DVD drive isloc ated
R in thece nter und ertherea rseat sin
veh icles witharea rbenc hseat that canbe
folded up
R in the armrest between therear seats in
vehicles withoutarear bench seatthatcan
be folded up :
Disc slot
; Eject button
The CD/D VDdrive isasingle discdrive. If
ther eis already adisc insert ed,this must be
ejec tedbefore anotherisinsert ed.
X Inser tadisc intothe disc slot.
The print edside ofthe disc must face
upwards. Ifneit her side ofthe disc is
print ed,the side youwish toplay must face
downwards.
The CD/D VDdrive draws inthe disc. Audio
CD/DVDand MP3 mode
179Rear Entert ainmentSyst em Z
Page 182 of 194
The
CD/D VDdrive plays thedisc:
R ifit has been insert edcorrec tlyand isa
permissible disc,and
R after youhave switched ondisc mode
(audio CD/DVD/MP3 mode)
Data onanMP3 CDfirst needs tobe loaded
by the drive. Loading maytake some time,
depending onthe number offolders and
track s. Removing
aCD/DV D
X Press theþ ejec tbut ton.
The drive ejec ts thedis c.
X Tak eth edis co utofthes lot.
If you donot takethe disc outofthe slot,
the drive willdraw itin again autom atically
aft erashor twhile. Switching
toaudio CD,audio DVDor
MP3 mode
X Insert aCD/DV D(Y page 179).
The Rear SeatEntertainment Systemloads
the inserted disc.
X Select Disc in
the menu usingthe
9=; buttonsonthe remote
cont roland press the9button toconfirm .
The corresponding modeisswitched on.
The Rear SeatEntertainment Systemplays
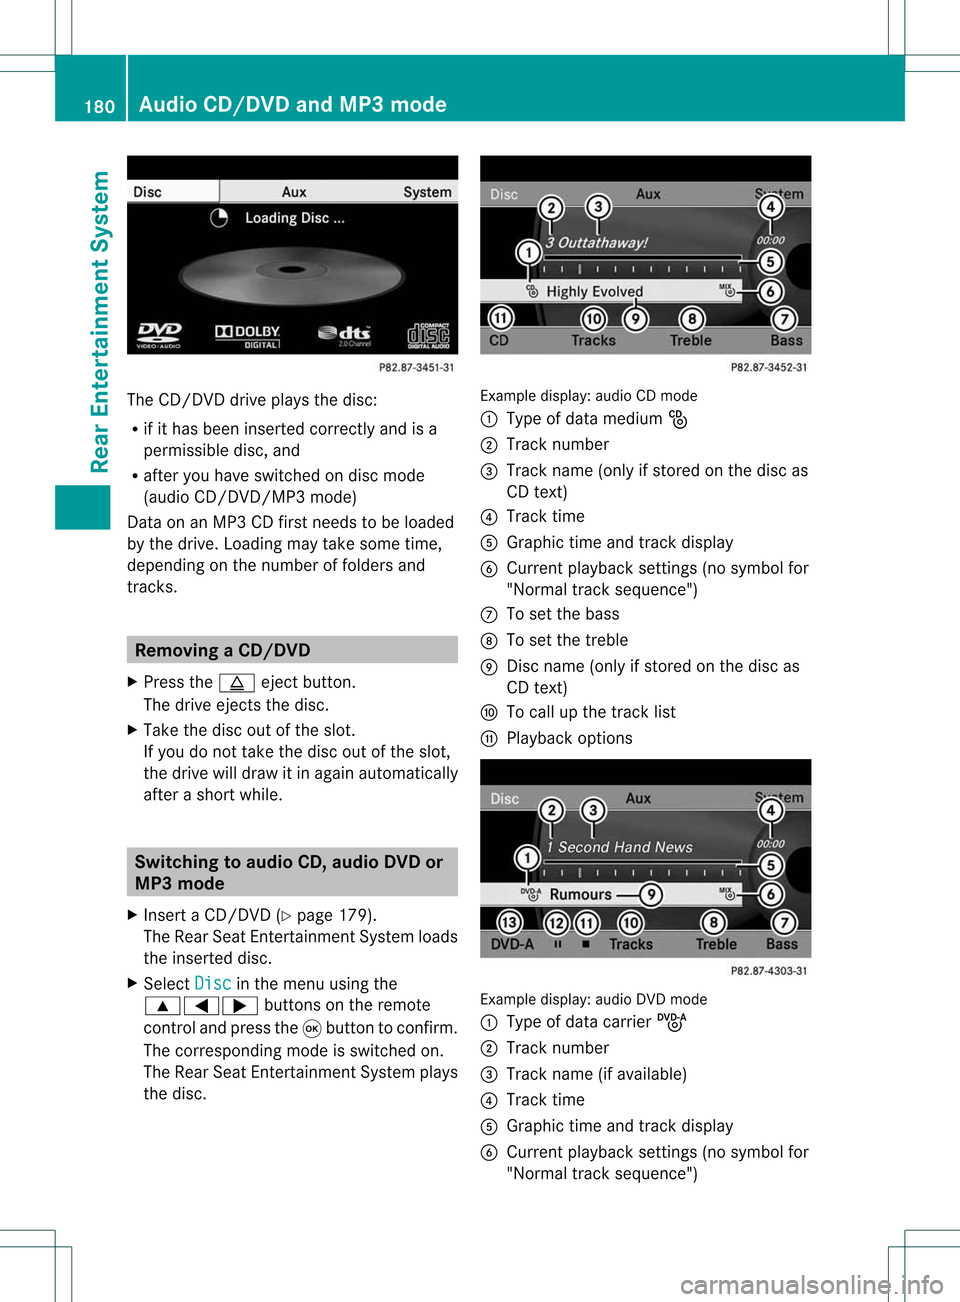
the disc. Example
display:audio CDmod e
: Type ofdat amedi um_
; Trac knum ber
= Trac kname (onlyifstore don thedisc as
CD text)
? Trac ktim e
A Graph ictim eand track displ ay
B Curr entp layback settings (no symbol for
"Norm altrack sequen ce")
C Toset the bass
D Toset the treble
E Disc name (onlyifstored onthe disc as
CD text)
F Tocall upthe track list
G Playback options Ex
ample display: audioDVDmode
: Type ofdata carrierü
; Trac knumb er
= Trac kname (ifavailabl e)
? Trac ktim e
A Graph ictim eand track displ ay
B Curr entp layback settings (no symbol for
"Norm altrack sequen ce") 180
Audio
CD/DVD andMP3 modeRearEnter tainment System
Page 183 of 194
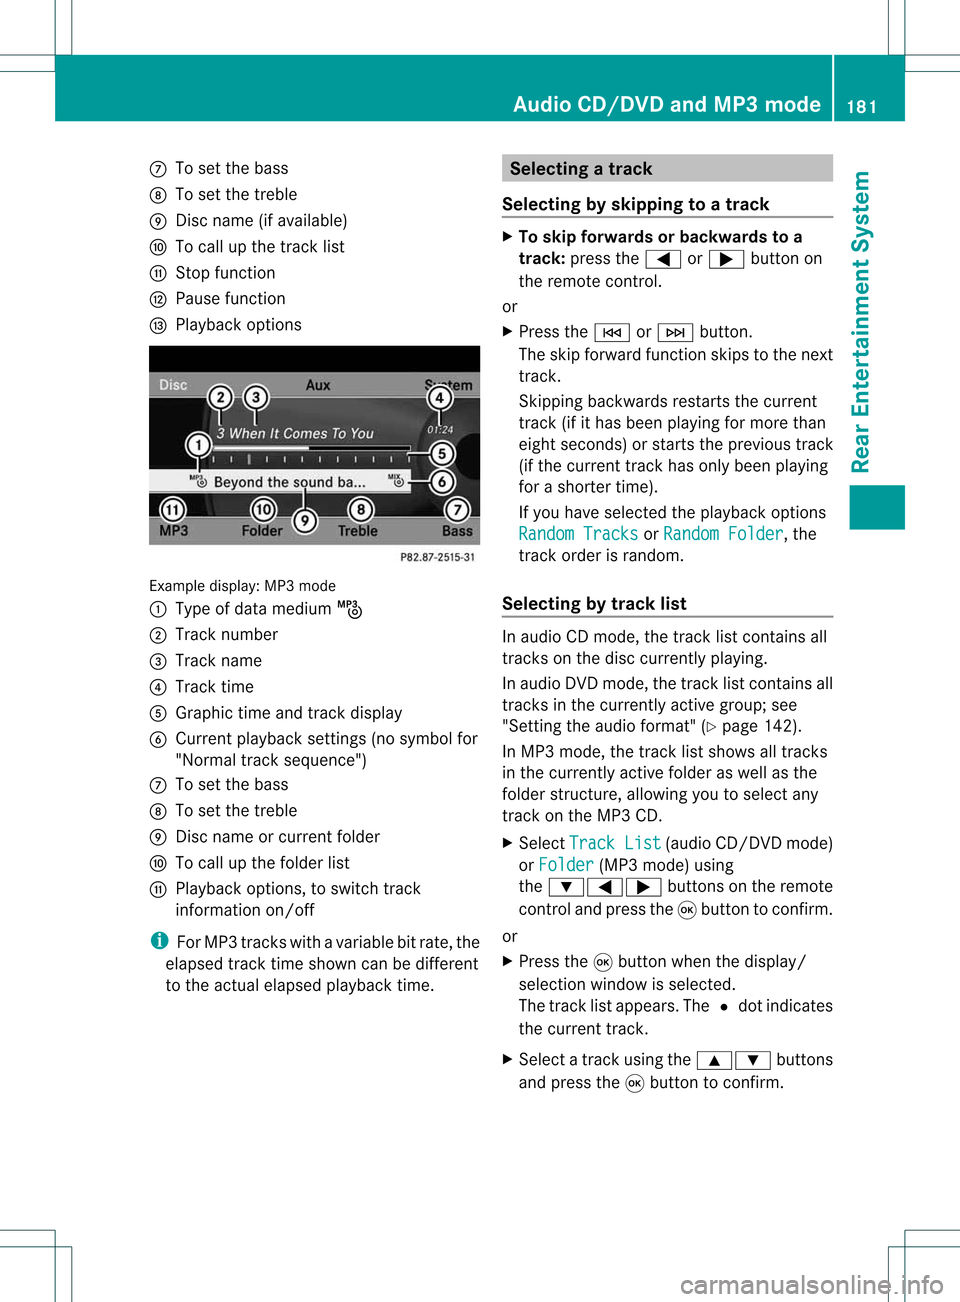
C
Toset the bass
D Toset the treble
E Disc name (ifavailab le)
F Tocall upthe track list
G Stop funct ion
H Pause function
I Playba ckoptions Example
display:MP3mode
: Type ofdata medium þ
; Track number
= Track name
? Track time
A Graphic timeandtrack display
B Current playbacksett ings (nosymbol for
"Normal tracksequence")
C Toset the bass
D Toset the treble
E Disc name orcurren tfolder
F Tocall upthe folder list
G Playba ckoptions, toswitch track
inform ationon/of f
i ForMP3 track swith avariable bitrate, the
elapsed tracktimeshown canbedifferent
to the actual elapsed playbacktime. Selecting
atrac k
Se lecti ng byskippin gto atrac k X
To skipfo rwa rds orbac kwards toa
trac k:pre ssthe = or; button on
the rem otecontr ol.
or
X Pre ssthe E orF button.
Th eski pfor wa rdfunctio nskip sto the next
tra ck.
Skip ping backwa rdsrestartsthe current
tra ck (ifi th as been playin gfor mor eth an
eigh tsecon ds)orstart sthe previous track
(if the curren ttrack hasonly been playing
for ashorter time).
If you have selected theplayba ckoptions
Random Tracks or
Random Folder ,
the
track order israndom.
Sel ecting bytrack list In
audio CDmode, thetrack listcontains all
tracks onthe disc currently playing.
In au dio DVD mode, thetrack listcontains all
tracks inthe currently activegroup;see
"Setting theaudio format" (Ypag e142).
In MP3 mode, thetrack listshow sall tracks
in the currently activefolderaswell asthe
folder structure,allow ingyou toselect any
track onthe MP3 CD.
X Select Track List (au
dio CD/DVD mode)
or Folder (MP3
mode) using
the :=; buttonsonthe remote
cont roland press the9button toconfirm.
or
X Press the9button whenthedispla y/
selection windowisselected.
The track listappea rs.The #dot indicates
the current track.
X Select atrack using the9: buttons
and press the9button toconfirm. Audio
CD/DVD andMP3 mode
181RearEntertainm entSystem Z
Page 184 of 194

Making
aselection byenter ingthetr ack
num berdirectly X
Pres sth eh buttonontherem ote
con trol.
The track entrydisplay appears .
Ex ample: track 2
X Pres sth e· numberbutt on.
Ex ample: track 12
X Pres sth ecor respon ding numberkeys in
rapid successio n.
i Itis no tp ossible toenter numbers that
exceed thenumber oftrack son the CDor
in the current lyactive folder.
X Wait forapproximately threeseconds after
making theentr y.
You willhear thetrack which hasbeen
enter ed.The correspon dingbasic menu
then reappears. Fast
forward /rewind
X With thedisplay /select ionwindow active,
press the= or; button onthe
remote controlrepeatedly untilyoureach
the desired position.
or
X Press andhold theE orF button
until thedesired position isreached. Selecting
afolder
This function ison lyavailable inMP3 mode .
X Sele ctFol der in
MP3 mode using
th e:=; buttonson therem ote
con trol and pres sth e9 butt ontocon firm.
or
X Pres sth e9 butt onwhen thedisplay/
selec tionw indow isselec ted.
The folder contentappears. :
Folder selectionsymbol
; Current foldername
= Track symbol
X To switch tothe super ordina tefolder :
select icon:using the9: buttons
on the remot econ troland press the9
butt ontocon firm.
The display showsthenextfolder up. :
Folder selection symbol
; Folder icon
X Select afolder usingthe9: buttons
and press the9button toconf irm.
You willsee thetrack sin the folder.
X Select atrack using the9: buttons
and press the9button toconf irm.
The track isplaye dand thecorrespon ding
folder isnow theactive folder. Pause
function
This funct ionisonly availa bleinaudio DVD
mode. 182
Audio
CD/DVD andMP3 modeRear Entert ainment System
Page 185 of 194

X
To paus eplay back:sel ect Ë using
the :=; buttons onthe rem ote
contro land pressthe 9button toconfi rm.
The Ë displ aycha nge sto Ì.
X To conti nue playback:sel ect Ì and
pre ssthe 9button toconfi rm.
The Ì displ aycha nge sto Ë. Sto
pfuncti on
This function isonly available inaudio DVD
mode.
X To inte rrupt playbac k:sele ctÉ using
the :=; buttonsonthe remote
control andpress the9button toconfirm.
The Ë displa ychange sto Ì.
X To continue playbac k:sele ctÌ and
press the9button toconfirm.
Pla yback continues fromthepointwhe reit
wa sinterrup ted.
X To stop playbac k:whi lepla yback is
interrup ted,selectÉ againand press
the 9button toconfirm.
Pla yback stops andreturns tothe
begi nning ofthe DVD. Ì ishigh lighted.
X To restart playbac k:sele ctÌ and
press the9button toconfirm.
Pla yback starts fromthebegi nning ofthe
DVD. Settin
gthe audio format
Further informationonaudio formats is
ava ilable inthe "Aud io"section
(Y pag e142).
X Select DVD-A usi
ng the :=;
buttons onthe remote controlandpress
the 9button toconfirm.
X Select Group usi
ng the 9: buttons
and press the9button toconfirm.
The listo favail ableau dio formats appears.
The #dot indica testhe format currently
sele cted. X
Select anaudio format using the
9: buttonsandpress the9button
to confirm.
X To exitthe menu: pressthe=
or ; button. Playbac
koptio ns
Fur ther informa tion onplay ba ck opti ons is
ava ilab lein the "Audio" secti on
(Y page 142) .
X Sel ect CD ,
DVD -A or
MP3 us
ing
the :=; buttons onthe remo te
control andpressthe 9buttons to
confi rm.
The options list appe ars .The # dot
indicates theoption current lyselected.
X Select Normal Track Sequence ,
Random Tracks or
Random Folder using
the
9: buttonsandpress the9button
to confirm .
The option isswitched on.For alloptions
except Normal TrackSequence ,
you will
see acorresponding displayin the displa y/
selection window.
i Ifyou change thedisc, theNormal Track
Sequence option
isactivated
automatically .Ifa no ption isselect ed,it
remains selectedafter theRear Seat
En tert ainmen tSyst emisswitc hedonor
off. Switching
track inform ationon/off
(MP3 mode only)
If the func tionisswitc hedon,folder andtrack
names aredisplayed.
If the func tion isswitc hedoff,disc andfile
names aredisplayed.
X Select MP3 using
the:=;
butt ons onthe remot econ troland press
the 9butt ontocon firm. Audio
CD/DVDand MP3 mode
183Rear Entert ainmentSyst em Z
Page 186 of 194
X
Sel ect DisplayTra ckInformation us
ing the 9: buttons andpressthe
9 button toconfi rm.
The functi onissw itche don O oroff ª,
de pendi ng on the previous statu s. Vide
oDVD mode Gen
eral notes
Here youwi llfind further informa tion onthe
fol lowi ng topi cs:
R sa fety notes (Ypage 133)
R notes onDVDs (Y pa ge 162) DVD
playbackcondit ions
Playback problems mayoccurwhen playing
cop ieddisc s.Ther eis alarge varietyof disc s,
DV Da uth oring sof twar e,writ ingsoftwar eand
writ ersavailab le.This varietymean sth at
th ere isno guaran teeth at theRear Seat
En tertainm entS yst em will beable toplay
vid eo DVDs that you havecopied yourself.
You willfind further informationinthe Video
section (Ypage 163). Information regarding
COMAND alsoapplies tothe Rear Seat
En tert ainment System. Function
restrictions
Dependin gon the DVD ,it is possible that
cert ainfunct ionsoractions described inthis
section willbetemporarily blockedormay not
funct ionatall. Assoon asyou trytoactivate
these functionsoractions ,you willsee the
K symbol inthe display . Inserting
andremoving aCD/DVD
X Proc eed asdes cribed inthe"Au dio CD/
DV Da ndMP3 mode"sec tion
(Y page 179) . Ac
tiv atin gvideo DVD mode
X Inse rtavid eo DVD.
The RearSea tEnterta inmentSys tem load s
the disc.
If disc mod ewa sthe last mod esel ecte d,it
wi llnow beacti ve.
If it wa snot, switch onvideo DVD modeas
de scri bedin the followi ng instructio n.
X Sel ect Disc in
the menu using the
9=; buttons onthe rem ote
contro land pressthe 9button toconfi rm.
If the video DVD fulfills the play ba ck
cri teri a,the filme ithe rstar tsautoma tically
or the menu saved onthe DVD appe ars. If
the DVD menu appe ars, yo umu ststa rtthe
fi lm ma nua lly.
X Sel ect the corr espo ndi ngmenu itemi nthe
DVD menu. Hiding/show
ingthe navigation menu
X To show: pressthe9 or: button
on the remote control.
X To hide: press the9 or: button.
or
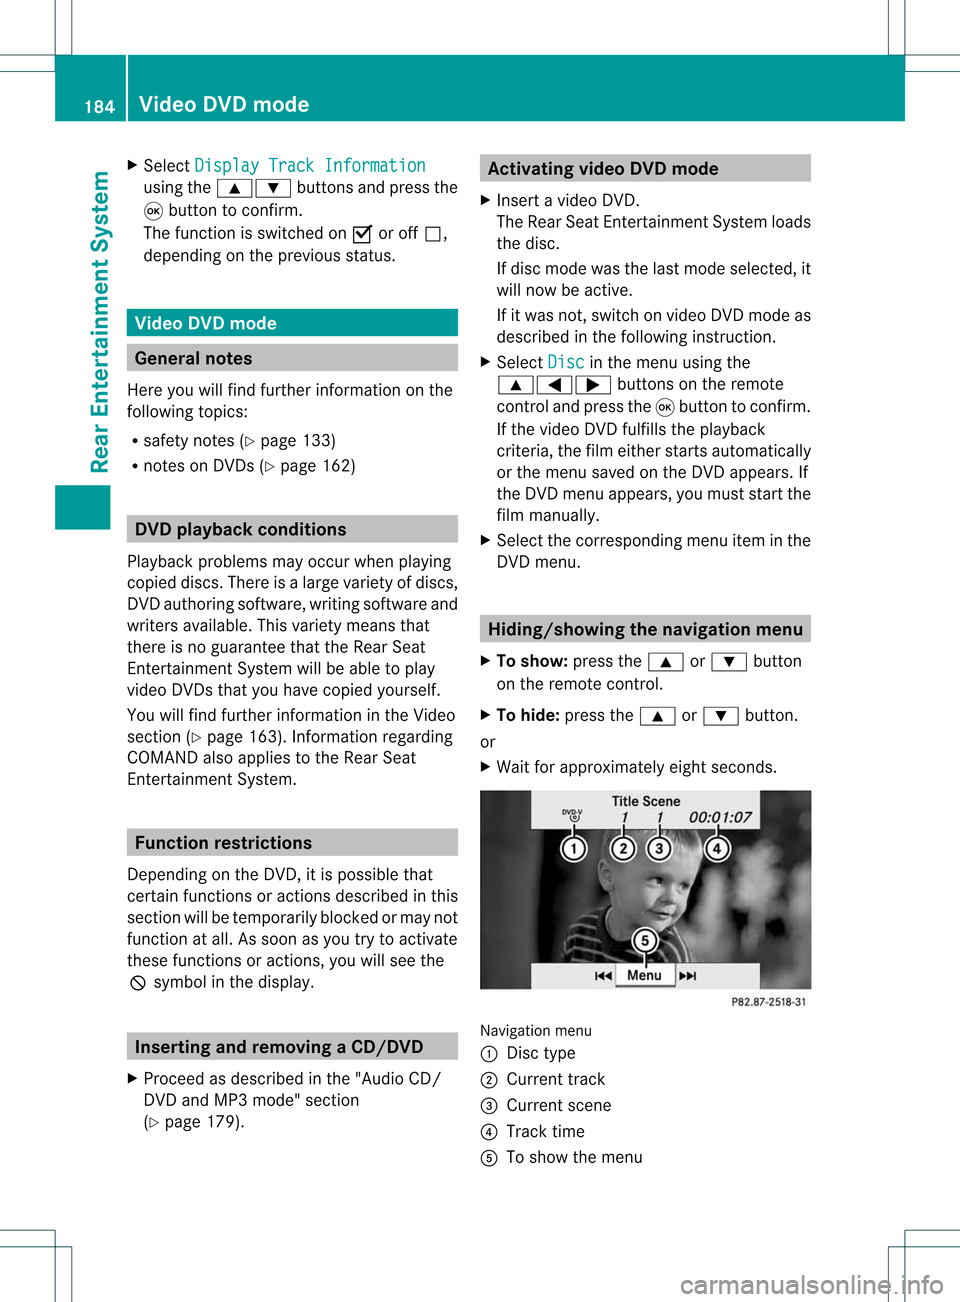
X Wait forapproximately eightseconds. Navigation
menu
: Disc type
; Current track
= Current scene
? Track time
A Toshow themenu 184
Video
DVDmodeRear Enterta inment System
Page 187 of 194

Showing/
hidingthemenu
X To show: pressthe9button onthe
remote control.
or
X Select Menu while
thenavigation menuis
shown andpress the9button toconf irm.
X To hide: press the9 button, select
Full Screen and
press the9button to
conf irm. Menu
: Video DVDoptions
; Pause function
= Stop function
? Toset the treble
A Toset the bass Fast
forward /rewind
X Press andhold theE orF button on
the remote controluntil thedesired
position hasbeen reached.
You seethenavigation menu. Pause
function
X To show themenu: pressthe9button
on the remote control.
or
X Select Menu while
thenavigation menuis
shown andpress the9button toconf irm. X
To pause playback: selectËandpress
the 9button toconf irm.
The Ë display changes toÌ.
X To continue playback: selectÌand
press the9button toconf irm.
The menu ishidden. Stop
function
X To show themenu: pressthe9button
on the remote control.
or
X Select Menu while
thenavigation menuis
shown andpress the9button toconf irm.
X To interru ptplayback: selectÉand
press the9button toconf irm.
The Ë display changes toÌ.T he
video image ishidden.
X To continue playback: selectÌand
press the9button toconfirm .
Play back continues fromthepoint where it
was interrupted. Themenu ishidden.
X To stop playback: whileplayback is
interrupted, selectÉagain andpress
the 9button toconfirm .
Play back stops andreturns tothe
beginning ofthe DVD .Ì ishighlighted.
X To restar tplayback: selectÌand
press the9button toconfirm .
Play back starts fromthebeginning ofthe
DVD . Selec
tingascene/ch apter
Not e Fur
ther inform ation onthis fun ction is
availab lein the"Vide o"sec tion
(Y page 166). Vid
eoDVD mode
185Rea rEnt ertai nme ntSyste m Z
Page 190 of 194

X
Sel ect AudioLanguage and
pressthe 9
bu tton toconfi rm.
Am enu appears afterashort while. The
# dot infron tof an ent ryindicat esthe
curren tlyselect edlanguage.
X Select alanguage usingthe9:
button sand press the9button tocon firm.
X To exit themenu: pressthe=
or ; button . Subtit
lesand camer aangle
These functionsare not available onallDVD s.
The number ofsubtitle languages andcamera
angles available dependsonthe contentof
the DVD. Itis po ssi ble tha tthe settin gsmay
also beaccessed fromtheDVD menu.
X Press the9button onthe remote control
and show themenu.
X Select DVD-Video and
press the9button
on the remote controltoconfirm .
X Select DVDFunctions and
press the9
button toconfirm .
X Select Subtitles or
Camera Angle and
press the9button toconfirm .
In both cases, amenu appearsafter afew
seconds. The#dot infront ofan entr y
indicates thecurrent setting.
X Select asettin gusing the9:
buttons andpress the9button toconfirm .
X To exit themenu: pressthe=
or ; button. Interactive
content
DVD scan also containinteract ivecont ent
(e.g. avideo game). Inavideo game, youmay
be able toinfluence eventsbyselecting and
triggering actions.Thetype andnumber of
actions depend onthe DVD .
X Select anaction usingthe
9;:= buttonsonthe remote
controland press the9button to
execute it.
A menu appearsand thefirst entry,
Select ,
is highlighted.
X Press the9button. AUX
mode Introduction
You canconn ectone extern alvideo source to
each ofthe displa ysofthe Rear Seat
Ent ertainment System(AUXdispla y)and also
one extern alvideo source tothe rear-seat
CD/DV Ddrive (AUX drive) withasound and
video signal.
Please seethecorresponding operating
instruct ionsforinformation onhow to
operate theextern alvideo source. Conne
ctingAUXequipment
AUX drive The
AUX drive jacks arelocated onthe CD/
DVD drive nexttothe CD/DV Deject button
(Y page 173).
Displaying AUX The
AUX displa yjacks areonthe side ofthe
screen (Ypage 173).
Audio andvideo conne ction X
Insert theaudi oplugs forthe left and right
signals intothecorresponding Land R
jacks.
X Insert thevideo plugintotheVjack. 188
AUX
modeRear Enterta inment System
Page 191 of 194
Acti
vating AUX mode
AUX drive X
Se lec tAux in
themen uusin gth e
9=; buttons on therem ote
co ntrol and pressthe9 but tonto confirm .
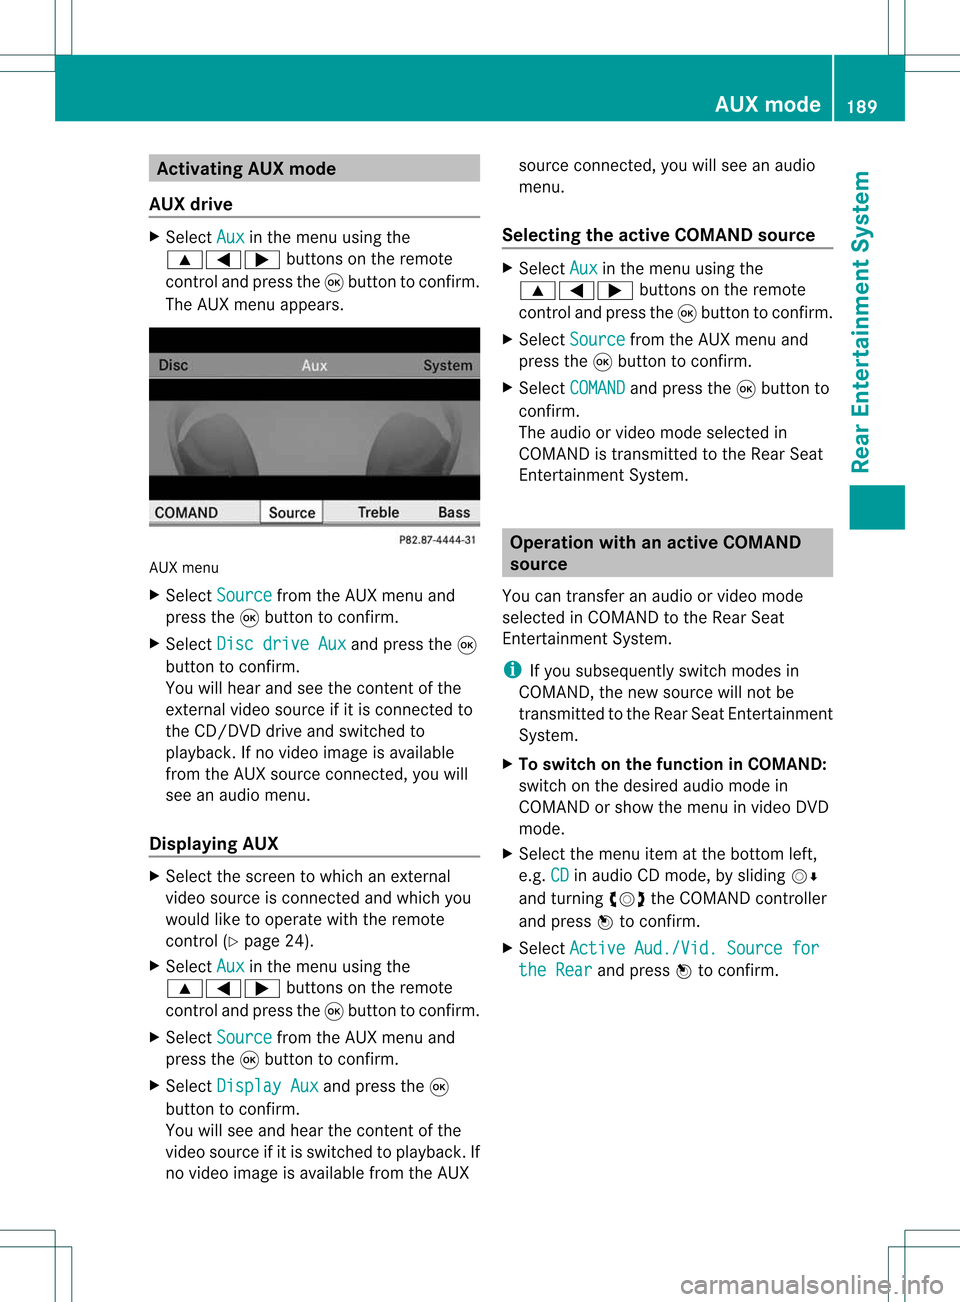
The AUXmen uappear s. AU
Xmen u
X Se lec tSou rce fr
om theAU Xmen uand
pre ssthe9 buttonto confirm .
X Se lec tDis cdri veAux and
pressthe9
but tonto confirm .
You willhear andseetheco nten to fthe
extern alvideo source ifit is conn ected to
the CD/DV Ddrive andswitched to
play back. Ifno video image isavaila ble
from theAUX source connected, youwill
see anaudi omenu.
Displaying AUX X
Select thescreen towhich anextern al
video source isconn ected andwhich you
would liketooperate withtheremote
cont rol(Ypage 24).
X Select Aux in
the menu usingthe
9=; buttonsonthe remote
cont roland press the9button toconfirm .
X Select Source from
theAUX menu and
press the9button toconfirm .
X Select Display Aux and
press the9
button toconfirm .
You willsee and hear thecont entofthe
video source ifit is switched toplay back. If
no video image isavaila blefrom theAUX source
connected, youwillsee anaudi o
menu.
Selec tingtheactive COMAND source X
Select Aux in
the menu usingthe
9=; buttonsonthe remote
cont roland press the9button toconfirm .
X Select Source from
theAUX menu and
press the9button toconfirm .
X Select COMAND and
press the9button to
confirm .
The audi oor video mode selected in
COMAND istransmit tedtothe Rear Seat
Ent ertainment System. Operat
ionwith anactive COMAND
source
You cantransf eran audi oorvideo mode
selec tedinCOMA NDtothe Rear Seat
En ter tain men tSyst em.
i Ifyou subsequen tlyswitc hmodes in
COMA ND,the new sourc ewill notbe
tr ansm itted tothe Rear SeatEnter tain men t
Syst em.
X To switch onthefunct ioninCOMAN D:
switc hon the desire daudio mode in
COMA NDorshow themen uin video DVD
mode.
X Selec tthe men uitem atthe bottom left,
e.g. CD in
audio CDmode, byslidin gVÆ
and turnin gcVd theCOMA NDcontroller
and press Wtocon firm .
X Selec tActi veAud. /Vid.Sour cefor the
Rear and
press Wtocon firm . AUX
mode
189Rea rEnter tainment System Z
Page 192 of 194
In
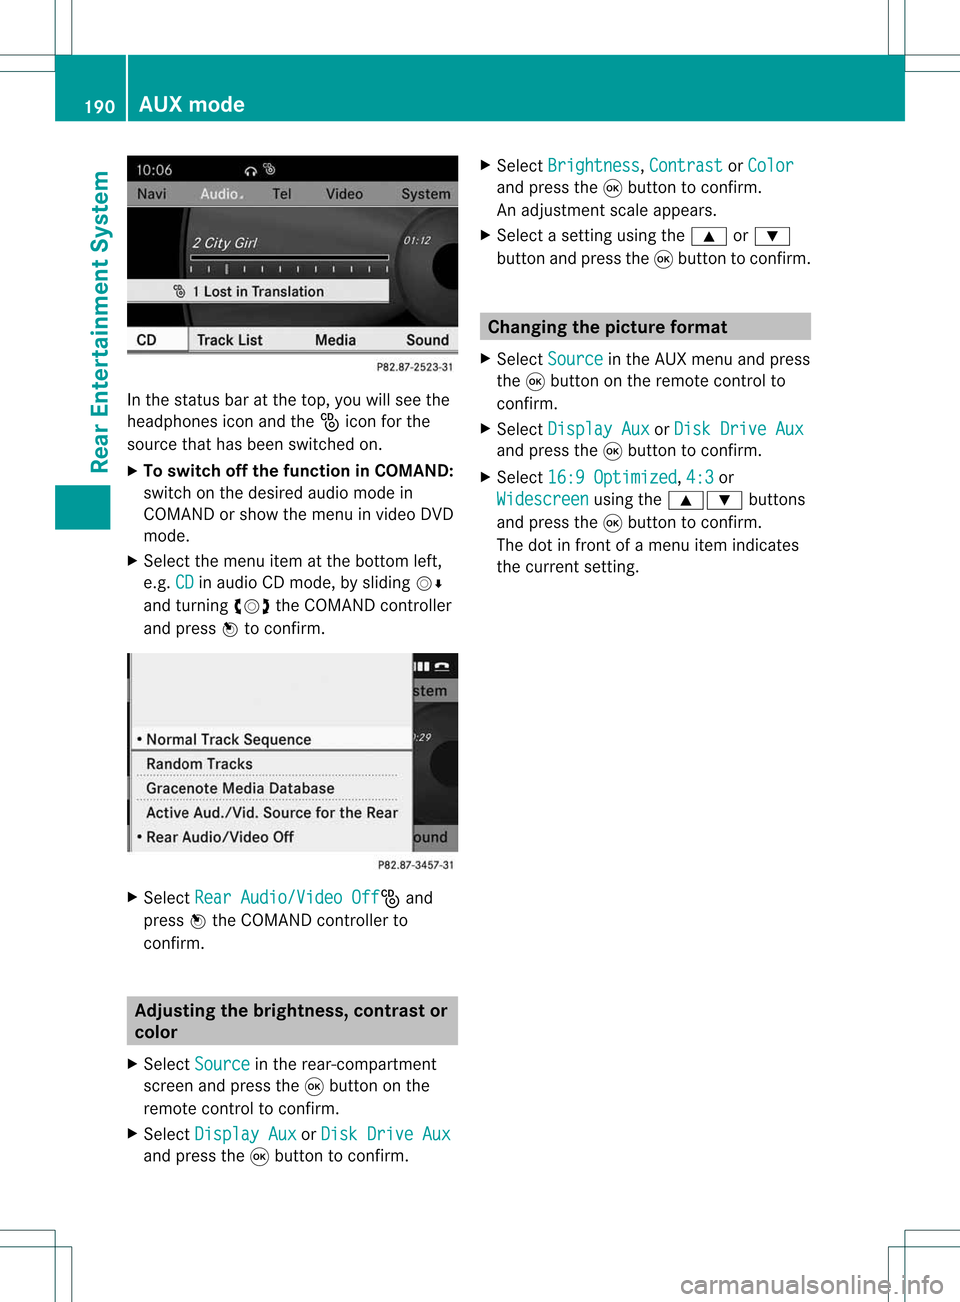
the status baratthe top, youwillsee the
head phones iconandthe_icon forthe
source thathasbeen switched on.
X To swi tch offthe functio nin COMA ND:
switch onthe desire daud iomode in
COMAND orshow themenu invideo DVD
mode.
X Select themenu itematthe bottom left,
e.g. CD in
aud ioCD mode, byslid ing VÆ
and turning cVdtheCOMAND controller
and press Wtoconfirm. X
Select RearAudio/Video Off _
and
press Wthe COMAND controller to
confirm. Adjusting
thebrightnes s,con trast or
col or
X Select Source in
the rear-compartment
screen andpress the9button onthe
remote controltoconfirm.
X Select Display Aux or
Disk Drive Aux and
press the9button toconfirm. X
Select Brightness ,
Contrast or
Color and
press the9button toconfirm.
An adjus tment scaleappears.
X Select asetting usingthe9 or:
button andpress the9button toconfirm. Changi
ngthe picture format
X Select Source in
the AUX menu andpress
the 9button onthe remote controlto
confirm.
X Select Display Aux or
Disk Drive Aux and
press the9button toconfirm.
X Select 16:9Optimized ,
4:3 or
Widescreen using
the9: buttons
and press the9button toconfirm.
The dotinfront ofamenu itemindicates
the current setting. 190
AUX
modeRear Entertainment System