light MERCEDES-BENZ E-Class CABRIOLET 2011 C207 Comand Manual
[x] Cancel search | Manufacturer: MERCEDES-BENZ, Model Year: 2011, Model line: E-Class CABRIOLET, Model: MERCEDES-BENZ E-Class CABRIOLET 2011 C207Pages: 194, PDF Size: 6.42 MB
Page 113 of 194
X
Sel ect the characte rsof the entry youare
sea rchi ngfor one byone andpressW to
confi rm.
Whe nthe selection isclear, COMAND
switches automatically tothe selection list.
X To complete thesearch: switchfromthe
phone bookwithcharacter bartothe
selection list(Ypage 111).
The lastlistentr yis automatically
highlighted.
With number keypad Altern
atively, youcan also enter digits using
the number keypad(directentry)
(Y page 31).
Dele ting character s X
To delete anindividual character:select
the 2 symbol byturning cVdthe
COMAND controller andpress Wbriefly.
or
X Briefly pressthe2 button
Each timeacharacter isdeleted, theentr y
most closely resembling theremaining
characters isshown atthe top ofthe list.
X To delete anentry: selectthe2
symbol byturning cVdtheCOMAND
cont roller andpress Wuntil theentr yis
deleted.
or
X Press andhold the2 button untilthe
entire entryis deleted.
Changing thelanguage ofthe character
bar X
Select Ö.
X The language isswitched. Changing
thecharacter setofthe
character bar X
Select pandpress Wtoconfirm .
The character setchanges eachtimeyou
make thisselection.
Selec tinganentry directly fromthelist You
canswitch tothe listatany time during
character entry.
X Slide VZtheCOMAND controller
repeatedly orpress andhold Wuntil the
character bardisappe ars.
or
X Select ¬andpress Wtoconfirm .
X To selec tanentry :turn cVd the
COMAND controller untilthedesired entry
is highlighted andpress Wtocon firm.
To select aphone number: theGicon
indi cates thatanentry contains morethan
one phone numbe r.
X Select aphone bookentry withtheGicon
and press Wtoconfirm.
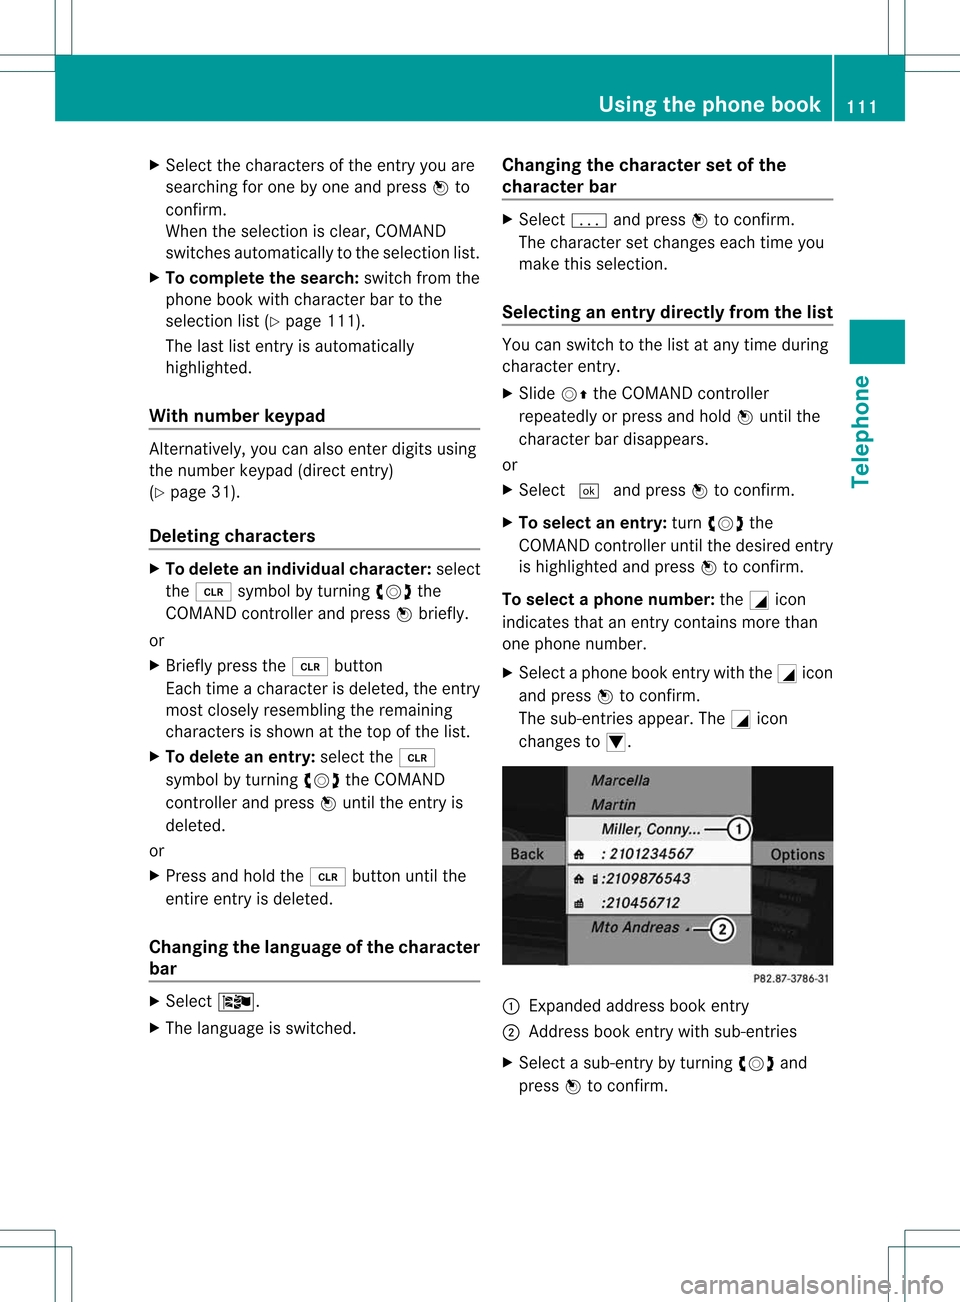
The sub-entries appear. TheGicon
changes toI. :
Expanded address book entry
; Address bookentry withsub-entries
X Select asub -entry byturning cVdand
press Wtoconfirm. Usi
ngthe phone book
111Tele phone Z
Page 114 of 194
X
To return tothe phonebook with
ch arac terbar: select Back in
the list and
pre ssW toconfi rm.
or
X Pre ssthe k back button. Di
spl aying detai lsfora ne ntry
X Select anent ryinthe select ionlistby
turn ingcVd theCOMAND controller.
X Select Options by
sliding VYandpress
W tocon firm.
X Select Details and
press Wtocon firm.
The detailed displayappears.
X To close thedeta iledview: slideXVY
repeatedly untiltheentryishighlighted
again orpress thek backbutton . Deleting
anentry fromthephone
book
If the entrycon tains onlyphone numbers, it
is deleted fromthephone bookandaddress
book.
If there isadditional dataincluded alongwith
the phone number, e.g.anavigable
destin ation, theentryisdeleted fromthe
phone bookbutretain edinthe address book.
X Select anent ryinthe select ionlistby
turn ingcVd theCOMAND controller.
X Select Options by
sliding VYandpress
W tocon firm.
X Select Delete and
press Wtocon firm.
Ap rompt appears asking whethe rthe entr y
should bedeleted.
X Select Yes or
No and
press Wtoconfirm .
If you select Yes ,
the entr yis deleted in
accordance withtherules described above.
If you select No ,
the process willbeaborted. Creating
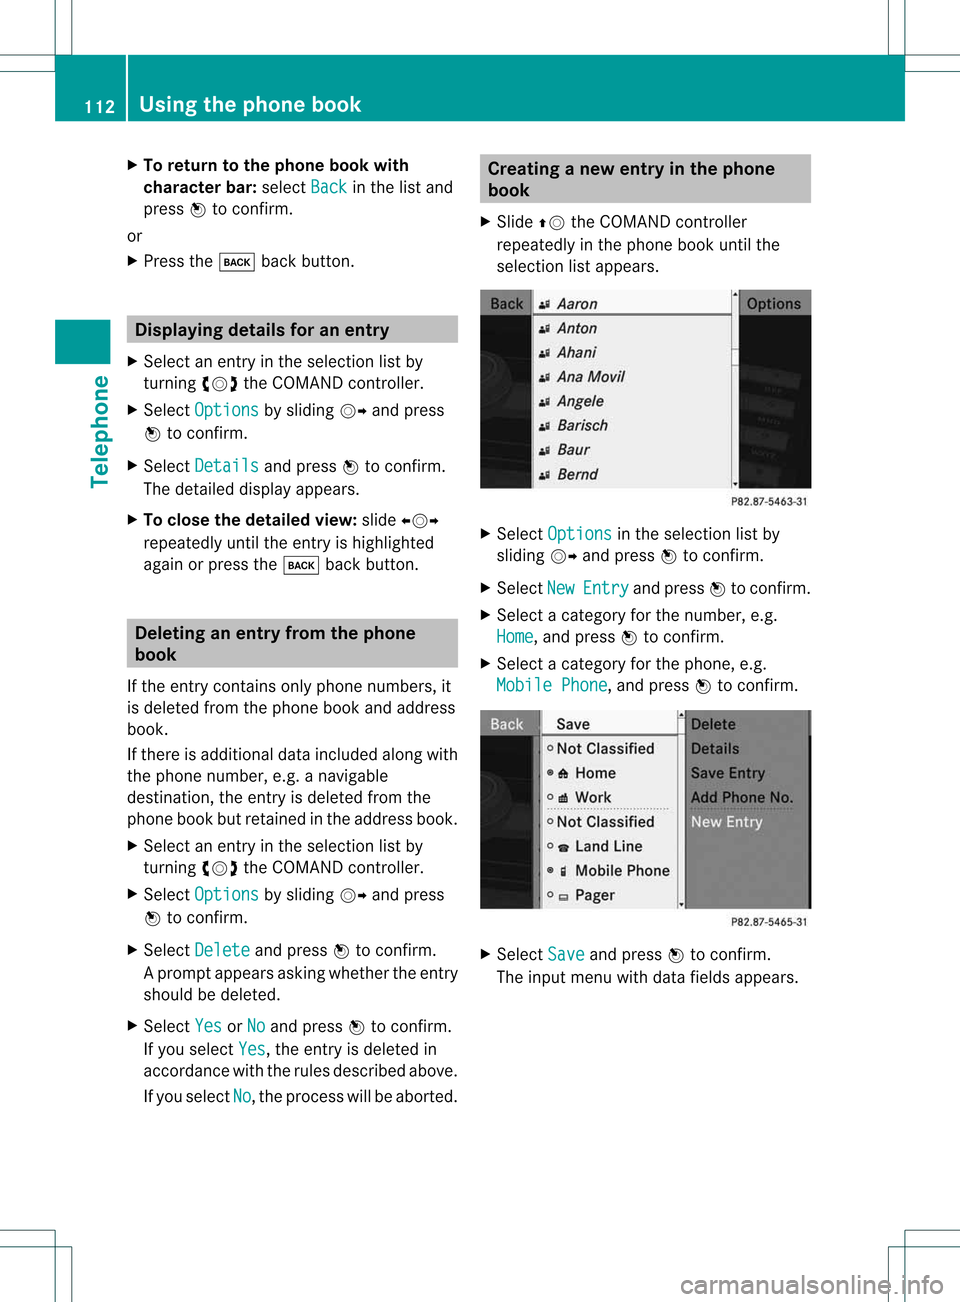
anew entry inthe phone
book
X Slide ZVtheCOMAND controller
repeatedly inthe phone bookuntilthe
selection listappea rs. X
Select Options in
the selection listby
sliding VYandpress Wtoconfirm .
X Select New Entry and
press Wtoconfirm .
X Select acategory forthe number, e.g.
Home ,
and press Wtoconfirm .
X Select acategory forthe phone, e.g.
Mobile Phone ,
and press Wtoconfirm . X
Select Save and
press Wtoconfirm .
The input menu withdata fields appea rs. 112
Using
thephone bookTelephone
Page 116 of 194
i
The respect ivemenu itemcanonly be
selected ifcalls have already beenmade or
received inCOMAND .
Displaying missedcallsinthe COMAND
display isnot supported byallmobile
phones. Opening
thecall listand selecting an
entry
X Press the% functionbutton .
X Select CallLists in
the telephone basic
menu bysliding VÆandturnin gcVd the
COMAND controller andpress Wto
conf irm.
Am enu appears.
X Select Calls Receive d or
Calls Dialed using
cVdandpress Wto
con firm.
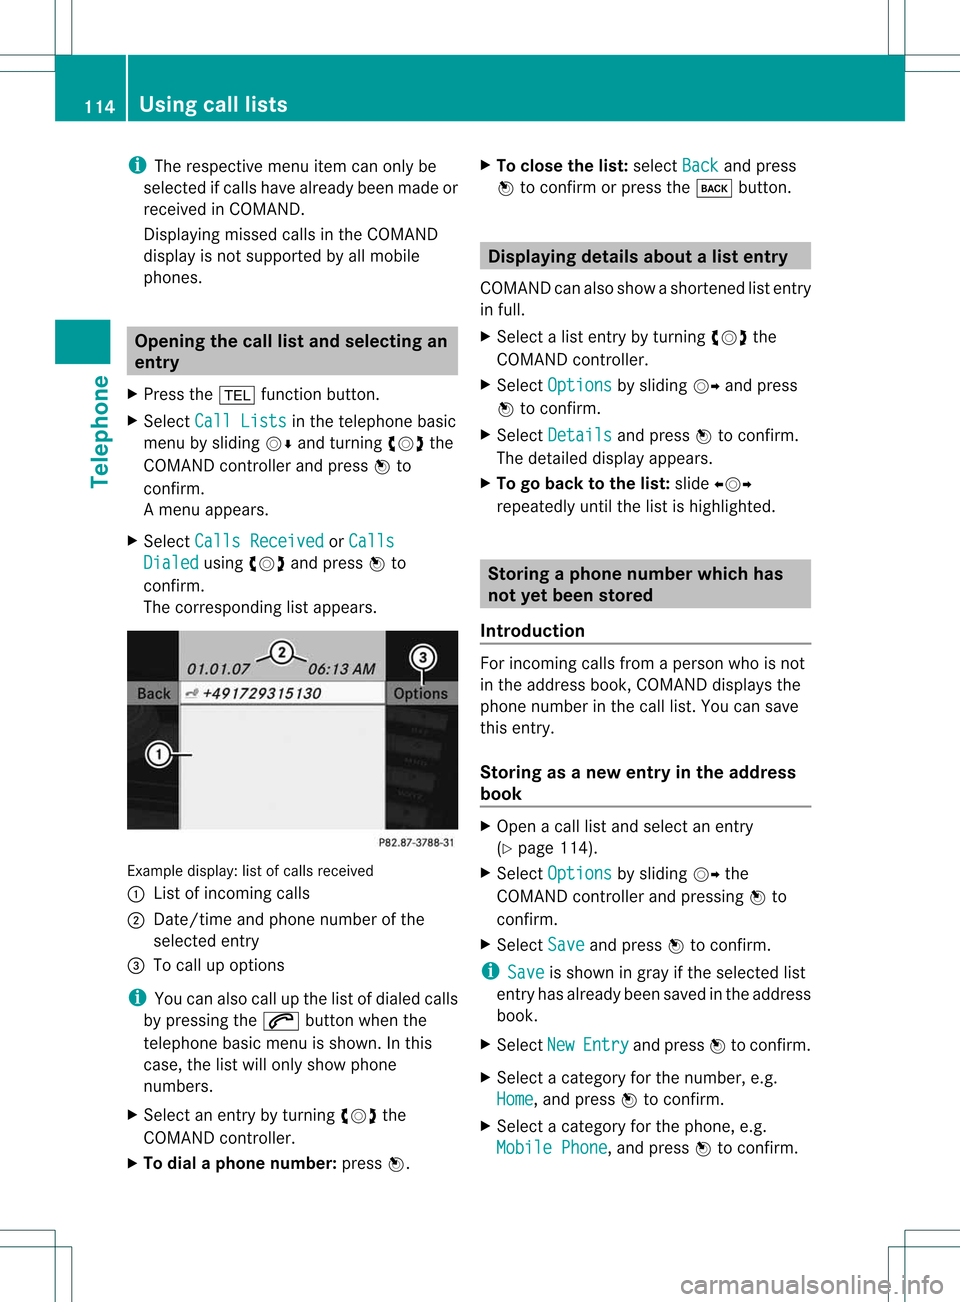
The correspondin glist appears. Ex
ample display: listofcalls received
: List ofincom ingcalls
; Date/ timeandphone number ofthe
select edent ry
= Tocall upoption s
i You canalso callupthe listofdialed calls
by pressing the6 button whenthe
telephon ebasic menu isshown. Inthis
case, thelistwill only show phone
numbers.
X Select anent ryby turn ingcVd the
COMAND controller.
X To dial aphone number :press W. X
To close thelist: select Back and
press
W tocon firm orpress thek button . Displaying
detailsabout alist entr y
COMAN Dcanalso showasho rten ed list entry
in full.
X Sel ect alist entry by turnin gcVd the
COMA NDcontroll er.
X Sel ect Options by
slidin gVY andpres s
W toconfirm .
X Sel ect Details and
pres sW toconfirm .
The detailed displayappear s.
X To go back tothelist :slide XVY
repe atedly untilth elist ishigh light ed. St
ori ng aph one num berwhich has
not yetbeen stored
Int rod uction For
incomin gcalls from apers onwho isno t
in theaddre ssbook ,COMA NDdispl aysthe
phon enum berinthecall list.You can save
this entry.
Storing asanew entry inthe address
book X
Open acall listand select anentr y
(Y page 114).
X Select Options by
sliding VYthe
COMAND controller andpressing Wto
conf irm.
X Select Save and
press Wtoconf irm.
i Save is
shown ingray ifthe selected list
entr yhas already beensaved inthe address
book.
X Select New Entry and
press Wtoconf irm.
X Select acategory forthe number, e.g.
Home ,
and press Wtoconf irm.
X Select acategory forthe phone, e.g.
Mobile Phone ,
and press Wtoconf irm. 114
Using
calllistsTelephone
Page 120 of 194
Disp
laying thedet ailed view foran
ad dress book entry
Selec ting anent ry X
Se arc hfo ran addr essbooken try and turn
cVd theCOM ANDc ont roller toselect itin
the selection list(Ypage 117).
or
X Select anaddress bookentryby browsing
(Y page 116).
X In both cases, pressW.
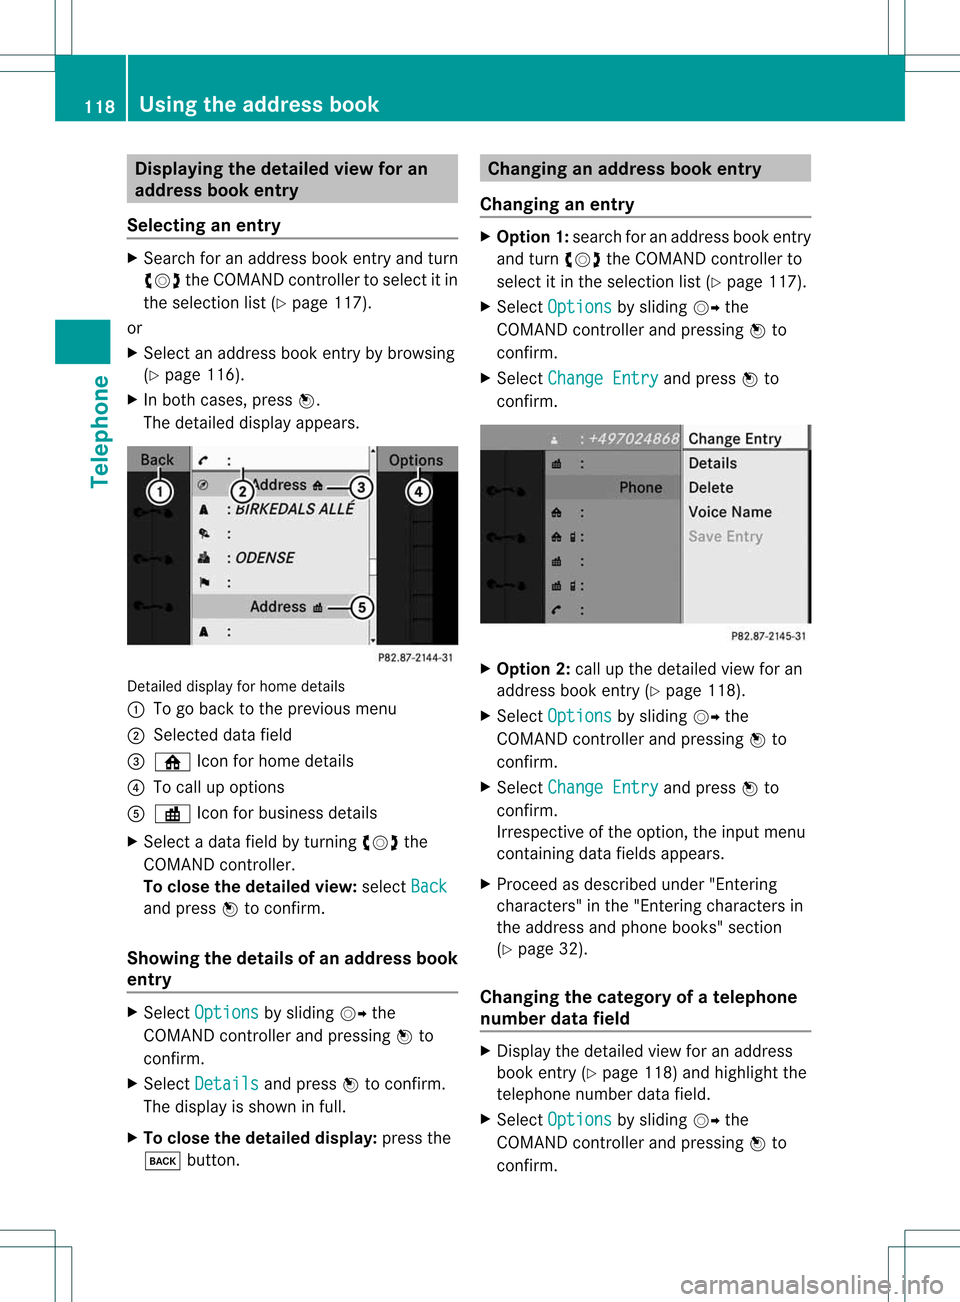
The detailed displayappears. Detailed
displayforhome details
: Togo back tothe previous menu
; Select eddata field
= ¸ Iconforhome details
? Tocall upoptions
A · Iconforbusiness details
X Select adata fieldbyturnin gcVd the
COMAND controller.
To close thedetailed view:select Back and
press Wtoconf irm.
Showing thedetails ofan add ress book
entry X
Select Options by
sliding VYthe
COMAND controller andpressing Wto
conf irm.
X Select Details and
press Wtoconf irm.
The display isshown infull.
X To close thedetailed display:pressthe
k button . Changing
anadd ress book entry
Changing anentry X
Option 1:search foranaddress bookentry
and turn cVd theCOMAND controller to
select itin the selection list(Ypage 117).
X Select Options by
sliding VYthe
COMAND controller andpressing Wto
conf irm.
X Select Change Entry and
press Wto
conf irm. X
Option 2:call upthe detailed viewforan
address bookentry(Y page 118).
X Select Options by
sliding VYthe
COMAND controller andpressing Wto
conf irm.
X Select Change Entry and
press Wto
conf irm.
Irrespect iveofthe option, theinput menu
cont aining datafields appears.
X Proceed asdescribed under"Entering
charact ers"inthe "Ent ering charact ersin
the address andphone books" section
(Y page 32).
Changing thecategory ofatelephone
number datafield X
Display thedetailed viewforanaddress
book entry(Y page 118)andhighlight the
telephone numberdatafield.
X Select Options by
sliding VYthe
COMAND controller andpressing Wto
conf irm. 118
Using
theaddress bookTelephone
Page 137 of 194
X
To exitthe men u:pre ssthe V eject/
lo ad button againo rpress thek button.
or
X Select Back by
slid ing VÆ andturning
cVd theCOMAND controller andpress
W toconfirm.
X To fill empty magazine trays:pressthe
V load/eject button.
The maga zinemenu appears.
X Select FillEmpty Slots .
You seethePlease Wait... messa
ge.
COMAND switches tothe next empty
maga zinetray. Youthen seethePlease Insert
Disc
ge.
i Never insertadata mediumbefore
COMAND promptsyoutodo so. Never
insert morethanonedisc intoamaga zine
tray atatime.
X Insert adisc intothedisc slotwith the
printed sidefacing upwards .
You seethePlease Wait... messa
ge.
Once thedisc isloa ded, theDVD changer
swi tches tothe next empty tray.Yousee
the Please Insert Disc
ge.
X Rep eatthis step until alltrays areloaded.
The DVD changer willpla ythe lastdisc
loaded ifit has been inserted cor rectlyand
is of aperm issible type.Thisapplies even
if not alltrays have been loaded withadisc.
X To comp letetheinser tion: press the
V eject/load buttonagain orpress the
k button.
Eject ingdiscs from theDVD chang er If
you remo veone disc while playing another
disc, theDVDc hanger interrupts playback.
Play back continues oncethedisc hasbeen
eject ed. X
To eject aCD/DVD: presstheV load/
ej ec tbut ton.
or
X Se lec tBac k by
slid ing VÆ andturning
cVd theCOMA NDcontrol ler and press
W toconfirm .
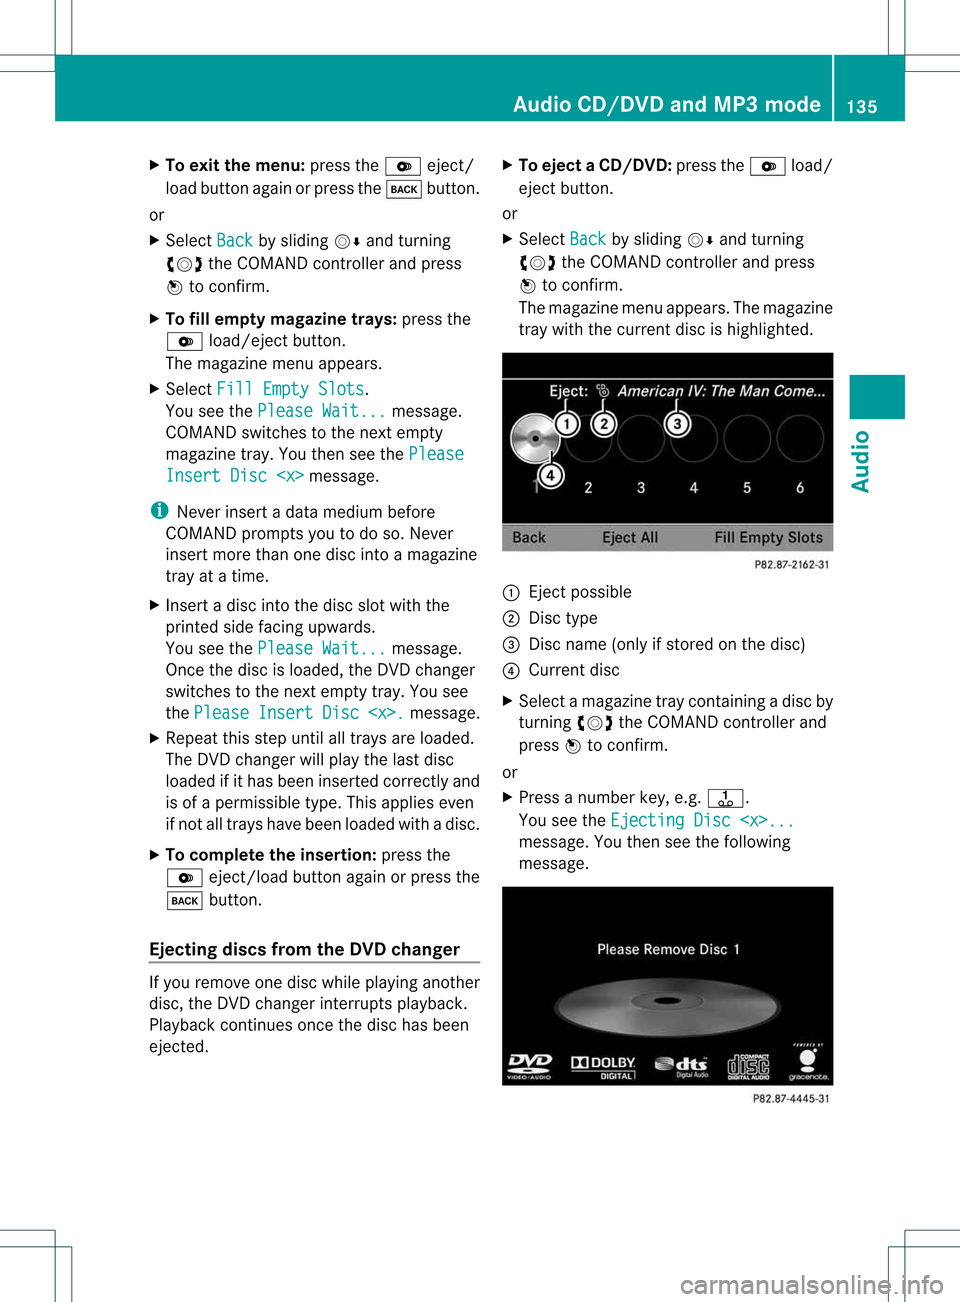
The mag azine men uappea rs.T he magazine
tray with thecurrent discishighlighted. :
Ejec tpossible
; Disc type
= Disc name (onlyifstored onthe disc)
? Current disc
X Select amagazine traycont aining adisc by
turnin gcVd theCOMAND controller and
press Wtoconf irm.
or
X Press anumber key,e.g.j.
You seetheEjecting Disc
Youthen seethefollowing
message. Audio
CD/DVD andMP3 mode
135Audio Z
Page 141 of 194
Stop
function
This funct ionisonly availa bleinaudi oDVD
mode.
X Switch onaudi oDVD mode (Ypage 137).
X To interru ptplayback: selectÉby
sliding VÆandturnin gcVd theCOMAND
cont roller andpress Wtoconf irm.
The Ë display changes toÌ. É
remains highlighted.
X To continue playback: selectÌand
press Wtoconf irm.
Play back continues fromthepoint where it
was interr upted.
X To stop playback: whileplayback is
interr upted, selectÉagain andpress
W toconf irm.
or
X Select Éandconf irmbypressing W
twice inrapid succession.
Ì ishighlighted.
X To restar tplayback: selectÌand
press Wtoconf irm.
Play back starts atthe beginning ofthe
DVD . Selec
tingaudio CD/DVD/MP3 discs
Selec tingviathe media list X
In audio CD/DVD andMP3 mode: select
Media by
sliding VÆorturnin gcVd the
COMAND controller andpress Wto
conf irm.
or
X In audio CD/DVD mode only:press W
the COMAND controller when thedisplay /
selection windowisactive.
The media listappears. The#dot
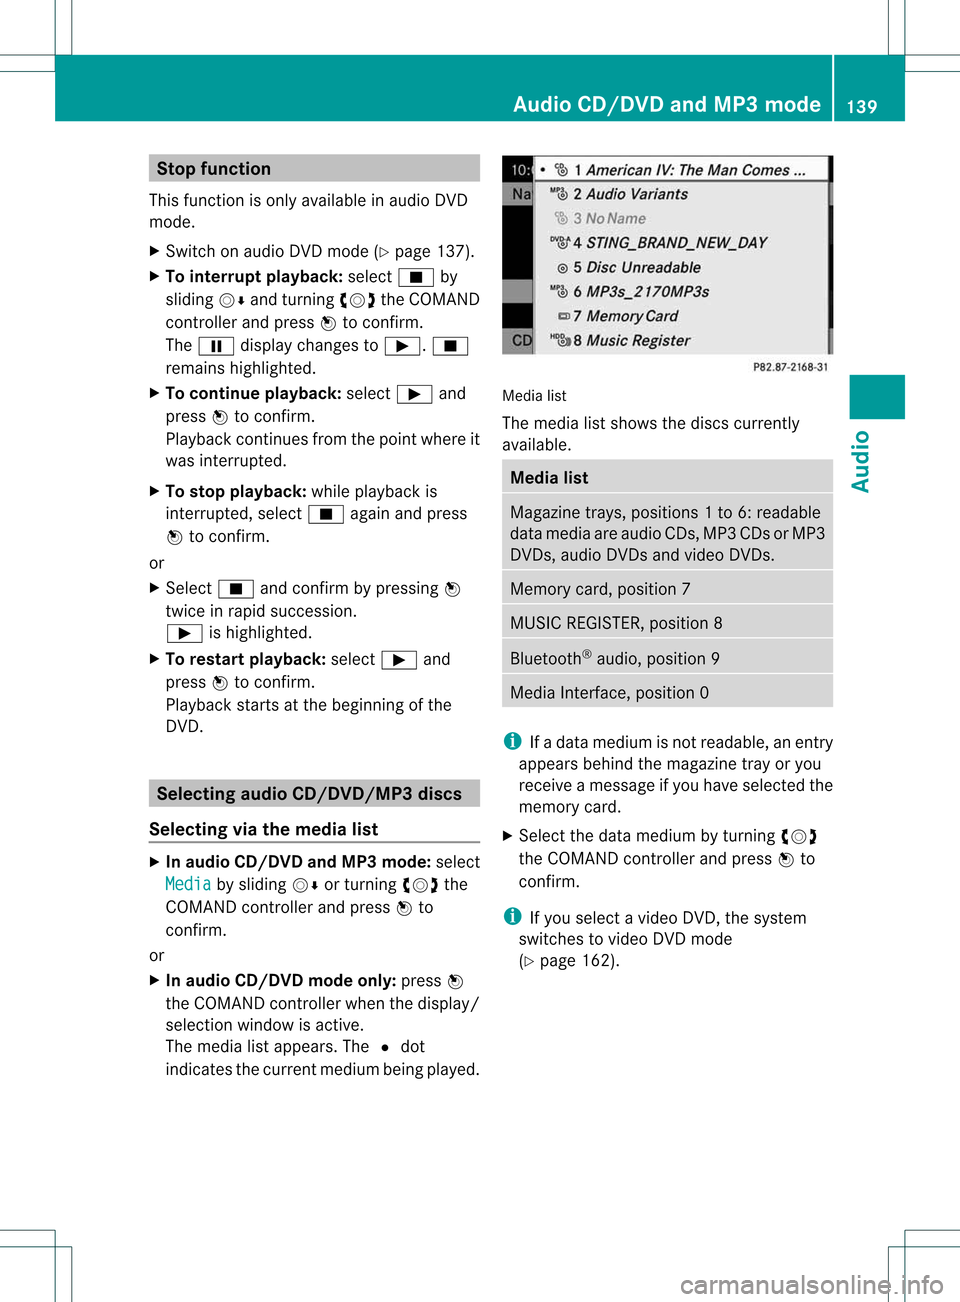
indicates thecurrent medium beingplayed. Media
list
The media listshows thediscs current ly
availa ble. Media
list Magazine
trays,positions 1to6: readable
data media areaudio CDs,MP3CDsorMP3
DVD s,audio DVDsand video DVDs. Memory
card,position 7 MUSIC
REGISTER, position8 Bluetooth
®
audio, position 9 Media
Interface, position 0 i
Ifadata medium isnot readable, anentr y
appears behindthemagazine trayoryou
receive amessage ifyou have selected the
memory card.
X Select thedata medium byturnin gcVd
the COMAND controller andpress Wto
conf irm.
i Ifyou select avideo DVD,the system
switches tovideo DVDmode
(Y page 162). Audio
CD/DVD andMP3 mode
139Audio Z
Page 148 of 194
Step
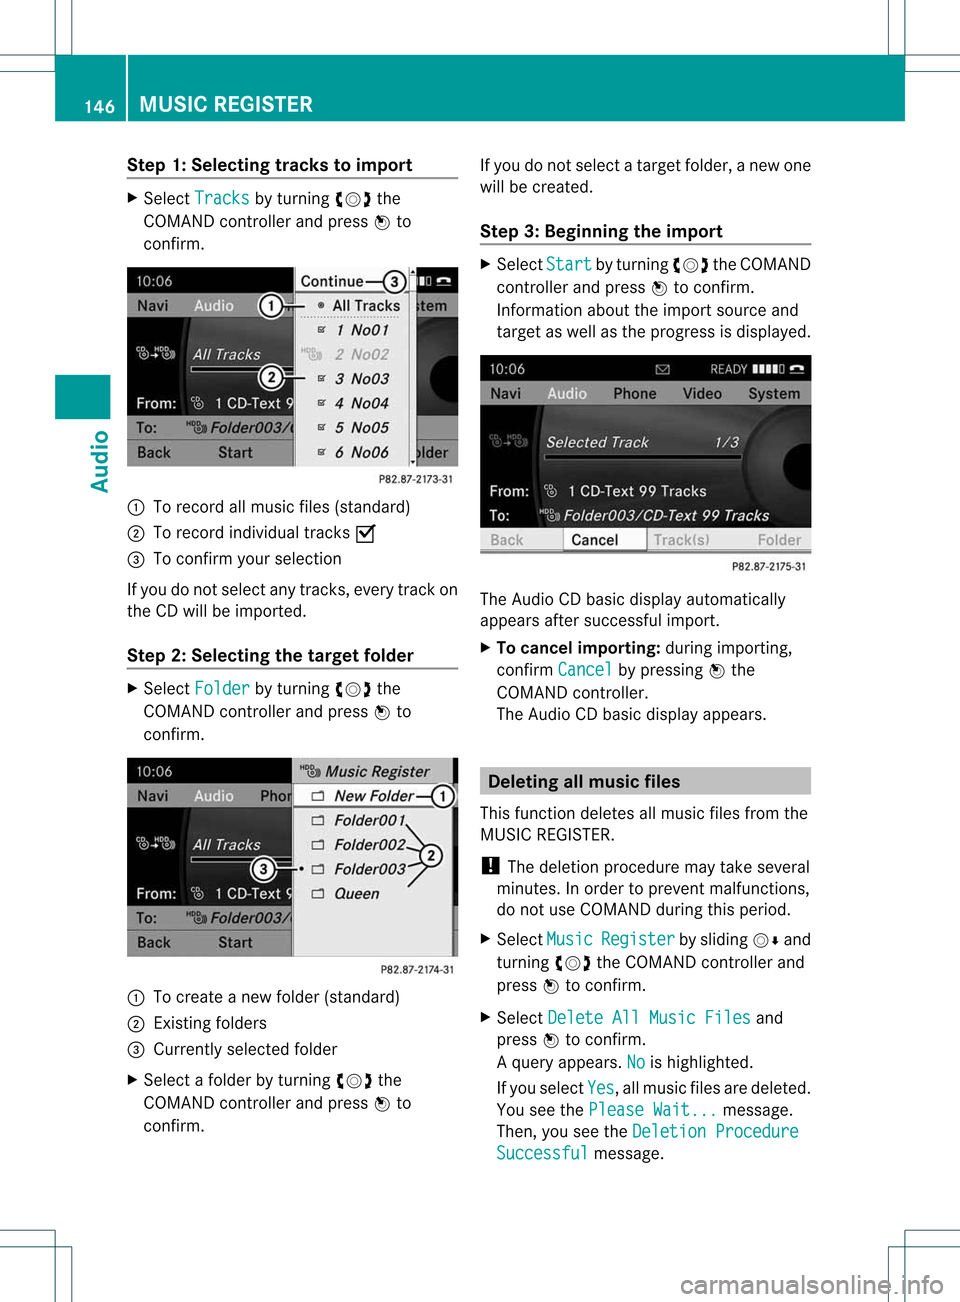
1:Selec tingtracks toimport X
Select Tracks by
turnin gcVd the
COMAND controller andpress Wto
conf irm. :
Torecord allmusic files(standard)
; Torecord individual tracksO
= Toconf irmyour selection
If you donot select anytrack s,every trackon
the CDwill beimported.
Step 2:Selec tingthetarget folder X
Select Folder by
turnin gcVd the
COMAND controller andpress Wto
conf irm. :
Tocreate anew folder (standard)
; Exist ingfolders
= Currently selectedfolder
X Select afolder byturnin gcVd the
COMAND controller andpress Wto
conf irm. If
you donot select atarget folder, anew one
will becreated.
Step 3:Beginning theimport X
Select Start by
turnin gcVd theCOMAND
cont roller andpress Wtoconf irm.
Inform ationabout theimport source and
target aswell asthe progress isdisplay ed. The
Audio CDbasic display automatically
appea rsafter successful import.
X To cancel importing:during importing,
conf irmCancel by
pressing Wthe
COMAND controller.
The Audio CDbasic display appears. Dele
ting allmusic files
This funct iondeletes allmusic filesfrom the
MUSIC REGISTER.
! The deletion procedure maytake several
minutes. Inorder toprevent malfunction s,
do not use COMAND duringthisperiod.
X Select Music Register by
sliding VÆand
turnin gcVd theCOMAND controller and
press Wtoconf irm.
X Select Delete AllMusic Files and
press Wtoconf irm.
Aq uery appear s.No is
high light ed.
If you sele ctYes ,
all musi cfiles aredelet ed.
You seethePlea seWait ... mess
age.
Then ,you seetheDele tion Procedure Succ
essful mess
age. 146
MUSIC
REGISTERAudio
Page 149 of 194
If
you select No ,
the process willbe aborted . Call
ingupmemory spaceinfo
X Select Music Register by
slid ing VÆ and
turning cVdtheCOMAND controller and
press Wtoconfirm.
X Select Memory Info and
press Wto
confirm.
The follo wing isdisp layed:
R storage capacity
R avai lablememory
R occupie dmemory
R content (folders,tracks) Fol
der functio ns
Introductio n You
canview thecontent ofthe MUSIC
REGISTER, changefolderortrack names and
dele teindivi dualfolders ortracks.
Call ingupthe MUSIC REGISTE R X
Select Folder by
slid ing VÆ andturning
cVd theCOMAND controller andpress
W toconfirm.
or
X Press Wthe COMAND controller whenthe
disp lay/selection windowisactive.
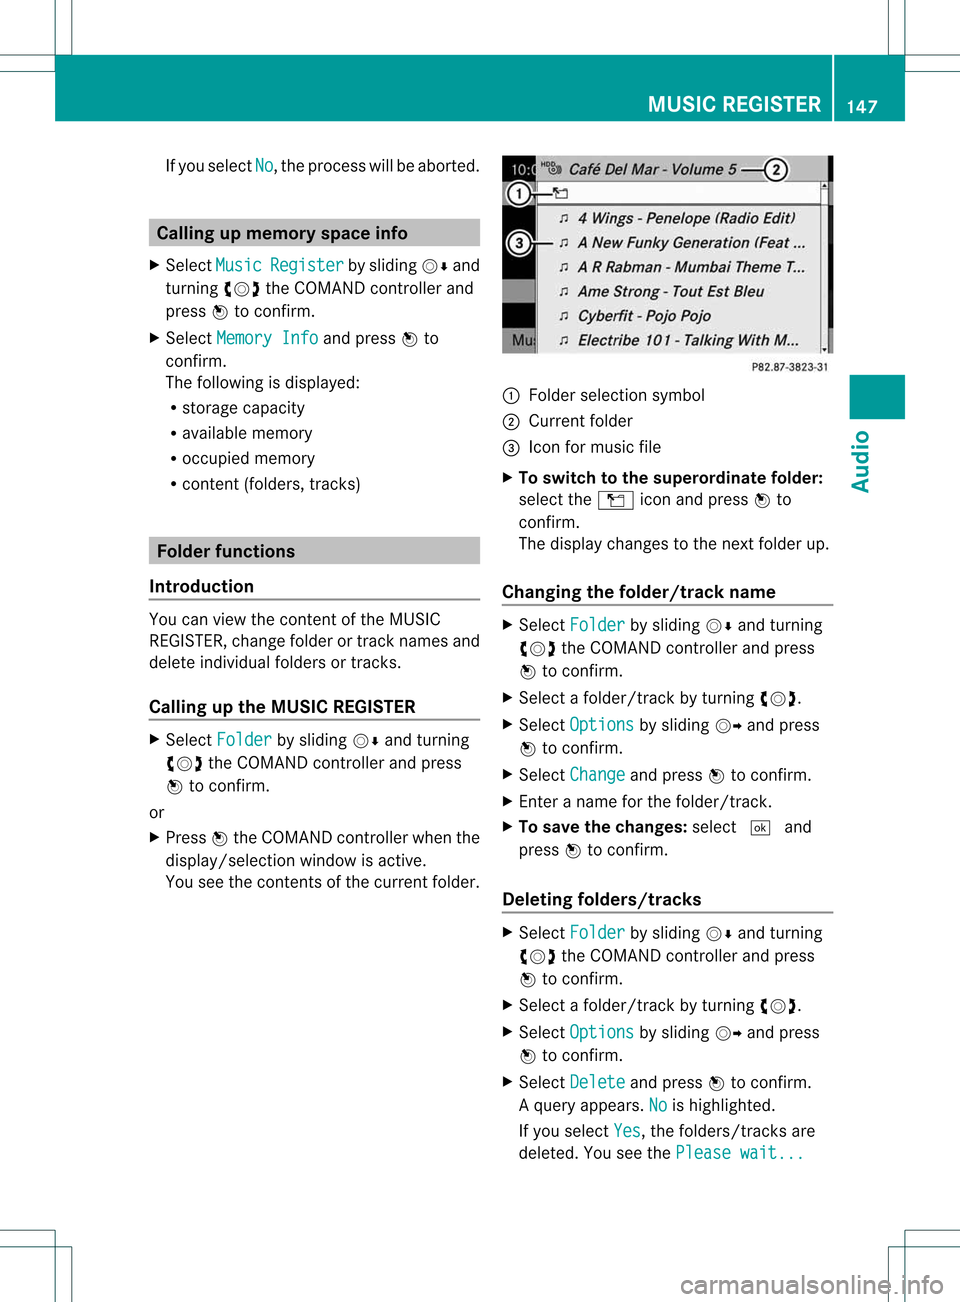
You seethecontent sof the current folder. :
Folder selection symbol
; Current folder
= Icon formusic file
X To swi tch tothe superordinate folder:
select theÒ iconandpress Wto
confirm.
The displaychanges tothe next folder up.
Changi ngthe folder/ trackname X
Select Folder by
slid ing VÆ andturning
cVd theCOMAND controller andpress
W toconfirm.
X Select afolder/track byturning cVd.
X Select Options by
slid ing VY andpress
W toconfirm.
X Select Change and
press Wtoconfirm.
X Ent eraname forthe folder/track.
X To save thechange s:select ¬and
press Wtoconfirm.
De letin gfolders/ tracks X
Select Folder by
slid ing VÆ andturning
cVd theCOMAND controller andpress
W toconfirm.
X Select afolder/track byturning cVd.
X Select Options by
slid ing VY andpress
W toconfirm.
X Select Delete and
press Wtoconfirm.
Aq uery appear s.No is
high light ed.
If you selectYes ,
th efol der s/track sare
delet ed.You seethePle ase wait... MUS
ICREG ISTER
147Audio Z
Page 155 of 194
i
iPod ®
is aregis tered trademark ofApple
In c.,Cupert ino,Californ ia,USA .
Sup ported iPod ®
var iant s The
followin gare exam plesofsupport ed
iPod ®
varian ts:
R iPod ®
min i
R iPod ®
nan o
R iPod ®
class ic
R iPod ®
touc h
Sup ported USB devices The
followin gUSB devic esare support ed:
R USB stick s(flash memo ry)
R USB hard drivesrequirin gast art up/
perm anentcurr entofamaxim umof
800 mA(itmay benec essary tocon necta
separat epower supply)
R cer tain MP3 players
i The Media Inter face support sUSB
st orage media of"USB DeviceSubc lass6".
In for mat ionconcerningUSB Device
Subc lass6isavail able from theequip ment
manufacturer.
For details andalist ofsupported devices,
visit http://www .mbusa-mobile.com. Or
call theMercedes-Benz CustomerAssistance
Center at
1-80 0-FOR-ME RCedes(1-800- 367-6372) (for
the USA) orCustomer Relations at
1-80 0-38 7-0100(for Canada ). Conne
ctinganexternal device
i Donot leave extern aldevices inthe
vehicle astheir correct function cannotbe
guara nteed ifthey aresubjected to
extreme temperatures, e.g.ifsubjected to
direct sunlight orvery lowoutside
temperatures (seetheoperating
instruct ionsofthe respective device).
Mercedes-Benz USA,LLCaccepts no
liab ility fordamage toextern aldevices. Never
connectmore thanonedevice ata
time. Youwillotherwise notbeable toplay
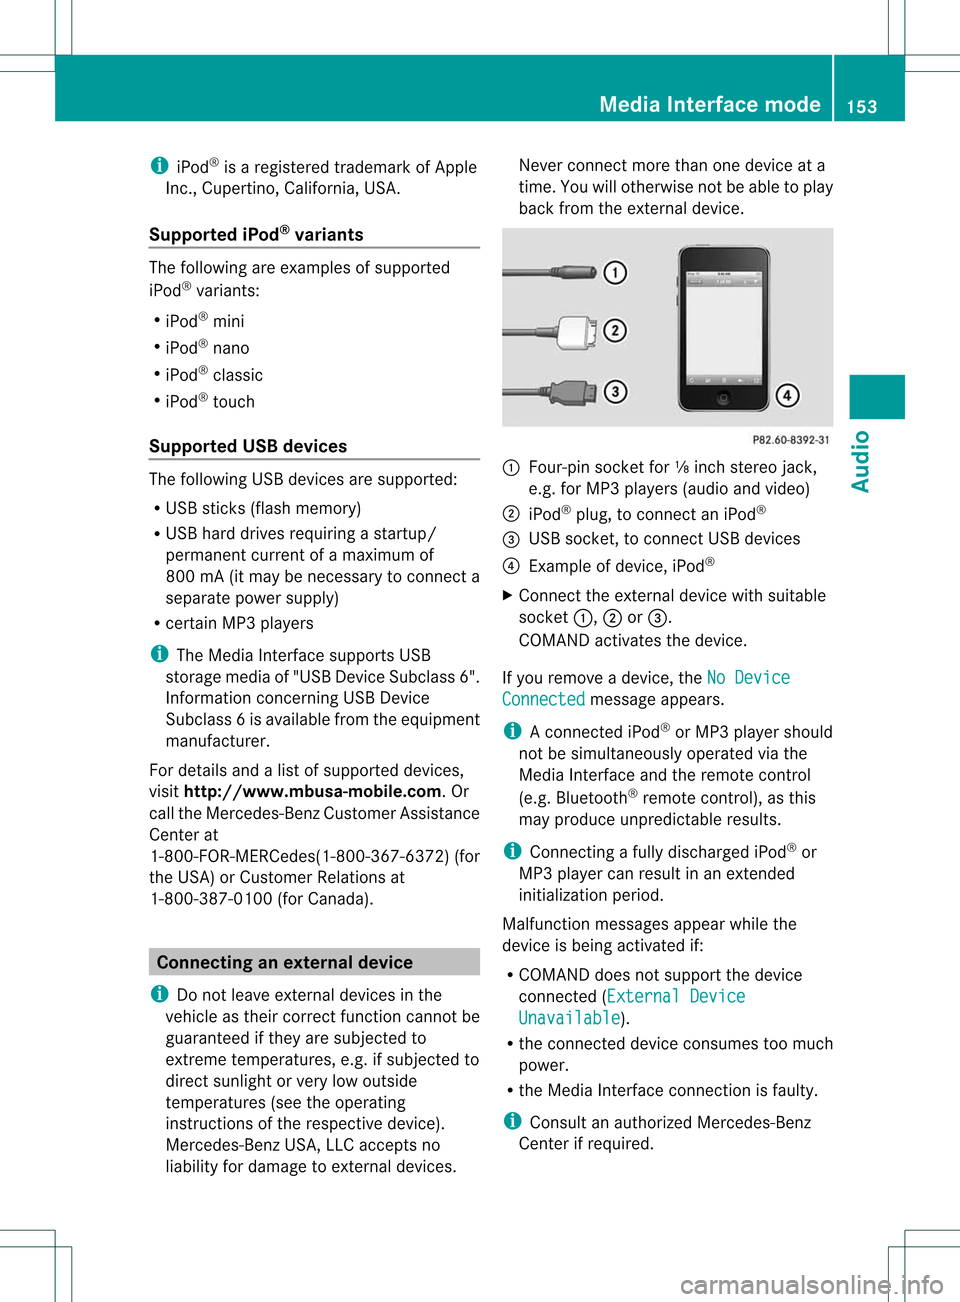
back fromtheextern aldevice. :
Four-pin socketfor⅛inch stereo jack,
e.g. forMP3 players(audio and video)
; iPod ®
plug, toconn ectaniPod ®
= USB socket ,to conn ectUSB devices
? Example ofdevice, iPod®
X Connect theextern aldevice withsuitabl e
socket :,;or=.
COMAND activatesthedevice.
If you remove adevice, theNoDevice Connected message
appears.
i Aconn ected iPod®
or MP3 playershould
not besimultaneousl yoperated viathe
Media Interfaceand theremote control
(e.g. Bluetooth ®
remote control), asthis
may produce unpredictable results.
i Connectin gafully discharged iPod®
or
MP3 playercan result inan extended
initialization period.
Malfunction messagesappearwhile the
device isbeing activated if:
R COMAND doesnotsupport thedevice
conn ected (External Device Unavailable ).
R the conn ected device consumes toomuch
power.
R the Media Interface connection isfaulty.
i Consult anauthorized Mercedes-Ben z
Center ifrequired. Media
Interface mode
153Audio Z
Page 159 of 194
Playing
backthecontents ofa
category orfolder
X Select thecategory orfolder byturnin g
cVd theCOMAND controller.
X Press Wthe COMAND controller forlonger
than twoseconds.
The cont entofthe category orfolder
selected isplay edinaccordance withthe
play back option (Ypage 142)selected. Alphabetical
track selec tion
iPod ®
and MP3 players This
funct ionisavaila bleforalphab etically
sorted categories andfolders. Thisfunct ion
is not availa bleforalbu msorplay lists, for
example.
X Select acategory, e.g.Artists ,
by turnin g
cVd theCOMAND controller andpress
W toconf irm.
The availa bleartists aredisplay ed.
X Press thecorrespon dingnumber keyonce
or several timestoselect thefirst letter of
the artist's name(e.g.foranartist
beginning withtheletter "C",press number
key l three times).
The availa bleletters arelisted atthe lower
edge ofthe display .
Aft eramessage, thefirst entryin the list
which matches theletter entered is
highlighted.
i Ifno correspon dingentryexists, thelast
entr ycorrespon dingtoap reviou sletter is
high lighted instead .
i For iPod s®
and MP3 players ,the quality
of the search resultsishigh lydepe ndent on
the versio nand langu ageva ria nt ofthe
sof twa re(e.g. iTune s®
ver sion) used to
po pulate the devic e. US
Bm ass storage device Thi
sfunction isava ilable foralpha betica lly
sorted directories .This funct ionisnot
availa bleforalbu msorplay lists, forexample.
X In adirectory, pressthecorresponding
number keyonce orseveral timestoselect
the first letter ofthe artist's name(e.g.for
an artist beginning withtheletter "C",press
number keyl three times).
The availa bleletters arelisted atthe lower
edge ofthe displa y.
If the directory onlycontains folders,
COMAND searchesforfolders. Aftera
message, thefirst entrywhich matches the
letter entered isshown atthe top ofthe list.
If no entr ymatches theentered letter,the
first item inthe lististhe last entryto
correspond toaselection. Selec
tinganactive partition (USB
mass storage devices only)
You canselect thisfunct ionforUSB mass
storage devices whenthestorage deviceis
partitioned. Uptofour partitions (primaryor
logical; FATformat) aresupported.
i The Windows ®
formatt ingprogram
supports FATpartitioning upto32 GB as
standard.
X Select Media Int. in
the basic displa yby
sliding VÆandturning cVdtheCOMAND
cont roller andpress Wtoconfirm .
X Select Select ActivePartition and
press Wtoconfirm . Playback
options
The following optionsareavaila ble:
R Normal TrackSequence Normal
tracksequence: youhear the
track sin their normal order(e.g.numerical
or alpha betical).
R Random Tracks Media
Interface mode
157Audio Z