oil change MERCEDES-BENZ E-CLASS CABRIOLET 2015 Owners Manual
[x] Cancel search | Manufacturer: MERCEDES-BENZ, Model Year: 2015, Model line: E-CLASS CABRIOLET, Model: MERCEDES-BENZ E-CLASS CABRIOLET 2015Pages: 349, PDF Size: 12.51 MB
Page 157 of 349
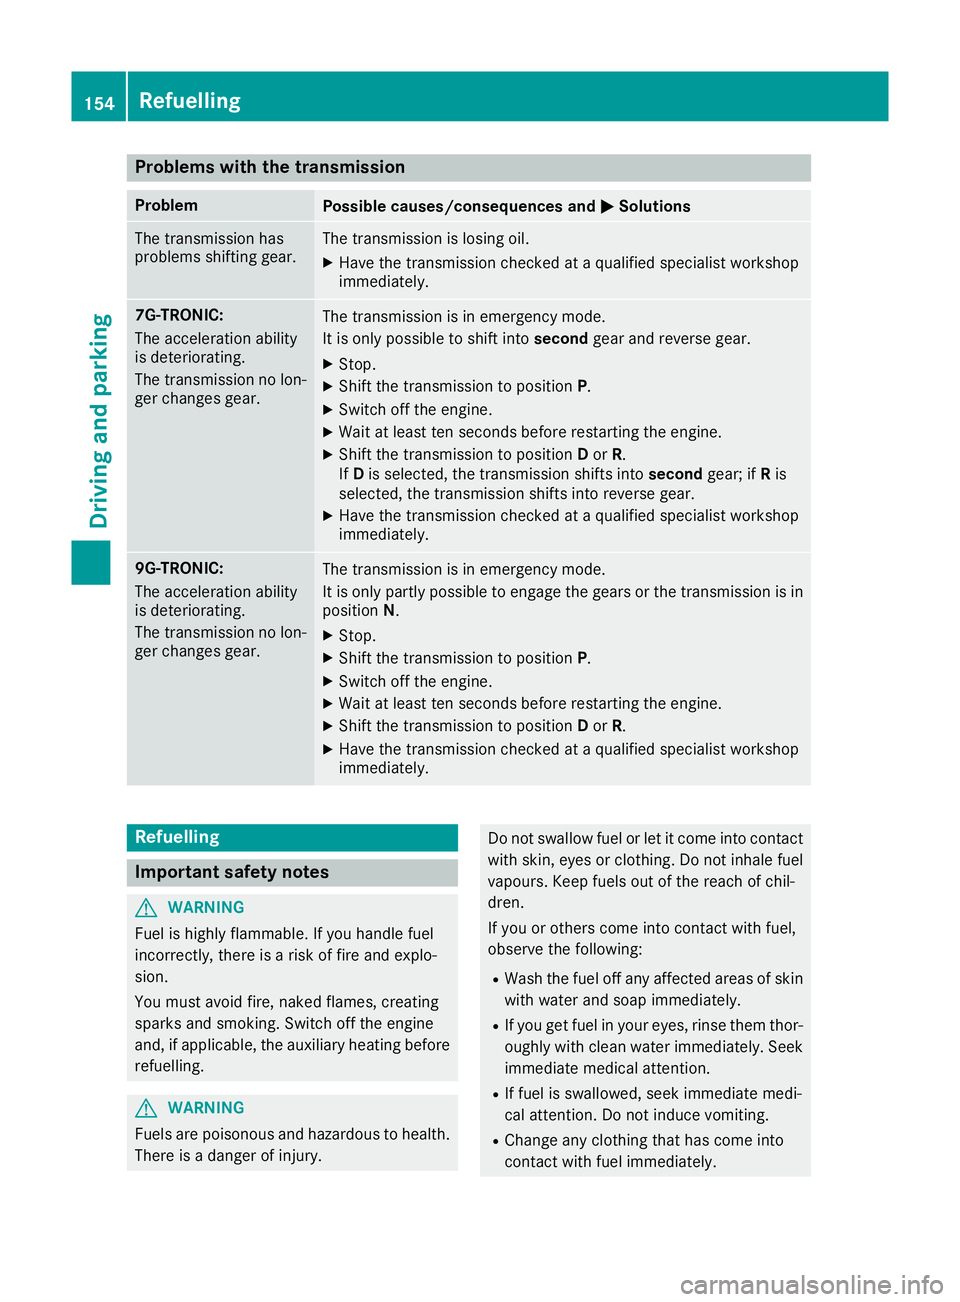
Problems with the transmission
Problem
Possible causes/consequences and
M
MSolutions The transmission has
problems shifting gear. The transmission is losing oil.
X Have the transmission checked at a qualified specialist workshop
immediately. 7G-TRONIC:
The acceleration ability
is deteriorating.
The transmission no lon-
ger changes gear. The transmission is in emergency mode.
It is only possible to shift into
secondgear and reverse gear.
X Stop.
X Shift the transmission to position P.
X Switch off the engine.
X Wait at least ten seconds before restarting the engine.
X Shift the transmission to position Dor R.
If D is selected, the transmission shifts into secondgear; ifRis
selected, the transmission shifts into reverse gear.
X Have the transmission checked at a qualified specialist workshop
immediately. 9G-TRONIC:
The acceleration ability
is deteriorating.
The transmission no lon-
ger changes gear. The transmission is in emergency mode.
It is only partly possible to engage the gears or the transmission is in
position N.
X Stop.
X Shift the transmission to position P.
X Switch off the engine.
X Wait at least ten seconds before restarting the engine.
X Shift the transmission to position Dor R.
X Have the transmission checked at a qualified specialist workshop
immediately. Refuelling
Important safety notes
G
WARNING
Fuel is highly flammable. If you handle fuel
incorrectly, there is a risk of fire and explo-
sion.
You must avoid fire, naked flames, creating
sparks and smoking. Switch off the engine
and, if applicable, the auxiliary heating before refuelling. G
WARNING
Fuels are poisonous and hazardous to health. There is a danger of injury. Do not swallow fuel or let it come into contact
with skin, eyes or clothing. Do not inhale fuel
vapours. Keep fuels out of the reach of chil-
dren.
If you or others come into contact with fuel,
observe the following:
R Wash the fuel off any affected areas of skin
with water and soap immediately.
R If you get fuel in your eyes, rinse them thor-
oughly with clean water immediately. Seek
immediate medical attention.
R If fuel is swallowed, seek immediate medi-
cal attention. Do not induce vomiting.
R Change any clothing that has come into
contact with fuel immediately. 154
RefuellingDriving and parking
Page 295 of 349
X
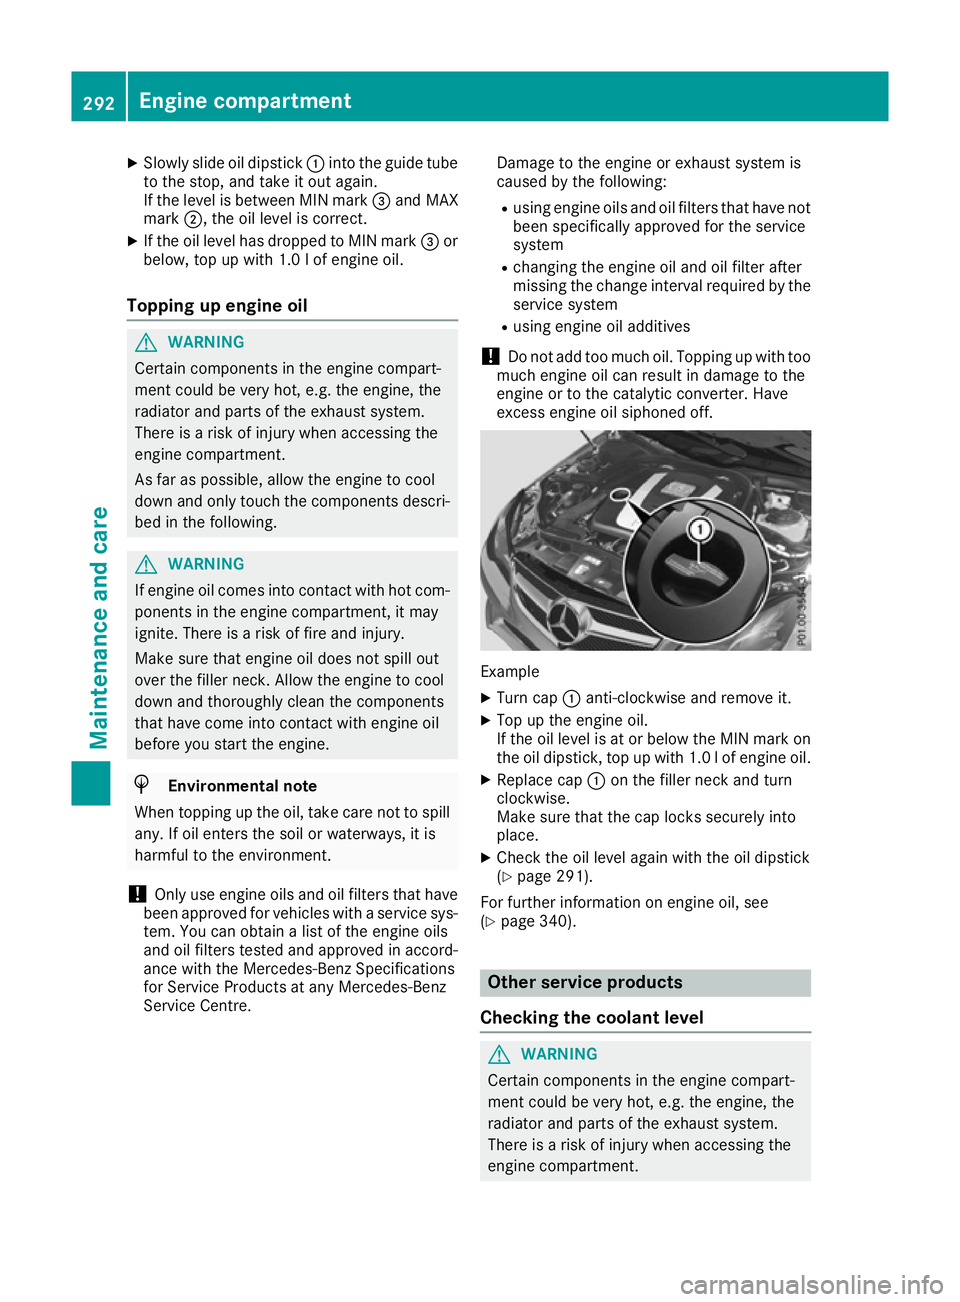
Slowly slide oil dipstick :into the guide tube
to the stop, and take it out again.
If the level is between MIN mark =and MAX
mark ;, the oil level is correct.
X If the oil level has dropped to MIN mark =or
below, top up with 1.0 lof engine oil.
Topping up engine oil G
WARNING
Certain components in the engine compart-
ment could be very hot, e.g. the engine, the
radiator and parts of the exhaust system.
There is a risk of injury when accessing the
engine compartment.
As far as possible, allow the engine to cool
down and only touch the components descri- bed in the following. G
WARNING
If engine oil comes into contact with hot com- ponents in the engine compartment, it may
ignite. There is a risk of fire and injury.
Make sure that engine oil does not spill out
over the filler neck. Allow the engine to cool
down and thoroughly clean the components
that have come into contact with engine oil
before you start the engine. H
Environmental note
When topping up the oil, take care not to spill
any. If oil enters the soil or waterways, it is
harmful to the environment.
! Only use engine oils and oil filters that have
been approved for vehicles with a service sys-
tem. You can obtain a list of the engine oils
and oil filters tested and approved in accord-
ance with the Mercedes-Benz Specifications
for Service Products at any Mercedes-Benz
Service Centre. Damage to the engine or exhaust system is
caused by the following:
R using engine oils and oil filters that have not
been specifically approved for the service
system
R changing the engine oil and oil filter after
missing the change interval required by the
service system
R using engine oil additives
! Do not add too much oil. Topping up with too
much engine oil can result in damage to the
engine or to the catalytic converter. Have
excess engine oil siphoned off. Example
X Turn cap :anti-clockwise and remove it.
X Top up the engine oil.
If the oil level is at or below the MIN mark on
the oil dipstick, top up with 1.0 lof engine oil.
X Replace cap :on the filler neck and turn
clockwise.
Make sure that the cap locks securely into
place.
X Check the oil level again with the oil dipstick
(Y page 291).
For further information on engine oil, see
(Y page 340). Other service products
Checking the coolant level G
WARNING
Certain components in the engine compart-
ment could be very hot, e.g. the engine, the
radiator and parts of the exhaust system.
There is a risk of injury when accessing the
engine compartment. 292
Engine compartmentMaintenance and care
Page 297 of 349
Further information on windscreen washer
fluid/antifreeze (Y page 342).Service
ASSYST PLUS
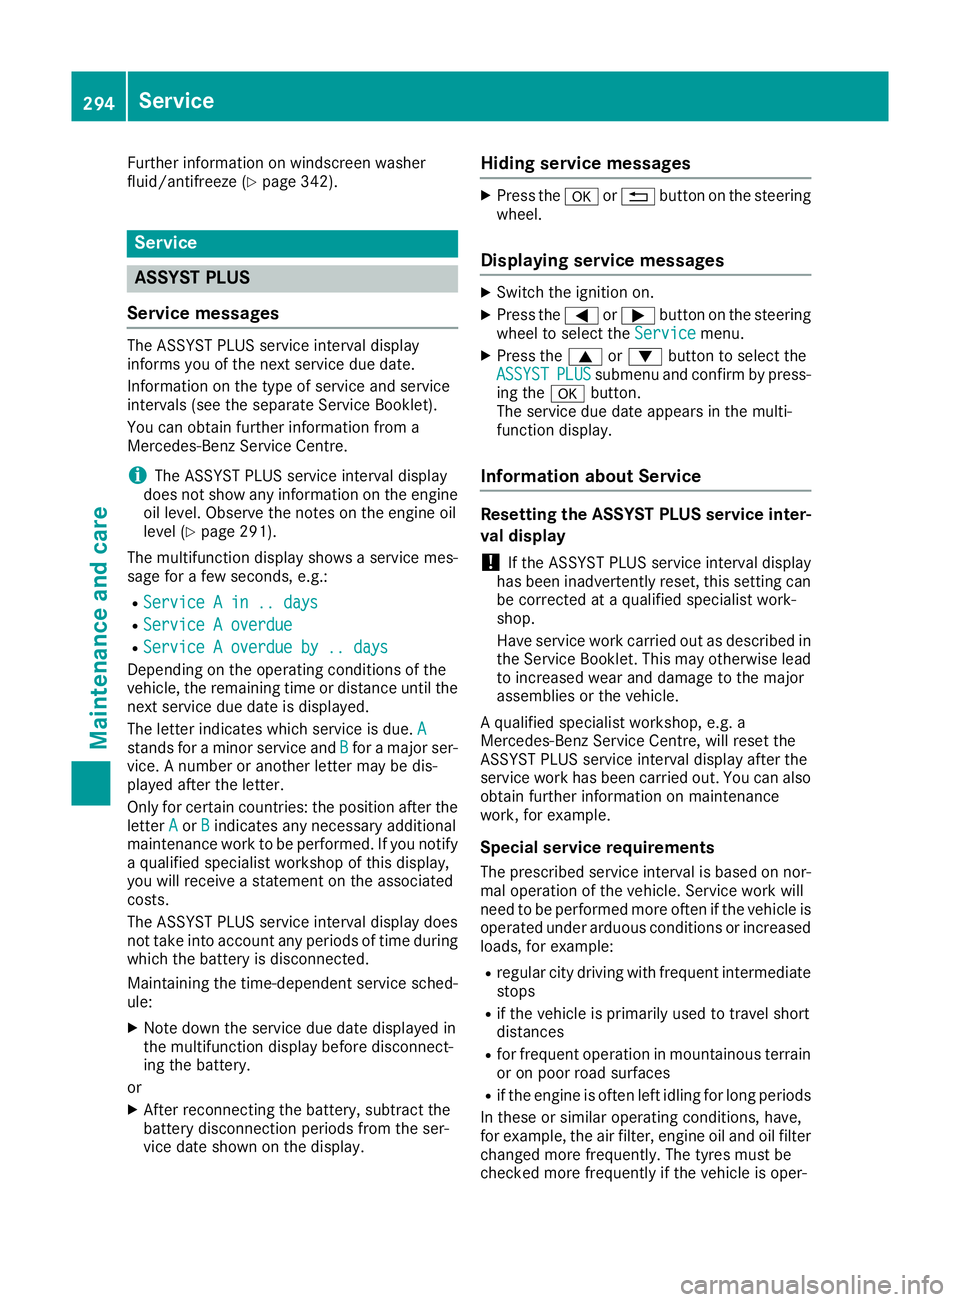
Service messages The ASSYST PLUS service interval display
informs you of the next service due date.
Information on the type of service and service
intervals (see the separate Service Booklet).
You can obtain further information from a
Mercedes-Benz Service Centre.
i The ASSYST PLUS service interval display
does not show any information on the engine oil level. Observe the notes on the engine oil
level (Y page 291).
The multifunction display shows a service mes-
sage for a few seconds, e.g.:
R Service A in .. days Service A in .. days
R Service A overdue
Service A overdue
R Service A overdue by .. days
Service A overdue by .. days
Depending on the operating conditions of the
vehicle, the remaining time or distance until the next service due date is displayed.
The letter indicates which service is due. A A
stands for a minor service and B
Bfor a major ser-
vice. A number or another letter may be dis-
played after the letter.
Only for certain countries: the position after the
letter A
A or B Bindicates any necessary additional
maintenance work to be performed. If you notify a qualified specialist workshop of this display,
you will receive a statement on the associated
costs.
The ASSYST PLUS service interval display does
not take into account any periods of time during
which the battery is disconnected.
Maintaining the time-dependent service sched-
ule:
X Note down the service due date displayed in
the multifunction display before disconnect-
ing the battery.
or X After reconnecting the battery, subtract the
battery disconnection periods from the ser-
vice date shown on the display. Hiding service messages X
Press the aor% button on the steering
wheel.
Displaying service messages X
Switch the ignition on.
X Press the =or; button on the steering
wheel to select the Service Servicemenu.
X Press the 9or: button to select the
ASSYST
ASSYST PLUS
PLUSsubmenu and confirm by press-
ing the abutton.
The service due date appears in the multi-
function display.
Information about Service Resetting the ASSYST PLUS service inter-
val display
! If the ASSYST PLUS service interval display
has been inadvertently reset, this setting can
be corrected at a qualified specialist work-
shop.
Have service work carried out as described in
the Service Booklet. This may otherwise lead to increased wear and damage to the major
assemblies or the vehicle.
A qualified specialist workshop, e.g. a
Mercedes-Benz Service Centre, will reset the
ASSYST PLUS service interval display after the
service work has been carried out. You can also
obtain further information on maintenance
work, for example.
Special service requirements The prescribed service interval is based on nor-
mal operation of the vehicle. Service work will
need to be performed more often if the vehicle is operated under arduous conditions or increased
loads, for example:
R regular city driving with frequent intermediate
stops
R if the vehicle is primarily used to travel short
distances
R for frequent operation in mountainous terrain
or on poor road surfaces
R if the engine is often left idling for long periods
In these or similar operating conditions, have,
for example, the air filter, engine oil and oil filter changed more frequently. The tyres must be
checked more frequently if the vehicle is oper- 294
ServiceMaintenance and care
Page 305 of 349
Cleaning the plastic trim
G
WARNING
Care products and cleaning agents containing solvents can cause surfaces in the cockpit to
become porous. This could result in plastic
parts breaking away when the airbags are
deployed. There is a danger of injury.
Do not use care products and cleaning agents containing solvents to clean the cockpit.
! Do not affix the following to plastic surfaces:
R stickers
R films
R scented oil bottles or similar items
You could otherwise damage the plastic.
! Do not allow cosmetics, insect repellent or
sunscreen to come in contact with the plastic trim. This maintains the high-quality look of
the surfaces.
X Wipe the plastic trim with a damp, lint-free
cloth, e.g. a microfibre cloth.
X Heavy soiling: use car care and cleaning
products recommended and approved by
Mercedes-Benz.
The surface may change colour temporarily.
Wait until the surface is dry again.
Cleaning the steering wheel and gear or selector lever X
Thoroughly wipe with a damp cloth or use
leather care agents that have been recom-
mended and approved by Mercedes-Benz.
Cleaning wooden trim and trim ele-
ments !
Do not use solvent-based cleaning agents
such as tar remover, wheel cleaners, polishes
or waxes. There is otherwise a risk of damag- ing the surface.
X Wipe the wooden trim and trim elements with
a damp, lint-free cloth, e.g. a microfibre cloth.
X Heavy soiling: use car care and cleaning
products recommended and approved by
Mercedes-Benz. Cleaning the seat covers General notes
! Do not use a microfibre cloth to clean covers
made out of real leather, artificial leather or
DINAMICA. If used frequently, this can dam-
age the cover.
i Note that regular care is essential to make
sure that the appearance and comfort of the
covers are retained over time.
Genuine leather seat covers
Leather is a natural product.
It has natural surface properties, e.g.:
R unevenness in structure
R marks caused by growth and injury
R subtle colour differences
These are characteristics of leather and not
material faults.
! To retain the natural appearance of the
leather, observe the following cleaning
instructions:
R Clean genuine leather covers carefully with
a damp cloth and then wipe the covers
down with a dry cloth.
R Make sure that the leather does not
become soaked. It may otherwise become
rough and cracked.
R Only use leather care agents that have
been tested and approved by Mercedes-
Benz. You can obtain these from a qualified
specialist workshop.
Seat covers from other materials
! Observe the following when cleaning:
R clean artificial leather covers with a cloth
moistened with a solution containing 1%
detergent (e.g. washing-up liquid).
R clean cloth covers with a microfibre cloth
moistened with a solution containing 1%
detergent (e.g. washing-up liquid). Rub
carefully, and always wipe entire seat sec-
tions to avoid leaving visible lines. Leave
the seat to dry afterwards. Cleaning results
depend on the type of dirt and how long it
has been there.
R Clean DINAMICA covers with a damp cloth.
Make sure that you wipe entire seat sec-
tions to avoid leaving visible lines. 302
CareMaintenance and care
Page 332 of 349
Interchanging the wheels
G
WARNING
Interchanging the front and rear wheels may
severely impair the driving characteristics if
the wheels or tyres have different dimensions. The wheel brakes or suspension components may also be damaged. There is a risk of acci-
dent.
Interchange front and rear wheels only if the
wheels and tyres are of the same dimensions.
! On vehicles fitted with a tyre pressure mon-
itor, electronic components are located in the wheel.
Tyre-fitting tools should not be applied in thearea of the valve, as this could damage the
electronic components.
Only have tyres changed at a qualified spe-
cialist workshop.
Interchanging the front and rear wheels of dif-
fering dimensions can render the general oper-
ating permit invalid.
Observe the instructions and safety notes in the "Fitting a wheel" section (Y page 329).
The wear patterns on the front and rear tyres
differ depending on the operating conditions.
Interchange the wheels before a clear wear pat-
tern has formed on the tyres. Front tyres typi-
cally wear more on the shoulders and the rear
tyres in the centre.
On vehicles that have the same size front and
rear wheels, you can interchange the wheels
every 5,000 to 10,000 km depending on the
degree of tyre wear. Ensure that the direction of
rotation is maintained.
Clean the contact surfaces of the wheel and the
brake disc thoroughly every time a wheel is
interchanged. Check the tyre pressure and, if
necessary, restart the tyre pressure loss warn-
ing system (Y page 326) or the tyre pressure
monitor (Y page 328). Direction of rotation
Tyres with a specified direction of rotation have additional benefits, e.g. if there is a risk of aqua- planing. These advantages can only be gained if
the tyres are fitted corresponding to the direc-
tion of rotation. An arrow on the sidewall of the tyre indicates its
correct direction of rotation. Storing wheels
Store wheels that are not being used in a cool,
dry and preferably dark place. Protect the tyres
against oil, grease, petrol and diesel. Fitting a wheel
Preparing the vehicle X
Stop the vehicle on solid, non-slippery and
level ground.
X Apply the parking brake.
X Move the front wheels to the straight-ahead
position.
X Vehicles with manual transmission:
depress the clutch pedal fully and engage first
or reverse gear.
X Vehicles with automatic transmission:
shift the automatic transmission to position
P.
X Switch off the engine.
X Remove the key from the ignition lock.
or, on vehicles with KEYLESS‑GO:
X Open the driver's door.
The on-board electronics now have status 0.
This is the same as the key having been
removed.
X Remove the Start/Stop button from the igni-
tion lock (Y page 139).
X If included in the vehicle equipment, remove
the tyre-change tool kit from the vehicle
(Y page 305).
X Safeguard the vehicle against rolling away.
i Apart from some country-specific variants,
vehicles are not equipped with tyre-changing
tools. Some tools for changing a wheel are
specific to the vehicle. For more information
on which tools are required to perform a
wheel change on your vehicle, consult a quali- fied specialist workshop.
Necessary tyre-changing tools may include,
for example:
R jack
R wheel chock Changing a wheel
329Wheels and tyres Z
Page 335 of 349
X
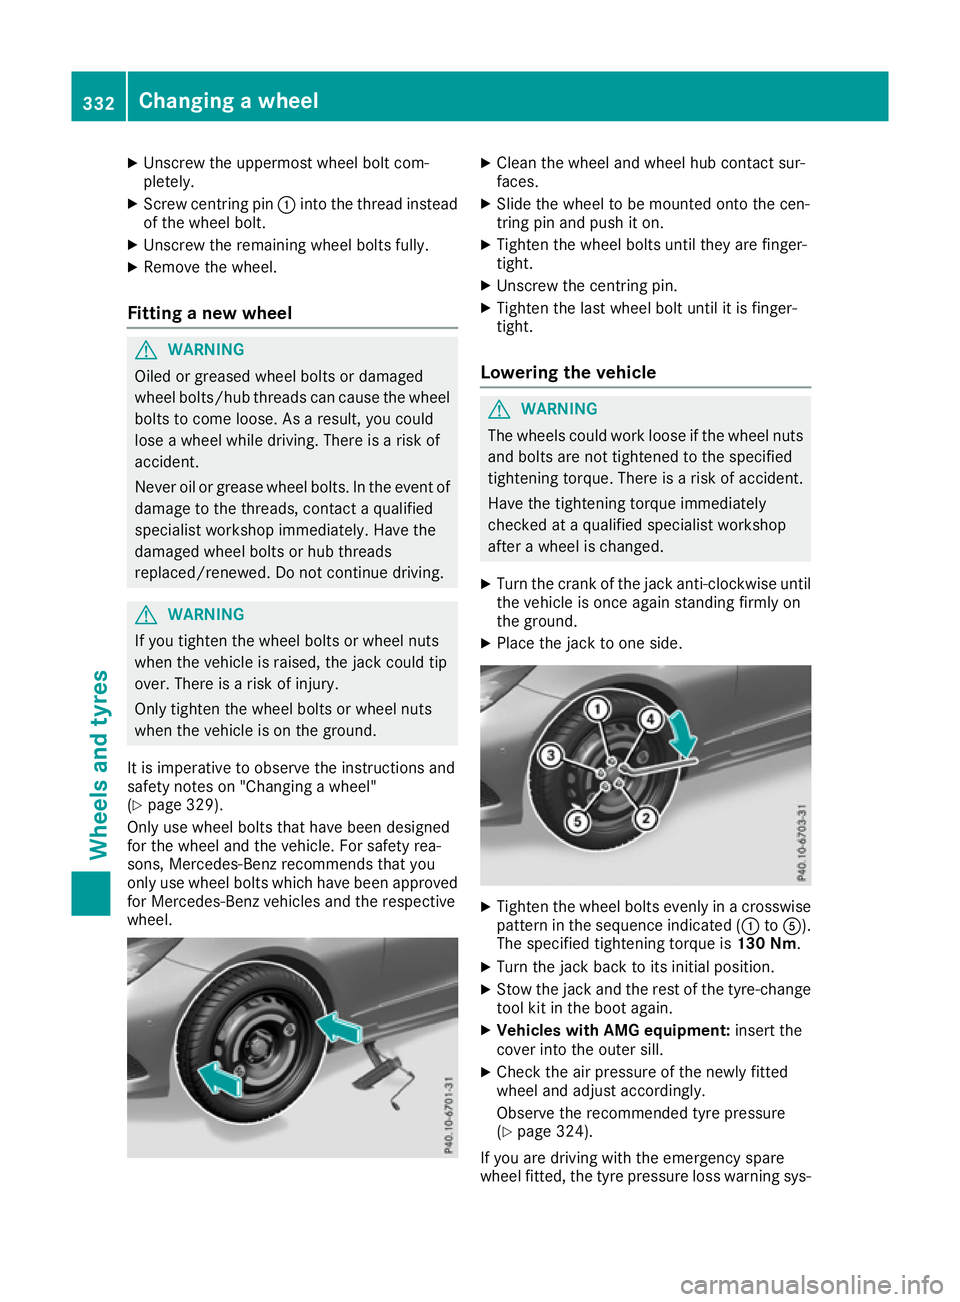
Unscrew the uppermost wheel bolt com-
pletely.
X Screw centring pin :into the thread instead
of the wheel bolt.
X Unscrew the remaining wheel bolts fully.
X Remove the wheel.
Fitting a new wheel G
WARNING
Oiled or greased wheel bolts or damaged
wheel bolts/hub threads can cause the wheel bolts to come loose. As a result, you could
lose a wheel while driving. There is a risk of
accident.
Never oil or grease wheel bolts. In the event ofdamage to the threads, contact a qualified
specialist workshop immediately. Have the
damaged wheel bolts or hub threads
replaced/renewed. Do not continue driving. G
WARNING
If you tighten the wheel bolts or wheel nuts
when the vehicle is raised, the jack could tip
over. There is a risk of injury.
Only tighten the wheel bolts or wheel nuts
when the vehicle is on the ground.
It is imperative to observe the instructions and
safety notes on "Changing a wheel"
(Y page 329).
Only use wheel bolts that have been designed
for the wheel and the vehicle. For safety rea-
sons, Mercedes-Benz recommends that you
only use wheel bolts which have been approved for Mercedes-Benz vehicles and the respective
wheel. X
Clean the wheel and wheel hub contact sur-
faces.
X Slide the wheel to be mounted onto the cen-
tring pin and push it on.
X Tighten the wheel bolts until they are finger-
tight.
X Unscrew the centring pin.
X Tighten the last wheel bolt until it is finger-
tight.
Lowering the vehicle G
WARNING
The wheels could work loose if the wheel nuts and bolts are not tightened to the specified
tightening torque. There is a risk of accident.
Have the tightening torque immediately
checked at a qualified specialist workshop
after a wheel is changed.
X Turn the crank of the jack anti-clockwise until
the vehicle is once again standing firmly on
the ground.
X Place the jack to one side. X
Tighten the wheel bolts evenly in a crosswise
pattern in the sequence indicated (: toA).
The specified tightening torque is 130 Nm.
X Turn the jack back to its initial position.
X Stow the jack and the rest of the tyre-change
tool kit in the boot again.
X Vehicles with AMG equipment: insert the
cover into the outer sill.
X Check the air pressure of the newly fitted
wheel and adjust accordingly.
Observe the recommended tyre pressure
(Y page 324).
If you are driving with the emergency spare
wheel fitted, the tyre pressure loss warning sys- 332
Changing a wheelWheels and tyres
Page 342 of 349
E 200, E 250, E 400 (only for certain coun-
tries)
! Only refuel using sulphur-free unleaded pet-
rol with at least 95 ROZ, that conforms to the
European standard EN 228 or E DIN or an
equivalent specification.
You could otherwise impair engine output or
damage the emission control system.
i In some countries, the available petrol may
not be sufficiently low in sulphur. This fuel can temporarily produce unpleasant odours,
especially on short journeys. As soon as sul-
phur-free fuel (sulphur content < 10 ppm) is
used for refuelling, the odours are reduced.
Additives ! Operating the engine with fuel additives
added later can lead to engine failure. Do not mix fuel additives with fuel. This does not
include additives for the removal and preven-
tion of residue build-up. Petrol must only be
mixed with additives recommended by
Mercedes-Benz. Observe the instructions for
use in the product description. More informa- tion about recommended additives can be
obtained from any Mercedes-Benz Service
Centre.
Mercedes-Benz recommends that you use fuel
brands that have additives.
The quality of the fuel available in some coun-
tries may not be sufficient. Residue could build
up in the injection system as a result. In this
case, in consultation with a Mercedes-Benz Ser- vice Centre, the petrol may be mixed with the
cleaning additive recommended by Mercedes-
Benz. Always observe the notes and mixing
ratios specified on the container.
Diesel Fuel grade
G
WARNING
If you mix diesel fuel with petrol, the flash
point of this fuel mixture is lower than that of pure diesel fuel. When the engine is running,
components in the exhaust system may over-
heat unnoticed. There is a risk of fire.
Never refuel with petrol. Never add petrol to
diesel fuel. !
When refuelling, only use diesel fuel that
conforms to the European standard EN 590 or is of equivalent quality. Fuel that does not
conform to EN 590 can lead to increased wear
as well as damage to the engine and exhaust system.
! Do not use the following:
R marine diesel
R heating oil
R bio-diesel
R vegetable oil
R petrol
R paraffin
R kerosene
Do not mix such fuels with diesel fuel and do
not use any special additives. Otherwise,
engine damage may occur.
! Vehicles with diesel particle filters:
in
countries outside the EU, only use low sulphur
Euro diesel with a sulphur content of under
50 ppm. Otherwise, the emission control sys- tem could be damaged.
! Vehicles without a diesel particle filter:
in countries where only diesel fuel with a high sulphur content is available, you will need to
carry out your vehicle's oil change at shorter
intervals. More information about the interval for oil change can be obtained from any quali-
fied specialist workshop.
Usually you will find information about the fuel
grade on the pump. If you cannot find the label
on the petrol pump, ask the filling station staff.
Information on refuelling (Y page 155).
Low outside temperatures In winter months, diesel fuel with an improved
cold flow quality is available. In Europe, the
EN 590 standard defines various climate-
dependent temperature categories. Malfunc-
tions can be avoided by refuelling with diesel
fuel that corresponds to the climatic specifica-
tions outlined in EN 590. At unusually low out-
side temperatures, it is possible that the flow
characteristics of the diesel fuel could be insuf- ficient. Accordingly, diesel fuel from warmer
areas may not be suitable for operation in colder
climatic conditions.
i Further information on country-specific fuel
properties and fuel types with low-tempera- Service products and capacities
339Technical data Z
Page 343 of 349
ture resistance can be obtained from oil com-
panies, e.g. at filling stations. AdBlue
®
Important safety notes Comply with the important safety notes for ser-
vice products when handling AdBlue ®
(Y page 337).
AdBlue ®
is a water-soluble fluid for the exhaust
gas aftertreatment of diesel engines. It is:
R non-toxic
R colourless and odourless
R non-flammable
If you open the AdBlue ®
tank, small amounts of
ammonia vapour may be released.
Ammonia vapours have a pungent odour and are
particularly irritating to the skin, to mucous
membranes and to the eyes. You may experi-
ence a burning sensation in your eyes, nose and throat. You may also experience coughing and
watery eyes.
Do not inhale any ammonia vapours that may be
released. Only fill the AdBlue ®
tank in well-ven-
tilated areas.
Low outside temperatures AdBlue
®
freezes at a temperature of approx-
imately -11 †. The vehicle is delivered from the
factory equipped with an AdBlue ®
preheating
system. Winter operation can thus be guaran-
teed even at temperatures below -11 †.
Additives !
Only use AdBlue ®
in accordance with ISO
22241. Do not use additives with AdBlue ®
and do not dilute AdBlue ®
with water. This
may destroy the BlueTEC exhaust gas after-
treatment system.
Purity !
Impurities in AdBlue ®
(e.g. due to other ser-
vice products, cleaning agents or dust) lead
to:
R increased emission values
R damage to the catalytic converter R
engine damage
R malfunctions in the BlueTEC ®
exhaust gas
aftertreatment system
Assuring the purity of AdBlue ®
is particularly
important with respect to avoiding malfunctions in the BlueTEC exhaust gas aftertreatment sys-
tem.
If AdBlue ®
is pumped out of the AdBlue ®
tank,
e.g. during repair work, do not use this fluid to
refill the tank. The purity of the fluid can no lon-
ger be guaranteed.
Capacities Model Total capacity
All models
25.0 l
Engine oil
General notes When handling engine oil, observe the important
safety notes on service products (Y page 337).
The quality of the engine oil is decisive for the
function and service life of an engine. After
extensive tests, Mercedes-Benz approves
engine oils that correspond to the current tech-
nical standard.
Therefore, only Mercedes-Benz approved
engine oils may be used in Mercedes-Benz
engines.
Further information on tested and approved
engine oils can be obtained from any Mercedes-
Benz Service Centre. Mercedes-Benz recom-
mends that you have the oil change carried out
at a qualified specialist workshop. Mercedes-
Benz approval is indicated on the oil container
by the inscription "MB-Freigabe" or "MB- 340
Service products and capacitiesTechnical data
Page 344 of 349
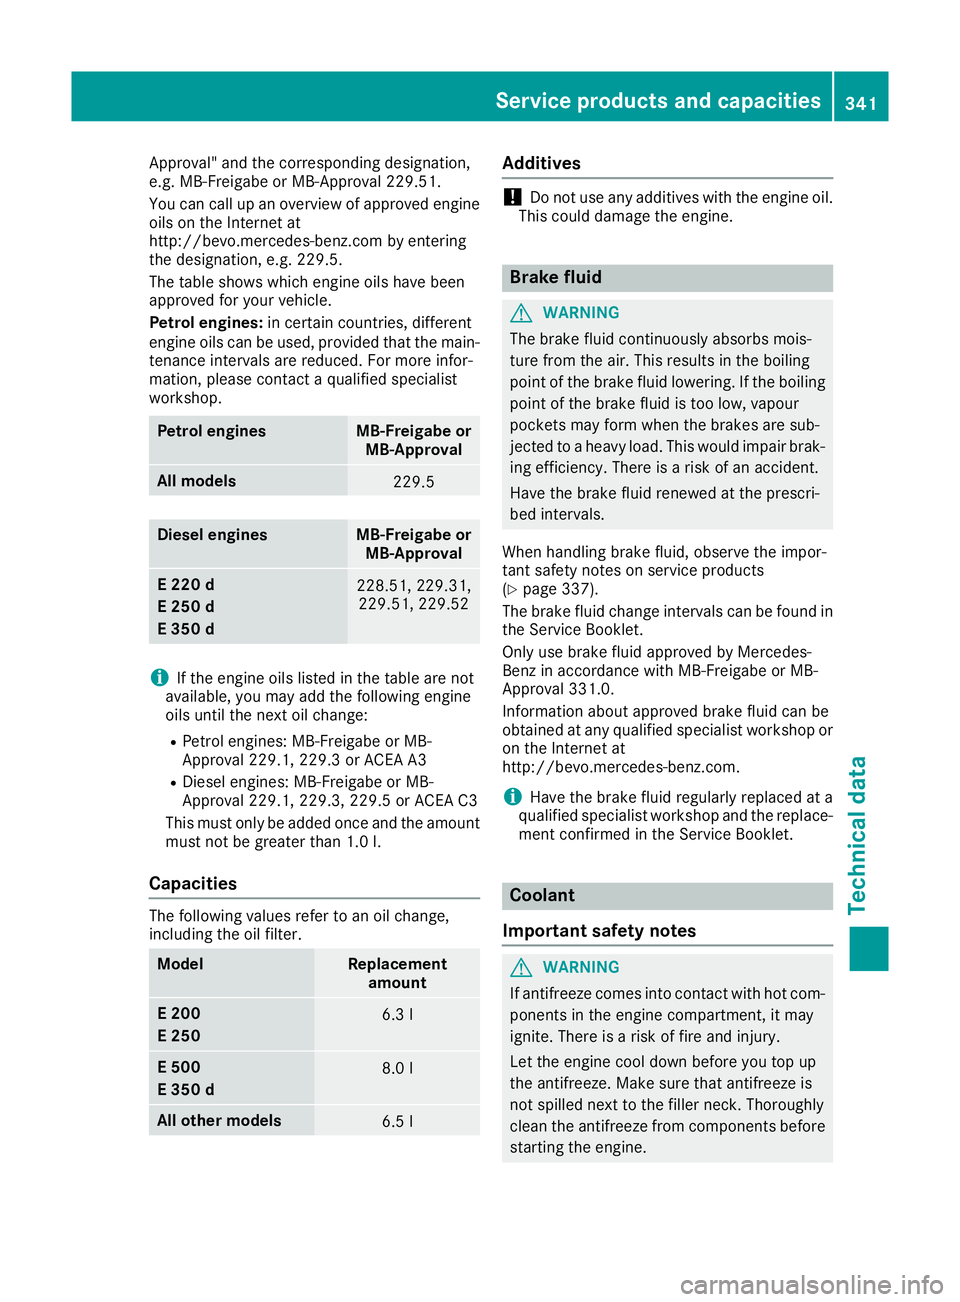
Approval" and the corresponding designation,
e.g. MB-Freigabe or MB-Approval 229.51.
You can call up an overview of approved engine
oils on the Internet at
http://bevo.mercedes-benz.com by entering
the designation, e.g. 229.5.
The table shows which engine oils have been
approved for your vehicle.
Petrol engines: in certain countries, different
engine oils can be used, provided that the main-
tenance intervals are reduced. For more infor-
mation, please contact a qualified specialist
workshop. Petrol engines MB-Freigabe or
MB-Approval All models
229.5
Diesel engines MB-Freigabe or
MB-Approval E 220 d
E 250 d
E 350 d
228.51, 229.31,
229.51, 229.52 i
If the engine oils listed in the table are not
available, you may add the following engine
oils until the next oil change:
R Petrol engines: MB-Freigabe or MB-
Approval 229.1, 229.3 or ACEA A3
R Diesel engines: MB-Freigabe or MB-
Approval 229.1, 229.3, 229.5 or ACEA C3
This must only be added once and the amount
must not be greater than 1.0 l.
Ca pacities The following values refer to an oil change,
including the oil filter.
Model Replacement
amount E 200
E 250
6.3 l
E 500
E 350 d
8.0 l
All other models
6.5 l Additives
!
Do not use any additives with the engine oil.
This could damage the engine. Brake fluid
G
WARNING
The brake fluid continuously absorbs mois-
ture from the air. This results in the boiling
point of the brake fluid lowering. If the boiling
point of the brake fluid is too low, vapour
pockets may form when the brakes are sub-
jected to a heavy load. This would impair brak- ing efficiency. There is a risk of an accident.
Have the brake fluid renewed at the prescri-
bed intervals.
When handling brake fluid, observe the impor-
tant safety notes on service products
(Y page 337).
The brake fluid change intervals can be found in the Service Booklet.
Only use brake fluid approved by Mercedes-
Benz in accordance with MB-Freigabe or MB-
Approval 331.0.
Information about approved brake fluid can be
obtained at any qualified specialist workshop or on the Internet at
http://bevo.mercedes-benz.co m.
i Have the brake fluid regularly replaced at a
qualified specialist workshop and the replace- ment confirmed in the Service Booklet. Coolant
Important safety notes G
WARNING
If antifreeze comes into contact with hot com- ponents in the engine compartment, it may
ignite. There is a risk of fire and injury.
Let the engine cool down before you top up
the antifreeze. Make sure that antifreeze is
not spilled next to the filler neck. Thoroughly
clean the antifreeze from components before
starting the engine. Service products and capacities
341Technical data Z