key MERCEDES-BENZ E-Class CABRIOLET 2017 A207 Manual Online
[x] Cancel search | Manufacturer: MERCEDES-BENZ, Model Year: 2017, Model line: E-Class CABRIOLET, Model: MERCEDES-BENZ E-Class CABRIOLET 2017 A207Pages: 322, PDF Size: 7.97 MB
Page 188 of 322
RESP®is switched off.
Ra loss of tire pressure or a defective tire is
detected.
Switching on Active Blind Spot Assist
XMake sure that Active Blind Spot Assist
(Ypage 198) is activated in the on-board
computer.
XTurn the SmartKey to position 2in the ignition
lock.
Warning lamps :in the exterior mirrors light
up red for approximately 1.5 seconds and
then turn yellow.
Active Lane Keeping Assist
General notes
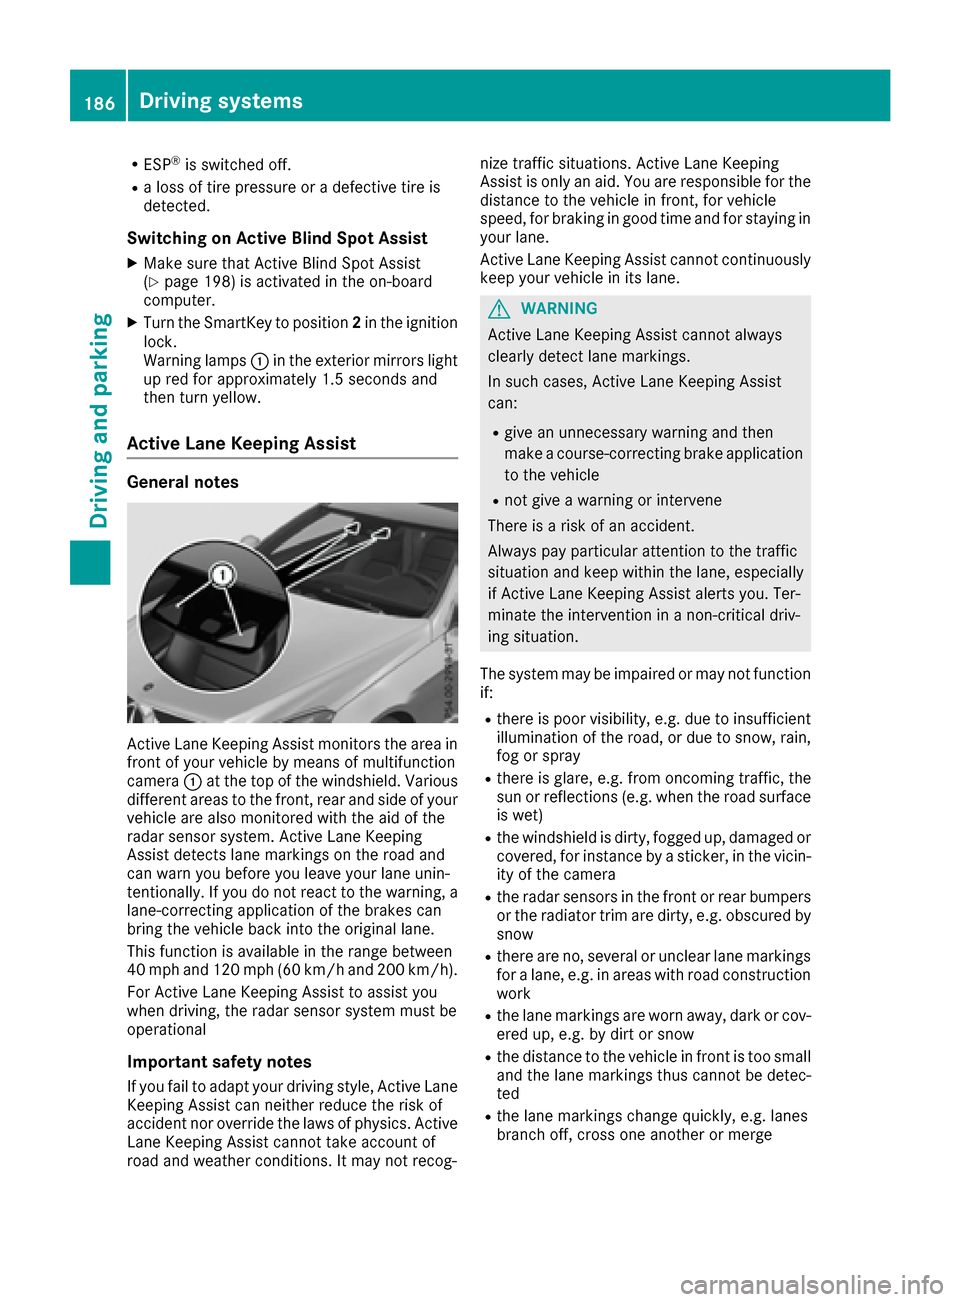
Active Lane Keeping Assist monitors the area in
front of your vehicle by means of multifunction
camera :at the top of the windshield. Various
different areas to the front, rear and side of your
vehicle are also monitored with the aid of the
radar sensor system. Active Lane Keeping
Assist detects lane markings on the road and
can warn you before you leave your lane unin-
tentionally. If you do not react to the warning, a
lane-correcting application of the brakes can
bring the vehicle back into the original lane.
This function is available in the range between
40 mph and 120 mph (60 km/h and 200 km/h).
For Active Lane Keeping Assist to assist you
when driving, the radar sensor system must be
operational
Important safety notes
If you fail to adapt your driving style, Active Lane
Keeping Assist can neither reduce the risk of
accident nor override the laws of physics. Active
Lane Keeping Assist cannot take account of
road and weather conditions. It may not recog- nize traffic situations. Active Lane Keeping
Assist is only an aid. You are responsible for the
distance to the vehicle in front, for vehicle
speed, for braking in good time and for staying in
you
r lane.
Active Lane Keeping Assist cannot continuously
keep your vehicle in its lane.
GWARNING
Active Lane Keeping Assist cannot always
clearly detect lane markings.
In such cases, Active Lane Keeping Assist
can:
Rgive an unnecessary warning and then
make a course-correcting brake application
to the vehicle
Rnot give a warning or intervene
There is a risk of an accident.
Always pay particular attention to the traffic
situation and keep within the lane, especially
if Active Lane Keeping Assist alerts you. Ter-
minate the intervention in a non-critical driv-
ing situation.
The system may be impaired or may not function
if:
Rthere is poor visibility, e.g. due to insufficient
illumination of the road, or due to snow, rain,
fog or spray
Rthere is glare, e.g. from oncoming traffic, the
sun or reflections (e.g. when the road surface
is wet)
Rthe windshield is dirty, fogged up, damaged or
covered, for instance by a sticker, in the vicin-
ity of the camera
Rthe radar sensors in the front or rear bumpers
or the radiator trim are dirty, e.g. obscured by
snow
Rthere are no, several or unclear lane markings
for a lane, e.g. in areas with road construction
work
Rthe lane markings are worn away, dark or cov-
ered up, e.g. by dirt or snow
Rthe distance to the vehicle in front is too small
and the lane markings thus cannot be detec-
ted
Rthe lane markings change quickly, e.g. lanes
branch off, cross one another or merge
186Driving system s
Driving an d parking
Page 192 of 322
Under normal operating conditions and with the
specified coolant level, the coolant temperature
may rise to 248 ‡ (120 †).
Operating the on-board computer
Overview
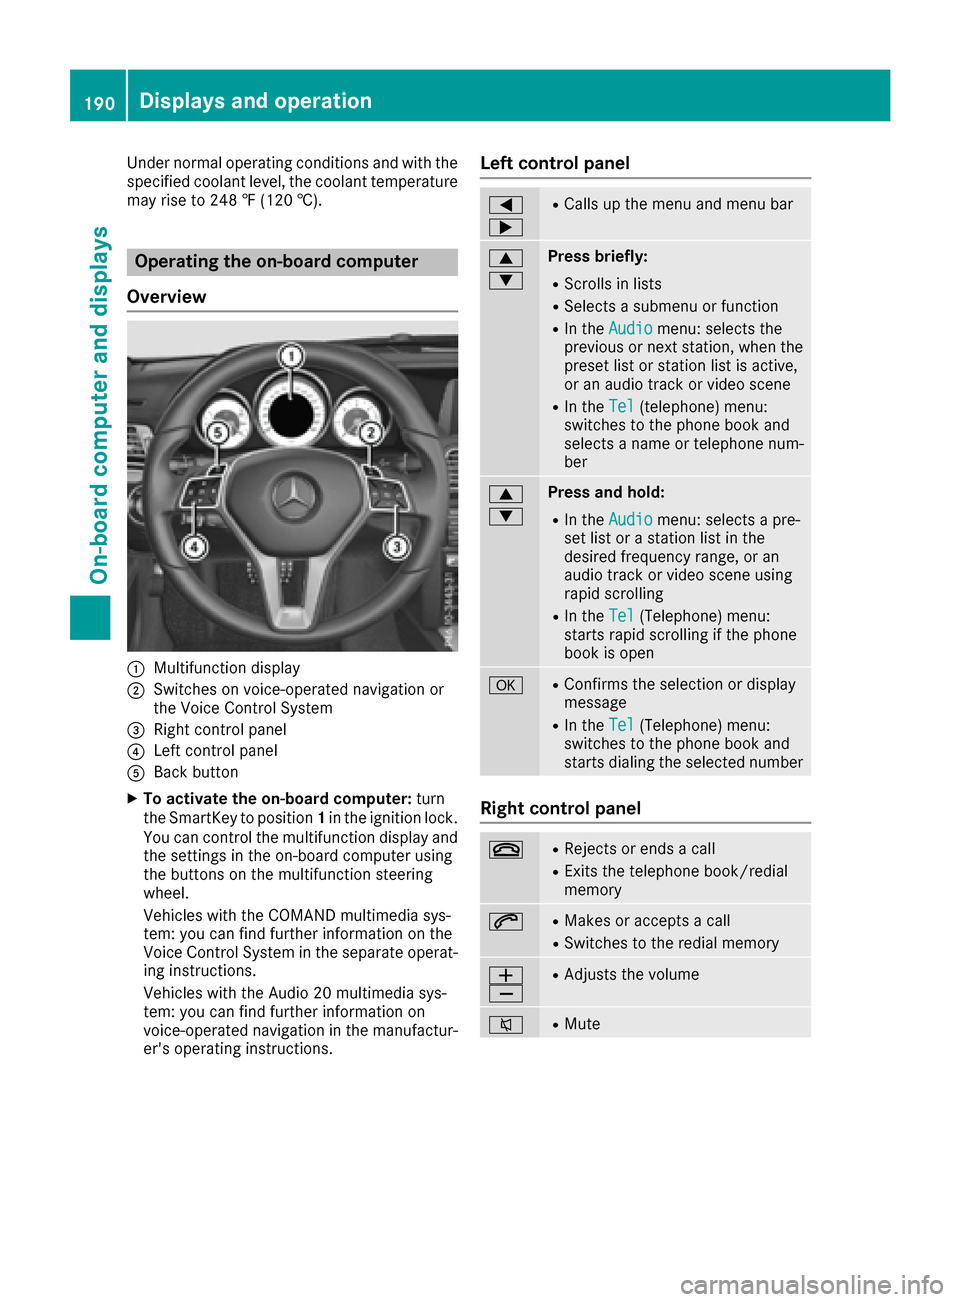
:Multifunction display
;Switches on voice-operated navigation or
the Voice Control System
=Right control panel
?Left control panel
ABack button
XTo activate the on-board computer: turn
the SmartKey to position 1in the ignition lock.
You can control the multifunction display and the settings in the on-board computer using
the buttons on the multifunction steering
wheel.
Vehicles with the COMAND multimedia sys-
tem: you can find further information on the
Voice Control System in the separate operat-
ing instructions.
Vehicles with the Audio 20 multimedia sys-
tem: you can find further information on
voice-operated navigation in the manufactur-
er's operating instructions.
Left control panel
=
;RCalls up the menu and menu bar
9
:Press briefly:
RScrolls in lists
RSelects a submenu or function
RIn the Audiomenu: selects the
previous or next station, when the
preset list or station list is active,
or an audio track or video scene
RIn the Tel(telephone) menu:
switches to the phone book and
selects a name or telephone num-
ber
9
:Press and hold:
RIn the Audiomenu: selects a pre-
set list or a station list in the
desired frequency range, or an
audio track or video scene using
rapid scrolling
RIn the Tel(Telephone) menu:
starts rapid scrolling if the phone
book is open
aRConfirms the selection or display
message
RIn the Tel(Telephone) menu:
switches to the phone book and
starts dialing the selected number
Right control panel
~RRejects or ends a call
RExits the telephone book/redial
memory
6RMakes or accepts a call
RSwitches to the redial memory
W
XRAdjusts the volume
8RMute
190Displays and operation
On-board computer and displays
Page 201 of 322
XPress the=or; button on the steering
wheel to select the Sett.menu.
XPress the:or9 button to select the
Instrument Clustersubmenu.
XPress ato confirm.
XPress the :or9 button to select the
Permanent Display:function.
The current setting, Outside Temperature
orSpeedometer [km/h]/Speedometer[mph], appears.
XPress the abutton to save the setting.
Lights
Setting the brightness of the instrument
cluster lighting and switches
The lighting in the instrument cluster, in the dis-
plays and the controls in the vehicle interior can
be adjusted with the Brightness Display/
Switches:function.
XPress the=or; button on the steering
wheel to select the Sett.menu.
XPress the:or9 button to select the
Lightssubmenu.
XPress ato confirm.
XPress the :or9 button to select the
Brightness Display/Switches:function.
The current setting appears.
XPress ato confirm.
XPress the :or9 button to adjust the
brightness to any level from Level 1to
Level 5(bright).
XPress the aor% button to save the
setting.
If the light switch is set to the Ã,Tor
L position, the brightness is dependent
upon the brightness of the ambient light.
iThe light sensor in the instrument cluster
automatically controls the brightness of the
multifunction display.
In daylight, the displays in the instrument
cluster are not illuminated.
Switching the daytime running lamps on/
off
XPress the =or; button on the steering
wheel to select the Sett.menu.
XPress the:or9 button to select the
Lightssubmenu.
XPress ato confirm.
XPress the :or9 button to select the
Day. Run. Lightsfunction.
If the Day. Run. Lightsfunction has been
switched on, the multifunction display shows
the cone of light and the Wsymbol in
orange.
XPress the abutton to save the setting.
Further information on daytime running lamps
(
Ypage 109).
Activating/deactivating surround light-
ing and exterior lighting delayed switch-
off
XPress the =or; button on the steering
wheel to select the Sett.menu.
XPress the:or9 button to select the
Lightssubmenu.
XPress ato confirm.
XUsing :or9, select the SurroundLightingfunction.
If the SurroundLightingfunction is activa-
ted, the light cone and the area around the
vehicle are displayed in orange in the multi-
function display.
XPress the abutton to save the setting.
Deactivating delayed switch-off of the exterior
lighting temporarily:
XBefore leaving the vehicle, turn the SmartKey to position 0in the ignition lock.
XTurn the SmartKey to position 2in the ignition
lock.
The exterior lighting delayed switch-off is
deactivated.
Delayed switch-off of the exterior lighting is
reactivated the next time you start the engine.
If you have activated the Surround Lighting
function and the light switch is set to the Ã
position, the following functions are activated
when it is dark:
Rsurround lighting: the exterior lighting
remains lit for 40 seconds after unlocking
with the SmartKey. If you start the engine, the
surround lighting is switched off and auto-
matic headlamp mode is activated
(
Ypage 109).
Rexterior lighting delayed switch-off: the
exterior lighting remains lit for 60 seconds
after the engine is switched off. If you close all
the doors and the trunk lid, the exterior light-
ing goes off after 15 seconds.
Menus and submenus199
On-board computer and displays
Z
Page 202 of 322
iDepending on your vehicle's equipment,
when the surround lighting and delayed
switch-off exterior lighting are on, the follow-
ing light up:
RParking lamps
RSide marker lamps
RSurround lighting in the exterior mirrors
Activating/deactivating the interior light-
ing delayed switch-off
If you activate the Light. Delayfunction, the
interior lighting remains on for 20 seconds after
you remove the SmartKey from the ignition lock.
XPress the =or; button on the steering
wheel to select the Sett.menu.
XPress the:or9 button to select the
Lightssubmenu.
XPress ato confirm.
XPress the :or9 button to select the
Light. Delayfunction.
When the Light. Delayfunction is activa-
ted, the vehicle interior is displayed in orange
in the multifunction display.
XPress the abutton to save the setting.
Vehicle
Activating/deactivating the automatic
door locking mechanism
XPress the =or; button on the steering
wheel to select the Sett.menu.
XPress the:or9 button to select the
Vehiclesubmenu.
XPress ato confirm.
XPress the :or9 button to select the
Auto. Door Locksfunction.
If the Auto.DoorLocksfunction is switched
on, the multifunction display shows the vehi-
cle's doors in orange.
XPress the abutton to save the setting.
If you activate the Auto.
DoorLocksfunction,
the vehicle is centrally locked above a speed of
around 9 mph (15 km/h).
For further information on the automatic locking feature, see (
Ypage 79).
Activating/deactivating the acoustic
locking verification signal
If you switch on the AcousticLockfunction, an
acoustic signal sounds when you lock the vehi-
cle.
XPress the =or; button on the steering
wheel to select the Sett.menu.
XPress the:or9 button to select the
Vehiclesubmenu.
XPress ato confirm.
XPress the :or9 button to select the
Acoustic Lockfunction.
If the Acoustic Lockfunction is activated,
the & symbol in the multifunction display
lights up orange.
XPress the abutton to save the setting.
Convenience
Activating/deactivating the EASY-
ENTRY/EXIT feature
GWARNING
When the EASY-ENTRY/EXIT feature adjusts
the steering wheel, you and other vehicle
occupants – particularly children – could
become trapped. There is a risk of injury.
While the EASY-ENTRY/EXIT feature is mak-
ing adjustments, make sure that no one has
any body parts in the sweep of the steering
wheel.
If somebody becomes trapped:
Rpress one of the memory function position
buttons, or
Rmove the switch for steering wheel adjust-
ment in the opposite direction to that in
which the steering wheel is moving.
The adjustment process is stopped.
XPress the =or; button on the steering
wheel to select the Sett.menu.
XPress the:or9 button to select the
Conveniencesubmenu.
XPress ato confirm.
200Menus and submenus
On-board computer and displays
Page 225 of 322
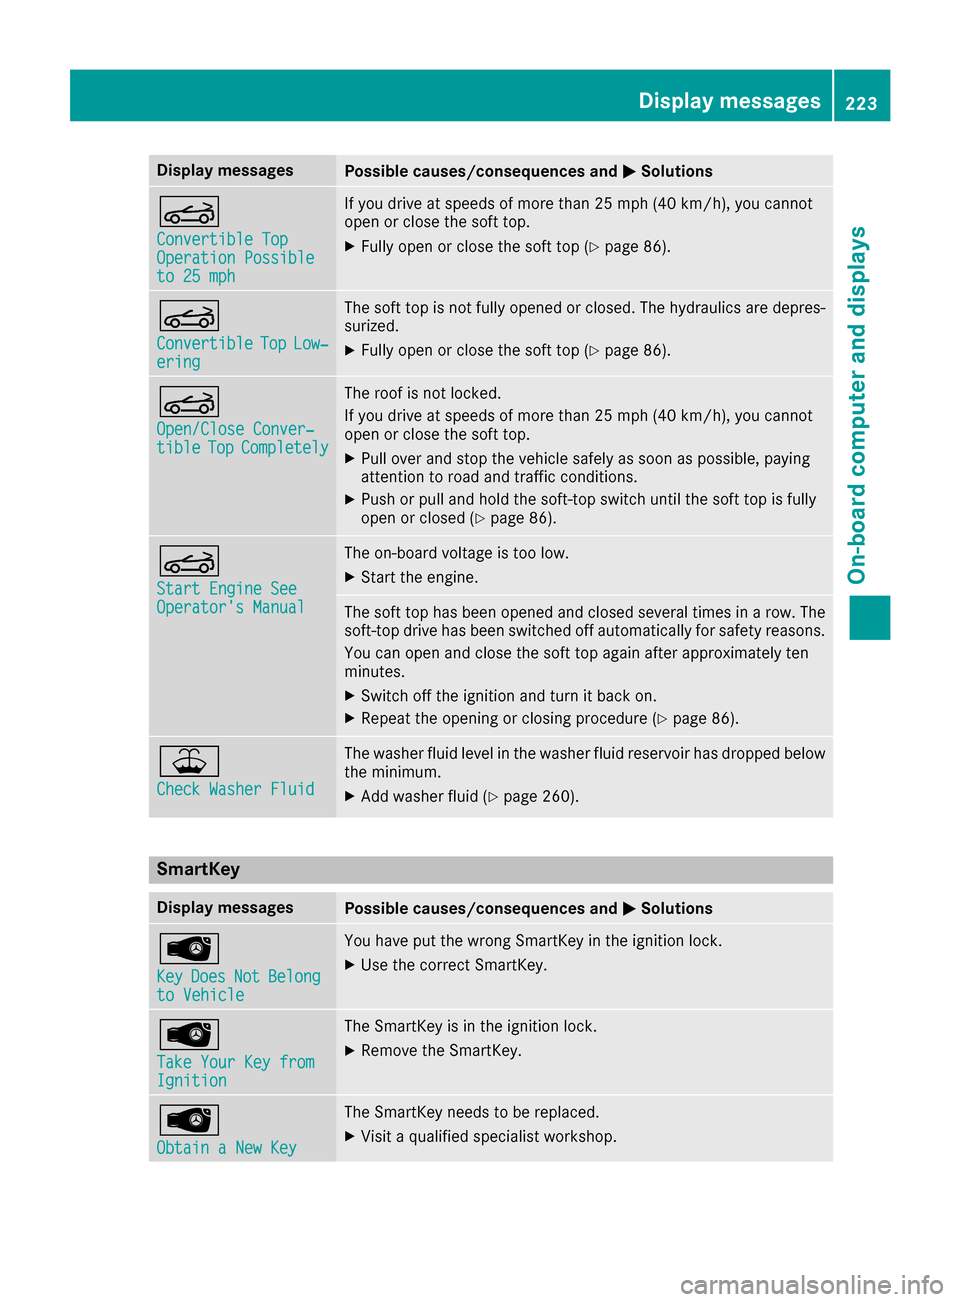
Display messagesPossible causes/consequences andMSolutions
K
Convertible TopOperation Possibleto 25 mph
If you drive at speeds of morethan 25 mph (40 km/h), you canno t
open or close th esof ttop.
XFull yopen or close th esof tto p (Ypage 86).
K
ConvertibleTopLow ‐ering
The sof tto pis no tfully opened or closed .The hydraulic sare depres-
surized.
XFull yopen or close th esof tto p (Ypage 86).
K
Open/Clos eConver ‐tibleTopCompletel y
The roofis no tlocked.
If you drive at speeds of mor ethan 25 mph (40 km/h), you canno t
open or close th esof ttop.
XPull ove rand stop th evehicl esafely as soo nas possible, payin g
attention to roa dand traffic conditions.
XPush or pull and hold th esoft-to pswitch until th esof tto pis full y
open or closed (Ypage 86).
K
Start Engine SeeOperator'sManual
The on-boar dvoltag eis to olow.
XStart th eengine.
The sof tto phas been opened and closed several times in arow .The
soft-to pdrive has been switched off automatically for safet yreasons.
You can open and close th esof tto pagain after approximately te n
minutes.
XSwitc hoff th eignition and tur nit bac kon .
XRepeat th eopening or closin gprocedure (Ypage 86).
¥
Check Washer Fluid
The washer flui dlevel in th ewasher flui dreservoir has dropped belo w
th eminimum .
XAddwasher flui d (Ypage 260).
SmartKey
Display messagesPossible causes/consequences and MSolutions
Â
KeyDoesNotBelongto Vehicl e
You haveput th ewrong SmartKey in th eignition lock.
XUse th ecorrec tSmartKey.
Â
Tak eYou rKey fro mIgnition
The SmartKey is in th eignition lock.
XRemove th eSmartKey.
Â
Obtain aNew Key
The SmartKey needs to be replaced.
XVisit aqualified specialist workshop .
Display messages223
On-board computer and displays
Z
Page 226 of 322
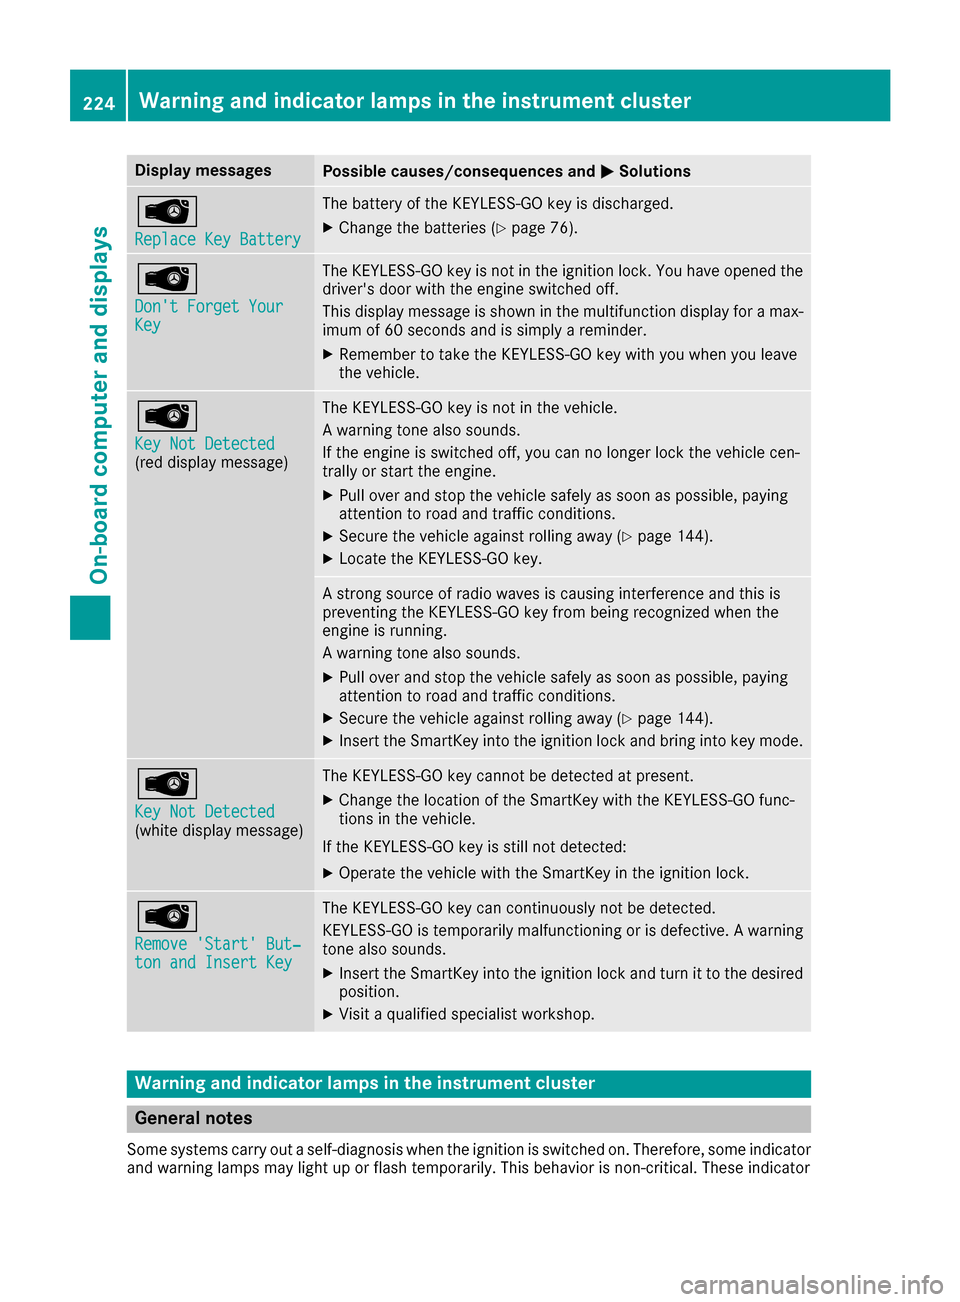
Display messagesPossible causes/consequences andMSolutions
Â
ReplaceKey Batter y
The battery of th eKEYLESS-GO ke yis discharged.
XChange th ebatterie s (Ypage 76) .
Â
Don't Forget You rKey
The KEYLESS-GO ke yis no tin th eignition lock. You hav eopened th e
driver's door wit hth eengin eswitched off .
This display message is shown in th emultifunction display for amax -
imum of 60 seconds and is simply areminder.
XRemembe rto tak eth eKEYLESS-GO ke ywit hyou when you leav e
th evehicle.
Â
Key Not Detected(re ddisplay message )
The KEYLESS-GO ke yis no tin th evehicle.
A warning tone also sounds.
If th eengin eis switched off ,you can no longer loc kth evehicl ecen-
trally or start th eengine.
XPull ove rand stop th evehicl esafely as soo nas possible, payin g
attention to roa dand traffic conditions.
XSecur eth evehicl eagainst rollin gaway (Ypage 144).
XLocate th eKEYLESS-GO key.
A stron gsource of radi owave sis causing interferenc eand this is
preventing th eKEYLESS-GO ke yfrom bein grecognized when th e
engin eis running.
A warning tone also sounds.
XPull ove rand stop th evehicl esafely as soo nas possible, payin g
attention to roa dand traffic conditions.
XSecur eth evehicl eagainst rollin gaway (Ypage 144).
XInsertth eSmartKey int oth eignition loc kand bring int oke ymode.
Â
Key Not Detected(whit edisplay message )
The KEYLESS-GO ke ycanno tbe detecte dat present.
XChange th elocation of th eSmartKey wit hth eKEYLESS-GO func-
tion sin th evehicle.
If th eKEYLESS-GO ke yis still no tdetected:
XOperat eth evehicl ewit hth eSmartKey in th eignition lock.
Â
Remove 'Start 'But ‐ton and Insert Key
The KEYLESS-GO ke ycan continuousl yno tbe detected.
KEYLESS-GO is temporarily malfunctioning or is defective. Awarning
tone also sounds.
XInser tth eSmartKey int oth eignition loc kand tur nit to th edesire d
position .
XVisitaqualified specialist workshop .
Warning and indicat orlamps in the instrume nt cluster
General notes
Some systems carry out aself-diagnosis when th eignition is switched on .Therefore ,som eindicator
and warning lamp smay ligh tup or flas htemporarily. This behavio ris non-critical .These indicator
224Warning and indicator lamps in the instrument cluster
On-board computer and displays
Page 239 of 322
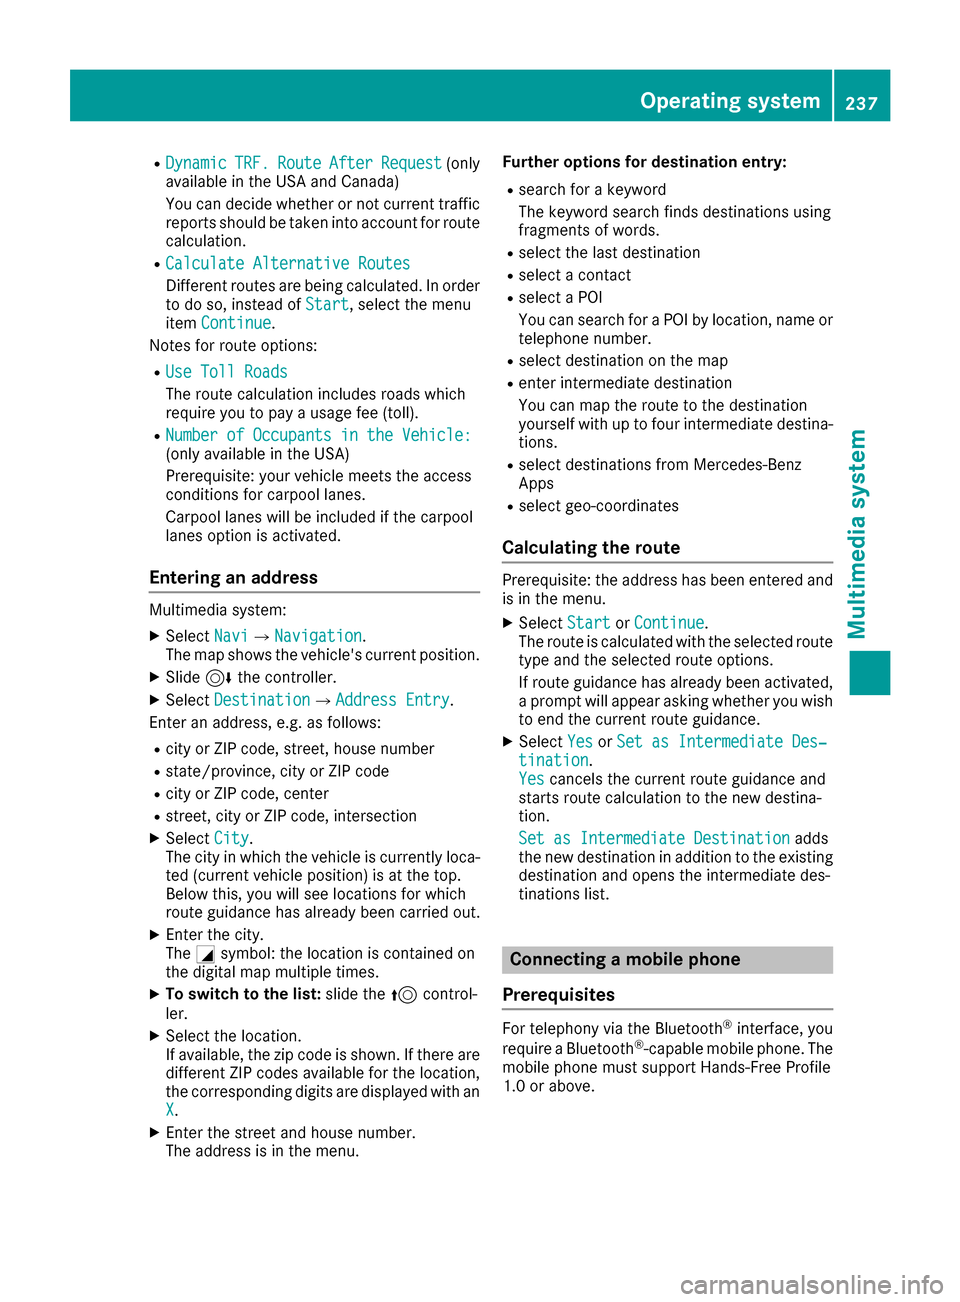
RDynamicTRF.RouteAfterRequest(only
available in the USA and Canada)
You can decide whether or not current traffic
reports should be taken into account for route
calculation.
RCalculate Alternative Routes
Different routes are being calculated. In order
to do so, instead of Start, select the menu
item Continue.
Notes for route options:
RUse Toll Roads
The route calculation includes roads which
require you to pay a usage fee (toll).
RNumber of Occupants in the Vehicle:(only available in the USA)
Prerequisite: your vehicle meets the access
conditions for carpool lanes.
Carpool lanes will be included if the carpool
lanes option is activated.
Entering an address
Multimedia system:
XSelect NaviQNavigation.
The map shows the vehicle's current position.
XSlide 6the controller.
XSelect DestinationQAddress Entry.
Enter an address, e.g. as follows:
Rcity or ZIP code, street, house number
Rstate/province, city or ZIP code
Rcity or ZIP code, center
Rstreet, city or ZIP code, intersection
XSelect City.
The city in which the vehicle is currently loca-
ted (current vehicle position) is at the top.
Below this, you will see locations for which
route guidance has already been carried out.
XEnter the city.
The Gsymbol: the location is contained on
the digital map multiple times.
XTo switch to the list: slide the5control-
ler.
XSelect the location.
If available, the zip code is shown. If there are
different ZIP codes available for the location,
the corresponding digits are displayed with an
X
.
XEnter the street and house number.
The address is in the menu. Further options for destination entry:
Rsearch for a keyword
The keyword search finds destinations using
fragments of words.
Rselect the last destination
Rselect a contact
Rselect a POI
You can search for a POI by location, name or
telephone number.
Rselect destination on the map
Renter intermediate destination
You can map the route to the destination
yourself with up to four intermediate destina-
tions.
Rselect destinations from Mercedes-Benz
Apps
Rselect geo-coordinates
Calculating the route
Prerequisite: the address has been entered and
is in the menu.
XSelect StartorContinue.
The route is calculated with the selected route
type and the selected route options.
If route guidance has already been activated,
a prompt will appear asking whether you wish
to end the current route guidance.
XSelect YesorSet as Intermediate Des‐tination.
Yescancels the current route guidance and
starts route calculation to the new destina-
tion.
Set as Intermediate Destination
adds
the new destination in addition to the existing
destination and opens the intermediate des-
tinations list.
Connecting a mobile phone
Prerequisites
For telephony via the Bluetooth®interface, you
require a Bluetooth®-capable mobile phone. The
mobile phone must support Hands-Free Profile
1.0 or above.
Operating system237
Multimedia system
Z
Page 240 of 322
Multimedia system:
XSelectVehicleQSystem Set‐tingsQActivate Bluetooth.
XActivate Bluetooth®O.
Mobile phone:
XActivate Bluetooth®and, if necessary, Blue-
tooth®visibility for other devices (see the
manufacturer's operating instructions).
The Bluetooth
®device names for all of one man-
ufacturer's products might be identical. To
make it possible to clearly identify your mobile
phone, change the device name (see the man-
ufacturer's operating instructions).
If the mobile phone supports the PBAP (Phone
Book Access Profile) and MAP (Message
Access Profile) Bluetooth
®profiles, the follow-
ing information will be transmitted after you
connect:
RPhone book
RCall lists
RText messages and e-mails
iFurther information on suitable mobile
phones can be obtained on the Internet at:
http://www.mercedes-benz.com/
connect
iIn the USA you can also contact the
Mercedes-Benz Customer Assistance Center
at 1-800-FOR-MERCedes (1-800-367-6372).
In Canada, you can get in touch with the Cus-
tomer Relations Center on 1-800-387-0100.
Searching for and authorizing a mobile
phone
Before using your mobile phone with the multi-
media system for the first time, you will need to search for the phone and then authorize (con-
nect) it. Depending on the mobile phone, author-
ization either takes place by means of Secure
Simple Pairing or by entering a passkey. The
multimedia system automatically makes the
procedure that is relevant for your mobile phone
available. The mobile phone is always connec-
ted automatically after authorization. Further
information on using a mobile phone with the
multimedia system (see the Digital Operator's
Manual).
If the multimedia system does not detect your
mobile phone, this may be due to particular security settings on your mobile phone (see the
manufacturer's operating instructions).
Only one mobile phone can be connected to the
multimedia system at any one time.
Searching for a mobile phone
Multimedia system:
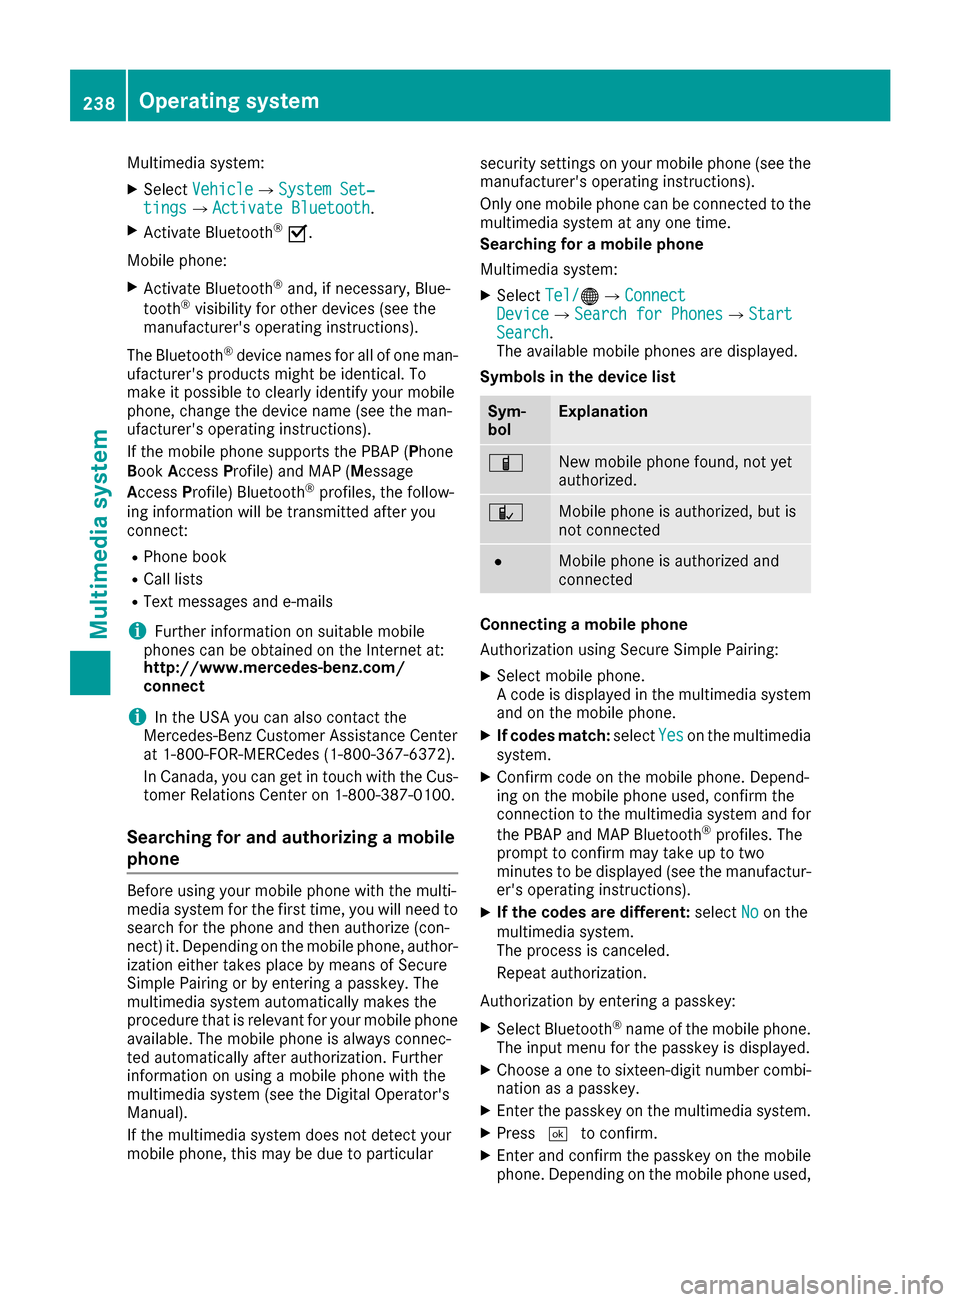
XSelect Tel/®QConnectDeviceQSearch for PhonesQStartSearch.
The available mobile phones are displayed.
Symbols in the device list
Sym-
bolExplanation
ÏNew mobile phone found, not yet
authorized.
ÑMobile phone is authorized, but is
not connected
#Mobile phone is authorized and
connected
Connecting a mobile phone
Authorization using Secure Simple Pairing:
XSelect mobile phone.
A code is displayed in the multimedia system
and on the mobile phone.
XIf codes match: selectYeson the multimedia
system.
XConfirm code on the mobile phone. Depend-
ing on the mobile phone used, confirm the
connection to the multimedia system and for
the PBAP and MAP Bluetooth
®profiles. The
prompt to confirm may take up to two
minutes to be displayed (see the manufactur-
er's operating instructions).
XIf the codes are different: selectNoon the
multimedia system.
The process is canceled.
Repeat authorization.
Authorization by entering a passkey:
XSelect Bluetooth®name of the mobile phone.
The input menu for the passkey is displayed.
XChoose a one to sixteen-digit number combi- nation as a passkey.
XEnter the passkey on the multimedia system.
XPress ¬to confirm.
XEnter and confirm the passkey on the mobile
phone. Depending on the mobile phone used,
238Operating system
Multimedia system
Page 243 of 322
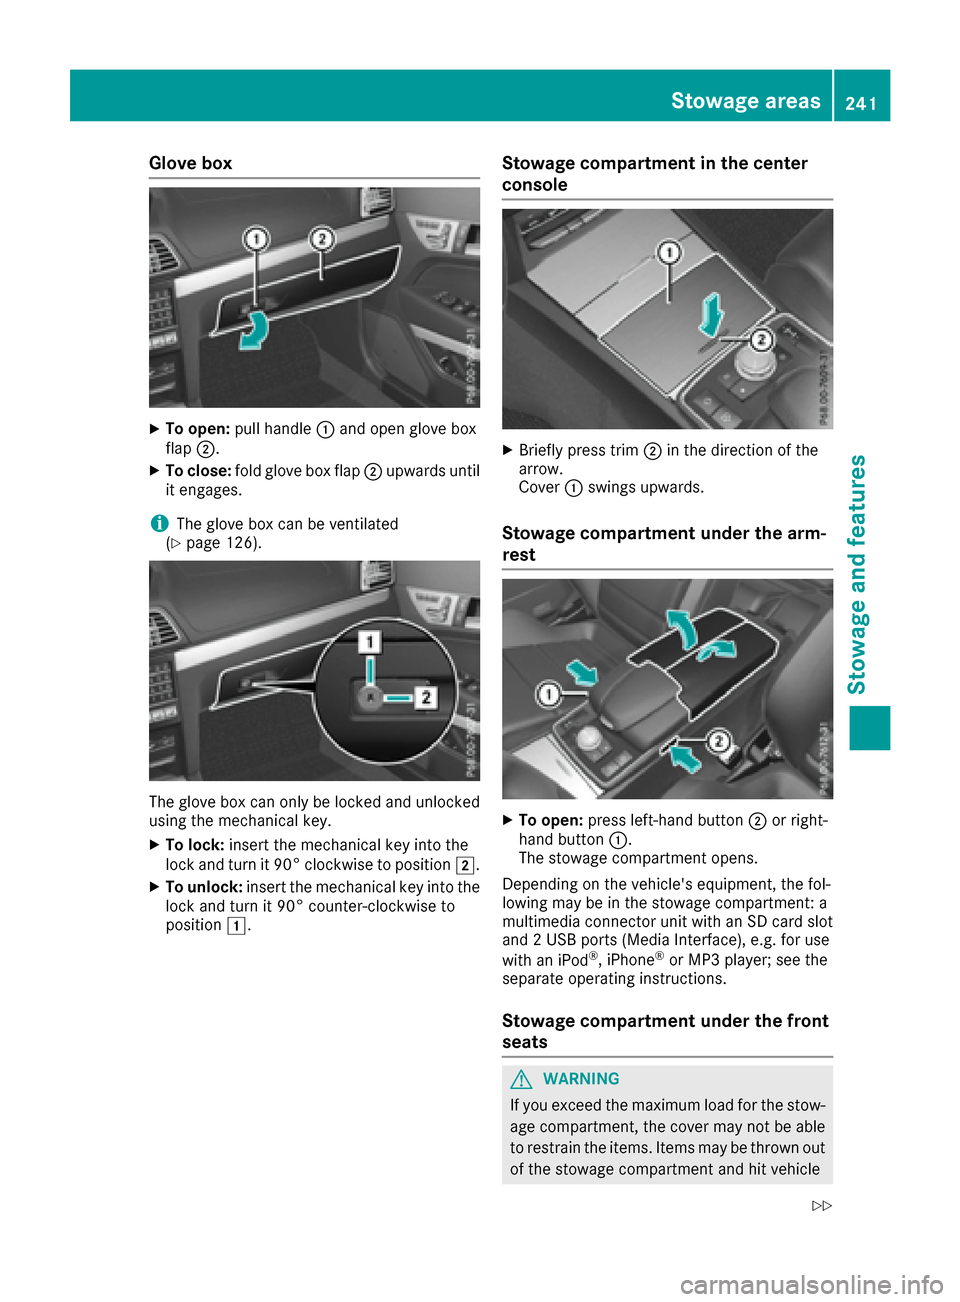
Glove box
XTo open:pull handle :and open glove box
flap ;.
XTo close: fold glove box flap ;upwards until
it engages.
iThe glove box can be ventilated
(Ypage 126).
The glove box can only be locked and unlocked
using the mechanical key.
XTo lock: insert the mechanical key into the
lock and turn it 90° clockwise to position 2.
XTo unlock:insert the mechanical key into the
lock and turn it 90° counter-clockwise to
position 1.
Stowage compartment in the center
console
XBriefly press trim ;in the direction of the
arrow.
Cover :swings upwards.
Stowage compartment under the arm-
rest
XTo open: press left-hand button ;or right-
hand button :.
The stowage compartment opens.
Depending on the vehicle's equipment, the fol-
lowing may be in the stowage compartment: a
multimedia connector unit with an SD card slot
and 2 USB ports (Media Interface), e.g. for use
with an iPod
®, iPhone®or MP3 player; see the
separate operating instructions.
Stowage compartment under the front
seats
GWARNING
If you exceed the maximum load for the stow- age compartment, the cover may not be able
to restrain the items. Items may be thrown out
of the stowage compartment and hit vehicle
Stowage areas241
Stowage and features
Z
Page 247 of 322
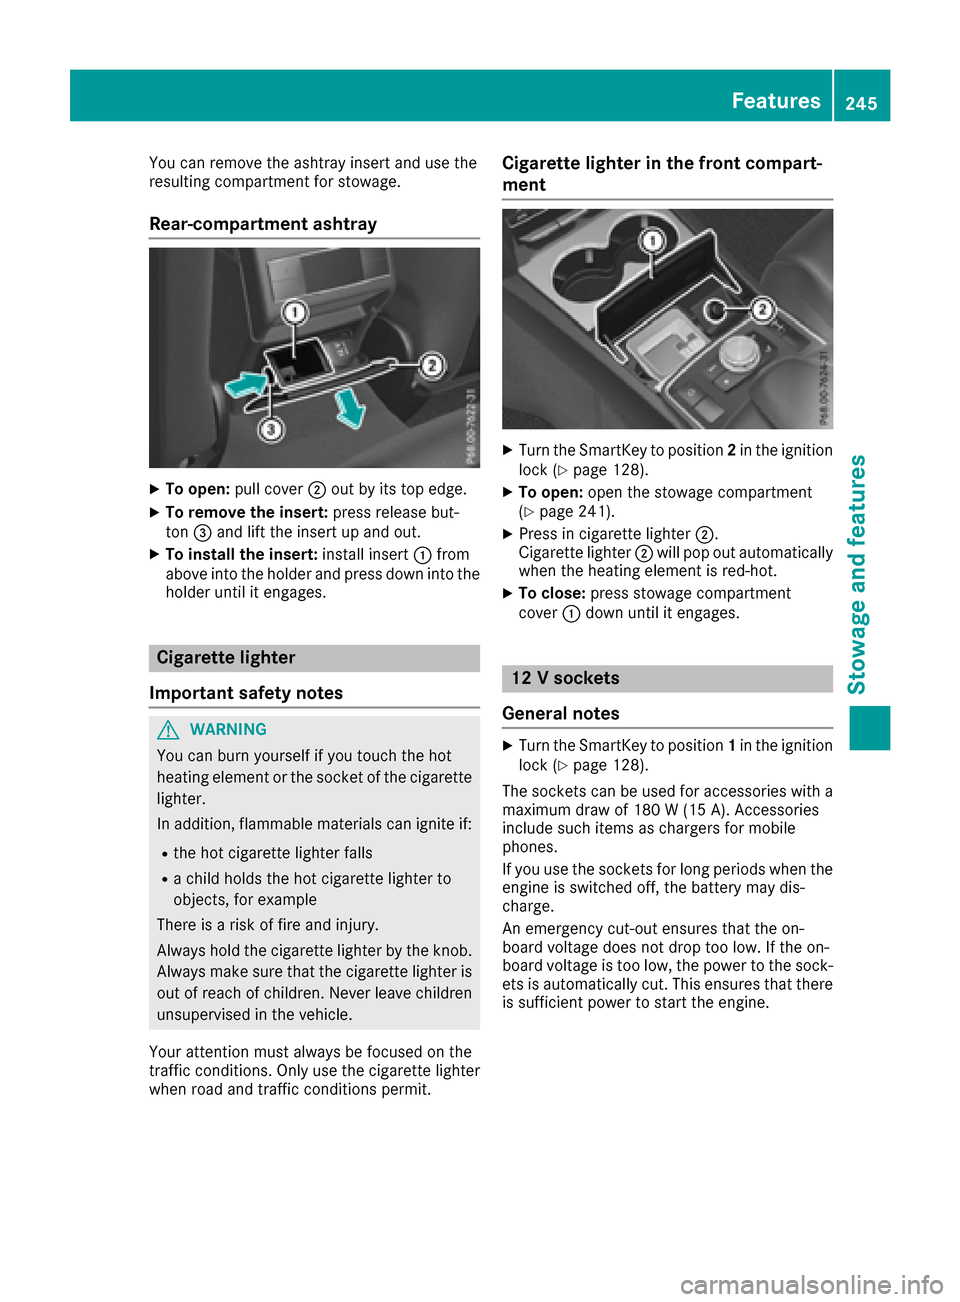
You can remove the ashtray insert and use the
resulting compartment for stowage.
Rear-compartment ashtray
XTo open:pull cover ;out by its top edge.
XTo remove the insert: press release but-
ton =and lift the insert up and out.
XTo install the insert: install insert:from
above into the holder and press down into the
holder until it engages.
Cigarette lighter
Important safety notes
GWARNING
You can burn yourself if you touch the hot
heating element or the socket of the cigarette lighter.
In addition, flammable materials can ignite if:
Rthe hot cigarette lighter falls
Ra child holds the hot cigarette lighter to
objects, for example
There is a risk of fire and injury.
Always hold the cigarette lighter by the knob.
Always make sure that the cigarette lighter is
out of reach of children. Never leave children
unsupervised in the vehicle.
Your attention must always be focused on the
traffic conditions. Only use the cigarette lighter when road and traffic conditions permit.
Cigarette lighter in the front compart-
ment
XTurn the SmartKey to position 2in the ignition
lock (Ypage 128).
XTo open: open the stowage compartment
(Ypage 241).
XPress in cigarette lighter ;.
Cigarette lighter ;will pop out automatically
when the heating element is red-hot.
XTo close: press stowage compartment
cover :down until it engages.
12 V sockets
General notes
XTurn the SmartKey to position 1in the ignition
lock (Ypage 128).
The sockets can be used for accessories with a maximum draw of 180 W (15 A). Accessories
include such items as chargers for mobile
phones.
If you use the sockets for long periods when the
engine is switched off, the battery may dis-
charge.
An emergency cut-out ensures that the on-
board voltage does not drop too low. If the on-
board voltage is too low, the power to the sock-
ets is automatically cut. This ensures that there is sufficient power to start the engine.
Features245
Stowage and features
Z