MERCEDES-BENZ E-CLASS CABRIOLET 2017 Owners Manual
Manufacturer: MERCEDES-BENZ, Model Year: 2017, Model line: E-CLASS CABRIOLET, Model: MERCEDES-BENZ E-CLASS CABRIOLET 2017Pages: 521, PDF Size: 10.64 MB
Page 91 of 521
Seats
Ad
justing the front seat mechanically and
electrically &
WARNING Risk of becoming trapped if
th e seats are adjus tedby children
Children could become trapped if they adjust
th e seats, particularly when unattended. #
When leaving theve hicle, alw aysta ke
th eke y with you and lock theve hicle.
This also applies tomobile phones if the
"Digital Car Key in the smartphone"
function is activated via the Mercedes
connect me web App. #
Never lea vechildren unat tended in the
ve hicle. The seats can be adjus
ted when the ignition is
switched off. &
WARNING Risk of becoming trapped
when adjusting the seats
When you adjust a seat, you or other vehicle
occupants could become trapped, e.g. on the
seat guide rail. #
Make sure when adjusting a seat that
no one has any body parts in the sweep
of the seat. Obser
vethe saf ety no tes on "Airbags" and "Chil‐
dren in theve hicle". &
WARNING Risk of accident due tothe
driver's seat not being engaged
If th e driver's seat is not engaged, it could
mo veunexpectedly while theve hicle is in
motion.
This could cause youto lose control of the
ve hicle. #
Alw ays make sure that the driver's seat
is engaged before starting theve hicle. &
WARNING Risk of becoming trapped if
th e seat height is adjus ted carelessly
If yo u adjust the seat height carelessly, you
or other vehicle occupants could be trapped
and thereby injured.
Children in particular could acciden tally
press the electrical seat adjustment buttons
and become trapped. #
While moving the seats, make sure that
hands or other body parts do not get
under the le ver assembly of the seat
adjustment sy stem. &
WARNING Risk of inju rydue tohead
re stra ints which are not fitted or are
adjus ted incor rectly
If head restra ints are not fitted or are adjus‐
te d incor rectl y,they cannot pr ovide pr otec‐
tion as intended.
There is an increased risk of injury in the
head and neck area, e.g. in theeve nt of an
accident or when braking. 88
Seats and stowing
Page 92 of 521
#
Alw ays drive with the head restra ints
fi tted. #
Before driving off, ma kesure forev ery
ve hicle occupant that the cent reofthe
head restra int supports the back of the
head at about eye le vel. Do not inter
change the head restra ints of the
front and rear seats. Otherwise, you cannot
adjust the height and angle of the head
re stra ints cor rectl y.
Ad just the head restra int fore -and-aft position so
th at it is as close as possible tothe back of your
head. &
WARNING Risk of inju ryor death due to
incor rect seat position
The seat belt does not of ferth e intended
le ve l of pr otection if you ha venot mo vedthe
seat backrest toan almost vertical position.
When braking or in theeve nt of an accident,
yo u could slide underneath the seat belt and
sus tain abdominal or neck injuries, forex am‐
ple. #
Adjust the seat proper lybefore begin‐
ning your journe y. #
Alw ays ensure that the seat backrest is
in an almost vertical position and that
th e shoulder section of your seat belt is
ro uted across the cent reofyour shoul‐
der. *
NO
TEDama getothe seats when moving
th e seats back The seats may be damaged
byobjects when
moving the seats bac k. #
When moving the seats bac k,make
sure that there are no objects in the
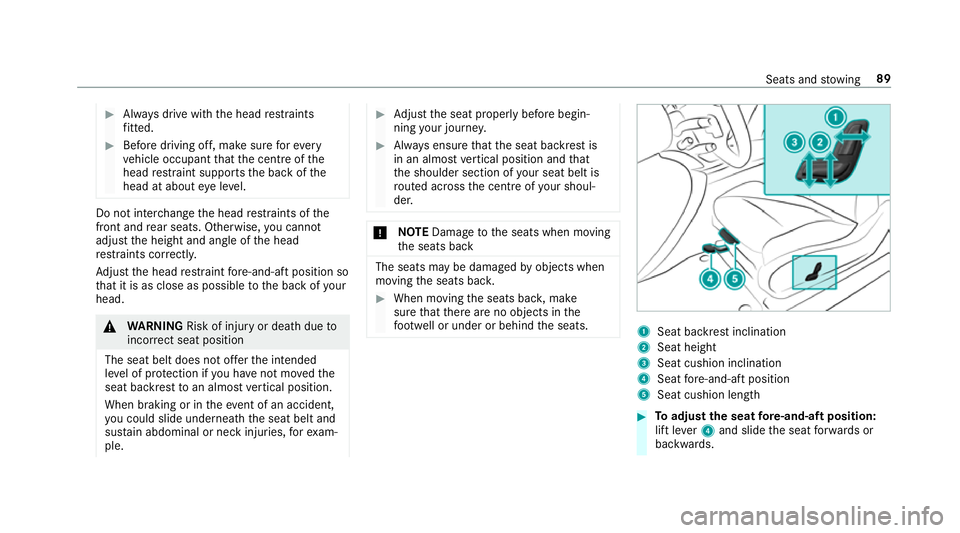
fo ot we ll or under or behind the seats. 1
Seat backrest inclination
2 Seat height
3 Seat cushion inclination
4 Seat fore -and-aft position
5 Seat cushion length #
Toadjust the seat fore -and-aft position:
lift le ver4 and slide the seat forw ards or
backwards. Seats and
stowing 89
Page 93 of 521
#
Make sure that the seat is engaged. #
Toadjust the seat cushion length: lift lever
5 and slide the front section of the seat
cushion forw ards or bac k. Ad
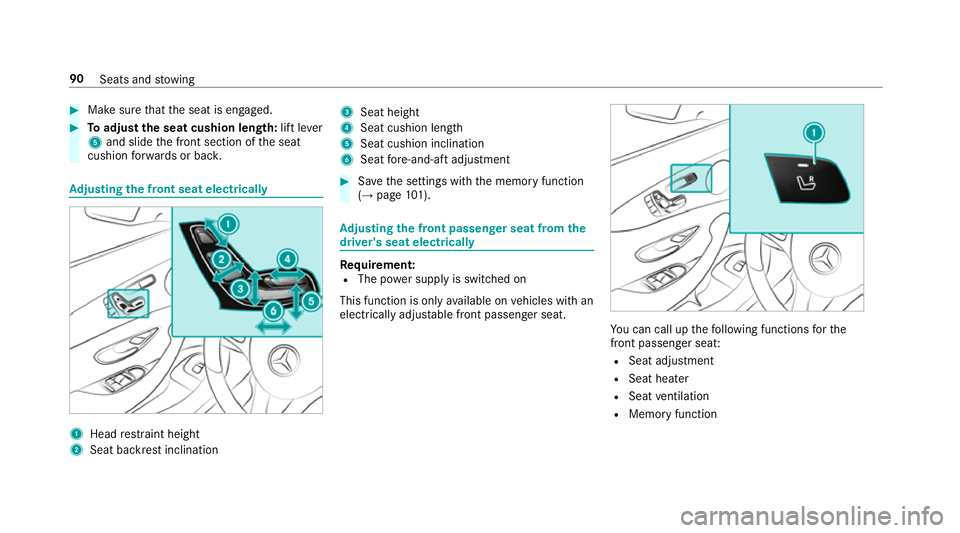
justing the front seat electrically 1
Head restra int height
2 Seat backrest inclination 3
Seat height
4 Seat cushion length
5 Seat cushion inclination
6 Seat fore -and-aft adjustment #
Save the settings with the memory function
(→ page 101). Ad
justing the front passen ger seat from the
driver's seat electrically Re
quirement:
R The po wer supp lyis switched on
This function is only available on vehicles with an
electrically adjus table front passenger seat. Yo
u can call up thefo llowing functions forthe
front passenger sea t:
R Seat adjustment
R Seat hea ter
R Seat ventilation
R Memory function 90
Seats and stowing
Page 94 of 521
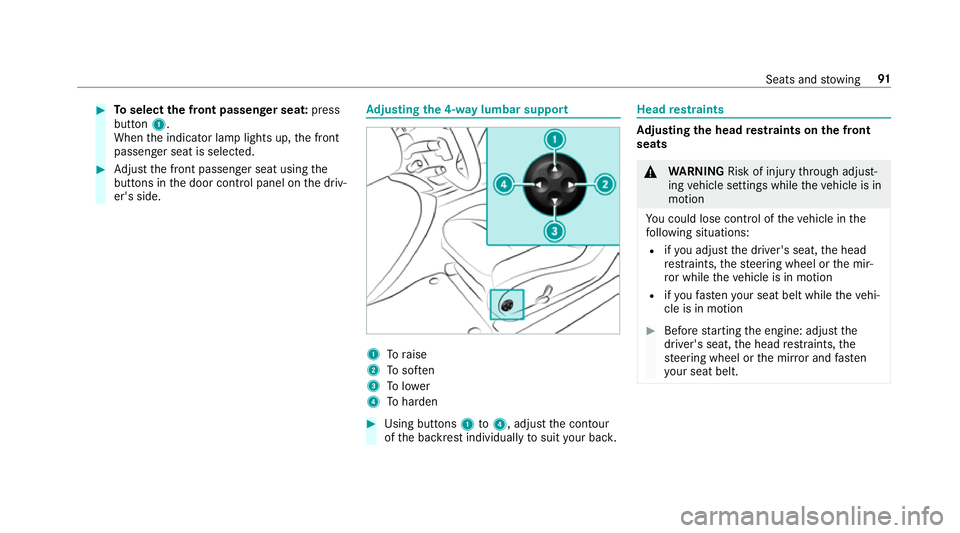
#
Toselect the front passenger seat: press
button 1.
When the indicator lamp lights up, the front
passenger seat is selected. #
Adjust the front passenger seat using the
buttons in the door control panel on the driv‐
er's side. Ad
justing the 4-w aylumbar support 1
Toraise
2 Tosof ten
3 Tolower
4 Toharden #
Using buttons 1to4 , adjust the conto ur
of the backrest individually tosuit your bac k. Head
restra ints Ad
justing the head restra ints on the front
seats &
WARNING Risk of inju rythro ugh adjust‐
ing vehicle settings while theve hicle is in
motion
Yo u could lose cont rol of theve hicle in the
fo llowing situations:
R ifyo u adjust the driver's seat, the head
re stra ints, thesteering wheel or the mir‐
ro r while theve hicle is in motion
R ifyo ufast enyour seat belt while theve hi‐
cle is in motion #
Before starting the engine: adjust the
driver's seat, the head restra ints, the
st eering wheel or the mir ror and fasten
yo ur seat belt. Seats and
stowing 91
Page 95 of 521
&
WARNING Risk of inju rydue tohead
re stra ints which are not fitted or are
adjus ted incor rectly
If head restra ints are not fitted or are adjus‐
te d incor rectl y,they cannot pr ovide pr otec‐
tion as intended.
There is an increased risk of injury in the
head and neck area, e.g. in theeve nt of an
accident or when braking. #
Alw ays drive with the head restra ints
fi tted. #
Before driving off, ma kesure forev ery
ve hicle occupant that the cent reofthe
head restra int supports the back of the
head at about eye le vel. Do not inter
change the head restra ints of the
front and rear seats. Otherwise, you cannot
adjust the height and angle of the head
re stra ints cor rectl y.
Ad just the head restra int fore -and-aft position so
th at it is as close as possible tothe back of your
head. #
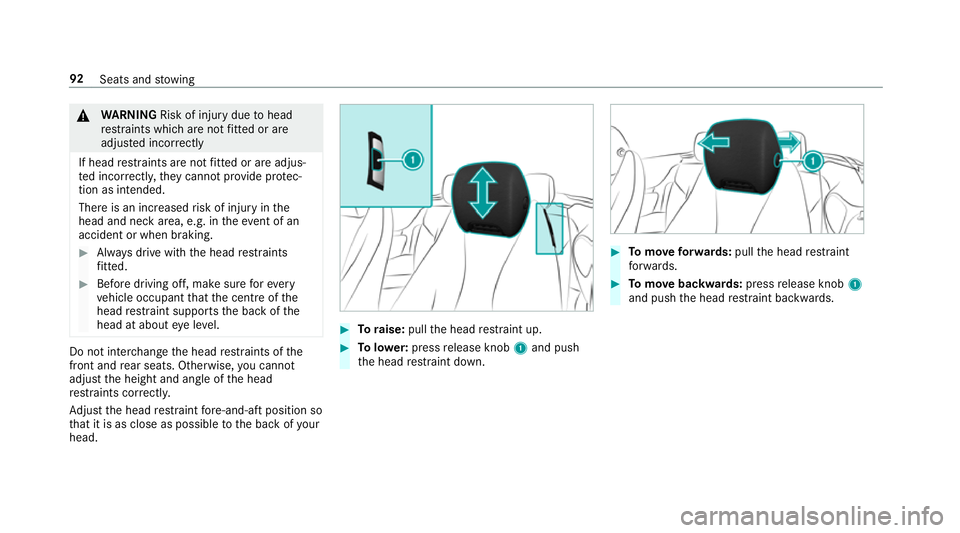
Toraise: pullthe head restra int up. #
Tolowe r:press release knob 1and push
th e head restra int down. #
Tomo veforw ards: pullthe head restra int
fo rw ards. #
Tomo vebackwards: pressrelease knob 1
and push the head restra int backwards. 92
Seats and stowing
Page 96 of 521
Fi
tting/ removing the rear seat head
re stra ints #
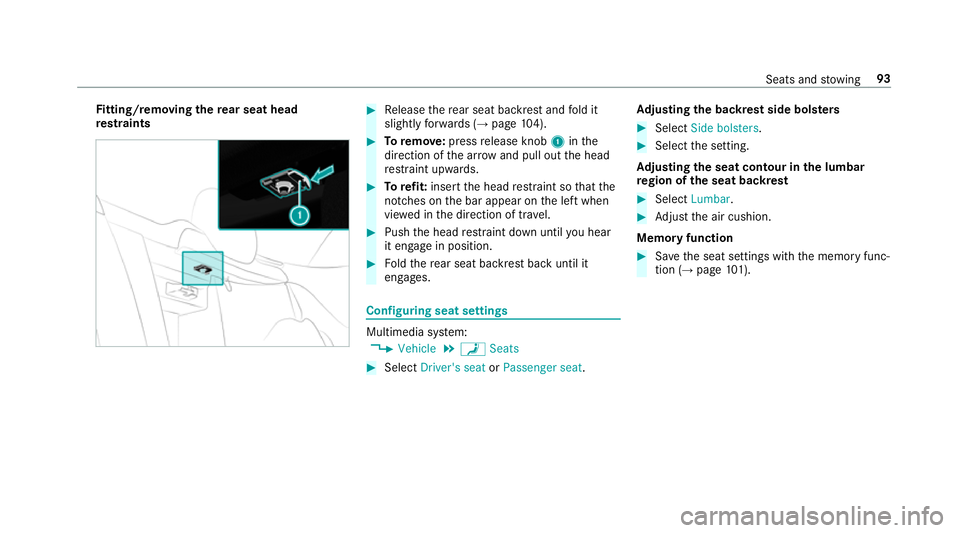
Release there ar seat backrest and fold it
slight lyforw ards (→ page104). #
Toremo ve: press release knob 1inthe
direction of the ar row and pull out the head
re stra int upwards. #
Torefit: inse rtthe head restra int so that the
notches on the bar appear on the left when
vie we d in the direction of tra vel. #
Push the head restra int down until you hear
it en gage in position. #
Foldthere ar seat backrest back until it
engages. Configuring seat settings
Multimedia sy
stem:
, Vehicle .
a Seats #
Select Driver's seat orPassenger seat .Ad
justing the backrest side bols ters #
Select Side bolsters . #
Select the setting.
Ad justing the seat contour in the lumbar
re gion of the seat backrest #
Select Lumbar . #
Adjust the air cushion.
Memory function #
Save the seat settings with the memory func‐
tion (→ page101). Seats and
stowing 93
Page 97 of 521
Overview of massa
geprog rammes The
following massage prog rammes can be selected: Massage prog
ramme for the front seats Function
Re laxing Massag eR elaxing massage withthe deliberate use of sweeping motions. Diagonal
patterns radiating outwards create thefe eling of more space.
Ac tivating Massa ge Quick, activating massage which uses varying motions and posture-
impr oving elements. Specifically forth e lo wer bac k.
Classic Massag eC omforting massage withrippling waves up and down the bac k.
Mobilising Massag eM obilising back massage whichtargets points of tension. Gently leaning
against the sur face stre ngthens ba ckmuscles and expands theth orax. Selecting
the massage prog ramme for the
front seats Multimedia sy
stem:
, Vehicle .
a Seats #
Select Driver's seat orFront-passenger area. #
Select Massage. #
Select a massage programme.
The massage programme runs for appro x‐
ima tely 9to 22 minutes, depending on the
setting. #
Toset the massage intensity: switch High
intensity onO or off ª. Re
setting seat and massa gesettings Multimedia sy
stem:
, Vehicle .
a Seats .
Reset #
Select YesorNo.
Depending on whe ther the settings forth e driver
or front passenger seat are selected, only the
selected seat can be reset. 94
Seats and stowing
Page 98 of 521
Fo
lding the front seat backrest forw ards/
back Wi
th th e EASY -ENTRY function, the seat mo ves
fo rw ards if you ha vefolded the seat backrest
fo rw ards. This makes it easier for passengers to
ge t into and out of there ar of theve hicle. Ve
hicles without the memory function #
If necessar y,release the head restra int and
push it down. #
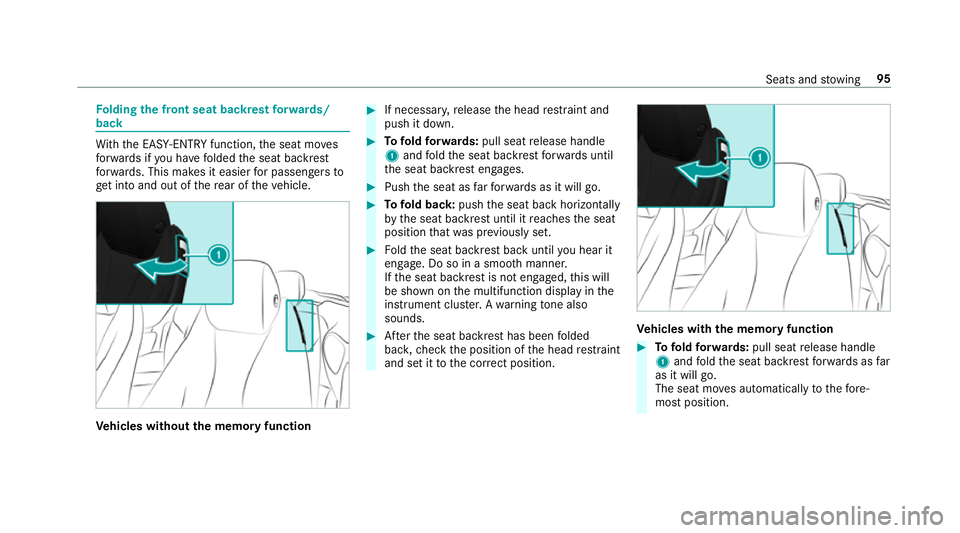
Tofold forw ards: pull seat release handle
1 and fold the seat backrest forw ards until
th e seat backrest engages. #
Push the seat as farfo rw ards as it will go. #
Tofold back: pushthe seat back horizon tally
by the seat backrest until it reaches the seat
position that wa s pr eviously set. #
Foldthe seat backrest back until you hear it
en gage . Do so in a smoo thmanner.
If th e seat backrest is not engaged, this will
be shown on the multifunction display in the
instrument clus ter.A wa rning tone also
sounds. #
Afterth e seat backrest has been folded
bac k,check the position of the head restra int
and set it tothe cor rect position. Ve
hicles with the memory function #
Tofold forw ards: pull seat release handle
1 and fold the seat backrest forw ards as far
as it will go.
The seat mo ves automatically tothefo re‐
most position. Seats and
stowing 95
Page 99 of 521
#
Tofold back: swing back the seat backrest
horizon tally.
If th e seat backrest is not engaged, this will
be shown on the multifunction display in the
instrument clus ter.A wa rning tone also
sounds.
The seat mo ves automatically tothestored
position.
If th e pr evious seat position can no longer be
set, e.g. because of luggage in there ar foot we ll
or af ter occupants ha veentered there ar of the
ve hicle: #
Pull seat release handle 1again and return
th e seat backrest toan upright position.
The seat loc ksinthe new fore -and-aft adjust‐
ment position. Switching the seat hea
ter on/o ff &
WARNING Risk of bu rns due torepeat‐
edly switching on the seat heater
Re peatedly switching on the seat heater can
cause the seat cushion and seat backrest
padding tobecome very hot. The health of persons with limited
temp era‐
ture sensitivity or a limited ability toreact to
exc essively high temp eratures may be af fec‐
te d or they may even suf fer burn-like injuries. #
Do not repeatedly switch on the seat
heater. Re
quirement:
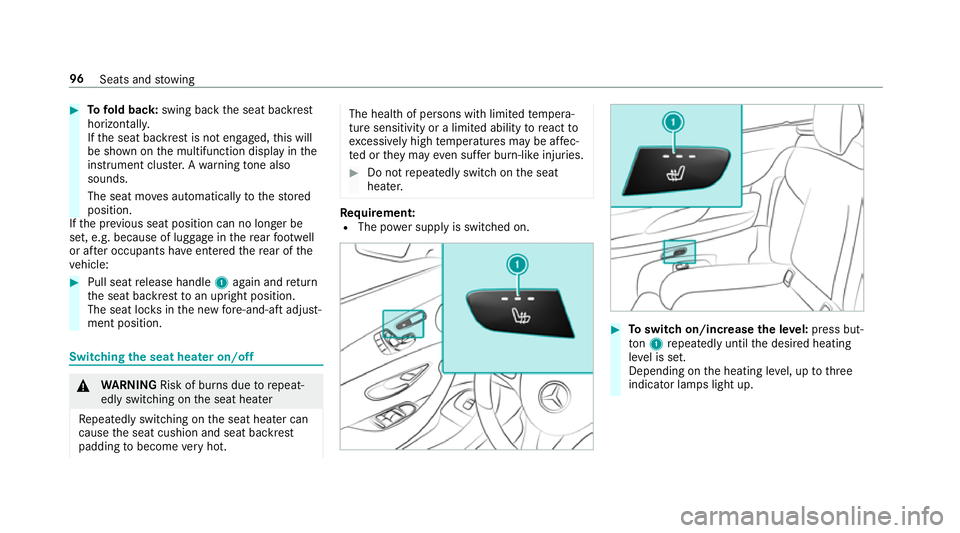
R The po wer supp lyis switched on. #
Toswitch on/increase the le vel:press but‐
to n1 repeatedly until the desired heating
le ve l is set.
Depending on the heating le vel, up tothree
indicator lamps light up. 96
Seats and stowing
Page 100 of 521
#
Toswitch off/reduce the le vel:press but‐
to n1 repeatedly until the desired heating
le ve l is set.
If all indicator lamps are off, the seat heater
is switched off.
% The seat heater automatically switches down
from theth re e heating le vels af ter 8, 10and
20 minutes until the seat heater is switched
off. Setting
the panel heating Multimedia sy
stem:
, Vehicle .
î Vehicle set-
tings .
Panel heating
When the seat heater is switched on, the armr‐
ests in theve hicle as well as the cent reconsole
can be hea ted using this function.
Setting options #
Select Front only orOff. Switching
the seat ventilation on/off Re
quirement:
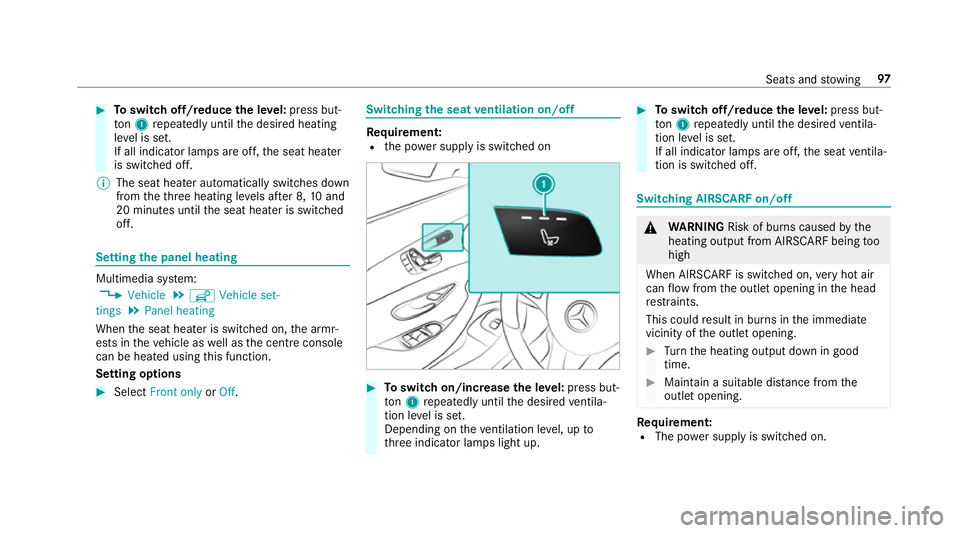
R the po wer supp lyis switched on #
Toswitch on/increase the le vel:press but‐
to n1 repeatedly until the desired ventila‐
tion le vel is set.
Depending on theve ntilation le vel, up to
th re e indicator lamps light up. #
Toswitch off/reduce the le vel:press but‐
to n1 repeatedly until the desired ventila‐
tion le vel is set.
If all indicator lamps are off, the seat ventila‐
tion is switched off. Switching AIRSCARF on/o
ff &
WARNING Risk of bu rns caused bythe
heating output from AIRSCARF being too
high
When AIRSCARF is switched on, very hot air
can flow from the outlet opening in the head
re stra ints.
This could result in burns in the immediate
vicinity of the outlet opening. #
Turn the heating output down in good
time. #
Maintain a suitable dis tance from the
outlet opening. Re
quirement:
R The po wer supp lyis switched on. Seats and
stowing 97