fuse MERCEDES-BENZ E-CLASS ESTATE 2012 Owners Manual
[x] Cancel search | Manufacturer: MERCEDES-BENZ, Model Year: 2012, Model line: E-CLASS ESTATE, Model: MERCEDES-BENZ E-CLASS ESTATE 2012Pages: 457, PDF Size: 11.62 MB
Page 13 of 457
E
EASY-ENTRY feature Activating/deactivating .................263
Function/notes ............................. 118
EASY-EXIT feature
Crash-responsive ........................... 118
Function/notes ............................. 118
Switching on/off ........................... 263
EASY-PACK convenience box ...........322
EASY-PACK folding floor Important safety notes ..................325
EASY-PACK folding luggage-com-
partment floor
Opening and closing ......................326
EASY-PACK loading sill protector ....326
EASY-PACK load-securing kit Components and storag e.............. 323
Inserting the brackets into the
loading rai l..................................... 323
EASY-PACK luggage compartment
management system ........................323
EBD (electronic brake force distri-
bution)
Display message ............................ 271
Function/notes ................................ 76
ECO display
Function/notes ............................. 185
On-board computer .......................250
ECO start/stop function
Deactivating/activating .................165
General information .......................165
Electrical fuses
see Fuses
Electronic Stability Program
see ESP ®
(Electroni cStability Program)
Electronic Traction System
see ETS/4ETS (Electronic Trac-
tionS ystem)
Emergency key
Unlocking the driver's door ..............90
Emergency key element
Function/notes ................................ 84
Locking vehicle ................................ 90
Emergency release
Driver's door .................................... 90
Fuel filler fla p................................. 181Emergency spare wheel
Important safety notes ..................425
Inflating the collapsible spare
wheel ............................................. 427
Points to remember .......................425
Removing ....................................... 426
Storage location ............................ 426
Stowing .......................................... 427
Technical data ............................... 429
Emergency unlocking
Tailgate ............................................ 95
Vehicle ............................................. 90
Engine
Display message ............................ 279
ECO start/stop function ................164
Engine number ............................... 435
Jump-starting ................................. 370
Running irregularl y......................... 168
Starting problems ..........................168
Starting the engine with the key ....163
Starting with KEYLESS GO .............163
Stopping ........................................ 184
Tow-starting (vehicle) ..................... 375
Warning lamp (engine diagnos-
tics) ............................................... 305
Engine electronics
Notes ............................................. 433
Problem (fault) ............................... 168
Engine oil
Additives ........................................ 442
Checking the oil level ..................... 346
Checking the oil level using the
dipstick .......................................... 347
Display message ............................ 280
Filling capacity ............................... 441
Notes about oil grades ................... 440
Notes on oil level/consumption ....346
Temperature (on-board computer) .264
Topping up ..................................... 347
Viscosity ........................................ 442
Environmental protection
Returning an end-of-life vehicle .......23
ESP ®
(Electronic Stability Pro-
gram) AMG menu (on-board computer) ...265
Deactivating/activating (AMG
vehicles) .......................................... 7410
Index
Page 14 of 457
Deactivating/activating (except
AMG vehicles
)................................ 256
Deactivating/activating (notes;
except AMG vehicles) ......................73
Display message ............................ 269
ETS/4ETS ........................................ 73
Function/notes ................................ 72
Important safety guidelines .............72
Trailer stabilisatio n.......................... 75
Warning lamp ................................. 302
ETS/4ETS (Electronic Traction Sys-
tem) ...................................................... 73
Exhaus ttail pipe (cleaning instruc-
tions) .................................................. 355
Exterior lighting Settings options ............................ .124
see Lights
Exterior mirrors
Adjusting ....................................... 119
Anti-dazzle mode (automatic) ........120
Folding in/ou t(automatically) .......120
Folding in/ou t(electrically) ...........119
Folding in whe nlocking (on-board
computer) ...................................... 264
Out of position (troubleshooting) ...120
Parking position ............................. 120
Resetting ....................................... 120
Storing settings (memory func-
tion) ............................................... 121F
Faul tmessage
see Display messages
Filler cap
see Fuel filler flap
Fire extinguisher ............................... 361
First-aid kit ......................................... 360
Fitting awheel
Removing awheel .......................... 392
Fitting wheels
Fitting awheel ............................... 392
Lowering the vehicle ......................393
Raising the vehicle .........................390
Securing the vehicle against roll-
ing away ........................................ 389Flat tyre
MOExtended tyres .........................363
Preparing the vehicle .....................363
TIREFIT kit ...................................... 364
Floormat ............................................ .341
Foglamps Extended range .............................. 131
Switching on/off ........................... 126
Folding bench seat (luggage com-
partment) ........................................... 113
Frequencies Garage door opene r....................... 338
Mobile phone ................................. 433
Two-way radio ................................ 433
Front foglamps
Display message ............................ 277
Fuel
Additives ........................................ 438
Consumption information ..............439
Consumption statistics ..................249
Displaying the current consump-
tion ................................................ 250
Displaying the range ......................250
Fuel gauge ............................... 32, 245
Grade (petrol) ................................ 437
Important safety notes ..................436
Notes for AMG vehicles .................437
Problem (malfunction) ...................182
Quality (diesel )............................... 438
Refuelling ...................................... .179
Tank content/reserve fuel .............436
Fuel filler flap
Emergency release ........................181
Opening/closing ............................ 180
Fuel filte r(white display message) .281
Fuel level Calling up the range (on-board
computer) ...................................... 250
Gauge ...................................... 32, 245
Fuel reserve
see Fuel
Fuel tank
Capacity ........................................ 436
Problem (malfunction) ...................182
Fuse allocation chart (vehicle tool
kit) ...................................................... 361 Index
11
Page 15 of 457
Fuses
Allocatio nchart ............................. 376
Before changing ............................. 376
Fuse box in the boot ......................376
Fuse box in the engine compart-
ment .............................................. 376
Fuse box in the luggage compart-
ment .............................................. 377
Important safety notes ..................375 G
Garage door opener Clearing the memory .....................337
Frequencies ................................... 338
Important safety notes ..................335
Opening/closing the garage door ..337
Programming (button in the rear-
view mirror) ................................... 336
Gear indicator (on-board com-
puter) ................................................. .264
Gearshift program SETUP (on-board computer) ..........265
Genuine Mercedes-Benz parts .........432
Glove compartment ..........................311H
Handbrake see Parking brake
Hazard warning lamps ......................129
Headbag Display message ............................ 275
Headlamp
Cleaning system (function) ............130
Cleaning system (notes) ................443
Headlamps
Misting up ...................................... 133
Topping up the cleaning system ....349
see Automatic headlamp mode
Head restraints
Adjusting ....................................... 109
Adjusting (electrically). ..................110
Adjusting (manually). .....................109
Adjusting (rear) .............................. 110
Fitting/removing (rear) ..................111
Luxury ............................................ 110 Heating
see Climate control
High-pressure cleaners ....................352
Hill start assist .................................. 164
HOLD function Display message ............................ 283
Function/notes ............................. 205 I
ICS padded play table .........................63
Ignition lock see Key positions
Immobiliser .......................................... 78
In-car hotspot see Separate operating instructions
Indicator and warning lamps
Coolant .......................................... 305
DISTRONI CPLUS ........................... 307
Engine diagnostics .........................305
Fuel tank ........................................ 305
SPORT handling mode ...................303
Indicator lamps
Display message ............................ 276
see Warning and indicator lamps
Infrared lamps (changing bulbs) ......137
Insectp rotection on the radiator ....346
Inspection see ASSYST PLUS
Instrument cluster
Overview .................................. 32, 245
Settings ......................................... 258
Warning and indicator
lamps ...................................... .34, 298
Instrument cluster lighting ..............246
Integrated child seat ICS padded pla ytable ...................... 63
Important safety guidelines .............61
Side hea drestraints ...................... ...64
Storing, ICS padded play table and
sid eh ead restraint s......................... 65
Intelligen tLight System
Activating/deactivatin g................. 259
Display message ............................ 278
Overview ........................................ 130
Setting the dipped-bea mhead-
lamps for driving on the right/left .260 12
Index
Page 147 of 457
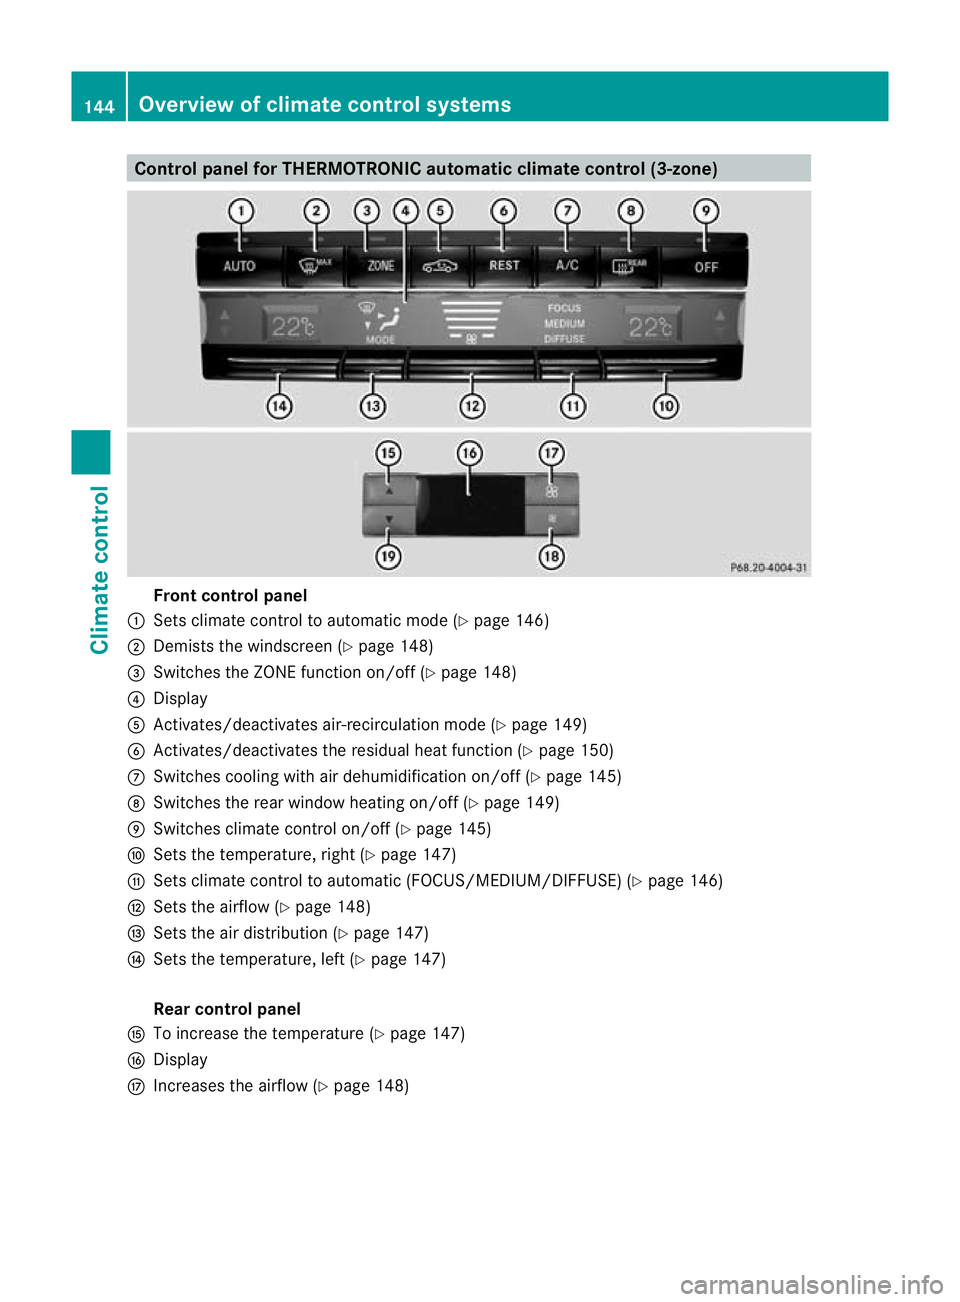
Control panel for THERMOTRONIC automatic climate control (3-zone)
Fron
tcontrol panel
: Sets climate control to automatic mode (Y page 146)
; Demists the windscreen (Y page 148)
= Switches the ZONE function on/off (Y page 148)
? Display
A Activates/deactivates air-recirculatio nmode (Y page 149)
B Activates/deactivates the residual heat function (Y page 150)
C Switches cooling with air dehumidification on/off( Ypage 145)
D Switches the rear window heating on/off (Y page 149)
E Switches climate control on/off (Y page 145)
F Sets the temperature, right (Y page 147)
G Sets climate control to automatic (FOCUS/MEDIUM/DIFFUSE )(Y page 146)
H Sets the airflow (Y page 148)
I Sets the air distribution (Y page 147)
J Sets the temperature, left (Y page 147)
Rear control panel
K To increase the temperature (Y page 147)
L Display
M Increases the airflow (Y page 148)144
Overview of climate control systemsClimate control
Page 148 of 457
N
Reduces the airflow ( Ypage 148)
O To reduce the temperature (Y page 147)Information about using
THERMOTRONIC automatic climate
control
The following contains instructions and rec-
ommendations to enable you to get the most
out of your THERMOTRONIC automati ccli-
mate control.
R Activate climate control using the Ãand
¿ buttons .The indicator lamps above
the à and¿ buttons light up.
R In automatic mode, you can also use the
ñ button to set a climate mode
(FOCUS/MEDIUM/DIFFUSE). The
MEDIUM level is recommended.
R Set the temperature to 22 †.
R Only use the demisting function briefly until
the windscreen is clear again.
R Only use the air-recirculation mode briefly,
e.g. if there are unpleasant outside odours
or when in a tunnel. The windows could
otherwise mist up as no fresh air is drawn
into the vehicle in air-recirculation mode.
R Use the ZONE function to adopt the tem-
perature settings on the driver's side for
the front-passenger side and the rear com-
partment as well. The indicator lamp above
the á button goes out.
R Use the residual heat function if you want
to heat or ventilate the vehicle interior
when the ignition is switched off. The resid-
ual heat function can only be activated or
deactivated with the ignition switched off. Operating the climate control system
Switching climate control on/off
Points to observe before use i
If climate control is switched off, the air
supply and air circulation are also switched off. Only use this setting for a brief period.
The windows could otherwise mist up.
i Switch on climate control primarily using
the à button (Y page 146).
Switching on/off X
Turn the key to position 2in the ignition
lock.
X To switch on: press theÃbutton.
The indicator lamp above the Ãbutton
lights up. Airflow and air distribution are set
to automatic mode.
or
X Press the ^button.
The indicator lamp above the ^button
goes out. The previous settings are reacti-
vated.
X To switch off: press the^button.
The indicator lamp above the ^button
lights up. Activating/deactivating the cooling
with air dehumidification function
Points to observe before use G
WARNING
If the "cooling with air dehumidification" func-
tion is deactivated, the air inside the vehicle
will not be cooled (during warm weather) or
dehumidified. The windows could mist up
more quickly. This may prevent you from
observing the traffic conditions, thereby caus-
ing an accident.
The cooling with air dehumidification function
is only available when the engine is running.
The air inside the vehicle is cooled and dehu-
midified according to the temperature selec-
ted. Operating the climate control system
145Climate control Z
Page 149 of 457
Condensation may drip from the underside of
the vehicle when cooling mode is active. This
is normal and no tasign that there is a mal-
function.
i The cooling with air dehumidification
function uses refrigerant R134a. This
refrigerant does not contain chlorofluoro-
carbons, and therefore does not damage
the ozone layer.
Switching on/off X
To activate: press the¿button.
The indicator lamp above the ¿button
lights up.
X To deactivate: press the¿button.
The indicator lamp above the ¿button
goes out. The cooling with air dehumidifi-
cation function has a delayed switch-off
feature.
Problems with the cooling with air
dehumidification function When you press the
¿button, the indica-
tor lamp in the button flashes three times or
remains off. You can no longer switch on the
cooling with air dehumidification function.
X Visit a qualified specialist workshop. Setting climate control to automatic
mode
In automatic mode, the set temperature is
maintained automatically at a constant level.
The system automatically regulates the tem-
perature of the dispensed air, the airflow and
the air distribution.
Automatic mode will achieve optimal opera-
tion if cooling with air dehumidification is also
activated. If desired, cooling with air dehu-
midification can be deactivated. X
Turn the key to position 2in the ignition
lock.
X Set the desired temperature.
X To activate: press theÃbutton.
The indicator lamp above the Ãbutton
lights up. Automatic air distribution and air-
flow are activated.
i THERMOTRONIC automatic climate con-
trol: when automatic mode is activated, you
can select a climate mode (Y page 146).
X To deactivate: press the air distribution
button.
THERMATIC automatic climate control:
press button F(Ypage 143).
THERMOTRONIC automatic climate con-
trol: press button I(Ypage 144).
The indicator lamp above the Ãbutton
goes out.
or
X Press the airflow button.
THERMATIC automatic climate control:
press button G(Ypage 143).
THERMOTRONIC automatic climate con-
trol: press button H(Ypage 144).
The indicator lamp above the Ãbutton
goes out. Setting the climate mode
In automatic mode you can select the follow-
ing climate modes:
FOCUS high airflow that is set slightly cooler
MEDIUM medium airflow, standard setting
DIFFUSE low airflow that is set slightly warmer and with less of adraught
X Turn the key to position 2in the ignition
lock.
X Press the Ãbutton.
X Press button Gup or downa nd select the
desired level (Y page 144)146
Operating the climate control systemClimate control
Page 203 of 457
DISTRONIC PLUS does not replace the park-
ing brake and must not be used for parking.
The DISTRONIC PLUS braking effect is can-
celled and the vehicle can start moving if:
R
DISTRONIC PLUS is deactivated using the
cruise control lever.
R you accelerate.
R there is a malfunction in the system or an
interruption in the powe rsupply, e.g .bat-
tery failure.
R the electrical system in the engine com-
partment, the battery or the fuses are tam-
pered with.
R the battery is disconnected.
If you wish to leave th evehicle or park it,
deactivate DISTRONIC PLUS and secure the
vehicle against rolling away. G
WARNING
Hybrid vehicles: ensure that you read the
"HYBRID" supplement .You could otherwise
fail to recognise dangers.
If DISTRONIC PLUS detects that the vehicle
in front is stopping, it brakes your vehicle until
it is stationary.
Once your vehicle is stationary, it remains
stationary and you do not need to depress the
brake.
i Depending on the specified minimum dis-
tance, your vehicle will come to a standstill
at a sufficient distance behind the vehicle
in front.T he specified minimum distance is
set using the control on the cruise control
lever.
Vehicles featuring automatic transmis-
sion with aselector lever
Select Park (P) X
Shift the transmission to position Pto pre-
ven tthe vehicle from rolling away.
DISTRONIC PLUS is deactivated. The warn-
ing message in the multifunction display
disappears. You will see a warning message in the multi-
function display if DISTRONIC PLUS is acti-
vated and:
R
the driver's door is open and the driver's
seat belt is unfastened.
R the engine is switched off, unless it is auto-
matically switched off by the ECO start/
stop function.
R the bonnet is opened.
The horn will also sound at regular intervals if
DISTRONIC PLUS is activated and you:
R switch the engine off, open the driver's
door and take off your seat belt
R open the bonnet
The sounding of the horn alerts you to the fact
that the vehicle has been parked while DIS-
TRONIC PLUS is still activated. The sound
becomes louder if you attempt to lock the
vehicle. The vehicle is not locked until DIS-
TRONIC PLUS is deactivated.
i If the engine has been switched off, it
cannot be started again until DISTRONIC
PLUS has been deactivated.
If DISTRONIC PLUS is activated and a fault
occurs in the system or if there is a disruption
in the power supply, the Brake immedi‐ ately message is shown in the multifunction
display. Immediately depress the brake firmly
until the warning message in the multifunc-
tion display goes out or shift the transmission
to position P. DISTRONIC PLUS is deactiva-
ted.
Vehicles featuring automatic transmis-
sion with aDIRECT SELECT lever
When DISTRONIC PLUS is activated, the
transmission is shifted automatically to posi-
tion Pif:
R the driver's door is open and the driver's
seat belt is unfastened.
R the engine is switched off, unless it is auto-
matically switched off by the ECO start/
stop function.
R the bonne tis opened. 200
Driving systemsDriving and parking
Page 209 of 457
The braking effect of the HOLD function is
cancelled and the vehicle could roll away if:
R
the HOLD function is deactivated by
depressing the accelerator pedal or the
brake pedal.
R there is a malfunction in the system or an
interruption in the power supply, e.g. bat-
tery failure.
R the electrical system in the engine com-
partment, the battery or the fuses are tam-
pered with.
R the battery is disconnected.
If you leave the vehicle or park it, deactivate
the HOLD function and secure the vehicle
against rolling away.
The HOLD function is deactivated automati-
cally if:
R you accelerate. On vehicles with automatic
transmission: only when the transmission
is in position Dor R.
R you shift the transmission to position Pon
vehicles with automatic transmission.
R you depress the brake pedal again with a
certain amount of pressure until ëdis-
appears from the multifunction display.
R you activate DISTRONIC PLUS.
On vehicles with automatic transmission and
a DIRECT SELECT lever, the transmission is
automatically shifted to Pif the HOLD func-
tion is activated and:
R the driver's door is open and the driver's
seat belt is unfastened.
R the engine is switched off, unless it is auto-
matically switched off by the ECO start/
stop function.
R the bonnet is opened.
R a system fault occurs.
R the power supply is not sufficient. In vehicles with manual transmission or auto-
matic transmission with a selector lever, you
see a warning message in the multifunction
display if the HOLD function is activated and:
R the driver's door is open and the driver's
seat belt is unfastened.
R the engine is switched off, unless it is auto-
matically switched off by the ECO start/
stop function.
R the bonnet is opened.
For vehicles with manual transmission:
Brake immediately X
Immediately depress the brake pedal firmly
until the warning message in the multifunc-
tion display goes out. This deactivates the
HOLD function.
In vehicles featuring automatic transmission
with a gear selector lever: Select Park (P)
X
Shift the transmission to position Pto pre-
vent the vehicle from rolling away.
The HOLD function is deactivated. The
warning message in the multifunction dis-
play disappears.
Ah orn will also sound at regular intervals if
the HOLD function is activated and you:
R switch the engine off, open the driver's
door and take off your seat belt
R open the bonnet
The sounding of the horn alerts you to the fact
that the vehicle has been parked while the
HOLD function is still activated. If you attempt
to lock the vehicle, the tone becomes louder.
The vehicle is not locked until the HOLD func-
tion is deactivated.
i If the engine has been switched off, it
cannot be started again until the HOLD
function has been deactivated.
If there is a fault in the system or power supply
while the HOLD function is activated, the
Brake immediatelyBrake immediately message is shown in the multifunction dis-
play. Immediately depress the brake firmly
until the warning message in the multifunc-
tion display goes out.206
Driving systemsDriving and parking
Page 281 of 457
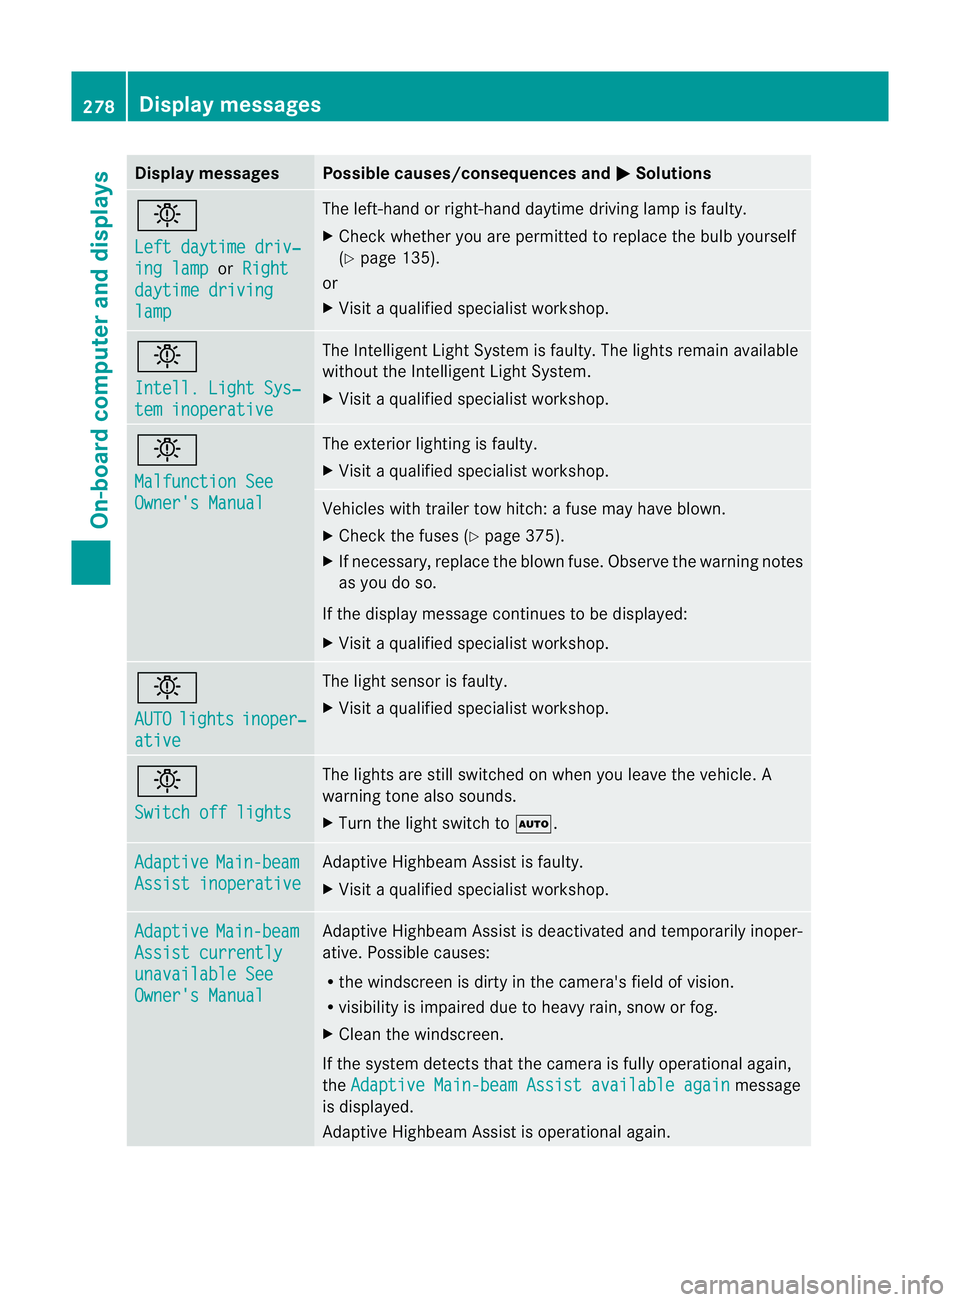
Display messages Possible causes/consequences and
M Solutions
b
Left daytime driv‐
ing lamp or
Right daytime driving
lamp The left-hand or right-hand daytime driving lamp is faulty.
X
Chec kwhether you are permitted to replace the bulb yourself
(Y page 135).
or
X Visit a qualified specialist workshop. b
Intell. Light Sys‐
tem inoperative The Intelligent Light System is faulty. The lights remain available
without the Intelligent Light System.
X
Visit a qualified specialist workshop. b
Malfunction See
Owner's Manual The exterior lighting is faulty.
X
Visit a qualified specialist workshop. Vehicles with trailer tow hitch: a fuse may have blown.
X
Check the fuses (Y page 375).
X If necessary, replace the blown fuse. Observe the warning notes
as you do so.
If the display message continues to be displayed:
X Visit a qualified specialist workshop. b
AUTO
lights inoper‐
ative The light sensor is faulty.
X
Visit a qualified specialist workshop. b
Switch off lights The lights are still switched on when you leave the vehicle. A
warning tone also sounds.
X
Turn the light switch to Ã.Adaptive Main-beam
Assist inoperative Adaptive Highbeam Assist is faulty.
X
Visit a qualified specialist workshop. Adaptive Main-beam
Assist currently
unavailable See
Owner's Manual Adaptive Highbeam Assist is deactivated and temporarily inoper-
ative. Possible causes:
R
the windscreen is dirty in the camera's field of vision.
R visibility is impaired due to heavy rain, snow or fog.
X Cleant he windscreen.
If the system detects that the camera is fully operational again,
the Adaptive Main-beam Assist available again message
is displayed.
Adaptive Highbeam Assist is operational again. 278
Display messagesOn-board computer and displays
Page 362 of 457
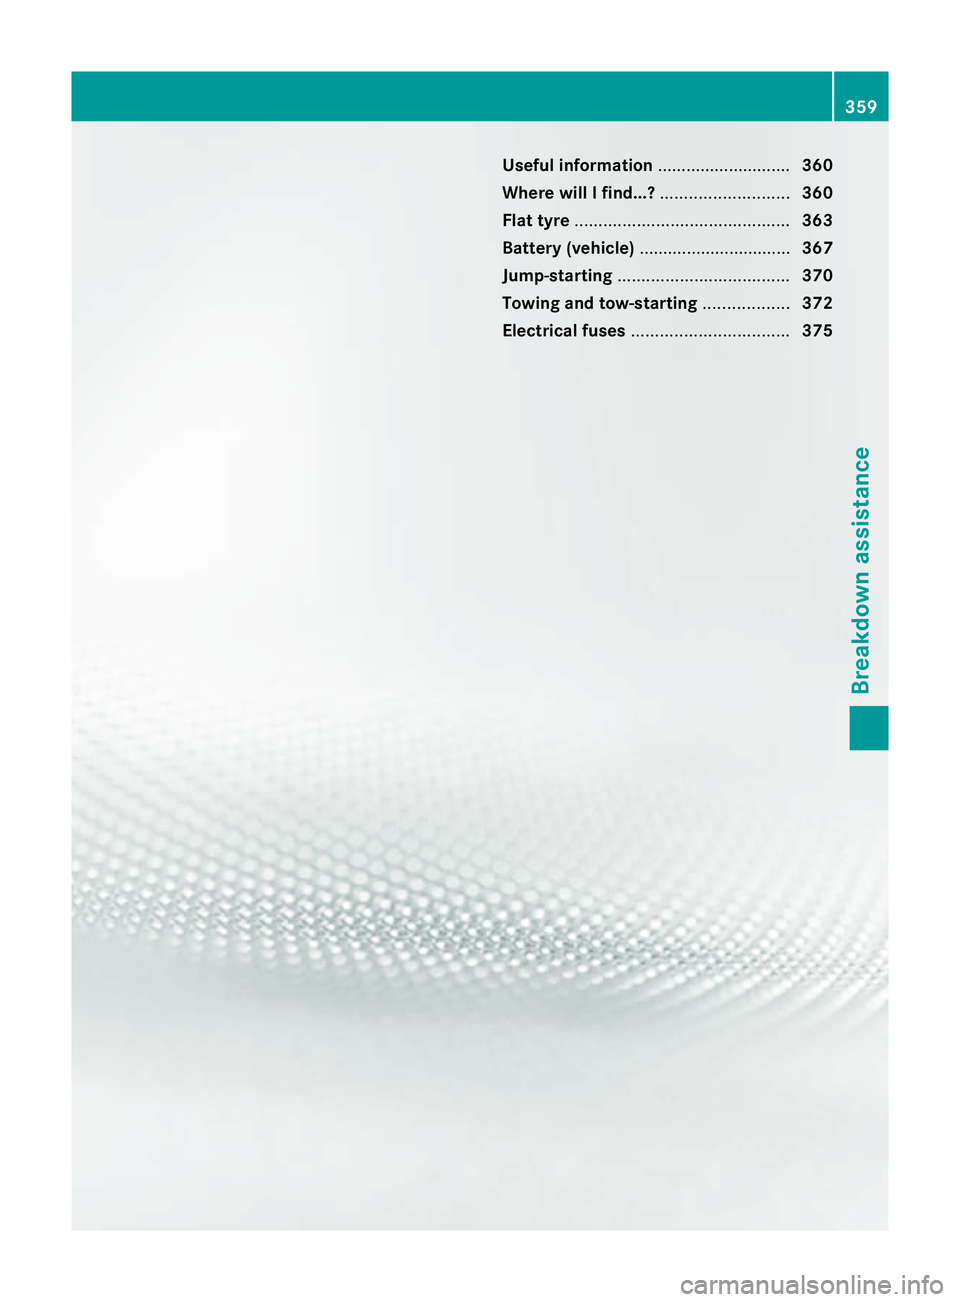
Useful information
............................360
Where will I find...? ...........................360
Flat tyre ............................................. 363
Batter y(vehicle) ................................ 367
Jump-starting .................................... 370
Towing and tow-starting ..................372
Electrical fuses ................................. 375 359Breakdown assistance