battery MERCEDES-BENZ E-CLASS ESTATE 2015 User Guide
[x] Cancel search | Manufacturer: MERCEDES-BENZ, Model Year: 2015, Model line: E-CLASS ESTATE, Model: MERCEDES-BENZ E-CLASS ESTATE 2015Pages: 497, PDF Size: 16.23 MB
Page 135 of 497
Problems with the seat heating
Problem
Possible causes/consequences and
M
MSolutions The seat heating has
switched off prema-
turely or cannot be
switched on. The on-board voltage is too low because too many electrical con-
sumers are switched on.
X Switch off electrical consumers that you do not need, such as
the rear window heating or interior lighting.
Once the battery is sufficiently charged, the seat heating will
switch back on automatically. Switching the seat ventilation on/off
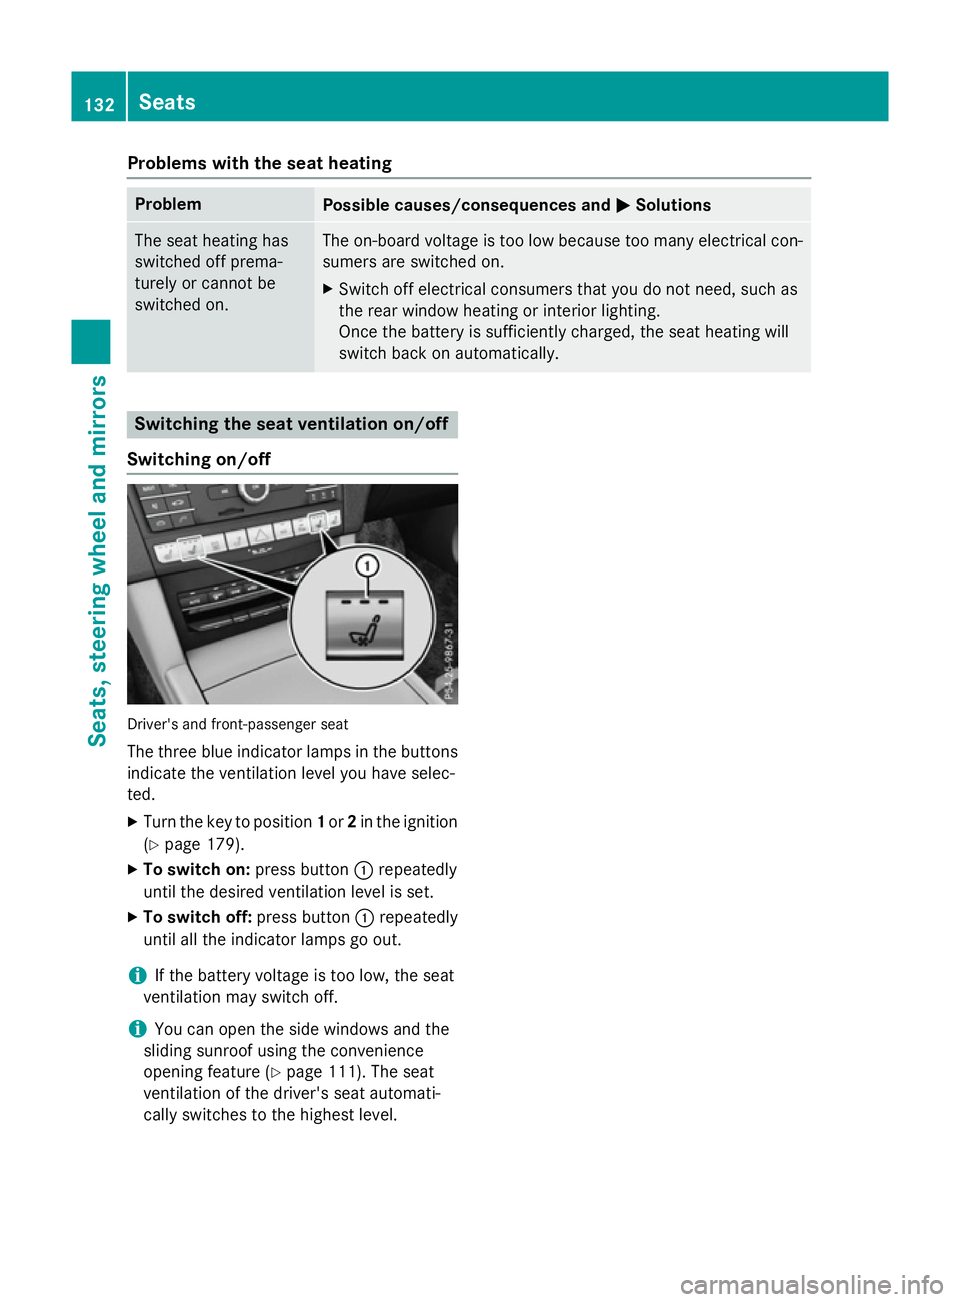
Switching on/off Driver's and front-passenger seat
The three blue indicator lamps in the buttons
indicate the ventilation level you have selec-
ted.
X Turn the key to position 1or 2in the ignition
(Y page 179).
X To switch on: press button:repeatedly
until the desired ventilation level is set.
X To switch off: press button:repeatedly
until all the indicator lamps go out.
i If the battery voltage is too low, the seat
ventilation may switch off.
i You can open the side windows and the
sliding sunroof using the convenience
opening feature (Y page 111). The seat
ventilation of the driver's seat automati-
cally switches to the highest level. 132
SeatsSeats, steering wheela
nd mirrors
Page 136 of 497
Problems with the seat ventilation
Problem
Possible causes/consequences and
M
MSolutions The seat ventilation has
switched off prema-
turely or cannot be
switched on. The on-board voltage is too low because too many electrical con-
sumers are switched on.
X Switch off electrical consumers that you do not need, such as
the rear window heating or interior lighting.
Once the battery is sufficiently charged, the seat ventilation will
switch back on automatically. Steering wheel
Important safety notes
G
WARNING
You could lose control of the vehicle while
driving if you:
R adjust the driver's seat, steering wheel or
mirrors
R fasten the seat belt
There is arisk of an accident.
Adjust the driver's seat, head restraint ,steer-
ing wheel and mirrors and fasten your seat
belt before startingt he engine. G
WARNING
Children could become trapped by the steer-
ing wheel if they adjust it. There is arisk of
injury.
When leaving the vehicle, always take the key with you and lock the vehicle. Never leave
children unattended in the vehicle.
The electrically adjustable steering wheel can
still be adjusted when there is no key in the
ignition lock. Adjusting the steering wheel man-
ually
G
WARNING
The steering wheel may move unexpectedly if you adjust it while driving. This could cause you to lose control of the vehicle. There is a
risk of an accident.
Make sure that the steering wheel is locked
before driving off. Never unlock the steering
wheel when the vehicle is in motion.
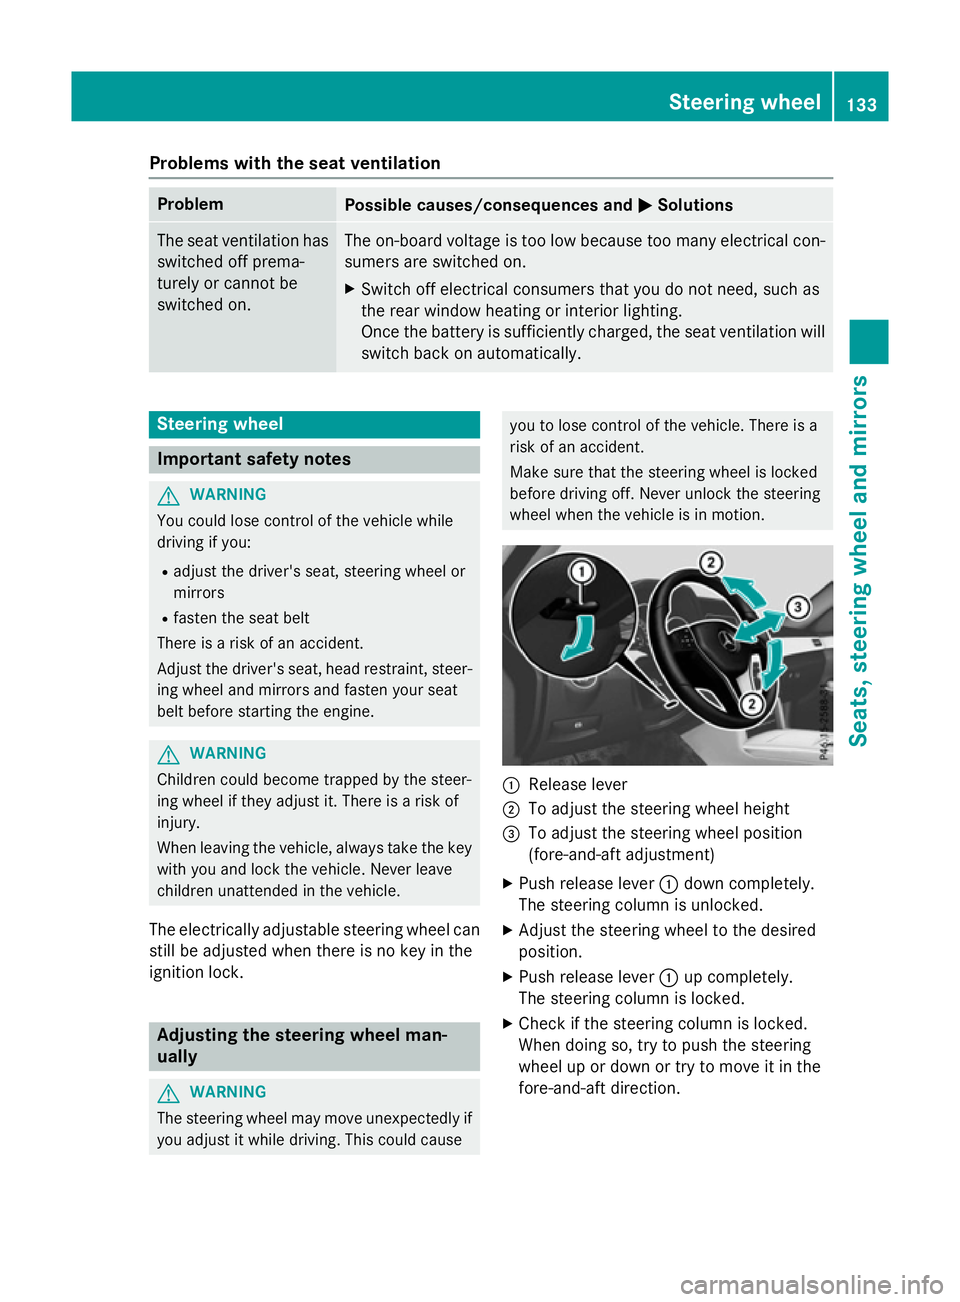
:
Release lever
; To adjust the steering wheel height
= To adjust the steering wheel position
(fore-and-aft adjustment)
X Push release lever :down completely.
The steering column is unlocked.
X Adjust the steering wheel to the desired
position.
X Push release lever :up completely.
The steering column is locked.
X Check if the steering column is locked.
When doing so, try to push the steering
wheel up or down or try to move it in the
fore-and-aft direction. Steering wheel
133Seats, steering wheela nd mirrors Z
Page 138 of 497
Problems with the steering wheel heating
Problem
Possible causes/consequences and
M
MSolutions The steering wheel
heating has switched
itself off prematurely or
cannot be switched on. The on-board voltage is too low because too many electrical con-
sumers are switched on.
X Switch off electrical consumers that you do not need, such as
the rear window heating or interior lighting.
Once the battery is sufficiently charged, the steering wheel
heating will switch back on automatically. EASY-ENTRY/EXIT feature
Important safety notes G
WARNING
When the EASY-ENTRY/EXIT feature adjusts
the steering wheel, you and other vehicle
occupants –particularly children –could
become trapped. There is arisk of injury.
While the EASY-ENTRY/EXIT feature is mak-
ing adjustments, make sure that no one has
any body parts in the sweep of the steering
wheel.
Move the steering wheel adjustment lever if
there is arisk of entrapment by the steering
wheel. The adjustment process is stopped.
Vehicles with amemory function: if there is a
risk of becoming trapped by the steering
wheel, you can also press one of the memory
function position buttons.T he adjustment
process is stopped. G
WARNING
If children activate the EASY-ENTRY/EXIT fea- ture, they can become trapped, particularly
when unattended. There is arisk of injury.
When leaving the vehicle, always take the key with you and lock the vehicle. Never leave
children unattended in the vehicle. G
WARNING
If you drive off while the EASY-ENTRY/EXIT
feature is making adjustments, you could lose
control of the vehicle. There is arisk of an
accident. Always wait until the adjustment process is
complete before driving off.
The EASY-ENTRY/EXIT feature makes getting in and out of your vehicle easier.
You can activate and deactivate the EASY-
ENTRY/EXI Tfeature in the on-board com-
puter (Y page 294).
Position of the steering wheel when the
EASY-ENTRY/EXIT featureisa ctive The steering wheel tilts upwards if you:
R remove the key from the ignition lock
R with KEYLESS-GO: open the driver's door;
KEYLESS-GO must be in position 1
R with the key: open the driver's door; the
key must be in position 0or 1in the ignition
lock (Y page 179)
i The steering wheel only moves upwards if
it has not already reached the upper stop.
Position of the steering wheel for driv-
ing The steering wheel is moved to the previously
set position if:
R the driver's door is closed and
R with KEYLESS-GO: you press the Start/
Stop button once
or
R with the key: you insert the key into the
ignition lock Steering wheel
135Seats, steering wheela nd mirrors Z
Page 140 of 497
mirror using adjustment button
=as long
as the indicator lamp is lit.
X Press adjustment button =up, down, or to
the left or right until you have adjusted the
exterior mirror to the correct position. You
should have agood overvie woftraffic con-
ditions.
The convex exterior mirrors provid ealarger
fiel dofv ision.
After the engine has been started, the exte-
rior mirrors are automatically heated if the
rear windo wheating is switched on and the
outsid etemperature is low.H eating takes a
maximu moften minutes.
i The exterior mirrors can alsobeh
eated
manually by switching on the rear window
heating.
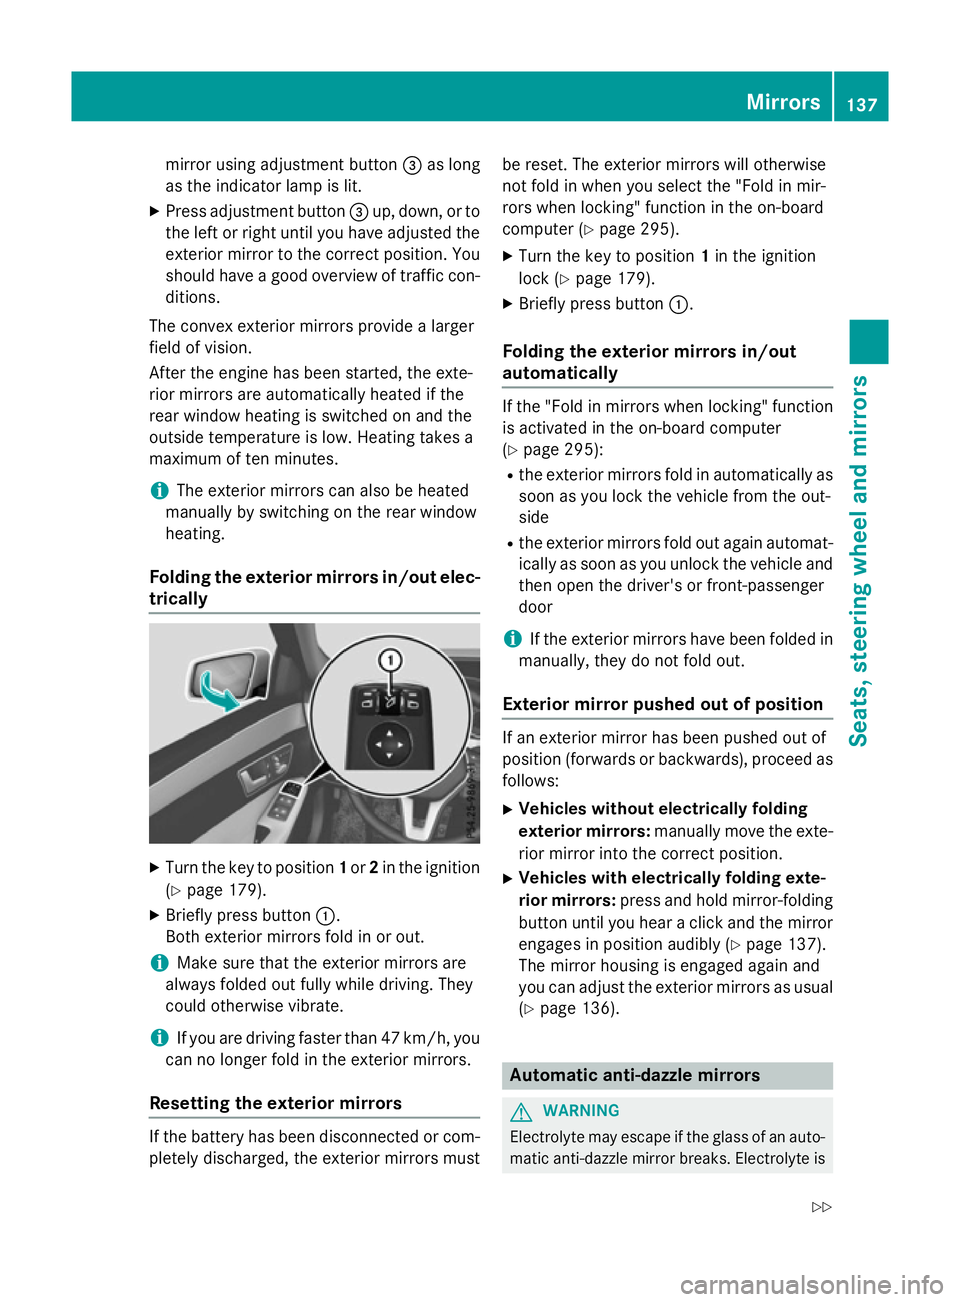
Folding the exterio rmirrors in/out elec-
trically X
Turn the key to position 1or 2in the ignition
(Y page1 79).
X Briefly press button :.
Both exterior mirrors fold in or out.
i Make sure that the exterior mirrors are
alwaysf oldedout full ywhile driving. They
could otherwise vibrate.
i If you are driving faster than 47 km/h, you
can no longer fold in the exterior mirrors.
Resetting the exterio rmirrors If the battery has been disconnected or com-
pletely discharged, the exterior mirrors must be reset. The exterior mirrors willo
therwise
not fold in when you select the "Fol dinmir-
rors when locking" function in the on-board
computer (Y page295).
X Turn the key to position 1in the ignition
lock (Y page179).
X Briefly press button :.
Folding the exterio rmirrors in/out
automatically If the "Fol
dinmirrors when locking" function
is activated in the on-board computer
(Y page2 95):
R the exterior mirrors fold in automatically as
soon as you lock the vehicl efrom the out-
side
R the exterior mirrors fold out again automat-
ically as soon as you unlock the vehicl eand
then open the driver' sorfront-passenger
door
i If the exterior mirrors have been folde
din
manually,t hey do not fold out.
Exterio rmirror pushed out of position If an exterior mirror has been pushed out of
position (forwards or backwards), proceed as
follows:
X Vehicles without electrically folding
exterio rmirrors: manually move the exte-
rior mirror into the correct position.
X Vehicles with electrically folding exte-
rior mirrors: press and hold mirror-folding
button until you hear aclick and the mirror
engage sinposition audibly (Y page137).
The mirror housing is engage dagain and
you can adjust the exterior mirrors as usual
(Y page1 36). Automatic anti-dazzle mirrors
G
WARNING
Electrolyte may escap eifthe glass of an auto-
matic anti-dazzle mirror breaks. Electrolyte is Mirrors
137Seats, steering wheel and mirrors
Z
Page 152 of 497
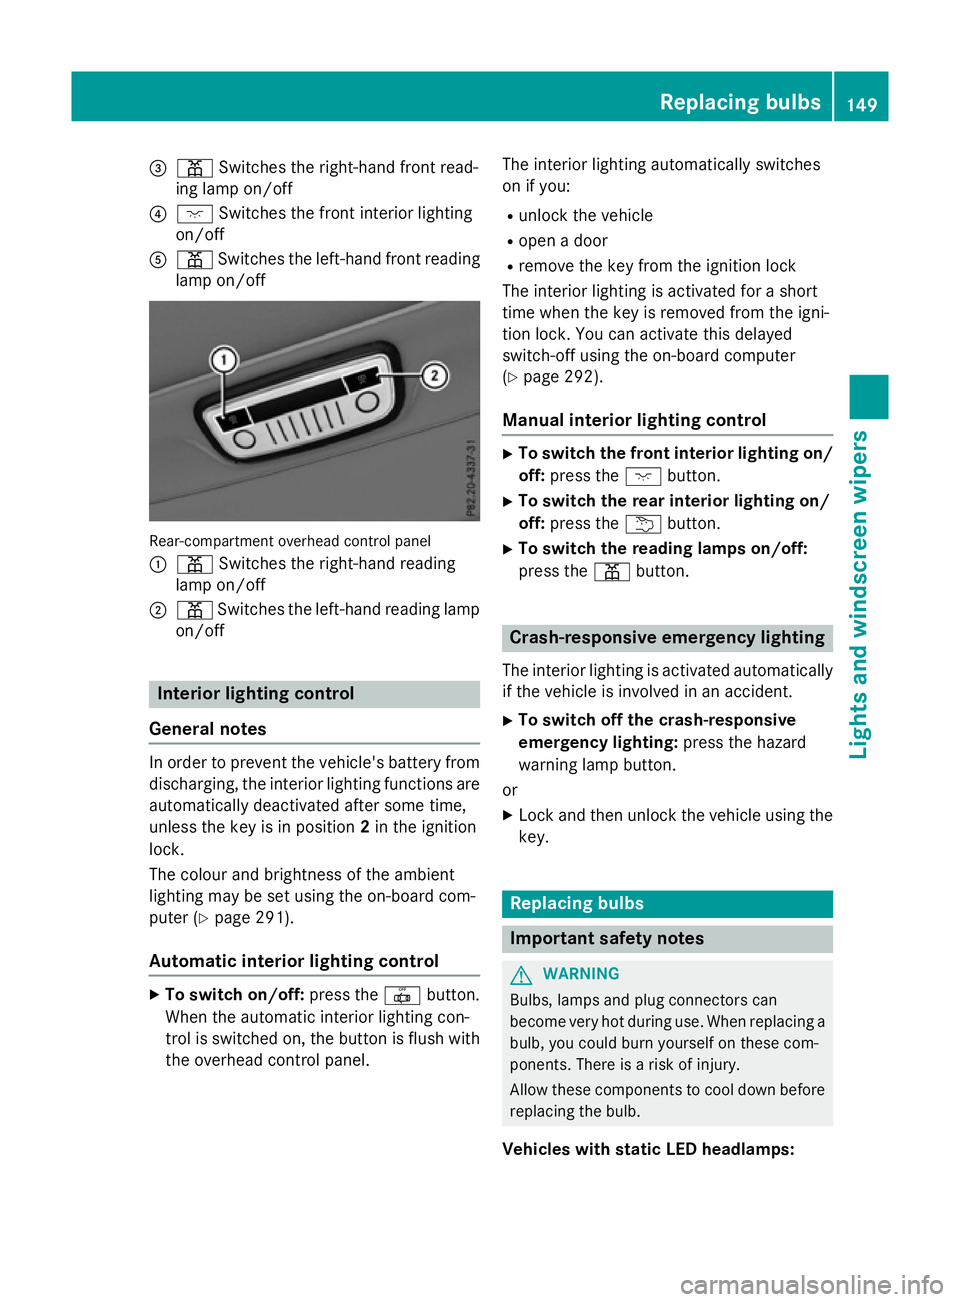
=
p Switches the right-hand front read-
ing lamp on/off
? c Switches the front interio rlighting
on/off
A p Switches the left-hand front reading
lamp on/off Rear-compartment overhead contro
lpan el
: p Switches the right-hand reading
lamp on/off
; p Switches the left-hand reading lamp
on/off Interior lighting control
General notes In order to prevent the vehicle's battery from
discharging, the interio rlighting functions are
automaticall ydeactivate daftersom etime,
unless the key is in position 2in the ignition
lock.
The colou rand brightness of the ambient
lighting may be set using the on-board com-
puter (Y page 291).
Automatic interior lighting control X
To switc hon/off: press the |button.
Whe nthe automatic interio rlighting con-
trol is switche don, the button is flush with
the overhead control panel. The interio
rlighting automaticall yswitches
on if you:
R unlock the vehicle
R ope nad oor
R remove the key from the ignition lock
The interio rlighting is activate dfor as hort
time when the key is removed from the igni-
tion lock. Yo ucan activate this delayed
switch-off using the on-board computer
(Y page 292).
Manua lint erior lighting control X
To switc hthe fron tint erior lighting on/
off: press the cbutton.
X To switc hthe rear interior lighting on/
off: press the ubutton.
X To switc hthe reading lamps on/off:
press the pbutton. Crash-responsive emergenc
ylighting
The interio rlighting is activate dautomatically
if the vehicl eisinvolve dinana ccident.
X To switc hoff the crash-responsive
emergenc ylighting: press the hazard
warning lamp button.
or X Lock and then unlock the vehicl eusing the
key. Replacing bulbs
Important safety notes
G
WARNING
Bulbs, lamps and plug connectors can
become very hot during use. Whe nreplacing a
bulb ,you could burn yoursel fonthesecom-
ponents. There is ariskofi njury.
Allow thes ecomponents to cool dow nbefore
replacing the bulb.
Vehicles with stati cLED headlamps: Replacing bulbs
149Lights and windscree nwipers Z
Page 167 of 497
Setting the air distribution
X
Turn the key to position 2in the ignition
lock (Y page 179).
X THERMATIC automatic climate control:
press air distribution adjustment switch F
up or down, until the desired symbol
appears in the display (Y page 157).
X THERMOTRONIC automatic climate con-
trol: press air distribution adjustment
switch Iup or down, until the desired
symbol appears in the display
(Y page 159). Setting the airflow
THERMATIC automatic climate control X
Turn the key to position 2in the ignition
lock (Y page 179).
X To increase or reduce: press airflow
adjustment switch Gup or down
(Y page 157).
THERMOTRONIC automatic climate
control X
Turn the key to position 2in the ignition
lock (Y page 179).
X To increase or reduce the front-com-
partment airflow: press airflow adjust-
ment switch Hup or down (Y page 159).
X To increase/reduce the rear-compart-
ment airflow: press theKorI but-
ton.
If the battery is not charged sufficiently, the
blower output may be reduced. Once the bat- tery is sufficiently charged again, full blower
output will be available. Switching the ZONE function on/off
X To activate: press theábutton.
The indicator lamp above the ábutton
lights up. THERMATIC automatic climate control: the
temperature settingf or the driver's side is
not adopted for the front-passenger side.
THERMOTRONIC automatic climate con-
trol: the temperature settingf or the driver's
side is not adopted for the front-passenger side and the rear compartment.
X To deactivate: press theábutton.
The indicator lamp above the ábutton
goes out.
THERMATIC automatic climate control: the
temperature settingf or the driver's side is
adopted for the front-passenger side.
THERMOTRONIC automatic climate con-
trol: the temperature settingf or the driver's
side is adopted for the front-passenger side and the rear compartment. Demisting the windscreen
You can use this function to defrost the wind-
screen or to demist the inside of the wind-
screen and the side windows.
Switch off the windscreen demisting function
as soon as the windscreen is clear again.
X Turn the key to position 2in the ignition
lock (Y page 179).
X To activate: press the¬button.
The indicator lamp above the ¬button
lights up.
The climate control system switches to the
following functions:
R high airflow
R high temperature
R air distribution to the windscreen and
front side windows
R air-recirculation mode off
If the battery is not charged sufficiently, the
blower output may be reduced. Once the bat- tery is sufficiently charged again, full blower
output will be available again. 164
Operating the climate control systemClimatec
ontrol
Page 168 of 497
X
To deactivate: press the¬button.
The indicator lamp above the ¬button
goe sout.T he previous settings ar ereacti-
vated .Air-recirculatio nmoder emains
deactivated.
or X Press the Ãbutton.
The indicator lamp above the ¬button
goe sout.A irflo wand ai rdistributio nareset
to automatic mode.
or
X THERMATI Cautomatic climate control:
press temperatur eadjustment switch E
or H up or down (Y page 157).
THERMOTRONIC automatic climate con-
trol :press temperatur eadjustment switch
F orJ up or down (Y page 159). Demistin
gthe windows
Window smisted up on the inside X
Activate the ¿cooling with ai rdehu-
midification function.
X Activate automatic mode Ã.
X Adjust the side ai rvents so tha tthe heated
ai risd irecte dtowards the side windows.
X If the windows continue to mis tup,activate
the "Windscreen demisting "fun ction ¬.
i Yo
us houl donlys elect thi ssetting until
the windscree nisc lear again.
Window smisted up on the outside X
THERMATI Cautomatic climate control:
press ai rdistributio nadjustment switch F
up or down (Y page 157), unti lthe P or
O symbo lappears in the display.
X THERMOTRONIC automatic climate con-
trol :press ai rdistributio nadjustment
switch Iup or down (Y page 159), until
the P orO symbo lappears in the
display.
X Adjust the side ai rvents so tha tnoairis
directe dtowards the side windows. Rea
rwindo wh eating
General notes The rea
rwindo wh eating ha sahighc urrent
draw. Yo ushoul dtherefore switch it off as
soo nasthe windo wisclear.Ito therwise
switches off automaticall yafter several
minutes.
If the battery voltag eistoo low, the rea rwin-
do wh eating ma yswitch off.
Switchin gon/off X
Turn the key to position 2in the ignition
lock (Y page 179).
X Press the ¤button.
The indicator lamp above the ¤button
lights up or goe sout. Operatin
gthe climate contro lsystem
165Climate control
Page 169 of 497
Problems with the rear window heating
Problem
Possible causes/consequences and
M
MSolutions The rear window heat-
ing has switched off
prematurely or cannot
be activated. The battery has not been sufficiently charged.
X Switch off any consumers that are not required, e.g. reading
lamps, interior lighting or the seat heating.
When the battery is sufficiently charged, the rear window heat- ing can be activated again. Switching air-recirculation mode
on/off
General notes You can deactivate the flow of fresh air if
unpleasant odours are enteringt he vehicle
from outside. The air already inside the vehi-
cle will then be recirculated.
If you activate air-recirculation mode, the win-
dows can mist up more quickly, in particular
at low temperatures. Only use air-recircula-
tion mode briefly to prevent the windows
misting up.
Activating/deactivating X
Turn the key to position 2in the ignition
lock (Y page 179).
X To activate: press thegbutton.
The indicator lamp above the gbutton
lights up.
i THERMATIC automatic climate control:
air-recirculation mode is activated auto-
matically at high outside temperatures.
THERMOTRONIC automatic climate con-
trol: air-recirculation mode is automatically
activated at high levels of pollution or at
high outside temperatures.
When air-recirculation mode is activated
automatically, the indicator lamp above the g button does not light up. Outside air is
added after about 30 minutes.
X To deactivate: press thegbutton.
The indicator lamp above the gbutton
goes out. i
Air-recirculation mode is deactivated
automatically:
R after approximately five minutes at out-
side temperatures below approximately
5†
R after approximately five minutes if cool-
ing with air dehumidification is deactiva-
ted
R after approximately 30 minutes at out-
side temperatures above approximately
5† if the cooling with air dehumidifica-
tion function is activated Convenience opening or closing using
the air-recirculation button G
WARNING
When the convenience closing feature is oper- ating, parts of the body could become trapped
in the closing area of the side window and the
sliding sunroof. There is arisk of injury.
Observe the complete closing procedure
when the convenience closing feature is oper-
ating. When closing make sure that no parts of the body are in the closing area. G
WARNING
During convenience opening parts of the body could be drawn in or become trapped
between the side window and window frame.
There is arisk of injury.
When opening, make sure that nobody is
touching the side window. If someone
becomes trapped, press the Wswitch 166
Operating the climate control systemClimatec
ontrol
Page 170 of 497
immediately to open/close the side window
in the door. The side window stops. To con-
tinue closing the side window, pull on the
W switch.
X Convenience closing feature: press and
hold the gbutton until the side win-
dows and the sliding sunroof or the pano-
rama sliding sunroof are closed.
The indicator lamp above the gbutton
light sup. Air-recirculation mode is activa-
ted.
If part softhe body are in the closin garea
during convenienc eclosing, proceed as fol-
lows:
X Press the Wbutton to sto pthe side win-
dows.
The side windows stop.
X To the nopen the side windows ,press the
W button again.
X Press the 3button to sto pthe sliding
sunroof or panorama sliding sunroof.
The sliding sunroof or panorama sliding
sunroof stops.
X To the nopen the sliding sunroof or pano-
rama sliding sunroof, pull back on the 3
button.
i Notes on the automatic reversin gfeature
for:
R the side windows (Y page 110)
R the sliding sunroof (Y page 115)
R the panorama sliding sunroof
(Y page 115)
X Convenience opening feature: press and
hold the gbutton until the side win-
dows and the sliding sunroof or panorama
sliding sunroof have opened. The side win-
dows and the sliding sunroof or panorama
sliding sunroof move back to their original
position.
The indicator lamp above the gbutton
goes out. Air-recirculation mode is deacti-
vated. i
If you open the side windows
,the sliding
sunroof or the panorama sliding sunroof
manually after closing the mwith the con-
venienc eclosing feature, the ywill remain in
this position when opened using the con-
venienc eopening feature. Activating/deactivating th
eresidual
heat function
General notes The residual heat function is only available
with THERMOTRONI
Cautomatic climat econ-
trol.
It is possible to make use of the residual heat
of the engin etocontinue heatin gthe vehicle
for approximately 30 minutes after the engine
has been switched off .The heatin gtime
depends on the set interior temperature.
Activating/deactivating X
Turn the key to position 0in the ignition
lock or remove it (Y page 179).
X To activate: press theÌbutton.
The indicator lamp above the Ìbutton
light sup.
i If the residual heat function is activated,
the windows may mist up on the inside.
i The blower will run at
alow speed regard-
less of the airflow setting.
i If you activate the residual heat function
at high temperatures, only the ventilation
will be activated. The blower runs at
medium speed.
X To deactivate: press theÌbutton.
The indicator lamp above the Ìbutton
goes out.
Residual heat is deactivate dautomatically:
R after approximately 30 minutes
R when the ignition is switched on
R if the battery voltage drops
R when the auxiliary heatin gisswitched on Operating thec
limate control system
167Climate control Z
Page 171 of 497
Auxiliary heating
Important safety notes G
DANGER
If th eexhaust pipe is blocke dorsufficient
ventilation is no tpossible, toxic exhaust
fumes can ente rthe vehicle, especially car-
bon monoxide. This is th ecase, e.g. in
enclosed spaces, or if th evehicl eiss tuck in
snow. There is ariskoff atal injuries.
You should switch off th eauxiliary heating in
enclosed spaces whic hdonothav eane xtrac-
tion system, e.g. agarage. If th evehicl eis
stuck in snow and you mus tleav ethe auxiliary
heating running, keep th eexhaust pipe and
th ea rea around th evehicl eclear of snow. To
guarantee asufficien tsupply of fresh air, open
aw indow on th eside of th evehicl eaway from
th ew ind. G
WARNING
When th eauxiliary heating is switched on,
part soft hevehicl ecan become ver yhot.
Flammabl ematerials suc hasleaves, gras sor
twigs may ignit eiftheyc om eintoc ontact
with:
R hot part softheexhaust system
R thee xhaust gas itself
There is ariskoff ire.
When th eauxiliary heating is switched on,
mak esuret hat:
R no flammabl ematerials come int ocontact
wit hh ot vehicl ecom ponents
R thee xhaust gas can escape from the
exhaust pipe unhindered
R thee xhaust gas does no tcom eintoc ontact
wit hflammabl ematerials.
The auxiliary heating and th eexhaust gas dis-
charge location can be foun dinfrontof the
right-hand fron twheel.
! Operating th
eauxiliary heating/ventila-
tion draws on th evehicl ebattery. Afte ryou
hav eheated or ventilated th evehicl ea maximum of two times
,drivef or alonger
distance.
i Switc
hthe auxiliary heating on regularly
once amonth for about te nminutes.
The auxiliary heating heat sthe air in th evehi-
cle interior to th eset temperature. This
occur swithout usin gthe heat of th erunning
engine. The auxiliary heating is operated
directly usin gthe vehicle's fuel .For this rea-
son ,the tan kcontent mustbeatl east at
reserv efuel level to ensur ethatthe auxiliary
heating functions.
The auxiliary heating/ventilation automati-
call yadjust stoc hanges in temperature and
weather conditions. Fo rthisr eason ,the aux-
iliar yheating could switch from ventilation
mod etoh eating mod eorfromh eating mode
to ventilation mode.
The auxiliary heating switches off automati-
call yafter 50 minutes. This time limi tcan be
altered. To do this, visit aqualified specialist
workshop.
You canno tuse th eauxiliary ventilation to
cool th evehicl einterior to atem perature
lower than th eoutside temperature.
Before switchin gon X
Turn th ekeyto position 2in th eignition
loc k(Ypage 179).
X Se tthe desired temperature.
Auxiliar yheating or auxiliary ventilation can
also be switched on if th emanually set cli-
mat econtro lisactivated. Optimum comfort
is attained by setting th esystem to automatic
mode. Se tthe temperature to 22 †.
The auxiliary heating or auxiliary ventilation
can be switched on/off usin gthe butto non
th ec entre console or th eremot econtrol.
The on-board computer can be used to spec-
ify up to three departur etimes,o ne of which
may be preselected (Y page 293).168
Operating th
eclimat econtro lsystemClimat econt rol