MERCEDES-BENZ E-CLASS SALOON 2009 Owners Manual
Manufacturer: MERCEDES-BENZ, Model Year: 2009, Model line: E-CLASS SALOON, Model: MERCEDES-BENZ E-CLASS SALOON 2009Pages: 373, PDF Size: 12.37 MB
Page 301 of 373
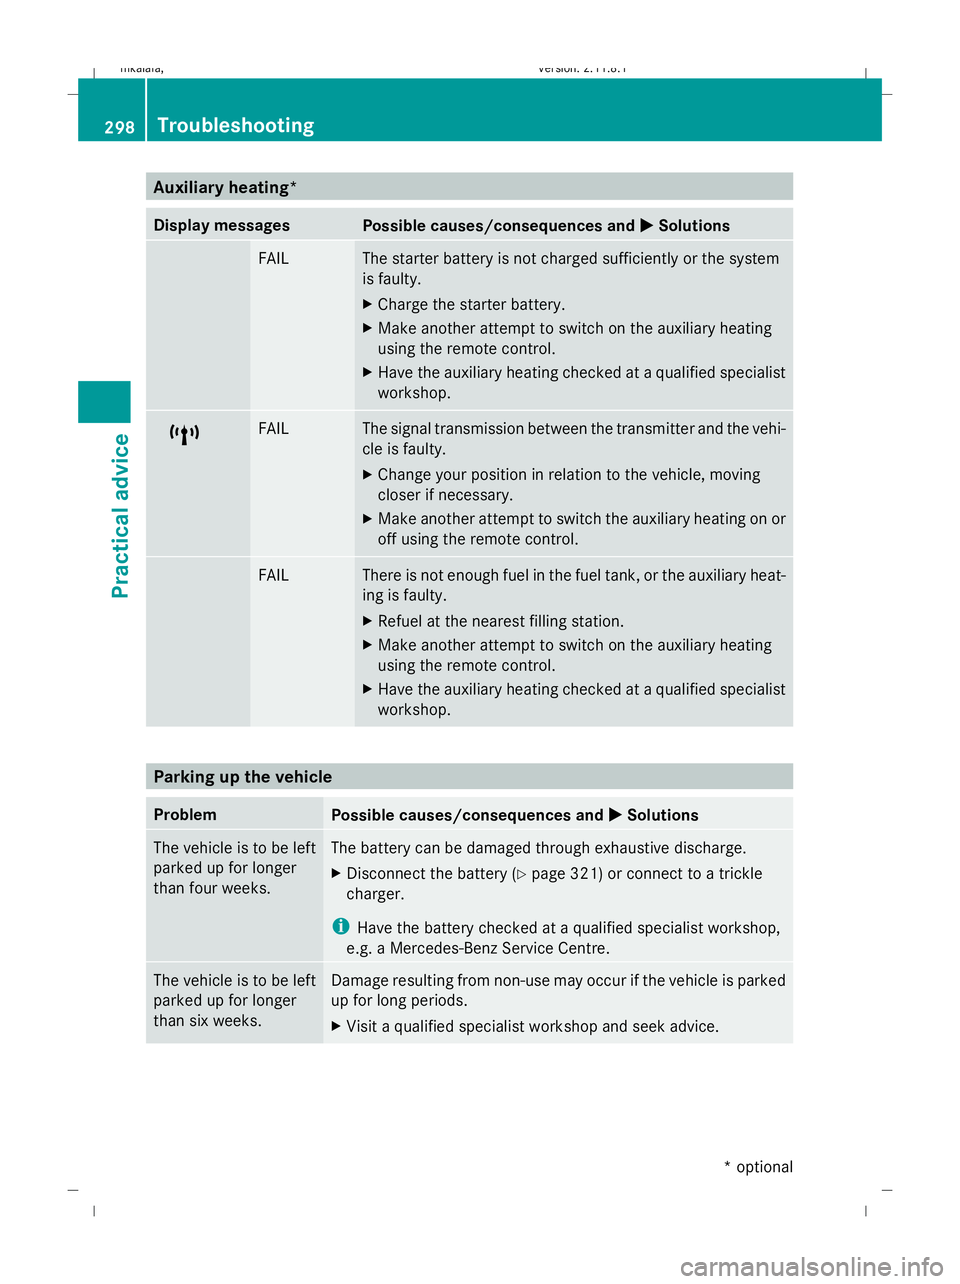
Auxiliary heating*
Display messages
Possible causes/consequences and
X
X Solutions FAIL The starter battery is not charged sufficiently or the system
is faulty.
X
Charge the starter battery.
X Make another attempt to switch on the auxiliary heating
using the remote control.
X Have the auxiliary heating checked at a qualified specialist
workshop. $ FAIL The signal transmission between the transmitter and the vehi-
cle is faulty.
X
Change your position in relation to the vehicle, moving
closer if necessary.
X Make another attempt to switch the auxiliary heating on or
off using the remote control. © FAIL There is not enough fuel in the fuel tank, or the auxiliary heat-
ing is faulty.
X
Refuel at the nearest filling station.
X Make another attempt to switch on the auxiliary heating
using the remote control.
X Have the auxiliary heating checked at a qualified specialist
workshop. Parking up the vehicle
Problem
Possible causes/consequences and
X XSolutions The vehicle is to be left
parked up for longer
than four weeks. The battery can be damaged through exhaustive discharge.
X
Disconnect the battery (Y page 321) or connect to a trickle
charger.
i Have the battery checked at a qualified specialist workshop,
e.g. a Mercedes-Benz Service Centre. The vehicle is to be left
parked up for longer
than six weeks. Damage resulting from non-use may occur if the vehicle is parked
up for long periods.
X
Visit a qualified specialist workshop and seek advice. 298
TroubleshootingPractical advice
* optional
212_AKB; 2; 4, en-GB
mkalafa,
Version: 2.11.8.1 2009-05-05T14:17:16+02:00 - Seite 298
Dateiname: 6515346702_buchblock.pdf; erzeugt am 07. May 2009 14:17:14; WK
Page 302 of 373
Locking/unlocking in an emergency
Emergency key element
If the vehicle can no longer be locked or
unlocked with the key, use the emergency
key element.
If you use the emergency key element to
unlock and open the driver's door or the boot
lid, the anti-theft alarm system* will be trig-
gered (Y page 65).
There are several ways to turn off the alarm:
X Press the %or& button on the key.
or
X Insert the key into the ignition lock.
or
X Press the start/stop button *in the ignition
lock. The key must be in the vehicle.
or
X Lock or unlock the vehicle using KEYLESS
GO*. The key must be outside the vehicle.
If you unlock the vehicle using the emergency
key element, the fuel filler flap will not be
unlocked automatically.
X To unlock the fuel filler flap: insert the
key in the ignition lock.
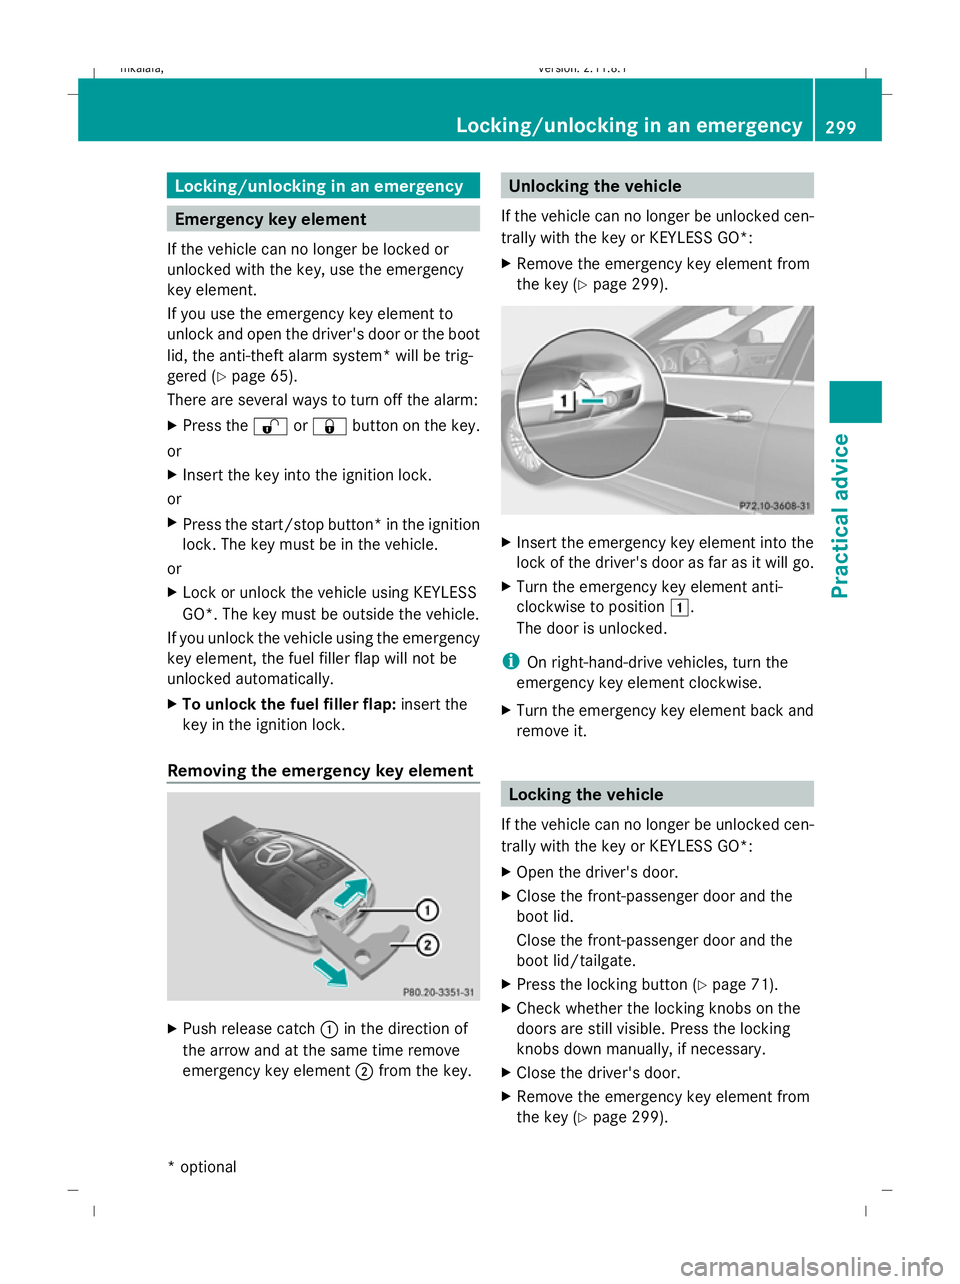
Removing the emergency key element X
Push release catch :in the direction of
the arrow and at the same time remove
emergency key element ;from the key. Unlocking the vehicle
If the vehicle can no longer be unlocked cen-
trally with the key or KEYLESS GO*:
X Remove the emergency key element from
the key (Y page 299). X
Insert the emergency key element into the
lock of the driver's door as far as it will go.
X Turn the emergency key element anti-
clockwise to position 1.
The door is unlocked.
i On right-hand-drive vehicles, turn the
emergency key element clockwise.
X Turn the emergency key element back and
remove it. Locking the vehicle
If the vehicle can no longer be unlocked cen-
trally with the key or KEYLESS GO*:
X Open the driver's door.
X Close the front-passenger door and the
boot lid.
Close the front-passenger door and the
boot lid/tailgate.
X Press the locking button (Y page 71).
X Check whether the locking knobs on the
doors are still visible. Press the locking
knobs down manually, if necessary.
X Close the driver's door.
X Remove the emergency key element from
the key (Y page 299). Locking/unlocking in an emergency
299Practical advice
* optional
212_AKB; 2; 4, en-GB
mkalafa,
Version: 2.11.8.1 2009-05-05T14:17:16+02:00 - Seite 299 Z
Dateiname: 6515346702_buchblock.pdf; erzeugt am 07. May 2009 14:17:15; WK
Page 303 of 373
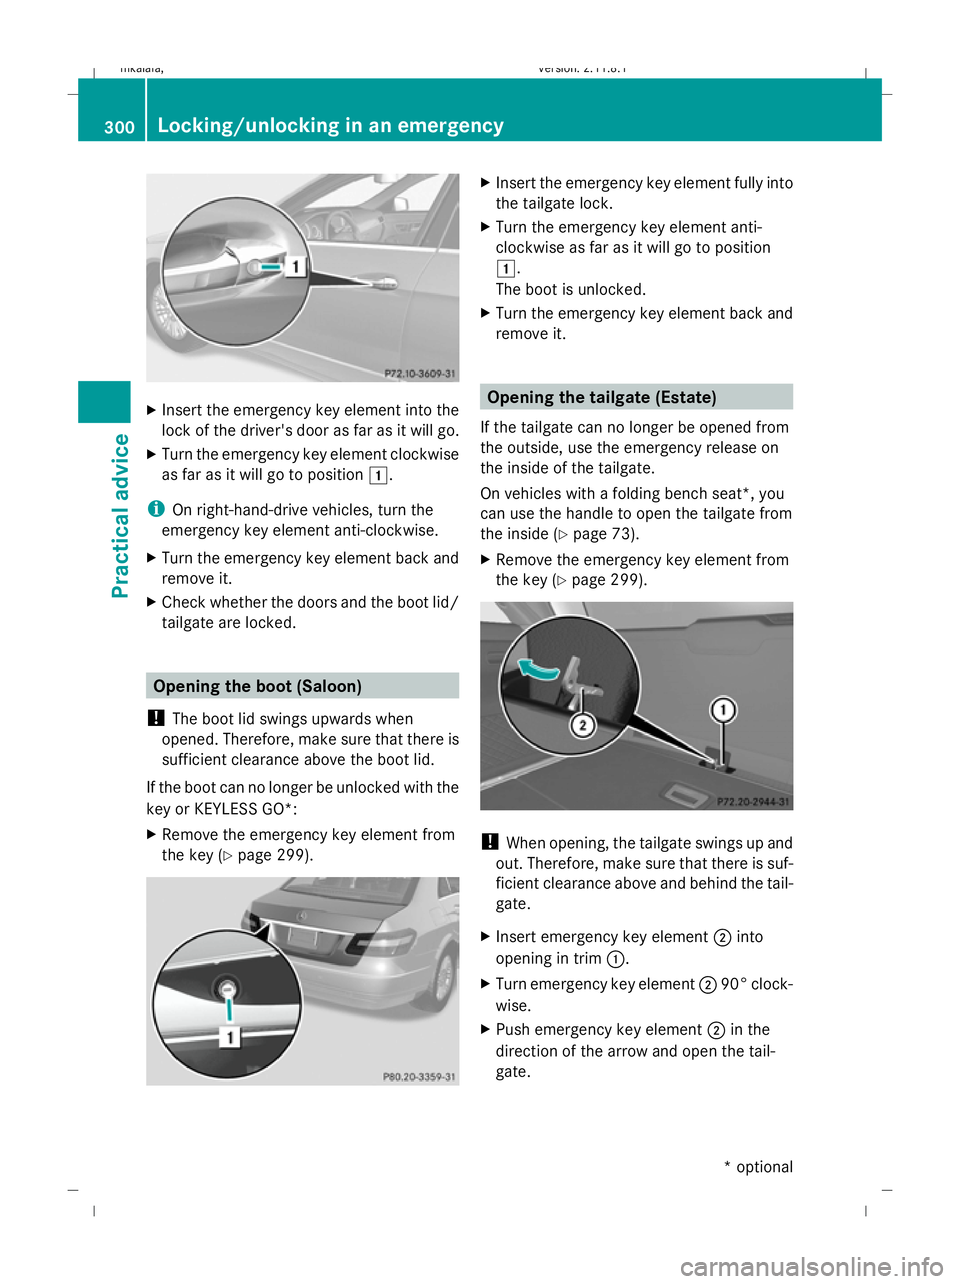
X
Insert the emergency key element into the
lock of the driver's door as far as it will go.
X Turn the emergency key element clockwise
as far as it will go to position 1.
i On right-hand-drive vehicles, turn the
emergency key element anti-clockwise.
X Turn the emergency key element back and
remove it.
X Check whether the doors and the boot lid/
tailgate are locked. Opening the boot (Saloon)
! The boot lid swings upwards when
opened. Therefore, make sure that there is
sufficient clearance above the boot lid.
If the boot can no longer be unlocked with the
key or KEYLESS GO*:
X Remove the emergency key element from
the key (Y page 299). X
Insert the emergency key element fully into
the tailgate lock.
X Turn the emergency key element anti-
clockwise as far as it will go to position
1.
The boot is unlocked.
X Turn the emergency key element back and
remove it. Opening the tailgate (Estate)
If the tailgate can no longer be opened from
the outside, use the emergency release on
the inside of the tailgate.
On vehicles with a folding bench seat*, you
can use the handle to open the tailgate from
the inside (Y page 73).
X Remove the emergency key element from
the key (Y page 299). !
When opening, the tailgate swings up and
out. Therefore, make sure that there is suf-
ficient clearance above and behind the tail-
gate.
X Insert emergency key element ;into
opening in trim :.
X Turn emergency key element ;90° clock-
wise.
X Push emergency key element ;in the
direction of the arrow and open the tail-
gate. 300
Locking/unlocking in an emergencyPractical advice
* optional
212_AKB; 2; 4, en-GB
mkalafa
,V ersion: 2.11.8.1
2009-05-05T14:17:16+02:00 - Seite 300
Dateiname: 6515346702_buchblock.pdf; erzeugt am 07. May 2009 14:17:15; WK
Page 304 of 373
Emergency fuel filler flap release
G
Risk of injury
The edges on the inside of the vehicle body
can be sharp. You could injure yourself when
using the fuel filler flap emergency release.
Avoid contact with the edges on the inside of
the vehicle body.
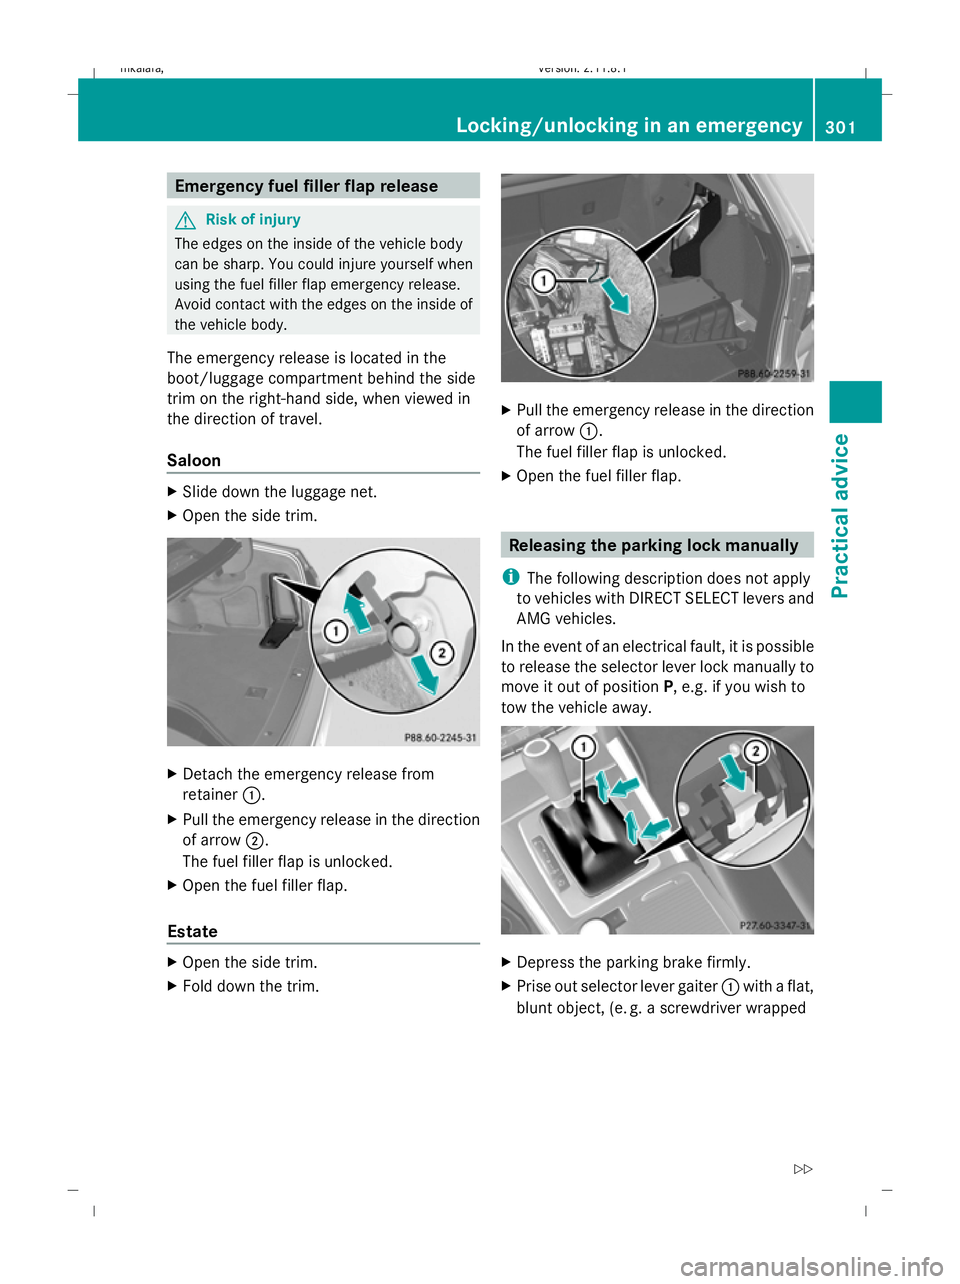
The emergency release is located in the
boot/luggage compartment behind the side
trim on the right-hand side, when viewed in
the direction of travel.
Saloon X
Slide down the luggage net.
X Open the side trim. X
Detach the emergency release from
retainer :.
X Pull the emergency release in the direction
of arrow ;.
The fuel filler flap is unlocked.
X Open the fuel filler flap.
Estate X
Open the side trim.
X Fold down the trim. X
Pull the emergency release in the direction
of arrow :.
The fuel filler flap is unlocked.
X Open the fuel filler flap. Releasing the parking lock manually
i The following description does not apply
to vehicles with DIRECT SELECT levers and
AMG vehicles.
In the event of an electrical fault, it is possible
to release the selector lever lock manually to
move it out of position P, e.g. if you wish to
tow the vehicle away. X
Depress the parking brake firmly.
X Prise out selector lever gaiter :with a flat,
blunt object, (e. g. a screwdriver wrapped Locking/unlocking in an emergency
301Practical advice
212_AKB; 2; 4, en-GB
mkalafa, Version: 2.11.8.1 2009-05-05T14:17:16+02:00 - Seite 301 Z
Dateiname: 6515346702_buchblock.pdf; erzeugt am 07. May 2009 14:17:16; WK
Page 305 of 373
in cloth) from the right-hand edge, pulling
it up and out.
X Press release button ;down and simul-
taneously move the selector lever out of
position P.
The selector lever can now be moved freely
until it is returned to position P.Resetting the active bonnet (pedes-
trian protection) after triggering
i The active bonnet is available for all mod-
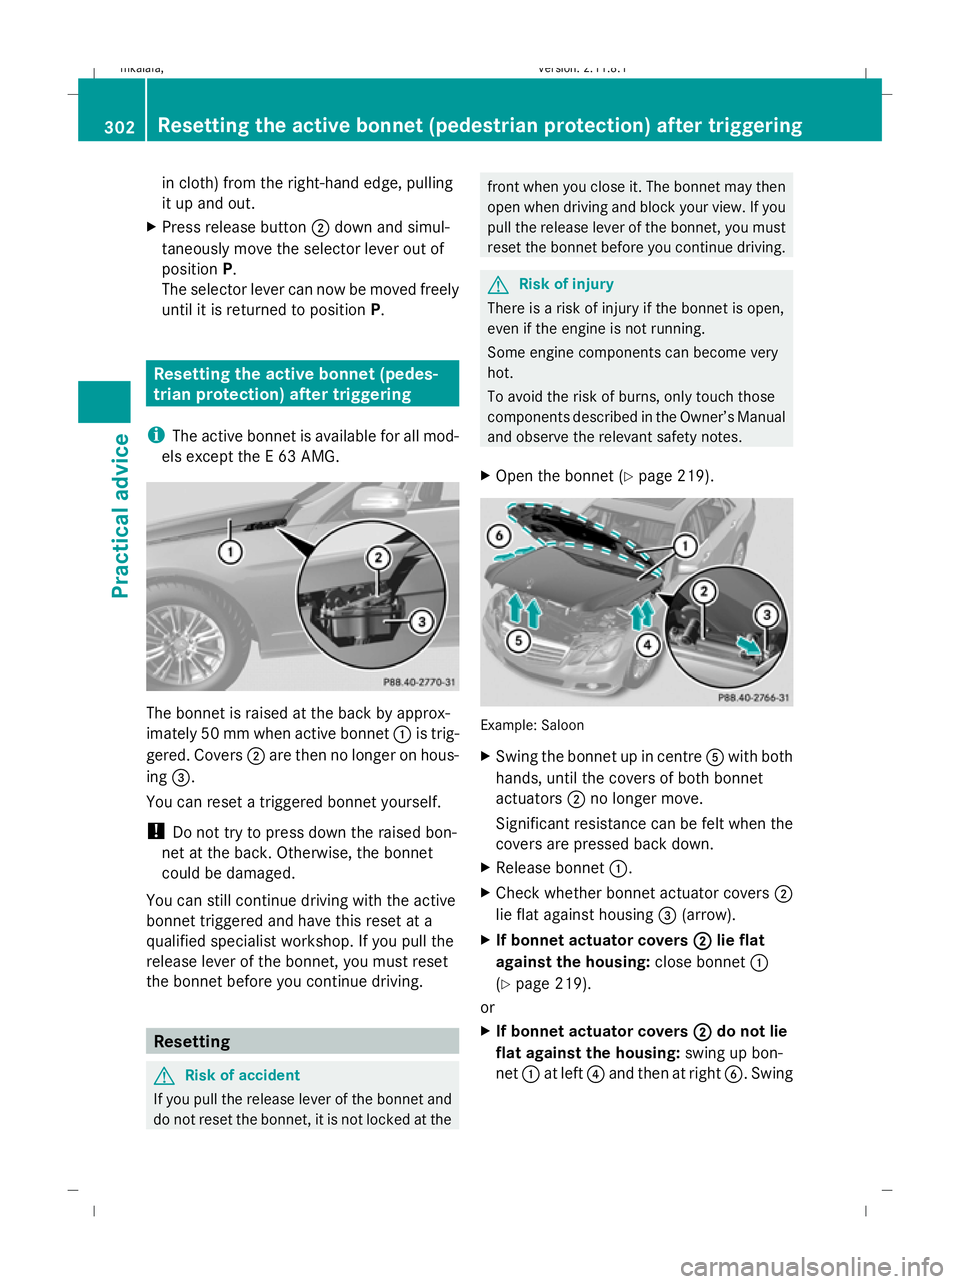
els except the E 63 AMG. The bonnet is raised at the back by approx-
imately 50 mm when active bonnet :is trig-
gered. Covers ;are then no longer on hous-
ing =.
You can reset a triggered bonnet yourself.
! Do not try to press down the raised bon-
net at the back. Otherwise, the bonnet
could be damaged.
You can still continue driving with the active
bonnet triggered and have this reset at a
qualified specialist workshop. If you pull the
release lever of the bonnet, you must reset
the bonnet before you continue driving. Resetting
G
Risk of accident
If you pull the release lever of the bonnet and
do not reset the bonnet, it is not locked at the front when you close it. The bonnet may then
open when driving and block your view. If you
pull the release lever of the bonnet, you must
reset the bonnet before you continue driving. G
Risk of injury
There is a risk of injury if the bonnet is open,
even if the engine is not running.
Some engine components can become very
hot.
To avoid the risk of burns, only touch those
components described in the Owner’s Manual
and observe the relevant safety notes.
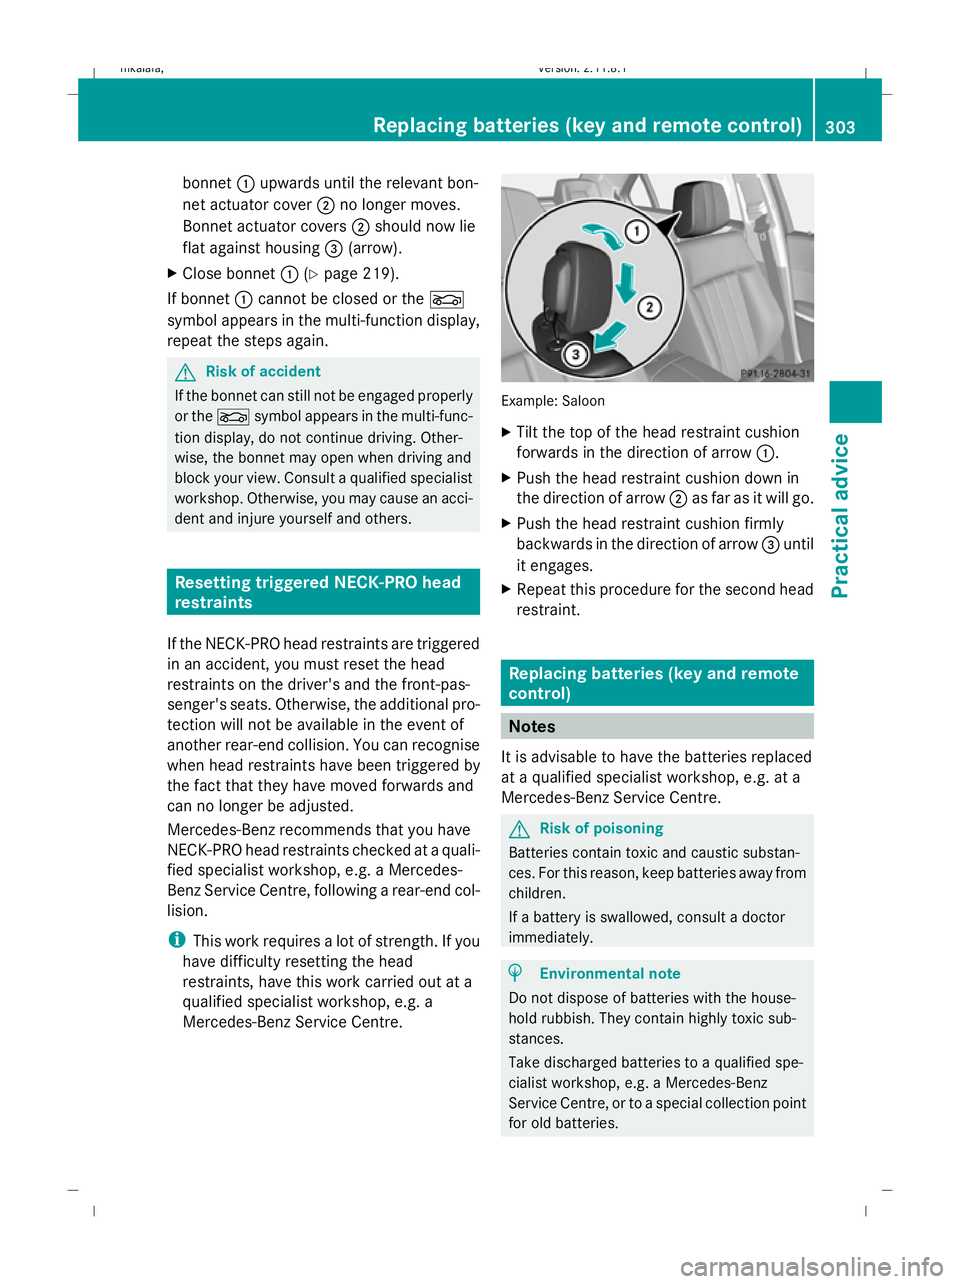
X Open the bonnet (Y page 219). Example: Saloon
X
Swing the bonnet up in centre Awith both
hands, until the covers of both bonnet
actuators ;no longer move.
Significant resistance can be felt when the
covers are pressed back down.
X Release bonnet :.
X Check whether bonnet actuator covers ;
lie flat against housing =(arrow).
X If bonnet actuator covers ; ;lie flat
against the housing: close bonnet:
(Y page 219).
or
X If bonnet actuator covers ; ;do not lie
flat against the housing: swing up bon-
net :at left ?and then at right B. Swing302
Resetting the active bonnet (pedestrian protection) after triggeringPractical advice
212_AKB; 2; 4, en-GB
mkalafa,
Version: 2.11.8.1 2009-05-05T14:17:16+02:00 - Seite 302
Dateiname: 6515346702_buchblock.pdf; erzeugt am 07. May 2009 14:17:17; WK
Page 306 of 373
bonnet
:upwards until the relevant bon-
net actuator cover ;no longer moves.
Bonnet actuator covers ;should now lie
flat against housing =(arrow).
X Close bonnet :(Ypage 219).
If bonnet :cannot be closed or the L
symbol appears in the multi-function display,
repeat the steps again. G
Risk of accident
If the bonnet can still not be engaged properly
or the Lsymbol appears in the multi-func-
tion display, do not continue driving. Other-
wise, the bonnet may open when driving and
block your view. Consult a qualified specialist
workshop. Otherwise, you may cause an acci-
dent and injure yourself and others. Resetting triggered NECK-PRO head
restraints
If the NECK-PRO head restraints are triggered
in an accident, you must reset the head
restraints on the driver's and the front-pas-
senger's seats. Otherwise, the additional pro-
tection will not be available in the event of
another rear-end collision. You can recognise
when head restraints have been triggered by
the fact that they have moved forwards and
can no longer be adjusted.
Mercedes-Benz recommends that you have
NECK-PRO head restraints checked at a quali-
fied specialist workshop, e.g. a Mercedes-
Benz Service Centre, following a rear-end col-
lision.
i This work requires a lot of strength. If you
have difficulty resetting the head
restraints, have this work carried out at a
qualified specialist workshop, e.g. a
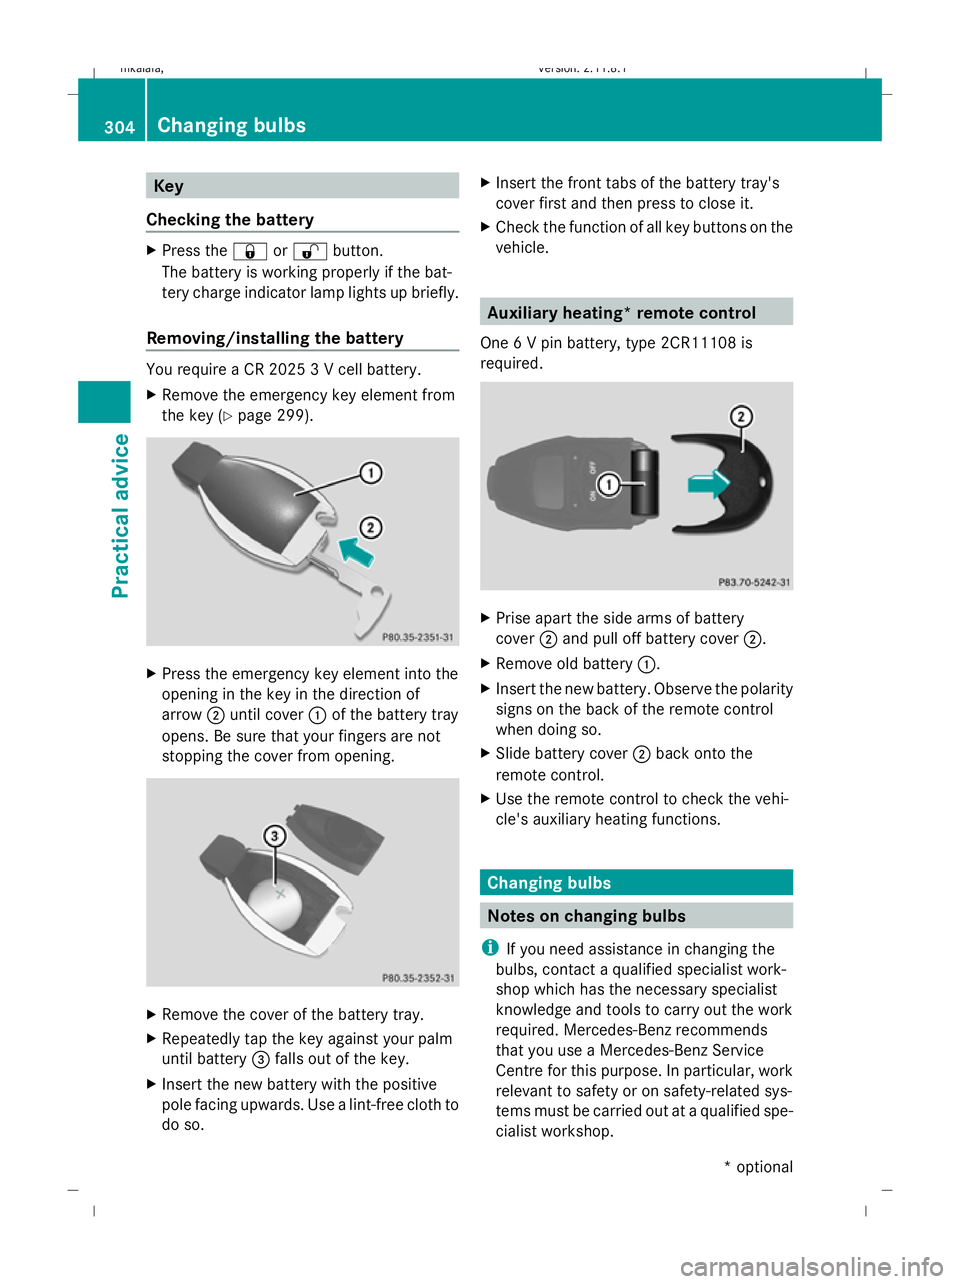
Mercedes-Benz Service Centre. Example: Saloon
X
Tilt the top of the head restraint cushion
forwards in the direction of arrow :.
X Push the head restraint cushion down in
the direction of arrow ;as far as it will go.
X Push the head restraint cushion firmly
backwards in the direction of arrow =until
it engages.
X Repeat this procedure for the second head
restraint. Replacing batteries (key and remote
control)
Notes
It is advisable to have the batteries replaced
at a qualified specialist workshop, e.g. at a
Mercedes-Benz Service Centre. G
Risk of poisoning
Batteries contain toxic and caustic substan-
ces. For this reason, keep batteries away from
children.
If a battery is swallowed, consult a doctor
immediately. H
Environmental note
Do not dispose of batteries with the house-
hold rubbish. They contain highly toxic sub-
stances.
Take discharged batteries to a qualified spe-
cialist workshop, e.g. a Mercedes-Benz
Service Centre, or to a special collection point
for old batteries. Replacing batteries (key and remote control)
303Practical advice
212_AKB; 2; 4, en-GB
mkalafa,Version: 2.11.8.1 2009-05-05T14:17:16+02:00 - Seite 303 Z
Dateiname: 6515346702_buchblock.pdf; erzeugt am 07. May 2009 14:17:17; WK
Page 307 of 373
Key
Checking the battery X
Press the &or% button.
The battery is working properly if the bat-
tery charge indicator lamp lights up briefly.
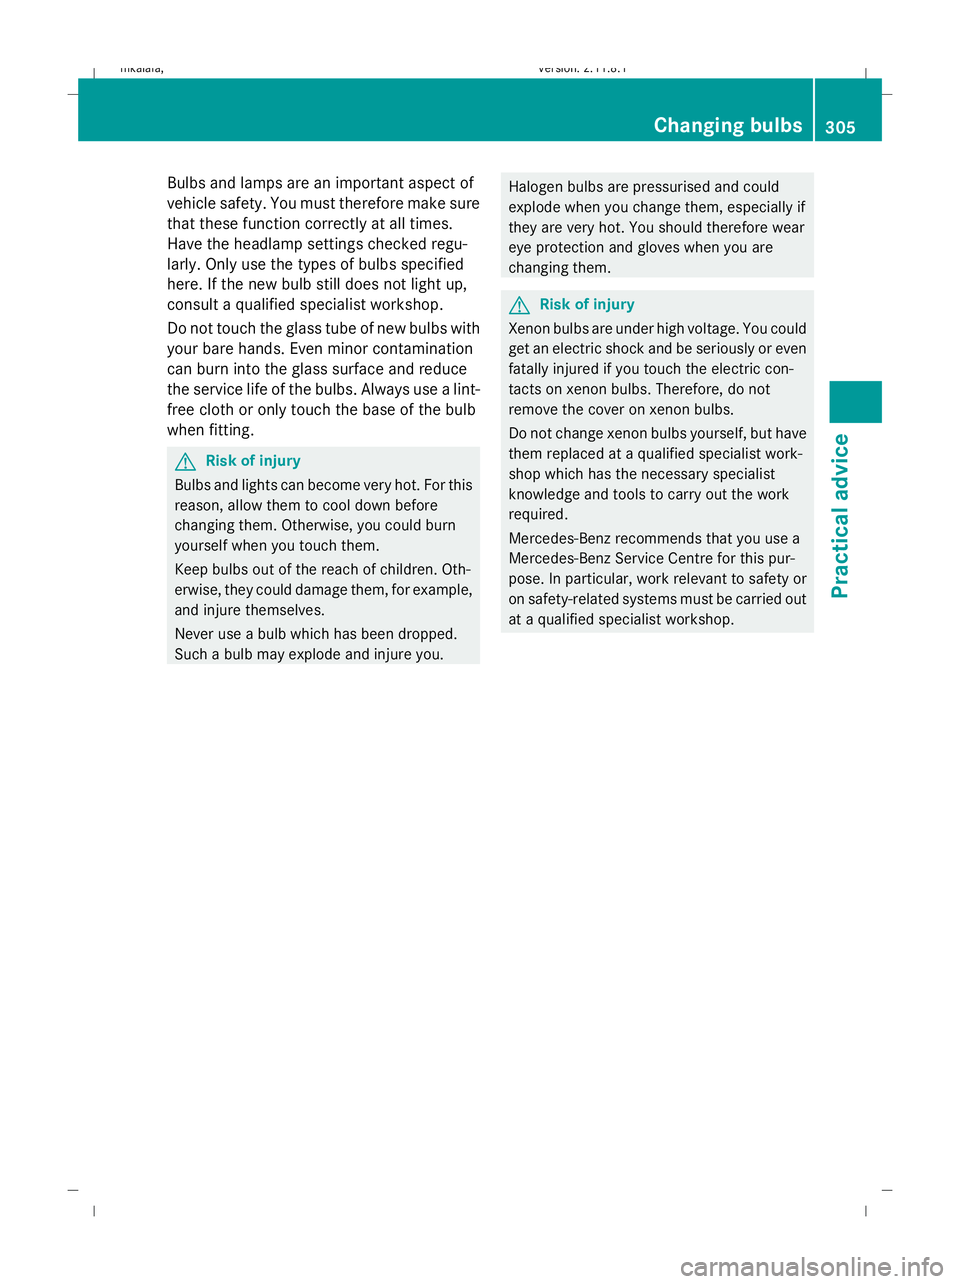
Removing/installing the battery You require a CR 2025 3 V cell battery.
X Remove the emergency key element from
the key (Y page 299). X
Press the emergency key element into the
opening in the key in the direction of
arrow ;until cover :of the battery tray
opens. Be sure that your fingers are not
stopping the cover from opening. X
Remove the cover of the battery tray.
X Repeatedly tap the key against your palm
until battery =falls out of the key.
X Insert the new battery with the positive
pole facing upwards. Use a lint-free cloth to
do so. X
Insert the front tabs of the battery tray's
cover first and then press to close it.
X Check the function of all key buttons on the
vehicle. Auxiliary heating* remote control
One 6 V pin battery, type 2CR11108 is
required. X
Prise apart the side arms of battery
cover ;and pull off battery cover ;.
X Remove old battery :.
X Insert the new battery. Observe the polarity
signs on the back of the remote control
when doing so.
X Slide battery cover ;back onto the
remote control.
X Use the remote control to check the vehi-
cle's auxiliary heating functions. Changing bulbs
Notes on changing bulbs
i If you need assistance in changing the
bulbs, contact a qualified specialist work-
shop which has the necessary specialist
knowledge and tools to carry out the work
required. Mercedes-Benz recommends
that you use a Mercedes-Benz Service
Centre for this purpose. In particular, work
relevant to safety or on safety-related sys-
tems must be carried out at a qualified spe-
cialist workshop. 304
Changing bulbsPractical advice
* optional
212_AKB; 2; 4, en-GB
mkalafa,
Version: 2.11.8.1 2009-05-05T14:17:16+02:00 - Seite 304
Dateiname: 6515346702_buchblock.pdf; erzeugt am 07. May 2009 14:17:18; WK
Page 308 of 373
Bulbs and lamps are an important aspect of
vehicle safety. You must therefore make sure
that these function correctly at all times.
Have the headlamp settings checked regu-
larly. Only use the types of bulbs specified
here. If the new bulb still does not light up,
consult a qualified specialist workshop.
Do not touch the glass tube of new bulbs with
your bare hands. Even minor contamination
can burn into the glass surface and reduce
the service life of the bulbs. Always use a lint-
free cloth or only touch the base of the bulb
when fitting. G
Risk of injury
Bulbs and lights can become very hot. For this
reason, allow them to cool down before
changing them. Otherwise, you could burn
yourself when you touch them.
Keep bulbs out of the reach of children. Oth-
erwise, they could damage them, for example,
and injure themselves.
Never use a bulb which has been dropped.
Such a bulb may explode and injure you. Halogen bulbs are pressurised and could
explode when you change them, especially if
they are very hot. You should therefore wear
eye protection and gloves when you are
changing them.
G
Risk of injury
Xenon bulbs are under high voltage. You could
get an electric shock and be seriously or even
fatally injured if you touch the electric con-
tacts on xenon bulbs. Therefore, do not
remove the cover on xenon bulbs.
Do not change xenon bulbs yourself, but have
them replaced at a qualified specialist work-
shop which has the necessary specialist
knowledge and tools to carry out the work
required.
Mercedes-Benz recommends that you use a
Mercedes-Benz Service Centre for this pur-
pose. In particular, work relevant to safety or
on safety-related systems must be carried out
at a qualified specialist workshop. Changing bulbs
305Practical advice
212_AKB; 2; 4, en-GB
mkalafa,V ersion: 2.11.8.1
2009-05-05T14:17:16+02:00 - Seite 305 Z
Dateiname: 6515346702_buchblock.pdf; erzeugt am 07. May 2009 14:17:18; WK
Page 309 of 373
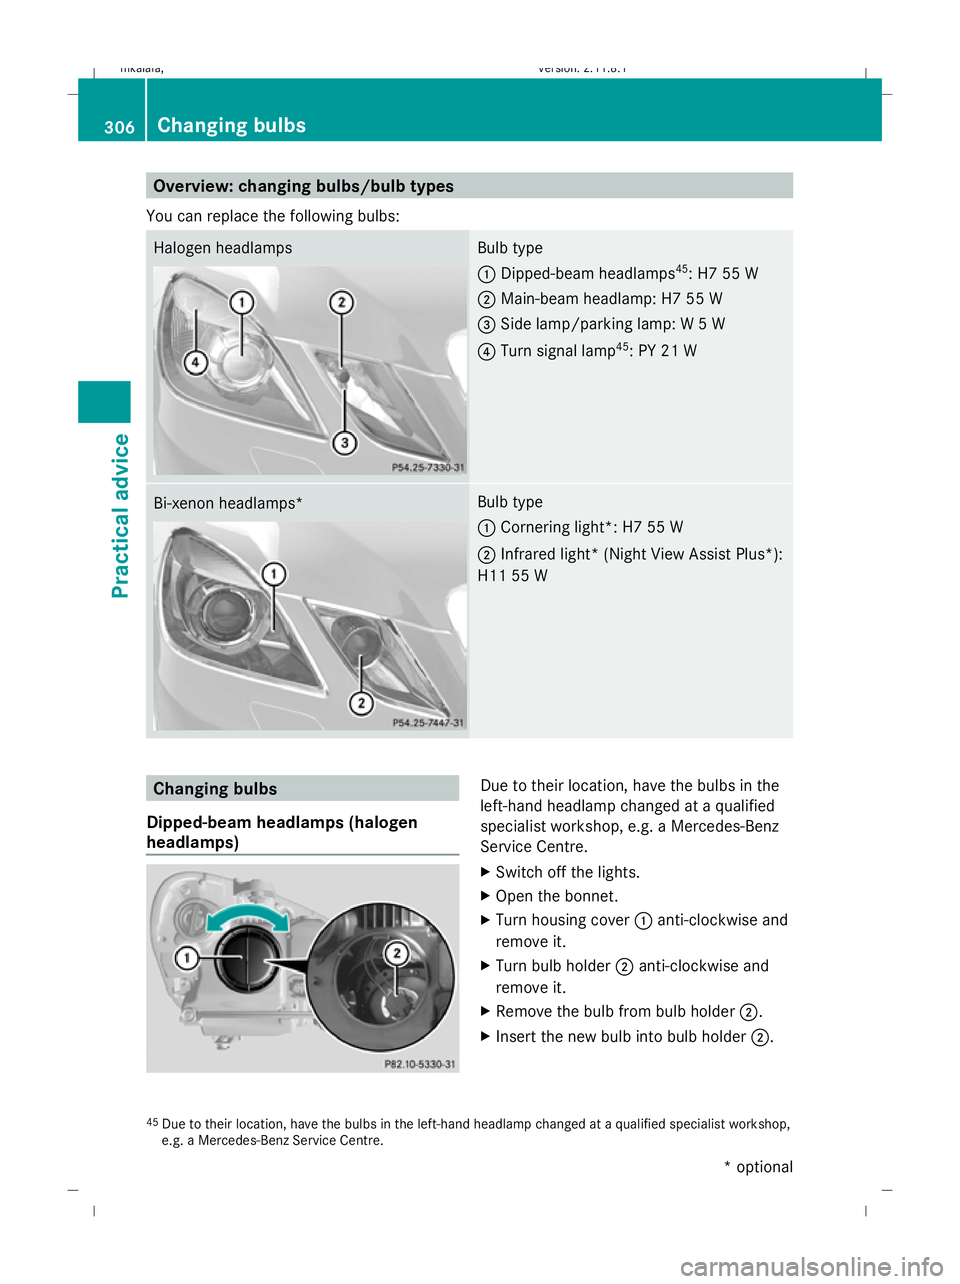
Overview: changing bulbs/bulb types
You can replace the following bulbs: Halogen headlamps Bulb type
:
Dipped-beam headlamps 45
: H7 55 W
; Main-beam headlamp: H7 55 W
= Side lamp/parking lamp: W 5 W
? Turn signal lamp 45
: PY 21 W Bi-xenon headlamps* Bulb type
:
Cornering light*: H7 55 W
; Infrared light* (Night View Assist Plus*):
H11 55 W Changing bulbs
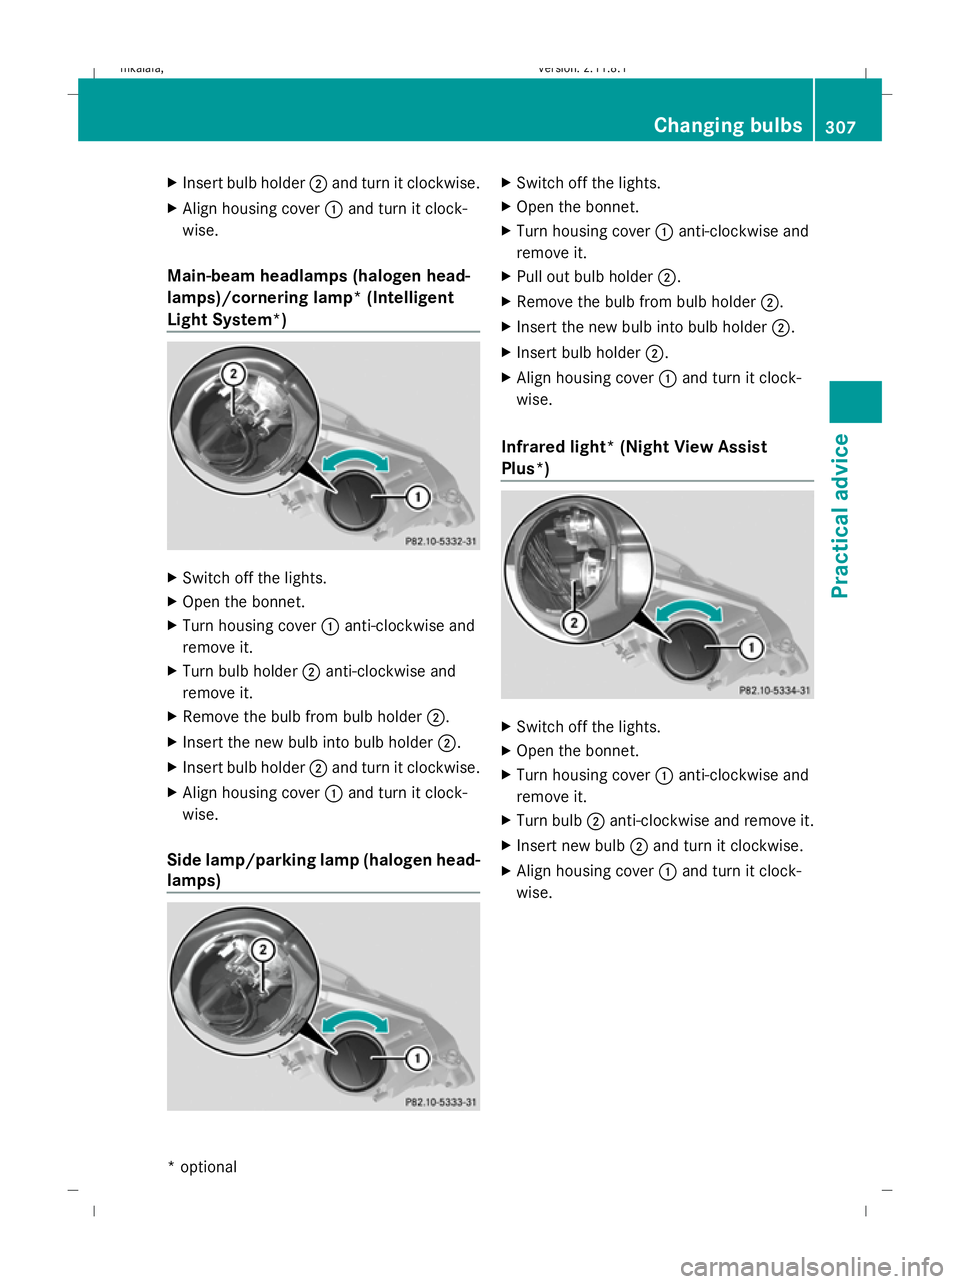
Dipped-beam headlamps (halogen
headlamps) Due to their location, have the bulbs in the
left-hand headlamp changed at a qualified
specialist workshop, e.g. a Mercedes-Benz
Service Centre.
X Switch off the lights.
X Open the bonnet.
X Turn housing cover :anti-clockwise and
remove it.
X Turn bulb holder ;anti-clockwise and
remove it.
X Remove the bulb from bulb holder ;.
X Insert the new bulb into bulb holder ;.
45 Due to their location, have the bulbs in the left-hand headlamp changed at a qualified specialist workshop,
e.g. a Mercedes-Benz Service Centre. 306
Changing bulbsPractical advice
* optional
212_AKB; 2; 4, en-GB
mkalafa,
Version: 2.11.8.1 2009-05-05T14:17:16+02:00 - Seite 306
Dateiname: 6515346702_buchblock.pdf; erzeugt am 07. May 2009 14:17:18; WK
Page 310 of 373
X
Insert bulb holder ;and turn it clockwise.
X Align housing cover :and turn it clock-
wise.
Main-beam headlamps (halogen head-
lamps)/cornering lamp* (Intelligent
Light System*) X
Switch off the lights.
X Open the bonnet.
X Turn housing cover :anti-clockwise and
remove it.
X Turn bulb holder ;anti-clockwise and
remove it.
X Remove the bulb from bulb holder ;.
X Insert the new bulb into bulb holder ;.
X Insert bulb holder ;and turn it clockwise.
X Align housing cover :and turn it clock-
wise.
Side lamp/parking lamp (halogen head-
lamps) X
Switch off the lights.
X Open the bonnet.
X Turn housing cover :anti-clockwise and
remove it.
X Pull out bulb holder ;.
X Remove the bulb from bulb holder ;.
X Insert the new bulb into bulb holder ;.
X Insert bulb holder ;.
X Align housing cover :and turn it clock-
wise.
Infrared light* (Night View Assist
Plus*) X
Switch off the lights.
X Open the bonnet.
X Turn housing cover :anti-clockwise and
remove it.
X Turn bulb ;anti-clockwise and remove it.
X Insert new bulb ;and turn it clockwise.
X Align housing cover :and turn it clock-
wise. Changing bulbs
307Practical advice
* optional
212_AKB; 2; 4, en-GB
mkalafa
,V ersion: 2.11.8.1
2009-05-05T14:17:16+02:00 - Seite 307 Z
Dateiname: 6515346702_buchblock.pdf; erzeugt am 07. May 2009 14:17:19; WK