MERCEDES-BENZ E-CLASS SALOON 2009 Owners Manual
Manufacturer: MERCEDES-BENZ, Model Year: 2009, Model line: E-CLASS SALOON, Model: MERCEDES-BENZ E-CLASS SALOON 2009Pages: 373, PDF Size: 12.37 MB
Page 311 of 373
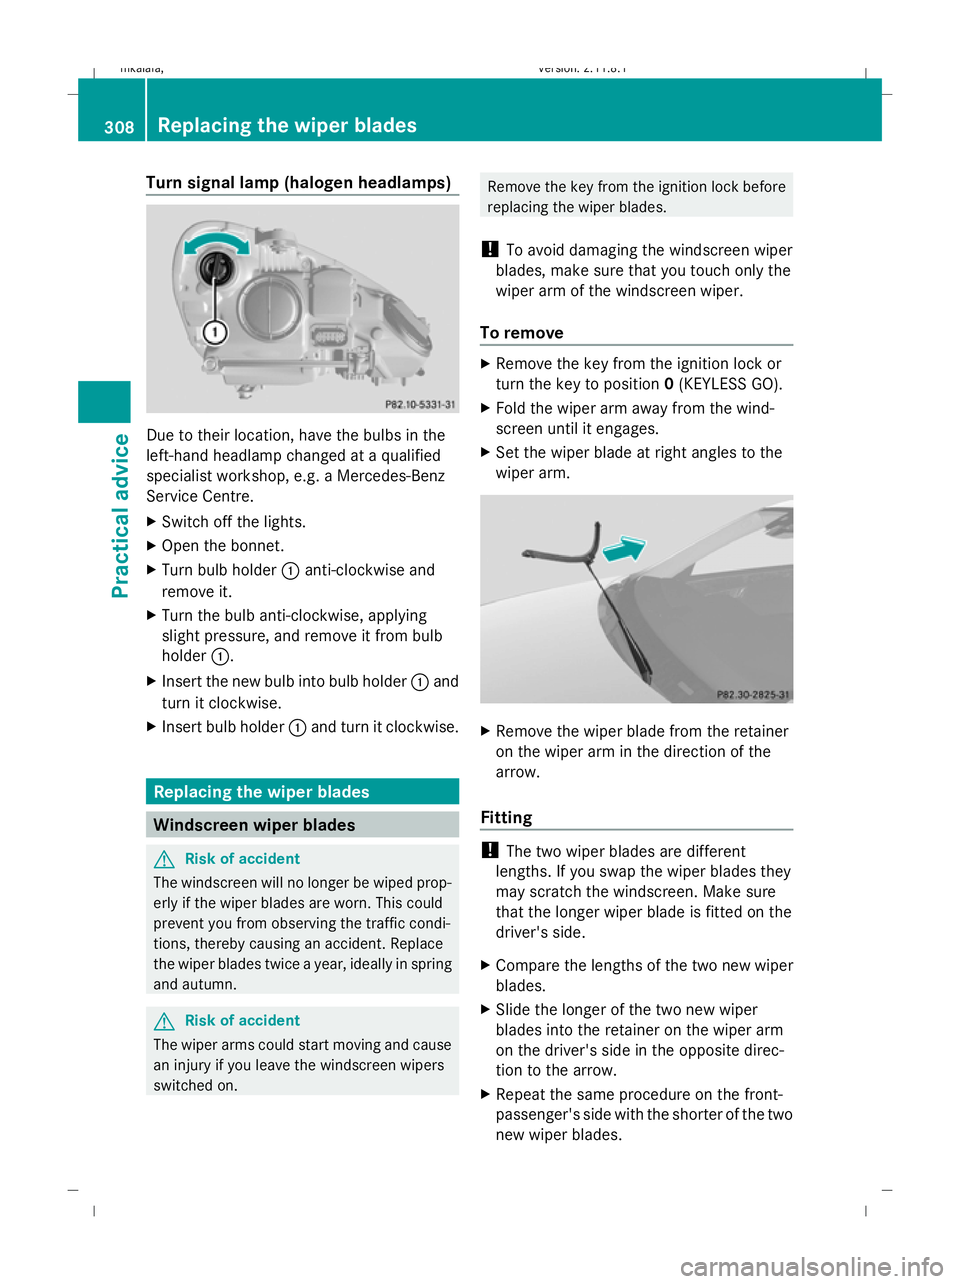
Turn signal lamp (halogen headlamps)
Due to their location, have the bulbs in the
left-hand headlamp changed at a qualified
specialist workshop, e.g. a Mercedes-Benz
Service Centre.
X Switch off the lights.
X Open the bonnet.
X Turn bulb holder :anti-clockwise and
remove it.
X Turn the bulb anti-clockwise, applying
slight pressure, and remove it from bulb
holder :.
X Insert the new bulb into bulb holder :and
turn it clockwise.
X Insert bulb holder :and turn it clockwise. Replacing the wiper blades
Windscreen wiper blades
G
Risk of accident
The windscreen will no longer be wiped prop-
erly if the wiper blades are worn. This could
prevent you from observing the traffic condi-
tions, thereby causing an accident. Replace
the wiper blades twice a year, ideally in spring
and autumn. G
Risk of accident
The wiper arms could start moving and cause
an injury if you leave the windscreen wipers
switched on. Remove the key from the ignition lock before
replacing the wiper blades.
! To avoid damaging the windscreen wiper
blades, make sure that you touch only the
wiper arm of the windscreen wiper.
To remove X
Remove the key from the ignition lock or
turn the key to position 0(KEYLESS GO).
X Fold the wiper arm away from the wind-
screen until it engages.
X Set the wiper blade at right angles to the
wiper arm. X
Remove the wiper blade from the retainer
on the wiper arm in the direction of the
arrow.
Fitting !
The two wiper blades are different
lengths. If you swap the wiper blades they
may scratch the windscreen. Make sure
that the longer wiper blade is fitted on the
driver's side.
X Compare the lengths of the two new wiper
blades.
X Slide the longer of the two new wiper
blades into the retainer on the wiper arm
on the driver's side in the opposite direc-
tion to the arrow.
X Repeat the same procedure on the front-
passenger's side with the shorter of the two
new wiper blades. 308
Replacing the
wiper bladesPractical advice
212_AKB; 2; 4, en-GB
mkalafa, Version: 2.11.8.1 2009-05-05T14:17:16+02:00 - Seite 308
Dateiname: 6515346702_buchblock.pdf; erzeugt am 07. May 2009 14:17:19; WK
Page 312 of 373
X
Turn the wiper blades until they are parallel
to the wiper arms.
X Fold the wiper arms back onto the wind-
screen. Rear window wiper blade
G
Risk of injury
The wiper arm could be set in motion and
injure you if the windscreen wipers are
switched on.
Remove the key from the ignition lock before
replacing the wiper blade.
Removing X
Remove the key from the ignition lock.
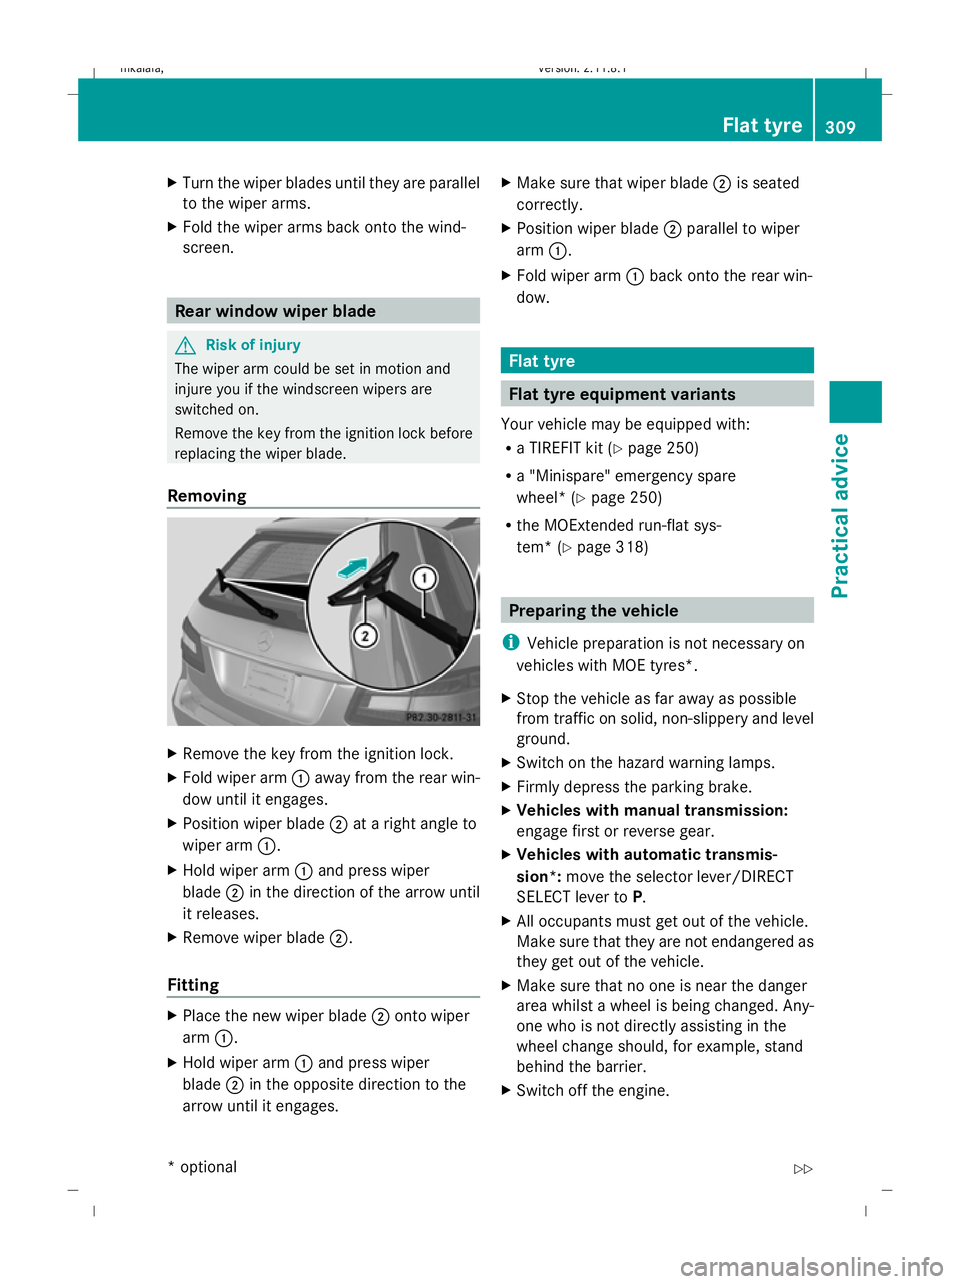
X Fold wiper arm :away from the rear win-
dow until it engages.
X Position wiper blade ;at a right angle to
wiper arm :.
X Hold wiper arm :and press wiper
blade ;in the direction of the arrow until
it releases.
X Remove wiper blade ;.
Fitting X
Place the new wiper blade ;onto wiper
arm :.
X Hold wiper arm :and press wiper
blade ;in the opposite direction to the
arrow until it engages. X
Make sure that wiper blade ;is seated
correctly.
X Position wiper blade ;parallel to wiper
arm :.
X Fold wiper arm :back onto the rear win-
dow. Flat tyre
Flat tyre equipment variants
Your vehicle may be equipped with:
R a TIREFIT kit (Y page 250)
R a "Minispare" emergency spare
wheel* (Y page 250)
R the MOExtended run-flat sys-
tem* (Y page 318) Preparing the vehicle
i Vehicle preparation is not necessary on
vehicles with MOE tyres*.
X Stop the vehicle as far away as possible
from traffic on solid, non-slippery and level
ground.
X Switch on the hazard warning lamps.
X Firmly depress the parking brake.
X Vehicles with manual transmission:
engage first or reverse gear.
X Vehicles with automatic transmis-
sion*: move the selector lever/DIRECT
SELECT lever to P.
X All occupants must get out of the vehicle.
Make sure that they are not endangered as
they get out of the vehicle.
X Make sure that no one is near the danger
area whilst a wheel is being changed. Any-
one who is not directly assisting in the
wheel change should, for example, stand
behind the barrier.
X Switch off the engine. Flat tyre
309Practical advice
* optional
212_AKB; 2; 4, en-GB
mkalafa,
Version: 2.11.8.1 2009-05-05T14:17:16+02:00 - Seite 309 Z
Dateiname: 6515346702_buchblock.pdf; erzeugt am 07. May 2009 14:17:20; WK
Page 313 of 373
X
Vehicles without KEYLESS GO*: remove
the key from the ignition lock.
X Vehicles with KEYLESS GO*: open the
driver's door.
The on-board electronics have status 0,
which is the same as the key having been
removed.
X Get out of the vehicle.
X Close the driver’s door.
X Place the warning triangle (Y page 248) at
a suitable distance. Observe legal require-
ments. Using the TIREFIT kit
You can use the TIREFIT kit to seal small
punctures, particularly those in the tyre tread.
You can use TIREFIT at outside temperatures
down to -20 †. G
Risk of accident
In the following cases your safety is especially
endangered, as tyre sealant is insufficient if:
R there are cuts or punctures in the tyre
greater than 4 mm.
R the wheel rim is damaged.
R you have driven at very low tyre pressures
or on a flat tyre.
Do not drive any further. Consult a qualified
specialist workshop which has the necessary
specialist knowledge and tools to carry out
the work required.
Mercedes-Benz recommends that you use a
Mercedes-Benz Service Centre for this pur-
pose. In particular, work relevant to safety or
on safety-related systems must be carried out
at a qualified specialist workshop.
X Do not remove any foreign objects which
have penetrated the tyre, e.g. screws or
nails.
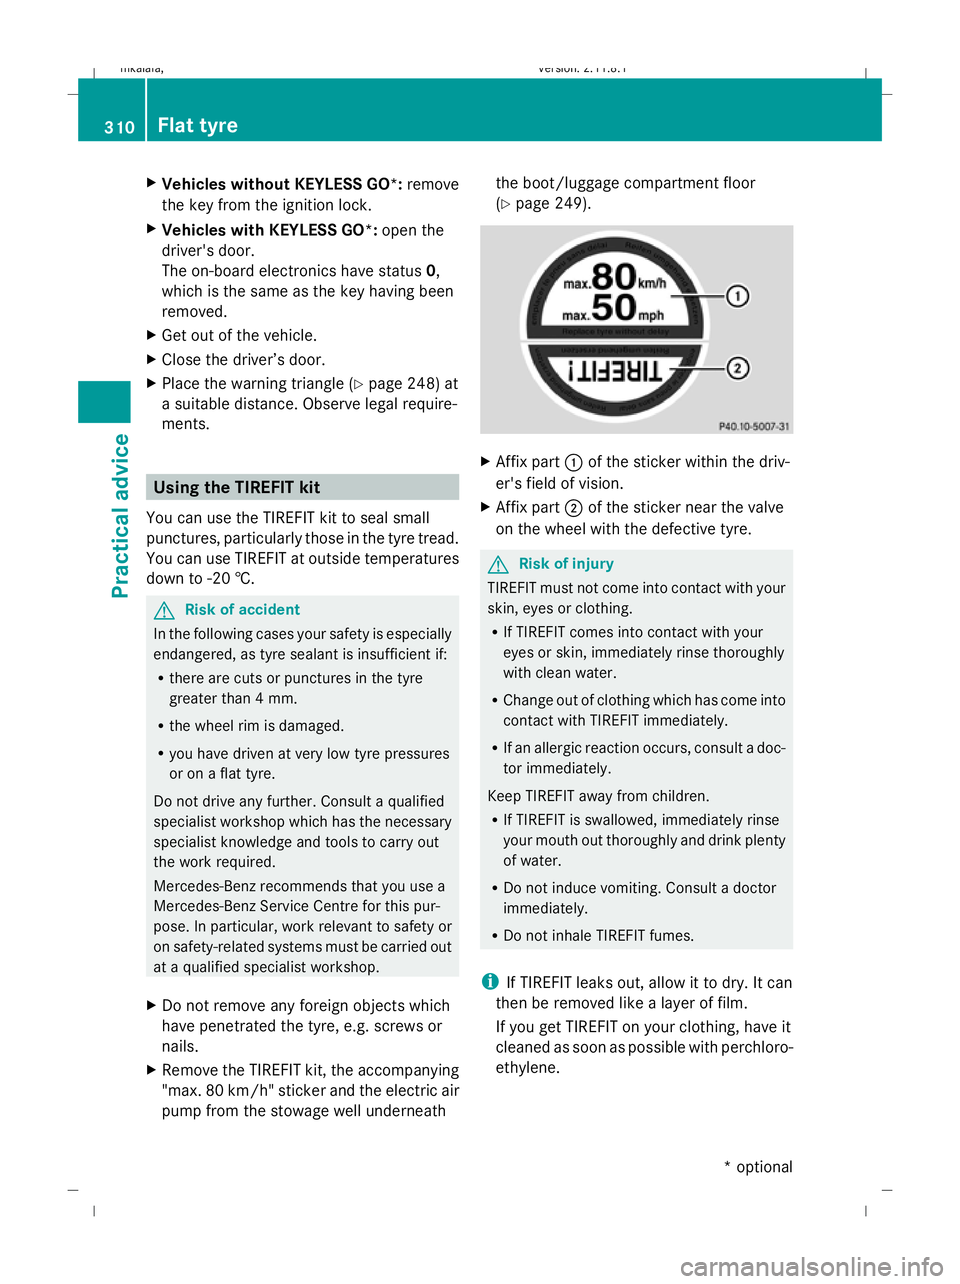
X Remove the TIREFIT kit, the accompanying
"max. 80 km/h" sticker and the electric air
pump from the stowage well underneath the boot/luggage compartment floor
(Y
page 249). X
Affix part :of the sticker within the driv-
er's field of vision.
X Affix part ;of the sticker near the valve
on the wheel with the defective tyre. G
Risk of injury
TIREFIT must not come into contact with your
skin, eyes or clothing.
R If TIREFIT comes into contact with your
eyes or skin, immediately rinse thoroughly
with clean water.
R Change out of clothing which has come into
contact with TIREFIT immediately.
R If an allergic reaction occurs, consult a doc-
tor immediately.
Keep TIREFIT away from children.
R If TIREFIT is swallowed, immediately rinse
your mouth out thoroughly and drink plenty
of water.
R Do not induce vomiting. Consult a doctor
immediately.
R Do not inhale TIREFIT fumes.
i If TIREFIT leaks out, allow it to dry. It can
then be removed like a layer of film.
If you get TIREFIT on your clothing, have it
cleaned as soon as possible with perchloro-
ethylene. 310
Flat tyrePractical advice
* optional
212_AKB; 2; 4, en-GB
mkalafa
,V ersion: 2.11.8.1
2009-05-05T14:17:16+02:00 - Seite 310
Dateiname: 6515346702_buchblock.pdf; erzeugt am 07. May 2009 14:17:20; WK
Page 314 of 373
G
Risk of injury
Comply with the manufacturer's safety
instructions shown on the sticker on the elec-
tric air pump.
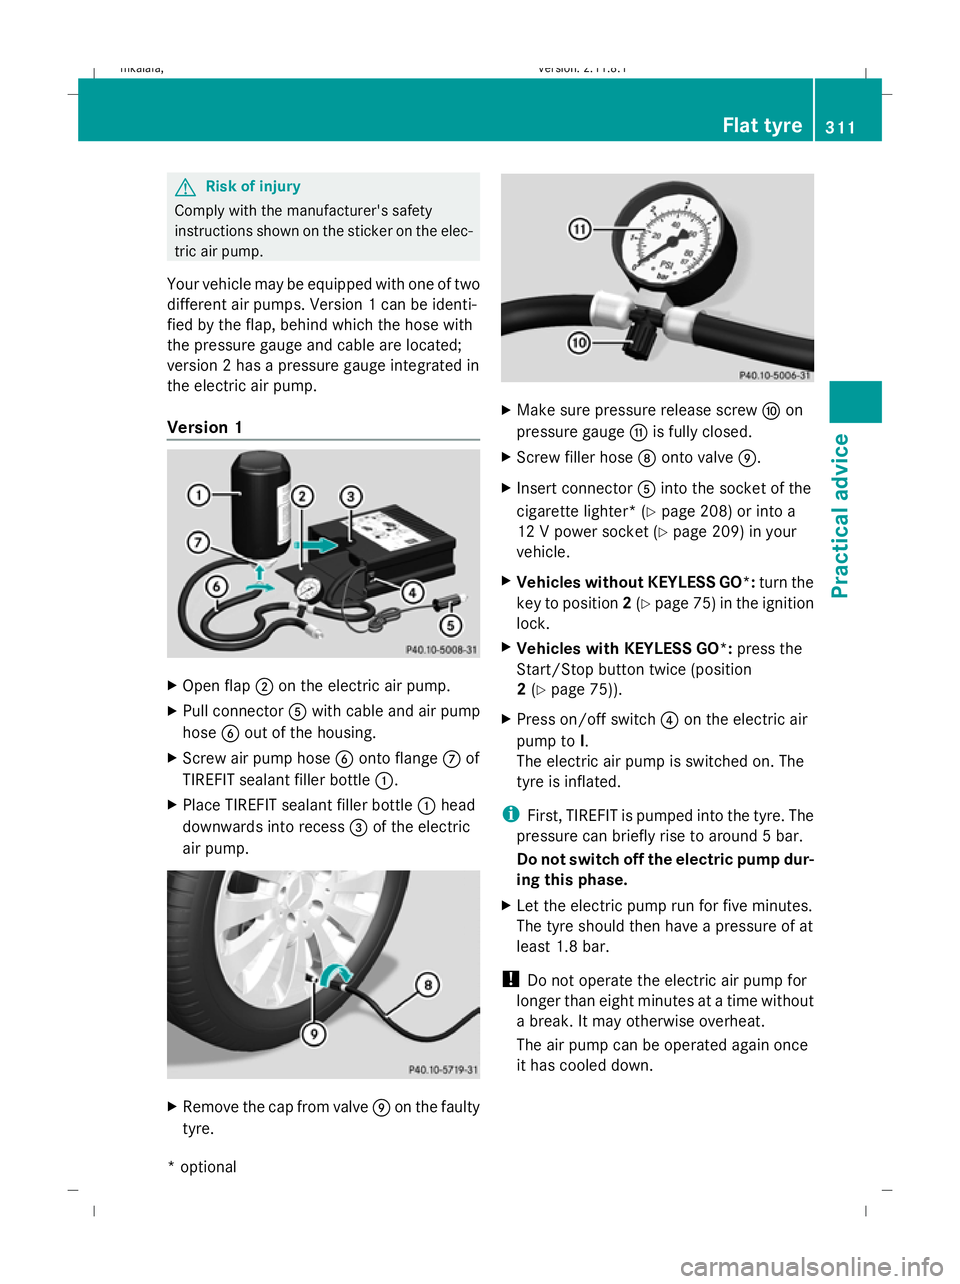
Your vehicle may be equipped with one of two
different air pumps. Version 1 can be identi-
fied by the flap, behind which the hose with
the pressure gauge and cable are located;
version 2 has a pressure gauge integrated in
the electric air pump.
Version 1 X
Open flap ;on the electric air pump.
X Pull connector Awith cable and air pump
hose Bout of the housing.
X Screw air pump hose Bonto flange Cof
TIREFIT sealant filler bottle :.
X Place TIREFIT sealant filler bottle :head
downwards into recess =of the electric
air pump. X
Remove the cap from valve Eon the faulty
tyre. X
Make sure pressure release screw Fon
pressure gauge Gis fully closed.
X Screw filler hose Donto valve E.
X Insert connector Ainto the socket of the
cigarette lighter* (Y page 208) or into a
12 V power socket ( Ypage 209) in your
vehicle.
X Vehicles without KEYLESS GO*: turn the
key to position 2(Y page 75) in the ignition
lock.
X Vehicles with KEYLESS GO*: press the
Start/Stop button twice (position
2 (Y page 75)).
X Press on/off switch ?on the electric air
pump to I.
The electric air pump is switched on. The
tyre is inflated.
i First, TIREFIT is pumped into the tyre. The
pressure can briefly rise to around 5 bar.
Do not switch off the electric pump dur-
ing this phase.
X Let the electric pump run for five minutes.
The tyre should then have a pressure of at
least 1.8 bar.
! Do not operate the electric air pump for
longer than eight minutes at a time without
a break. It may otherwise overheat.
The air pump can be operated again once
it has cooled down. Flat tyre
311Practical advice
* optional
212_AKB; 2; 4, en-GB
mkalafa
,V ersion: 2.11.8.1
2009-05-05T14:17:16+02:00 - Seite 311 Z
Dateiname: 6515346702_buchblock.pdf; erzeugt am 07. May 2009 14:17:21; WK
Page 315 of 373
If a pressure of 1.8 bar is not reached
after five minutes:
X Switch off and disconnect the electric air
pump and drive the vehicle forwards or
backwards approximately 10 m.
This distributes the TIREFIT more evenly.
X Pump up the tyre again. G
Risk of accident
If a pressure of 1.8 bar is not achieved after
five minutes, the tyre is too badly damaged.
Do not drive any further. Consult a qualified
specialist workshop which has the necessary
specialist knowledge and tools to carry out
the work required. Mercedes-Benz recom-
mends that you use a Mercedes-Benz Service
Centre for this purpose. In particular, work
relevant to safety or on safety-related sys-
tems must be carried out at a qualified spe-
cialist workshop.
When a tyre pressure of at least 1.8 bar
is reached:
X Press on/off switch ?on the electric air
pump to 0.
The electric air pump is switched off.
X Remove the TIREFIT kit from the wheel.
! After use, excess TIREFIT may run out of
the filler hose. This may cause stains.
Therefore, place the filler hose in the plastic
which contained the TIREFIT kit.
X Stow away the TIREFIT kit, the electric air
pump and the warning triangle.
X Pull away immediately.
X Stop after driving for approximately ten
minutes and check the tyre pressure with
the electric air pump. G
Risk of accident
If the tyre pressure is now lower than 1.3 bar,
the tyre is too badly damaged. Do not drive
any further. Consult a qualified specialist
workshop which has the necessary specialist
knowledge and tools to carry out the work required. Mercedes-Benz recommends that
you use a Mercedes-Benz Service Centre for
this purpose. In particular, work relevant to
safety or on safety-related systems must be
carried out at a qualified specialist workshop.
X If the tyre pressure is still at least 1.3 bar,
correct it (see fuel filler flap for values).
To increase the tyre pressure: switch on
the electric air pump.
To reduce the tyre pressure: open pres-
sure release screw Fon pressure
gauge G.
X Drive to the nearest workshop and have the
tyre changed there.
X Have the TIREFIT kit replaced as soon as
possible at a qualified specialist workshop,
e.g. at a Mercedes-Benz Service Centre. G
Risk of accident
Do not exceed the maximum speed of
80 km/h.
The "max. 80 km/h" label must be affixed in
the driver's field of vision.
The vehicle's handling characteristics may be
affected. H
Environmental note
Have the used TIREFIT kit disposed of profes-
sionally, e.g. at a Mercedes-Benz Service
Centre.
X Have the TIREFIT kit replaced every four
years at a qualified specialist workshop,
e.g. a Mercedes-Benz Service Centre. 312
Flat tyrePractical advice
212_AKB; 2; 4, en-GB
mkalafa
,V ersion: 2.11.8.1
2009-05-05T14:17:16+02:00 - Seite 312
Dateiname: 6515346702_buchblock.pdf; erzeugt am 07. May 2009 14:17:21; WK
Page 316 of 373
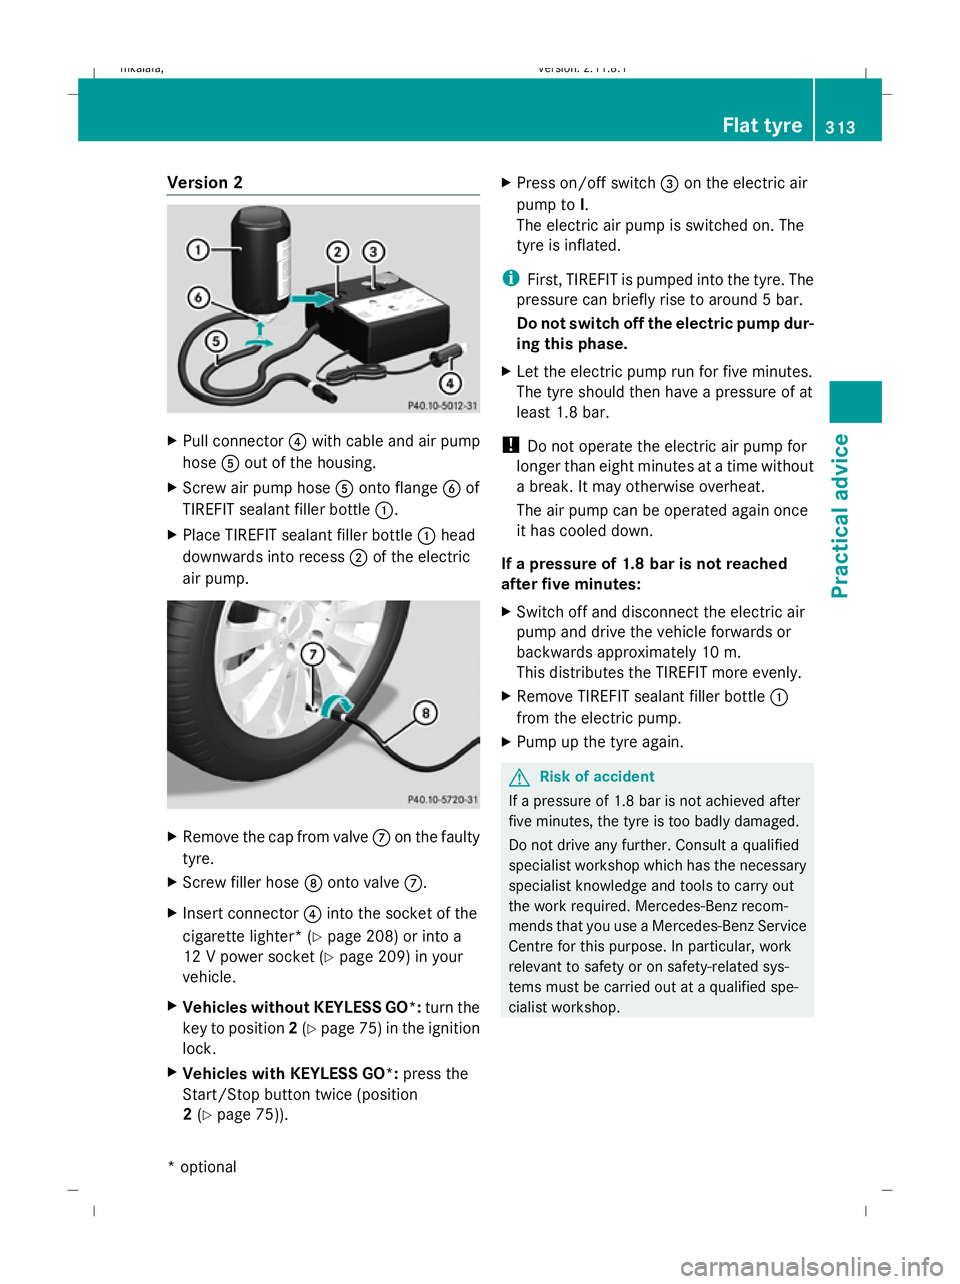
Version 2
X
Pull connector ?with cable and air pump
hose Aout of the housing.
X Screw air pump hose Aonto flange Bof
TIREFIT sealant filler bottle :.
X Place TIREFIT sealant filler bottle :head
downwards into recess ;of the electric
air pump. X
Remove the cap from valve Con the faulty
tyre.
X Screw filler hose Donto valve C.
X Insert connector ?into the socket of the
cigarette lighter* (Y page 208) or into a
12 V power socket ( Ypage 209) in your
vehicle.
X Vehicles without KEYLESS GO*: turn the
key to position 2(Y page 75) in the ignition
lock.
X Vehicles with KEYLESS GO*: press the
Start/Stop button twice (position
2 (Y page 75)). X
Press on/off switch =on the electric air
pump to I.
The electric air pump is switched on. The
tyre is inflated.
i First, TIREFIT is pumped into the tyre. The
pressure can briefly rise to around 5 bar.
Do not switch off the electric pump dur-
ing this phase.
X Let the electric pump run for five minutes.
The tyre should then have a pressure of at
least 1.8 bar.
! Do not operate the electric air pump for
longer than eight minutes at a time without
a break. It may otherwise overheat.
The air pump can be operated again once
it has cooled down.
If a pressure of 1.8 bar is not reached
after five minutes:
X Switch off and disconnect the electric air
pump and drive the vehicle forwards or
backwards approximately 10 m.
This distributes the TIREFIT more evenly.
X Remove TIREFIT sealant filler bottle :
from the electric pump.
X Pump up the tyre again. G
Risk of accident
If a pressure of 1.8 bar is not achieved after
five minutes, the tyre is too badly damaged.
Do not drive any further. Consult a qualified
specialist workshop which has the necessary
specialist knowledge and tools to carry out
the work required. Mercedes-Benz recom-
mends that you use a Mercedes-Benz Service
Centre for this purpose. In particular, work
relevant to safety or on safety-related sys-
tems must be carried out at a qualified spe-
cialist workshop. Flat tyre
313Practical advice
* optional
212_AKB; 2; 4, en-GB
mkalafa,
Version: 2.11.8.1 2009-05-05T14:17:16+02:00 - Seite 313 Z
Dateiname: 6515346702_buchblock.pdf; erzeugt am 07. May 2009 14:17:21; WK
Page 317 of 373
When a tyre pressure of at least 1.8 bar
is reached:
X Press on/off switch =on the electric air
pump to 0.
The electric air pump is switched off.
X Remove the TIREFIT kit from the wheel.
! After use, excess TIREFIT may run out of
the filler hose. This may cause stains.
Therefore, place the filler hose in the plastic
which contained the TIREFIT kit.
X Stow away the TIREFIT kit, the electric air
pump and the warning triangle.
X Pull away immediately.
X Stop after driving for approximately ten
minutes and check the tyre pressure with
the electric air pump. G
Risk of accident
If the tyre pressure is now lower than 1.3 bar,
the tyre is too badly damaged. Do not drive
any further. Consult a qualified specialist
workshop which has the necessary specialist
knowledge and tools to carry out the work
required. Mercedes-Benz recommends that
you use a Mercedes-Benz Service Centre for
this purpose. In particular, work relevant to
safety or on safety-related systems must be
carried out at a qualified specialist workshop. X
If the tyre pressure is still at least 1.3 bar,
correct it (see fuel filler flap for values).
To increase the tyre pressure: switch on
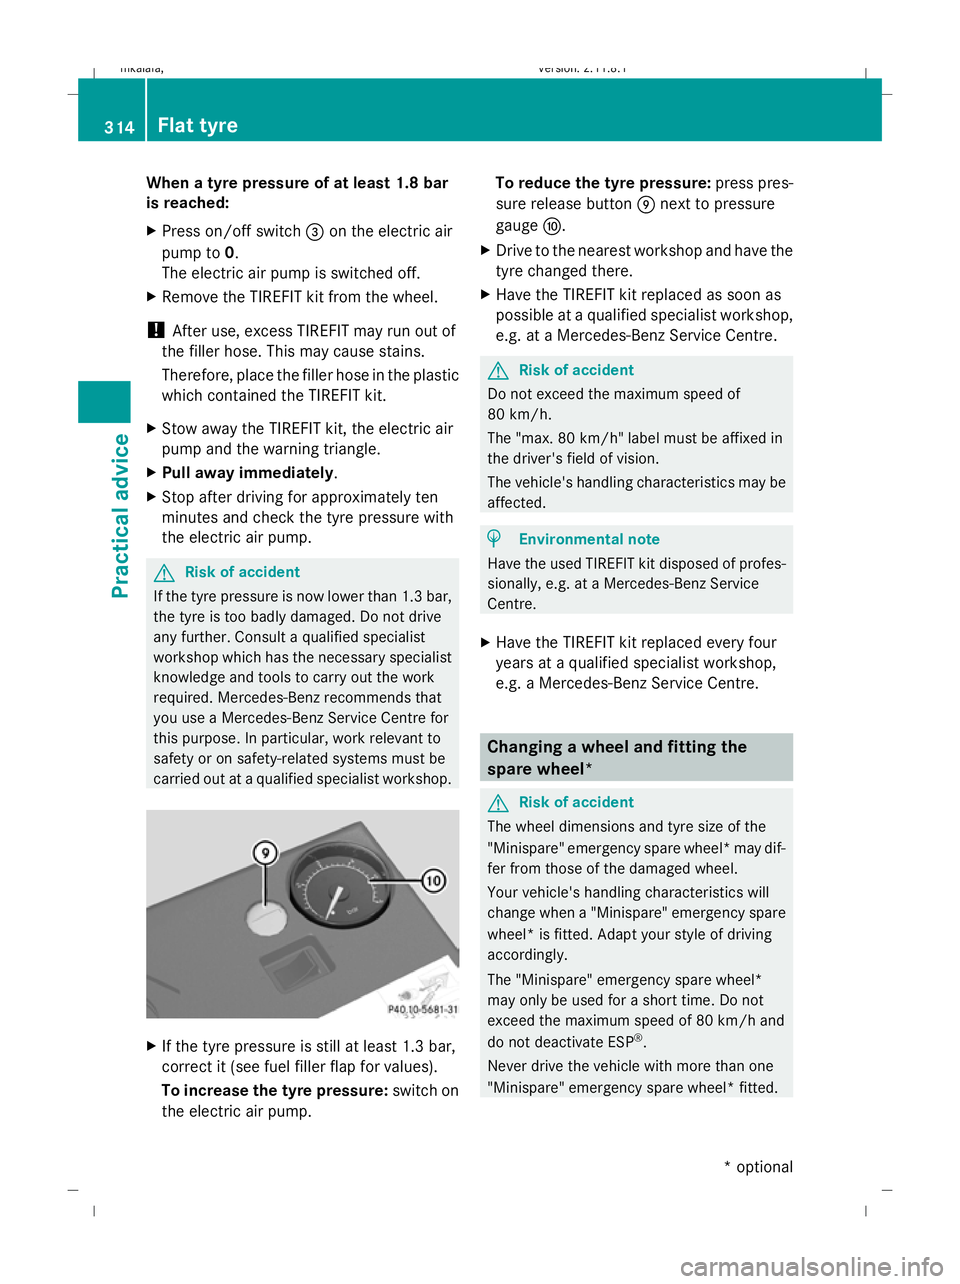
the electric air pump. To reduce the tyre pressure:
press pres-
sure release button Enext to pressure
gauge F.
X Drive to the nearest workshop and have the
tyre changed there.
X Have the TIREFIT kit replaced as soon as
possible at a qualified specialist workshop,
e.g. at a Mercedes-Benz Service Centre. G
Risk of accident
Do not exceed the maximum speed of
80 km/h.
The "max. 80 km/h" label must be affixed in
the driver's field of vision.
The vehicle's handling characteristics may be
affected. H
Environmental note
Have the used TIREFIT kit disposed of profes-
sionally, e.g. at a Mercedes-Benz Service
Centre.
X Have the TIREFIT kit replaced every four
years at a qualified specialist workshop,
e.g. a Mercedes-Benz Service Centre. Changing a wheel and fitting the
spare wheel*
G
Risk of accident
The wheel dimensions and tyre size of the
"Minispare" emergency spare wheel* may dif-
fer from those of the damaged wheel.
Your vehicle's handling characteristics will
change when a "Minispare" emergency spare
wheel* is fitted. Adapt your style of driving
accordingly.
The "Minispare" emergency spare wheel*
may only be used for a short time. Do not
exceed the maximum speed of 80 km/h and
do not deactivate ESP ®
.
Never drive the vehicle with more than one
"Minispare" emergency spare wheel* fitted. 314
Flat tyrePractical advice
* optional
212_AKB; 2; 4, en-GB
mkalafa,
Version: 2.11.8.1 2009-05-05T14:17:16+02:00 - Seite 314
Dateiname: 6515346702_buchblock.pdf; erzeugt am 07. May 2009 14:17:22; WK
Page 318 of 373
G
Risk of accident
Have the collapsible emergency spare
wheel *replaced with a new wheel as soon as
possible at a qualified specialist workshop
which has the necessary specialist knowledge
and tools to carry out the work required.
Mercedes-Benz recommends that you use a
Mercedes-Benz Service Centre for this pur-
pose. In particular, work relevant to safety or
on safety-related systems must be carried out
at a qualified specialist workshop.
Preparing the vehicle i
Vehicles without a spare wheel* are not
equipped with a vehicle tool kit at the fac-
tory. For more information on which tools
are required to perform a wheel change on
your vehicle, e.g. wheel chock, jack, cen-
tring pin or wheel wrench, consult a
Mercedes-Benz Service Centre.
X Prepare the vehicle as described
(Y page 309).
X If a trailer is coupled, uncouple it.
X Place the wheels in the straight-ahead posi-
tion.
X Remove the following items from the stow-
age well under the boot/luggage compart-
ment floor:
R the "Minispare" emergency spare
wheel*
R the vehicle tool kit
R the folding wheel chock
R the jack
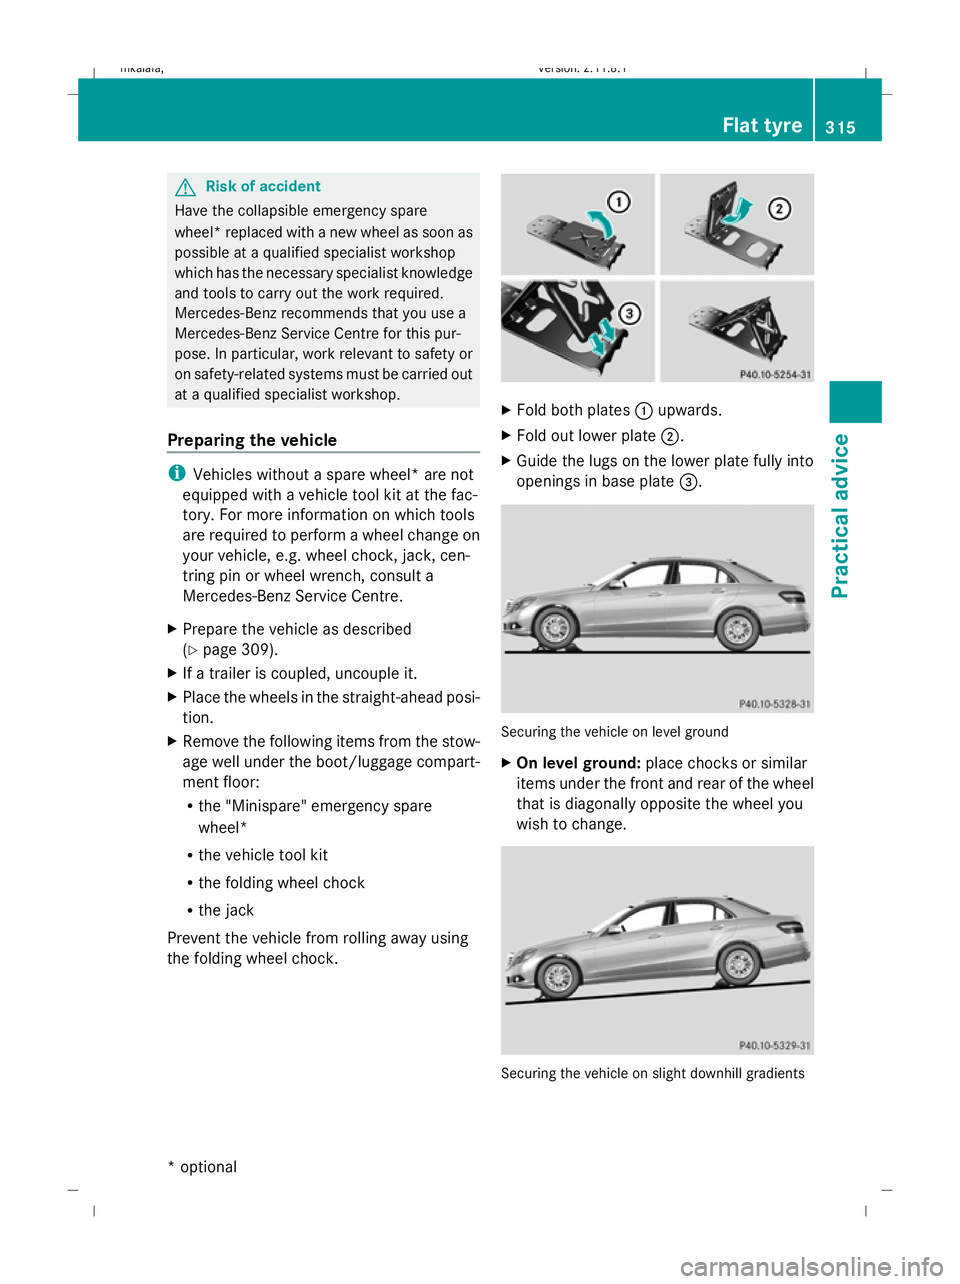
Prevent the vehicle from rolling away using
the folding wheel chock. X
Fold both plates :upwards.
X Fold out lower plate ;.
X Guide the lugs on the lower plate fully into
openings in base plate =. Securing the vehicle on level ground
X
On level ground: place chocks or similar
items under the front and rear of the wheel
that is diagonally opposite the wheel you
wish to change. Securing the vehicle on slight downhill gradients Flat tyre
315Practical advice
* optional
212_AKB; 2; 4, en-GB
mkalafa,
Version: 2.11.8.1 2009-05-05T14:17:16+02:00 - Seite 315 Z
Dateiname: 6515346702_buchblock.pdf; erzeugt am 07. May 2009 14:17:22; WK
Page 319 of 373
X
On downhill gradients: place foldable
chocks or similar items behind the wheels
of the front and rear axle. X
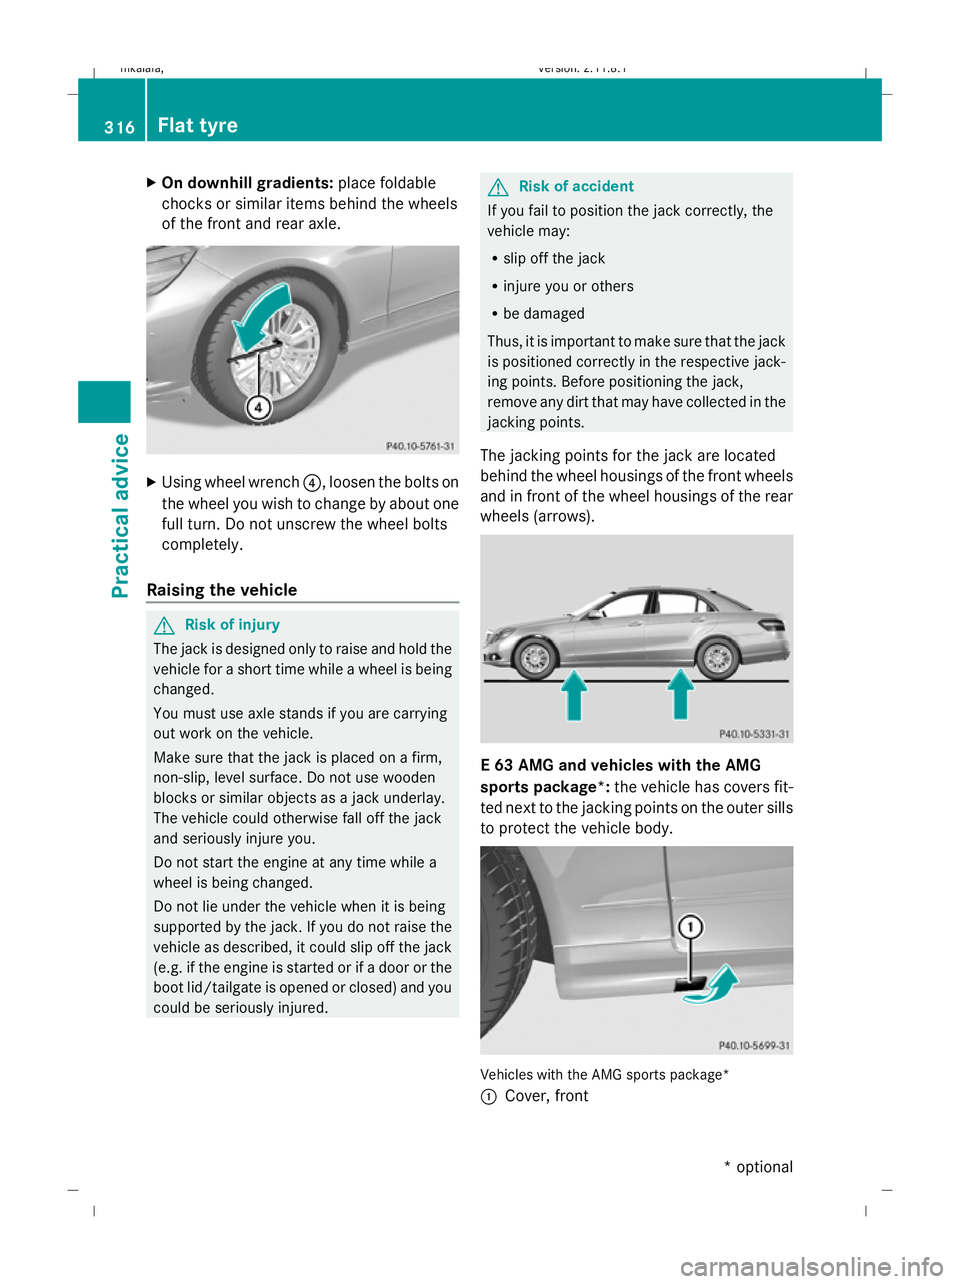
Using wheel wrench ?, loosen the bolts on
the wheel you wish to change by about one
full turn. Do not unscrew the wheel bolts
completely.
Raising the vehicle G
Risk of injury
The jack is designed only to raise and hold the
vehicle for a short time while a wheel is being
changed.
You must use axle stands if you are carrying
out work on the vehicle.
Make sure that the jack is placed on a firm,
non-slip, level surface. Do not use wooden
blocks or similar objects as a jack underlay.
The vehicle could otherwise fall off the jack
and seriously injure you.
Do not start the engine at any time while a
wheel is being changed.
Do not lie under the vehicle when it is being
supported by the jack. If you do not raise the
vehicle as described, it could slip off the jack
(e.g. if the engine is started or if a door or the
boot lid/tailgate is opened or closed) and you
could be seriously injured. G
Risk of accident
If you fail to position the jack correctly, the
vehicle may:
R slip off the jack
R injure you or others
R be damaged
Thus, it is important to make sure that the jack
is positioned correctly in the respective jack-
ing points. Before positioning the jack,
remove any dirt that may have collected in the
jacking points.
The jacking points for the jack are located
behind the wheel housings of the front wheels
and in front of the wheel housings of the rear
wheels (arrows). E 63 AMG and vehicles with the AMG
sports package*:
the vehicle has covers fit-
ted next to the jacking points on the outer sills
to protect the vehicle body. Vehicles with the AMG sports package*
:
Cover, front 316
Flat tyrePractical advice
* optional
212_AKB; 2; 4, en-GB
mkalafa,
Version: 2.11.8.1 2009-05-05T14:17:16+02:00 - Seite 316
Dateiname: 6515346702_buchblock.pdf; erzeugt am 07. May 2009 14:17:23; WK
Page 320 of 373
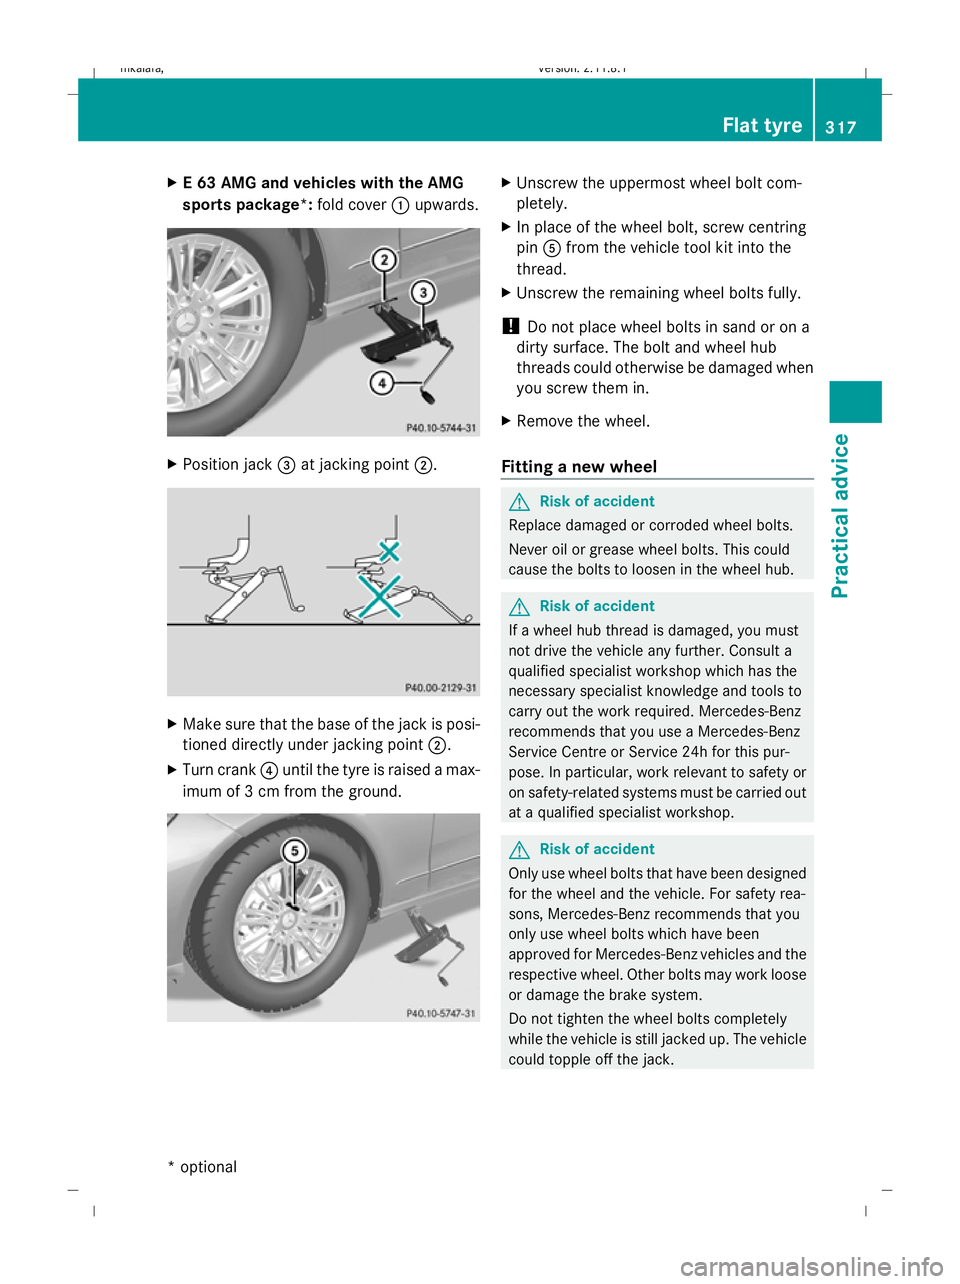
X
E 63 AMG and vehicles with the AMG
sports package*: fold cover:upwards. X
Position jack =at jacking point ;. X
Make sure that the base of the jack is posi-
tioned directly under jacking point ;.
X Turn crank ?until the tyre is raised a max-
imum of 3 cm from the ground. X
Unscrew the uppermost wheel bolt com-
pletely.
X In place of the wheel bolt, screw centring
pin Afrom the vehicle tool kit into the
thread.
X Unscrew the remaining wheel bolts fully.
! Do not place wheel bolts in sand or on a
dirty surface. The bolt and wheel hub
threads could otherwise be damaged when
you screw them in.
X Remove the wheel.
Fitting a new wheel G
Risk of accident
Replace damaged or corroded wheel bolts.
Never oil or grease wheel bolts. This could
cause the bolts to loosen in the wheel hub. G
Risk of accident
If a wheel hub thread is damaged, you must
not drive the vehicle any further. Consult a
qualified specialist workshop which has the
necessary specialist knowledge and tools to
carry out the work required. Mercedes-Benz
recommends that you use a Mercedes-Benz
Service Centre or Service 24h for this pur-
pose. In particular, work relevant to safety or
on safety-related systems must be carried out
at a qualified specialist workshop. G
Risk of accident
Only use wheel bolts that have been designed
for the wheel and the vehicle. For safety rea-
sons, Mercedes-Benz recommends that you
only use wheel bolts which have been
approved for Mercedes-Benz vehicles and the
respective wheel. Other bolts may work loose
or damage the brake system.
Do not tighten the wheel bolts completely
while the vehicle is still jacked up. The vehicle
could topple off the jack. Flat tyre
317Practical advice
* optional
212_AKB; 2; 4, en-GB
mkalafa,
Version: 2.11.8.1 2009-05-05T14:17:16+02:00 - Seite 317 Z
Dateiname: 6515346702_buchblock.pdf; erzeugt am 07. May 2009 14:17:23; WK