flat tire MERCEDES-BENZ E-Class WAGON 2013 W212 Owner's Guide
[x] Cancel search | Manufacturer: MERCEDES-BENZ, Model Year: 2013, Model line: E-Class WAGON, Model: MERCEDES-BENZ E-Class WAGON 2013 W212Pages: 420, PDF Size: 14.26 MB
Page 366 of 420
Selecting, mounting and replacing
tires
R Only mount tires and wheels of the same
type and make.
R Only mount tires of the correct size onto
the wheels.
R Break in new tires at moderate speeds for
the
first 60 miles (100 km). They only reach
their full performance after this distance.
R Do not drive with tires which have too little
tread depth, as this significantly reduces
the traction on wet roads (hydroplaning).
R Replace the tires after six years at the
latest, regardless of wear.
Observe the notes on the emergency spare
wheel (Y page 398). MOExtended tires (tires with run-flat
properties)
With MOExtended tires (tires with run flat
characteristics), you can continue to drive
your vehicle even if there is a total loss of
pressure in one or more tires.
MOExtended tires may only be used in
conjunction with an active tire pressure loss
warning
system or with an active tire pressure
monitor and on wheels specifically tested by
Mercedes-Benz.
Notes on driving with MOExtended tires with
a flat tire ( Y page 344).
i Vehicles equipped with MOExtended tires
are not equipped with a TIREFIT kit at the
factory. It is therefore recommended that
you additionally equip your vehicle with a
TIREFIT kit if you mount tires that do not
feature run-flat properties, e.g. winter tires.
A TIREFIT kit can be obtained from a
qualified specialist workshop. Winter operation
General notes
Have
your vehicle winterproofed at a qualified
specialist workshop at the onset of winter.
Observe the notes in the "Changing a wheel"
section ( Y page 384). Driving with summer tires
At
temperatures below 45 ‡ (+7 †), summer
tires lose elasticity significantly, and
therefore traction and braking power as well.
Change the tires on your vehicle to
M+S tires. Using summer tires at very cold
temperatures could cause cracks to form,
thereby damaging the tires permanently.
Mercedes-Benz cannot accept responsibility
for this type of damage. M+S tires
G
WARNING
M+S tires with a tire tread depth of less than
ã
in (4 mm) are not suitable for use in winter
and do not provide sufficient traction. There
is a risk of an accident.
M+S tires with a tread depth of less than ã
in (4 mm) must be replaced immediately.
At temperatures below 45 ‡ (+7 †), use
winter tires or all-weather tires. Both types of
tire are identified by the M+S marking.
Only winter tires bearing the i snowflake
symbol in addition to the M+S marking
provide the best possible grip in wintry road
conditions.
Only these tires will allow driving safety
systems such as ABS and ESP ®
to function
optimally in winter. These tires have been
developed specifically for driving in snow.
Use M+S tires of the same make and tread on
all wheels to maintain safe handling
characteristics. 364
Winter operation
Wheels and tires
Page 368 of 420

Tire pressure
Tire pressure specifications
Important safety notes G
WARNING
Tires with tire pressures that are too low or
too high are associated with the following
hazards:
R they
can burst, in particular if the vehicle is
heavily laden or when driven at high
speeds.
R the tires can wear excessively and/or
unevenly, which can severely impair tire
traction.
R the driving, steering and braking
characteristics may be severely impaired.
There is a risk of accident.
Follow recommended tire inflation pressures
and check the pressure of all the tires
including the spare wheel:
R monthly, at least
R if the load changes
R before beginning a long journey
R under different operating conditions, e.g.
off-road driving
If necessary, correct the tire pressure.
i The specifications on the sample Tire and
Loading Information placard and tire
pressure tables are examples. Tire
pressure specifications are vehicle-specific
and may deviate from the data shown here.
The tire pressure specifications that are
valid for your vehicle can be found on the
Tire and Loading Information placard and
tire pressure table on the vehicle.
General notes The recommended tire pressures for the tires
mounted at the factory can be found on the
labels described here.
Operation with the emergency spare
wheel
(Y page 398). Further information on tire pressures can be
obtained at a qualified specialist workshop.
Tire and Loading Information placard
:
Recommended tire pressures
The Tire and Loading Information placard is
on the B-pillar on the driver's side
(Y page 373).
The Tire and Loading Information placard
contains
the recommended tire pressures for
cold tires. The recommended tire pressures
are valid for the maximum permissible load
and up to the maximum permissible vehicle
speed.
Tire pressure table The tire pressure table is on the inside of the
fuel filler flap.
Example: tire pressure table for all tires permitted
for this vehicle by the factory
The tire pressure table contains the
recommended pressures for cold tires for
various operating conditions, i.e. differing
load and speed conditions.366
Tire pressure
Wheels and tires
Page 370 of 420

The tires are cold:
R
if the vehicle has been parked without
direct
sunlight on the tires for at least three
hours and
R if the vehicle has been driven for less than
1 mile (1.6 km).
The tire temperature changes depending on
the outside temperature, the vehicle speed
and the tire load. If the tire temperature
changes by 18 ‡ (10 †), the tire pressure
changes by approximately 10 kPa (0.1 bar/
1.5 psi). Take this into account when
checking the pressure of warm tires. Only
correct the tire pressure if it is too low for the
current operating conditions. If you check the
tire pressure when the tires are warm, the
resulting value will be higher than if the tires
were cold. This is normal. Do not reduce the
tire pressure to the value specified for cold
tires. The tire pressure would otherwise be
too low.
Observe the recommended tire pressures for
cold tires:
R on the Tire and Loading Information placard
on the B-pillar on the driver's side
R in the tire pressure table on the inside of
the fuel filler flap
R on the yellow label on the emergency spare
wheel (depending on the vehicle
equipment) Underinflated or overinflated tires
Underinflation G
WARNING
Tires with pressure that is too low can
overheat and burst as a consequence. In
addition,
they also suffer from excessive and/
or irregular wear, which can severely impair
the braking properties and the driving
characteristics. There is a risk of an accident.
Avoid tire pressures that are too low in all the
tires, including the spare wheel. Underinflated tires may:
R
overheat, leading to tire defects
R have an adverse effect on handling
characteristics
R wear quickly and unevenly
R have
an adverse effect on fuel consumption
Overinflation G
WARNING
Tires with excessively high pressure can burst
because they are damaged more easily by
road debris, potholes etc. In addition, they
also suffer from irregular wear, which can
severely
impair the braking properties and the
driving characteristics. There is a risk of an
accident.
Avoid tire pressures that are too high in all the
tires, including the spare wheel.
Overinflated tires may:
R increase the braking distance
R have an adverse effect on handling
characteristics
R wear quickly and unevenly
R have an adverse effect on ride comfort
R be more susceptible to damage
Maximum tire pressures :
Example: maximum permissible tire
pressure
Never exceed the maximum permissible tire
inflation pressure. Always observe the
recommended tire pressure for your vehicle 368
Tire pressure
Wheels and tires
Page 372 of 420
Restarting the tire pressure loss
warning system
Restart the tire pressure loss warning system
if you have:
R
changed the tire pressure
R changed the wheels or tires
R mounted new wheels or tires
X Before restarting, make sure that the tire
pressures are set properly on all four tires
for the respective operating conditions.
The recommended tire pressures can be
found on the Tire and Loading Information
placard on the B-pillar
on the driver's side
or the tire pressure table on the fuel filler
flap. The tire pressure loss warning system
can only give reliable warnings if you have
set the correct tire pressure. If an incorrect
tire pressure is set, these incorrect values
will be monitored.
X Also observe the notes in the section on tire
pressures ( Y page 366).
X Make sure that the SmartKey is in
position 2 (Y
page 153) in the ignition lock.
X Press = or ; on the steering wheel
to select the Serv.Serv. menu.
X Press the 9 or : button to select
Tire Pressure.
X Press the a button.
The message appears in the multifunction
display.
If you wish to confirm the restart:
X Press the a button.
The Tire Pressure Now OK? message
appears in the multifunction display.
X Press the 9 or : button to select
Yes.
X Press the a button.
The Run Flat Indicator Restarted
message appears in the multifunction
display.
After a teach-in period, the tire pressure
loss warning system will monitor the set
tire pressures of all four tires. If you wish to cancel the restart:
X
Press the % button.
or
X When the Tire Pressure Now OK?
message appears, press the 9
or : button to select Cancel.
X Press the a button.
The tire pressure values stored at the last
restart will continue to be monitored. Tire pressure monitor
Important safety notes G
WARNING
Each tire, including the spare (if provided),
should be checked at least once a month
when cold and inflated to the pressure
recommended by the vehicle manufacturer
on the Tire and Loading Information placard
on the driver's door B-pillar or the tire
pressure label on the inside of the fuel filler
flap.
If your vehicle has tires of a different size
than the size indicated on the Tire and Loading
Information placard or the tire pressure label,
you should determine the proper tire pressure
for those tires.
As an added safety feature, your vehicle has
been equipped with a tire pressure monitoring
system (TPMS) that illuminates a low tire
pressure telltale when one or more of your
tires are significantly underinflated.
Accordingly, when the low tire pressure
telltale illuminates, you should stop and check
your tires as soon as possible, and inflate
them to the proper pressure. Driving on a
significantly underinflated tire causes the tire
to overheat and can lead to tire failure.
Underinflation also reduces fuel efficiency
and tire tread life, and may affect the vehicle's
handling and stopping ability.
Please note that the TPMS is not a substitute
for proper tire maintenance, and it is the
driver's responsibility to maintain correct tire
pressure, even if underinflation has not 370
Tire pressure
Wheels and tires
Page 380 of 420
Mercedes-Benz recommends a minimum
tread
depth of ã in (4 mm) on all four winter
tires. Observe the legally required minimum
tire tread depth (Y page 363). Winter tires can
reduce the braking distance on snow-covered
surfaces in comparison with summer tires.
The braking distance is still much further than
on surfaces that are not icy or covered with
snow. Take appropriate care when driving.
Further information on winter tires (M+S
tires) (Y page 364).
Temperature G
WARNING
The temperature grade for this tire is
established for a tire that is properly inflated
and not overloaded. Excessive speed,
underinflation, or excessive loading, either
separately or in combination, can cause
excessive heat build-up and possible tire
failure.
The temperature grades are A (the highest),
B, and C. These represent the tire's
resistance to the generation of heat and its
ability to dissipate heat when tested under
controlled conditions on a specified indoor
laboratory test wheel. Sustained high
temperature
can cause the material of the tire
to degenerate and reduce tire life, and
excessive temperature can lead to sudden
tire failure. The grade C corresponds to a level
of performance which all passenger car tires
must meet under the Federal Motor Vehicle
Safety Standard No. 109. Grades B and A
represent higher levels of performance on the
laboratory test wheel than the minimum
required by law. Tire labeling
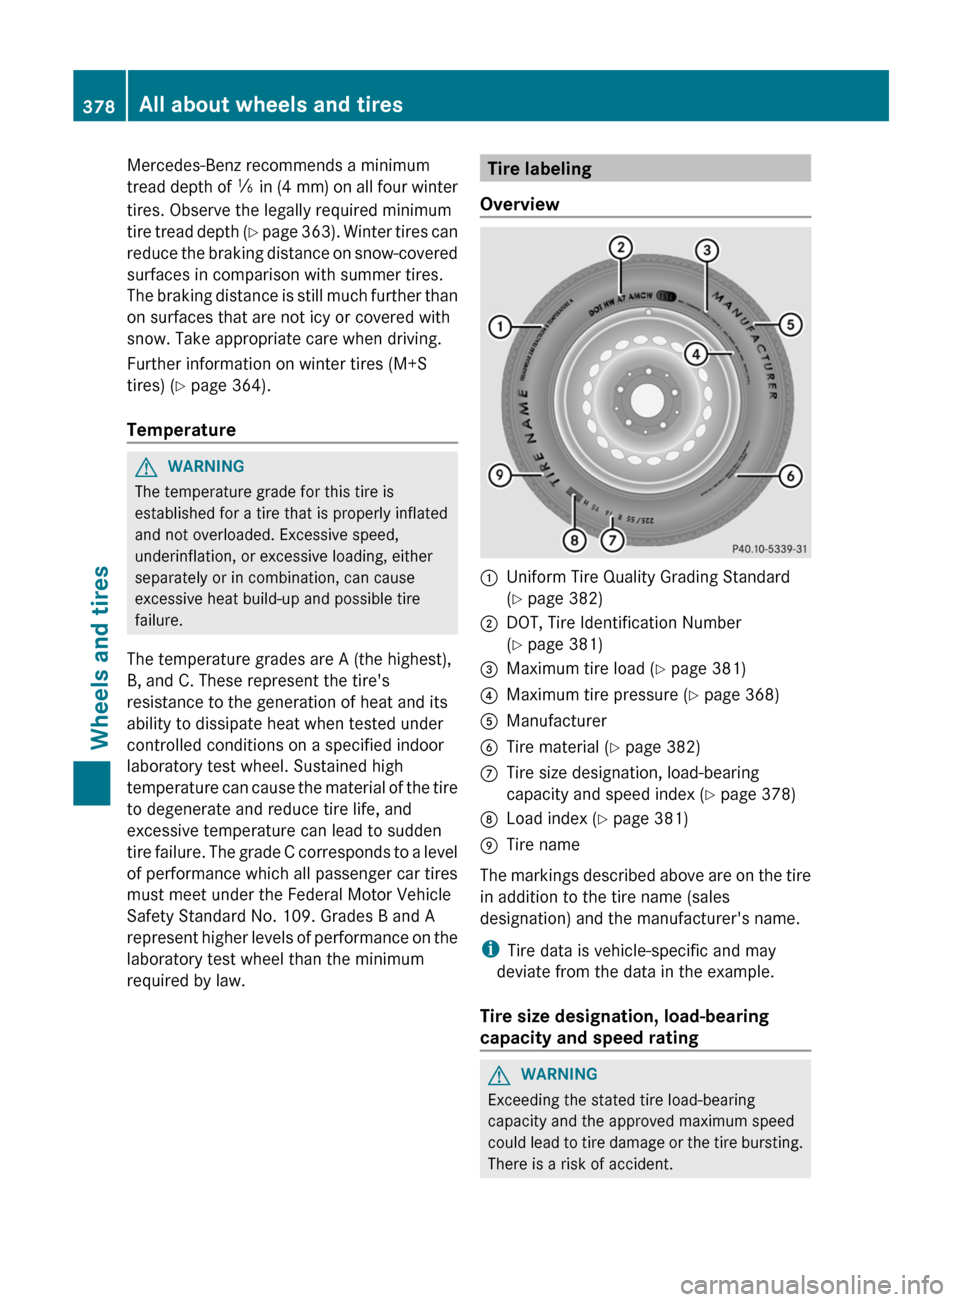
Overview :
Uniform Tire Quality Grading Standard
(Y page 382)
; DOT, Tire Identification Number
(Y page 381)
= Maximum tire load ( Y page 381)
? Maximum tire pressure (Y page 368)
A Manufacturer
B Tire material ( Y page 382)
C Tire size designation, load-bearing
capacity and speed index
(Y page 378)
D Load index ( Y page 381)
E Tire name
The markings described above are on the tire
in addition to the tire name (sales
designation) and the manufacturer's name.
i Tire data is vehicle-specific and may
deviate from the data in the example.
Tire size designation, load-bearing
capacity and speed rating G
WARNING
Exceeding the stated tire load-bearing
capacity and the approved maximum speed
could
lead to tire damage or the tire bursting.
There is a risk of accident. 378
All about wheels and tires
Wheels and tires
Page 386 of 420
Tread
The part of the tire that comes into contact
with the road.
Bead
The tire bead ensures that the tire sits
securely
on the wheel. There are several steel
wires in the bead to prevent the tire from
coming loose from the wheel rim.
Sidewall
The part of the tire between the tread and the
bead.
Weight of optional extras
The combined weight of those optional extras
that weigh more than the replaced standard
parts and more than 2.3 kilograms (5 lbs).
These optional extras, such as high-
performance brakes, level control, a roof rack
or a high-performance battery, are not
included in the curb weight and the weight of
the accessories.
TIN (Tire Identification Number)
This is a unique identifier which can be used
by a tire manufacturer to identify tires, for
example for a product recall, and thus identify
the purchasers. The TIN is made up of the
manufacturer's identity code, tire size, tire
type code and the manufacturing date.
Load bearing index
The load bearing index (also load index) is a
code that contains the maximum load bearing
capacity of a tire.
Traction
Traction is the result of friction between the
tires and the road surface.
Treadwear indicators
Narrow bars (tread wear bars) that are
distributed over the tire tread. If the tire tread
is level with the bars, the wear limit of á in
(1.6 mm) has been reached. Occupant distribution
The distribution of occupants in a vehicle at
their designated seating positions.
Total load limit
Rated cargo and luggage load plus
68 kilograms (150 lb) multiplied by the
number of seats in the vehicle.
Changing a wheel
Flat tire
You
can find information on what to do in the
event of a flat tire in the "Breakdown
assistance" section (Y page 344).
Instructions for driving with MOExtended
tires in the event of a flat tire are also provided
there.
The "Breakdown assistance" section
(Y page 344) contains information and notes
on how to deal with a flat tire. Instructions for
driving with MOExtended tires in the event of
a flat tire are also provided there. Interchanging the wheels
G
WARNING
Interchanging the front and rear wheels may
severely impair the driving characteristics if
the
wheels or tires have different dimensions.
The wheel brakes or suspension components
may also be damaged. There is a risk of
accident.
Rotate front and rear wheels only if the wheels
and tires are of the same dimensions.
! On vehicles equipped with a tire pressure
monitor, electronic components are
located in the wheel.
Tire-mounting tools should not be used
near the valve. This could damage the
electronic components.
Only have tires changed at a qualified
specialist workshop. 384
Changing a wheel
Wheels and tires
Page 389 of 420
R
before raising the vehicle, secure it from
rolling away by applying the parking brake
and inserting wheel chocks. Never
disengage the parking brake while the
vehicle is raised.
R the jack must be placed on a firm, flat and
non-slip surface. On a loose surface, a
large,
load-bearing underlay must be used.
On a slippery surface, a non-slip underlay
must be used, e.g. rubber mats.
R do not use wooden blocks or similar
objects as a jack underlay. Otherwise, the
jack will not be able to achieve its load-
bearing capacity due to the restricted
height.
R the maximum clearance between the
underside of the tire and the ground must
be 1.2 in (3 cm).
R never place your hands and feet under the
raised vehicle.
R never lie under the raised vehicle.
R never start the engine when the vehicle is
raised.
R never open or close a door or the trunk lid/
tailgate when the vehicle is raised.
R make sure that no persons are present in
the vehicle when the vehicle is raised. X
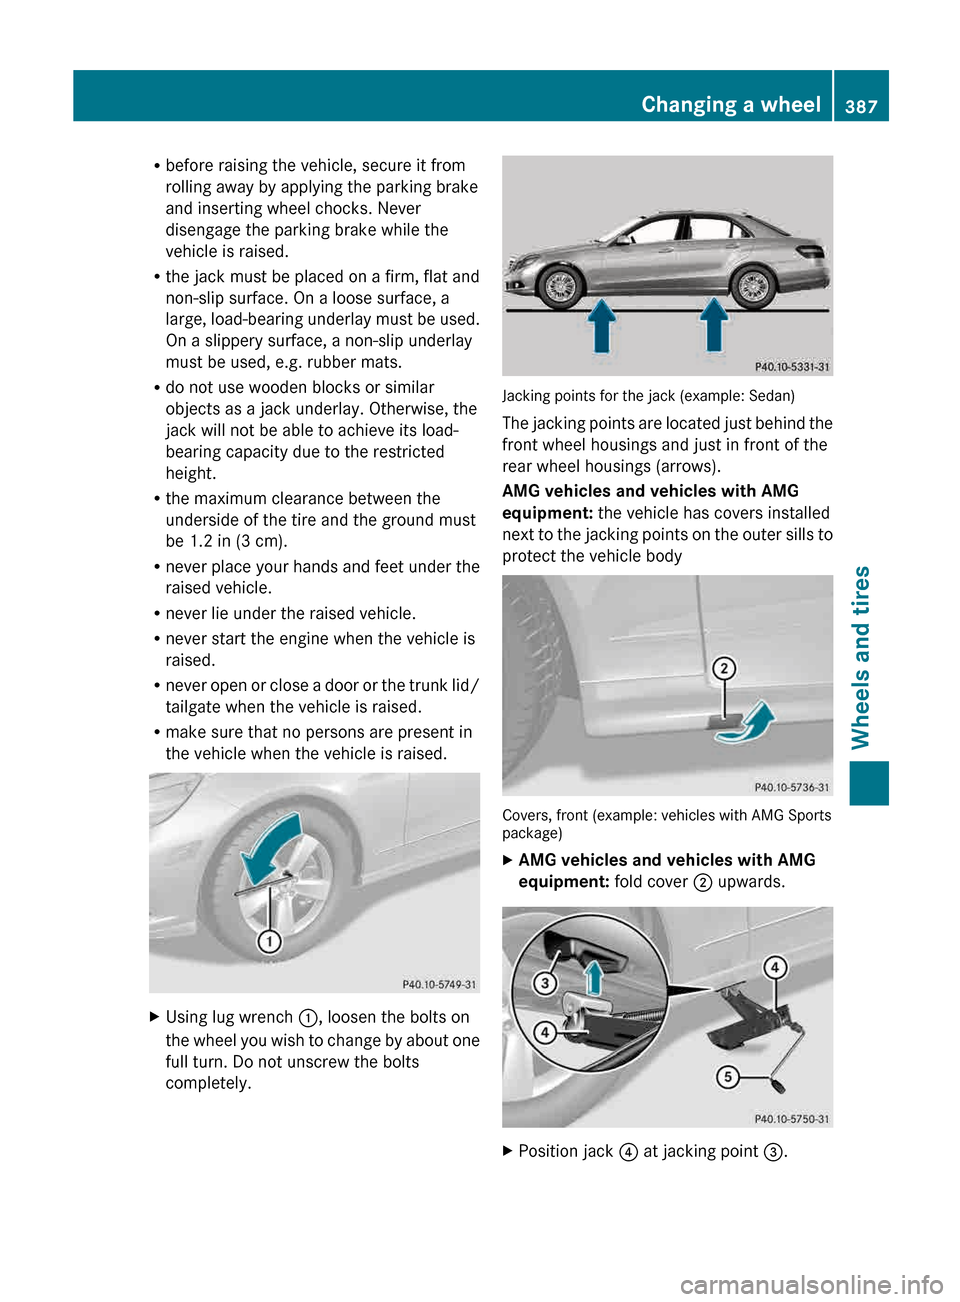
Using lug wrench :, loosen the bolts on
the
wheel you wish to change by about one
full turn. Do not unscrew the bolts
completely. Jacking points for the jack (example: Sedan)
The
jacking points are located just behind the
front wheel housings and just in front of the
rear wheel housings (arrows).
AMG vehicles and vehicles with AMG
equipment: the vehicle has covers installed
next to the jacking points on the outer sills to
protect the vehicle body Covers, front (example: vehicles with AMG Sports
package)
X
AMG vehicles and vehicles with AMG
equipment: fold cover ; upwards. X
Position jack ? at jacking point =. Changing a wheel
387
Wheels and tires Z
Page 391 of 420
!
To prevent damage to the paintwork, hold
the wheel securely against the wheel hub
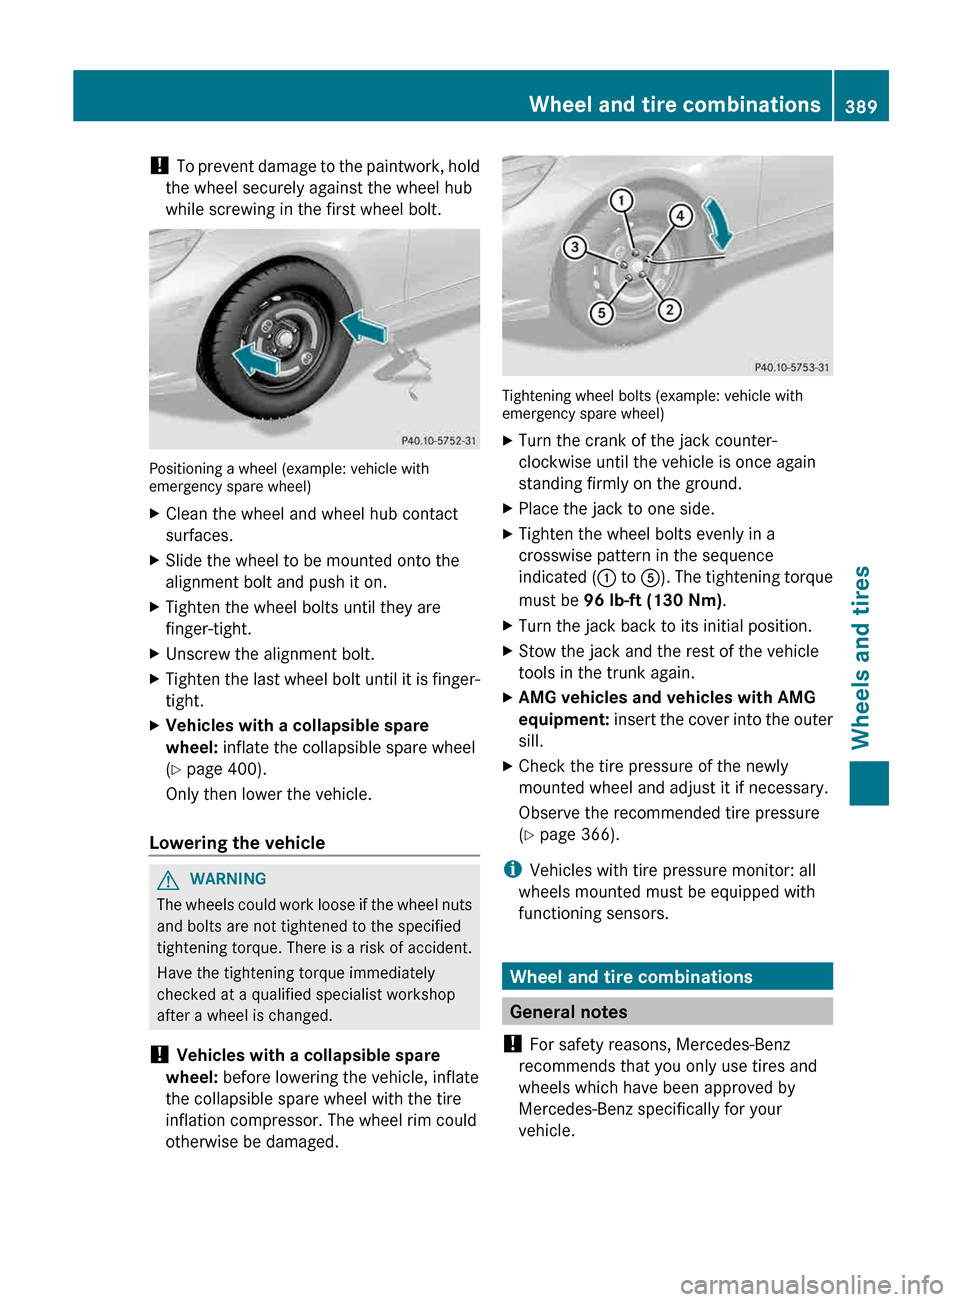
while screwing in the first wheel bolt. Positioning a wheel (example: vehicle with
emergency spare wheel)
X
Clean the wheel and wheel hub contact
surfaces.
X Slide the wheel to be mounted onto the
alignment bolt and push it on.
X Tighten the wheel bolts until they are
finger-tight.
X Unscrew the alignment bolt.
X Tighten the last wheel bolt until it is finger-
tight.
X Vehicles with a collapsible spare
wheel: inflate the collapsible spare wheel
(Y page 400).
Only then lower the vehicle.
Lowering the vehicle G
WARNING
The wheels could work loose if the wheel nuts
and bolts are not tightened to the specified
tightening torque. There is a risk of accident.
Have the tightening torque immediately
checked at a qualified specialist workshop
after a wheel is changed.
! Vehicles with a collapsible spare
wheel: before lowering the vehicle, inflate
the collapsible spare wheel with the tire
inflation compressor. The wheel rim could
otherwise be damaged. Tightening wheel bolts (example: vehicle with
emergency spare wheel)
X
Turn the crank of the jack counter-
clockwise until the vehicle is once again
standing firmly on the ground.
X Place the jack to one side.
X Tighten the wheel bolts evenly in a
crosswise pattern in the sequence
indicated ( :
to A). The tightening torque
must be 96 lb-ft (130 Nm).
X Turn the jack back to its initial position.
X Stow the jack and the rest of the vehicle
tools in the trunk again.
X AMG vehicles and vehicles with AMG
equipment:
insert the cover into the outer
sill.
X Check the tire pressure of the newly
mounted wheel and adjust it if necessary.
Observe the recommended tire pressure
(Y page 366).
i Vehicles with tire pressure monitor: all
wheels mounted must be equipped with
functioning sensors. Wheel and tire combinations
General notes
! For safety reasons, Mercedes-Benz
recommends that you only use tires and
wheels which have been approved by
Mercedes-Benz specifically for your
vehicle. Wheel and tire combinations
389
Wheels and tires Z
Page 392 of 420
These tires have been specially adapted for
use with the control systems, such as ABS
or ESP
®
, and are marked as follows:
R MO = Mercedes-Benz Original
R MOE
= Mercedes-Benz Original Extended
(tires featuring run-flat characteristics)
R MO1 = Mercedes-Benz Original (only
certain AMG tires)
Mercedes-Benz Original Extended tires
may only be used on wheels that have been
specifically approved by Mercedes-Benz.
Only use tires, wheels or accessories
tested and approved by Mercedes-Benz.
Certain characteristics, e.g. handling,
vehicle noise emissions or fuel
consumption, may otherwise be adversely
affected. In addition, when driving with a
load, tire dimension variations could cause
the tires to come into contact with the
bodywork and axle components. This could
result in damage to the tires or the vehicle.
Mercedes-Benz accepts no liability for
damage resulting from the use of tires,
wheels or accessories other than those
tested and approved.
Information on tires, wheels and approved
combinations can be obtained from any
qualified specialist workshop.
Overview of abbreviations used in the
following tire tables:
R BA: both axles
R FA: front axle
R RA: rear axle
The recommended pressures for various
operating conditions can be found:
R on the Tire and Loading Information placard
with the recommended tire pressures on
the B-pillar on the driver's side
R in the tire pressure table on the inside of
the fuel filler flap
Observe the notes on recommended tire
pressures under various operating conditions
(Y page 366). Check tire pressures regularly, and only when
the tires are cold. Comply with the
maintenance recommendations of the tire
manufacturer
in the vehicle document wallet.
Notes on the vehicle equipment – always
equip the vehicle with:
R tires of the same size on a given axle (left/
right)
R the same type of tires at a given time
(summer tires, winter tires, MOExtended
tires)
Vehicles with MOExtended tires are not
equipped with a TIREFIT kit at the factory. It
is therefore recommended that you
additionally equip your vehicle with a TIREFIT
kit if you mount tires that do not feature run-
flat properties, e.g. winter tires. A TIREFIT kit
may be obtained from a qualified specialist
workshop.
i Not all wheel and tire combinations are
available at the factory for all countries.
i On the following pages, you can find
information on approved wheel rims and
tire sizes for equipping your vehicle with
winter tires. Winter tires are not available
at the factory as standard equipment or
optional extras.
If you would like to equip your vehicle with
approved winter tires, you may also, in
certain circumstances, require rims of the
appropriate size. The sizes of the approved
winter tires may deviate from that of the
standard tires. This is dependent on the
model and the equipment installed at the
factory.
The tires and wheel rims, as well as further
information, can be obtained at a qualified
specialist workshop. 390
Wheel and tire combinations
Wheels and tires
Page 393 of 420
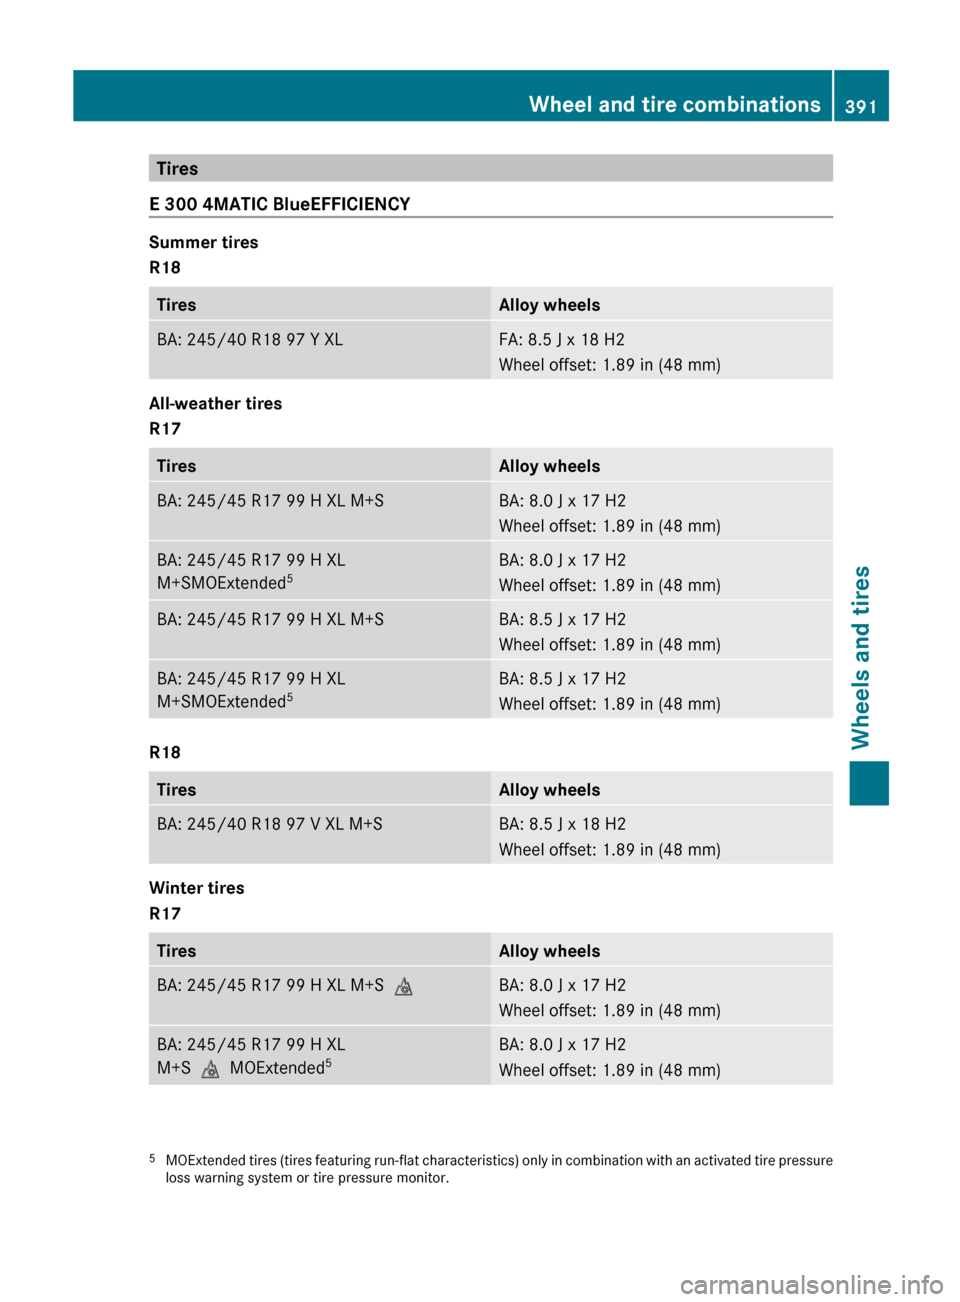
Tires
E 300 4MATIC BlueEFFICIENCY Summer tires
R18
Tires Alloy wheels
BA: 245/40 R18 97 Y XL FA: 8.5 J x 18 H2
Wheel offset: 1.89 in
(48 mm)All-weather tires
R17
Tires Alloy wheels
BA: 245/45 R17 99 H XL M+S BA: 8.0 J x 17 H2
Wheel offset: 1.89 in
(48 mm)BA: 245/45 R17 99 H XL
M+SMOExtended
5 BA: 8.0 J x 17 H2
Wheel offset: 1.89 in
(48 mm)BA: 245/45 R17 99 H XL M+S BA: 8.5 J x 17 H2
Wheel offset: 1.89 in
(48 mm)BA: 245/45 R17 99 H XL
M+SMOExtended
5 BA: 8.5 J x 17 H2
Wheel offset: 1.89 in
(48 mm)R18
Tires Alloy wheels
BA: 245/40 R18 97 V XL M+S BA: 8.5 J x 18 H2
Wheel offset: 1.89 in
(48 mm)Winter tires
R17
Tires Alloy wheels
BA: 245/45 R17 99 H XL M+S
i BA: 8.0 J x 17 H2
Wheel offset: 1.89 in
(48 mm)BA: 245/45 R17 99 H XL
M+S
iMOExtended 5 BA: 8.0 J x 17 H2
Wheel offset: 1.89 in
(48 mm)5
MOExtended
tires (tires featuring run-flat characteristics) only in combination with an activated tire pressure
loss warning system or tire pressure monitor. Wheel and tire combinations
391
Wheels and tires Z