MERCEDES-BENZ G-Class 2014 W463 Owner's Manual
Manufacturer: MERCEDES-BENZ, Model Year: 2014, Model line: G-Class, Model: MERCEDES-BENZ G-Class 2014 W463Pages: 354, PDF Size: 7.63 MB
Page 271 of 354
X
To initiate an emergency call
manually: press cover 0043briefly to open.
X Press SOS button 0044briefly.
The indicator lamp in SOS button 0044
flashes until the emergency call is
concluded.
X Wait for the voice connection with the
Response Center.
X After the emergency call, close cover 0043.
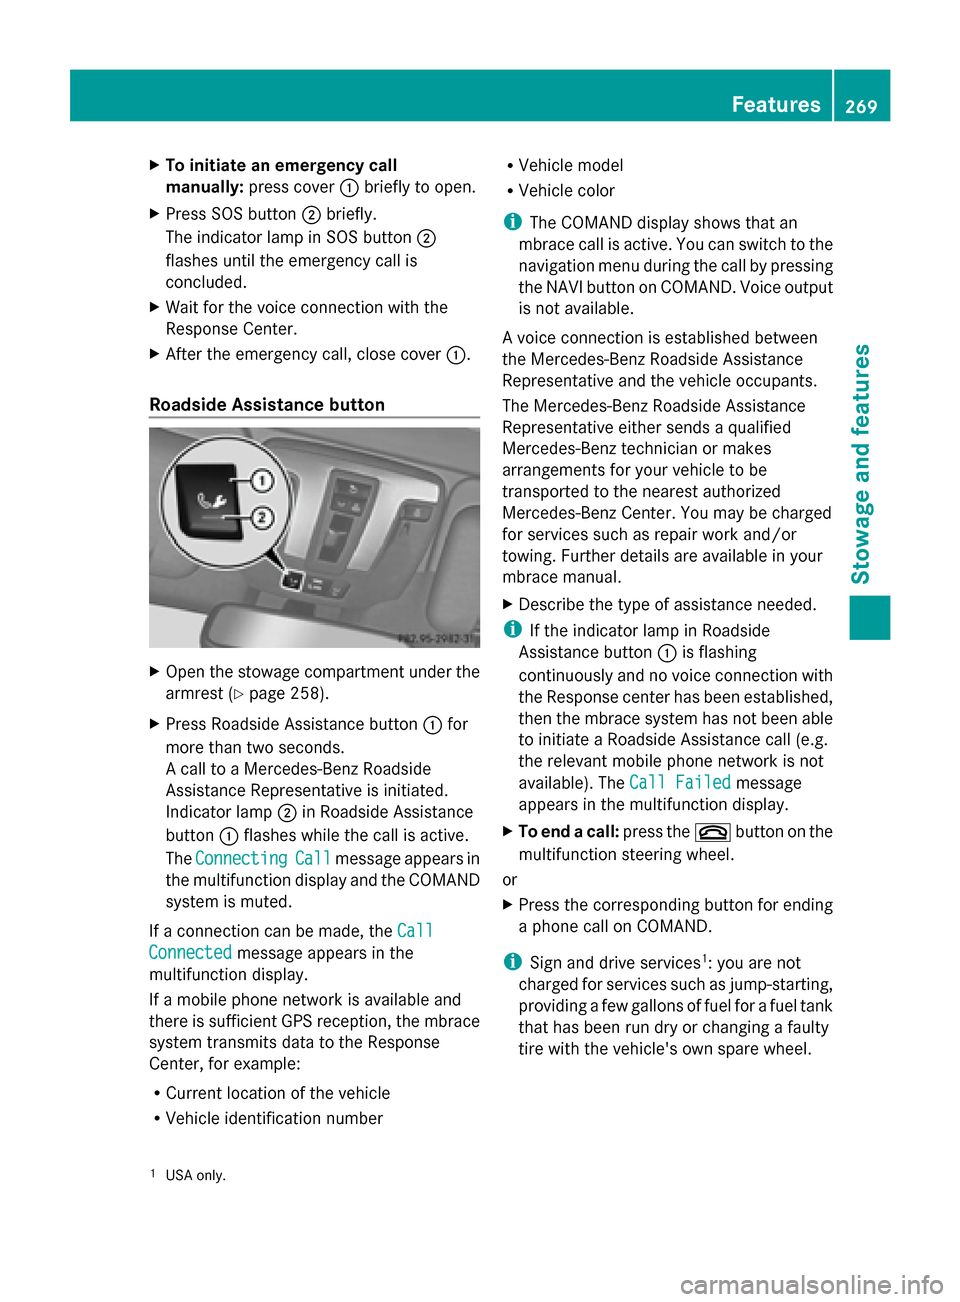
Roadside Assistance button X
Open the stowage compartment under the
armrest (Y page 258).
X Press Roadside Assistance button 0043for
more than two seconds.
A call to a Mercedes-Benz Roadside
Assistance Representative is initiated.
Indicator lamp 0044in Roadside Assistance
button 0043flashes while the call is active.
The Connecting Connecting Call
Callmessage appears in
the multifunction display and the COMAND
system is muted.
If a connection can be made, the Call
Call
Connected
Connected message appears in the
multifunction display.
If a mobile phone network is available and
there is sufficient GPS reception, the mbrace
system transmits data to the Response
Center, for example:
R Current location of the vehicle
R Vehicle identification number R
Vehicle model
R Vehicle color
i The COMAND display shows that an
mbrace call is active. You can switch to the
navigation menu during the call by pressing
the NAVI button on COMAND. Voice output
is not available.
A voice connection is established between
the Mercedes-Benz Roadside Assistance
Representative and the vehicle occupants.
The Mercedes-Benz Roadside Assistance
Representative either sends a qualified
Mercedes-Benz technician or makes
arrangements for your vehicle to be
transported to the nearest authorized
Mercedes-Benz Center. You may be charged
for services such as repair work and/or
towing. Further details are available in your
mbrace manual.
X Describe the type of assistance needed.
i If the indicator lamp in Roadside
Assistance button 0043is flashing
continuously and no voice connection with
the Response center has been established,
then the mbrace system has not been able
to initiate a Roadside Assistance call (e.g.
the relevant mobile phone network is not
available). The Call Failed Call Failedmessage
appears in the multifunction display.
X To end a call: press the0076button on the
multifunction steering wheel.
or
X Press the corresponding button for ending
a phone call on COMAND.
i Sign and drive services 1
: you are not
charged for services such as jump-starting,
providing a few gallons of fuel for a fuel tank
that has been run dry or changing a faulty
tire with the vehicle's own spare wheel.
1 USA only. Features
269Stowage an d features Z
Page 272 of 354
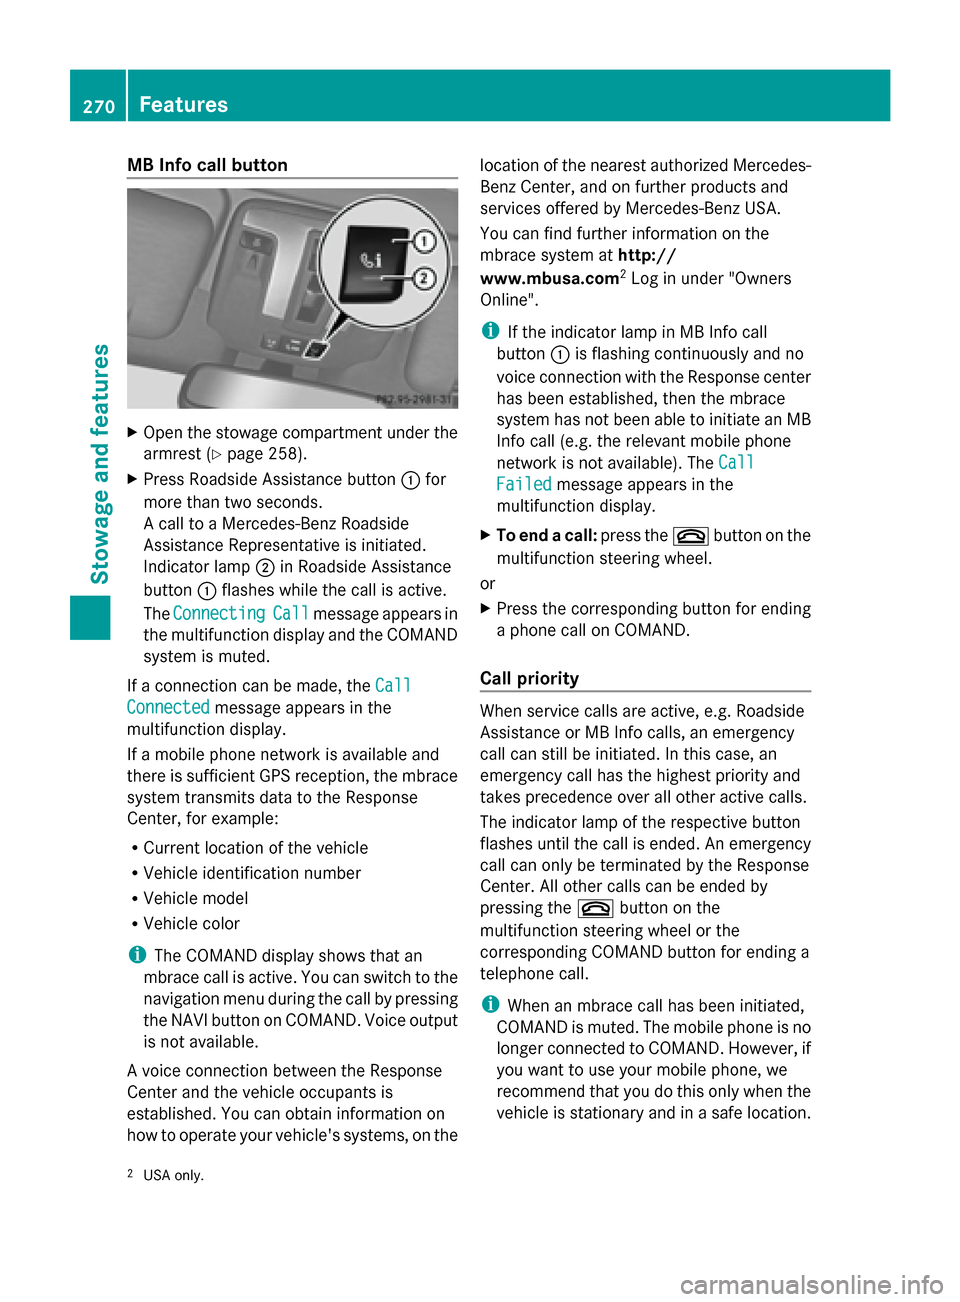
MB Info call button
X
Open the stowage compartment under the
armrest (Y page 258).
X Press Roadside Assistance button 0043for
more than two seconds.
A call to a Mercedes-Benz Roadside
Assistance Representative is initiated.
Indicator lamp 0044in Roadside Assistance
button 0043flashes while the call is active.
The Connecting
Connecting Call Callmessage appears in
the multifunction display and the COMAND
system is muted.
If a connection can be made, the Call
Call
Connected Connected message appears in the
multifunction display.
If a mobile phone network is available and
there is sufficient GPS reception, the mbrace
system transmits data to the Response
Center, for example:
R Current location of the vehicle
R Vehicle identification number
R Vehicle model
R Vehicle color
i The COMAND display shows that an
mbrace call is active. You can switch to the
navigation menu during the call by pressing
the NAVI button on COMAND. Voice output
is not available.
A voice connection between the Response
Center and the vehicle occupants is
established. You can obtain information on
how to operate your vehicle's systems, on the location of the nearest authorized Mercedes-
Benz Center, and on further products and
services offered by Mercedes-Benz USA.
You can find further information on the
mbrace system at
http://
www.mbusa.com 2
Log in under "Owners
Online".
i If the indicator lamp in MB Info call
button 0043is flashing continuously and no
voice connection with the Response center
has been established, then the mbrace
system has not been able to initiate an MB
Info call (e.g. the relevant mobile phone
network is not available). The Call
Call
Failed Failed message appears in the
multifunction display.
X To end a call: press the0076button on the
multifunction steering wheel.
or
X Press the corresponding button for ending
a phone call on COMAND.
Call priority When service calls are active, e.g. Roadside
Assistance or MB Info calls, an emergency
call can still be initiated. In this case, an
emergency call has the highest priority and
takes precedence over all other active calls.
The indicator lamp of the respective button
flashes until the call is ended. An emergency
call can only be terminated by the Response
Center. All other calls can be ended by
pressing the
0076button on the
multifunction steering wheel or the
corresponding COMAND button for ending a
telephone call.
i When an mbrace call has been initiated,
COMAND is muted. The mobile phone is no
longer connected to COMAND. However, if
you want to use your mobile phone, we
recommend that you do this only when the
vehicle is stationary and in a safe location.
2 USA only. 270
FeaturesStowage and features
Page 273 of 354
Downloading destinations in COMAND
Destination Download gives you access to a
database with over ten million points of
interest (POIs) which can be downloaded onto
the navigation system of your vehicle. If you
know the destination, you can download the
address or obtain the location of points of
interest (POIs) or important destinations in
the surrounding area.
You are prompted to confirm route guidance
to the address entered.
i Information on the components and
operating principles of the COMAND
system can be found in the separate
COMAND operating instructions.
X Select Yes
Yes with the 0059or0065 button
on COMAND.
X Confirm with the 008Bbutton on COMAND.
The system calculates the route and
subsequently starts the route guidance with
the address entered.
i If you select No No, the address can be stored
in the address book.
i The Destination Download function is
available if the corresponding mobile
phone network is available and data
transfer is possible.
Search & Send "Search & Send" is a destination entry
service. You can find further information on
"Search & Send" in the separate COMAND
operating instructions.
Vehicle remote opening If you have unintentionally locked your
vehicle (e.g. the SmartKey is inside the
vehicle) and a replacement key is not
available:
X Contact the following service hotlines: R
USA: Response Center at
1-888-990-9007
R Canada: Customer Service at
1-888-923-8367
You will be asked for your password.
X Return to your vehicle at the time arranged
with the Response Center.
X Press the release button on the door handle
of the rear door for at least 20 seconds until
the indicator lamp in the SOS button
(Y page 268) flashes.
The Connecting Call
Connecting Call message appears
on the multifunction display.
Alternatively, the vehicle can be opened via
the Internet in the "Owner's Online" section
using your identification number and
password 3
.
i Vehicle remote opening is only possible if
the corresponding mobile phone network
is accessible.
The SOS button flashes and the
Connecting Connecting Call
Callmessage appears in the
multifunction display to confirm that the
command for vehicle remote unlocking has
been received.
If the lock cylinder on the rear door is
pressed for longer than 20 seconds before
receiving authorization for remote
unlocking from the Response center, you
must wait 15 minutes before you can press
the lock cylinder on the rear door again.
Vehicle remote closing The remote closing feature can be used when
you have forgotten to lock the vehicle and you
are no longer nearby. The vehicle can then be
locked by the Mercedes-Benz Customer
Assistance Center.
The vehicle can be remotely locked within
four days of the ignition being turned off.
X
Contact the following service hotlines:
3 USA only. Features
271Stowage and fea tures Z
Page 274 of 354
R
USA: Mercedes-Benz Customer
Assistance Center at 1-800-FOR-
MERCedes (1-800-367-6372) or
1-888-990-9007
R Canada: Customer Service at
1-888-923-8367
You will be asked for your PIN.
The next time you are inside the vehicle and
you switch on the ignition, the Tele Aid Tele Aid
Doors Locked Remotely
Doors Locked Remotely message appears
in the multifunction display.
USA only: alternatively, the vehicle can be
locked via:
R the Internet, under the "Owners Online"
section
R the telephone application (e.g. iPhone ®
,
Blackberry)
To do this, you will need your identification
number and password.
i The vehicle remote closing feature is
available when the relevant mobile phone
network is available and data connection is
possible.
Stolen vehicle recovery service If your vehicle has been stolen:
X
Contact the police.
The police will issue an incident report. This
report has a number.
X Forward this number to the Response
Center together with your PIN.
The Response Center will then attempt to
covertly contact the mbrace system. The
Response Center contacts you and the
local law enforcement authority if the
vehicle is located. However, only the law
enforcement agency is informed of the
location of the vehicle.
i If the anti-theft alarm system is active for
longer than 30 seconds, mbrace is
automatically connected with the
Customer Assistance center. Vehicle remote malfunction diagnosis With the vehicle remote malfunction
diagnosis (Vehicle Health Check), the
Customer Assistance center can provide
improved support for problems with your
vehicle. During an existing call, vehicle data
is transferred to the Customer Assistance
center. The customer service representative
can use the received data to decide what kind
of assistance is required. You are then, for
example, guided to the nearest Mercedes-
Benz Service center or a recovery vehicle is
called.
If vehicle data needs to be transferred during
an MB Info call or a Roadside Assistance call,
this is initiated by the Customer Assistance
center. You will see the Roadside Roadside
Assistance Connected
Assistance Connected message in the
COMAND display. If the vehicle remote
malfunction diagnosis is able to be started,
the Request for vehicle diagnosis Request for vehicle diagnosis
received. Start vehicle diagnosis?
received. Start vehicle diagnosis?
message appears in the display.
X Press Yes Yesto confirm the message.
X If the Vehicle Diagnosis: Please
Vehicle Diagnosis: Please
start ignition
start ignition message appears: turn
the SmartKey to position 2in the ignition
lock.
X If the Please follow the
Please follow the
instructions
instructions received
receivedby
byphone
phone and
and
move your vehicle into a safe
move your vehicle into a safe
position position message appears: follow the
instructions of the customer service
representative.
The message in the display disappears.
If you select Cancel
Cancel , the vehicle remote
malfunction diagnosis is canceled
completely.
The vehicle operating state check begins.
Meanwhile, the Vehicle diagnosis Vehicle diagnosis
activated
activated message appears.
When the check is finished, the Sending
Sending
vehicle diagnosis data... (Voice
vehicle diagnosis data... (Voice
connection may be interrupted connection may be interrupted
during during data
datatransfer)
transfer) message appears.272
FeaturesStowage and features
Page 275 of 354
The vehicle data can now be sent to the
Customer Assistance center.
X Press OK
OK to confirm the message.
The voice connection with the Customer
Assistance center is terminated.
The Vehicle Diagnosis: Vehicle Diagnosis:
Transferring data...
Transferring data... message
appears.
The vehicle data is sent to the Customer
Assistance center.
Depending on what the customer service
representative agreed with you, the voice
connection is re-established after the transfer
is complete. If necessary, you will be
contacted at a later time by another means,
e.g. by e-mail or phone.
Further functions of the vehicle remote
malfunction diagnosis include, for example:
R transfer of service data to the Customer
Assistance center. If a service is overdue,
the COMAND display shows a message
about various special offers at your
workshop.
R monthly status information e-mail on oil
level, air pressure, maintenance, brakes,
etc. If applicable, you will receive
information on special offers in the e-mail.
USA only: this information can also be
called up under "Owners Online" at http://
www.mbusa.com.
Information on the data stored in the vehicle
(Y page 25).
Information on Roadside Assistance
(Y page 22).
Downloading routes Downloading routes allows you to transfer
and save predefined routes in the navigation
system. To do this, an SD memory card must
be inserted into the COMAND system. If no
SD memory card is inserted, you must insert
the card into the card slot on the COMAND
system before saving.
A route can be prepared and sent either by a
customer service representative or via the mbrace portal on the Internet. Each route can
include up to 20 way points. When a route has
been received by the navigation system, the
'Route name' has been saved to
'Route name' has been saved to
memory card. Do you want to start memory card. Do you want to start
route guidance? route guidance? message appears on the
COMAND display. The route is saved to the
SD memory card.
X To start route guidance: selectYes Yes.
An overview of the route is shown in the
display.
i If you select No
No, the saved route can be
called up later in the navigation menu.
X Select Start
Start.
Route guidance is started.
i Downloaded and saved data can be called
up again in COMAND. Further information
can be found in the "COMAND", "Online
and Internet services" and "Download
destination/route" sections.
Speed alert You can define the upper speed limit, which
must not be exceeded by the vehicle. If this
selected speed is exceeded by the vehicle, a
message will be sent to the Customer
Assistance center. The Customer Assistance
center then forwards this information to you.
You can select the way in which you receive
this information beforehand. Possible options
include text message, e-mail or an automated
call.
The data which is sent to the Customer
Assistance center contains the following
information:
R the location where the speed limit was
exceeded
R the time at which the speed limit was
exceeded
R the selected speed limit which was
exceeded Features
273Stowage and features Z
Page 276 of 354
Geo fencing
Geo fencing allows you to select areas which
the vehicle should not enter or leave. You will
be informed if the vehicle crosses the
boundaries of the selected areas. You can
select the way in which you receive this
information beforehand. Possible options
include text message, e-mail or an automated
call.
The area can be determined as either a circle
or a polygon with a maximum of ten corners.
You can specify up to ten areas
simultaneously. Different settings are
possible for each area.
USA only: these settings can be called up
under "Owners Online" at http://
www.mbusa.com.
Alternatively, you can trigger an MB Info call
and inform the customer service
representative that you wish to activate geo
fencing.
Currently inactive areas can be activated by
text message.
Triggering the vehicle alarm With this function, you can trigger the
vehicle's panic alarm via text message. An
alarm sounds and the exterior lighting
flashes. Depending on the setting, the panic
alarm lasts five or ten seconds. Afterwards,
the alarm switches off. Brush guard (USA only)
G
WARNING
The brush guard is designed solely to enhance
the appearance of the vehicle and help
protect grille and headlamps from minor
mishaps, either on or off road.
Since the safety characteristics are limited in
the event of an accident, brush guard are not
intended to prevent injury or damage in the
event of an accident. Also observe state and
local regulations on installation and use. Raise and lower the brush guard in an open
space with plenty of room.
i If you wish to remove the brush guard,
contact a qualified specialist workshop. Garage door opener
Important safety notes G
WARNING
Before programming the integrated remote
control to a garage door opener or gate
operator, make sure people and objects are
out of the way of the device to prevent
potential harm or damage. When
programming a garage door opener, the door
moves up or down. When programming a gate
operator, the gate opens or closes.
Do not use the integrated remote control with
any garage door opener that lacks safety stop
and reverse features as required by U.S.
federal safety standards (this includes any
garage door opener model manufactured
before April 1, 1982). A garage door that
cannot detect an object - signaling the door
to stop and reverse - does not meet current
U.S. federal safety standards.
When programming a garage door opener,
park vehicle outside the garage.
Do not run the engine while programming the
integrated remote control. Inhalation of
exhaust gas is hazardous to your health. All
exhaust gas contains carbon monoxide (CO),
and inhaling it can cause unconsciousness
and possible death. All exhaust gas contains
carbon monoxide (CO), and inhaling it can
cause unconsciousness and possible death.
You can use the HomeLink ®
garage door
opener integrated into the rear-view mirror to
operate up to three different gate/garage
door opener systems. 274
FeaturesStowage and features
Page 277 of 354
i
Certain garage door drives are
incompatible with the integrated garage
door opener. If you have difficulty
programming the integrated garage door
opener, contact an authorized Mercedes-
Benz Center. You can also contact the
following service hotlines:
R USA: Mercedes-Benz Customer
Assistance Center at
1-800-FOR-MERCedes
R Canada: Customer Service at
1-800-387-0100
i USA only:
This device complies with Part 15 of the
FCC Rules. Operation is subject to the
following two conditions:
1. This device may not cause harmful
interference, and
2. this device must accept any interference
received, including interference that may
cause undesired operation.
Any unauthorized modification to this
device could void the user's authority to
operate the equipment.
i Canada only:
This device complies with the RSS-210
Rules of Industry Canada. Operation is
subject to the following two conditions:
1. This device may not cause harmful
interference, and
2. this device must accept any interference
received, including interference that may
cause undesired operation of the device.
Any unauthorized modification to this
device could void the user's authority to
operate the equipment.
Programming the remote control Programming
G
WARNING
Only press the button on the integrated
garage door opener if there are no persons or
objects present within the sweep of the garage door. Persons could otherwise be
injured as the door moves.
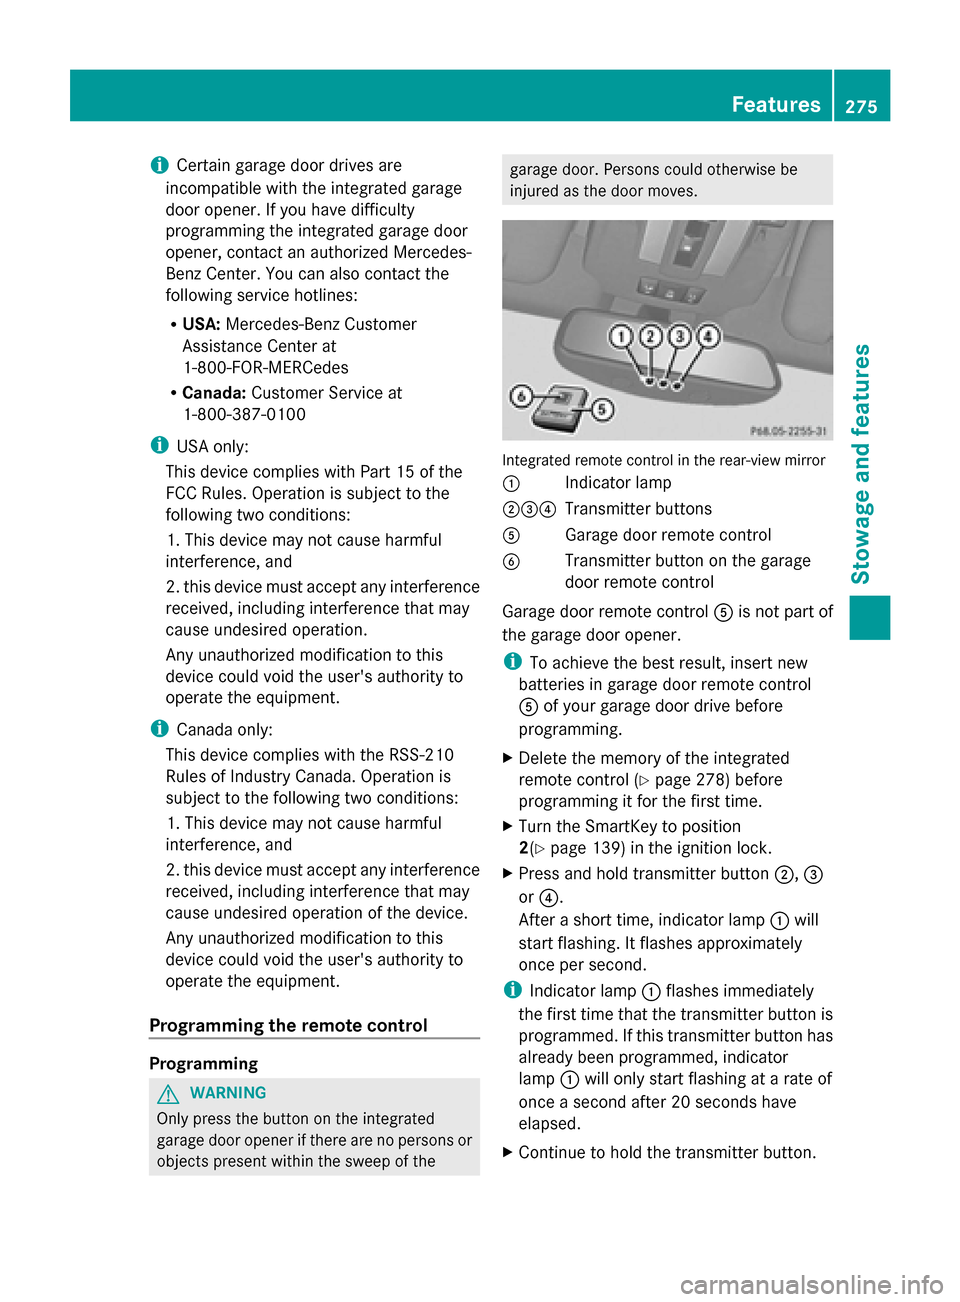
Integrated remote control in the rear-view mirror
0043
Indicator lamp
004400870085 Transmitter buttons
0083 Garage door remote control
0084 Transmitter button on the garage
door remote control
Garage door remote control 0083is not part of
the garage door opener.
i To achieve the best result, insert new
batteries in garage door remote control
0083 of your garage door drive before
programming.
X Delete the memory of the integrated
remote control (Y page 278) before
programming it for the first time.
X Turn the SmartKey to position
2(Y page 139) in the ignition lock.
X Press and hold transmitter button 0044,0087
or 0085.
After a short time, indicator lamp 0043will
start flashing. It flashes approximately
once per second.
i Indicator lamp 0043flashes immediately
the first time that the transmitter button is
programmed. If this transmitter button has
already been programmed, indicator
lamp 0043will only start flashing at a rate of
once a second after 20 seconds have
elapsed.
X Continue to hold the transmitter button. Features
275Stowage and featu res Z
Page 278 of 354
X
Point transmitter button 0083of garage door
remote control 0084towards the transmitter
buttons on the rear-view mirror at a
distance of 2 to 12 inches (5 to 30 cm).
i The distance between garage door
remote control 0083and the integrated
garage door opener depends on the system
of the garage door drive. Several attempts
might be necessary. You should test every
position for at least 20 seconds before
trying another position.
X Keep transmitter button 0084on garage door
remote control 0083pressed until indicator
lamp 0043starts to flash rapidly.
The programming has been successful if
indicator lamp 0043flashes rapidly.
X Release transmitter buttons 0044,0087or0085
on the integrated remote control and
transmitter button 0084on the garage door
remote control.
If indicator lamp 0043goes out after
approximately 20 seconds and has not
flashed rapidly:
X Release transmitter buttons 0044,0087or0085
on the integrated remote control and
transmitter button 0084on the garage door
remote control.
X Repeat the procedure for the other
transmitter buttons. When doing so, vary
the distance between the garage door's
remote control and the transmitter buttons
in the rear-view mirror.
i If the garage door system works with a
rolling code, you must synchronize the
remote control integrated in the rear-view
mirror with the garage door system
receiver after programming.
You will find further information in the
garage door opening system's operating
instructions, e.g. the sections on
"Synchronizing the transmitter" or
"Registering a new transmitter". You can
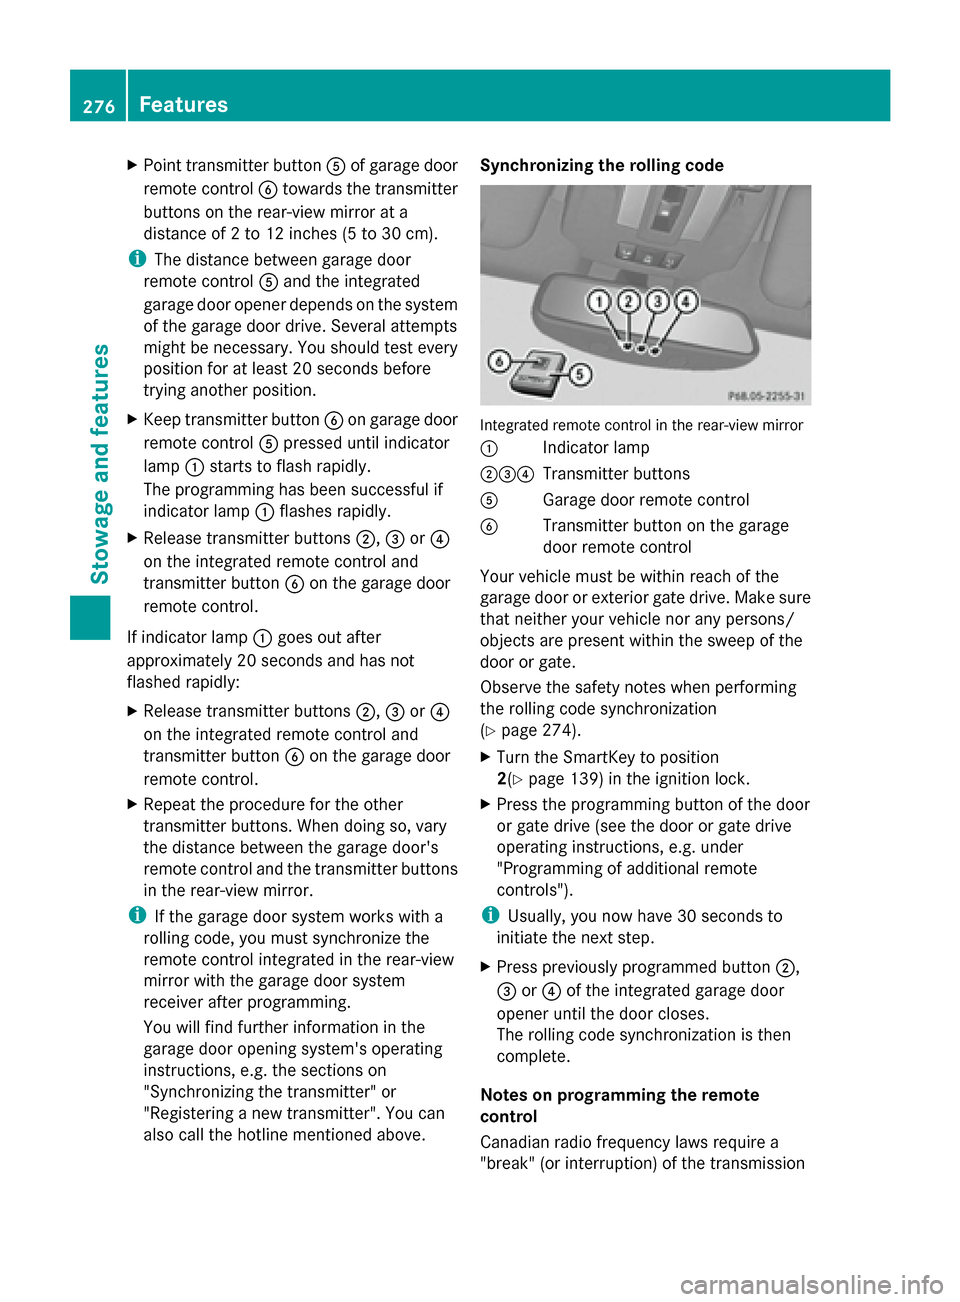
also call the hotline mentioned above. Synchronizing the rolling code
Integrated remote control in the rear-view mirror
0043
Indicator lamp
004400870085 Transmitter buttons
0083 Garage door remote control
0084 Transmitter button on the garage
door remote control
Your vehicle must be within reach of the
garage door or exterior gate drive. Make sure
that neither your vehicle nor any persons/
objects are present within the sweep of the
door or gate.
Observe the safety notes when performing
the rolling code synchronization
(Y page 274).
X Turn the SmartKey to position
2(Y page 139) in the ignition lock.
X Press the programming button of the door
or gate drive (see the door or gate drive
operating instructions, e.g. under
"Programming of additional remote
controls").
i Usually, you now have 30 seconds to
initiate the next step.
X Press previously programmed button 0044,
0087 or0085 of the integrated garage door
opener until the door closes.
The rolling code synchronization is then
complete.
Notes on programming the remote
control
Canadian radio frequency laws require a
"break" (or interruption) of the transmission 276
FeaturesStowage and features
Page 279 of 354
signals after broadcasting for a few seconds.
Therefore, these signals may not last long
enough for the integrated remote control to
recognize the signal during programming.
Comparable with Canadian law, American
garage door openers also have a built-in
"interruption".
If you live in Canada or have difficulties
programming the garage door opener
(regardless of where you live) when using the
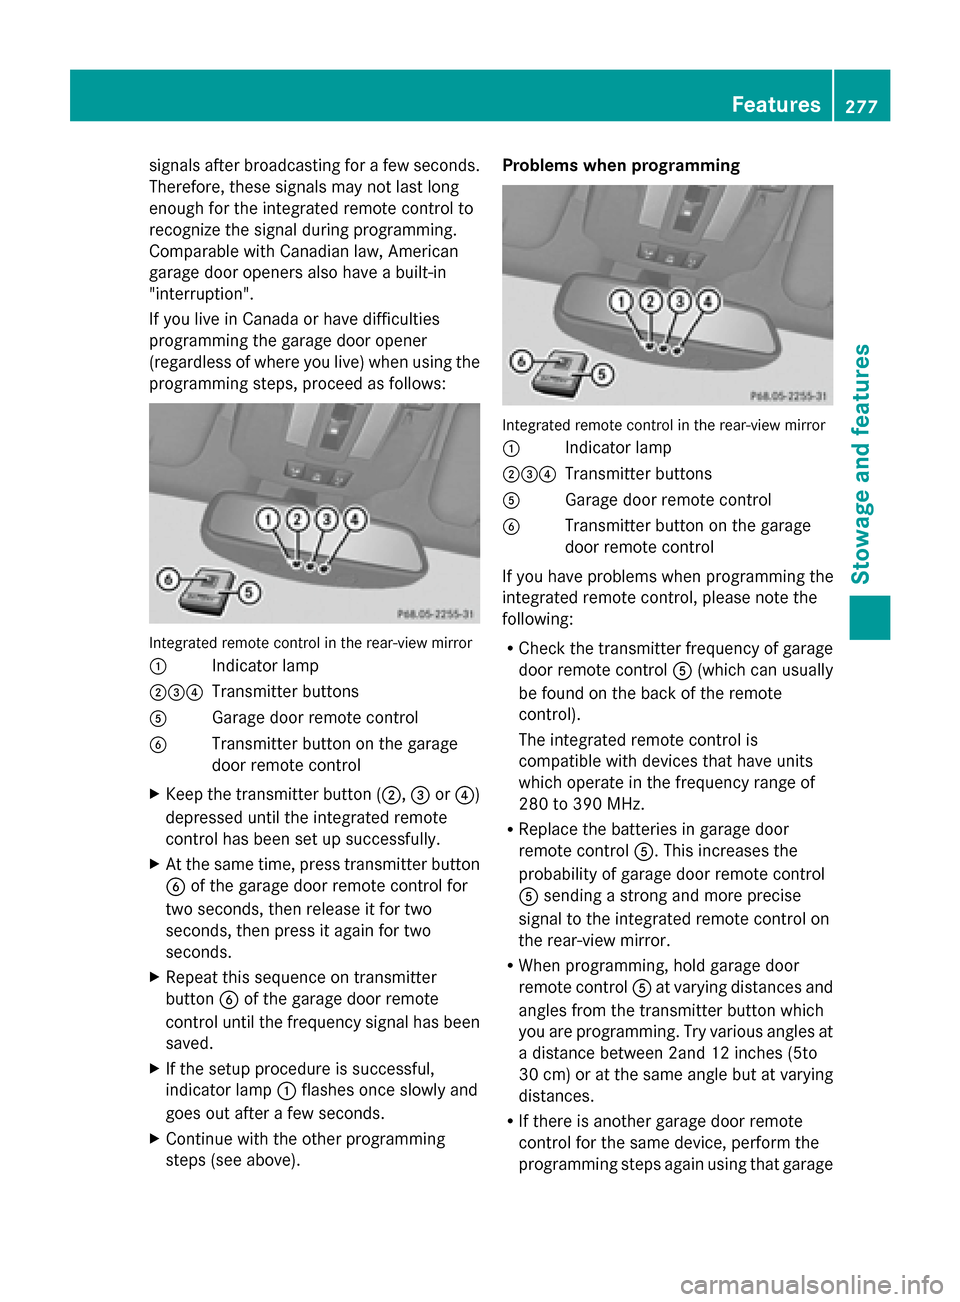
programming steps, proceed as follows: Integrated remote control in the rear-view mirror
0043 Indicator lamp
004400870085 Transmitter buttons
0083 Garage door remote control
0084 Transmitter button on the garage
door remote control
X Keep the transmitter button (0044, 0087or0085)
depressed until the integrated remote
control has been set up successfully.
X At the same time, press transmitter button
0084 of the garage door remote control for
two seconds, then release it for two
seconds, then press it again for two
seconds.
X Repeat this sequence on transmitter
button 0084of the garage door remote
control until the frequency signal has been
saved.
X If the setup procedure is successful,
indicator lamp 0043flashes once slowly and
goes out after a few seconds.
X Continue with the other programming
steps (see above). Problems when programming
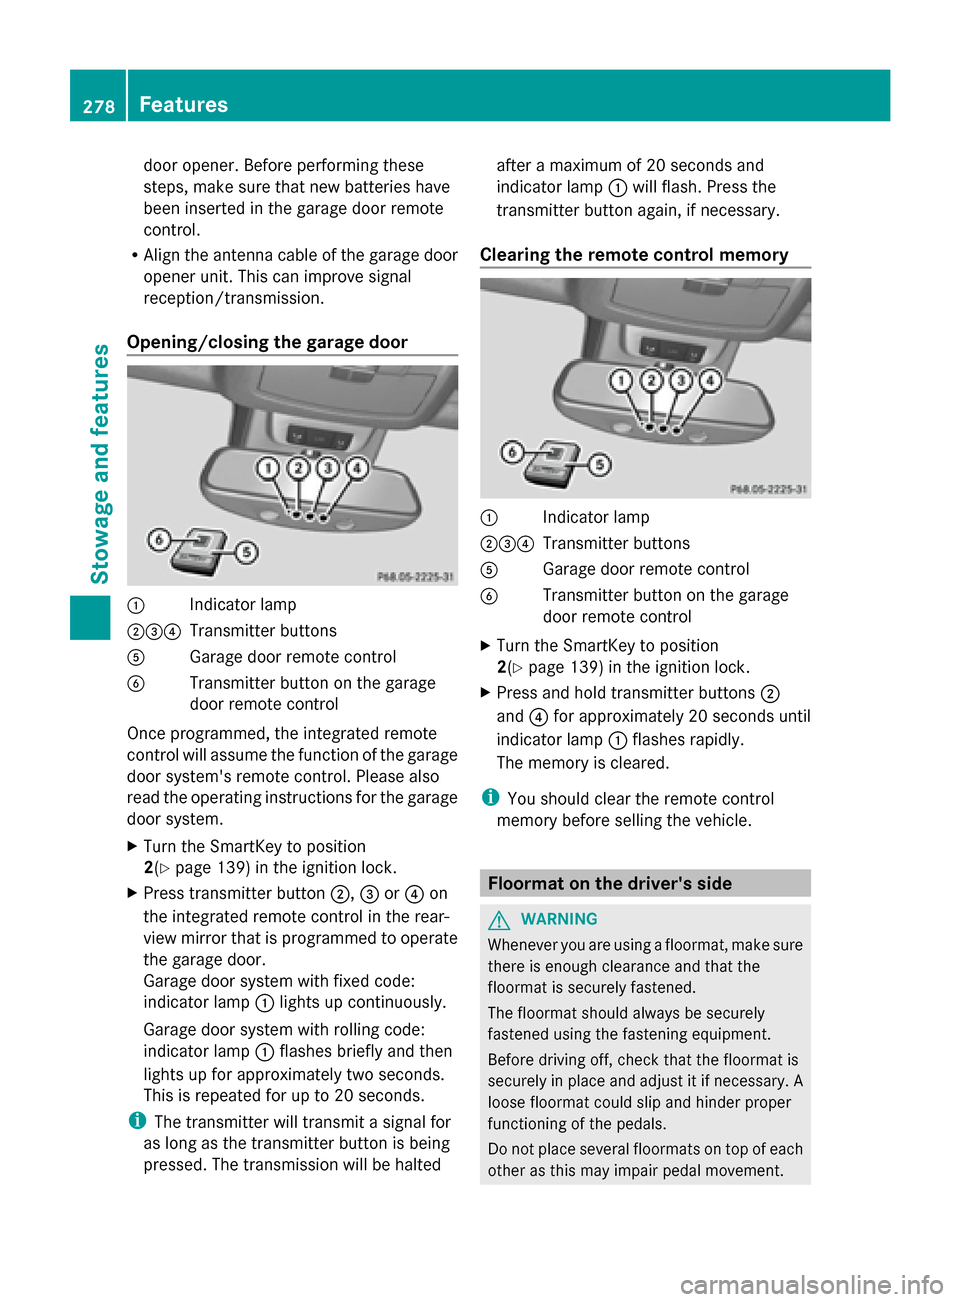
Integrated remote control in the rear-view mirror
0043
Indicator lamp
004400870085 Transmitter buttons
0083 Garage door remote control
0084 Transmitter button on the garage
door remote control
If you have problems when programming the
integrated remote control, please note the
following:
R Check the transmitter frequency of garage
door remote control 0083(which can usually
be found on the back of the remote
control).
The integrated remote control is
compatible with devices that have units
which operate in the frequency range of
280 to 390 MHz.
R Replace the batteries in garage door
remote control 0083. This increases the
probability of garage door remote control
0083 sending a strong and more precise
signal to the integrated remote control on
the rear-view mirror.
R When programming, hold garage door
remote control 0083at varying distances and
angles from the transmitter button which
you are programming. Try various angles at
a distance between 2and 12 inches (5to
30 cm) or at the same angle but at varying
distances.
R If there is another garage door remote
control for the same device, perform the
programming steps again using that garage Features
277Stowage and features Z
Page 280 of 354
door opener. Before performing these
steps, make sure that new batteries have
been inserted in the garage door remote
control.
R Align the antenna cable of the garage door
opener unit. This can improve signal
reception/transmission.
Opening/closing the garage door 0043
Indicator lamp
004400870085 Transmitter buttons
0083 Garage door remote control
0084 Transmitter button on the garage
door remote control
Once programmed, the integrated remote
control will assume the function of the garage
door system's remote control. Please also
read the operating instructions for the garage
door system.
X Turn the SmartKey to position
2(Y page 139) in the ignition lock.
X Press transmitter button 0044,0087or0085 on
the integrated remote control in the rear-
view mirror that is programmed to operate
the garage door.
Garage door system with fixed code:
indicator lamp 0043lights up continuously.
Garage door system with rolling code:
indicator lamp 0043flashes briefly and then
lights up for approximately two seconds.
This is repeated for up to 20 seconds.
i The transmitter will transmit a signal for
as long as the transmitter button is being
pressed. The transmission will be halted after a maximum of 20 seconds and
indicator lamp
0043will flash. Press the
transmitter button again, if necessary.
Clearing the remote control memory 0043
Indicator lamp
004400870085 Transmitter buttons
0083 Garage door remote control
0084 Transmitter button on the garage
door remote control
X Turn the SmartKey to position
2(Y page 139) in the ignition lock.
X Press and hold transmitter buttons 0044
and 0085for approximately 20 seconds until
indicator lamp 0043flashes rapidly.
The memory is cleared.
i You should clear the remote control
memory before selling the vehicle. Floormat on the driver's side
G
WARNING
Whenever you are using a floormat, make sure
there is enough clearance and that the
floormat is securely fastened.
The floormat should always be securely
fastened using the fastening equipment.
Before driving off, check that the floormat is
securely in place and adjust it if necessary. A
loose floormat could slip and hinder proper
functioning of the pedals.
Do not place several floormats on top of each
other as this may impair pedal movement. 278
FeaturesStowage and features