MERCEDES-BENZ G-CLASS SUV 2008 Owners Manual
Manufacturer: MERCEDES-BENZ, Model Year: 2008, Model line: G-CLASS SUV, Model: MERCEDES-BENZ G-CLASS SUV 2008Pages: 293, PDF Size: 4.49 MB
Page 191 of 293
Where will I find...?
188 Where will I find...?
Warning triangle, first-aid kit and
vehicle tool kit
G
Risk of injury
The jack is designed only to raise and hold
the vehicle for a short time while a wheel
is being changed.
You must use axle stands if you are carrying
out work on the vehicle.
Make sure that the jack is placed on a firm,
non-slip, level surface. Do not use wooden
blocks or similar objects as a jack underlay.
Otherwise, the jack will not be able to ach-
ieve its load-bearing capacity due to the
restricted height.
Do not start the engine at any time while a
wheel is being changed.
Do not lie under the vehicle when it is being
supported by the jack. If you do not raise
the vehicle as described, it could slip off the
jack (e.g. if the engine is started or a door
or the tailgate is opened or closed) and you
could be seriously injured.
i Check the expiry date of the first-aid kit
annually, and replace the contents when
necessary. i
When using the jack, you should also
observe the safety notes in the "Flat tyre"
section (Y page 243).
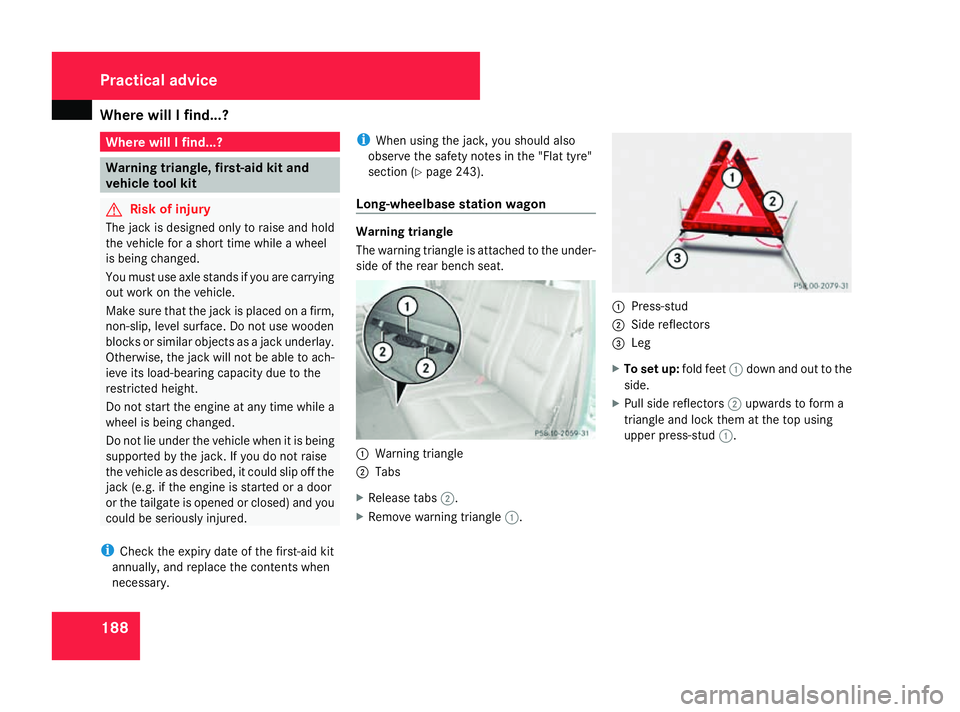
Long-wheelbase station wagon Warning triangle
The warning triangle is attached to the under-
side of the rear bench seat.
1
Warning triangle
2 Tabs
X Release tabs 2.
X Remove warning triangle 1. 1
Press-stud
2 Side reflectors
3 Leg
X To set up: fold feet1down and out to the
side.
X Pull side reflectors 2upwards to form a
triangle and lock them at the top using
upper press-stud 1. Practical advice
463_AKB; 1; 8, en-GB
wobuchh,
Version: 2.10.6 2008-07-17T15:19:41+02:00 - Seite 188Dateiname: 6515_4091_02_buchblock.pdf; preflight
Page 192 of 293
Where will I find...?
189
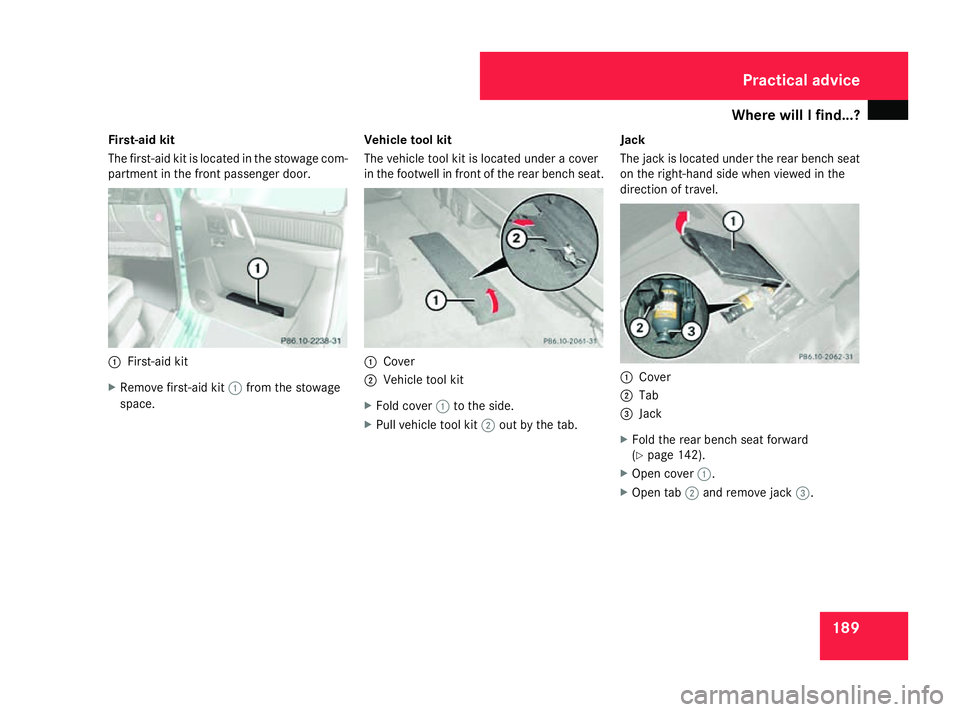
First-aid kit
The first-aid kit is located in the stowage com-
partment in the front passenger door. 1
First-aid kit
X Remove first-aid kit 1from the stowage
space. Vehicle tool kit
The vehicle tool kit is located under a cover
in the footwell in front of the rear bench seat. 1
Cover
2 Vehicle tool kit
X Fold cover 1to the side.
X Pull vehicle tool kit 2out by the tab. Jack
The jack is located under the rear bench seat
on the right-hand side when viewed in the
direction of travel. 1
Cover
2 Tab
3 Jack
X Fold the rear bench seat forward
(Y page 142).
X Open cover 1.
X Open tab 2and remove jack 3. Practical advice
463_AKB; 1; 8, en-GB
wobuchh
, Version: 2.10.6 2008-07-17T15:19:41+02:00 - Seite 189 ZDateiname: 6515_4091_02_buchblock.pdf; preflight
Page 193 of 293
Where will I find...?
190
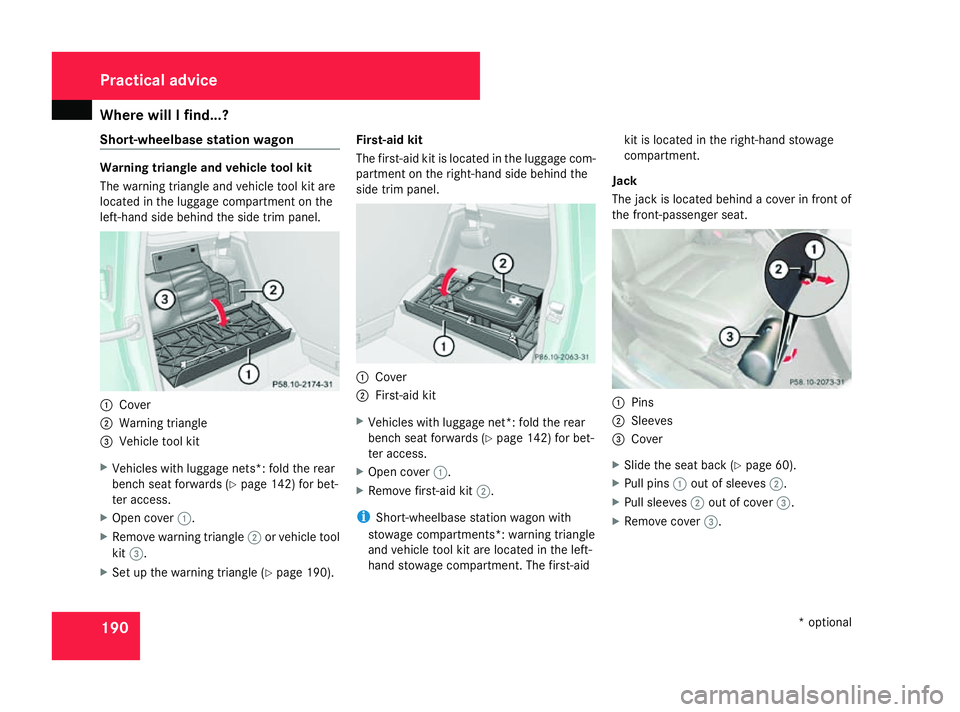
Short-wheelbase station wagon Warning triangle and vehicle tool kit
The warning triangle and vehicle tool kit are
located in the luggage compartment on the
left-hand side behind the side trim panel. 1
Cover
2 Warning triangle
3 Vehicle tool kit
X Vehicles with luggage nets*: fold the rear
bench seat forwards (Y page 142) for bet-
ter access.
X Open cover 1.
X Remove warning triangle 2or vehicle tool
kit 3.
X Set up the warning triangle (Y page 190).First-aid kit
The first-aid kit is located in the luggage com-
partment on the right-hand side behind the
side trim panel.
1
Cover
2 First-aid kit
X Vehicles with luggage net*: fold the rear
bench seat forwards (Y page 142) for bet-
ter access.
X Open cover 1.
X Remove first-aid kit 2.
i Short-wheelbase station wagon with
stowage compartments*: warning triangle
and vehicle tool kit are located in the left-
hand stowage compartment. The first-aid kit is located in the right-hand stowage
compartment.
Jack
The jack is located behind a cover in front of
the front-passenger seat. 1
Pins
2 Sleeves
3 Cover
X Slide the seat back (Y page 60).
X Pull pins 1out of sleeves 2.
X Pull sleeves 2out of cover 3.
X Remove cover 3. Practical advice
* optional
463_AKB; 1; 8, en-GB
wobuchh,
Version: 2.10.6 2008-07-17T15:19:41+02:00 - Seite 190Dateiname: 6515_4091_02_buchblock.pdf; preflight
Page 194 of 293
Where will I find...?
1911
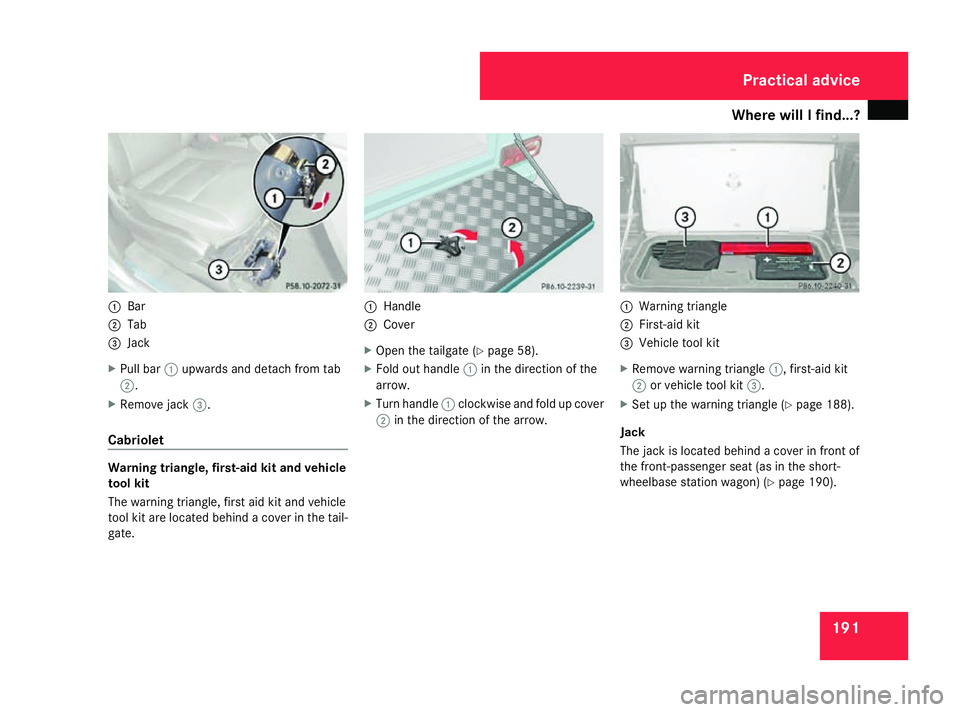
Bar
2 Tab
3 Jack
X Pull bar 1upwards and detach from tab
2.
X Remove jack 3.
Cabriolet Warning triangle, first-aid kit and vehicle
tool kit
The warning triangle, first aid kit and vehicle
tool kit are located behind a cover in the tail-
gate. 1
Handle
2 Cover
X Open the tailgate (Y page 58).
X Fold out handle 1in the direction of the
arrow.
X Turn handle 1clockwise and fold up cover
2 in the direction of the arrow. 1
Warning triangle
2 First-aid kit
3 Vehicle tool kit
X Remove warning triangle 1, first-aid kit
2 or vehicle tool kit 3.
X Set up the warning triangle (Y page 188).
Jack
The jack is located behind a cover in front of
the front-passenger seat (as in the short-
wheelbase station wagon) (Y page 190). Practical advice
463_AKB; 1; 8, en-GB
wobuchh
, Version: 2.10.6 2008-07-17T15:19:41+02:00 - Seite 191 ZDateiname: 6515_4091_02_buchblock.pdf; preflight
Page 195 of 293
Where will I find...?
192 Fire extinguisher*
i Have the fire extinguisher refilled after
each use and checked every two years.
Otherwise, it may fail in an emergency.
Observe the legal requirements in all coun-
tries concerned.
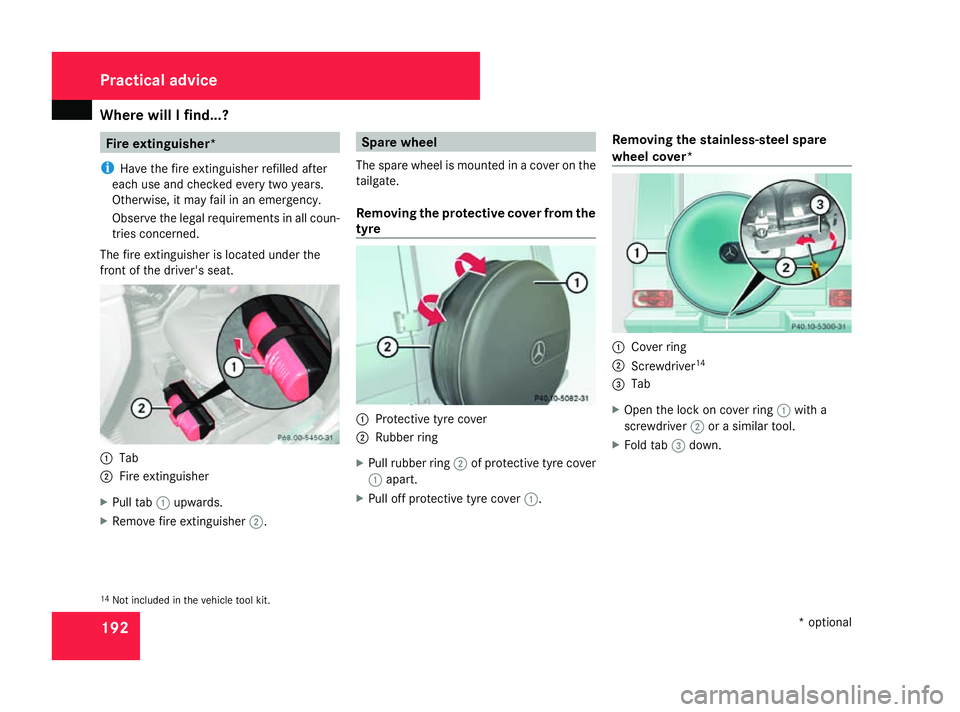
The fire extinguisher is located under the
front of the driver's seat. 1
Tab
2 Fire extinguisher
X Pull tab 1upwards.
X Remove fire extinguisher 2. Spare wheel
The spare wheel is mounted in a cover on the
tailgate.
Removing the protective cover from the
tyre 1
Protective tyre cover
2 Rubber ring
X Pull rubber ring 2of protective tyre cover
1 apart.
X Pull off protective tyre cover 1.Removing the stainless-steel spare
wheel cover* 1
Cover ring
2 Screwdriver 14
3 Tab
X Open the lock on cover ring 1with a
screwdriver 2or a similar tool.
X Fold tab 3down.
14 Not included in the vehicle tool kit. Practical advice
* optional
463_AKB; 1; 8, en-GB
wobuchh,
Version: 2.10.6 2008-07-17T15:19:41+02:00 - Seite 192Dateiname: 6515_4091_02_buchblock.pdf; preflight
Page 196 of 293
Where will I find...?
1934
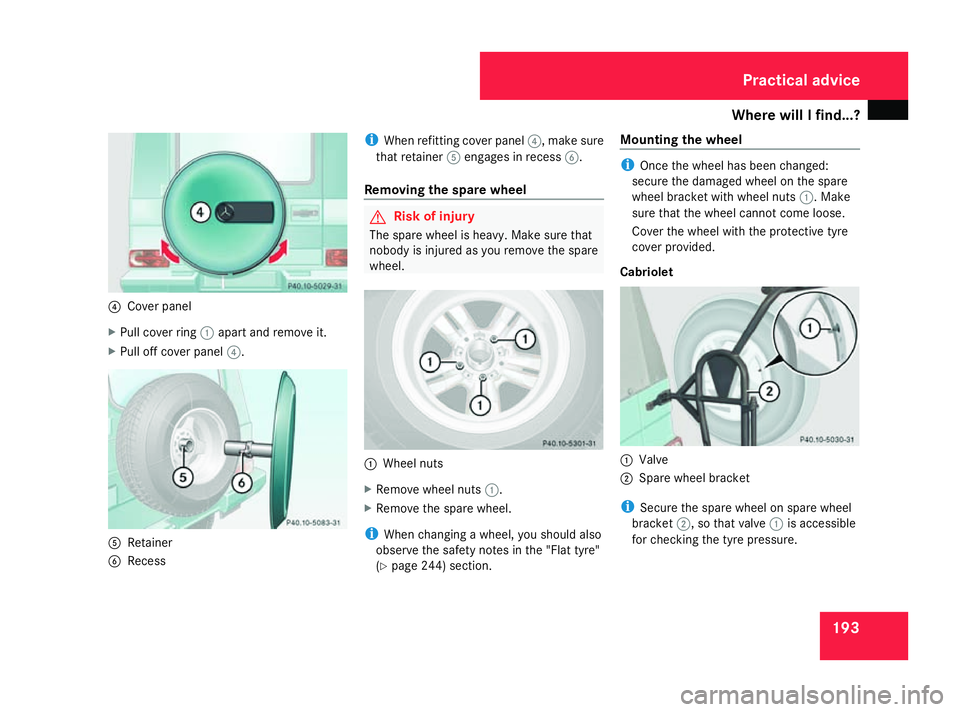
Cover panel
X Pull cover ring 1apart and remove it.
X Pull off cover panel 4. 5
Retainer
6 Recess i
When refitting cover panel 4, make sure
that retainer 5engages in recess 6.
Removing the spare wheel G
Risk of injury
The spare wheel is heavy. Make sure that
nobody is injured as you remove the spare
wheel. 1
Wheel nuts
X Remove wheel nuts 1.
X Remove the spare wheel.
i When changing a wheel, you should also
observe the safety notes in the "Flat tyre"
(Y page 244) section. Mounting the wheel i
Once the wheel has been changed:
secure the damaged wheel on the spare
wheel bracket with wheel nuts 1. Make
sure that the wheel cannot come loose.
Cover the wheel with the protective tyre
cover provided.
Cabriolet 1
Valve
2 Spare wheel bracket
i Secure the spare wheel on spare wheel
bracket 2, so that valve 1is accessible
for checking the tyre pressure. Practical advice
463_AKB; 1; 8, en-GB
wobuchh,
Version: 2.10.6 2008-07-17T15:19:41+02:00 - Seite 193 ZDateiname: 6515_4091_02_buchblock.pdf; preflight
Page 197 of 293
Display
messages 194 Display messages
Notes
The on-board computer shows warnings or
malfunctions in the multi-function display.
Certain display messages are accompanied
by a warning tone or a continuous tone.
The multi-function display shows high-priority
display messages in red. In the following
tables, these display messages are printed in
red.
Please respond in accordance with the dis-
play messages and follow the additional
notes in this Owner's Manual. G
Risk of accident
No further messages can be displayed if the
instrument cluster and/or the multi-func-
tion display fails. This means that you will not see information
about the driving situation, such as the
speed, outside temperature, warning/indi-
cator lamps, display messages or system
failures. The vehicle's handling character-
istics may be affected. Adjust your driving
style and speed accordingly.
Immediately consult a qualified specialist
workshop which has the necessary special-
ist knowledge and tools to carry out the
work required. Mercedes-Benz recom-
mends that you use a Mercedes-Benz
Service Centre for this purpose. In particu-
lar, work relevant to safety or on safety-
related systems must be carried out at a
qualified specialist workshop.
The following tables contain all the display
messages. Hiding display messages After a few seconds, the on-board computer
automatically hides some low priority display
messages. Other messages remain visible in
the multi-function display until you hide them
yourself.
Some high priority display messages cannot
be hidden. The multi-function display shows
these messages continuously until the cau-
ses of the messages have been remedied.
Use the buttons on the multi-function steer-
ing wheel.
X
Use the è,·,jork button
to select another display.
The on-board computer saves certain dis-
play messages in the message mem-
ory (Ypage 103). Practical advice
463_AKB; 1; 8, en-GB
wobuchh,
Version: 2.10.6 2008-07-17T15:19:41+02:00 - Seite 194Dateiname: 6515_4091_02_buchblock.pdf; preflight
Page 198 of 293
Display
messages 195Text messages
G
Risk of ac
cident and injury
If maintenance work is carried out incorrectly this can jeopardise the operating safety of your vehicle. You risk losing control of your vehicle
and thereby causing an accident. The safety systems may also no longer be able to protect you or others as they are designed to do.
Always have maintenance work carried out at a qualified specialist workshop which has the necessary specialist knowledge and tools to
carry out the work required.
Mercedes-Benz recommends that you use a Mercedes-Benz Service Centre for this purpose.
In particular, all work relevant to safety or on safety-related systems must be carried out at a qualified specialist workshop. Practical advice
463_AKB; 1; 8, en-GB
wobuchh,
Version: 2.10.6 2008-07-17T15:19:41+02:00 - Seite 195 ZDateiname: 6515_4091_02_buchblock.pdf; preflight
Page 199 of 293
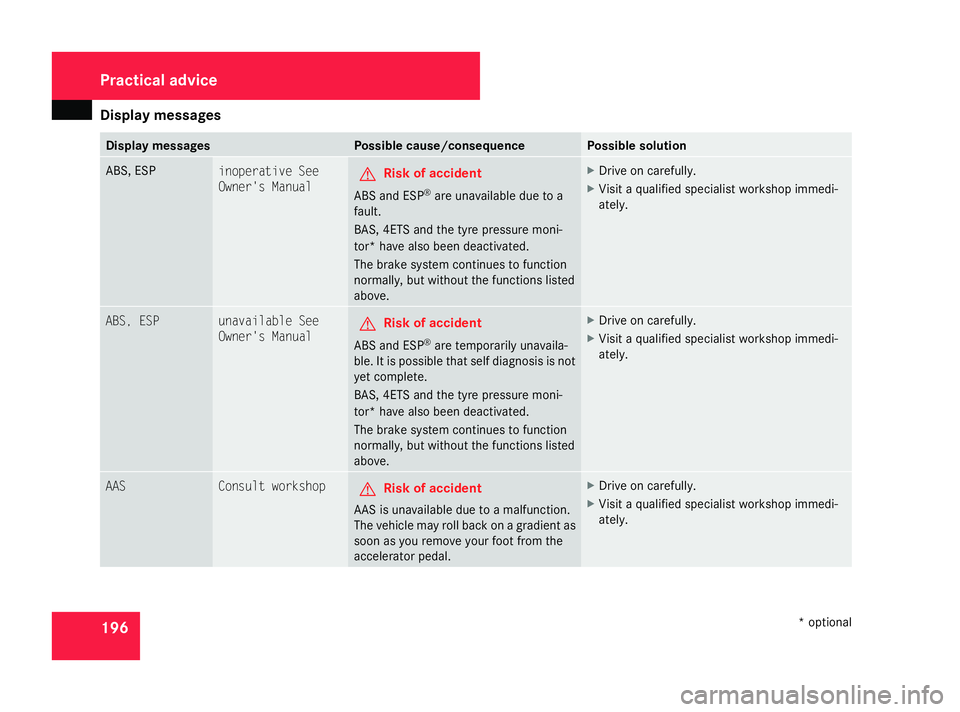
Display
messages 196 Display messages Possible cause/consequence Possible solution
ABS, ESP
inoperative See
Owner's Manual
G
Risk of accident
ABS and ESP ®
are unavailable due to a
fault.
BAS, 4ETS and the tyre pressure moni-
tor* have also been deactivated.
The brake system continues to function
normally, but without the functions listed
above. X
Drive on carefully.
X Visit a qualified specialist workshop immedi-
ately. ABS, ESP unavailable See
Owner's Manual
G
Risk of accident
ABS and ESP ®
are temporarily unavaila-
ble. It is possible that self diagnosis is not
yet complete.
BAS, 4ETS and the tyre pressure moni-
tor* have also been deactivated.
The brake system continues to function
normally, but without the functions listed
above. X
Drive on carefully.
X Visit a qualified specialist workshop immedi-
ately. AAS Consult workshop
G
Risk of accident
AAS is unavailable due to a malfunction.
The vehicle may roll back on a gradient as
soon as you remove your foot from the
accelerator pedal. X
Drive on carefully.
X Visit a qualified specialist workshop immedi-
ately. Practical advice
* optional
463_AKB; 1; 8, en-GB
wobuchh,
Version: 2.10.6 2008-07-17T15:19:41+02:00 - Seite 196Dateiname: 6515_4091_02_buchblock.pdf; preflight
Page 200 of 293
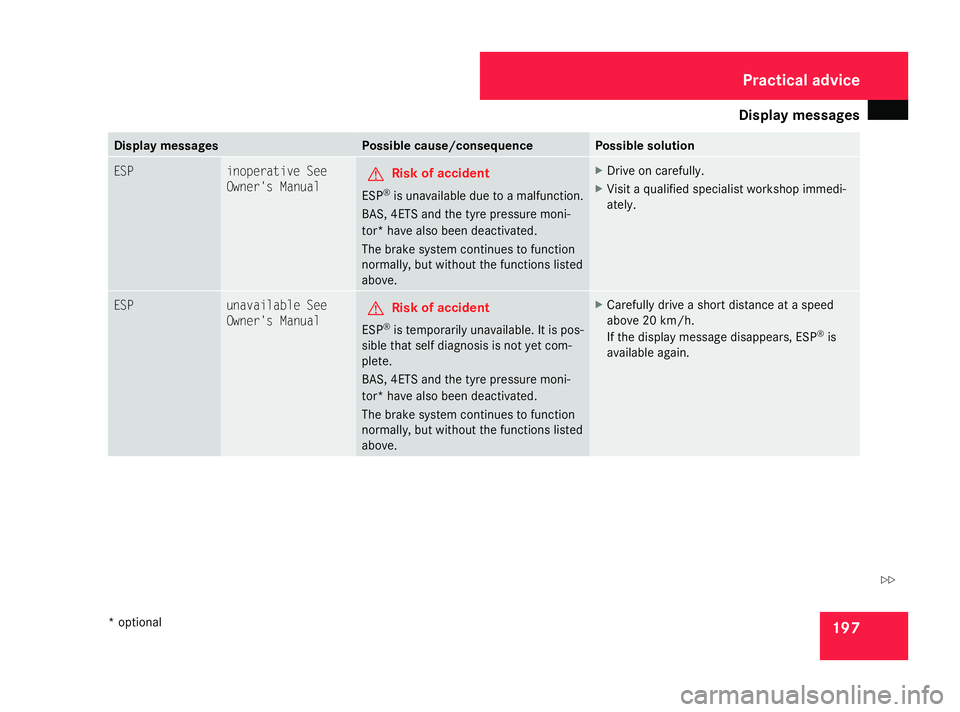
Display
messages 197Display messages Possible cause/consequence Possible solution
ESP inoperative See
Owner's Manual G
Risk of accident
ESP ®
is unavailable due to a malfunction.
BAS, 4ETS and the tyre pressure moni-
tor* have also been deactivated.
The brake system continues to function
normally, but without the functions listed
above. X
Drive on carefully.
X Visit a qualified specialist workshop immedi-
ately. ESP unavailable See
Owner's Manual G
Risk of accident
ESP ®
is temporarily unavailable. It is pos-
sible that self diagnosis is not yet com-
plete.
BAS, 4ETS and the tyre pressure moni-
tor* have also been deactivated.
The brake system continues to function
normally, but without the functions listed
above. X
Carefully drive a short distance at a speed
above 20 km/h.
If the display message disappears, ESP ®
is
available again. Practical advice
* optional
463_AKB; 1; 8, en-GB
wobuchh,
Version: 2.10.6 2008-07-17T15:19:41+02:00 - Seite 197 ZDateiname: 6515_4091_02_buchblock.pdf; preflight