tow MERCEDES-BENZ G-CLASS SUV 2008 Owner's Manual
[x] Cancel search | Manufacturer: MERCEDES-BENZ, Model Year: 2008, Model line: G-CLASS SUV, Model: MERCEDES-BENZ G-CLASS SUV 2008Pages: 293, PDF Size: 4.49 MB
Page 93 of 293
Transmission
90
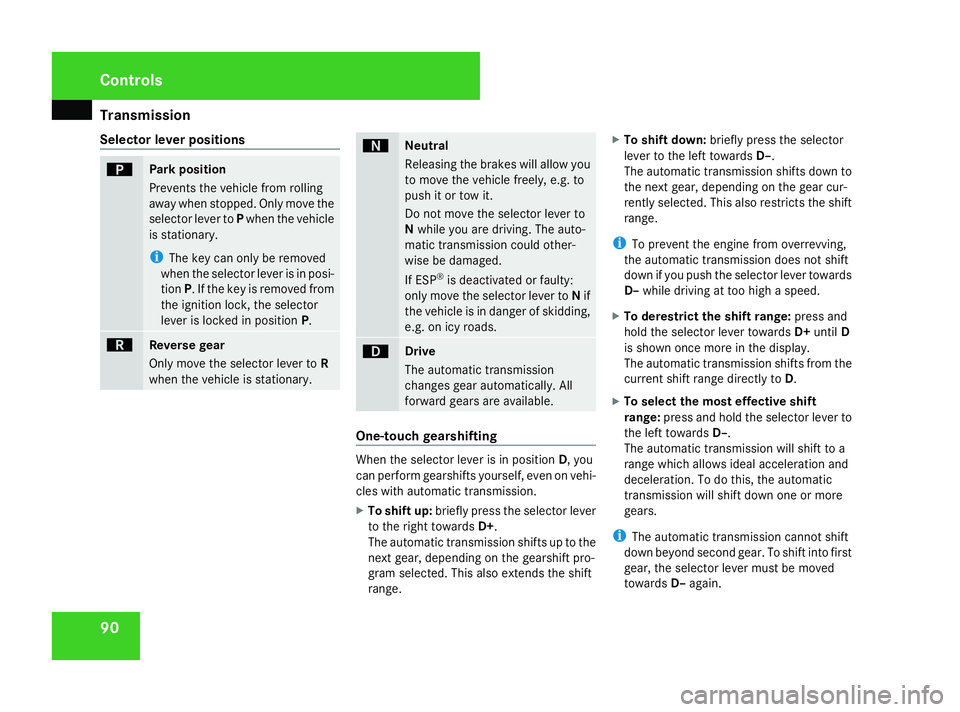
Selector lever positions ì
Park position
Prevents the vehicle from rolling
away when stopped. Only move the
selector lever to Pwhen the vehicle
is stationary.
i The key can only be removed
when the selector lever is in posi-
tion P. If the key is removed from
the ignition lock, the selector
lever is locked in position P.í
Reverse gear
Only move the selector lever to
R
when the vehicle is stationary. ë
Neutral
Releasing the brakes will allow you
to move the vehicle freely, e.g. to
push it or tow it.
Do not move the selector lever to
N
while you are driving. The auto-
matic transmission could other-
wise be damaged.
If ESP ®
is deactivated or faulty:
only move the selector lever to Nif
the vehicle is in danger of skidding,
e.g. on icy roads. ê
Drive
The automatic transmission
changes gear automatically. All
forward gears are available.
One-touch gearshifting
When the selector lever is in position
D, you
can perform gearshifts yourself, even on vehi-
cles with automatic transmission.
X To shift up: briefly press the selector lever
to the right towards D+.
The automatic transmission shifts up to the
next gear, depending on the gearshift pro-
gram selected. This also extends the shift
range. X
To shift down: briefly press the selector
lever to the left towards D–.
The automatic transmission shifts down to
the next gear, depending on the gear cur-
rently selected. This also restricts the shift
range.
i To prevent the engine from overrevving,
the automatic transmission does not shift
down if you push the selector lever towards
D– while driving at too high a speed.
X To derestrict the shift range: press and
hold the selector lever towards D+until D
is shown once more in the display.
The automatic transmission shifts from the
current shift range directly to D.
X To select the most effective shift
range: press and hold the selector lever to
the left towards D–.
The automatic transmission will shift to a
range which allows ideal acceleration and
deceleration. To do this, the automatic
transmission will shift down one or more
gears.
i The automatic transmission cannot shift
down beyond second gear. To shift into first
gear, the selector lever must be moved
towards D–again. Controls
463_AKB; 1; 8, en-GB
wobuchh
,V ersion: 2.10.6
2008-07-17T15:19:41+02:00 - Seite 90 Dateiname: 6515_4091_02_buchblock.pdf; preflight
Page 94 of 293
Transmission
91
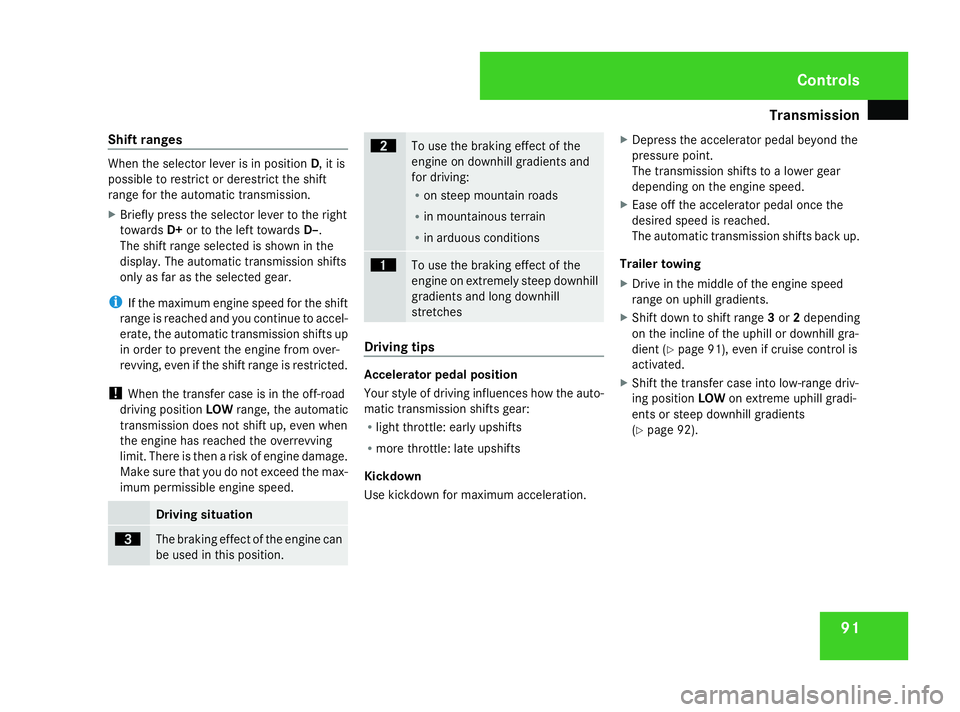
Shift ranges When the selector lever is in position
D, it is
possible to restrict or derestrict the shift
range for the automatic transmission.
X Briefly press the selector lever to the right
towards D+or to the left towards D–.
The shift range selected is shown in the
display. The automatic transmission shifts
only as far as the selected gear.
i If the maximum engine speed for the shift
range is reached and you continue to accel-
erate, the automatic transmission shifts up
in order to prevent the engine from over-
revving, even if the shift range is restricted.
! When the transfer case is in the off-road
driving position LOWrange, the automatic
transmission does not shift up, even when
the engine has reached the overrevving
limit. There is then a risk of engine damage.
Make sure that you do not exceed the max-
imum permissible engine speed. Driving situation
è
The braking effect of the engine can
be used in this position. ç
To use the braking effect of the
engine on downhill gradients and
for driving:
R
on steep mountain roads
R in mountainous terrain
R in arduous conditions æ
To use the braking effect of the
engine on extremely steep downhill
gradients and long downhill
stretches
Driving tips
Accelerator pedal position
Your style of driving influences how the auto-
matic transmission shifts gear:
R light throttle: early upshifts
R more throttle: late upshifts
Kickdown
Use kickdown for maximum acceleration. X
Depress the accelerator pedal beyond the
pressure point.
The transmission shifts to a lower gear
depending on the engine speed.
X Ease off the accelerator pedal once the
desired speed is reached.
The automatic transmission shifts back up.
Trailer towing
X Drive in the middle of the engine speed
range on uphill gradients.
X Shift down to shift range 3or 2depending
on the incline of the uphill or downhill gra-
dient (Y page 91), even if cruise control is
activated.
X Shift the transfer case into low-range driv-
ing position LOWon extreme uphill gradi-
ents or steep downhill gradients
(Y page 92). Controls
463_AKB; 1; 8, en-GB
wobuchh
,V ersion: 2.10.6
2008-07-17T15:19:41+02:00 - Seite 91 ZDateiname: 6515_4091_02_buchblock.pdf; preflight
Page 95 of 293
Transmission
92 Transfer case
The vehicle has permanent all-wheel drive.
The front and rear axles are being constantly
driven.
You will find further information about driving
off-road in the "Operation" section
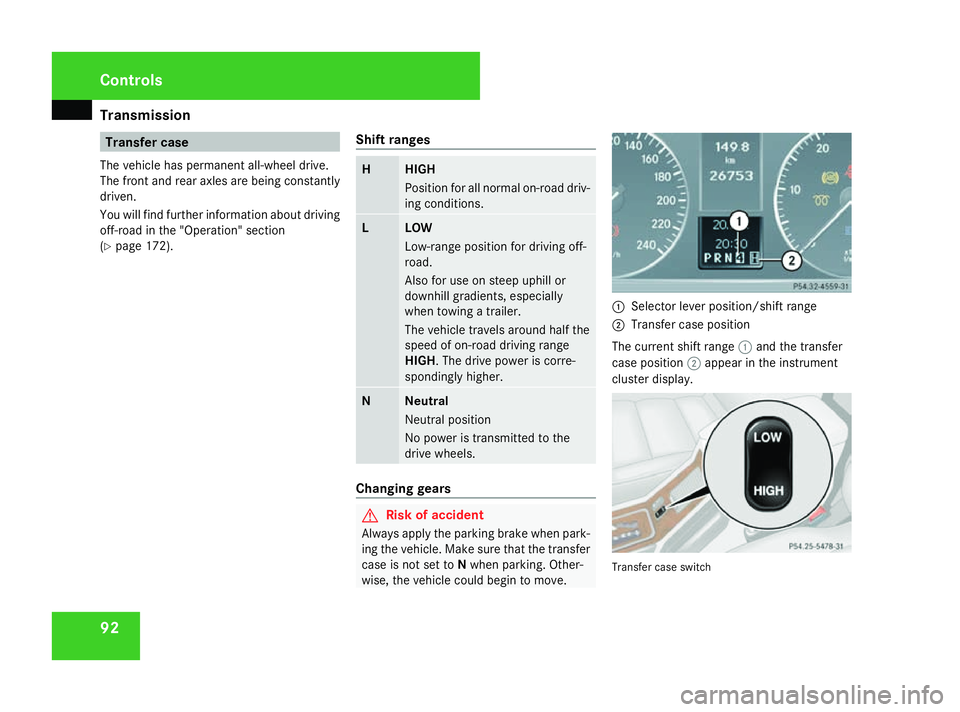
(Y page 172). Shift ranges H HIGH
Position for all normal on-road driv-
ing conditions.
L LOW
Low-range position for driving off-
road.
Also for use on steep uphill or
downhill gradients, especially
when towing a trailer.
The vehicle travels around half the
speed of on-road driving range
HIGH. The drive power is corre-
spondingly higher.
N Neutral
Neutral position
No power is transmitted to the
drive wheels.
Changing gears
G
Risk of accident
Always apply the parking brake when park-
ing the vehicle. Make sure that the transfer
case is not set to Nwhen parking. Other-
wise, the vehicle could begin to move. 1
Selector lever position/shift range
2 Transfer case position
The current shift range 1and the transfer
case position 2appear in the instrument
cluster display. Transfer case switchControls
463_AKB; 1; 8, en-GB
wobuchh
,V ersion: 2.10.6
2008-07-17T15:19:41+02:00 - Seite 92 Dateiname: 6515_4091_02_buchblock.pdf; preflight
Page 116 of 293
Driving sys
tems 113
If the call is connected, the call duration
appears in the multi-function display. If it is
stored in the phone book, the name is also
displayed. Otherwise, the number dialled is
displayed.
or
X If you do not wish to make a call, press the
ì button.
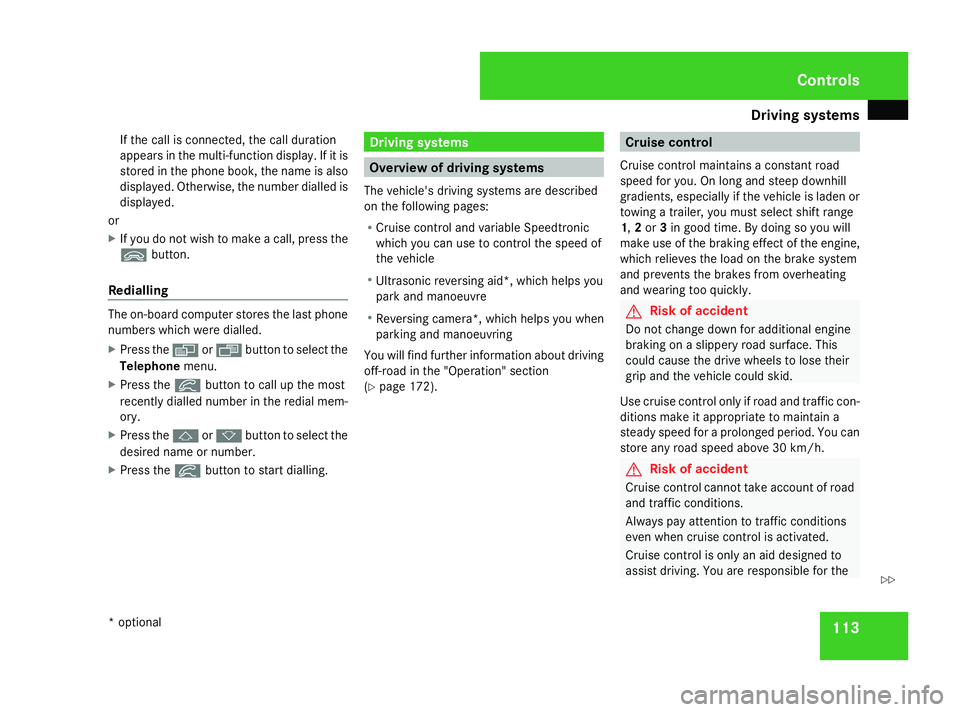
Redialling The on-board computer stores the last phone
numbers which were dialled.
X
Press the èor· button to select the
Telephone menu.
X Press the íbutton to call up the most
recently dialled number in the redial mem-
ory.
X Press the jork button to select the
desired name or number.
X Press the íbutton to start dialling. Driving systems
Overview of driving systems
The vehicle's driving systems are described
on the following pages:
R Cruise control and variable Speedtronic
which you can use to control the speed of
the vehicle
R Ultrasonic reversing aid*, which helps you
park and manoeuvre
R Reversing camera *,which helps you when
parking and manoeuvring
You will find further information about driving
off-road in the "Operation" section
(Y page 172). Cruise control
Cruise control maintains a constant road
speed for you. On long and steep downhill
gradients, especially if the vehicle is laden or
towing a trailer, you must select shift range
1, 2or 3in good time. By doing so you will
make use of the braking effect of the engine,
which relieves the load on the brake system
and prevents the brakes from overheating
and wearing too quickly. G
Risk of accident
Do not change down for additional engine
braking on a slippery road surface. This
could cause the drive wheels to lose their
grip and the vehicle could skid.
Use cruise control only if road and traffic con-
ditions make it appropriate to maintain a
steady speed for a prolonged period. You can
store any road speed above 30 km/h. G
Risk of accident
Cruise control cannot take account of road
and traffic conditions.
Always pay attention to traffic conditions
even when cruise control is activated.
Cruise control is only an aid designed to
assist driving. You are responsible for the Cont
rols
* option al
463_AKB; 1; 8, en-GB
wobuchh,
Version: 2.10.6 2008-07-17T15:19:41+02:00 - Seite 113 ZDateiname: 6515_4091_02_buchblock.pdf; preflight
Page 118 of 293
Driving sys
tems 115
Calling up the last speed stored G
Risk of accident
Only select a stored speed if you know what
that speed is and whether it is suitable for
the current situation. Otherwise, sudden
acceleration or braking could endanger you
or others.
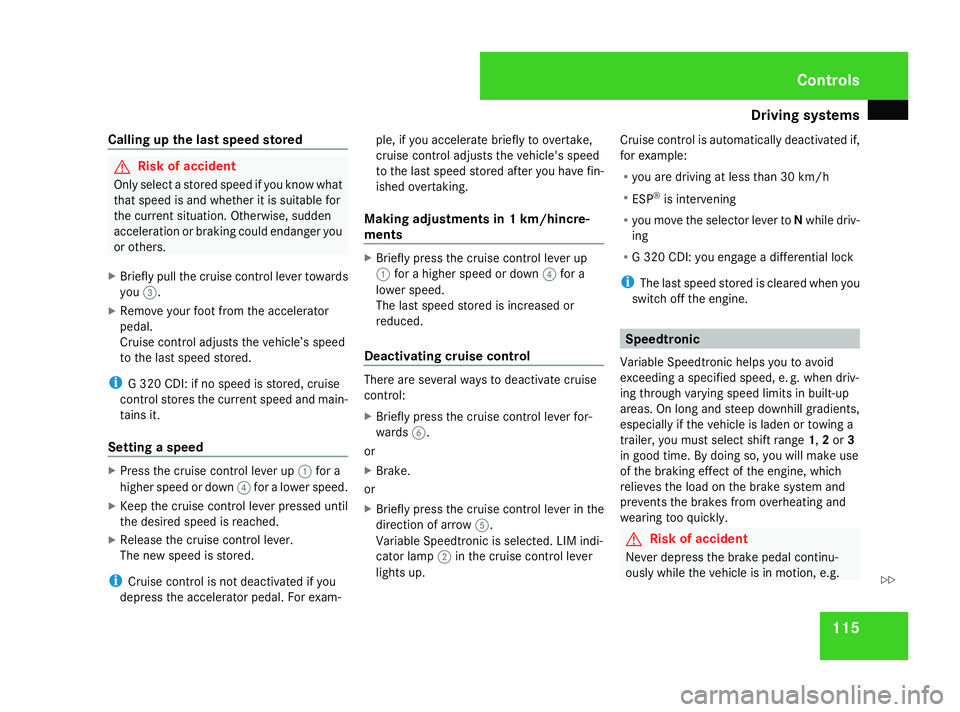
X Briefly pull the cruise control lever towards
you 3.
X Remove your foot from the accelerator
pedal.
Cruise control adjusts the vehicle’s speed
to the last speed stored.
i G 320 CDI: if no speed is stored, cruise
control stores the current speed and main-
tains it.
Setting a speed X
Press the cruise control lever up 1for a
higher speed or down 4for a lower speed.
X Keep the cruise control lever pressed until
the desired speed is reached.
X Release the cruise control lever.
The new speed is stored.
i Cruise control is not deactivated if you
depress the accelerator pedal. For exam- ple, if you accelerate briefly to overtake,
cruise control adjusts the vehicle's speed
to the last speed stored after you have fin-
ished overtaking.
Making adjustments in 1 km/hincre-
ments X
Briefly press the cruise control lever up
1 for a higher speed or down 4for a
lower speed.
The last speed stored is increased or
reduced.
Deactivating cruise control There are several ways to deactivate cruise
control:
X Briefly press the cruise control lever for-
wards 6.
or
X Brake.
or
X Briefly press the cruise control lever in the
direction of arrow 5.
Variable Speedtronic is selected. LIM indi-
cator lamp 2in the cruise control lever
lights up. Cruise control is automatically deactivated if,
for example:
R
you are driving at less than 30 km/h
R ESP ®
is intervening
R you move the selector lever to Nwhile driv-
ing
R G 320 CDI: you engage a differential lock
i The last speed stored is cleared when you
switch off the engine. Speedtronic
Variable Speedtronic helps you to avoid
exceeding a specified speed, e. g. when driv-
ing through varying speed limits in built-up
areas. On long and steep downhill gradients,
especially if the vehicle is laden or towing a
trailer, you must select shift range 1,2or 3
in good time. By doing so, you will make use
of the braking effect of the engine, which
relieves the load on the brake system and
prevents the brakes from overheating and
wearing too quickly. G
Risk of accident
Never depress the brake pedal continu-
ously while the vehicle is in motion, e.g. Controls
463_AKB; 1; 8, en-GB
wobuchh
,V ersion: 2.10.6
2008-07-17T15:19:41+02:00 - Seite 115 ZDateiname: 6515_4091_02_buchblock.pdf; preflight
Page 120 of 293
Driving sys
tems 117than the stored limit speed allows. You
could otherwise cause an accident.
You can only exceed the limit speed stored
if you deactivate variable Speedtronic:
R
using the cruise control lever.
R by depressing the accelerator pedal
beyond the pressure point (kickdown).
It is not possible to deactivate variable
Speedtronic by braking.
Storing the current speed You can use the cruise control lever to limit
the speed to any speed above 30 km/h while
the engine is running.
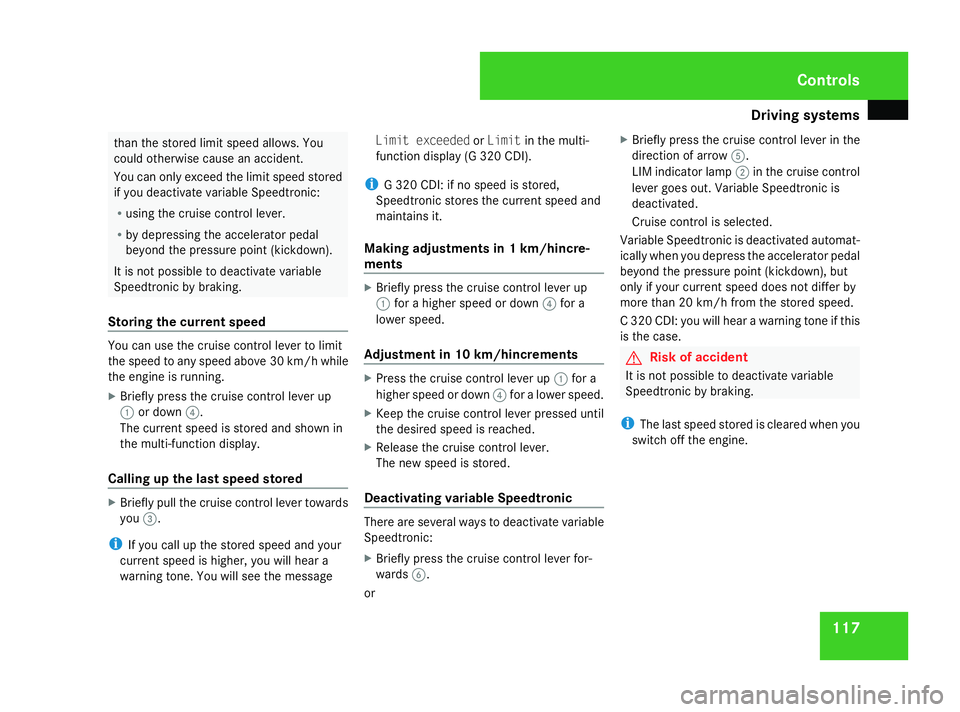
X Briefly press the cruise control lever up
1 or down 4.
The current speed is stored and shown in
the multi-function display.
Calling up the last speed stored X
Briefly pull the cruise control lever towards
you 3.
i If you call up the stored speed and your
current speed is higher, you will hear a
warning tone. You will see the message Limit exceeded
orLimit in the multi-
function display (G 320 CDI).
i G 320 CDI: if no speed is stored,
Speedtronic stores the current speed and
maintains it.
Making adjustments in 1 km/hincre-
ments X
Briefly press the cruise control lever up
1 for a higher speed or down 4for a
lower speed.
Adjustment in 10 km/hincrements X
Press the cruise control lever up 1for a
higher speed or down 4for a lower speed.
X Keep the cruise control lever pressed until
the desired speed is reached.
X Release the cruise control lever.
The new speed is stored.
Deactivating va riable Speedtronic There are several ways to deactivate variable
Speedtronic:
X
Briefly press the cruise control lever for-
wards 6.
or X
Briefly press the cruise control lever in the
direction of arrow 5.
LIM indicator lamp 2in the cruise control
lever goes out. Variable Speedtronic is
deactivated.
Cruise control is selected.
Variable Speedtronic is deactivated automat-
ically when you depress the accelerator pedal
beyond the pressure point (kickdown), but
only if your current speed does not differ by
more than 20 km/h from the stored speed.
C 320 CDI: you will hear a warning tone if this
is the case. G
Risk of accident
It is not possible to deactivate variable
Speedtronic by braking.
i The last speed stored is cleared when you
switch off the engine. Controls
463_AKB; 1; 8, en-GB
wobuchh
,V ersion: 2.10.6
2008-07-17T15:19:41+02:00 - Seite 117 ZDateiname: 6515_4091_02_buchblock.pdf; preflight
Page 122 of 293
Driving sys
tems 119
!
When parking, pay particular attention to
objects above or below the sensors, such
as flower pots or trailer towbars. The ultra-
sonic reversing aid does not detect such
objects when they are in the immediate
vicinity of the vehicle. You could damage
the vehicle or the objects.
Ultrasonic sources such as an automatic
car wash, a lorry's compressed-air brakes
or a pneumatic drill could cause the ultra-
sonic reversing aid to malfunction.
Minimum distance Centre Approximately 30 cm
Corners Approximately 30 cm
If there is an obstacle within this range, all
warning displays flash and a warning tone
sounds. If the distance falls below the mini-
mum clearance, it may no longer be shown.
Warning displays
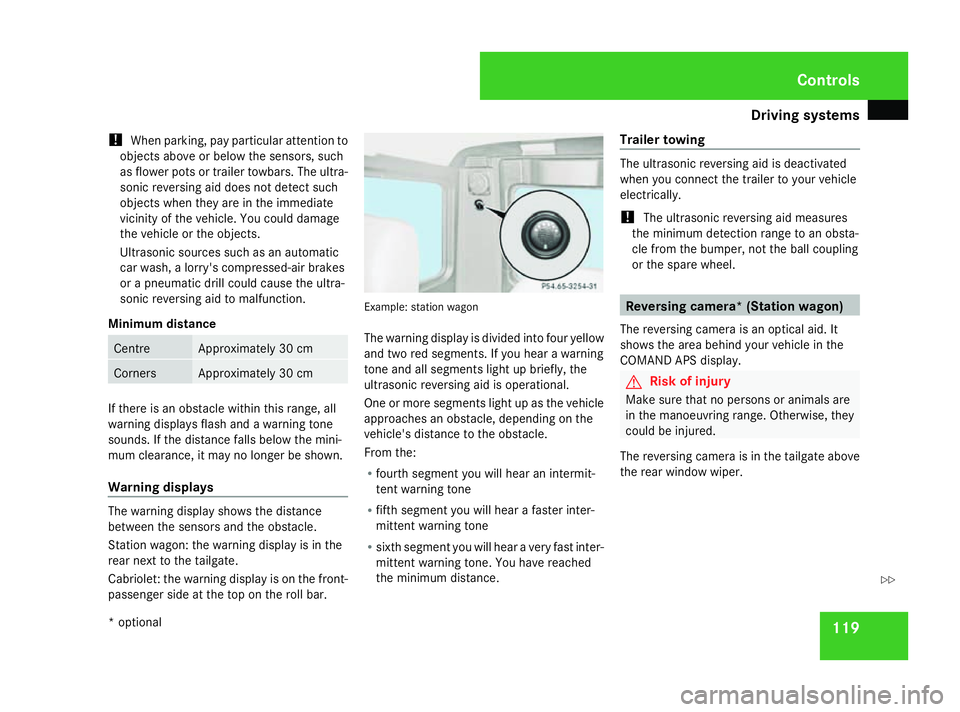
The warning display shows the distance
between the sensors and the obstacle.
Station wagon: the warning display is in the
rear next to the tailgate.
Cabriolet: the warning display is on the front-
passenger side at the top on the roll bar. Example: station wagon
The warning display is divided into four yellow
and two red segments. If you hear a warning
tone and all segments light up briefly, the
ultrasonic reversing aid is operational.
One or more segments light up as the vehicle
approaches an obstacle, depending on the
vehicle's distance to the obstacle.
From the:
R
fourth segment you will hear an intermit-
tent warning tone
R fifth segment you will hear a faster inter-
mittent warning tone
R sixth segment you will hear a very fast inter-
mittent warning tone. You have reached
the minimum distance. Trailer towing The ultrasonic reversing aid is deactivated
when you connect the trailer to your vehicle
electrically.
!
The ultrasonic reversing aid measures
the minimum detection range to an obsta-
cle from the bumper, not the ball coupling
or the spare wheel. Reversing camera* (Station wagon)
The reversing camera is an optical aid. It
shows the area behind your vehicle in the
COMAND APS display. G
Risk of injury
Make sure that no persons or animals are
in the manoeuvring range. Otherwise, they
could be injured.
The reversing camera is in the tailgate above
the rear window wiper. Controls
* optional
463_AKB; 1; 8, en-GB
wobuchh
,V ersion: 2.10.6
2008-07-17T15:19:41+02:00 - Seite 119 ZDateiname: 6515_4091_02_buchblock.pdf; preflight
Page 124 of 293
Air conditioning
121
i
The reversing camera also functions
when towing a trailer.
Switching off the reversing camera X
Shift the automatic transmission to P,Nor
D.
or
X In COMAND APS, activate another func-
tion. (See the separate COMAND APS oper-
ating instructions.) Air conditioning
General notes
The vehicle is equipped with the Thermatic
air-conditioning system. Thermatic combines
an automatic heating and ventilation system
with a cooling system.
Thermatic controls the temperature and the
humidity of the vehicle interior and filters out
undesirable substances from the air.
Thermatic is only operational when the
engine is running. Optimum operation is ach-
ieved only when you drive with the side win-
dows and sliding/tilting sunroof* closed.
i Ventilate the vehicle for a brief period
during warm weather, e.g. using the sum-
mer opening feature (Y page 85). This will
speed up the cooling process and the desired interior temperature will be
reached more quickly.
i The integrated filter filters out most par-
ticles of dust and completely filters out pol-
len. A clogged filter reduces the amount of
air supplied to the vehicle interior. For this
reason, you should always observe the
interval for replacing the filter, which is
specified in the Service Booklet. As it
depends on environmental conditions, e.g.
heavy air pollution, the interval may be
shorter than stated in the Service Booklet. G
Risk of accident
Observe the settings recommended on the
following pages. The windows could other-
wise mist up. This may obstruct your view
of the traffic situation, thereby causing an
accident. Cont
rols
* option al
463_AKB; 1; 8, en-GB
wobuchh,
Version: 2.10.6 2008-07-17T15:19:41+02:00 - Seite 121 ZDateiname: 6515_4091_02_buchblock.pdf; preflight
Page 139 of 293
Cabriolet soft top
136 come loose. You could lose control of your
vehicle and injure yourself and other per-
sons.
Do not drive the vehicle with the draught
stop fitted if the rear seat is occupied.
Do not place any objects on top of the fitted
draught stop.
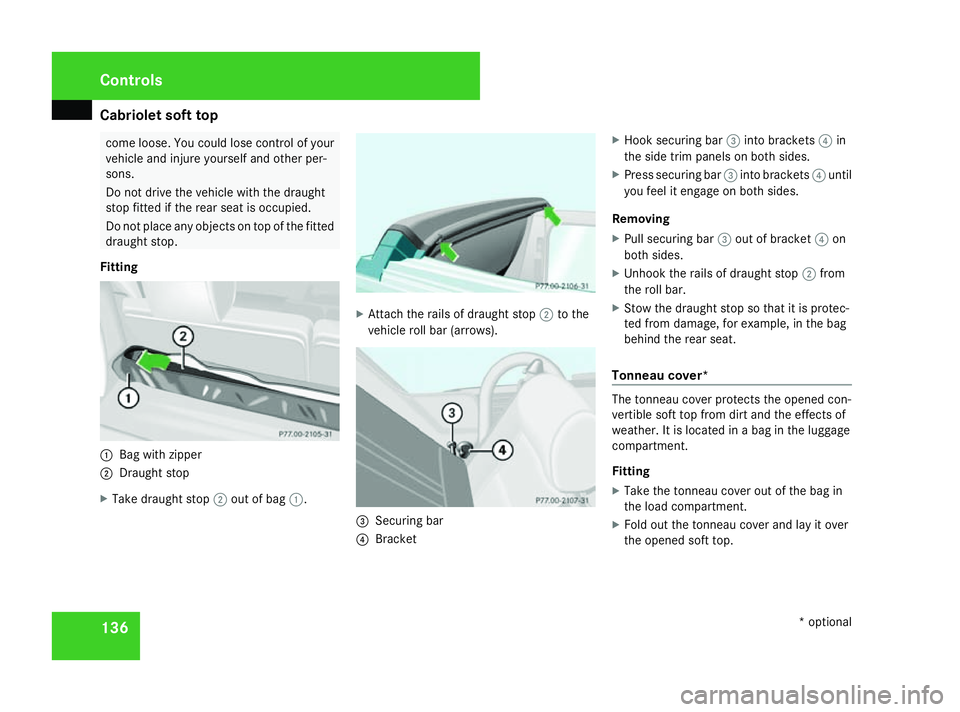
Fitting 1
Bag with zipper
2 Draught stop
X Take draught stop 2out of bag 1. X
Attach the rails of draught stop 2to the
vehicle roll bar (arrows). 3
Securing bar
4 Bracket X
Hook securing bar 3into brackets 4in
the side trim panels on both sides.
X Press securing bar 3into brackets 4until
you feel it engage on both sides.
Removing
X Pull securing bar 3out of bracket 4on
both sides.
X Unhook the rails of draught stop 2from
the roll bar.
X Stow the draught stop so that it is protec-
ted from damage, for example, in the bag
behind the rear seat.
Tonneau cover* The tonneau cover protects the opened con-
vertible soft top from dirt and the effects of
weather. It is located in a bag in the luggage
compartment.
Fitting
X
Take the tonneau cover out of the bag in
the load compartment.
X Fold out the tonneau cover and lay it over
the opened soft top. Controls
* optional
463_AKB; 1; 8, en-GB
wobuchh,
Version: 2.10.6
2008-07-17T15:19:41+02:00 - Seite 136 Dateiname: 6515_4091_02_buchblock.pdf; preflight
Page 140 of 293
Cabriolet soft top
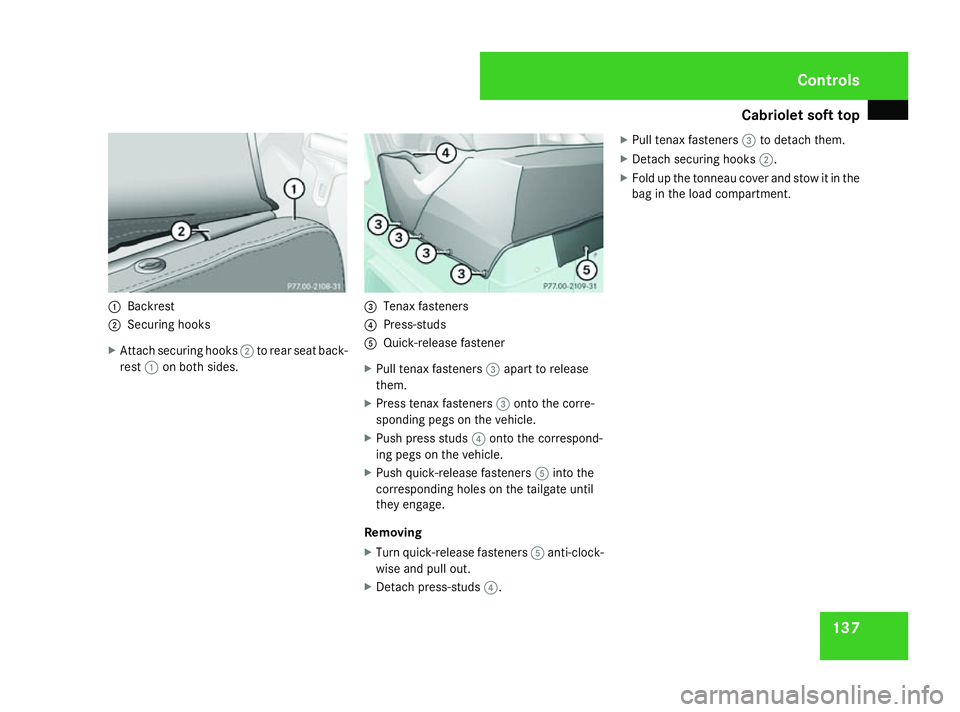
1371
Backrest
2 Securing hooks
X Attach securing hooks 2to rear seat back-
rest 1on both sides. 3
Tenax fasteners
4 Press-studs
5 Quick-release fastener
X Pull tenax fasteners 3apart to release
them.
X Press tenax fasteners 3onto the corre-
sponding pegs on the vehicle.
X Push press studs 4onto the correspond-
ing pegs on the vehicle.
X Push quick-release fasteners 5into the
corresponding holes on the tailgate until
they engage.
Removing
X Turn quick-release fasteners 5anti-clock-
wise and pull out.
X Detach press-studs 4. X
Pull tenax fasteners 3to detach them.
X Detach securing hooks 2.
X Fold up the tonneau cover and stow it in the
bag in the load compartment. Controls
463_AKB; 1; 8, en-GB
wobuchh,
Version: 2.10.6 2008-07-17T15:19:41+02:00 - Seite 137 ZDateiname: 6515_4091_02_buchblock.pdf; preflight