MERCEDES-BENZ G-CLASS SUV 2012 Owners Manual
Manufacturer: MERCEDES-BENZ, Model Year: 2012, Model line: G-CLASS SUV, Model: MERCEDES-BENZ G-CLASS SUV 2012Pages: 357, PDF Size: 8.86 MB
Page 271 of 357
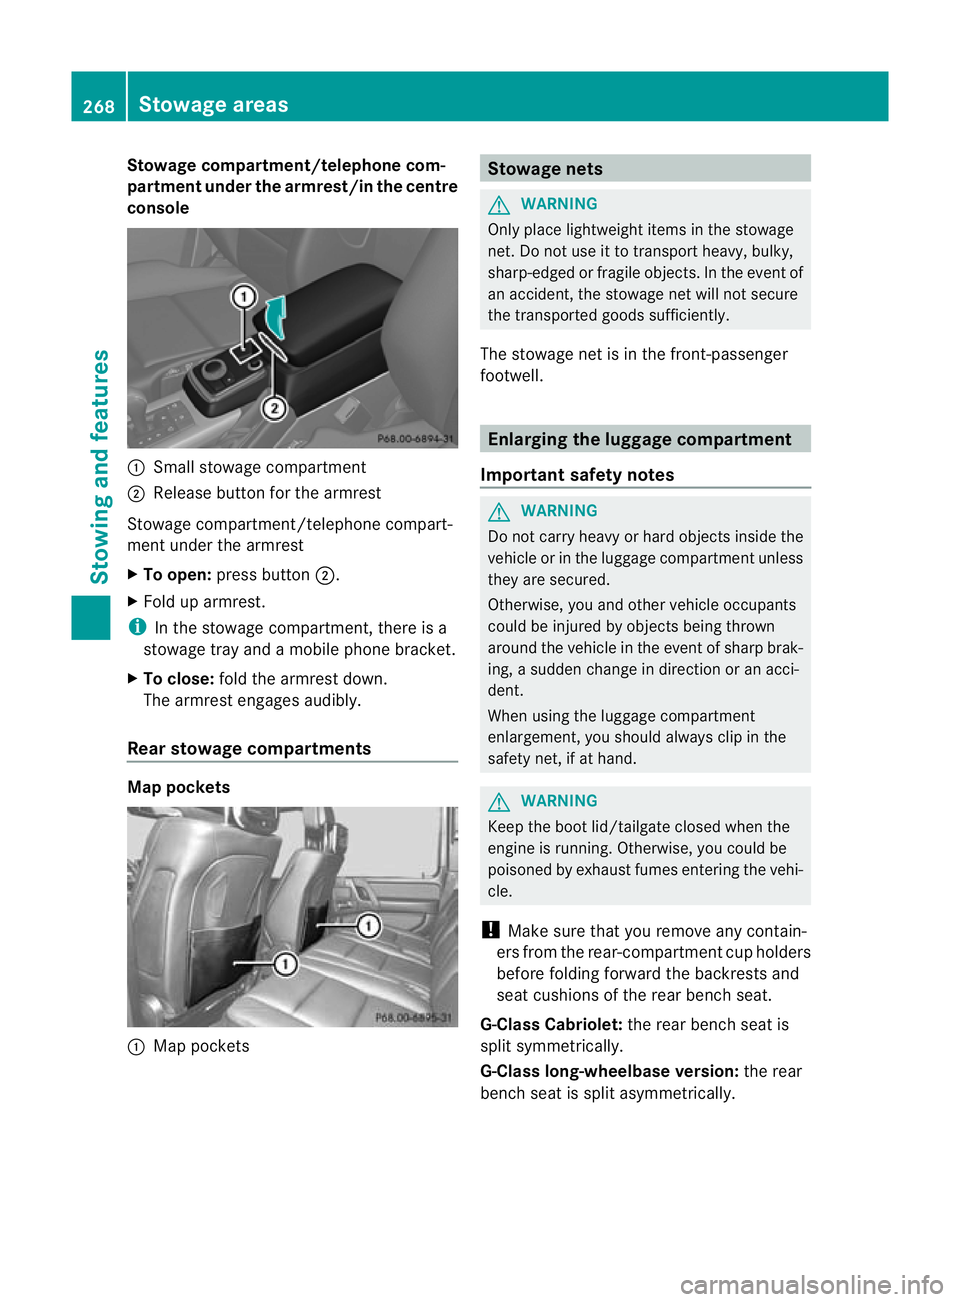
Stowage compartment/telephone com-
partment under the armrest/in the centre
console
:
Small stowage compartment
; Release button for the armrest
Stowage compartment/telephone compart-
ment under the armrest
X To open: press button ;.
X Fold up armrest.
i In the stowage compartment, there is a
stowage tray and a mobile phone bracket.
X To close: fold the armrest down.
The armrest engages audibly.
Rear stowage compartments Map pockets
:
Map pockets Stowage nets
G
WARNING
Only place lightweight items in the stowage
net. Do not use it to transport heavy, bulky,
sharp-edged or fragile objects. In the event of
an accident, the stowage net will not secure
the transported goods sufficiently.
The stowage net is in the front-passenger
footwell. Enlarging the luggage compartment
Important safety notes G
WARNING
Do not carry heavy or hard objects inside the
vehicle or in the luggage compartmen tunless
they are secured.
Otherwise, you and othe rvehicle occupants
could be injured by objects being thrown
around the vehicle in the event of sharp brak-
ing, a sudden change in direction or an acci-
dent.
When using the luggage compartment
enlargement, you should alway sclip in the
safety net, if at hand. G
WARNING
Keep the boot lid/tailgate closed when the
engine is running. Otherwise, you could be
poisoned by exhaust fumes entering the vehi-
cle.
! Make sure that you remove any contain-
ers fro mthe rear-compartment cup holders
before folding forward the backrests and
seat cushions of the rear bench seat.
G-Class Cabriolet: the rear bench seat is
split symmetrically.
G-Class long-wheelbase version: the rear
bench seat is split asymmetrically. 268
Stowage areasStowing and features
Page 272 of 357
The left-hand and right-hand rear seats can
be folded down to increase the load compart-
ment capacity. The following changes are
possible:
R fold the seat backrests forward
R fold the rear bench seat down fully.
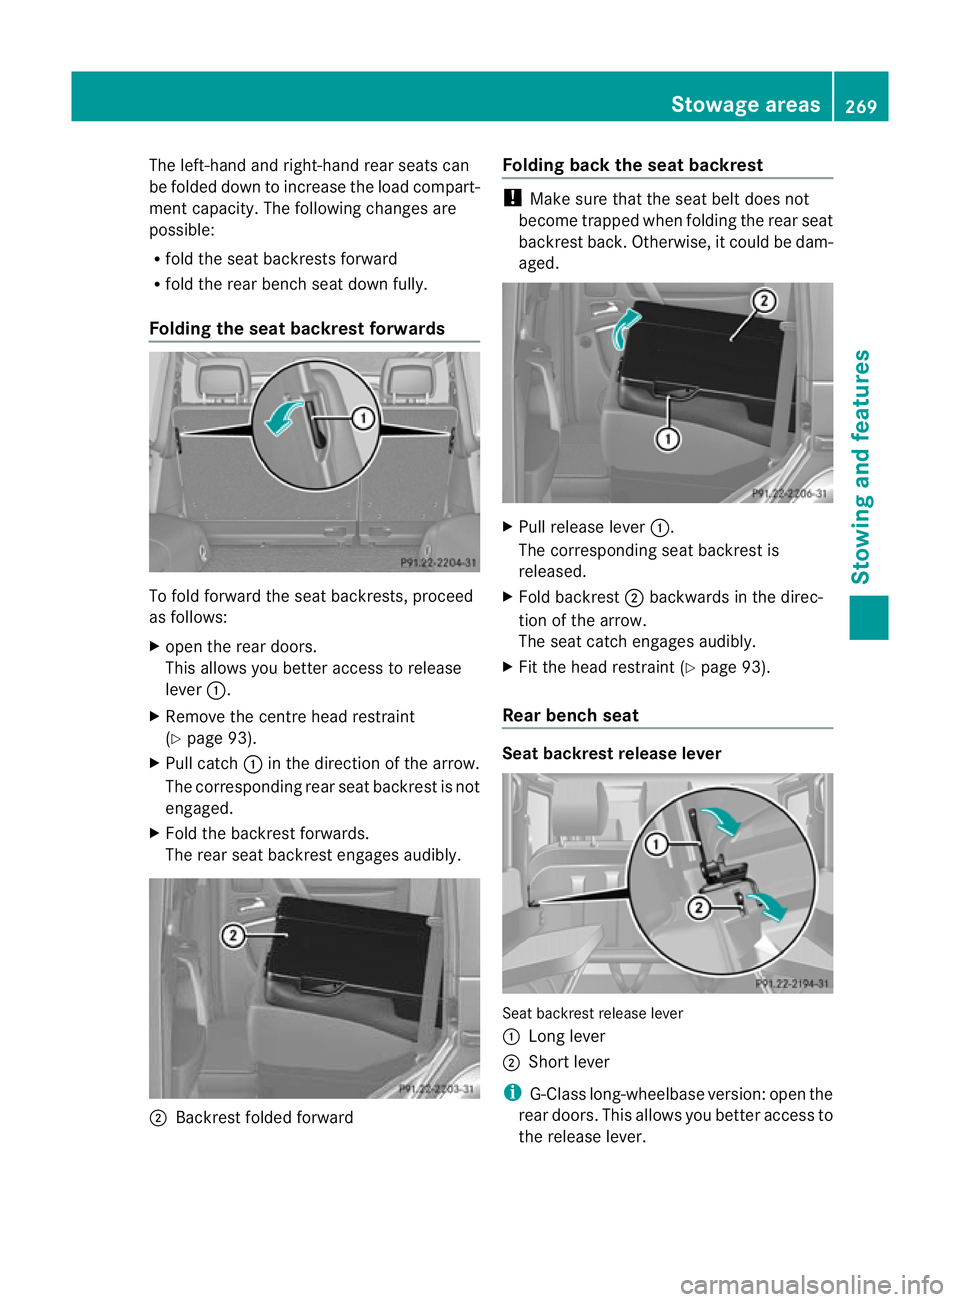
Folding the seat backrest forwards To fold forward the seat backrests, proceed
as follows:
X open the rear doors.
This allows you better access to release
lever :.
X Remove the centre head restraint
(Y page 93).
X Pull catch :in the direction of the arrow.
The corresponding rear seat backrest is not
engaged.
X Fold the backrest forwards.
The rear seat backrest engages audibly. ;
Backrest folded forward Folding back the seat backrest !
Make sure that the seat belt does not
become trapped when folding the rear seat
backrest back. Otherwise, it could be dam-
aged. X
Pull release lever :.
The corresponding seat backrest is
released.
X Fold backrest ;backwards in the direc-
tion of the arrow.
The seat catch engages audibly.
X Fit the head restraint (Y page 93).
Rear bench seat Seat backrest release lever
Seat backrest release lever
:
Long lever
; Short lever
i G-Class long-wheelbase version: open the
rear doors. This allows you better access to
the release lever. Stowage areas
269Stowing and features Z
Page 273 of 357
X
Remove the head restraints (Y page 93).
X Pull short lever ;in the direction of the
arrow and hold it.
X Pull long lever :in the direction of the
arrow and fold the seat backrest forwards.
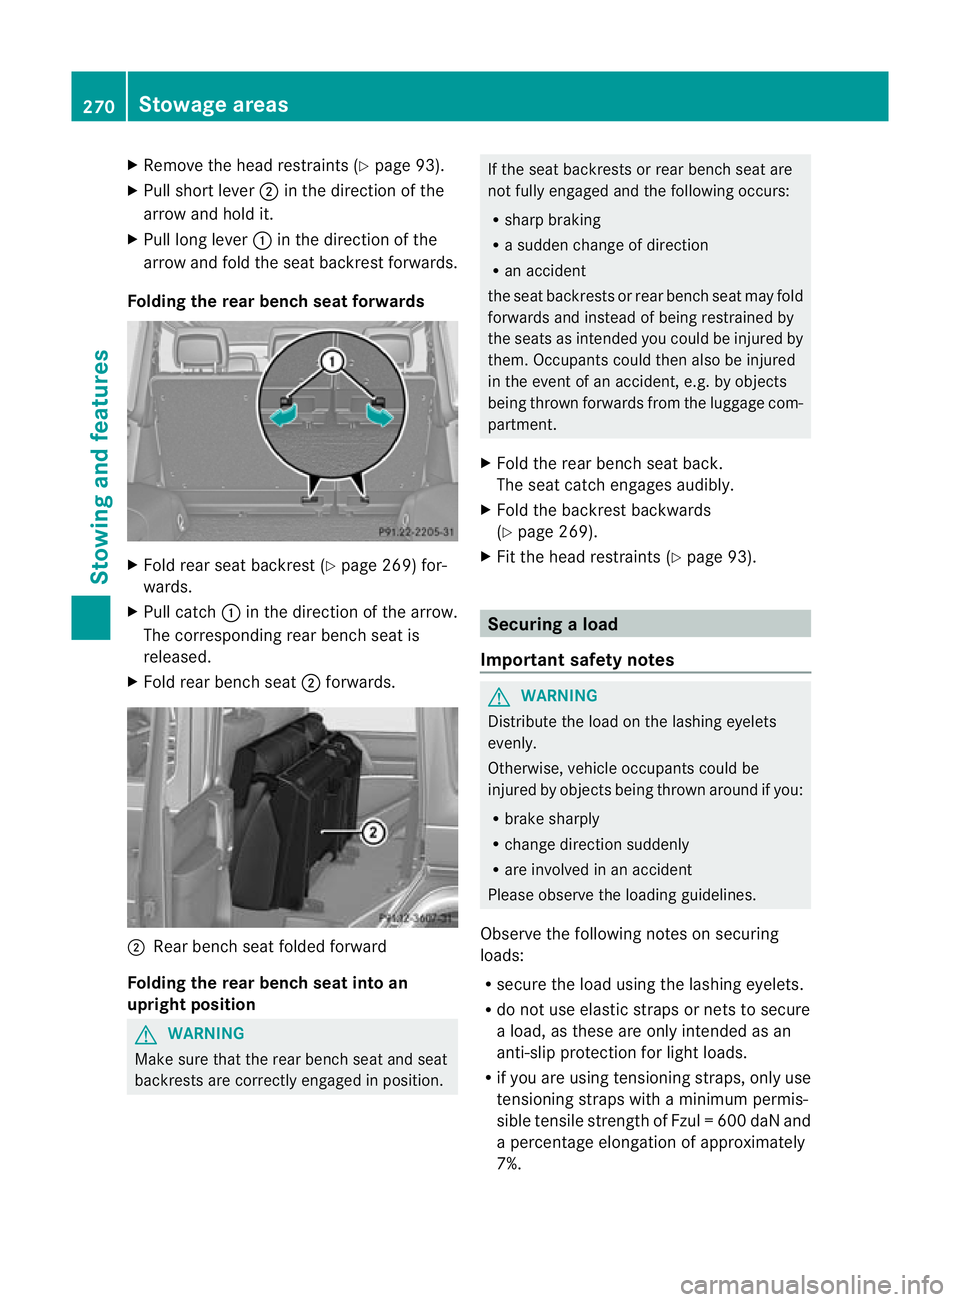
Folding the rear bench seat forwards X
Fold rear seat backrest (Y page 269) for-
wards.
X Pull catch :in the direction of the arrow.
The corresponding rear bench seat is
released.
X Fold rear bench seat ;forwards. ;
Rear bench seat folded forward
Folding the rear bench sea tinto an
upright position G
WARNING
Make sure that the rear bench seat and seat
backrests are correctly engaged in position. If the seat backrests or rear bench seat are
not fully engaged and the following occurs:
R sharp braking
R a sudden change of direction
R an accident
the seat backrests or rear bench seat may fold
forwards and instead of being restrained by
the seats as intended you could be injured by
them. Occupants could then also be injured
in the event of an accident, e.g. by objects
being thrown forwards from the luggage com-
partment.
X Fold the rear bench seat back.
The seat catch engages audibly.
X Fold the backrest backwards
(Y page 269).
X Fit the head restraints (Y page 93). Securing
aload
Important safety notes G
WARNING
Distribute the load on the lashing eyelets
evenly.
Otherwise, vehicle occupants could be
injured by objects being thrown around if you:
R brake sharply
R change directio nsuddenly
R are involved in an accident
Please observe the loading guidelines.
Observe the following notes on securing
loads:
R secure the load using the lashing eyelets.
R do no tuse elastic straps or nets to secure
a load, as these are only intended as an
anti-slip protection for light loads.
R if you are using tensioning straps, only use
tensioning straps with a minimum permis-
sible tensile strength of Fzul =600 daN and
a percentage elongatio nofapproximately
7%. 270
Stowage areasStowing and features
Page 274 of 357
R
do not route lashing materials across sharp
edges or corners.
R Pad sharp edges for protection.
R only use lashing material that has been
checked in accordance with applicable
standards, e.g. lashing nets or lashing
straps.
R fill the spaces between the load and the
load compartment walls and the wheel
mountings in a form-locking way. Only use
dimensionally stable transportation aids
for this, such as chocks, wooden fixings or
padding.
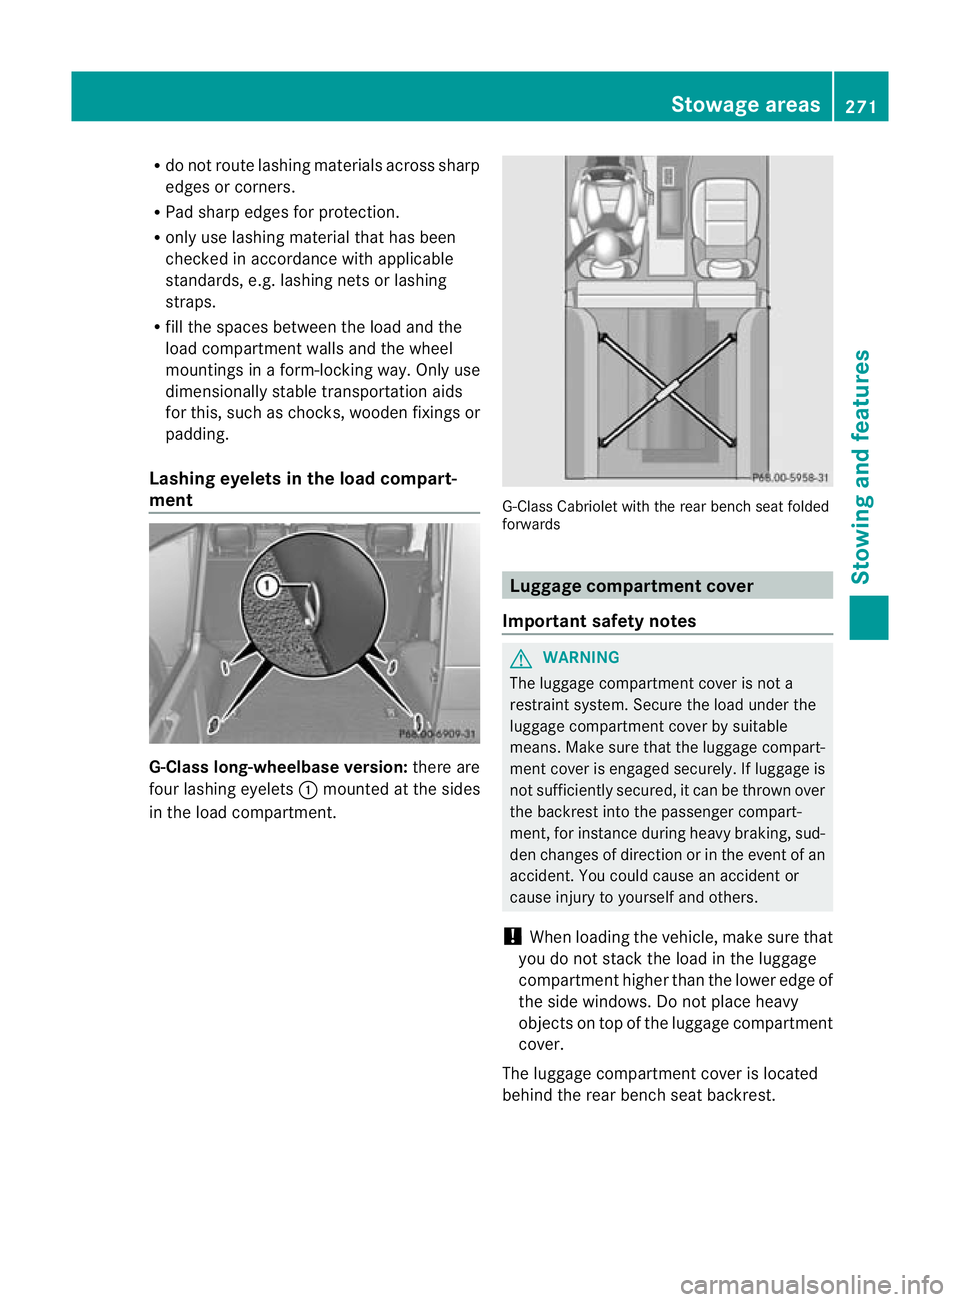
Lashing eyelets in the load compart-
ment G-Class long-wheelbase version:
there are
four lashing eyelets :mounted at the sides
in the load compartment. G-Class Cabriolet with the rear bench seat folded
forwards
Luggage compartment cover
Important safety notes G
WARNING
The luggage compartment cover is not a
restraint system. Secure the load under the
luggage compartment cover by suitable
means. Make sure that the luggage compart-
ment cover is engaged securely. If luggage is
not sufficiently secured, it can be thrown over
the backrest into the passenger compart-
ment, for instance during heavy braking, sud-
den changes of direction or in the event of an
accident. You could cause an acciden tor
cause injury to yoursel fand others.
! Whe nloading the vehicle, make sure that
you do not stack the load in the luggage
compartment higher than the lower edge of
the side windows. Do not place heavy
objects on top of the luggage compartment
cover.
The luggage compartment cover is located
behind the rear bench seat backrest. Stowage areas
271Stowing and features Z
Page 275 of 357
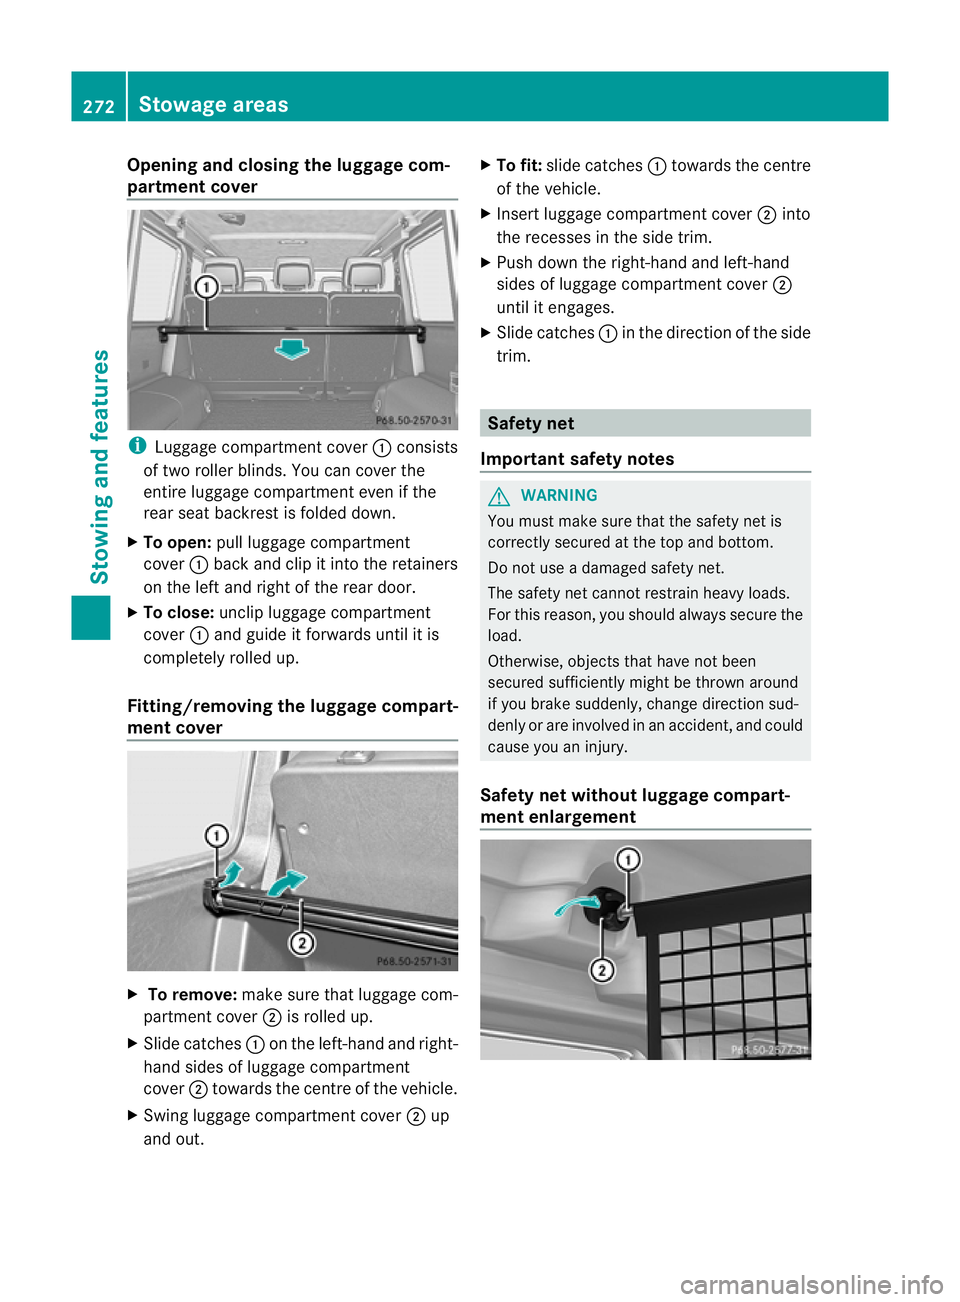
Opening and closing the luggage com-
partment cover
i
Luggage compartment cover :consists
of two roller blinds. You can cover the
entire luggage compartment even if the
rear seat backrest is folded down.
X To open: pull luggage compartment
cover :back and clip it into the retainers
on the left and right of the rear door.
X To close: unclip luggage compartment
cover :and guide it forwards until it is
completely rolled up.
Fitting/removing the luggage compart-
ment cover X
To remove: make sure that luggage com-
partment cover ;is rolled up.
X Slide catches :on the left-hand and right-
hand sides of luggage compartment
cover ;towards the centre of the vehicle.
X Swing luggage compartment cover ;up
and out. X
To fit: slide catches :towards the centre
of the vehicle.
X Insert luggage compartment cover ;into
the recesses in the side trim.
X Push down the right-hand and left-hand
sides of luggage compartment cover ;
until it engages.
X Slide catches :in the direction of the side
trim. Safety net
Important safety notes G
WARNING
You must make sure that the safety net is
correctly secured at the top and bottom.
Do not use a damaged safety net.
The safety net cannot restrain heavy loads.
For this reason, you should always secure the
load.
Otherwise, objects that have not been
secured sufficiently might be thrown around
if you brake suddenly, change direction sud-
denly or are involved in an accident, and could
cause you an injury.
Safety net without luggage compart-
ment enlargement 272
Stowage areasStowing and features
Page 276 of 357
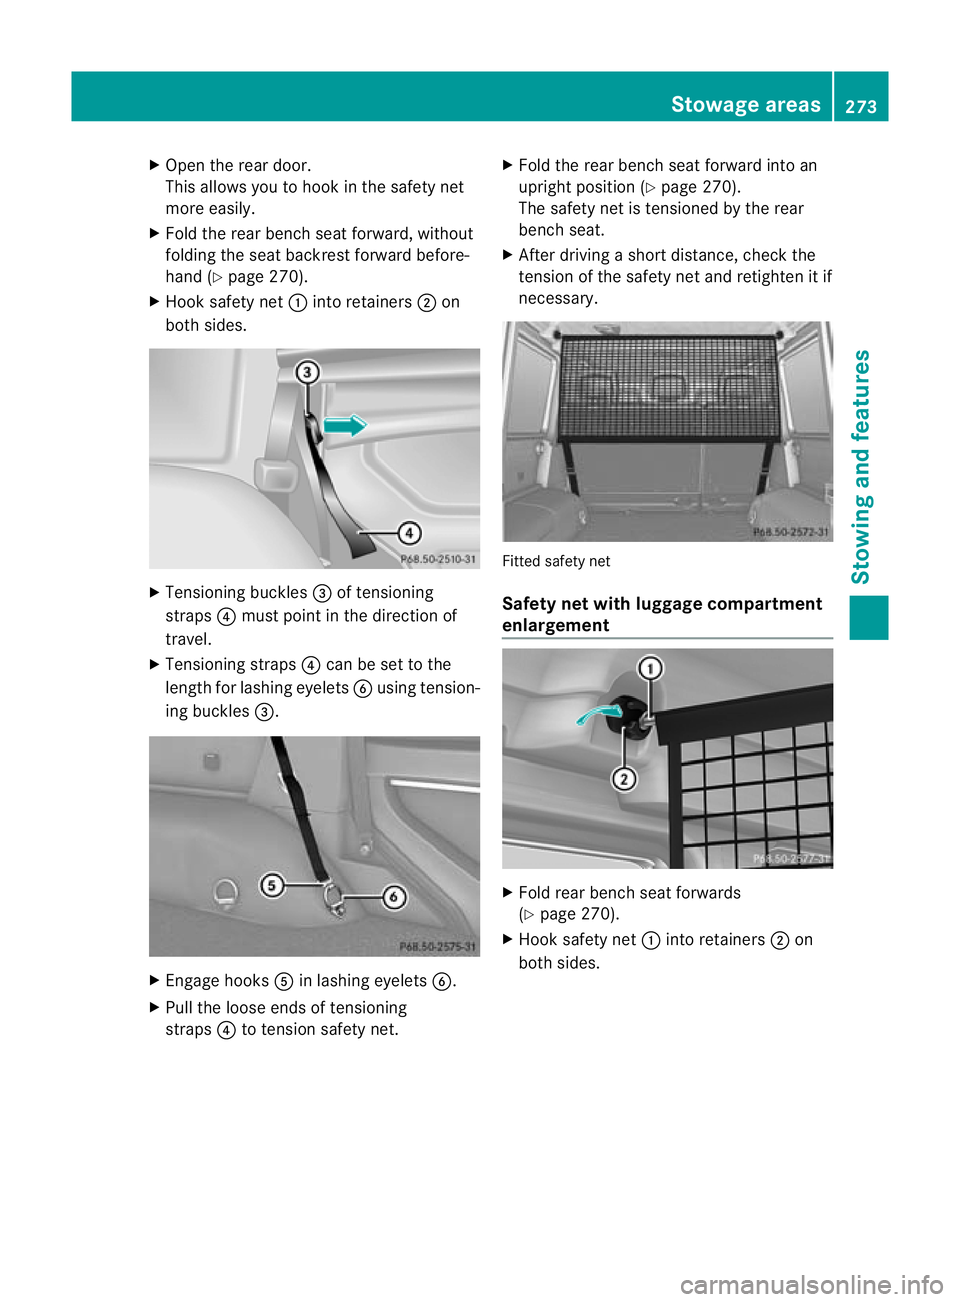
X
Open the rear door.
This allows you to hook in the safety net
more easily.
X Fold the rear bench seat forward, without
folding the seat backrest forward before-
hand (Y page 270).
X Hook safety net :into retainers ;on
both sides. X
Tensioning buckles =of tensioning
straps ?must point in the direction of
travel.
X Tensioning straps ?can be set to the
length for lashing eyelets Busing tension-
ing buckles =. X
Engage hooks Ain lashing eyelets B.
X Pull the loose ends of tensioning
straps ?to tension safety net. X
Fold the rear bench seat forward into an
upright position (Y page 270).
The safety net is tensioned by the rear
bench seat.
X After driving a short distance, check the
tension of the safety net and retighten it if
necessary. Fitted safety net
Safety net with luggage compartment
enlargement
X
Fold rear bench seat forwards
(Y page 270).
X Hook safety net :into retainers ;on
both sides. Stowage areas
273Stowing and features Z
Page 277 of 357
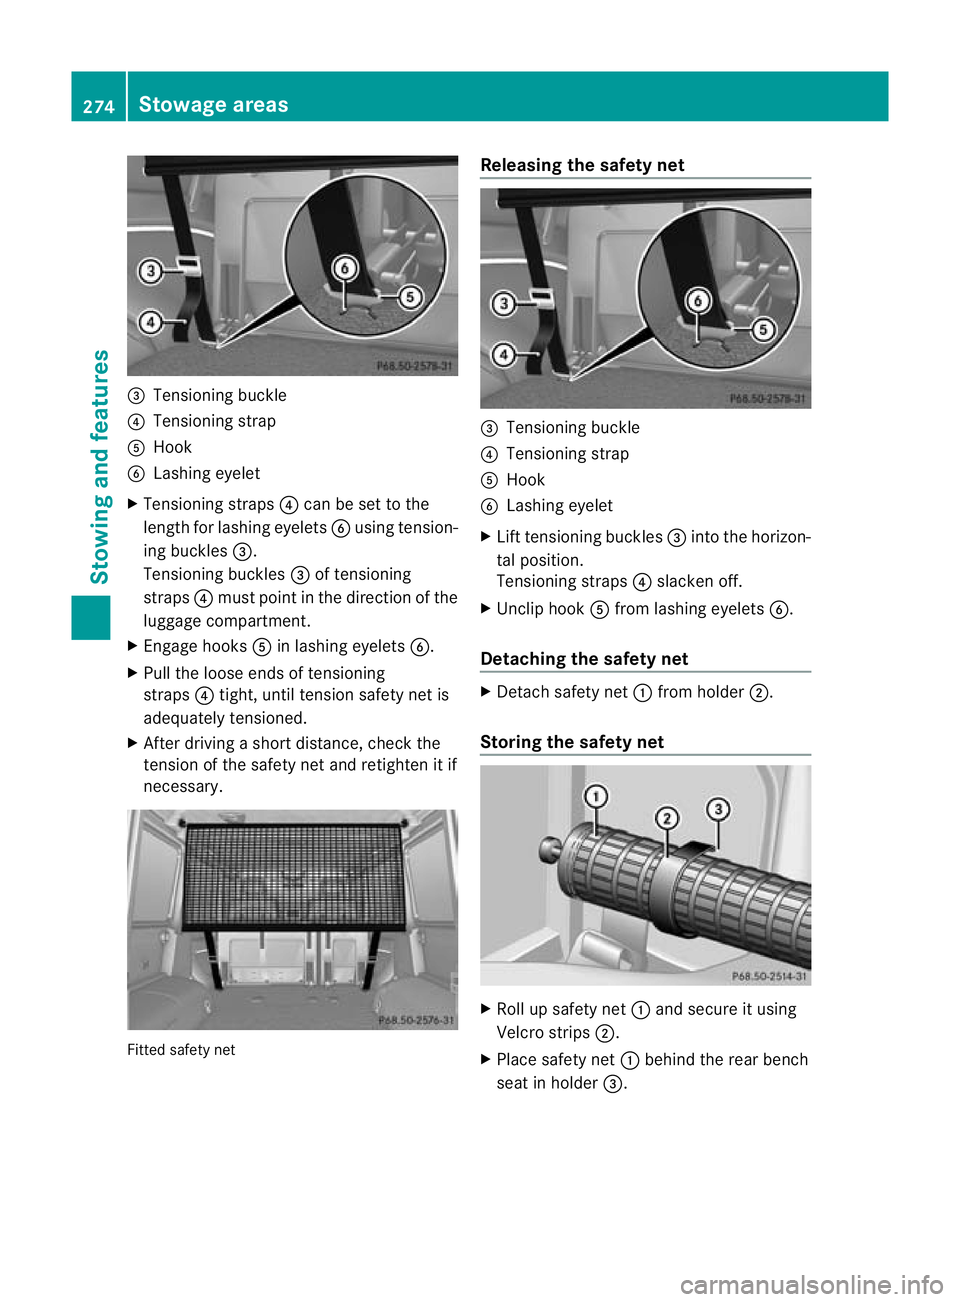
=
Tensioning buckle
? Tensioning strap
A Hook
B Lashing eyelet
X Tensioning straps ?can be set to the
length for lashing eyelets Busing tension-
ing buckles =.
Tensioning buckles =of tensioning
straps ?must point in the direction of the
luggage compartment.
X Engage hooks Ain lashing eyelets B.
X Pull the loose ends of tensioning
straps ?tight, until tension safety net is
adequately tensioned.
X After driving a short distance, check the
tension of the safety net and retighten it if
necessary. Fitted safety net Releasing the safety net
=
Tensioning buckle
? Tensioning strap
A Hook
B Lashing eyelet
X Lift tensioning buckles =into the horizon-
tal position.
Tensioning straps ?slacken off.
X Unclip hook Afrom lashing eyelets B.
Detaching the safety net X
Detach safety net :from holder ;.
Storing the safety net X
Roll up safety net :and secure it using
Velcro strips ;.
X Place safety net :behind the rear bench
seat in holder =.274
Stowage areasStowing and features
Page 278 of 357
Roof carrier
G
WARNING
An incorrectl ysecured roof carrier, ski rack or
load could become detached from the vehi-
cle. These objects may then be thrown around
and can injure you or others or cause an acci-
dent. Follow the roof carrier/ski rack manu-
facturer's installation instructions and special
instructions for use.
The roof load raises the vehicle's centre of
gravity, thereby affecting vehicle handling.
Always observe the maximum roof load (see
the "Technical data" section). Always adapt
your driving style to the prevailing road, traffic
and weather conditions and drive with partic-
ular care if the roof is laden.
! Mercedes-Benz recommends that you
only use roof carriers that have been tested
and approved for Mercedes-Benz vehicles.
This helps to preven tdamage to the vehi-
cle.
Positio nthe load on the roof carrier in such
a way that the vehicle will not sustain dam-
age even when it is in motion.
Make sure that the sliding sunroof can be
fully raised, depending on the vehicle's
equipment.
X Follow the manufacturer’s installation
instructions when fitting the roof carrier. Features
Cup holders
Important safety notes G
WARNING
If you are transporting objects in the stowage
compartments, the stowage compartments
must remain closed while the vehicle is in
motion. Otherwise, vehicle occupants could
be injured by objects being thrown around if
you: R
brake sharply
R change direction suddenly
R are involved in an accident
Only use the cup holders for containers of a
suitable size and which have lids. The drinks
could otherwise spill.
Cup holders should not be used for hot drinks.
You may otherwise scald yourself.
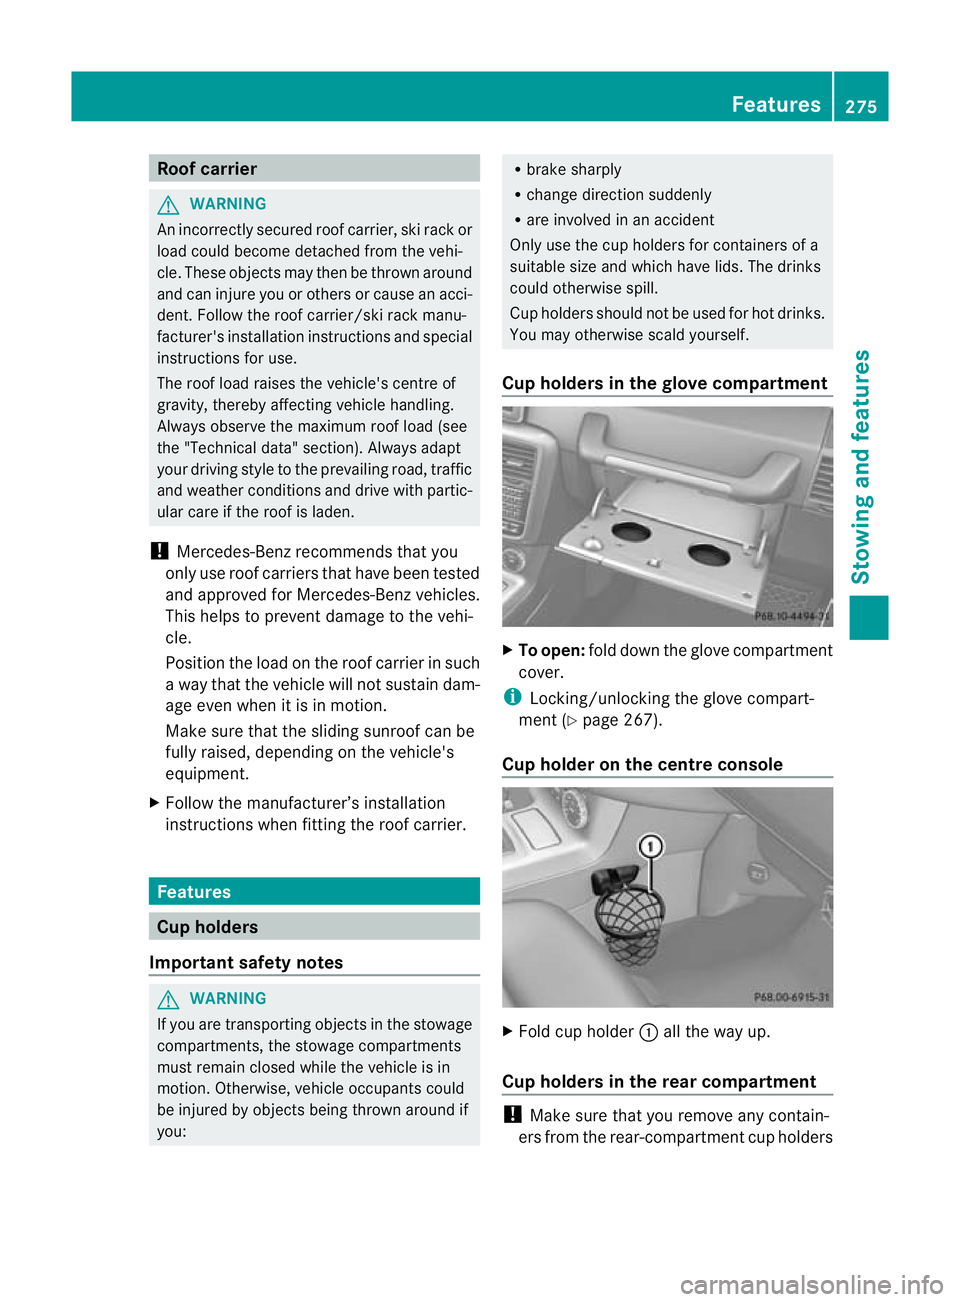
Cup holders in the glove compartment X
To open: fold down the glove compartment
cover.
i Locking/unlocking the glove compart-
ment (Y page 267).
Cup holder on the centre console X
Fold cup holder :all the way up.
Cup holders in the rear compartment !
Make sure that you remove any contain-
ers from the rear-compartment cup holders Features
275Stowing and features Z
Page 279 of 357
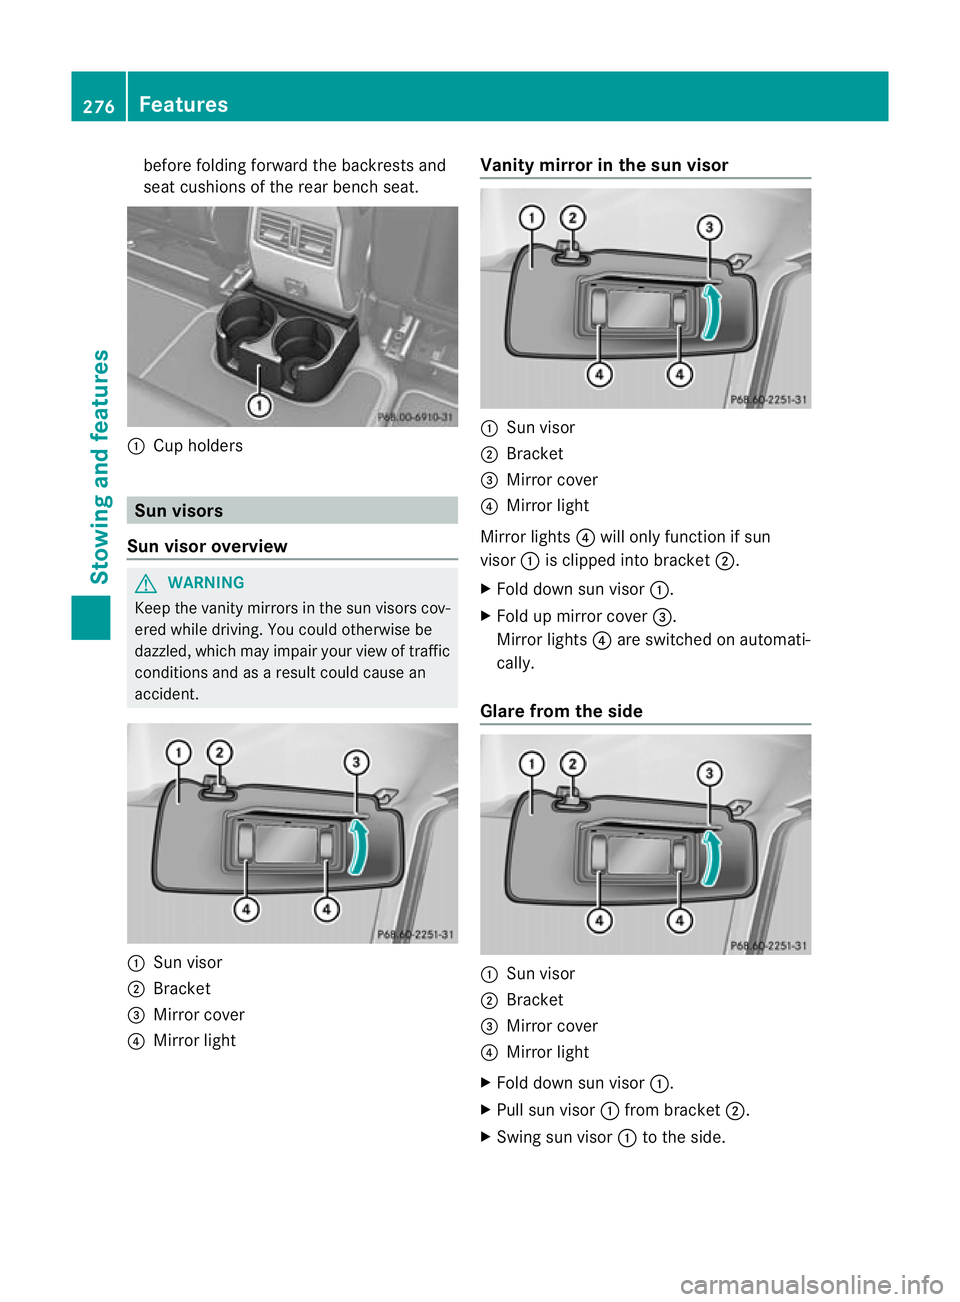
before folding forward the backrests and
seat cushions of the rear bench seat.
:
Cup holders Sun visors
Sun visor overview G
WARNING
Keep the vanity mirror sinthe sun visors cov-
ered while driving. You could otherwise be
dazzled, which may impair your view of traffic
conditions and as a result could cause an
accident. :
Sun visor
; Bracket
= Mirror cover
? Mirror light Vanity mirror in the sun visor
:
Sun visor
; Bracket
= Mirror cover
? Mirror light
Mirror lights ?will only function if sun
visor :is clipped into bracket ;.
X Fold down sun visor :.
X Fold up mirror cover =.
Mirror lights ?are switched on automati-
cally.
Glare from the side :
Sun visor
; Bracket
= Mirror cover
? Mirror light
X Fold down sun visor :.
X Pull sun visor :from bracket ;.
X Swing sun visor :to the side. 276
FeaturesStowing and features
Page 280 of 357
Stowage compartment/ashtray
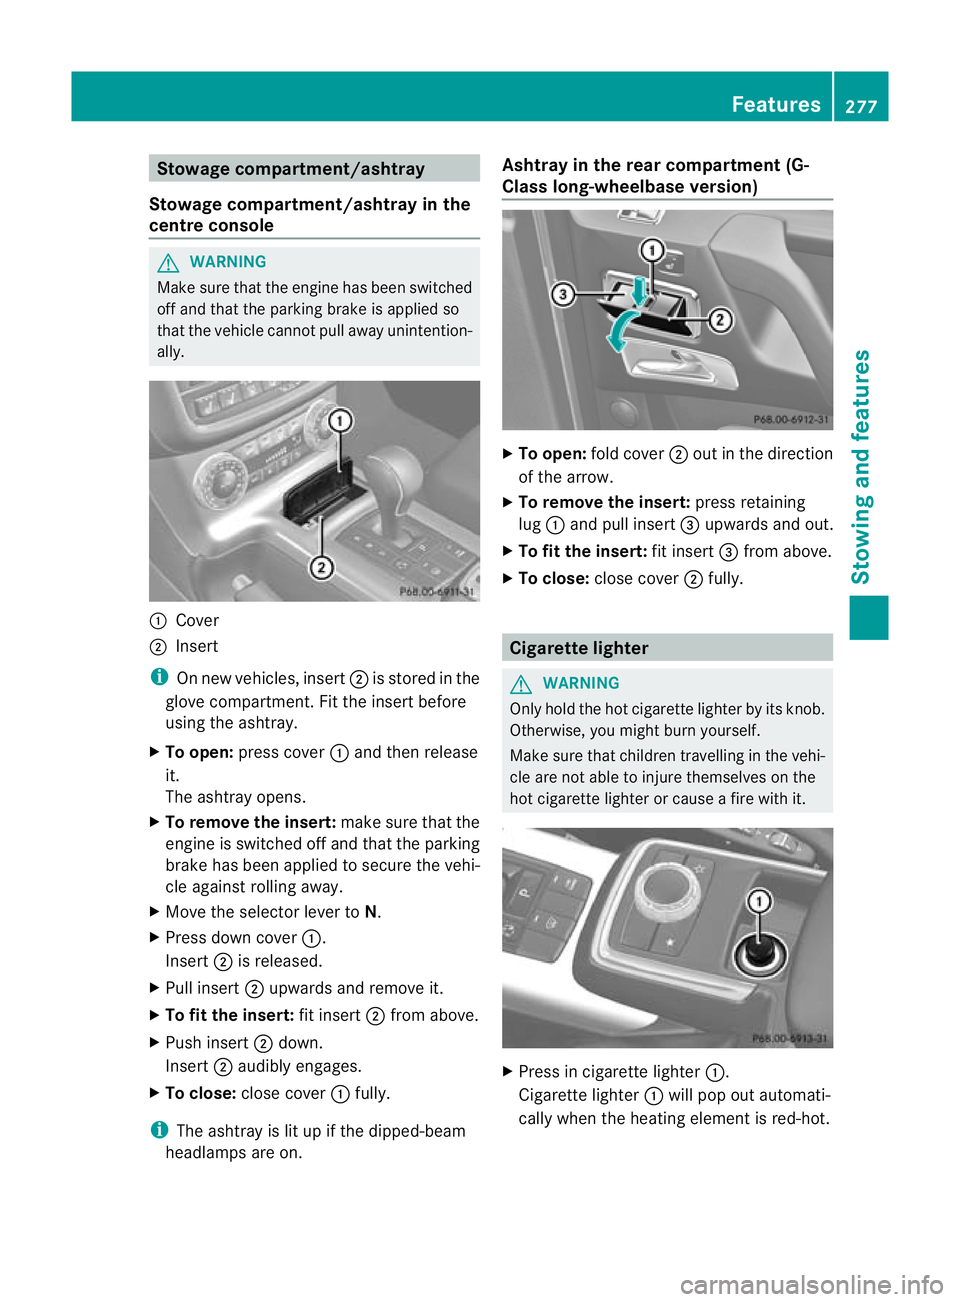
Stowage compartment/ashtray in the
centre console G
WARNING
Make sure that the engine has been switched
off and that the parking brake is applied so
that the vehicle cannot pull away unintention-
ally. :
Cover
; Insert
i On new vehicles, insert ;is stored in the
glove compartment. Fit the insert before
using the ashtray.
X To open: press cover :and then release
it.
The ashtray opens.
X To remove the insert: make sure that the
engine is switched off and that the parking
brake has been applied to secure the vehi-
cle against rolling away.
X Move the selector lever to N.
X Press down cover :.
Insert ;is released.
X Pull insert ;upwards and remove it.
X To fit the insert: fit insert;from above.
X Push insert ;down.
Insert ;audibly engages.
X To close: close cover :fully.
i The ashtray is lit up if the dipped-beam
headlamps are on. Ashtray in the rear compartment (G-
Class long-wheelbase version)
X
To open: fold cover ;out in the direction
of the arrow.
X To remove the insert: press retaining
lug :and pull insert =upwards and out.
X To fit the insert: fit insert=from above.
X To close: close cover ;fully. Cigarette lighter
G
WARNING
Only hold the hot cigarette lighter by its knob.
Otherwise, you might burn yourself.
Make sure that children travelling in the vehi-
cle are not able to injure themselves on the
hot cigarette lighter or cause a fire with it. X
Press in cigarette lighter :.
Cigarette lighter :will pop out automati-
cally when the heating element is red-hot. Features
277Stowing and features Z