belt MERCEDES-BENZ G-CLASS SUV 2012 Owners Manual
[x] Cancel search | Manufacturer: MERCEDES-BENZ, Model Year: 2012, Model line: G-CLASS SUV, Model: MERCEDES-BENZ G-CLASS SUV 2012Pages: 357, PDF Size: 8.86 MB
Page 8 of 357
Neutral (ECO start/stop function)
.150
Overview ........................................ 149
Problem (fault) ............................... 156
Progra mselector button ................152
Pulling away ................................... 144
Selector leve r................................ 149
Shift range s................................... 153
Steering wheel gearshift paddle s... 153
Trailer towing ................................. 152
Transmissio nposition display ........150
Automatic transmission emer-
gency running mode .........................156
Auxiliary heating Activating/deactivating .................134
Activating/deactivating (on the
centre console ).............................. 135
Display message ............................ 250
Important safety notes ..................134
Malfunction ................................... .138
Problem (display message) ............138
Remote control .............................. 135
Setting ........................................... 223
Setting the departur etime ............ .136
Auxiliary ventilation
Activating/deactivating .................134
Activating/deactivating (on the
centre console ).............................. 135
Problem (display message) ............138
Remote control .............................. 135
Axle load, permissible (traile rtow-
ing) ...................................................... 350 B
Backrest (display message) .............249
BAS (Brake Assist System) .................61
Battery Changing (auxiliary heating
remote control) .............................. 137
Changing (key )................................. 71
Checking (key )................................. 71
Important safety guidelines (key )..... 70
Battery (vehicle)
Charging ........................................ 311
Display message ............................ 239
Important safety notes ..................309
Jump starting ................................. 313
Overview ........................................ 309Belt tensioner
Activation ......................................... 39
Function .......................................... .47
Blind Spo tAssist
Activating/deactivating .................220
Display message ............................ 243
Notes/function .............................. 190
Trailer towing ................................. 192
see Active Blind Spot Assist
BlueTEC (AdBlue ®
) ............................. 345
Bonnet Closing .......................................... .291
Display message ............................ 249
Important safety notes ..................290
Opening ......................................... 291
Brake fluid
Display message ............................ 232
Notes ............................................. 346
Brake lamps
Adaptive .......................................... .61
Display message ............................ 235
Brakes
ABS .................................................. 60
BAS .................................................. 61
Brake fluid (notes) .........................346
Display message ............................ 229
Driving tips .................................... 165
High-performance brake system ....166
Important safety notes ..................165
Parking brake ................................ 164
Warning lamp ................................. 253
Breakdown
see Flat tyre
see Towing away
Bulbs
Brake lamp .................................... 118
Cornering light function .................117
Foglamps ....................................... 117
Rea rfoglamp ................................. 118
Reversing lamp .............................. 118
Tai llamp ........................................ 118
see Changing bulbs Index
5
Page 17 of 357
Resetting the current lap
...............227
Starting anew lap .......................... 226
Stopping ........................................ 226
RACETIMER (on-board computer) ....226
Radar sensors Overview ........................................ 351
Radiator cover ................................... 291
Radio Selecting astation ......................... 217
see separate operating instructions
Reading lamp ..................................... 110
Rear bench seat Folding forward .............................. 270
Rear compartment
Setting the airv ents...................... 140
Rear-compartment seat belt sta-
tus indicator ........................................ 47
Rear door Closing ............................................ .76
Display message ............................ 249
Important safety notes ....................75
Opening ........................................... 75
Opening/closing .............................. 75
Rear foglamp
Display message ............................ 236
Switching on/off ........................... 107
Rear lamps
see Lights
Rear seat bench
Folding into an upright position .....270
Rear-view mirror
Anti-dazzle mode (automatic) ........100
Rear window heating
Problem (fault) ............................... 133
Switching on/off ........................... 133
Rear window wiper
Switching on/off ........................... 120
Refuelling
Fuel gauge ..................................... 211
Important safety notes ..................156
Refuelling proces s......................... 157
see Fuel
Remote control
Auxiliary heating/ventilation .......... 135
Changing the batteries (auxiliary
heating) ......................................... 137
Programming (garage door opener) 280 Reserve (fuel tank)
see Fuel
Reserve fuel
Display message ............................ 240
Warning lamp ................................. 260
Residual heat
Switching on/off ........................... 133
Restraint systems
see SRS (Supplemental Restraint
System)
Rev counter ........................................ 212
Reversing camera Function/notes ............................. 200
Reversing camera (cleaning
instructions) ...................................... 299
Reversing lamp Changing bulbs .............................. 118
Reversing lamp (display message) ..236
Roof see Soft top
Roof load (maximum) ........................348
Route (navigation) see Route guidance (navigation)
Route guidance (navigation) ............216 S
Safety Childre ninthe vehicle ..................... 48
Child restraint systems ....................48
Safety net
Detaching and storing .................... 274
Important safety information .........272
Releasing ....................................... 274
with luggage compartment
enlargement .................................. 273
without luggage compartment
enlargement .................................. 272
Safety systems
see Driving safety systems
Seat
Folding the front seat backrests
forwards (EASY-ENTRY feature) .......94
Seat backrest
Folding back .................................. 269
Seat belt
Adjusting the height ......................... 46
Belt force limiter .............................. 4714
Index
Page 18 of 357
Bel
ttensioner .................................. 47
Cleaning ......................................... 301
Display message ............................ 232
Fastening ......................................... 44
Fastening, front ............................... 44
Fastening in the rear, centre ............45
Important safety guidelines .............43
Rea rseat belt status indicator .........47
Releasing ......................................... 46
Warning lamp ................................. 252
Warning lamp (function) ................... 47
Seat heating
Malfunction indicator lamp ..............96
Seats
Adjusting (electrically). ....................92
Adjusting the 4-way lumba rsup-
por t.................................................. 94
Adjusting the head restraint ............92
Cleaning the cover .........................300
Correct driver's seat position ........... 90
Important safety notes ....................91
Overview .......................................... 91
Storing settings (memory function) 102
Switching sea theating on/off .........95
Switching the sea tventilation on/
off .................................................... 96
Seat ventilation
Malfunction indicator lamp ..............97
Securing aload .................................. 270
Sensors (cleaning instructions) .......298
Service menu (on-board computer) .220
Service products
AdBlue ®
special additive s.............. 345
Brake fluid ..................................... 346
Coolant (engine) ............................ 347
Engine oil ....................................... 345
Fuel ................................................ 341
Important safety notes ..................341
Notes ............................................. 341
Washer fluid .................................. .347
Settings
Calling up a stored setting .............102
Factory (on-board computer) .........225
On-board computer .......................221
Setting the air distribution ...............131
SETUP (on-board computer) .............226
Shift ranges ....................................... 153Short journeys (diesel particle fil-
ter)
...................................................... 164
Side lamps Switching on/off ........................... 107
Side windows
Convenience opening ......................78
Important safety notes ....................77
Opening/closing .............................. 77
Overview .......................................... 77
Troubleshooting ............................... 78
Ski rack .............................................. 275
Sliding sunroof Important safety information ...........79
Opening/closing .............................. 79
Operating manually ..........................79
Problem (malfunction) .....................80
Snow chains ...................................... 324
Socket Front-passenger footwell ...............278
Luggage compartment ...................278
Rea rcompartmen t......................... 278
Soft top
Closing ............................................ .82
Closing manually in an emergenc y... 82
Important safety notes ....................81
Opening ........................................... 81
Troubleshooting ............................... 87
Spare fuses ........................................ 318
Spare wheel Fitting ............................................ 329
Notes/data .................................... 333
Spare wheel bracket at the rear ....307
Stainless-steel spare wheel cover ..308
Specialist workshop ............................ 22
Speed, controlling see Cruise control
Speedometer
Digita l............................................ 216
In the Instrument cluster ...............211
Segments ...................................... 212
Selecting the unit of measurement 221
see Instrument cluster
SPEEDTRONIC
Display message ............................ 244
Permanent ..................................... 182
Selecting ........................................ 179
Variabl e......................................... 178 Index
15
Page 32 of 357
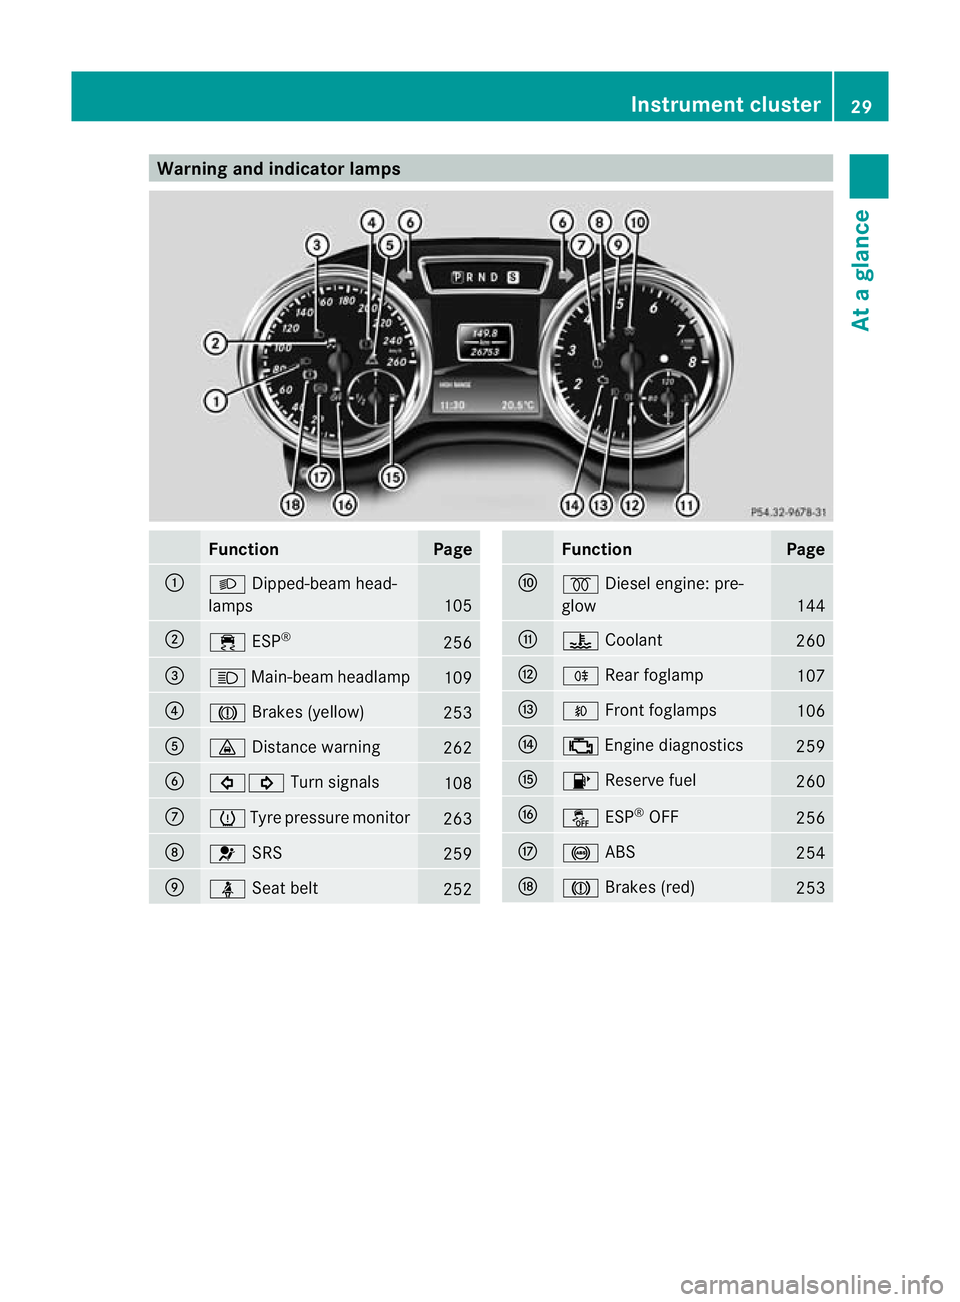
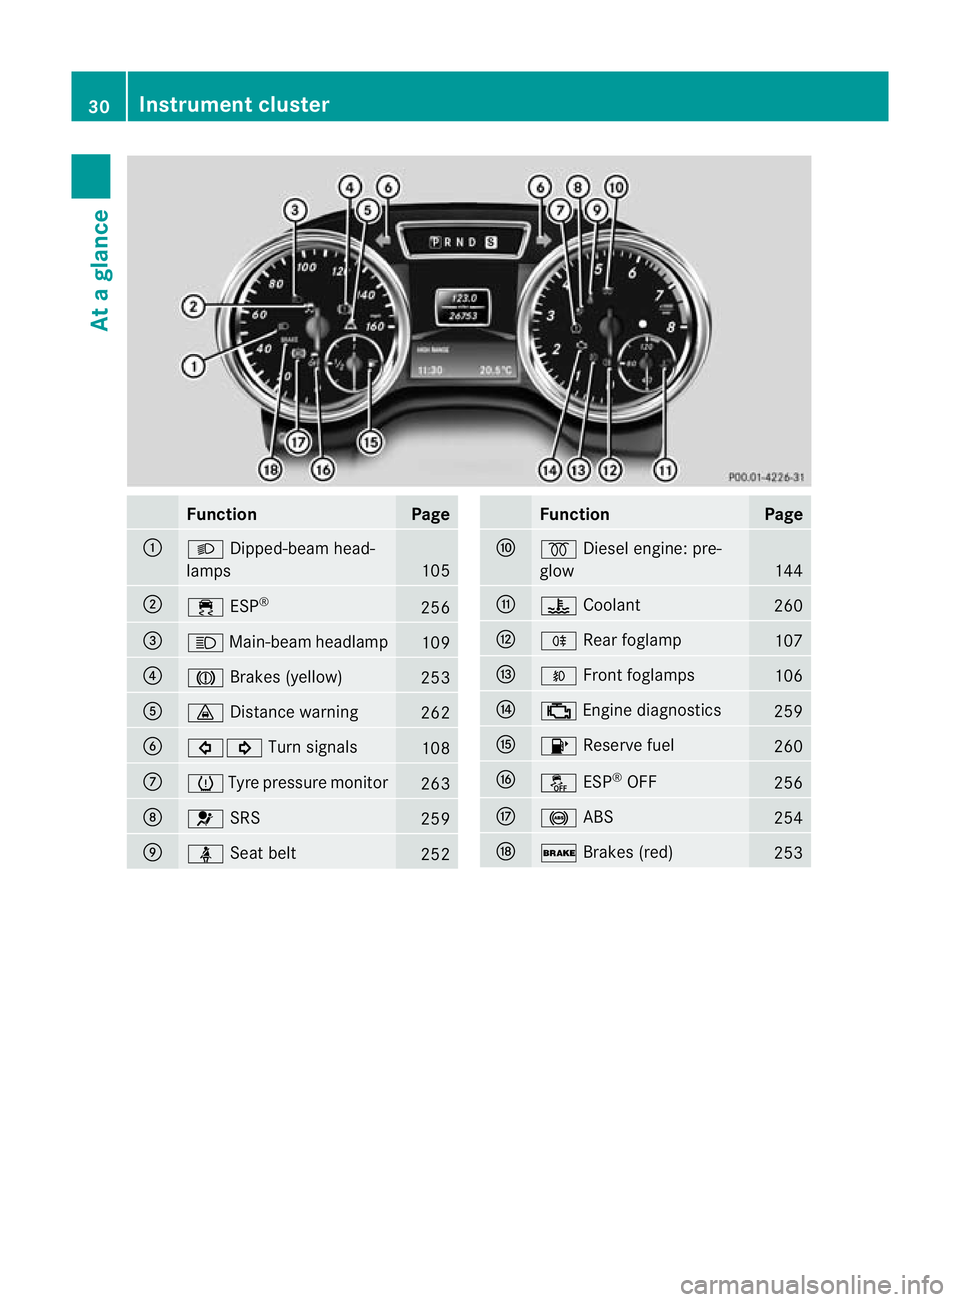
Warning and indicator lamps
Function Page
:
L
Dipped-bea mhead-
lamps 105
;
÷
ESP® 256
=
K
Main-beam headlamp 109
?
J
Brakes (yellow) 253
A
·
Distance warning 262
B
#!
Turn signals 108
C
h
Tyre pressure monitor 263
D
6
SRS 259
E
ü
Seat belt 252 Function Page
F
%
Diesel engine: pre-
glow 144
G
?
Coolant 260
H
R
Rear foglamp 107
I
O
Front foglamps 106
J
;
Engine diagnostics 259
K
8
Reserve fuel 260
L
å
ESP®
OFF 256
M
!
ABS 254
N
J
Brakes (red) 253Instrument cluster
29At a glance
Page 33 of 357
Function Page
:
L
Dipped-beam head-
lamps 105
;
÷
ESP® 256
=
K
Main-beam headlamp 109
?
J
Brakes (yellow) 253
A
·
Distance warning 262
B
#!
Turn signals 108
C
h
Tyre pressure monitor 263
D
6
SRS 259
E
ü
Seatbelt 252 Function Page
F
%
Diesel engine: pre-
glow 144
G
?
Coolant 260
H
R
Rear foglamp 107
I
O
Front foglamps 106
J
;
Engine diagnostics 259
K
8
Reserve fuel 260
L
å
ESP®
OFF 256
M
!
ABS 254
N
$
Brakes (red) 25330
Instrument clusterAt a glance
Page 41 of 357
Useful information
i This Owner's Manual describes all mod-
els, series and optional equipment for your
vehicle that were available at the time of
going to press. Country-specific differen-
ces are possible. Note that your vehicle
may not be fitted with all features descri-
bed. This is also the case for systems and
functions relevant to safety.
i Read the information on qualified special-
ist workshops: (Y page 22). Occupant safety
Important safety notes
G
WARNING
If service work is not carried out correctly, the
operating safety of your vehicle may be affec-
ted. This could cause you to lose control of
your vehicle and cause an accident. More-
over, the safety system smay no longer be
able to protect you or others as they are
designed to do.
Always have service work carried out at a
qualified specialist workshop. G
WARNING
Modifications to or work performed incor-
rectly on the following parts can result in the
restraint systems no tfunctioning as intended:
R the restraint system, consisting of seat
belts and their anchorage points, belt ten-
sioners, belt force limiters and airbags
R the wiring
R networked electronic systems
Airbags and belt tensioners could fail to
deploy or be triggered in an acciden tdespite
the deceleration force being sufficien tto trig-
ger the systems, or could be triggered unin-
tentionally. For this reason, never make any
modifications to the restraint systems.
Therefore, you must not tamper with elec-
tronic components or their software. Seat belts, together with the Supplemental
Restraint System, SRS (Y page 39), are
complementary, co-ordinated restraint sys-
tems. They reduce the risk of injury in spe-
cific, pre-defined types of accident situations
and thereby increase occupant safety. How-
ever, seat belts and airbags generally do not
protect against objects penetrating the vehi-
cle from the outside.
To ensure that the restraint systems can
deliver their full potential protection, make
sure that:
R the seat and head restraint are adjusted
properly (Y page 90)
R the seat belt has been fastened properly
(Y page 44)
R the airbags can inflate properly if they are
deployed (Y page 40)
R the steering wheel is adjusted properly
(Y page 90)
R the restraint systems have not been modi-
fied
An airbag increases the protection of vehicle
occupants wearing a seat belt. However, air-
bags are only an additional restraint system
which complements, but does not replace,
the seat belt. All vehicle occupants must wear
their seat belt correctly at all times, even if
the vehicle is equipped with airbags. The air-
bags are not deployed in all types of acci-
dents. For example, if the protective capacity
of correctly fastened seat belts is not
increased by deploying the airbags, the air-
bags will not deploy.
Airbag deployment only provides increased
protection if the seat belt is worn correctly.
The seat belt helps, firstly, to keep the vehicle
occupant in the best position in relation to the
airbag. Secondly, in a head-on collision, for
example, the seat belt prevents the vehicle
occupant from being propelled towards the
point of impact. 38
Occupant safetySafety
Page 42 of 357
SRS (Supplemental Restraint System)
Introduction SRS reduces the risk of occupants coming
into contact with the vehicle's interior in the
event of an accident. It can also reduce the
forces to which occupants are subjected dur-
ing an accident.
SRS consists of:
R the 6 SRS warning lamp
R airbags
R airbag control unit (with crash sensors)
R belt tensioners
R belt force limiters
SRS warning lamp G
WARNING
If SRS is malfunctioning, individual systems
may be triggered unintentionally or might not
be triggered in the event of an accident with
a high rate of vehicle deceleration.
A malfunction has occurred if:
R the 6 SRS warning lamp does not light
up when the ignition is switched on.
R the engine is running and the 6SRS
warning lamp does not go out after a few
seconds.
R the engine is running and the 6SRS
warning lamp lights up again.
In this case, have SRS checked immediately
at a qualified specialist workshop.
SRS functions are checked regularly when
you switch on the ignition and when the
engine is running. Therefore, malfunctions
can be detected in good time.
The 6 SRS warning lamp in the instrument
cluster lights up when the ignition is switched
on. It goes out no later than a few seconds
after the engine is started. Triggering of belt tensioners, belt force
limiters and airbags During the first stage of a collision, the airbag
control unit evaluates important physical
data relating to vehicle deceleration or accel-
eration, such as:
R
duration
R direction
R magnitude
Based on the evaluation of this data, the air-
bag control unit pre-emptively triggers the
belt tensioners in the first stage.
i The belt tensioners can only be triggered
if the seat belt tongues are correctly
engaged in the seat belt buckles.
If there is an even higher rate of vehicle decel-
eration or acceleration in a longitudinal direc-
tion, the front airbags are also deployed.
Your vehicle is equipped with adual-stage
driver's airbag and a single-stage front-
passenger fron tairbag. The airbag control
unit evaluates vehicle deceleration or accel-
eration in the event of a collision. In the first
deploymen tstage, the driver's airbag is filled
with enough propellant gas to reduce the risk
of injuries .The front airbag is fully deployed
if a second deployment threshold is exceeded
within a few milliseconds. The front-
passenger front airbag is filled with the max-
imum amount of propellant gas in one stage
at the moment of impact.
The belt tensioner and airbag triggering
thresholds are variable and are adapted to the
rate of deceleration or acceleration of the
vehicle. This process is pre-emptive in nature.
The triggering process must take place in
good time at the start of the collision.
i Airbags are not deployed in all types of
accidents. Also, not all airbags are
deployed together in an accident. The dif-
ferent airbag systems work independently
of each other. Occupant safety
39Safety Z
Page 43 of 357
How the airbag system works is deter-
mined by the severity of the collision detec-
ted, especially the vehicle deceleration or
acceleration, and the apparent type of acci-
dent:
R
head-on collision
R side impact
R overturning
R rea rimpact
The rate of vehicle deceleratio noraccelera-
tion and the direction of the force are essen-
tially determined by:
R the distribution of forces during the colli-
sion
R the collisio nangle
R the deformation characteristics of the vehi-
cle
R the characteristics of the object with which
the vehicle has collided
Factors which can only be see nand measured
after a collision has occurred do not play a
decisive role in the deployment of an airbag,
nor do they provide an indicatio nofairbag
deployment.
The vehicle may be deformed significantly,
e.g. the bonnet or the wing, without an airbag
being deployed. This is the case if only parts
which are relatively easily deformed are affec-
ted and the rate of deceleration is not high.
Conversely, airbags may be deployed even
though the vehicle suffers only minor defor-
mation. This is the case if, for example, very
rigid vehicle parts such as longitudinal body
members are hit, and sufficien tdeceleration
occurs as a result. Airbags
Important safety notes G
WARNING
Airbags provide additional protection; they
are not, however, a substitute for seat belts. Observe the following notes to reduce the risk
of serious or even fatal injury caused by airbag
deployment:
R
all vehicle occupants –inparticular, preg-
nant women – must wear their seat belt
correctly at all times and lean back against
the backrest, which should be positioned
as close to the vertical as possible. The
head restraint must support the back of the
head at about eye level.
R always secure childre nless than 1.50mt all
and unde r12years of age in suitable child
restraint systems.
R all vehicle occupants must select a seat
position that is as far away from the airbag
as possible. The driver's seat position must
allow the vehicle to be driven safely. The
driver's chest should be as far away from
the centre of the driver's airbag cover as
possible.
R move the front-passenger seat as far back
as possible. This is especially important if
you have secured a child in a child restraint
system on the front-passenger seat.
R vehicle occupants ―inparticular childre n―
must not lean their head in the area of the
window where the windowbag is deployed
R rearward-facing child restraint systems
must not be fitted to the front-passenger
seat unless the front-passenger airbag has
been disabled .Onthe front-passenger
seat, the front-passenger airbag is disabled
if a child restraint system with automatic
child seat recognition is fitted to the front-
passenger seat in a vehicle equipped with
automatic child seat recognition. The
4 PASSENGER AIRBAG OFF indicator
lamp must be continuously lit.
If the front-passenger seat of your vehicle
does not have automatic child seat recog-
nition, or your rearward-facing child
restraint system does not have automatic
child seat recognition, children must be
secured in a child restraint system on a
suitable seat in the rear. If you secure a
forward-facing child restraint system to the 40
Occupant safetySafety
Page 45 of 357
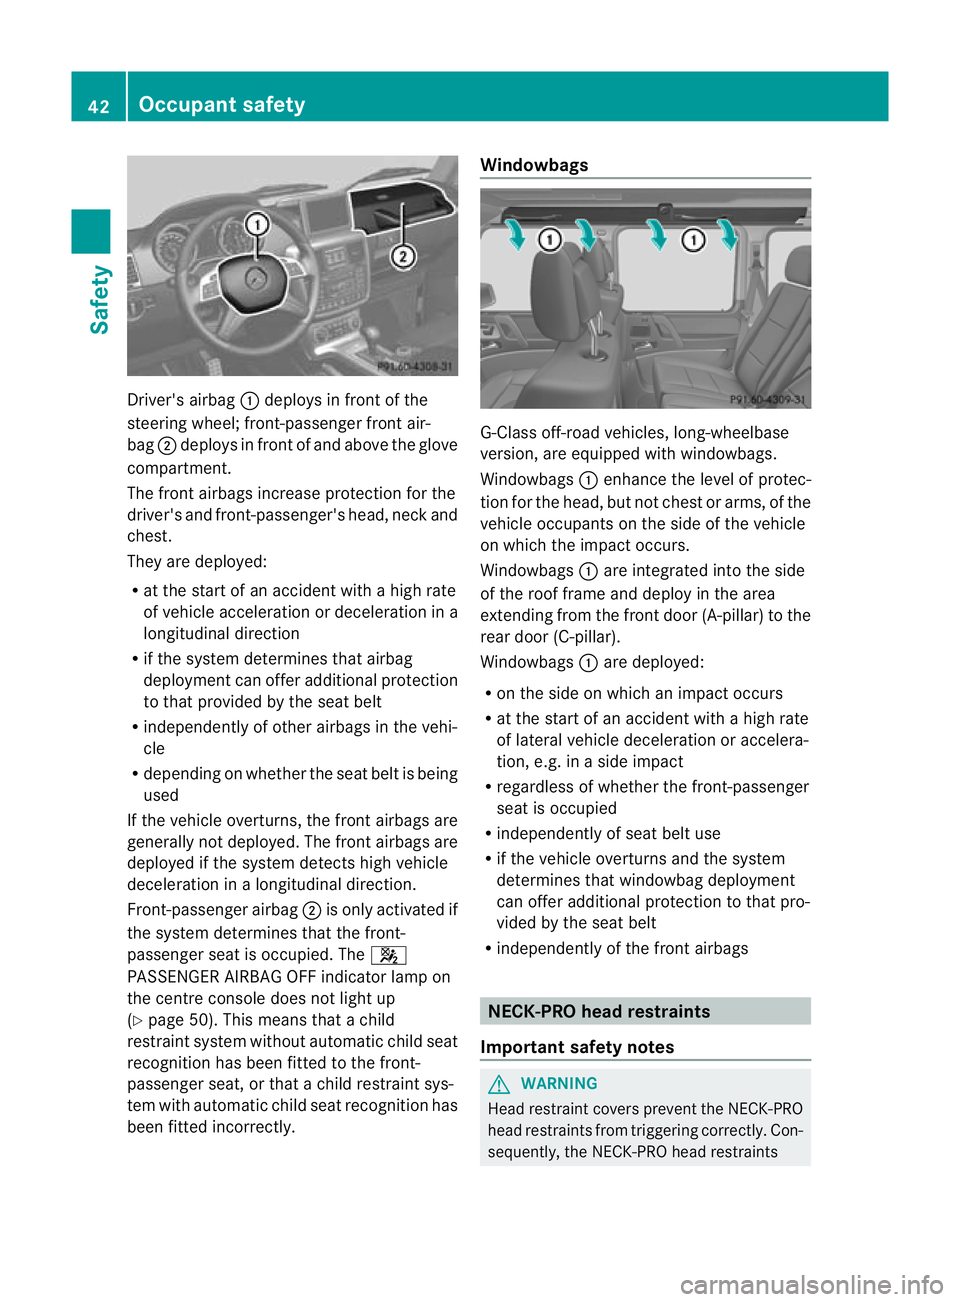
Driver's airbag
:deploys in front of the
steering wheel; front-passenge rfront air-
bag ;deploys in front of and above the glove
compartment.
The front airbags increase protection for the
driver's and front-passenger's head, neck and
chest.
They are deployed:
R at the start of an accident with a high rate
of vehicle acceleration or deceleratio nina
longitudinal direction
R if the system determines that airbag
deploymen tcan offer additional protection
to that provided by the seat belt
R independently of other airbag sinthe vehi-
cle
R depending on whether the seat belt is being
used
If the vehicle overturns, the front airbags are
generally not deployed. The front airbags are
deployed if the system detects high vehicle
deceleration in a longitudinal direction.
Front-passenger airbag ;is only activated if
the system determines that the front-
passenger seat is occupied. The 4
PASSENGER AIRBAG OFF indicator lamp on
the centre console does not light up
(Y page 50). This means that a child
restraint system without automatic child seat
recognition has been fitted to the front-
passenger seat, or that a child restraint sys-
tem with automatic child seat recognition has
been fitted incorrectly. Windowbags
G-Class off-road vehicles, long-wheelbase
version, are equipped with windowbags.
Windowbags
:enhance the level of protec-
tion for the head, but not chest or arms, of the
vehicle occupants on the side of the vehicle
on which the impact occurs.
Windowbags :are integrated into the side
of the roof frame and deploy in the area
extending from the front door (A-pillar) to the
rear door (C-pillar).
Windowbags :are deployed:
R on the side on which an impact occurs
R at the start of an accident with a high rate
of lateral vehicle deceleration or accelera-
tion, e.g. in a side impact
R regardless of whether the front-passenger
seat is occupied
R independently of seat belt use
R if the vehicle overturns and the system
determines that windowbag deployment
can offer additional protection to that pro-
vided by the seat belt
R independently of the front airbags NECK-PRO head restraints
Important safety notes G
WARNING
Head restraint covers prevent the NECK-PRO
head restraints from triggering correctly. Con-
sequently, the NECK-PRO head restraints 42
Occupant safetySafety
Page 46 of 357
cannot provide the intended level of protec-
tion. Do not use head restraint covers.
The NECK-PRO head restraints increase pro-
tectio nto the driver's and the front passeng-
er's head and neck.T he NECK-PRO head
restraints on the driver's and front-passenger
seats are moved forwards and upwards in the
event of a rear-end collision of a certain
severity. This provides better head support.
If the NECK-PRO head restraints have been
triggered in an accident, reset the NECK-PRO
head restraints on the driver’s and front-
passenger seat (Y page 43). Otherwise, the
additional protection will not be available in
the event of another rear-end collision. You
can recognise if NECK-PRO head restraints
have been triggered by the fact that they have
moved forwards and can no longer be adjus-
ted.
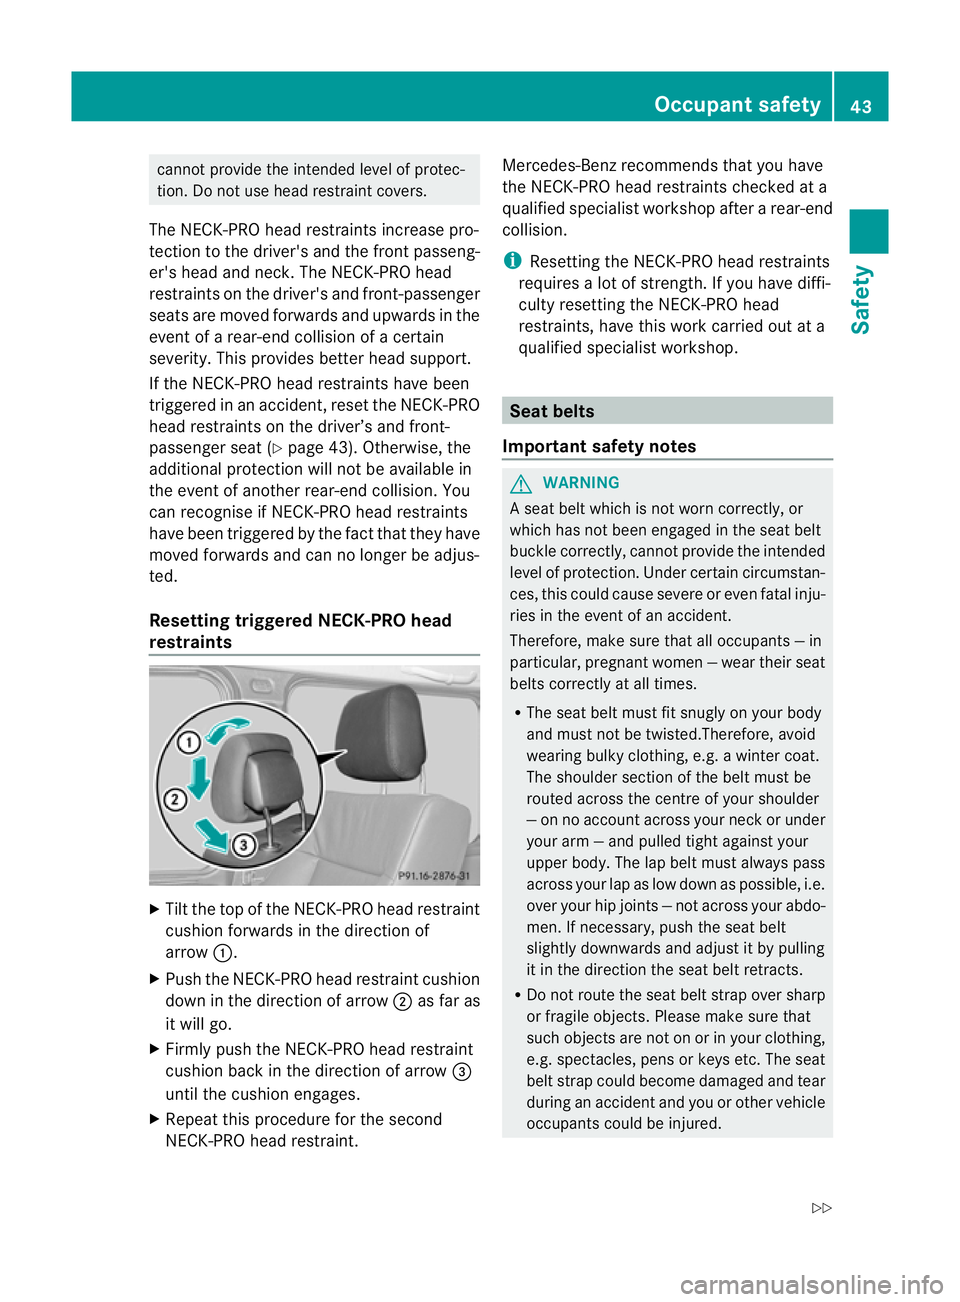
Resetting triggered NECK-PRO head
restraints X
Tilt the top of the NECK-PRO head restraint
cushion forwards in the direction of
arrow :.
X Push the NECK-PRO head restraint cushion
down in the direction of arrow ;as far as
it will go.
X Firmly push the NECK-PRO head restraint
cushion back in the direction of arrow =
until the cushion engages.
X Repeatt his procedure for the second
NECK-PRO head restraint. Mercedes-Ben
zrecommends that you have
the NECK-PRO head restraints checked at a
qualified specialist workshop after a rear-end
collision.
i Resetting the NECK-PRO head restraints
requires a lot of strength. If you have diffi-
culty resetting the NECK-PRO head
restraints, have this work carried out at a
qualified specialist workshop. Seat belts
Important safety notes G
WARNING
A seat belt which is not worn correctly, or
which has not been engaged in the seat belt
buckle correctly, cannot provide the intended
level of protection. Under certain circumstan-
ces, this could cause severe or even fatal inju-
ries in the event of an accident.
Therefore, make sure that all occupants —in
particular, pregnan twomen —wear their seat
belts correctly at all times.
R The seat belt must fit snugly on your body
and must not be twisted.Therefore, avoid
wearing bulky clothing, e.g. a winter coat.
The shoulder section of the belt must be
routed across the centre of your shoulder
—onn o account across your neck or under
your arm —and pulled tight against your
uppe rbody. The lap belt must always pass
across your lap as low down as possible, i.e.
over your hip joints —not across your abdo-
men. If necessary, push the seat belt
slightly downwards and adjust it by pulling
it in the direction the seat belt retracts.
R Do not route the seat belt strap over sharp
or fragile objects. Please make sure that
such objects are not on or in your clothing,
e.g. spectacles, pens or keys etc. The seat
belt strap could become damaged and tear
during an accident and you or other vehicle
occupants could be injured. Occupant safety
43Safety
Z