MERCEDES-BENZ G-CLASS SUV 2012 Owners Manual
Manufacturer: MERCEDES-BENZ, Model Year: 2012, Model line: G-CLASS SUV, Model: MERCEDES-BENZ G-CLASS SUV 2012Pages: 357, PDF Size: 8.86 MB
Page 311 of 357
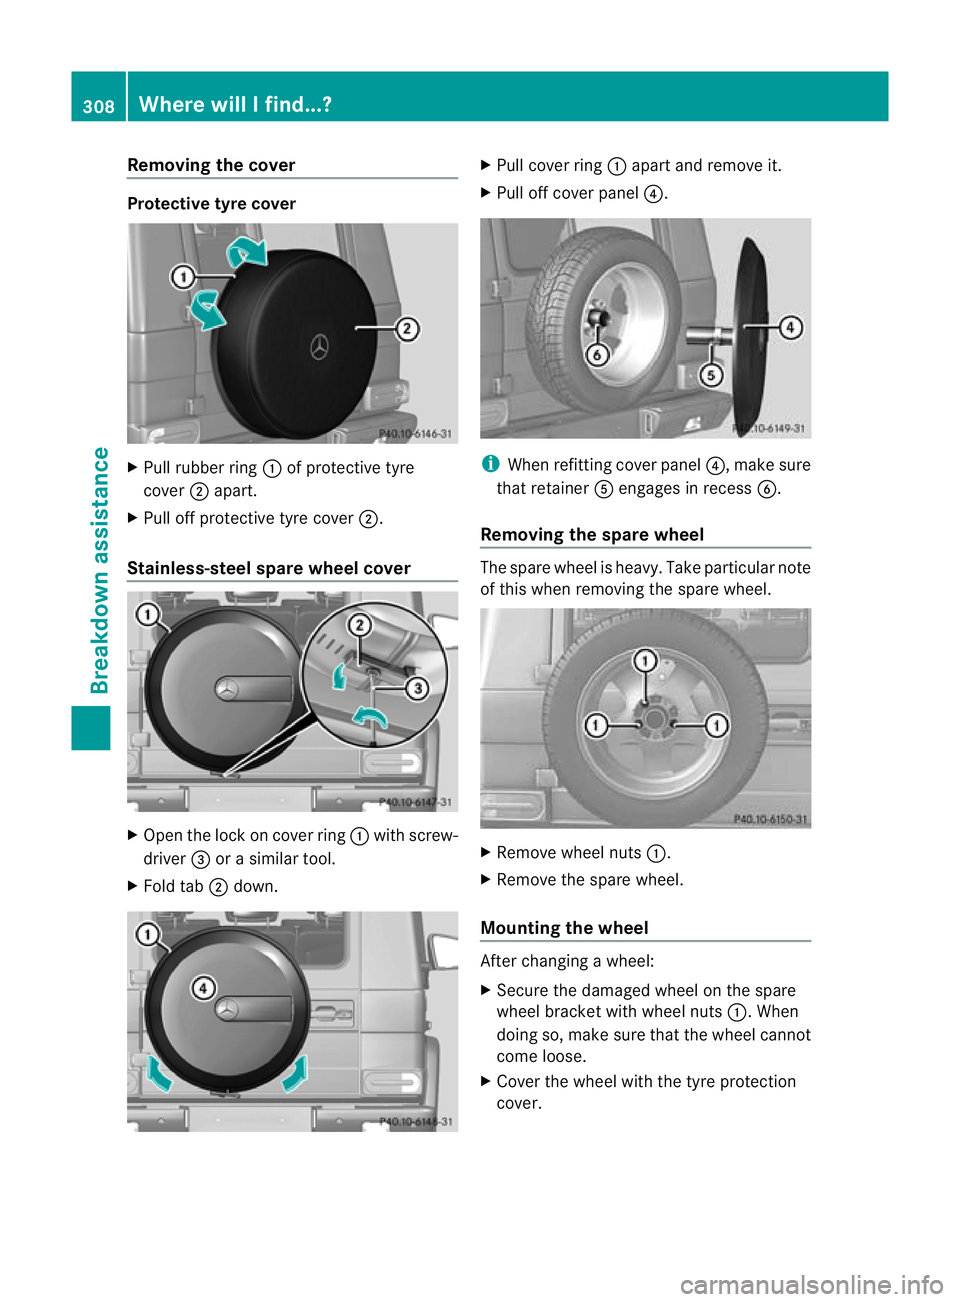
Removing the cover
Protective tyre cover
X
Pull rubber ring :of protective tyre
cover ;apart.
X Pull off protective tyre cover ;.
Stainless-steel spare wheel cover X
Ope nthe lock on cover ring :with screw-
driver =or a similar tool.
X Fold tab ;down. X
Pull cover ring :apart and remove it.
X Pull off cover panel ?. i
When refitting cover panel ?, make sure
that retainer Aengages in recess B.
Removing the spare wheel The spare wheel is heavy. Take particular note
of this when removing the spare wheel.
X
Remove wheel nuts :.
X Remove the spare wheel.
Mounting the wheel After changing a wheel:
X Secure the damaged wheel on the spare
wheel bracket with wheel nuts :.When
doing so, make sure that the wheel cannot
come loose.
X Cover the wheel with the tyre protection
cover. 308
Where will I find...?Breakdown assistance
Page 312 of 357
X
Vehicles with stainless-steel spare
wheel cover: make sure when refitting
cove rpanel ?that retainer Aengages in
recess B(Ypage 308).
X Make sure that tab ;is below when refit-
ting cover ring :(Ypage 308).
X For safety reasons, regularly check to
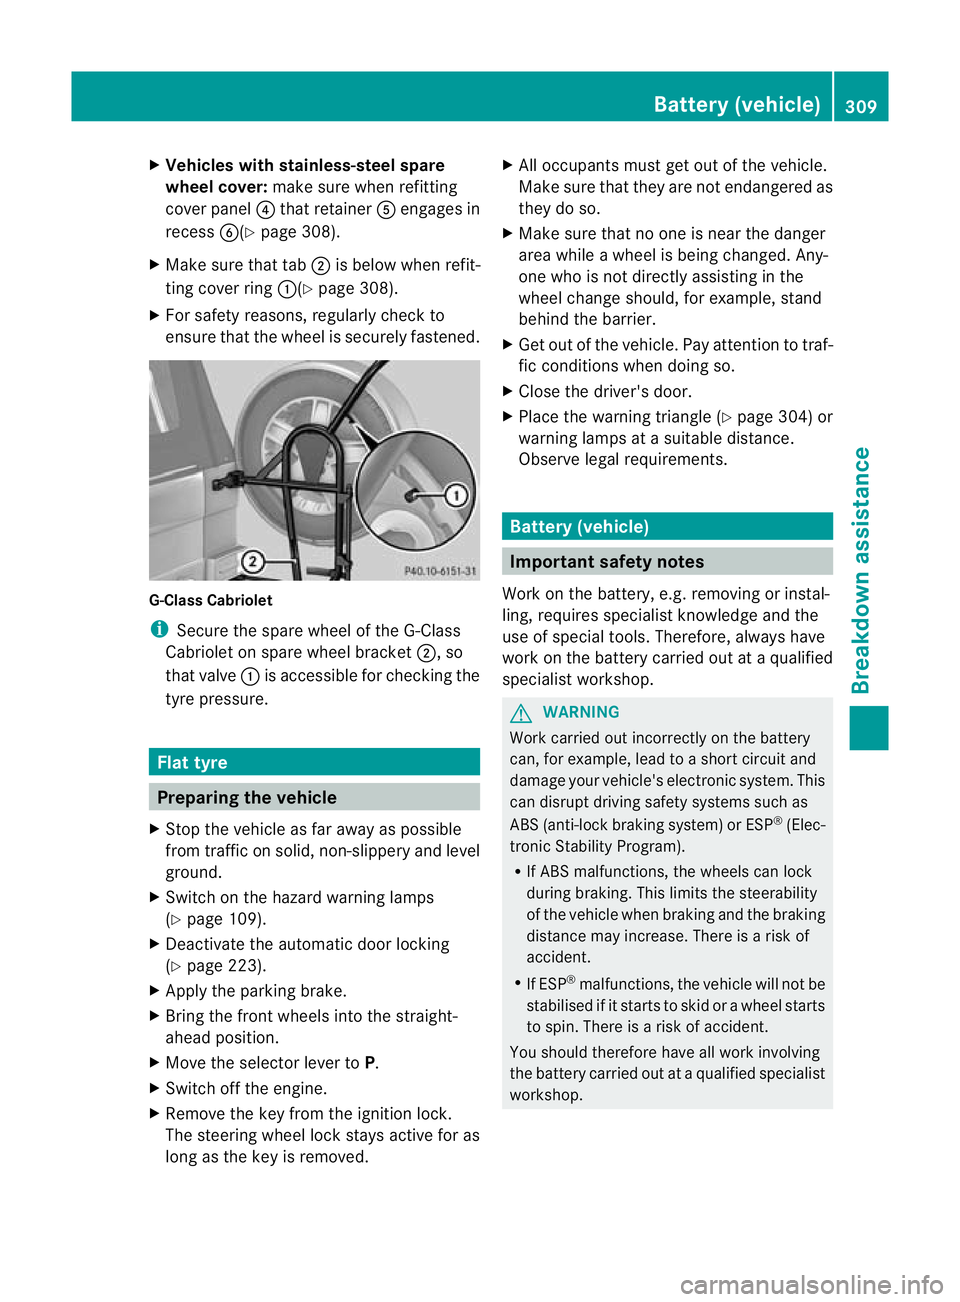
ensure that the wheel is securely fastened. G-Class Cabriolet
i
Secure the spare wheel of the G-Class
Cabriolet on spare wheel bracket ;, so
that valve :is accessible for checking the
tyre pressure. Flat tyre
Preparing the vehicle
X Stop the vehicle as far away as possible
from traffic on solid ,non-slippery and level
ground.
X Switch on the hazard warning lamps
(Y page 109).
X Deactivate the automatic door locking
(Y page 223).
X Apply the parking brake.
X Bring the front wheels into the straight-
ahead position.
X Move the selector lever to P.
X Switch off the engine.
X Remove the key from the ignition lock.
The steering wheel lock stays active for as
long as the key is removed. X
All occupants must get out of the vehicle.
Make sure that they are not endangered as
they do so.
X Make sure that no one is near the danger
area while a wheel is being changed. Any-
one who is not directly assisting in the
wheel change should, for example, stand
behind the barrier.
X Get out of the vehicle. Pay attention to traf-
fic conditions when doing so.
X Close the driver's door.
X Place the warning triangle (Y page 304) or
warning lamps at a suitable distance.
Observe legal requirements. Battery (vehicle)
Important safety notes
Work on the battery, e.g. removing or instal-
ling, requires specialist knowledge and the
use of special tools. Therefore, always have
work on the battery carried out at a qualified
specialist workshop. G
WARNING
Work carried out incorrectly on the battery
can, for example, lead to a short circuit and
damage your vehicle's electronic system. This
can disrupt driving safety systems such as
ABS (anti-lock braking system) or ESP ®
(Elec-
tronic Stability Program).
R If ABS malfunctions, the wheels can lock
during braking. This limits the steerability
of the vehicle when braking and the braking
distance may increase. There is a risk of
accident.
R If ESP ®
malfunctions, the vehicle will not be
stabilised if it starts to skid or a wheel starts
to spin. There is a risk of accident.
You should therefore have all work involving
the battery carried out at a qualified specialist
workshop. Battery (vehicle)
309Breakdown assistance Z
Page 313 of 357
G
WARNING
During the charging process, a battery produ-
ces hydrogen gas. If a short circuit occurs or
sparks are created, the hydrogen gas can
ignite. There is a risk of an explosion.
R Make sure that the positive terminal of a
connected battery does not come into con-
tact with vehicle parts.
R Never place metal objects or tools on a bat-
tery.
R It is important that you observe the descri-
bed order of the battery terminals when
connecting and disconnecting a battery.
R When jump-starting, make sure that the
battery poles with identical polarity are
connected.
R It is particularly important to observe the
described order when connecting and dis-
connecting the jump leads.
R Never connect or disconnect the battery
terminals while the engine is running. G
WARNING
Electrostatic build-up can lead to the creation
of sparks, which could ignite the highly explo-
sive gases of a battery .There is a risk of an
explosion.
Before handling the battery, touch the vehicle
body to remove any existing electrostatic
build-up. G
WARNING
Battery acid is caustic. There is a risk of injury.
Avoid contact with the skin, eyes or clothing.
Do not inhale any battery gases. Do not lean
over the battery. Keep children away from
batteries. Wash battery acid immediately with
water and seek medical attention.
! Have the battery checked regularly at a
qualified specialist workshop.
Observe the service intervals in the Service
Booklet or contact a qualified specialist
workshop for more information. !
Always have work on the battery carried
out at a qualified specialist workshop.
Should it, in exceptional circumstances, be
absolutely necessary to disconnectt he bat-
tery yourself, please observe the following:
R switch off the engine and remove the
key. Check that all the indicator lamps in
the instrumentc luster are off.Otherwise,
you may damage electroni ccomponents
such as the alternator, for example.
R first, disconnect the negative terminal
clamp, followed by the positive terminal
clamp. Never swap the terminal clamps.
The vehicle electronics may otherwise be
damaged.
R on vehicles with automatic transmission,
the transmission is locked in position P
after disconnecting the battery. The vehi-
cle is secured against rolling away.Y ou
can then no longer move the vehicle.
The battery and the cover of the positive
terminal clamp must be fitted securely dur-
ing operation.
! Have the battery checked and, if neces-
sary, replaced at a qualified specialist
workshop every two years or at least every
20,000 km. H
Environmental note Batteries contain pollutants.
It is illegal to dispose of them
with the household rubbish.
They must be collected sep-
arately and disposed of in an
environmentally responsible
recycling system. Dispose of batteries in an
environmentally responsible
manner
.Take discharged
batteries to a qualified spe-
cialis tworkshop or to a col-
lection point for used batter-
ies. 310
Battery (vehicle)Breakdown assistance
Page 314 of 357
In order for the battery to achieve the maxi-
mum possible service life, it must always be
sufficiently charged.
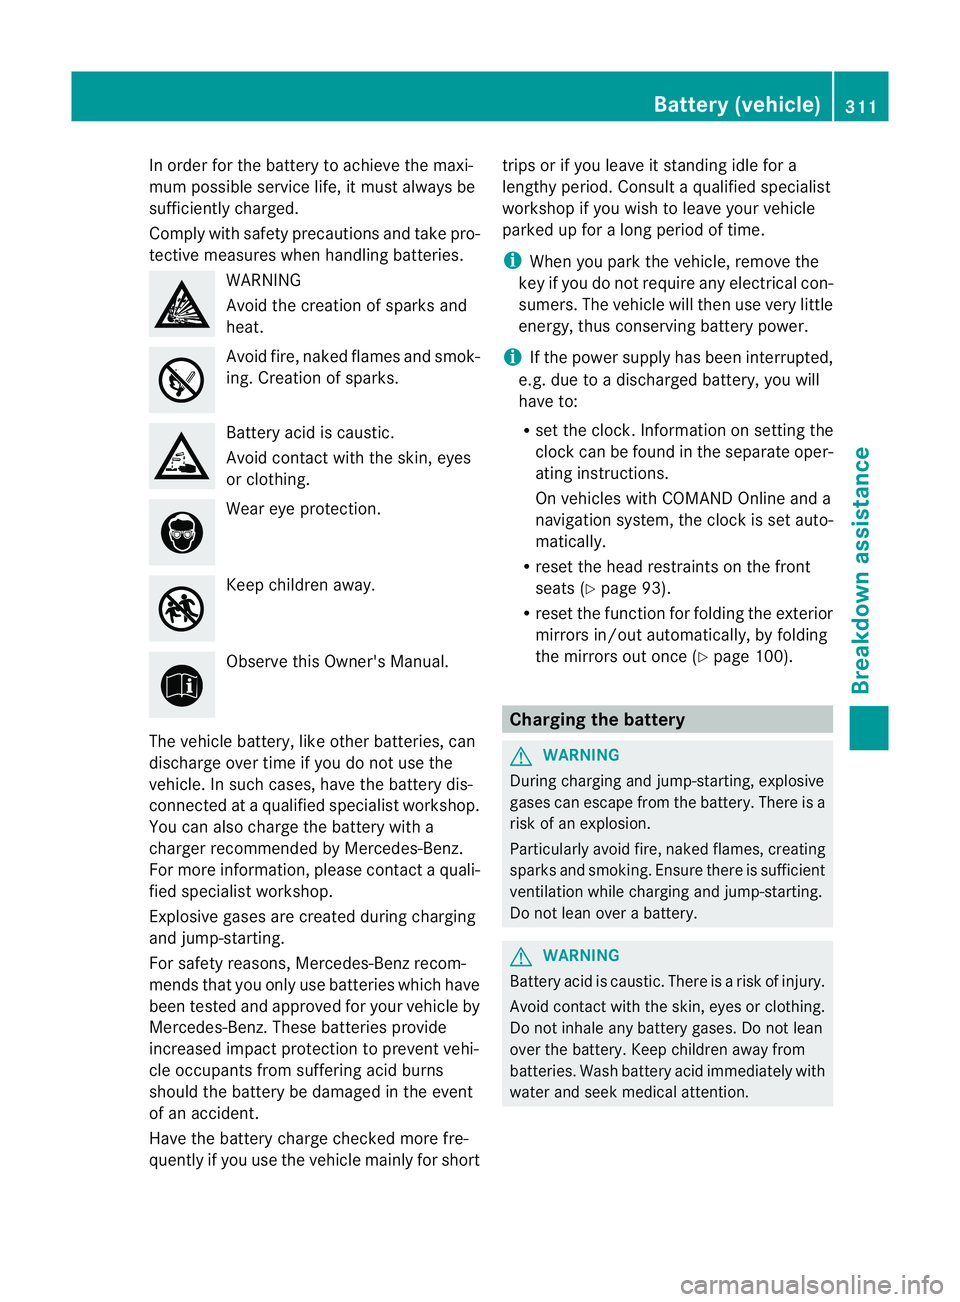
Comply with safety precautions and take pro-
tective measures when handling batteries. WARNING
Avoid the creation of sparks and
heat.
Avoid fire, naked flames and smok-
ing. Creation of sparks.
Battery acid is caustic.
Avoid contact with the skin, eyes
or clothing.
Wear eye protection.
Keep childre
naway. Observe this Owner's Manual.
The vehicle battery, like other batteries, can
discharge over time if you do not use the
vehicle. In such cases, have the battery dis-
connected at a qualified specialist workshop.
You can also charge the battery with a
charger recommended by Mercedes-Benz.
For more information, please contac taquali-
fied specialist workshop.
Explosive gases are created during charging
and jump-starting.
For safety reasons, Mercedes-Benz recom-
mends that you only use batteries which have
been tested and approved for your vehicle by
Mercedes-Benz .These batteries provide
increased impact protection to prevent vehi-
cle occupants from suffering acid burns
should the battery be damaged in the event
of an accident.
Have the battery charge checked more fre-
quently if you use the vehicle mainly for short trips or if you leave it standing idle for a
lengthy period. Consult a qualified specialist
workshop if you wish to leave your vehicle
parked up for a long period of time.
i
When you park the vehicle, remove the
key if you do not require any electrical con-
sumers. The vehicle will then use very little
energy, thus conserving battery power.
i If the power supply has been interrupted,
e.g. due to a discharged battery, you will
have to:
R set the clock. Information on setting the
clock can be found in the separate oper-
ating instructions.
On vehicles with COMAND Online and a
navigation system, the clock is set auto-
matically.
R reset the head restraints on the front
seats (Y page 93).
R reset the function for folding the exterior
mirrors in/out automatically, by folding
the mirrors out once (Y page 100). Charging the battery
G
WARNING
During charging and jump-starting, explosive
gases can escape from the battery. There is a
risk of an explosion.
Particularly avoid fire, naked flames, creating
sparks and smoking. Ensure there is sufficient
ventilation while charging and jump-starting.
Do not lean over a battery. G
WARNING
Battery acid is caustic. There is a risk of injury.
Avoid contact with the skin, eyes or clothing.
Do not inhale any battery gases. Do not lean
over the battery. Keep children away from
batteries. Wash battery acid immediately with
water and seek medical attention. Battery (vehicle)
311Breakdown assistance Z
Page 315 of 357
G
WARNING
A discharged battery can freeze at tempera-
tures below freezing point. When jump-start-
ing the vehicle or charging the battery, gases
can escape from the battery .There is a risk of
an explosion.
Allow the frozen battery to thaw out before
charging it or jump-starting.
! Only charge the installed battery with a
battery charger which has been tested and
approved by Mercedes-Benz. These battery
chargers allow the battery to be charged
while still installed in the vehicle.
! Only use battery chargers with a maxi-
mum charging voltage of 14.8 V.
! Only charge the battery using the jump-
start connection point.
Never charge a battery still installed in the
vehicle unless a battery charger unit
approved by Mercedes-Ben zis being used.
Ab attery charge runit specially adapted for
Mercedes-Benz vehicles and tested and
approved by Mercedes-Benz is available as an
accessory .Itpermits the charging of the bat-
tery in its installed position .Contact a
Mercedes-Benz Service Centre for informa-
tion and availability. Charge the battery in
accordance with the separate instructions for
the battery charger.
The jump-starting connection point is in the
engine compartment (Y page 313).
Read the battery charger's operating instruc-
tions before charging the battery.
X Open the bonnet (Y page 291).
X Connect the battery charger to the positive
terminal and earth point in the same order
as when connecting the donor battery in
the jump-starting procedure
(Y page 313). 312
Battery (vehicle)Breakdown assistance
Page 316 of 357
Jump-starting
G
WARNING
Battery acid is caustic. There is a risk of injury.
Avoid contact with the skin, eyes or clothing. Do not inhale any battery gases. Do not lean over
the battery. Keep children away from batteries. Wash battery acid immediately with water and
seek medical attention. G
WARNING
Gases escaping from the battery during jump-starting may cause minor explosions. Avoid cre-
ating sparks. Keep naked flames away from the battery, and do not smoke.
Comply with the important safety precautions when handling batteries. You will find these under
"Battery (vehicle) -important safety notes" in the index. G
WARNING
During charging and jump-starting, explosive gases can escape from the battery .There is a risk
of an explosion.
Particularly avoid fire, naked flames, creating sparks and smoking. Ensure there is sufficient
ventilation while charging and jump-starting. Do not lean over a battery. G
WARNING
During the charging process, a battery produces hydrogen gas. If a short circuit occurs or sparks
are created, the hydrogen gas can ignite. There is a risk of an explosion.
R Make sure that the positive terminal of a connected battery does not come into contact with
vehicle parts.
R Never place metal objects or tools on a battery.
R It is important that you observe the described order of the battery terminals when connecting
and disconnecting a battery.
R When jump-starting, make sure that the battery poles with identical polarity are connected.
R It is particularly important to observe the described order when connecting and disconnecting
the jump leads.
R Never connect or disconnect the battery terminals while the engine is running. G
WARNING
Ad ischarged battery can freeze at temperatures below freezing point .When jump-starting the
vehicle or charging the battery, gases can escape from the battery. There is a risk of an explosion.
Allow the frozen battery to thaw out before charging it or jump-starting. G
WARNING
Non-combusted fuel can collect in the exhaust system and ignite. There is a risk of fire. Avoid
repeated and lengthy starting attempts.
! Avoid repeated and lengthy starting attempts. Otherwise, non-combusted fuel may dam-
age the catalytic converter and create a risk of fire. Jump-starting
313Breakdown assistance Z
Page 317 of 357
Do not use a rapid charging device to start the vehicle.
Make sure the jump leads are not damaged.
Make sure the jump leads are not touching any other metal objects when they are connected
to the battery.
If the indicator/warning lamps do not ligh tup at temperatures around or below freezing point,
the discharged battery is likely to be frozen (a commonplace scenario). In this case, do not
jump-start the vehicle or recharge the battery.
Once the battery has thawed out, its service life may be dramatically reduced.
The starting characteristic scan be impaired, particularly at low temperatures.
It is recommended that you have the thawed out battery checked at a qualified specialist
workshop.
Do no tuse a rapid charging device to start the vehicle. If your vehicle's battery is discharged,
the engine can be jump-started from another vehicle or from a second battery using jump
leads. Observe the following points:
R The battery is not accessible in all vehicles. If the other vehicle's battery is not accessible,
jump-start the vehicle using a second battery or ajump-starting device.
R Vehicles with apetrol engine: only jump-star tthe vehicle when the engine and exhaust
system are cold.
R Do not start the engine if the battery is frozen. Let the battery thaw first.
R Jump-starting may only be performed from batteries with a nominal voltage of 12 V.
R Only use jump leads that have a sufficient cross-section and insulated terminal clamps.
R If the battery is fully discharged, leave the battery that is being used to jump-start connected
for a few minutes before attempting to start. This charges the empty battery a little.
R Make sure that the two vehicles do not touch.
Make sure that:
R The jump leads are not damaged.
R Non-insulated parts of the terminal clamps do not come into contact with other metal parts
while the jump leads are connected to the battery.
R The jump leads cannot come into contact with parts such as the pulley or the fan. These
parts move when the engine is started and while it is running.
X Apply the parking brake.
X Move the selector lever to P.
X Switch off all electrical consumers (e.g. radio, blower, etc.).
X Open the bonnet (Y page 291).314
Jump-startingBreakdown assistance
Page 318 of 357
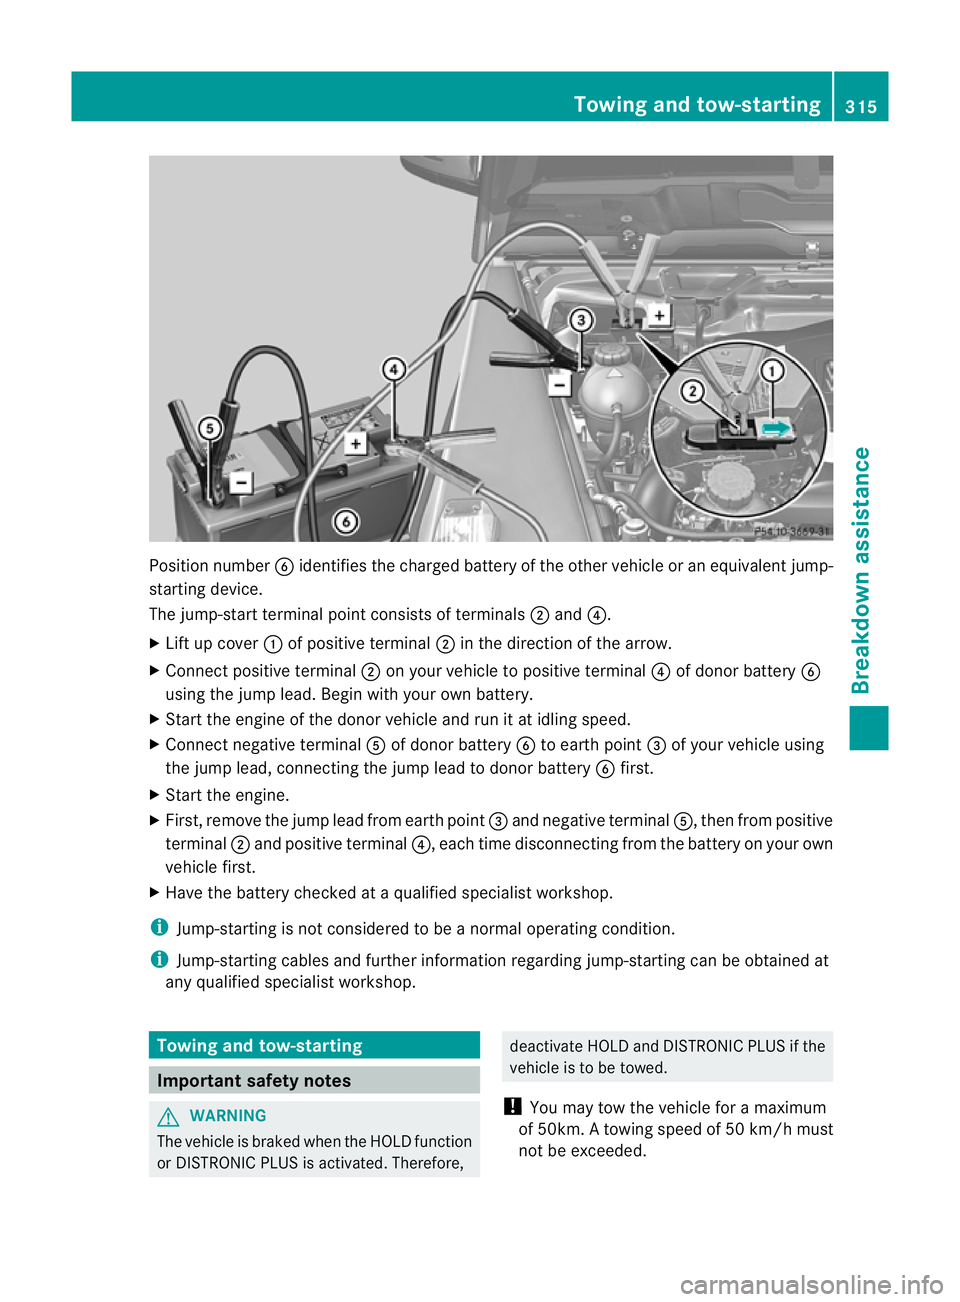
Position number
Bidentifies the charged battery of the other vehicle or an equivalent jump-
starting device.
The jump-start terminal point consists of terminals ;and ?.
X Lift up cover :of positive terminal ;in the direction of the arrow.
X Connec tpositive terminal ;on your vehicle to positive terminal ?of donor battery B
using the jump lead. Begin with your own battery.
X Start the engine of the donor vehicle and run it at idling speed.
X Connect negative terminal Aof donor battery Bto earth point =of your vehicle using
the jump lead, connectingt he jump lead to donor battery Bfirst.
X Start the engine.
X First, remove the jump lead from earth point =and negative terminal A, then from positive
terminal ;and positive terminal ?, each time disconnecting from the battery on your own
vehicle first.
X Have the battery checked at a qualified specialist workshop.
i Jump-starting is not considered to be a normal operating condition.
i Jump-starting cables and further information regarding jump-starting can be obtained at
any qualified specialist workshop. Towing and tow-starting
Important safety notes
G
WARNING
The vehicle is braked when the HOLD function
or DISTRONIC PLUS is activated. Therefore, deactivate HOLD and DISTRONIC PLUS if the
vehicle is to be towed.
! You may tow the vehicle for a maximum
of 50km. A towing speed of 50 km/h must
not be exceeded. Towing and tow-starting
315Breakdown assistance Z
Page 319 of 357
For towing distances over 50 km, the entire
vehicle mus
tbe lifted up and transported.
! Only secure the tow cable or towing bar
to the towing eyes. You could otherwise
damage the vehicle.
! Do not use the towing eyes for recovery
purposes as this could damage the vehicle.
If in doubt, recover the vehicle with a crane.
! When towing, pull away slowly and
smoothly. If the tractive power is too high,
the vehicles could be damaged.
! Your vehicles is equipped with an auto-
matic transmission .Therefore, you must
not have the vehicle tow-started. The trans-
mission may otherwise be damaged. G
WARNING
If the weight of the vehicle to be towed or tow-
started is greater than the permissible gross
weight of your vehicle:
R the towing eye could detach itself
R the vehicle/trailer combination could over-
turn.
There is a risk of an accident.
When towing or tow-starting another vehicle,
its weight should not be greater than the per-
missible gross weight of your vehicle.
Information on your vehicle's gross vehicle
weight rating can be found on the vehicle
identification plate (Y page 340).
Observe the legal requirements for the rele-
vant countries when towing.
It is better to have the vehicle transported
than to have it towed.
If the transfer case can be shifted into neutral
N, you can tow the vehicle.
If the transfer case cannot be shifted into
neutral N, you can tow the vehicle with one
axle raised. Please bear the following in mind:
R remove the propeller shaft between the
transfer case and the rolling axle.
R turn the key to position 1in the ignition lock
(Y page 143). The battery must be connected and charged.
Otherwise, you:
R
cannot turn the key in the ignition lock to
position 2(Ypage 143)
R cannot shift the automatic transmission to
position N
i Deactivate the automatic locking feature
(Y page 74). You could otherwise be locked
out when pushing or towing the vehicle.
Deactivate tow-away protection before the
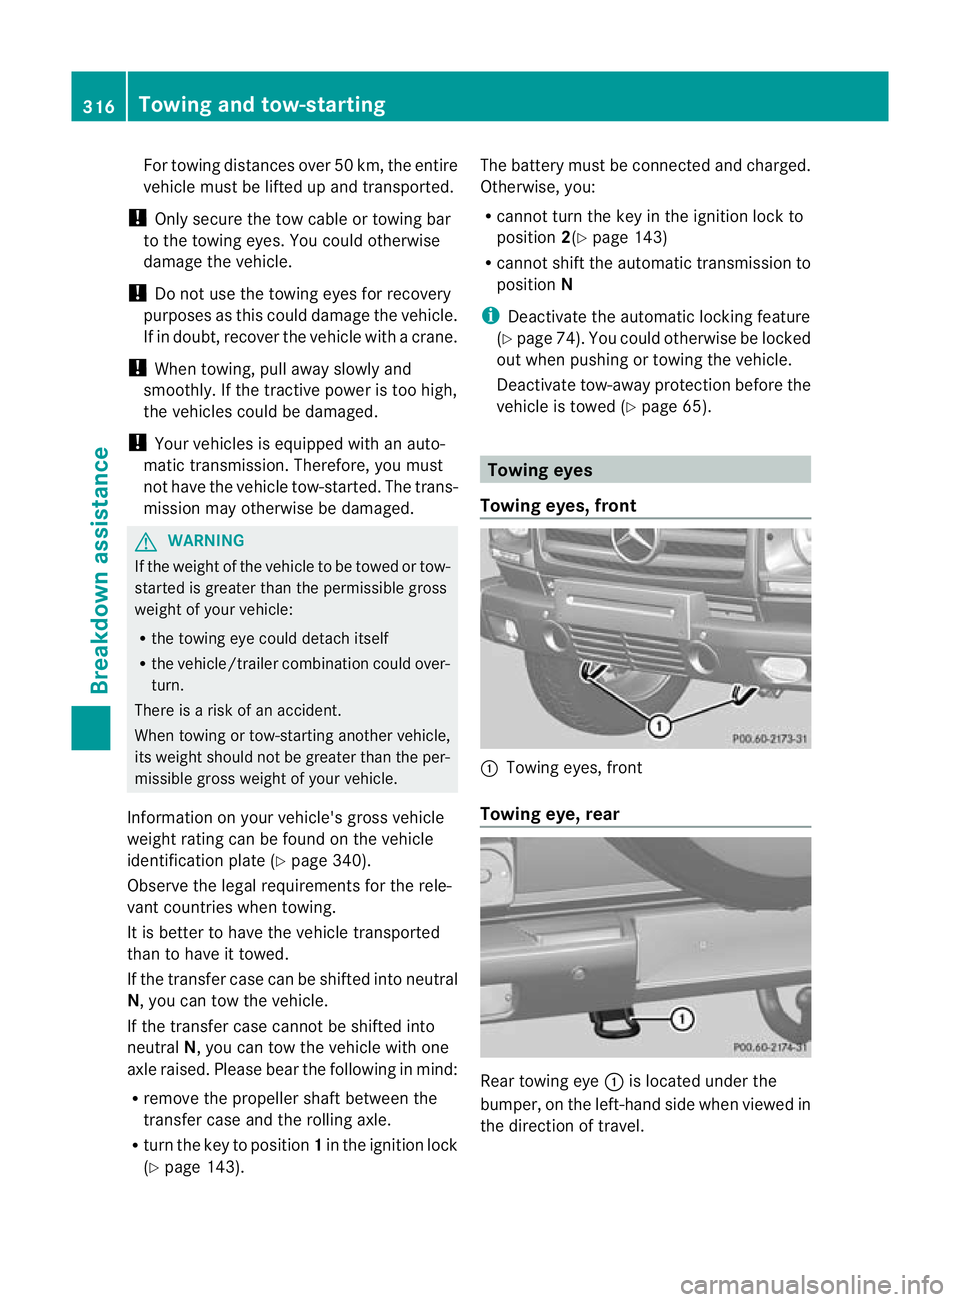
vehicle is towed (Y page 65). Towing eyes
Towing eyes, front :
Towing eyes, front
Towing eye, rear Rear towing eye
:is located under the
bumper, on the left-hand side when viewed in
the direction of travel. 316
Towing and tow-startingBreakdown assistance
Page 320 of 357
Towing the vehicle with both axles on
the ground
It is important tha tyou observe the safety
instructions when towing away your vehicle
(Y page 315).
X Switch on the hazard warning lamps
(Y page 109).
i In order to signal a change of direction
when towing the vehicle with the hazard
warning lamps switched on, use the com-
bination switch as usual.Int his case, only
the turn signals for the desired direction
flash. When you reset the combination
switch, the hazard warning lamps start
flashing again.
X Turn the key to position 2in the ignition
lock (Y page 143).
X When the vehicle is stationary, depress the
brake pedal and keep it depressed.
X Shift the transfer case to neu-
tral(Y page 203).
X Shift the automatic transmission to posi-
tion N.
X Release the brake pedal.
X Release the parking brake (Y page 164).
i The transmission can only change gear
when the battery has sufficient charge.
If you cannot move the selector lever to N,
you must remove the propeller shafts to the
driven axles. Transporting the vehicle
! Only lash the vehicle down by the wheels
or wheel rims, not by parts of the vehicle
such as axle or steering components. Oth-
erwise, the vehicle could be damaged.
Use the towing eyes to pull the vehicle if it
needs to be transported on a trailer or trans-
porter (Y page 316).
X Apply the parking brake.
X Turn the key to position 2in the ignition
lock (Y page 143). X
Move the selector lever to N.
X Shift the transfer case to neu-
tral(Y page 203).
X Secure the towing cable to the towing eyes
(Y page 316).
X Make sure that the vehicle cannot roll
away.
X Release the parking brake.
X Load the vehicle onto the transporter.
As soon as the vehicle is loaded:
X Apply the parking brake.
X Shift the automatic transmission to posi-
tion P.
X Turn the key to position 0in the ignition
lock (Y page 143) and remove it.
X Secure the vehicle. Recovering
avehicle that has become
stuck
! When recovering a trapped vehicle, do not
jerk the vehicle or pull it at an angle. If the
tractive power is too high, the vehicles
could be damaged.
If the drive wheels get trapped on loose or
muddy ground, recover th evehicle with the
utmost care, especially so if the vehicle is
laden.
Never attempt to recover a vehicle with a
trailer attached.
Pull out the vehicle backwards, if possible,
using the tracks it made when it became
stuck. Towing in the event of malfunctions
General notes !
If you are removing the propeller shaft,
use M10 nuts as spacers on the M8 bolts
and secure them with M8 nuts.
New self-locking nuts must be used when
the propeller shafts are refitted. Towing and tow-starting
317Breakdown assistance Z