tow MERCEDES-BENZ G-CLASS SUV 2012 Owner's Manual
[x] Cancel search | Manufacturer: MERCEDES-BENZ, Model Year: 2012, Model line: G-CLASS SUV, Model: MERCEDES-BENZ G-CLASS SUV 2012Pages: 357, PDF Size: 8.86 MB
Page 154 of 357
Staying in neutral (N)
G
WARNING
If children are left unsupervised in the vehicle,
they could:
R open the doors, thus endangering other
people or road users.
R get out and disrupt traffic.
R operate the vehicle's equipment.
Additionally, children could set the vehicle in
motion if, for example, they:
R release the parking brake.
R shift the automatic transmission out of
parking position P.
R start the engine.
There is a risk of an accident and injury.
When leaving the vehicle, always take the key
with you and lock the vehicle. Never leave
children or animals unattended in the vehicle.
Always keep the key out of reach of children.
X Make sure the ignition is switched on.
X When the vehicle is stationary, depress the
brake pedal and keep it depressed.
X Select neutral N.
X Release the brake pedal.
X If the parking brake is applied, release it.
X Switch off the ignition and leave the key in
the ignition lock.
Shifting to transmission position D X
When the vehicle is stationary, depress the
brake pedal and keep it depressed.
X Push the selector lever back past the first
point of resistance.
Transmission position Dis engaged.
i For AMG vehicles: the ECO start/stop
function switches the engine off automati-
cally if the vehicle is braked to a standstill
when in transmission position Dand the
brake is still depressed (Y page 145). Transmission positions
B
Park position
This prevents the vehicle from roll-
ing away when stopped. Do not
shift the transmission into position
P(Y
page 149) unless the vehicle is
stationary.
i The key can only be removed if
the transmission is in position P.
When there is no key in the igni-
tion lock, the selector lever is
locked in position P.
Have the vehicle electronics
checked immediately at a qualified
specialist workshop. C
Reverse gear
Only shift the transmission to
R
when the vehicle is stationary. A
Neutral
No power is transmitted from the
engine to the drive wheels.
Releasing the brakes will allow you
to move the vehicle freely, e.g. to
push it or tow it.
Do not shift the transmission to N
while driving. Otherwise, the auto-
matic transmission could be dam-
aged.
If ESP ®
is deactivated or faulty:
only shift the transmission to posi-
tion Nif the vehicle is in danger of
skidding, e.g. on icy roads.
If you want to engage the transfer
case, shift briefly into N
(Y page 202).
! Rolling in neutral Ncan lead to
damage to the transmission. 7
Drive
The automatic transmission
changes gear automatically. All
forward gears are available. Automatic transmission
151Driving and parking Z
Page 155 of 357
Changing gear
The automatic transmission shifts to the indi-
vidual gears automatically when it is in trans-
mission position D.Gearshifting is deter-
mined by:
R a shift range restriction, if selected
R the position of the transfer case (HIGH
RANGE orLOW RANGE)
R the position of the accelerator pedal
R the road speed Driving tips
Accelerator pedal position Your style of driving influences how the auto-
matic transmission shifts gear:
R
little throttle: early upshifts
R more throttle: late upshifts
Kickdown Use kickdown for maximum acceleration.
X
Depress the accelerator pedal beyond the
pressure point.
The transmission shifts to a lower gear
depending on the engine speed.
X Ease off the accelerator pedal once the
desired speed is reached.
The automatic transmission shifts back up.
Towing atrailer X
Drive in the middle of the engine speed
range on uphill gradients.
X Limi tshift range to 3or 2depending on the
uphill or downhill gradient (Y page 153),
even if cruise control or SPEEDTRONIC is
activated.
X Shift the transfer case into low-range driv-
ing position LOW RANGE on extreme uphill
gradients or steep downhill gradients
(Y page 202). Program selector button
General notes The program selector button allows you to
choose between drive programs with differ-
ent driving characteristics.
i
On AMG vehicles, drive program Eis
called drive program C.
Driving programs E
Economy
C Controlled
Efficiency Comfortable, economical
driving
S
Sport Sporty driving style
M
Manual Manual gearshifting
i
The automatic transmission switches to
automatic drive program E(drive program
C in AMG vehicles) each time the engine is
started.
i For further information on the automatic
drive program, see (Y page 153).
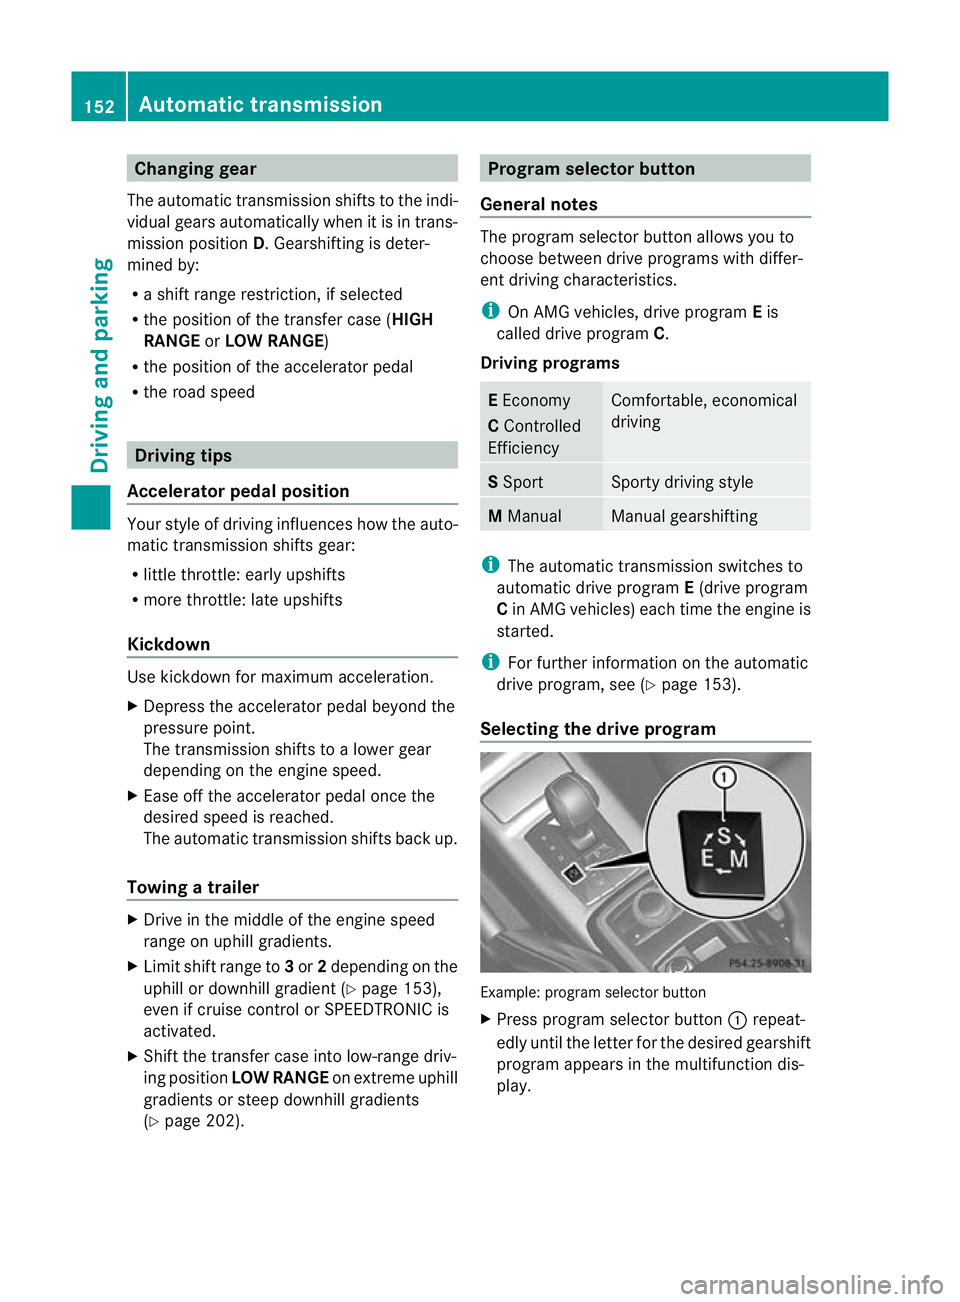
Selecting the drive program Example: program selector button
X
Press program selector button :repeat-
edly until the letter for the desired gearshift
program appears in the multifunction dis-
play. 152
Automatic transmissionDriving and parking
Page 165 of 357
AdBlue
®
may leak ou tas a result of overfilling.
Mercedes-Benz offers a special disposable
hose with overfill protection. You can obtain
this from any Mercedes-Benz Service Centre.
AdBlue ®
is available in a variety of containers
and receptacles. Only use the disposable
hose with Mercedes-Benz AdBlue ®
refill can-
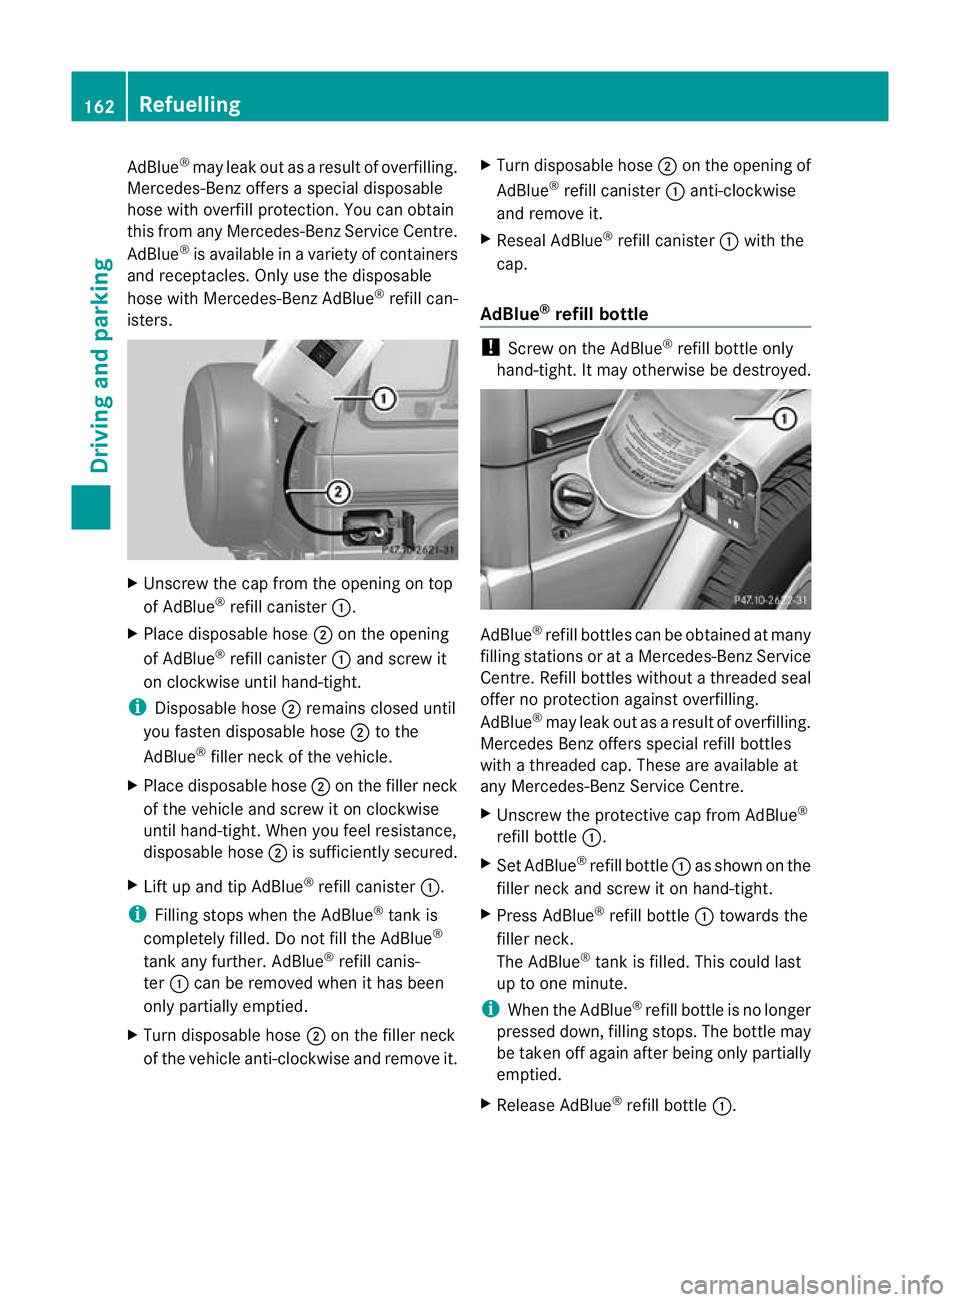
isters. X
Unscrew the cap from the opening on top
of AdBlue ®
refill canister :.
X Place disposable hose ;on the opening
of AdBlue ®
refill canister :and screw it
on clockwise until hand-tight.
i Disposable hose ;remains closed until
you fasten disposable hose ;to the
AdBlue ®
filler neck of the vehicle.
X Place disposable hose ;on the filler neck
of the vehicle and screw it on clockwise
until hand-tight. When you feel resistance,
disposable hose ;is sufficiently secured.
X Lift up and tip AdBlue ®
refill canister :.
i Filling stops when the AdBlue ®
tank is
completely filled. Do not fill the AdBlue ®
tank any further. AdBlue ®
refill canis-
ter :can be removed when it has been
only partially emptied.
X Turn disposable hose ;on the filler neck
of the vehicle anti-clockwise and remove it. X
Turn disposable hose ;on the opening of
AdBlue ®
refill canister :anti-clockwise
and remove it.
X Reseal AdBlue ®
refill canister :with the
cap.
AdBlue ®
refill bottle !
Screw on the AdBlue ®
refill bottle only
hand-tight. It may otherwise be destroyed. AdBlue
®
refill bottles can be obtained at many
filling stations or at aMercedes-BenzS ervice
Centre. Refill bottles without a threaded seal
offer no protection against overfilling.
AdBlue ®
may leak out as a result of overfilling.
Mercedes Benzo ffers special refill bottles
with a threaded cap. These are available at
any Mercedes-Benz Service Centre.
X Unscrew the protective cap from AdBlue ®
refill bottle :.
X Set AdBlue ®
refill bottle :as show nonthe
filler neck and screw it on hand-tight.
X Press AdBlue ®
refill bottle :towards the
filler neck.
The AdBlue ®
tank is filled. This could last
up to one minute.
i When the AdBlue ®
refill bottle is no longer
pressed down, filling stops. The bottle may
be taken off again after being only partially
emptied.
X Release AdBlue ®
refill bottle :.162
RefuellingDriving and parking
Page 166 of 357
X
Turn AdBlue ®
refill bottle :anti-clockwise
and remove it.
X Screw the protective cap onto AdBlue ®
refill bottle :again.
Closing the AdBlue ®
filler cap and fuel
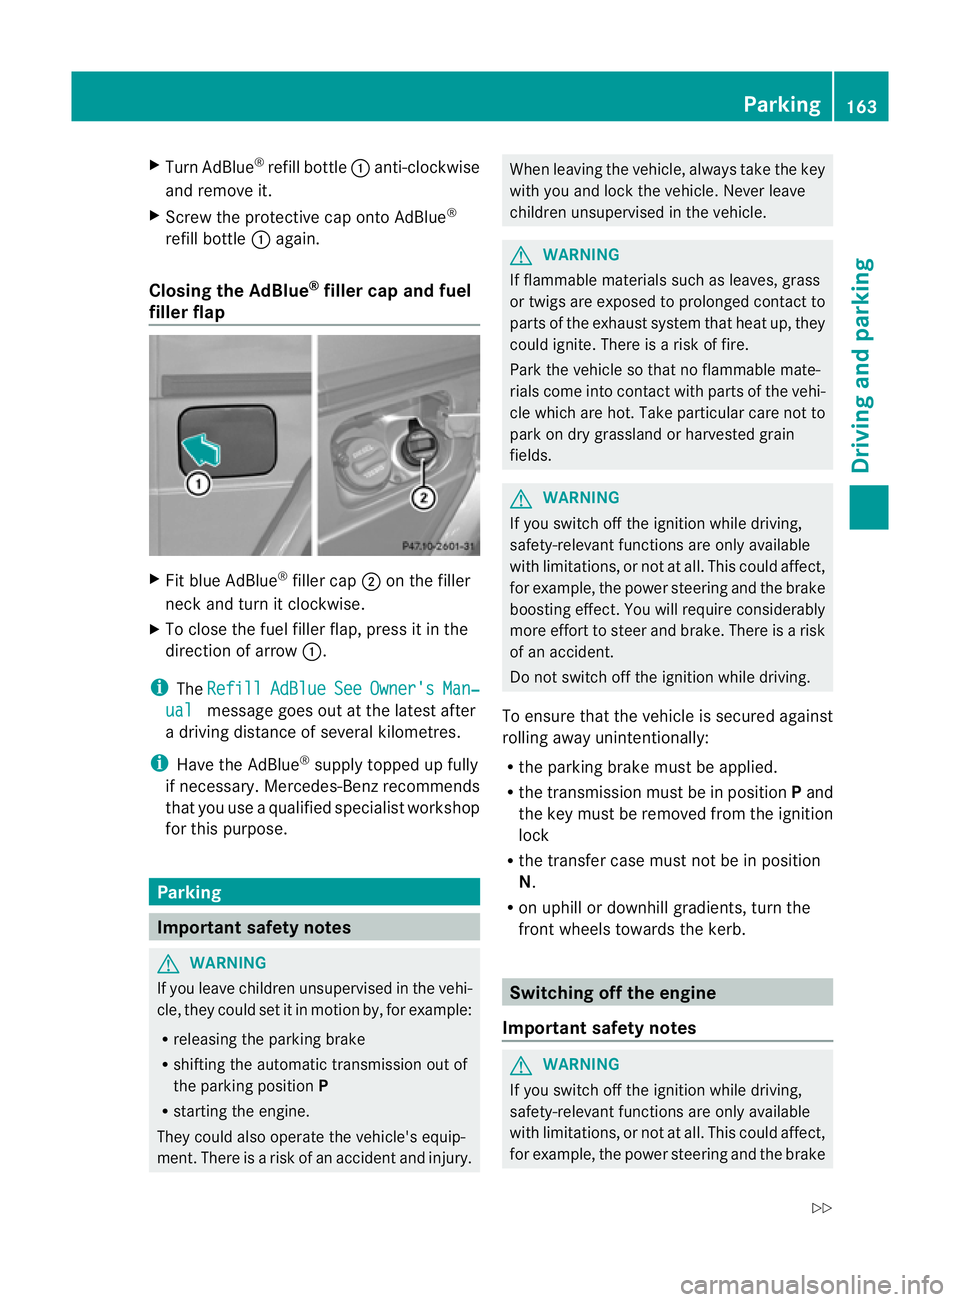
filler flap X
Fit blue AdBlue ®
filler cap ;on the filler
neck and turn it clockwise.
X To close the fuel filler flap, press it in the
direction of arrow :.
i The Refill AdBlue See Owner's Man‐
ual message goes out at the latest after
a driving distance of several kilometres.
i Have the AdBlue ®
supply topped up fully
if necessary. Mercedes-Benz recommends
that you use a qualified specialist workshop
for this purpose. Parking
Important safety notes
G
WARNING
If you leave children unsupervised in the vehi-
cle, they could set it in motion by, for example:
R releasing the parking brake
R shifting the automatic transmission out of
the parking position P
R starting the engine.
They could also operate the vehicle's equip-
ment.T here is a risk of an accident and injury. When leaving the vehicle, always take the key
with you and lock the vehicle. Never leave
children unsupervised in the vehicle.
G
WARNING
If flammable materials such as leaves, grass
or twigs are exposed to prolonged contact to
parts of the exhaust system that heat up, they
could ignite. There is a risk of fire.
Park the vehicle so that no flammable mate-
rials come into contact with parts of the vehi-
cle which are hot. Take particular care not to
park on dry grassland or harvested grain
fields. G
WARNING
If you switch off the ignition while driving,
safety-relevant functions are only available
with limitations, or not at all. This could affect,
for example, the power steering and the brake
boosting effect.Y ou will require considerably
more effort to steer and brake. There is a risk
of an accident.
Do not switch off the ignition while driving.
To ensure that the vehicle is secured against
rolling away unintentionally:
R the parking brake must be applied.
R the transmission must be in position Pand
the key must be removed from the ignition
lock
R the transfer case must not be in position
N.
R on uphill or downhill gradients, turn the
front wheels towards the kerb. Switching off the engine
Important safety notes G
WARNING
If you switch off the ignition while driving,
safety-relevant functions are only available
with limitations, or not at all. This could affect,
for example, the power steering and the brake Parking
163Driving and parking
Z
Page 168 of 357
drive short distances, you should take a 20
minute trip on a motorway or rural road at
least every 500km. Brakes
Important safety notes G
WARNING
If you shift down on a slippery road surface in
an attempt to increase the engine's braking
effect, the drive wheels could lose their grip.
This increases the risk of skidding and having
an accident.
Do not shift down for additional engine brak-
ing on a slippery road surface.
Downhill gradients On long and steep downhill gradients, espe-
cially if the vehicle is laden or towing a trailer,
you must select shift range
1,2or 3
(Y page 153) in good time.
i This also applies if you have activated
cruise control or SPEEDTRONIC.
This will use the braking effec tofthe engine,
so less braking will be required to prevent the
vehicle from gaining speed. This relieves the
load on the brake system and prevents the
brakes from overheating and wearing too
quickly. If you need additional braking,
depress the brake pedal repeatedly rather
than continuously.
Heavy and light loads G
WARNING
The braking system can overheat if you leave
your foot on the brake pedal while driving.
This increases the braking distance and could
even cause the braking system to fail. There
is a risk of an accident.
Never use the brake pedal as a footrest.Do
not simultaneously depress both the brake
pedal and the accelerato rpedal while driving. If the brakes have been subjected to a heavy
load, do not stop the vehicle immediately, but
drive on for a short while. This allows the air-
flow to cool the brakes more quickly.
If the brakes have been used only moderately,
you should occasionally test their effective-
ness. To do this, brake more firmly from a
higher speed. This improves the grip of the
brakes.
Wet road surfaces
If driving in heavy rain for a prolonged period
of time without braking, there may be a
delayed reaction from the brakes when brak-
ing for the first time. This may also occur after
the vehicle has been washed.
You have to depress the brake pedal more
firmly. Maintain a greater distance from the
vehicle in front.
After driving on a wet road or having the vehi-
cle washed, brake firmly while paying atten-
tion to the traffic conditions .This will warm
up the brake discs, thereby drying them more
quickly and protecting them against corro-
sion.
Limited braking performance on salt-
treated roads If you drive on salt-treated roads, a layer of
salt may form on the brake discs and pads.
This can increase the braking distance con-
siderably.
R
Apply the brakes occasionally in order to
prevent any salt build-up. Ensure that you
do not endanger other road users when
doing so.
R Carefully depress the brake pedal at the
end of the journey and when starting the
next journey.
R Maintain a much greater distance to the
vehicle in front. Driving tips
165Driving and parking Z
Page 171 of 357
R
Clean any mud from the tyre tread after
fording.
R Apply the brakes to dry them after fording.
R Water offers a high degree of resistance,
the ground is slippery and ,insome cases,
unstable. Therefore, it is difficult and dan-
gerous to pull away in the water.
R Ensure that a bow wave does not form as
you drive.
R Clean any mud from the tyre tread after
fording.
R Apply the brakes to dry them after fording. Parking the vehicle after heavy loads
on the engine
! Vehicles with adiesel engine: your
vehicle's exhaust gas turbocharger may get
very hot under heavy engine load, e.g. dur-
ing:
R trailer towing
R longe rmotorway journeys at high speed
R longer journeys through mountainous
terrain
X Let the engine run for approximately
another two minutes while the vehicle is
stationary before switching off the engine.
This way, the exhaust gas turbocharger can
cool down more effectively. Winter driving
General notes G
DANGER
If the exhaust pipe is blocked or adequate
ventilation is not possible, poisonous gases
such as carbon monoxide (CO) may enter the
vehicle. This is the case, e.g. if the vehicle
becomes trapped in snow. There is a risk of
fatal injury.
If you leave the engine or the auxiliary heating
running, make sure the exhaust pipe and area
around the vehicle are clear of snow. To ensure an adequate supply of fresh air, open
a window on the side of the vehicle that is not
facing into the wind. G
WARNING
If you have fitted snow chains to the front
wheels, they may scrape against the vehicle
body or chassis components. This could
cause damage to the vehicle or the tyres.
There is a risk of an accident.
To avoid hazardous situations:
R never fit snow chains on the front wheels
R fit snow chains to the rear wheels in pairs.
At the onset of winter, have your vehicle win-
terproofed at a qualified specialist workshop.
Observe the notes in the "Winter operation"
section (Y page 323).
Driving with summer tyres Observe the notes in the "Winter operation"
section (Y
page 323).
Slippery road surfaces G
WARNING
If you shift down on a slippery road surface in
an attempt to increase the engine's braking
effect, the drive wheels could lose their grip.
This increases the risk of skidding and having
an accident.
Do not shift down for additional engine brak-
ing on a slippery road surface.
You should drive particularly carefully on slip-
pery road surfaces. Avoid sudden accelera-
tion, steering and braking manoeuvres.
If the vehicle threatens to skid or cannot be
stopped when moving at low speed:
X Move the transmission to position N.
X Try to bring the vehicle under control by
using corrective steering.
i For more information on driving with
snow chains, see (Y page 324).168
Driving tipsDriving and parking
Page 173 of 357
R
Chec kthat items of luggage and loads are
stowed safely and are well secured
(Y page 271).
R To avoid damaging the vehicle, make sure
there is always sufficient ground clearance.
R Always keep the engine running and in gear
when driving on a downhill gradient.
R Always keep the engine running and in gear
when driving on a slope.
R Drive slowly and evenly, if necessary at
walking pace.
R Ensure that the wheels are in contact with
the ground at all times.
R Drive with extreme care on unknown off-
road routes where visibility is poor. For
safety reasons, get out of the vehicle first
and survey the off-road route.
R Check the depth of water before fording
rivers and streams.
R When fording, do not stop and do not
switch off the engine.
R Look out for obstacles such as rocks, holes,
tree stumps and furrows.
R Always keep the doors, the rear door or
tailgate (G-Class Cabriolet), the side win-
dows and the sliding sunroof closed while
the vehicle is in motion.
R Switch off cruise control and variable
SPEEDTRONIC.
R Do not stray from marked routes or paths.
R Adapt your speed to the terrain. The
rougher, steeper or more ruts on the ter-
rain, the slower your speed should be.
R Drive slowly and at a constant speed
through the water. Ensure that a bow wave
does not form as you drive.
R On sand, drive quickly to overcome the roll-
ing resistance. Otherwise, the vehicle could
dig itself into the sand.
R Do not jump with the vehicle as this will
interrupt the vehicle's propulsion. R
Avoid high engine speeds. Drive at appro-
priate engine speeds.
R Always check the vehicle for damage after
off-road driving.
i Information about retrofitting special all-
terrain tyres is available from any qualified
specialist workshop.
i Do not use the HOLD function when driv-
ing off-road, on steep uphill or downhill gra-
dients or on slippery or loose surfaces. The
HOLD function cannot hold the vehicle on
such surfaces.
Checklist before driving off-road !
If the engine oil warning lamp lights up
during the journey, stop the vehicle in a
safe place as soon as is possible. Check the
engine oil level. The warning given by the
engine oil warning light must not be
ignored. Continuing your journey when the
symbol is shown may result in engine dam-
age.
X Engine oil level: check the engine oil and
top it up if necessary.
Only then does the engine receive enough
oil when the vehicle is standing on a steep
incline.
X G3 50 BlueTEC: have the AdBlue ®
level
checked at a qualified specialist workshop
(Y page 160).
X Tyre-change tool kit: check that the jack
is working and make sure you have the
wheelbrace, a robust tow cable and a fold-
ing spade in the vehicle.
X Wheels and tyres: check the tyre tread
depth and tyre pressure.
X Check for damage and remove any foreign
objects, e.g. small stones, from the
wheels/tyres.
X Replace any missing valve caps.
X Replace dented or damaged wheels.
X Carry a sound spare wheel. 170
Driving tipsDriving and parking
Page 177 of 357
Do not use cruise control:
R
in traffi cconditions that do not allow you
to drive at a constant speed, e.g. heavy
traffic, on winding roads or off-road
R on slippery road surfaces. Braking or accel-
erating could cause the drive wheels to lose
traction and the vehicle could then skid.
R when there is poor visibility, e.g. due to fog,
heavy rain or snow
General notes Cruise control maintains a constant road
speed for you. On long and steep downhill
gradients, especially if the vehicle is laden or
towing a trailer, you must select shift range
1,
2or 3in good time. By doing so, you will
make use of the braking effect of the engine.
This relieves the load on the brake system and
prevents the brakes from overheating and
wearing too quickly.
Use cruise control only if road and traffic con-
ditions make it appropriate to maintain a
steady speed for a prolonged period. You can
store any road speed above 30 km/h.
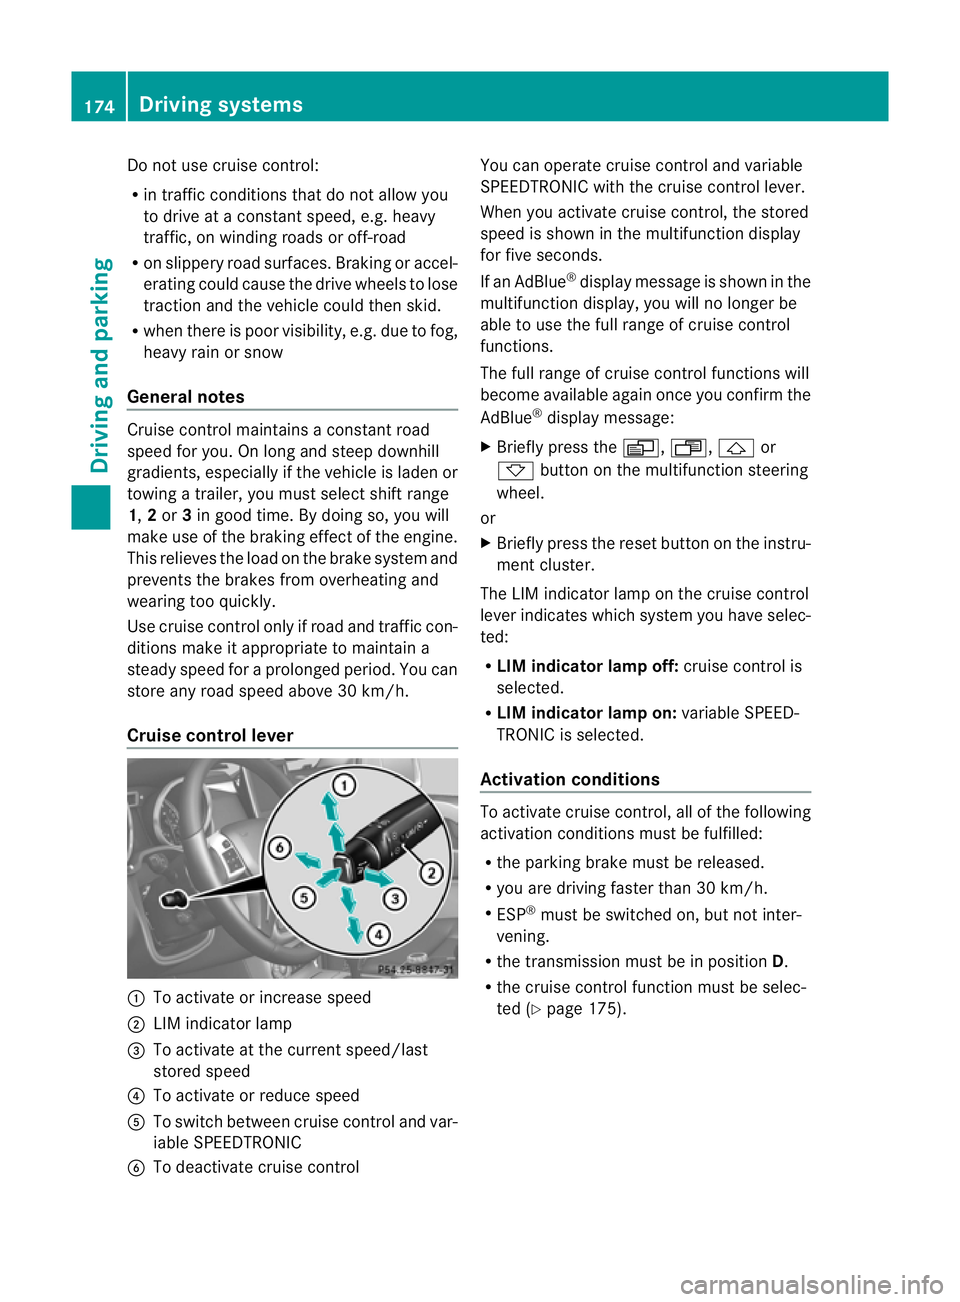
Cruise control lever :
To activate or increase speed
; LIM indicator lamp
= To activate at the current speed/last
stored speed
? To activate or reduce speed
A To switch between cruise control and var-
iable SPEEDTRONIC
B To deactivate cruise control You can operate cruise control and variable
SPEEDTRONIC with the cruise control lever.
When you activate cruise control, the stored
speed is shown in the multifunction display
for five seconds.
If an AdBlue ®
display message is shown in the
multifunction display, you will no longer be
able to use the full range of cruise control
functions.
The full range of cruise control functions will
become available again once you confirm the
AdBlue ®
display message:
X Briefly press the V,U,&or
* button on the multifunction steering
wheel.
or
X Briefly press the reset button on the instru-
ment cluster.
The LIM indicator lamp on the cruise control
lever indicates which system you have selec-
ted:
R LIM indicator lamp off: cruise control is
selected.
R LIM indicator lamp on: variable SPEED-
TRONIC is selected.
Activation conditions To activate cruise control, all of the following
activation conditions must be fulfilled:
R
the parking brake must be released.
R you are driving faster than 30 km/h.
R ESP ®
must be switched on, but not inter-
vening.
R the transmission must be in position D.
R the cruise control function must be selec-
ted (Y page 175). 174
Driving systemsDriving and parking
Page 179 of 357
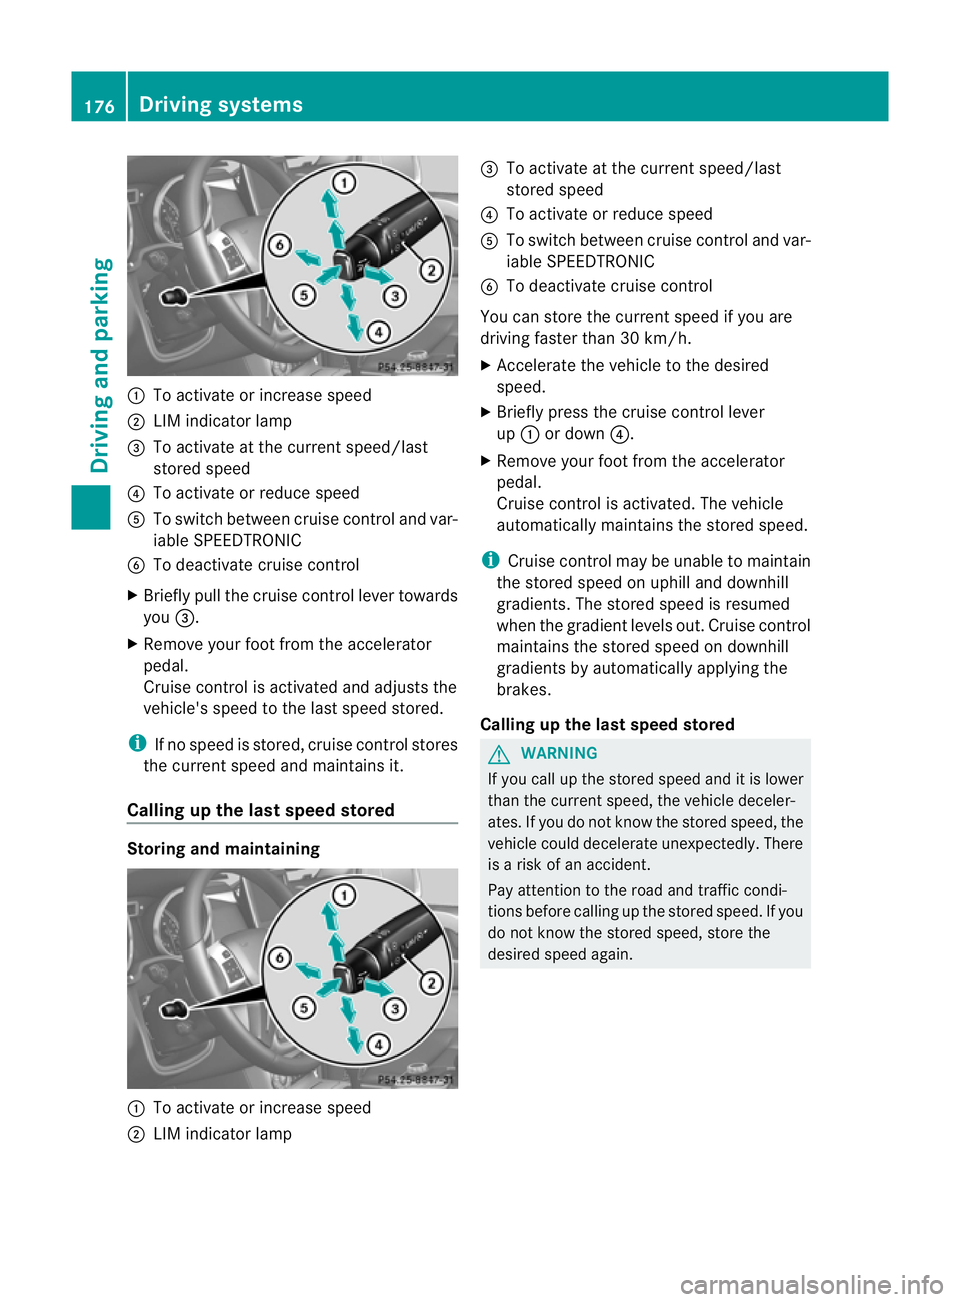
:
To activate or increase speed
; LIM indicator lamp
= To activate at the curren tspeed/last
stored speed
? To activate or reduce speed
A To switch between cruise control and var-
iable SPEEDTRONIC
B To deactivate cruise control
X Briefly pull the cruise control lever towards
you =.
X Remove your foot from the accelerator
pedal.
Cruise control is activated and adjusts the
vehicle's speed to the last speed stored.
i If no speed is stored, cruise control stores
the curren tspeed and maintains it.
Calling up the last speed stored Storing and maintaining
:
To activate or increase speed
; LIM indicator lamp =
To activate at the curren tspeed/last
stored speed
? To activate or reduce speed
A To switch between cruise control and var-
iable SPEEDTRONIC
B To deactivate cruise control
You can store the curren tspeed if you are
driving faster than 30 km/h.
X Accelerate the vehicle to the desired
speed.
X Briefly press the cruise control lever
up : or down ?.
X Remove your foot from the accelerator
pedal.
Cruise control is activated. The vehicle
automatically maintains the stored speed.
i Cruise control may be unable to maintain
the stored speed on uphill and downhill
gradients. The stored speed is resumed
when the gradient levels out. Cruise control
maintains the stored speed on downhill
gradients by automatically applying the
brakes.
Calling up the last speed stored G
WARNING
If you call up the stored speed and it is lower
than the curren tspeed, the vehicle deceler-
ates. If you do not know the stored speed, the
vehicle could decelerate unexpectedly. There
is a risk of an accident.
Pay attention to the road and traffic condi-
tions before calling up the stored speed. If you
do not know the stored speed, store the
desired speed again. 176
Driving systemsDriving and parking
Page 180 of 357
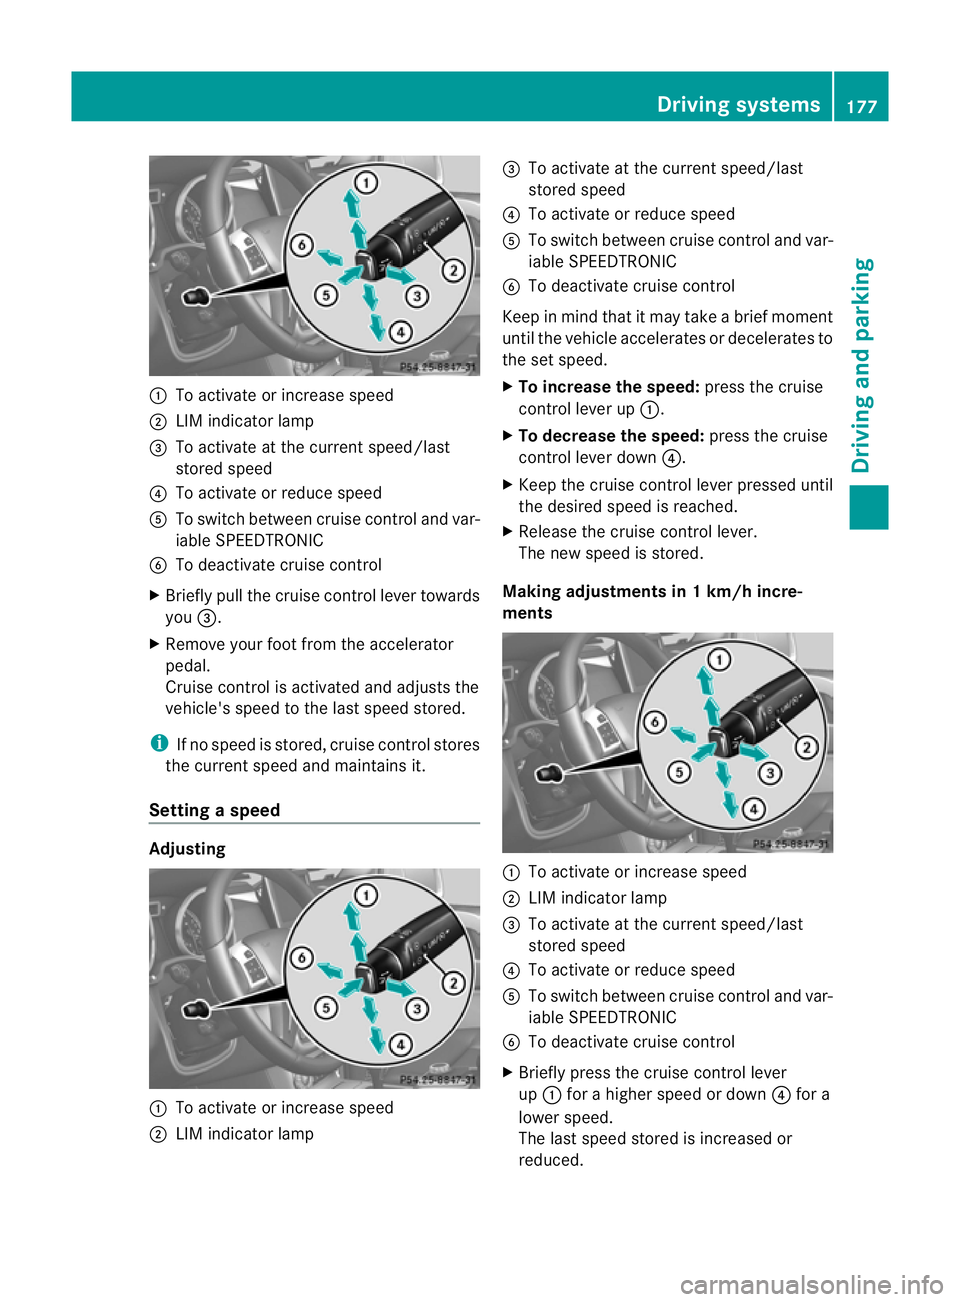
:
To activate or increase speed
; LIM indicator lamp
= To activate at the curren tspeed/last
stored speed
? To activate or reduce speed
A To switch between cruise control and var-
iable SPEEDTRONIC
B To deactivate cruise control
X Briefly pull the cruise control lever towards
you =.
X Remove your foot from the accelerator
pedal.
Cruise control is activated and adjusts the
vehicle's speed to the last speed stored.
i If no speed is stored, cruise control stores
the curren tspeed and maintains it.
Setting aspeed Adjusting
:
To activate or increase speed
; LIM indicator lamp =
To activate at the current speed/last
stored speed
? To activate or reduce speed
A To switch between cruise control and var-
iable SPEEDTRONIC
B To deactivate cruise control
Keep in mind tha titmay take a brie fmoment
until the vehicle accelerates or decelerates to
the set speed.
X To increase the speed: press the cruise
control lever up :.
X To decrease the speed: press the cruise
control lever down ?.
X Keep the cruise control lever pressed until
the desired speed is reached.
X Release the cruise control lever.
The new speed is stored.
Making adjustments in 1 km/h incre-
ments :
To activate or increase speed
; LIM indicator lamp
= To activate at the current speed/last
stored speed
? To activate or reduce speed
A To switch between cruise control and var-
iable SPEEDTRONIC
B To deactivate cruise control
X Briefly press the cruise control lever
up : for a higher speed or down ?for a
lower speed.
The last speed stored is increased or
reduced. Driving systems
177Driving and parking Z