MERCEDES-BENZ G-CLASS SUV 2012 Owners Manual
Manufacturer: MERCEDES-BENZ, Model Year: 2012, Model line: G-CLASS SUV, Model: MERCEDES-BENZ G-CLASS SUV 2012Pages: 357, PDF Size: 8.86 MB
Page 321 of 357
X
Observe the safety notes as you do so
(Y page 315).
i Consult a Mercedes-Benz Service Centre.
Engine damage, gear damage or electri-
cal faults X
Move the selector lever to posi-
tion N(Y page 149).
X Shift the transfer case to neu-
tral (Ypage 203).
In the event of damage to the transfer
case Have the propellers
hafts between the axles
and the transfer case removed.
In the event of damage to the front axle Have the propeller shaft between the rear
axle and the transfer case removed.
Have the vehicle towed with the front axle
raised.
In the event of damage to the rear axle
Have the propeller shaft between the front
axle and the transfer case removed.
Then, have the vehicle towed with the rear
axle raised and with wheel rollers under the
front axle.
Electrical fuses
Important safety notes
G
WARNING
Only use fuses that have been approved for
Mercedes-Ben zvehicles and which have the
correct fuse rating for the systems con-
cerned. Do not attempt to repair or bridge
faulty fuses. Using fuses which have not been
approved or attempting to repair or bridge
faulty fuses could cause the fuse to be over-
loaded and result in a fire. Have the cause traced and rectified at a qualified specialist
workshop.
! Only use fuses that have been approved
for Mercedes-Benz vehicles and which
have the correct fuse rating for the system
concerned. Otherwise, components or sys-
tems could be damaged.
The fuses in your vehicle serve to disconnect
faulty circuits. If afuse blows, all the compo-
nents on the circuit and their functions will
fail.
Blown fuses must be replace dwith fuses of
the same rating, which you can recognise by
the colour and fuse rating. The fuse ratings
are listed in the fuse allocation chart.
If the newly inserted fuse also blows, have the
cause traced and rectified at a qualified spe-
cialist workshop, e.g. a Mercedes-Benz
Service Centre. Before replacing a fuse
X Park the vehicle and apply the parking
brake.
X Switch off all electrical consumers.
X Remove the key from the ignition lock.
All indicator lamps in the instrumen tcluster
must be off.
The fuses are located in various fuse boxes:
R Main fuse box on the driver's side of the
dashboard
R Fuse box in the front-passenger footwell
R Fuse box in the transmission tunnel
R Fuse box in the battery case
The fuse allocation char tand the spare fuses
are in the main fuse bo xonthe dashboard
(Y page 319).
You will find the fuse removal device in the
vehicle tool kit (Y page 306).318
Electrical fusesBreakdown assistance
Page 322 of 357
Dashboard fuse box
! Do no tuse a pointed object such as a
screwdriver to open the cover in the dash-
board. You could damage the dashboard or
the cover.
! Make sure that no moisture can enter the
fuse box when the cover is open.
! When closing the cover, make sure that it
is lying correctly on the fuse box. Moisture
seeping in or dirt could otherwise impair
the operation of the fuses. X
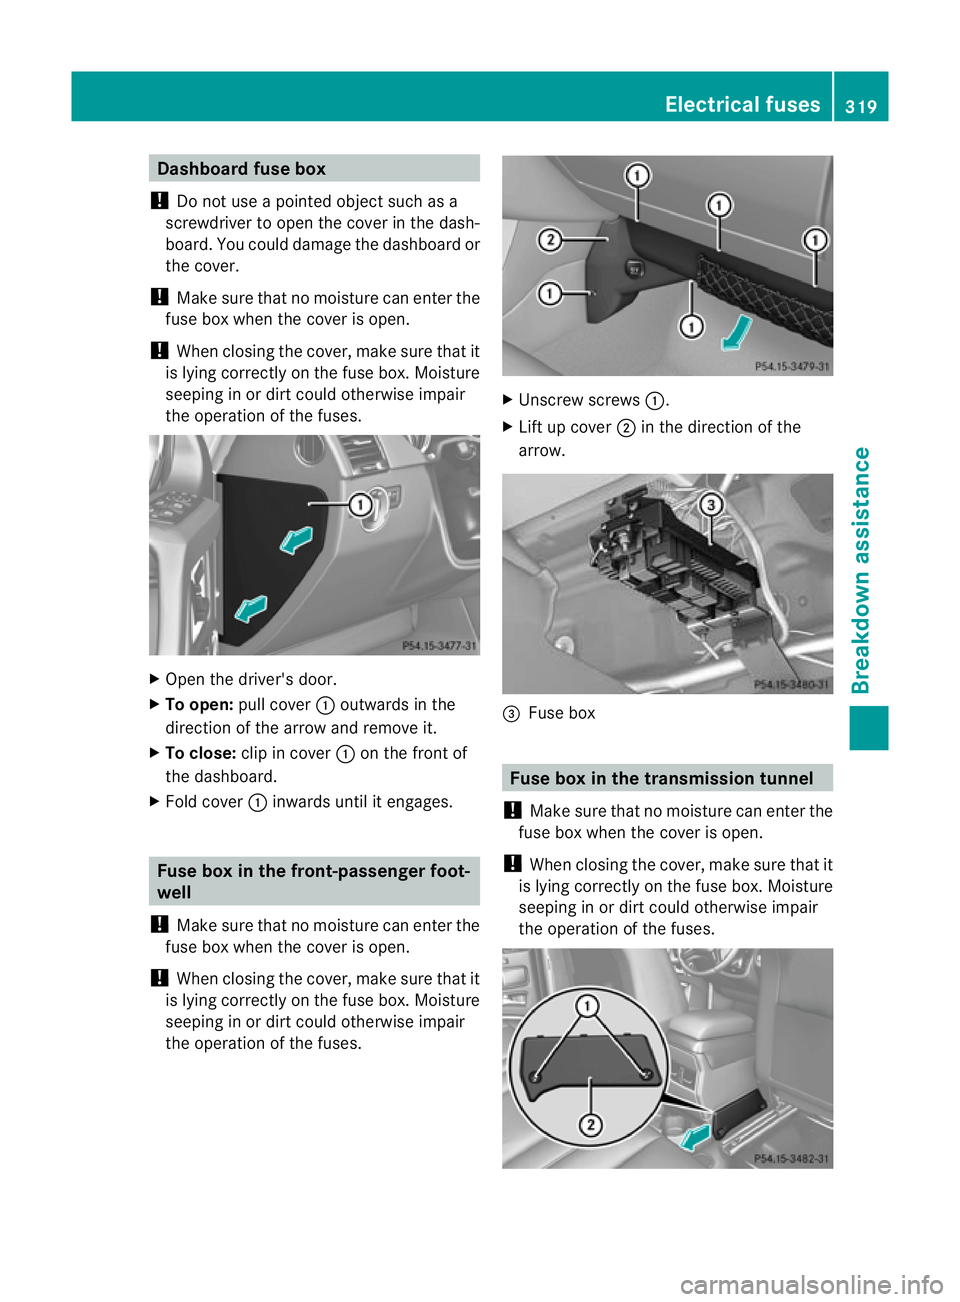
Open the driver's door.
X To open: pull cover :outwards in the
direction of the arrow and remove it.
X To close: clip in cover :on the front of
the dashboard.
X Fold cover :inwards until it engages. Fuse box in the front-passengerf
oot-
well
! Make sure that no moisture can enter the
fuse box when the cover is open.
! When closing the cover, make sure that it
is lying correctly on the fuse box .Moisture
seeping in or dirt could otherwise impair
the operation of the fuses. X
Unscrew screws :.
X Lift up cover ;in the direction of the
arrow. =
Fuse box Fuse box in the transmission tunnel
! Make sure that no moisture can enter the
fuse box when the cover is open.
! When closing the cover, make sure that it
is lying correctly on the fuse box. Moisture
seeping in or dirt could otherwise impair
the operation of the fuses. Electrical fuses
319Breakdown assistance Z
Page 323 of 357
X
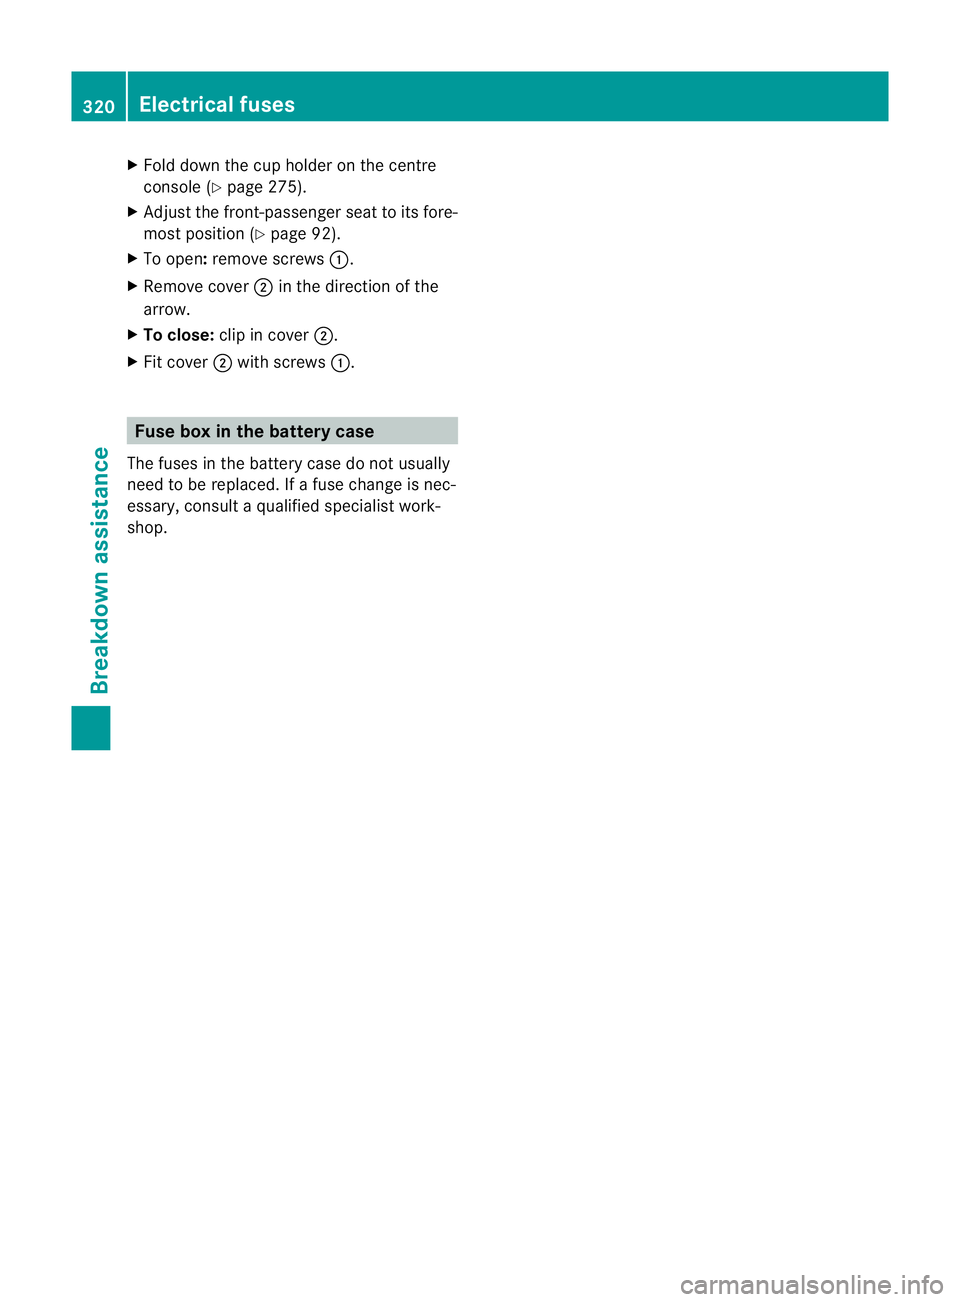
Fold dow nthe cup holder on the centre
console (Y page 275).
X Adjust the front-passenger seat to its fore-
most position (Y page 92).
X To open: remove screws :.
X Remove cover ;in the direction of the
arrow.
X To close: clip in cover ;.
X Fit cover ;with screws :. Fuse box in the battery case
The fuses in the battery case do not usually
need to be replaced. If a fuse change is nec-
essary, consult a qualified specialist work-
shop. 320
Electrical fusesBreakdown assistance
Page 324 of 357
Useful information
............................322
Important safety notes ....................322
Operation ........................................... 322
Winter operation ............................... 323
Tyre pressure .................................... 325
Changing awheel ............................. 329
Wheel and tyre combinations ..........333 321Wheels and tyres
Page 325 of 357
Useful information
i This Owner's Manual describes all mod-
els, series and optional equipment for your
vehicle that were available at the time of
going to press. Country-specific differen-
ces are possible. Note that your vehicle
may not be fitted with all features descri-
bed. This is also the case for systems and
functions relevant to safety.
i Read the information on qualified special-
ist workshops: (Y page 22). Important safety notes
G
Warning
Af lat tyre severely impairs the driving, steer-
ing and braking characteristics of the vehicle.
There is a risk of an accident.
Do not drive with a flat tyre. Immediately
replace the flat tyre with your spare wheel, or
consult a qualified specialist workshop. G
WARNING
Tyres, wheels or accessories which have not
been approved by Mercedes-Ben zfor your
vehicle, or are not used as they should be, can
impair driving safety. As a result, you could
cause an accident .Before purchasing and
using them, enquire about their suitability,
legal stipulations and factory recommenda-
tions at a Mercedes-Benz Service Centre.
Accessories that are not approved for your
vehicle by Mercedes-Benz or are not being
used correctly can impair the operating
safety.
Before purchasing and using non-approved
accessories, visit a qualified specialist work-
shop and enquire about:
R suitability
R legal stipulations
R factory recommendations Information on the dimensions and types of
wheels and tyres for your vehicle can be
found in the "Wheel/tyre combinations" sec-
tion (Y
page 333).
Information on air pressure for the tyres on
your vehicle can be found:
R on the tyre pressure label on the fuel filler
flap
R in the "Tyre pressure" section
Modification work on the brake system and
wheels is not permitted, nor is the use of
spacer plates or brake dust shields. This inva-
lidates the general operating permit for the
vehicle.
i Further information on wheels and tyres
can be obtained at any qualified specialist
workshop. Operation
Notes on driving
Check the tyre pressures when the vehicle is
heavily laden and, if necessary, adjust.
While driving, pay attention to vibrations,
noises and unusual handling characteristics,
e.g. pulling to one side. This may indicate that
the wheels or tyres are damaged. If you sus-
pect that a tyre is defective, reduce your
speed immediately. Stop the vehicle as soon
as possible to chec kthe wheels and tyres for
damage. Hidden tyre damage could also be
causing the unusual handling characteristics.
If you find no signs of damage, have the tyres
and wheels checked at a specialist workshop.
When parking your vehicle, make sure that
the tyres do not get deformed by the kerb or
other obstacles. If it is necessary to drive over
kerbs, speed humps or similar elevations, try
to do so slowly and at an obtuse angle. Oth-
erwise, the tyres, particularly the sidewalls,
may be damaged. 322
OperationWheels and tyres
Page 326 of 357
Regular checking of wheels and tyres
R Regularly check the wheels and tyres of
your vehicle for damage at leas tevery 14
days, as well as after driving off-road or on
rough roads. Damage includes cuts, punc-
tures, cracks and bulges on tyres or severe
corrosio nordeformation on wheels, for
example. Damaged wheels can cause a
loss of tyre pressure.
R Regularly chec kthe tyre tread depth and
the condition of the tread across the whole
width of the tyre (Y page 323). In order to
inspect the inner side of the tyre surface,
turn the steering wheel to full lock.
R All wheels must have a valve cap to protect
the valve against dirt and moisture. Do not
fit anything onto the valve other than the
standard valve cap or avalve cap approved
by Mercedes-Ben zfor your vehicle.
Do not fit anything onto the valve, such as
tyre pressure monitoring systems.
R You should regularly check the pressure of
all your tyres including the spare wheel,
particularly prior to long trips. Adjust the
tyre pressure as necessary (Y page 328).
The service life of tyres depends on various
factors, including the following:
R driving style
R tyre pressure
R tyre mileage Tyre tread
G
WARNING
Please keep in mind that:
R tyre grip decreases rapidly on wet roads
when the tread depth is less than 3mm.
Thus, you should replace tyres that have
insufficient tread.
R winter tyres should be replaced when the
tread depth is 4mmorless, as they no lon-
ger provide adequate grip.
R the tread on a tyre may not wear evenly.
Thus, you should regularly check the tread depth and the condition of the tread across
the entire width of all tyres. If necessary,
turn the fron
twheels to full lock in order to
inspect the tyre tread more easily.
Otherwise, you could lose control of the vehi-
cle and cause an accident due to the reduced
grip of the tyres on the road. Selecting, fitting and replacing tyres
R Only fit tyres and wheels of the same type
and make.
R Only fit approved tyres of the correct size
onto the wheels.
R Tyres are supplied with a protective layer
from the factory. Run in new tyres at mod-
erate speeds for the first 100 km. They only
reach their full performance after this dis-
tance.
R Do not drive with tyres which have too little
tread depth. This otherwise significantly
reduces the traction on wet roads (aqua-
planing).
R Replace the tyres after six years at the lat-
est, regardless of wear. This also applies to
the spare wheel. Winter operation
General notes
Have your vehicle winterproofed at a qualified
specialist workshop at the onset of winter.
Observe the notes in the "Changing a wheel"
section (Y page 329). Driving with summer tyres
At temperatures below +7 †, summer tyres
lose elasticity and therefore traction and
braking power. Change the tyres on your vehi-
cle to M+S tyres. Using summer tyres at very
cold temperatures could cause tears to form,
thereby damaging the tyres permanently. Winter operation
323Wheels and tyres Z
Page 327 of 357
Mercedes-Ben
zcannot accept responsibility
for this type of damage. M+S tyres
G
WARNING
M+S tyres with a tyre tread depth of less than
4mma re not suitable for use in winter as they
do not provide sufficient traction. There is a
risk of accident.
M+S tyres with a tread depth of less than
4 mm must be replaced. G
WARNING
The spare wheel and M+S tyres have different
tyre characteristics. Driving characteristics
can be severely impaired when you fit the
spare wheel. There is a risk of an accident.
You should therefore adapt yourd riving style
and drive carefully.H ave the spare wheel
replaced with a new wheel with an M+S tyre
at the nearest qualified specialist workshop.
At temperatures below +7 †, use winter tyres
or all-season tyres. Both types of tyre are
identified by the M+S marking.
Only winter tyres bearing the isnowflake
symbol in addition to the M+S marking pro-
vide the best possible grip in wintry road con-
ditions. Only these tyres will allow driving
safety systems such as ABS and ESP ®
to
function optimally in winter, as these tyres
have been designed specifically for driving on
snow.
Use M+S tyres of the same make and tread
on all wheels to maintain safe handling char-
acteristics.
Always observe the maximum permissible
speed specified for the M+S tyres you have
fitted.
If you fit M+S tyres that have a lower maxi-
mum permissible speed than that of the vehi-
cle, affix an appropriate warning sign in the
driver's field of vision .This can be obtained
at a qualified specialist workshop. Under these circumstances, you should also
restrict the maximum speed of the vehicle
using variable SPEEDTRONIC so that it does
not exceed the maximum permissible speed
for the M+S tyres(Y
page 178).
When you have fitted the M+S tyres:
X Check the tyre pressures (Y page 327).
X Restart the tyre pressure monitor
(Y page 328).
i You can obtain information about winter
tyres that have been approved by
Mercedes-Ben zespecially for your vehicle
at any Mercedes-Benz Service Centre.
i For further information about tyres, see
(Y page 333). Snow chains
! Information aboutt he use of snow chain
compatible AMG winter tyres is applicable
for AMG tyres. Use of snow chains is only
permissible with these tyres.
For safety reasons, Mercedes-Ben zrecom-
mends that you only use snow chains that
have been specially approved for your vehicle
by Mercedes-Benz, or that are of a corre-
sponding standard of quality.
R only use snow chains when the road sur-
face is completely snow-covered. Remove
the snow chains as soon as possible when
you come to road that is not snow-covered.
R local regulations may restrict the use of
snow chains. Observe the appropriate reg-
ulations if you wish to fit snow chains.
R Do not exceed the maximum permissible
speed of 50 km/h.
If you intend to fit snow chains, please bear
the following points in mind:
R snow chains cannot be fitted to all wheel/
tyre combinations (Y page 62).
R fit the snow chains on all four wheels for
maximum tractive power and driving sta-
bility. Observe the manufacturer's fitting
instructions. 324
Winter operationWheels and tyres
Page 328 of 357
i
You may wish to deactivate
ESP ®
(Y page 62) when pulling away with
snow chains fitted. This way you can allow
the wheels to spin in a controlled manner,
achieving an increased driving force (cut-
ting action). Tyre pressure
Tyre pressure specifications
Important safety notes G
WARNING
Underinflated or overinflated tyres pose the
following risks:
R the tyres may burst, especially as the load
and vehicle speed increase.
R the tyres may wear excessively and/or
unevenly, which may greatly impair tyre
traction.
R the driving characteristics, as well as steer-
ing and braking, may be greatly impaired.
There is a risk of an accident.
Observe the recommended tyre pressure and
chec kthe tyre pressure of all the tyres includ-
ing the spare wheel:
R at least every two weeks
R when the load changes
R before embarking on a longer journey
R for changed operating conditions, e.g. off-
road driving
If necessary, correct the tyre pressure. G
WARNING
If you fit unsuitable accessories onto tyre
valves, the tyre valves may be overloaded and
malfunction, which can cause tyre pressure
loss. Due to their design, retrofitted tyre pres-
sure monitors keep the tyre valve open. This
can also result in tyre pressure loss. There is
a risk of accident.
Only screw standard valve caps or valve caps
specifically provided by Mercedes-Ben zfor
your vehicle onto the tyre valve. G
WARNING
If the tyre pressure drops repeatedly, the
wheel, valve or tyre may be damaged. Tyre
pressure that is too low may result in a tyre
blow-out. There is a risk of accident.
R Check the tyre for foreign objects.
R Check whether the wheel is losing air or the
valve is leaking.
If you are unable to rectify the damage, con-
tact a qualified specialist workshop. H
Environmental note
Check the tyre pressure regularly, at least
every 14 days.
General notes You will find a table of tyre pressures for var-
ious operating conditions on the inside of
your vehicle's fuel filler flap.
Operation with a trailer:
the applicable
value for the rear tyres is the maximum tyre
pressure value stated in the table inside the
fuel filler flap.
The table inside the fuel filler flap may state
tyre pressures for different load conditions.
These are defined in the table as different
numbers of passengers and amounts of lug-
gage. The actual number of seats may vary –
for more information, please refer to the vehi-
cle's registration documents.
If tyre sizes are not specified, the tyre pres-
sures stated on the tyre pressure information
label apply for all tyres approved for this vehi-
cle. Tyre pressure
325Wheels and tyres Z
Page 329 of 357
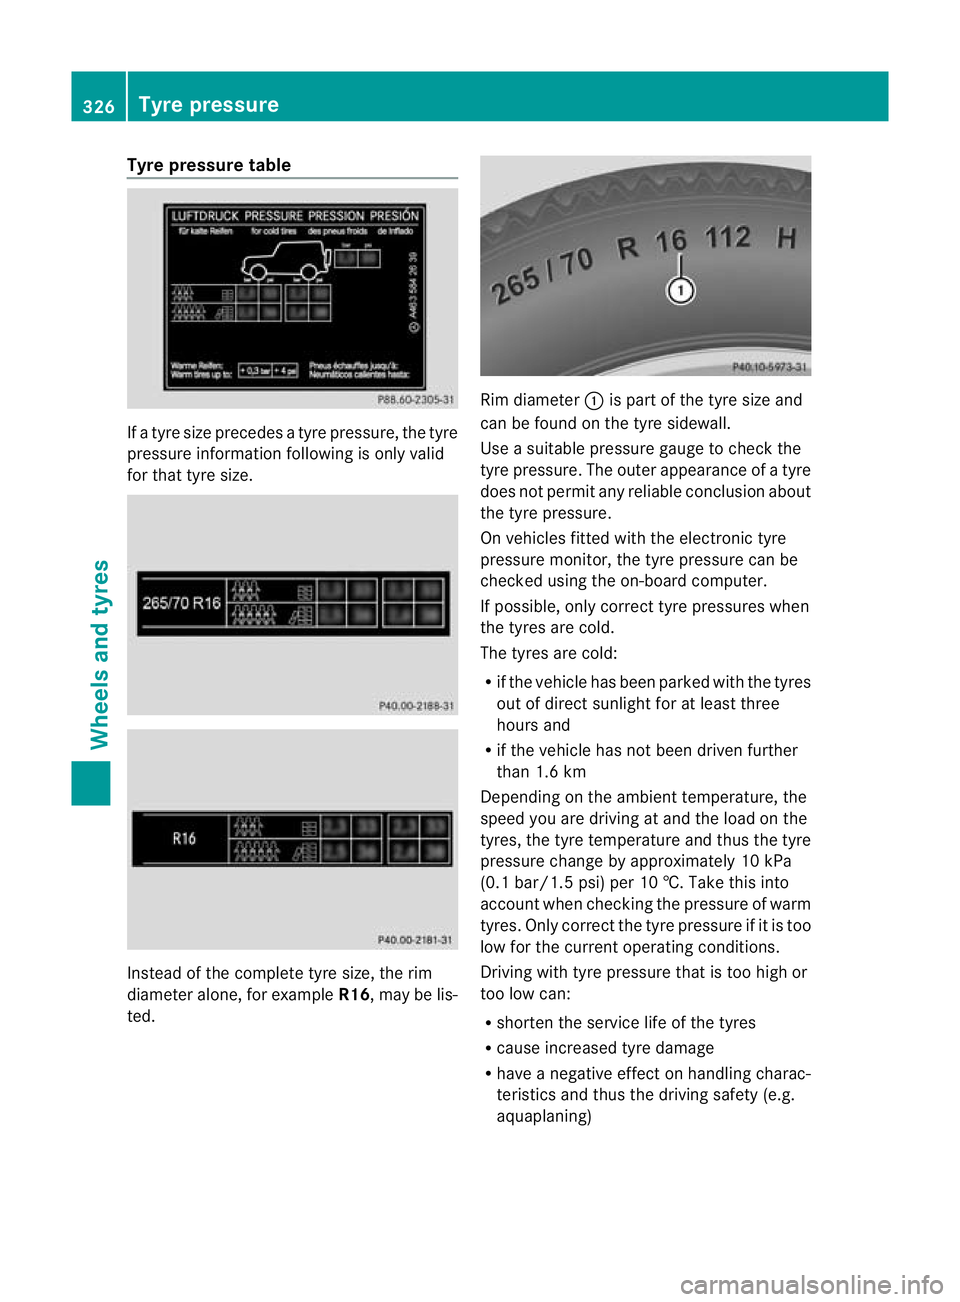
Tyre pressure table
If a tyre size precedes a tyre pressure, the tyre
pressure informatio
nfollowing is only valid
for that tyre size. Instead of the complete tyre size, the rim
diameter alone, for example
R16, may be lis-
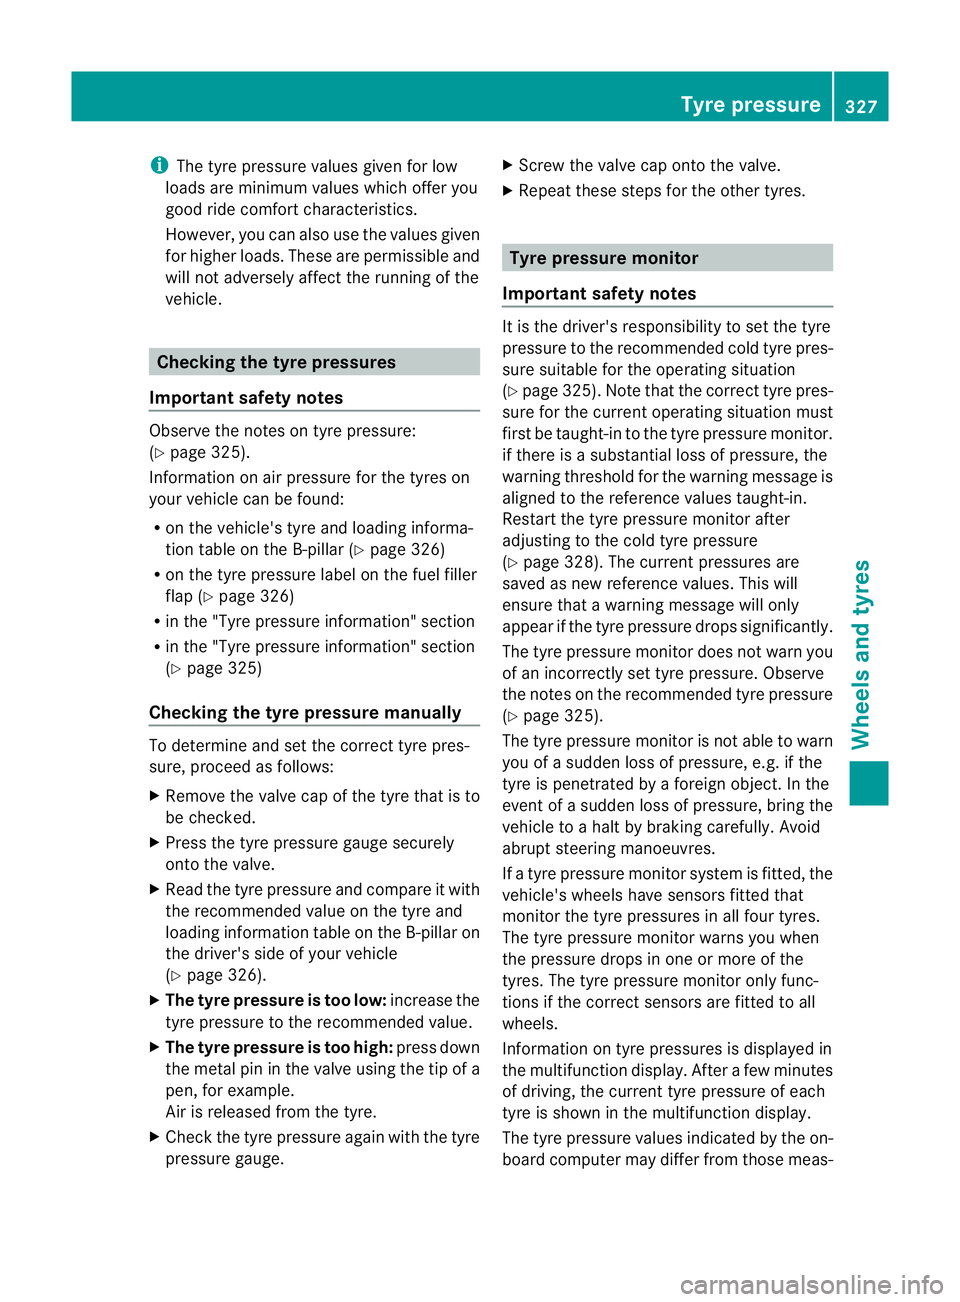
ted. Rim diameter
:is part of the tyre size and
can be found on the tyre sidewall.
Use a suitable pressure gauge to check the
tyre pressure. The outer appearance of a tyre
does not permit any reliable conclusion about
the tyre pressure.
On vehicles fitted with the electronic tyre
pressure monitor, the tyre pressure can be
checked using the on-board computer.
If possible, only correc ttyre pressures when
the tyres are cold.
The tyres are cold:
R if the vehicle has been parked with the tyres
out of direc tsunlight for at least three
hours and
R if the vehicle has no tbeen driven further
than 1.6 km
Depending on the ambient temperature, the
speed you are driving at and the load on the
tyres, the tyre temperature and thus the tyre
pressure change by approximately 10 kPa
(0.1 bar/1.5 psi) per 10 †. Take this into
accoun twhen checking the pressure of warm
tyres. Only correct the tyre pressure if it is too
low for the current operating conditions.
Driving with tyre pressure that is too high or
too low can:
R shorten the service life of the tyres
R cause increased tyre damage
R have a negative effect on handling charac-
teristics and thus the driving safety (e.g.
aquaplaning) 326
Tyre pressureWheels and tyres
Page 330 of 357
i
The tyre pressure values given for low
loads are minimum values which offer you
good ride comfor tcharacteristics.
However, you can also use the values given
for higher loads. These are permissible and
will not adversely affect the running of the
vehicle. Checking the tyre pressures
Important safety notes Observe the notes on tyre pressure:
(Y
page 325).
Information on air pressure for the tyres on
your vehicle can be found:
R on the vehicle's tyre and loading informa-
tion table on the B-pillar (Y page 326)
R on the tyre pressure label on the fuel filler
flap (Y page 326)
R in the "Tyre pressure information" section
R in the "Tyre pressure information" section
(Y page 325)
Checking the tyre pressure manually To determine and set the correct tyre pres-
sure, proceed as follows:
X Remove the valve cap of the tyre that is to
be checked.
X Press the tyre pressure gauge securely
onto the valve.
X Read the tyre pressure and compare it with
the recommended value on the tyre and
loading information table on the B-pillar on
the driver's side of your vehicle
(Y page 326).
X The tyre pressure is too low: increase the
tyre pressure to the recommended value.
X The tyre pressure is too high: press down
the metal pin in the valve using the tip of a
pen, for example.
Air is released from the tyre.
X Check the tyre pressure again with the tyre
pressure gauge. X
Screw the valve cap onto the valve.
X Repeatt hese steps for the other tyres. Tyre pressure monitor
Important safety notes It is the driver's responsibility to set the tyre
pressure to the recommended cold tyre pres-
sure suitable for the operating situation
(Y
page 325). Note that the correct tyre pres-
sure for the current operating situation must
first be taught-in to the tyre pressure monitor.
if there is a substantial loss of pressure, the
warning threshold for the warning message is
aligned to the reference values taught-in.
Restart the tyre pressure monitor after
adjusting to the cold tyre pressure
(Y page 328). The current pressures are
saved as new reference values. This will
ensure that a warning message will only
appearift he tyre pressure drops significantly.
The tyre pressure monitor does not warn you
of an incorrectly set tyre pressure. Observe
the notes on the recommended tyre pressure
(Y page 325).
The tyre pressure monitor is not able to warn
you of a sudden loss of pressure, e.g. if the
tyre is penetrated by a foreign object. In the
event of a sudden loss of pressure, bring the
vehicle to a halt by braking carefully. Avoid
abrupt steering manoeuvres.
If a tyre pressure monitor system is fitted, the
vehicle's wheels have sensors fitted that
monitor the tyre pressures in all four tyres.
The tyre pressure monitor warns you when
the pressure drops in one or more of the
tyres. The tyre pressure monitor only func-
tions if the correct sensors are fitted to all
wheels.
Information on tyre pressures is displayed in
the multifunction display. After a few minutes
of driving, the current tyre pressure of each
tyre is shown in the multifunction display.
The tyre pressure values indicated by the on-
board computer may differ from those meas- Tyre pressure
327Wheels and tyres Z