MERCEDES-BENZ G-CLASS SUV 2016 Owners Manual
Manufacturer: MERCEDES-BENZ, Model Year: 2016, Model line: G-CLASS SUV, Model: MERCEDES-BENZ G-CLASS SUV 2016Pages: 261, PDF Size: 6.01 MB
Page 221 of 261
High-pressure cleaner
G
WARNING
The wate rjet of circular-jet nozzles (dirt grind-
ers) can caus edamage not visible from the
outside to tyres or chassi scomponents. Com-
ponents damaged in this way can unexpect-
edlyf ail.There is arisk of an accident.
Do not use high-pressure cleaners with circu-
lar-jet nozzles to clea nthe vehicle. Have dam-
agedt yres or chassi scomponents replaced
immediately.
! Always maintai
nadistance of at least 30 cm
between the vehicl eand the high-pressure
cleaner nozzle. Information about the correct
distance is available from the equipment
manufacturer.
Move the high-pressure cleaner nozzle
around when cleaning yourv ehicle.
Do not aim directly at any of the following:
R tyres
R door gaps, roof gaps, joints etc.
R electrica lcomponents
R battery
R plugc onnectors
R lamps
R seals
R trim elements
R ventilation slots
Damag etosealsore lectrica lcomponents
can leadtol eaks or failures.
! Vehicles with decorative film: parts of your
vehicl eare covered with adecorative film.
Maintain adistance of at least 70 cm between
the parts of the vehicl ecovered with the film
and the nozzle of the high pressure cleaner.
Information about the correct distance is
available from the equipment manufacturer.
Move the high-pressure cleaner nozzle
around whilst cleaning.
Cleaning the paintwork !
Do not affix:
R stickers
R films
R magneti cplates or similari tems to painted surfaces. You could oth
erwise
damage the paintwork.
Scratches, corrosive deposits, area saffecte dby
corrosion and damage cause dbyinadequate
car ecannot always be completel yrepaired .In
such cases ,visit aquali fied specialis tworkshop.
X Remov eimpuri ties immediately, where pos-
sible, whilst avoiding rubbing too hard.
X Soa kinsect remains with insect remove rand
rinse off the treated area safterwards.
X Soa kbirdd ropping swithw ater and rinse off
the treated area safterwards.
X Remov ecoolant, brake fluid ,tree resins ,oils,
fuel sand greases by rubbing gently with a
cloth soaked in petroleu mether or lighter
fluid.
X Use tar remove rtoremove tar stains.
X Use silicone remove rtoremove wax. Cleanin
gvehicle parts
Cleaning th ewheels G
WARNING
Th ew ater jet of circular-jet nozzles (dirt grind-
ers) can caus edamage not visible from the
outside to tyres or chassi scomponents. Com-
ponents damaged in this way can unexpect-
edlyf ail.There is arisk of an accident.
Do not use high-pressure cleaners with circu-
lar-jet nozzles to clea nthe vehicle. Have dam-
agedt yres or chassi scomponents replaced
immediately.
! Do not use acidic whee
lcleaning products
to remove brake dust. This coul ddamage
whee lbolts and brake components.
! Do not park up yourv
ehiclefor along period
of time immediatel yafter cleaning, particu-
larl yafter cleaning the whee lrim with wheel
cleaner. Whee lcleaner may leadtoi ncreased
corrosio nofthe brake discs and pads. You
should therefore drive for afew minutes after
cleaning. By heating up the brakes ,the brake
discs and padsd ry. The vehiclecan then be
parked up for along period of time. 218
CareMaintenanc
eand care
Page 222 of 261
Cleaning th
ewindows G
WARNING
If th ewindscreen wipers are set in motion
when cleaning the windscreen or wiper
blades, you coul dbecome trapped. There is a
dange rofinjury.
Always switch off the windscreen wipers and
the ignitio nbefore cleaning the windscreen or
wiper blades.
! Do not use dry cloths, abrasive cleaning
agents, solvents or solvent-based cleaning
agents to clea nthe insid eofthe windows/
windscreen. Do not touch the insid eofthe
windows/windscreen with hard items such
as an ice scrape roraring. Otherwise, the
windows/windscreen coul dbedamaged.
! Clean the water drainage channels of the
windscreen and the rear windo watregular
intervals. Deposits such as leaves, petal sand
pollen may under certain circumstances pre-
vent water from draining away. This can lead
to corrosio ndamage and damage to elec-
tronic components.
X Clean the insid eand outside of the windows
with adamp cloth and acleaning agent that is
recommende dand approved by Mercedes-
Benz.
Cleaning the wiper blades G
WARNING
If the windscreen wipers are set in motion
when cleaning the windscreen or wiper
blades, you coul dbecome trapped. There is a
dange rofinjury.
Always switch off the windscreen wipers and
the ignitio nbefore cleaning the windscreen or
wiper blades.
! Do not pullont
he wiper blade. Otherwise,
the wiper blade coul dbedamaged.
! Do not clea
nwiper blades too often and do
not rub them too hard .Otherwise, the graph-
ite coating coul dbedamaged. This could
caus ewiper noise. !
Hold the wiper arm securel
ywhen folding
back. The windscreen could be damagedif
the wiper arm hits against it suddenly.
X Fold the wiper arms awayf rom the wind-
screen.
X Cleant he wiper bladesc arefully usingadamp
cloth.
X Fold the windscreen wipers back againb efore
switching on the ignition.
Cleaning the exterior lighting !
Only use cleaning agents or cleaning cloths
that are suitablef or plastic lenses. Unsuitable
cleaning agents or cleaning cloths could
scratch or damage the plastic lenses of the
exterior lighting.
X Cleant he plastic lenses of the exterior light-
ing using awet sponge and amild cleaning
agent, e.g. Mercedes-Benz car shampoo or
cleaning cloths.
Cleaning the exhaust pipe G
WARNING
The exhaust tail pipe and tail pipe trim can
become very hot. If you come into contact
with these parts of the vehicle, you could burn
yourself. There is arisk of injury.
Always be particularl ycarefu laround the
exhaust tail pipea nd the tail pipetrim. Allow
these components to cool downb efore touch-
ing them.
! Do not clea
nthe exhaust pipew ith acid-
base dcleaning agents, such as sanitary
cleanser or whee lcleaner.
Impurities combined with the effects of road grit and corrosive environmental factors may cause
flas hrust to form on the surface. You can
restore the original shine of the exhaust pipeby
cleaning it regularly, especially in winter and
after washing the vehicle.
X Clean the exhaust pipew ithacare product
tested and approved by Mercedes-Benz. Ca
re
219Maintenance an dcare Z
Page 223 of 261
Cleaning th
etrailer tow hitch !
Do not clean the bal
lcoupling with ahigh-
pressure cleaner. Do not use solvents.
! Please note the care instructionsint
he
trailer coupling manufacturer's operating
instructions. H
Environmental note
Dispose of oilya nd greasycloths in an envi-
ronmentally-responsible manner.
The ball coupling must be cleaned if it becomes dirt yorc orroded.
X Remov erust ,e.g.w ith aw ire brush.
X After cleaning ,lightly oil or greas ethe ball
coupling.
X Chec kthatthe vehicle' strailer to whitch is
working properly.
You can also have th emaintenanc ework on the
ball coupling and th etrailer to whitch carried out
by aq ualifie dspecialist workshop. Interior care
Cleaning th edisplay !
For cleaning, do not use any of the following:
R alcohol-based thinne rorpetrol
R abrasive cleaning agents
R commercially-available householdc leaning
agents
These may damage the displays urface. Do
not put pressure on the displays urface when
cleaning. This could lead to irreparable dam-
age to the display.
X Before cleaning the display, make sure that it
is switched off and has cooled down.
X Cleant he displays urface using acommer-
cially available microfibre cloth and TFT/LCD
displayc leaner.
X Dry the displays urface usingadry microfibre
cloth.
Cleaning the plastic trim G
WARNING
Care products and cleaning agents containing solvents can cause surfaces in the cockpit to become porous.T
his could result in plastic
parts breakin gaway when the airbags are
deployed. There is adanger of injury.
Do not use care product sand cleanin gagents
containin gsolvents to clean the cockpit.
! Never attac
hthe following to plastic surfa-
ces:
R stickers
R films
R perfume oil container or similar
You could otherwise damage the plastic.
! Do not allow cosmetics
,insec trepellent or
sunscreen to come in contact with the plastic trim .This maintains the high-quality look of
the surfaces.
X Wipe the plastic trim with adamp, lint-free
cloth, e.g. amicrofibre cloth.
X Heavy soiling: use care and cleanin gprod-
ucts recommended and approved by
Mercedes-Benz.
The surface may chang ecolour temporarily.
Wait until the surface is dry again.
Cleaning the steering wheel and selec-
tor lever X
Thoroughly wipe with adamp cloth or use
leather care agents that have been recom-
mended and approved by Mercedes-Benz.
Cleaning wood trim and trim elements !
Do not use solvent-based cleaning agents
such as tar remover, wheel cleaners, polishes
or waxes. There is otherwise arisk of damag-
ing the surface.
X Wipe the wood trim and trim elements with a
damp, lint-free cloth, e.g. amicrofibre cloth.
X Heavy soiling: use care and cleaning prod-
ucts recommended and approved by
Mercedes-Benz.
Cleaning the seat covers General notes
! Clean cloth covers with
amicrofibre cloth
moistened with asolution containing 1%
detergent (e.g. washing-up liquid). Rubc are-220
CareMaintenanc
eand care
Page 224 of 261
fully, and alwaysw
ipee ntire sea tsections to
avoi dleaving visible lines .Leave the sea tto
dry afterwards .Cleaning results depend on
the type of dirt and how long it has been there.
Note that regular care is essentia ltomake sure
that the appearance and comfort of the covers
are retained over time.
Cleaning the seat belts G
WARNING
Seat belts may be severely weakened if
bleached or coloured. This may lea dtothe
seat belts, for example, tearing or failing in an accident. There is an increased risk of injury,
possibly even fatal.
Never bleach or colou rseat belts.
! Do not clea
nthe seat belts using chemical
cleaning agents. Do not dry the seat belts at
temperatures above 80 †orindirect sun-
light.
X Use clean, lukewarm water and soap solution.
Cleaning the wood luggage-compart-
ment floor !
For cleanin
gand treating the wooden lug-
gage compartment floor, do not use any of the
following:
R microfibre cloth
R householdc leaning agents
R commercially available furniture polishes,
sprays or similari tems
R steam cleaners
Otherwise, the surface of the wooden luggage
compartment floor will be damaged.
! Do not apply self-adhesive films or masking
strips to the wooden luggage compartment
floor; the solvent residue and plasticisers con-
tained in them may destroy the paintwork.
Use alint-free cotton cloth to remove dust, dirt
and fingerprints. If necessary, dampen the lint-
free cotton cloth with asmall amount of clear
water.
Use wood oil recommended and approved by
Mercedes-Benz to treat and protect the wooden
luggage compartment floor. This revitalises the
wooden surface and increases the resilience of
the wood. To apply the wood oil:
X Using the sanding pad that comes with the
care set, sand the wooden surface in the
direction of the grain.
X Clean off the wood dust.
X Using acotton cloth, distribute athin layer of
wood oil evenly over the wooden surface
using asimple wiping motion .Always wipe
along the grain.
X Then, using asecond cotton cloth, apply the
remaining wood oil.
An ew protective coat forms within approx-
imately four hours.
As econd treatment with the wood oil is recom-
mended for extremely worn wooden luggage
compartment floor surfaces.
Cleaning the roof lining and carpets X
Roof lining: if it is verydirty, us easoft brush
or dry shampoo.
X Carpets: uset he carpet and textil ecleaning
agents recommended and approved by
Mercedes-Benz. Care
221Maintenanc eand care Z
Page 225 of 261
Where will
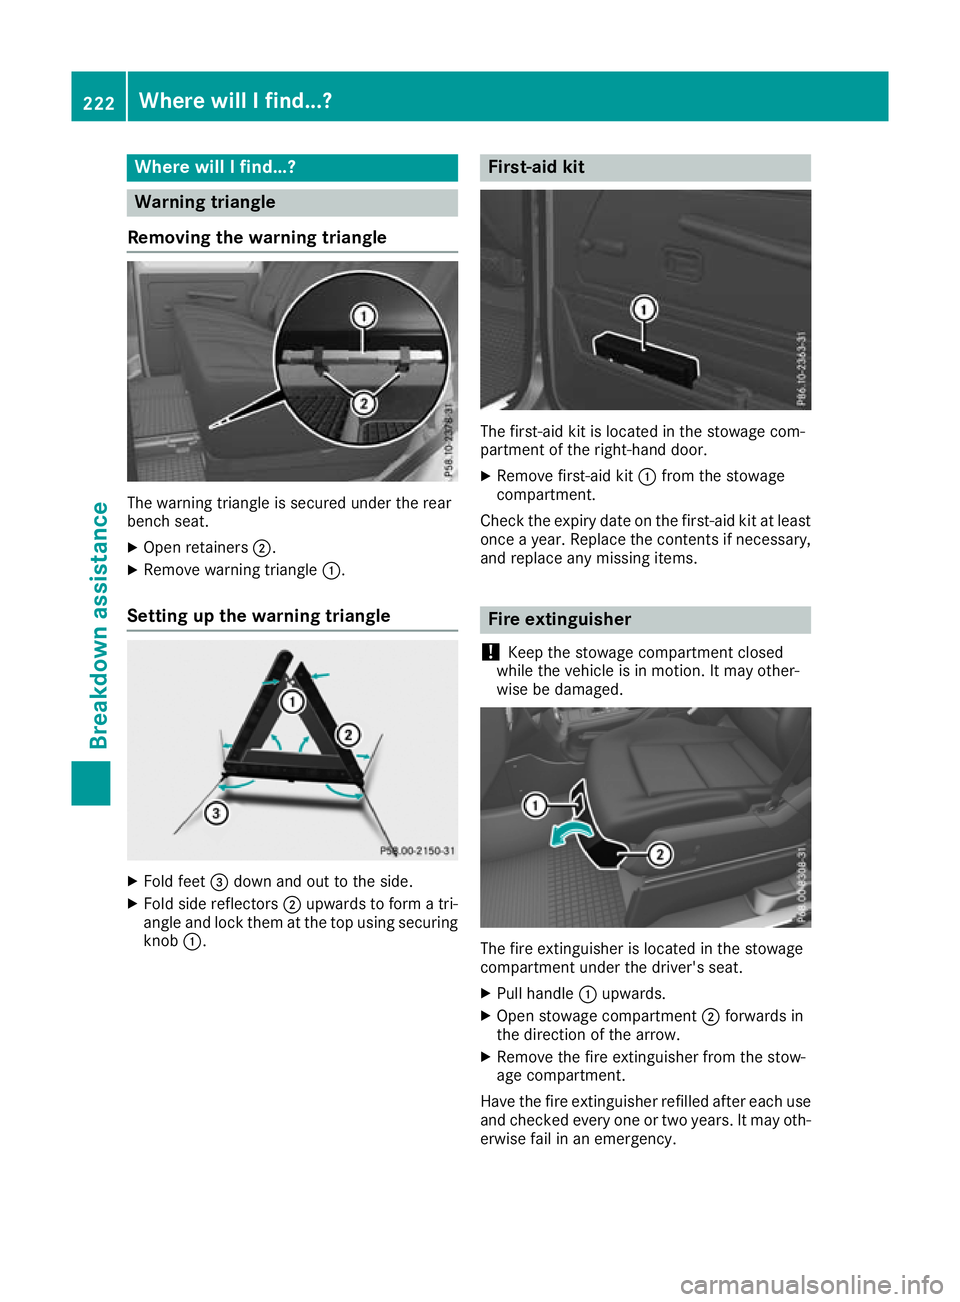
Ifind...? Warning triangle
Removing the warning triangle The warning triangle is secured unde
rthe rear
bench seat.
X Open retainers ;.
X Remove warning triangle :.
Setting up the warning triangle X
Fol dfeet =dow nand ou ttothe side.
X Fold sid ereflectors ;upwards to form atri-
angl eand lock them at the top using securing
knob :. First-aid kit
The first-aid kit is locate
dinthe stowage com-
partmen tofthe right-hand door.
X Remove first-aid kit :from the stowage
compartment.
Check the expiry date on the first-aid kit at least
once ayear. Replace the contents if necessary,
and replace any missing items. Fire extinguisher
! Keep the stowage compartment closed
whilet hevehicl eisinm otion.Itm ay other-
wise be damaged. The fire exti
nguisher is located in the stowage
compartment under the driver's seat.
X Pull handle :upwards.
X Open stowage compartment ;forwards in
the direction of the arrow.
X Remove the fire extinguisher from the stow-
age compartment.
Have the fire extinguisher refilled after each use and checked every one or two years. It may oth-
erwise fail in an emergency. 222
Where will
Ifind...?Breakdowna ssistan ce
Page 226 of 261
Observe the legal requirements for each indi-
vidualc ountry. Veh
icle toolkit
General notes The vehicl
etool kit contains:
R vehicle tool kit with:
- fuse extractor
- pump lever for vehicle jack
- screwdriver
- Wheel wrench
R jack
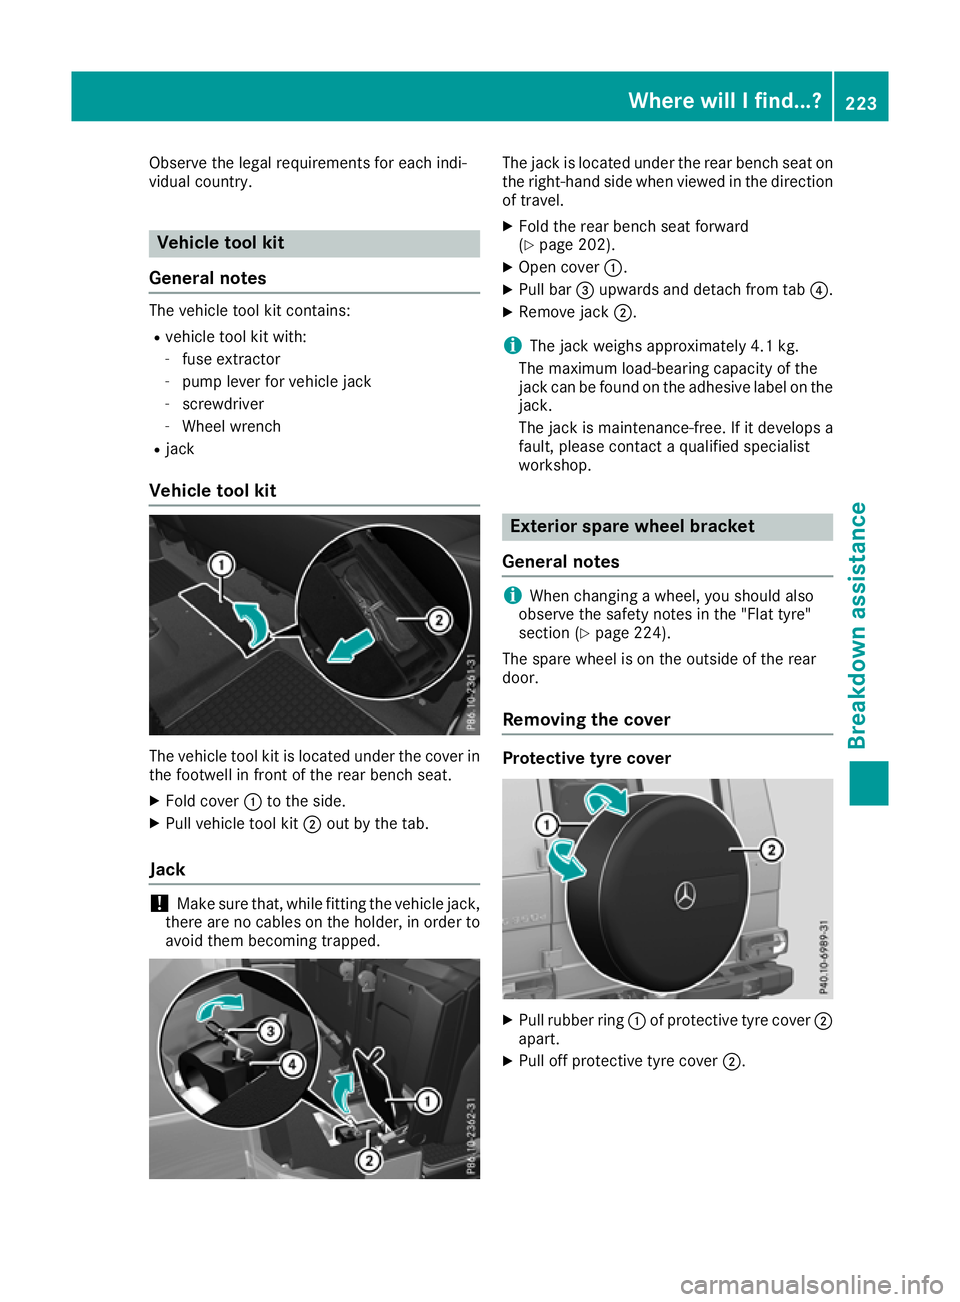
Vehicle tool kit The vehicle tool kit is located under the cover in
the footwell in front of the rear bench seat.
X Fold cover :to the side.
X Pull vehicle tool kit ;out by the tab.
Jack !
Make sure that, while fitting the vehicle jack,
there are no cables on the holder, in order to avoid them becoming trapped. The jack is located under the rear bench seat on
the right-hand side when viewed in the direction
of travel.
X Fold the rear bench seat forward
(Y page 202).
X Open cover :.
X Pull bar =upwards and detach from tab ?.
X Remove jack ;.
i The jack weighs approximately 4.1 kg.
The maximum load-bearing capacity of the
jack can be found on the adhesive label on the
jack.
The jack is maintenance-free. If it develops a
fault, please contact aqualified specialist
workshop. Exterior spare wheelb
racket
General notes i
When changin
gawheel, you should also
observe the safety notes in the "Flat tyre"
section (Y page 224).
The spare wheel is on the outside of the rear
door.
Removing the cover Protective tyrec
over X
Pull rubber ring :of protective tyre cover ;
apart.
X Pull off protective tyre cover ;. Wherew
illIf ind...?
223Breakdow nassistan ce
Page 227 of 261
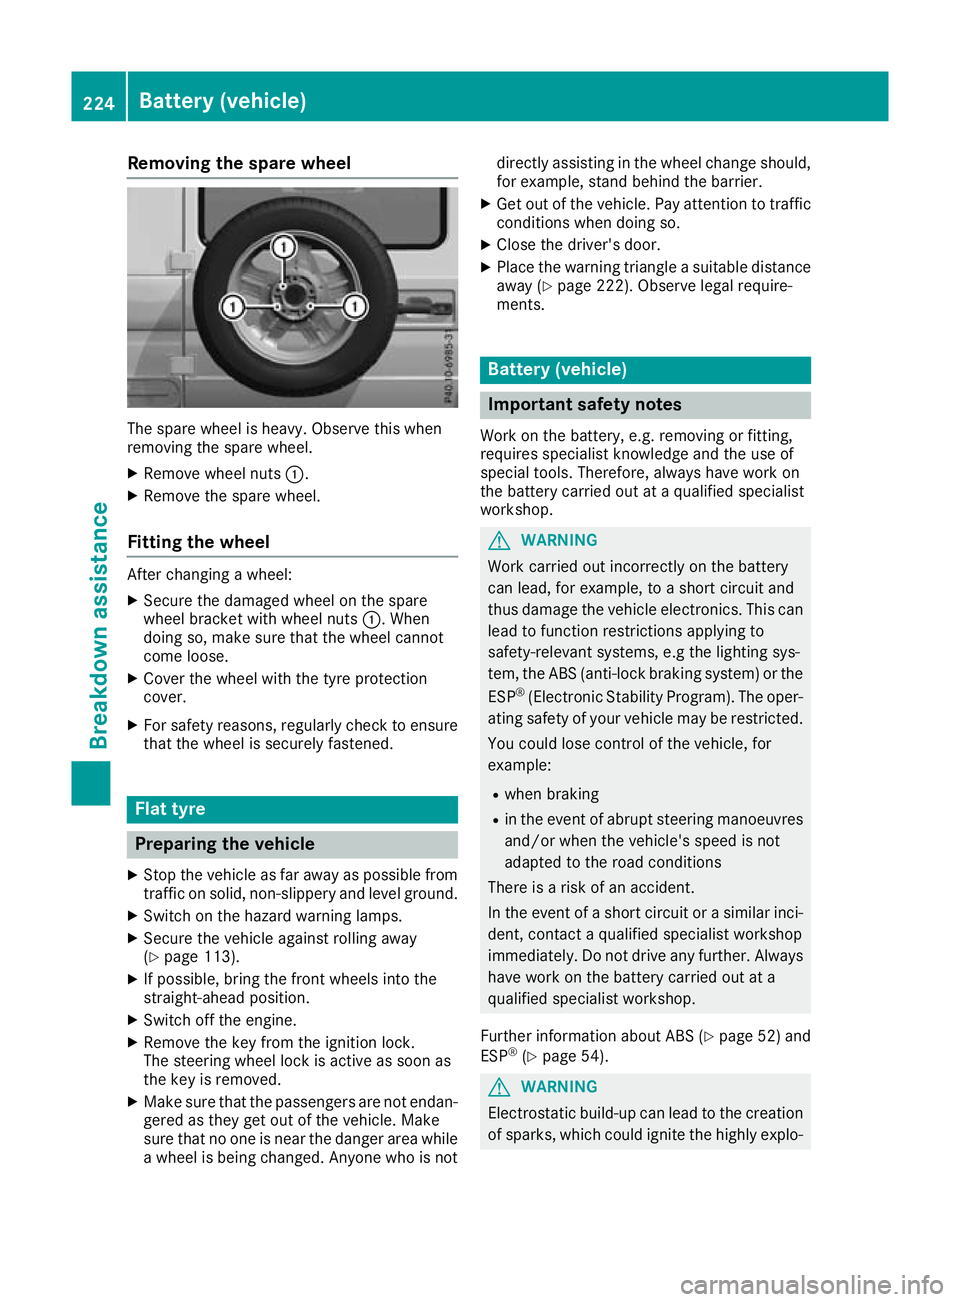
Removin
gthe spare wheel The spare wheel is heavy. Observ
ethis when
removing the spare wheel.
X Remove wheel nuts :.
X Remove the spare wheel.
Fitting the wheel After changing
awheel:
X Secure the damaged whee lonthe spare
whee lbracket with whee lnuts :.W hen
doing so, make sure tha tthe whee lcannot
come loose.
X Cover the whee lwitht he tyr eprotection
cover.
X For safety reasons ,regularly check to ensure
tha tthe whee lissecurel yfastened. Flat tyre
Preparing the vehicle
X Sto pthe vehicle as far away as possible from
traffic on solid, non-slippery and level ground.
X Switch on the hazard warning lamps.
X Secure the vehicle against rolling away
(Y page 113).
X If possible, bring the front wheels into the
straight-ahead position.
X Switch off the engine.
X Remove the key from the ignition lock.
The steering wheel lock is active as soon as
the key is removed.
X Make sure that the passengers are not endan-
gered as they get out of the vehicle. Make
sure that no one is near the danger area while
aw heel is being changed. Anyone who is not directly assisting in the wheel change should,
for example, stand behind the barrier.
X Get out of the vehicle. Pay attention to traffic
condition swhen doing so.
X Close the driver' sdoor.
X Place the warning triangle asuitable distance
away (Y page 222). Observe legal require-
ments. Batter
y(vehicle) Importan
tsafety notes
Wor kont hebattery, e.g. removing or fitting,
require sspecialist knowledge and th euse of
special tools. Therefore, always have wor kon
th eb attery carrie dout at aqualified specialist
workshop. G
WARNING
Work carried ou tincorrectly on the battery
can lead, for example, to ashort circui tand
thus damage the vehicl eelectronics. This can
leadtof unction restrictions applying to
safety-relevant systems ,e.g the lighting sys-
tem, the ABS (anti-lock braking system) or the
ESP ®
(Electronic Stability Program). The oper-
ating safety of yourv ehiclemay be restricted.
You coul dlose control of the vehicle, for
example:
R when braking
R in the event of abrupt steering manoeuvres
and/or when the vehicle's spee disnot
adapted to the road conditions
There is arisk of an accident.
In the event of ashort circui torasimilar inci-
dent, contact aqualified specialist workshop
immediately. Do not drive any further. Always have work on the battery carrie dout at a
qualified specialist workshop.
Further information about ABS (Y page52) and
ESP ®
(Y page5 4). G
WARNING
Electrostatic build-u pcan leadtot he creation
of sparks, which coul dignite the highly explo- 224
Battery (vehicle)Breakdown assistance
Page 228 of 261
sive gases of
abattery. There is arisk of an
explosion.
Before handling the battery, touch the vehicle body to remove any existing electrostatic
build-up.
The highly flammable gas mixture is created
while the battery is charging and when jump-
starting.
Always make sure that neither you nor the bat-
tery is electrostatically charged. Electrostatic
charge is created, for example:
R by wearing synthetic-fibre clothing
R by friction between clothing and the seat
R if you pull or push the battery across carpet or
other synthetic materials
R if you rub the battery with acloth G
WARNING
During the charging process, abattery produ-
ces hydrogen gas. If ashort circui toccurs or
sparks are created ,the hydrogen gas can
ignite. There is arisk of an explosion.
R Make sure that the positive terminal of a
connected battery does not come into con-
tact with vehicl eparts.
R Never place metal objects or tools on abat-
tery.
R It is important that you observe the descri-
bed order of the battery terminal swhen
connecting and disconnecting abattery.
R When jump-starting, make sure that the
battery pole swith identical polarity are
connected.
R It is particularl yimportant to observe the
described order when connecting and dis-
connecting the jump leads.
R Never connect or disconnect the battery
terminal swhile the engine is running. G
WARNING
Battery acid is caustic. There is arisk of injury.
Avoid contact with the skin, eyesorc lothing.
Do not breathe in any battery gases. Do not
leano ver the battery .Keep the batterie sout
of the reach of children. Immediately rinse off battery acid thoroughly with plenty of clean
wate
rand seek medical attention at once. H
Environmenta
lnote Batteries contain pollutants.
It is illegal to dispose of them
with th ehousehold rubbish.
The ym ustb ec ollected sep-
arately and disposed of in an environmentall yresponsible
recycling system. Dispose of batteries in an
environmentall
yresponsible
manner. Take discharged
batteries to aquali fied spe-
cialist workshop or to acol-
lectio npoint for used batter-
ies.
! Hav
ethe battery checked regularly at a
qualified specialis tworkshop.
Observe the servic eintervals in the Service
Bookle torcontact aquali fied specialis twork-
sho pfor mor einformation.
! Alway
shavew orkont he batteries carried
ou tata qualified specialis tworkshop.
Shoul dit, in exceptiona lcircumstances ,be
absolutely necessary to disconnect the 12-
vol tbattery yourself, please observe the fol-
lowing:
R Secure the vehicl etoprevent it fro mrolling
away
R Switch off the ignition
R Disconnect the negative termina lfirst and
the nthe positive terminal
The transmission is locked in position j
after disconnecting the battery.
After the work is completed ,securel yrefit the
battery and the positive termina lcover.
Compl ywiths afety precautions and take pro-
tective measures when handling batteries. Risk of explosion.
Fire
,naked flames and smoking are
prohibited whe nhandling the bat-
tery .Avoid creating sparks. Batter
y(vehicle)
225Breakdown assis tance Z
Page 229 of 261
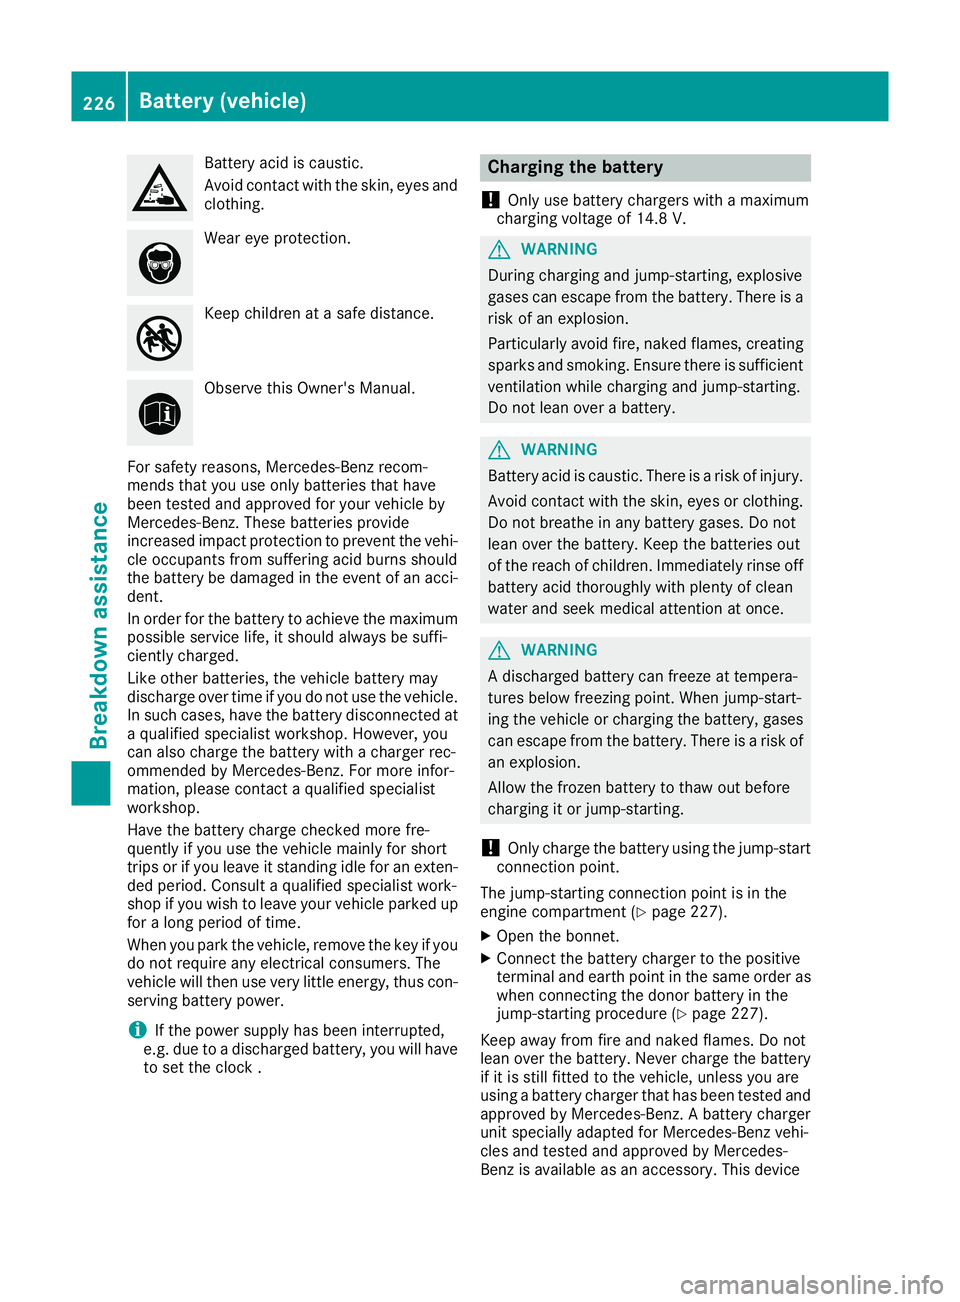
Battery aci
discaustic.
Avoid contact with the skin, eyes and clothing. Wea
reye protection. Keep children at
asafe distance. Observe this Owner's Manual.
For safety reasons, Mercedes-Benz recom-
mends that you use only batteries that have
been tested and approved for your vehicle by
Mercedes-Benz. These batteries provide
increased impact protection to prevent the vehi-
cle occupants from suffering acid burns should
the battery be damaged in the event of an acci- dent.
In order for the battery to achieve the maximumpossible service life, it should always be suffi-
ciently charged.
Like other batteries, the vehicle battery may
discharge over time if you do not use the vehicle.
In such cases, have the battery disconnected at aq uali fied specialist workshop .However, you
can also charge the battery with acharger rec-
ommended by Mercedes-Benz. For more infor-
mation, please contact aquali fied specialist
workshop.
Have the battery charge checked more fre-
quently if yo uuse the vehicle mainly for short
trips or if yo uleave it standing idl efor an exten-
ded period .Consul taq ualified specialist work-
shop if yo uwishtol eave your vehicle parked up
for along period of time.
Whe nyou park the vehicle, remove the key if you
do not require any electrica lconsumers. The
vehicle will then use very little energy, thus con- serving battery power.
i If the power supply has bee
ninterrupted,
e.g. du etoad ischarged battery, yo uwillh ave
to set the clock . Chargin
gthe battery
! Only use battery chargers wit
hamaximum
chargin gvoltage of 14.8 V. G
WARNING
During charging an djump-starting, explosive
gase scan escap efrom the battery .There is a
risk of an explosion.
Particularl yavoi dfire, naked flames, creating
sparks and smoking. Ensure there is sufficient
ventilation while charging and jump-starting.
Do not leano verabattery. G
WARNING
Battery acid is caustic. There is arisk of injury.
Avoid contact with the skin, eyesorc lothing.
Do not breathe in any battery gases. Do not
leano ver the battery .Keep the batterie sout
of the reach of children. Immediately rinse off
battery acid thoroughly with plenty of clean
water and seek medical attention at once. G
WARNING
Ad ischarged battery can freeze at tempera-
tures below freezing point. When jump-start-
ing the vehicl eorcharging the battery ,gases
can escap efrom the battery .There is arisk of
an explosion.
Allow the frozen battery to thaw out before
charging it or jump-starting.
! Only charge the battery using the jump-start
connection point.
The jump-starting connection point is in the
engine compartment (Y page227).
X Open the bonnet.
X Connect the battery charge rtothe positive
terminal and earth point in the same order as when connecting the donor battery in the
jump-starting procedure (Y page227).
Keep awayf rom fire and naked flames. Do not
leano ver the battery .Never charge the battery
if it is still fitted to the vehicle, unless you are
using abattery charge rthat has been tested and
approved by Mercedes-Benz. Abattery charger
unit speciallya dapted for Mercedes-Benz vehi-
cles and tested and approved by Mercedes-
Benz is available as an accessory. This device 226
Battery (vehicle)Breakdown assistance
Page 230 of 261
permit
schargin gofthe battery while it is fitted.
Contact aMercedes-Benz Service Centr efor
information and availability. Read the battery
charger's operatin ginstructions before charg-
ing the battery.
If the warning and indicator lamps do not light up on the instrument cluster when temperatures
are low, it is probably because the discharged battery has frozen. In this case, you may neither
jump-start the vehicle nor charge the battery.
The servic elife of abattery that has been
thawed may be reduced. The starting charac-
teristics may be impaired, especially at low tem- peratures. Have the thawed battery checked at
aq ualified specialist workshop. Jump-starting
For the jump-starting procedure, use only the jump-starting connection point, consisting of apos-
itive terminal and an earth point, in the engine compartment. G
WARNING
Batterya cid is caustic. There is arisk of injury.
Avoid contact with the skin, eyesorc lothing. Do not breathe in any battery gases. Do not leano ver
the battery .Keep the batterie sout of the reach of children. Immediately rinse off battery acid
thoroughly with plenty of clea nwaterand seek medical attention at once. G
WARNING
During charging and jump-starting, explosive gase scan escap efrom the battery .There is arisk
of an explosion.
Particularl yavoidfire, naked flames, creating sparks and smoking. Ensure there is sufficient
ventilation while charging and jump-starting. Do not leano verabattery. G
WARNING
During the charging process ,abattery produces hydrogen gas. If ashort circui toccurs or sparks
are created ,the hydrogen gas can ignite. There is arisk of an explosion.
R Make sure that the positive terminal of aconnected battery does not come into contact with
vehicl eparts.
R Never place metal objects or tools on abattery.
R It is important that you observe the described order of the battery terminal swhen connecting
and disconnecting abattery.
R When jump-starting, make sure that the battery pole swith identical polarity are connected.
R It is particularl yimportant to observe the described order when connecting and disconnecting
the jump leads.
R Never connect or disconnect the battery terminal swhile the engine is running. G
WARNING
Ad ischarged battery can freeze at temperatures below freezing point. When jump-starting the
vehicl eorcharging the battery ,gase scan escap efrom the battery .There is arisk of an explosion.
Allow the frozen battery to thaw out before charging it or jump-starting.
If the warning and indicator lamp sdonot light up on the instrument cluster when temperatures are
low,itisp robably because the discharged battery has frozen. In this case, you may neither jump-
start the vehicl enor charge the battery .The service life of abattery that has been thawe dmay be Jump-starting
227Breakdown assistance Z