MERCEDES-BENZ G550 2010 W463 Owner's Manual
Manufacturer: MERCEDES-BENZ, Model Year: 2010, Model line: G550, Model: MERCEDES-BENZ G550 2010 W463Pages: 272, PDF Size: 7.04 MB
Page 241 of 272

GWarning!
Wiper blades are components that are subject
to wear and tear. Replace the wiper blades
twice a year, preferably in the spring and fall.
Otherwise the windows will not be wiped
properly. As a result, you may not be able to
observe surrounding traffic conditions and
could cause an accident.
! Never open the hood when a front wiper
arm is folded forward.
Hold on to the wiper when folding a wiper
arm back. If released, the force of the
impact from the tensioning spring could
crack the windshield or the rear window.
Do not allow a wiper arm to contact the
windshield glass or the rear window
without a wiper blade inserted.
Mercedes-Benz recommends that you have
this work carried out at an authorized
Mercedes-Benz Center.
XRemove the SmartKey from the starter
switch.
Removing wiper blades
! Do not pull on the wiper blade inserts.
They could tear.
XFold the wiper arm forward until it snaps
into place.
XTurn wiper blade ; at a right angle to wiper
arm =.
XPress safety tab : of attachment link ?
down and slide wiper blade ; from the end
of wiper arm =.
XRemove wiper blade ;.
Installing wiper blades
XGuide wiper blade : so that opening goes
through wiper arm ?.
XPress wiper blade : into wiper arm ?
until safety tab ; engages in attachment
link =.
XFold the wiper arm backward to rest on the
windshield.
! Make sure the wiper blades are installed
properly. Improperly installed wiper blades
may cause windshield damage.
Flat tire
Safety notes
When you replace the vehicle’s tires, you can
use the spare wheel as a regular road wheel.
However, the spare tire may not be older than
6 years. In addition, the rim and tire must be
of same size and model as the regular road
wheels.
Flat tire239Practical hints463_AKB; 3; 35, en-USd2ureepe,Version: 2.11.8.12009-07-16T20:59:56+02:00 - Seite 239Z
Page 242 of 272
GWarning!
If the spare tire is more than 6 years old or is
not the same model as the regular tires, have
the spare tire replaced with a new tire at the
nearest Mercedes-Benz Center.
Never operate the vehicle with more than one
spare wheel mounted.
GWarning!
G 55 AMG:
Rim and tire size of spare wheel and regular
wheel differ. Handling will be adversely
affected when the spare wheel is used.
Do not exceed the maximum speed of 50
mph (80 km/h).
Preparing the vehicle
XWhenever possible, park the vehicle in a
safe distance from moving traffic on a hard,
flat surface.XTurn on the hazard warning flasher.XTurn the steering wheel so that the front
wheels are in a straight-ahead position.XEngage the parking brake.XShift the automatic transmission into park
position P.XTurn off the engine.XRemove the SmartKey from the starter
switch.XHave any passenger exit the vehicle at a
safe distance from the roadway. Open
doors only when conditions are safe to do
so.
Mounting the spare wheel
Introduction
XPrepare the vehicle as described
( Y page 240).GWarning!
You must remove the spare wheel from the
spare wheel carrier before lifting the vehicle.
Otherwise the vehicle could fall off the jack
and injure you or others.
XRemove the spare wheel from the spare
wheel carrier.XTake the vehicle tool kit out of the vehicle.XTake the jack out of the vehicle.
For information on where to find the
respective items, see “Where will I find ...?”
( Y page 200) and ( Y page 201).
i Vehicles without spare wheel are not
factory-equipped with the tools required for
a wheel change such as a jack or a wheel
wrench. Some tools required for a wheel
change are specific to your vehicle.
Contact an authorized Mercedes-Benz
Center to obtain the tools approved for
your vehicle. This section describes the
wheel change using the tools approved and
recommended for your vehicle.
Lifting the vehicle
GWarning!
When jacking up the vehicle, only use the jack
which has been specifically approved by
Mercedes-Benz for your vehicle.
The jack is designed exclusively for jacking up
the vehicle under the axle housing. Make sure
the jack is positioned correctly under the axle
housing. The jack must always be vertical
when in use, especially on inclines or
declines.
The jack is intended only for lifting the vehicle
briefly for wheel changes. It is not suited for
performing maintenance work under the
vehicle. To help avoid personal injury, use the
jack only to lift the vehicle during a wheel
change.
Never get beneath the vehicle while it is
supported by the jack. Keep hands and feet
away from the area under the lifted vehicle.
240Flat tirePractical hints
463_AKB; 3; 35, en-USd2ureepe,Version: 2.11.8.12009-07-16T20:59:56+02:00 - Seite 240
Page 243 of 272
Always lower the vehicle onto sufficient
capacity jackstands before working under the
vehicle.
Always firmly engage the parking brake and
block the wheels with wheel chocks or other
sizeable objects before raising the vehicle
with the jack. Do not disengage the parking
brake while the vehicle is raised.
Make sure that the ground on which the
vehicle is standing and where you place the
jack is solid, level and not slippery. If
necessary, use a large underlay. On slippery
surfaces, such as tiled floors, you should use
a non-slip underlay, for example a rubber mat.
Do not use wooden blocks or similar objects
to support the jack. Otherwise the jack may
not be able to achieve its load-bearing
capacity if it is not at its full height.
Never start the engine when the vehicle is
raised.
Also observe the notes on the jack.
XPrevent the vehicle from rolling away by
blocking wheels with wheel chocks (not
included) or other sizeable objects.
When changing a wheel on a level surface:
XPlace a wheel chock or other sizeable
object in front of and another wheel chock
or other sizeable object behind the wheel
that is diagonally opposite to the wheel
being changed.
Always try lifting the vehicle using the jack on
a level surface. However, should
circumstances require you to do so on a hill:
XPlace wheel chocks or other sizeable
objects on the downhill side in front of both
wheels on the side opposite to the side on
which the wheel is to be changed.
GWarning!
Only jack up the vehicle on level ground or on
slight inclines/declines. Otherwise, the
vehicle could fall off the jack and injure you or
others.
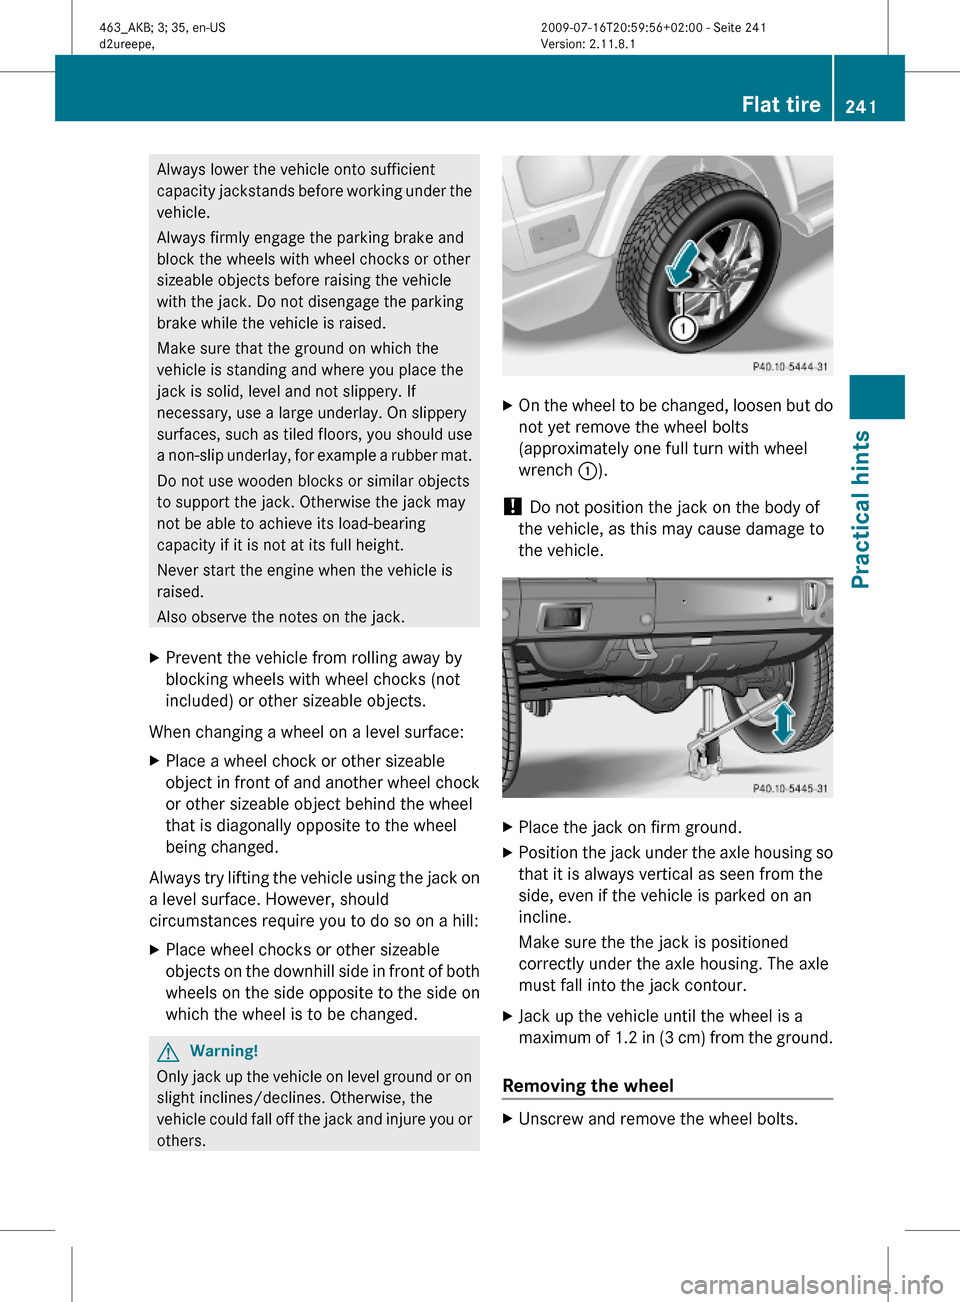
XOn the wheel to be changed, loosen but do
not yet remove the wheel bolts
(approximately one full turn with wheel
wrench :).
! Do not position the jack on the body of
the vehicle, as this may cause damage to
the vehicle.
XPlace the jack on firm ground.XPosition the jack under the axle housing so
that it is always vertical as seen from the
side, even if the vehicle is parked on an
incline.
Make sure the the jack is positioned
correctly under the axle housing. The axle
must fall into the jack contour.
XJack up the vehicle until the wheel is a
maximum of 1.2 in (3 cm) from the ground.
Removing the wheel
XUnscrew and remove the wheel bolts.Flat tire241Practical hints463_AKB; 3; 35, en-USd2ureepe,Version: 2.11.8.12009-07-16T20:59:56+02:00 - Seite 241Z
Page 244 of 272
! Do not place wheel bolts in sand or dirt.
This could result in damage to the wheel
bolts and wheel hub threads.
XRemove the wheel.
Attaching the spare wheel
GWarning!
Always replace wheel bolts that are damaged
or rusted.
Never apply oil or grease to wheel bolts.
Damaged wheel hub threads should be
repaired immediately. Do not continue to
drive under these circumstances! Contact an
authorized Mercedes-Benz Center or call
Roadside Assistance.
Incorrect wheel bolts or improperly tightened
wheel bolts can cause the wheel to come off.
This could cause an accident. Make sure to
use the correct wheel bolts.
GWarning!
Only use genuine Mercedes-Benz wheel bolts.
Other wheel bolts may come loose.
Do not tighten the wheel bolts when the
vehicle is raised. Otherwise the vehicle could
fall off the jack.
XClean contact surfaces of wheel and wheel
hub.
! To avoid paint damage, place wheel flat
against hub and hold it there while
installing first wheel bolt.
XGuide the spare wheel onto the wheel hub
and push it on.
XInsert the wheel bolts and tighten them
slightly.
Lowering the vehicle
XUsing the pump handle, turn the release
bolt of the jack counterclockwise
approximately one turn.
iNever turn the release bolt of the jack
more than one or two revolutions.
Otherwise hydraulic fluid can escape.
XLower the vehicle until the vehicle is resting
fully on its own weight.
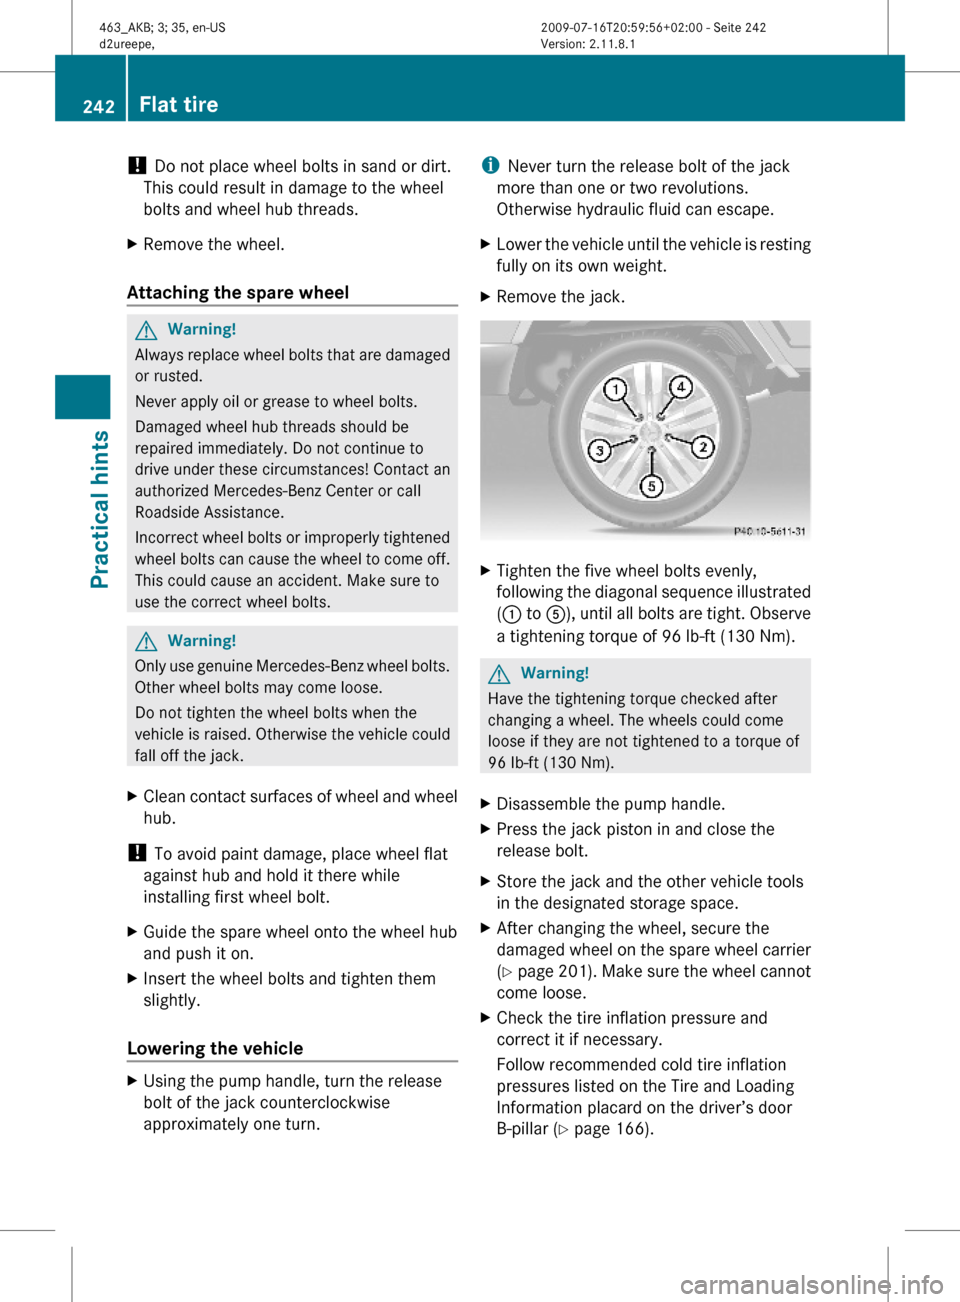
XRemove the jack.XTighten the five wheel bolts evenly,
following the diagonal sequence illustrated
(: to A), until all bolts are tight. Observe
a tightening torque of 96 lb-ft (130 Nm).
GWarning!
Have the tightening torque checked after
changing a wheel. The wheels could come
loose if they are not tightened to a torque of
96 lb-ft (130 Nm).
XDisassemble the pump handle.XPress the jack piston in and close the
release bolt.
XStore the jack and the other vehicle tools
in the designated storage space.
XAfter changing the wheel, secure the
damaged wheel on the spare wheel carrier
(Y page 201). Make sure the wheel cannot
come loose.
XCheck the tire inflation pressure and
correct it if necessary.
Follow recommended cold tire inflation
pressures listed on the Tire and Loading
Information placard on the driver’s door
B-pillar (Y page 166).
242Flat tirePractical hints
463_AKB; 3; 35, en-USd2ureepe,Version: 2.11.8.12009-07-16T20:59:56+02:00 - Seite 242
Page 245 of 272
XDo not exceed the maximum speed of
50 mph (80 km/h).
Battery
Safety notes
A battery should always be sufficiently
charged in order to achieve its rated service
life. Refer to Maintenance Booklet for battery
maintenance intervals.
If you use your vehicle mostly for short-
distance trips, you will need to have the
battery charge checked more frequently.
When replacing a battery, always use a
battery approved by Mercedes-Benz.
If you do not intend to operate your vehicle
for an extended period of time, contact an
authorized Mercedes-Benz Center about
steps you need to observe.
GWarning!
Observe all safety instructions and
precautions when handling automotive
batteries.
Risk of explosion.Fire, open flames and
smoking are prohibited
when handling batteries.
Avoid creating sparks.
Battery acid is caustic. Do
not allow it to come into
contact with skin, eyes or
clothing.
Wear suitable protective
clothing, especially gloves,
apron and faceguard.
Wear eye protection.
Rinse any acid spills
immediately with clear
water. Contact a physician
if necessary.
Keep children away.Follow the instructions in
this Operator’s Manual.
A battery contains materials that can harm
the environment if disposed of improperly. A
large 12 V storage battery contains lead.
Recycling of the battery is the preferred
method of disposal. Many states (USA only)
or provinces (Canada only) require sellers of
batteries to accept the old battery for
recycling.
GWarning!
Failure to follow these instructions can result
in severe injury or death.
Never lean over batteries while connecting.
You might get injured.
Battery fluid contains sulfuric acid. Do not
allow this fluid to come in contact with eyes,
skin or clothing. In case it does, immediately
flush affected area with water and seek
medical help if necessary.
A battery will also produce hydrogen gas,
which is flammable and explosive. Keep
flames or sparks away from battery, avoid
improper connection of jumper cables,
smoking etc.
GWarning!
Do not place metal objects on the battery as
this could result in a short circuit.
Use leak-proof batteries only to avoid the risk
of acid burns in the event of an accident.
Take care that you do not become statically
charged, e.g. by wearing synthetic clothing or
rubbing against textiles. For this reason, you
also should not pull or push the battery over
carpets or other synthetic materials.
Never touch the battery first. First touch the
outside body of the vehicle in order to release
any possible electrostatic charges.
Battery243Practical hints463_AKB; 3; 35, en-USd2ureepe,Version: 2.11.8.12009-07-16T20:59:56+02:00 - Seite 243Z
Page 246 of 272
Do not rub the battery with rags or cloths. The
battery could explode if touched due to
electrostatic charge or due to spark
formation.
! As any other battery, the battery may
discharge if you do not operate the vehicle
for an extended period of time. Have the
battery disconnected at a qualified
workshop or an authorized Mercedes-Benz
Center in such a case. You may also
connect an accessory battery charge unit
expressly approved by Mercedes-Benz for
your vehicle model to maintain the battery
charge. Contact an authorized Mercedes-
Benz Center for further information.
The battery, the battery ventilation hose
and the lateral plug must always be
securely installed when the vehicle is in
operation.
! Never loosen or detach battery terminal
clamps while the engine is running or the
SmartKey is in the starter switch.
Otherwise the alternator and other
electronic components could be severely
damaged.
Have the battery checked regularly at an
authorized Mercedes-Benz Center.
Refer to Maintenance Booklet for
maintenance intervals or contact an
authorized Mercedes-Benz Center for
further information.
Charging the battery
GWarning!
Never charge a battery while still installed in
the vehicle unless the accessory battery
charge unit approved by Mercedes-Benz is
being used. Gases may escape during
charging and could cause an explosion that
may result in personal injury, paint damage or
corrosion.
An accessory battery charge unit specially
adapted for Mercedes-Benz vehicles and
tested and approved by Mercedes-Benz is
available. It permits the charging of the
battery in its installed position. Contact an
authorized Mercedes-Benz Center for
information and availability.
Charge battery in accordance with the
separate instructions for the accessory
battery charger.
Have the battery charged at an authorized
Mercedes-Benz Center. If you charge the
battery yourself, follow the operating
instructions for your charging device.
Only use a battery charge unit with a
maximum charging voltage of 14.8 V.XCharge battery in accordance with the
instructions of the battery charger
manufacturer.
Jump starting
GWarning!
Failure to follow these directions will cause
damage to the electronic components, and
can lead to a battery explosion and severe
injury or death.
Never lean over batteries while connecting or
jump starting. You might get injured.
Battery fluid contains sulfuric acid. Do not
allow this fluid to come in contact with eyes,
skin or clothing. In case it does, immediately
flush affected area with water, and seek
medical help if necessary.
A battery will also produce hydrogen gas,
which is flammable and explosive. Keep
flames or sparks away from battery, avoid
improper connection of jumper cables,
smoking, etc.
Attempting to jump start a frozen battery can
result in it exploding, causing personal injury.
Read all instructions before proceeding.
244Jump startingPractical hints
463_AKB; 3; 35, en-USd2ureepe,Version: 2.11.8.12009-07-16T20:59:56+02:00 - Seite 244
Page 247 of 272
! Do not tow-start the vehicle. You could
otherwise seriously damage the automatic
transmission which is not covered by the
Mercedes-Benz Limited Warranty.
! Jump starting should only be performed
using the jump-start terminals located in
the engine compartment.
Avoid repeated and lengthy starting
attempts.
Do not attempt to start the engine using a
battery quick-charge unit.
If the engine does not run after several
unsuccessful starting attempts, have it
checked at the nearest authorized
Mercedes-Benz Center.
Excessive unburned fuel generated by
repeated failed starting attempts may
damage the catalytic converter and may
present a fire risk.
Make sure the jumper cables do not have
loose or missing insulation.
Make sure the cable clamps do not touch
any other metal part while the other end is
still attached to a battery.
If the battery is discharged, the engine can be
started with jumper cables and the fully
charged battery of another vehicle or an
equivalent starter pack. Observe the
following:
R Access to the battery is not possible on all
vehicles. If you cannot access the battery
of the other vehicle, provide jump startpower by an external battery or starter
pack.
R Jump starting should only be performed
when the engine and catalytic converter
are cold.
R Do not jump start the engine or charge the
battery if the battery is frozen. Let the
battery thaw out first.
R Only jump start from batteries with the
same voltage rating (12 V). Jump starting
with a more powerful battery could damage
the vehicle’s electrical system. Such
damage will not be covered by the
Mercedes-Benz Limited Warranty.
R Only use jumper cables with sufficient
cross-section and insulated terminal
clamps.
R Always make sure the jumper cables are
not on or near pulleys, fans or other parts
that move when an engine is started or
running.
R Should the battery be drained completely,
let the donating power source charge the
vehicle for several minutes before
reattempting the starting process.XMake sure the two vehicles do not touch.XSwitch off all electrical consumers.XEngage the parking brake.XMake sure the automatic transmission is in
park position P.XOpen the hood ( Y page 152).Jump starting245Practical hints463_AKB; 3; 35, en-USd2ureepe,Version: 2.11.8.12009-07-16T20:59:56+02:00 - Seite 245Z
Page 248 of 272
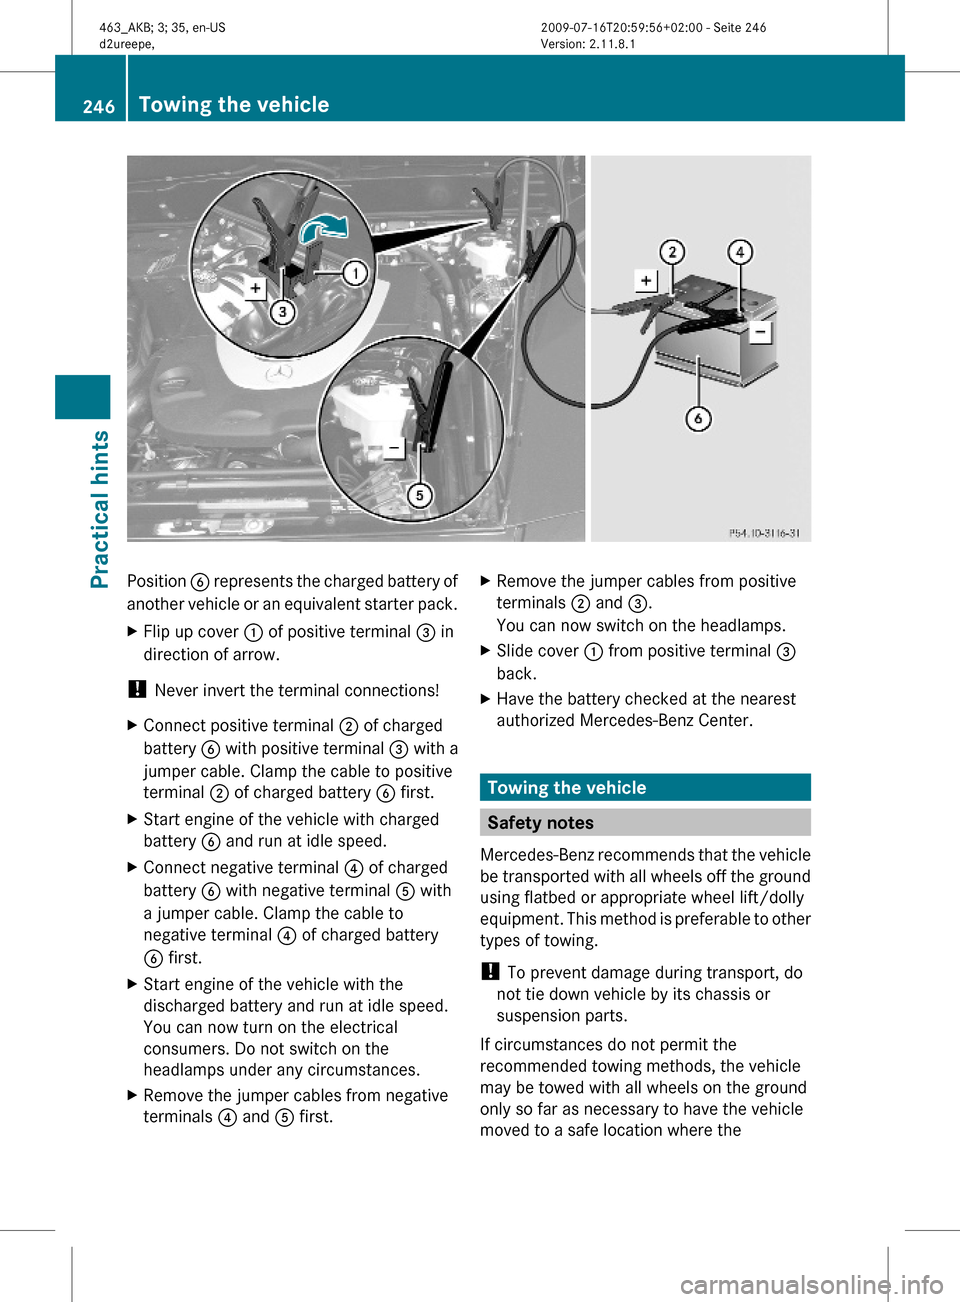
Position B represents the charged battery of
another vehicle or an equivalent starter pack.
XFlip up cover : of positive terminal = in
direction of arrow.
! Never invert the terminal connections!
XConnect positive terminal ; of charged
battery B with positive terminal = with a
jumper cable. Clamp the cable to positive
terminal ; of charged battery B first.
XStart engine of the vehicle with charged
battery B and run at idle speed.
XConnect negative terminal ? of charged
battery B with negative terminal A with
a jumper cable. Clamp the cable to
negative terminal ? of charged battery
B first.
XStart engine of the vehicle with the
discharged battery and run at idle speed.
You can now turn on the electrical
consumers. Do not switch on the
headlamps under any circumstances.
XRemove the jumper cables from negative
terminals ? and A first.
XRemove the jumper cables from positive
terminals ; and =.
You can now switch on the headlamps.
XSlide cover : from positive terminal =
back.
XHave the battery checked at the nearest
authorized Mercedes-Benz Center.
Towing the vehicle
Safety notes
Mercedes-Benz recommends that the vehicle
be transported with all wheels off the ground
using flatbed or appropriate wheel lift/dolly
equipment. This method is preferable to other
types of towing.
! To prevent damage during transport, do
not tie down vehicle by its chassis or
suspension parts.
If circumstances do not permit the
recommended towing methods, the vehicle
may be towed with all wheels on the ground
only so far as necessary to have the vehicle
moved to a safe location where the
246Towing the vehiclePractical hints
463_AKB; 3; 35, en-USd2ureepe,Version: 2.11.8.12009-07-16T20:59:56+02:00 - Seite 246
Page 249 of 272
recommended towing methods can be
employed.
! Before towing the vehicle observe the
following instructions:
R Do not tow-start the vehicle. You could
otherwise seriously damage the
automatic transmission which is not
covered by the Mercedes-Benz Limited
Warranty.
R Do not tow with sling-type equipment.
Towing with sling-type equipment over
bumpy roads will damage radiator and
supports.
R Towing of the vehicle should only be
done using the towing eye. Never attach
a tow cable, tow rope or tow rod to the
vehicle chassis, frame or suspension
parts.
! When towing the vehicle with all wheels
on the ground, the gear selector lever must
be in neutral position N and the SmartKey
must be in starter switch position 2.
When towing the vehicle with all wheels on
the ground, the vehicle may be towed only
for distances up to 30 miles (50 km) and at
a speed not to exceed 30 mph (50 km/h).
If the vehicle is towed with one axle raised
(observe instructions regarding flexible
drive shaft and propeller shafts), the engine
must be shut off and the SmartKey must be
in starter switch position 1. Otherwise, the
4-ETS may become engaged which may
cause loss of towing control.GWarning!
If circumstances require towing the vehicle
with all wheels on the ground, always tow with
a tow bar if:
R the engine will not run
R there is a malfunction in the brake system
R there is a malfunction in the power supply
or in the vehicle’s electrical system
This is necessary to adequately control the
towed vehicle.
Prior to towing the vehicle with all wheels on
the ground, make sure the SmartKey is in
starter switch position 2.
If the SmartKey is left in the starter switch
position 0 for an extended period of time, it
can no longer be turned in the switch. In this
case, the steering is locked. To unlock,
remove SmartKey from starter switch and
reinsert.GWarning!
With the engine not running, there is no power
assistance for the brake and steering
systems. In this case, it is important to keep
in mind that a considerably higher degree of
effort is necessary to brake and steer the
vehicle. Adapt your driving accordingly.
! Avoid pulling the vehicle abruptly or
diagonally, since it could result in damage
to the chassis alignment.
! Do not use the towing eye bolt for
recovery, as this could damage the vehicle.
If in doubt, recover the vehicle with a crane.
i If the battery is disconnected or
discharged
R the SmartKey will not turn in the starter
switch
R the automatic transmission will remain in
park position P
For more information see “Battery”
( Y page 243) or “Jump starting”
( Y page 244).
For information on manually unlocking the
gear selector lever, see ( Y page 230).
i When towing the vehicle with all wheels
on the ground, note the following:
With the automatic central locking
activated and the SmartKey in starter
switch position 2, the vehicle doors lock if
Towing the vehicle247Practical hints463_AKB; 3; 35, en-USd2ureepe,Version: 2.11.8.12009-07-16T20:59:56+02:00 - Seite 247Z
Page 250 of 272
a wheel is turning at vehicle speeds of
approximately 9 mph (15 km/h) or above.
To prevent the vehicle doors from locking,
deactivate the automatic central locking
(Y page 111).
iTo signal turns while being towed with
hazard warning flasher in use, turn the
SmartKey in starter switch to position 2
and activate combination switch for left or
right turn signal in usual manner – only the
selected turn signal will operate. Upon
canceling the turn signal, the hazard
warning flasher will operate again.
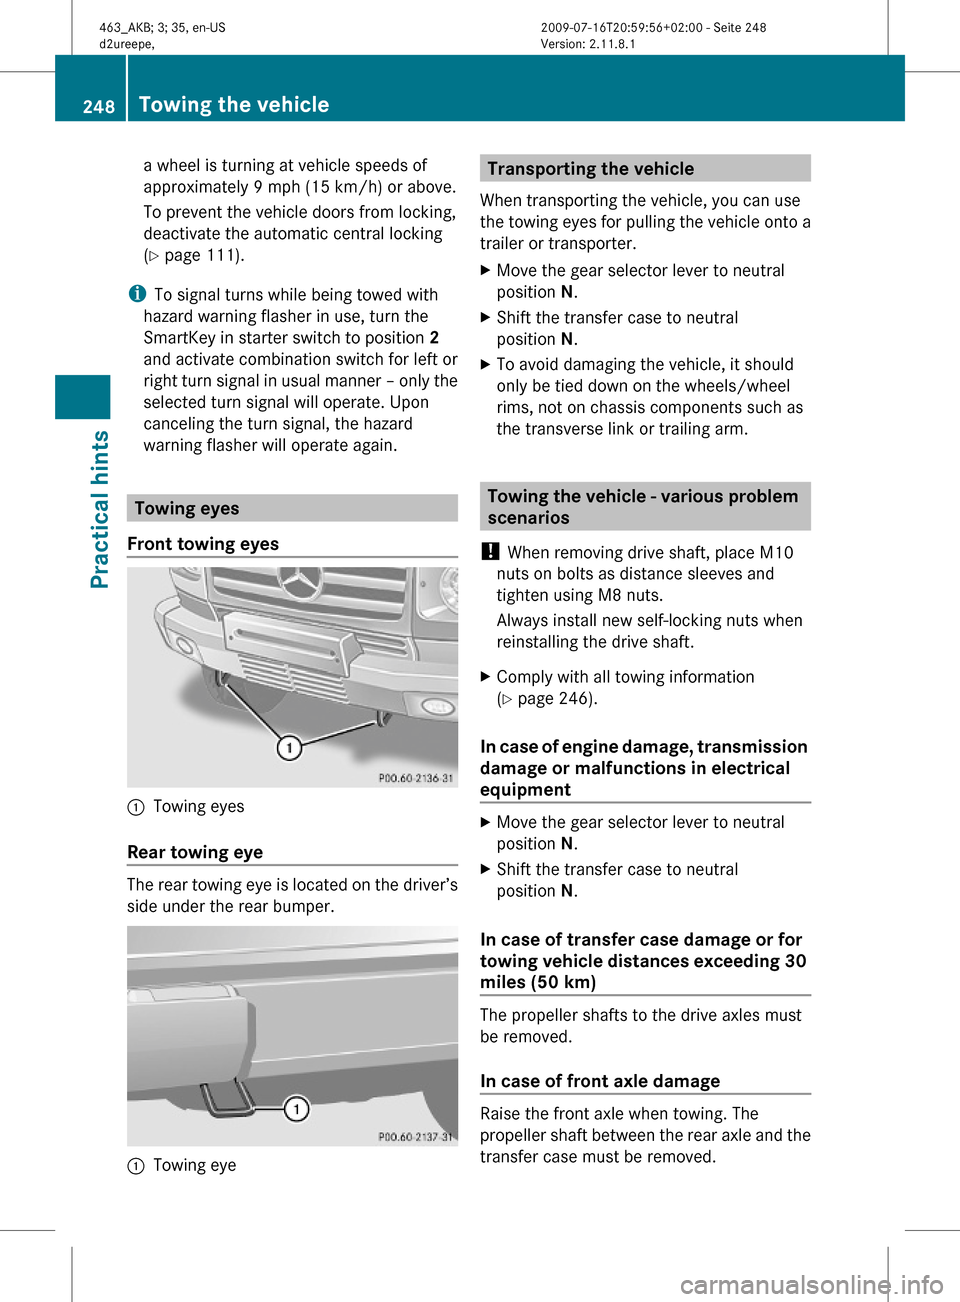
Towing eyes
Front towing eyes
:Towing eyes
Rear towing eye
The rear towing eye is located on the driver’s
side under the rear bumper.
:Towing eyeTransporting the vehicle
When transporting the vehicle, you can use
the towing eyes for pulling the vehicle onto a
trailer or transporter.
XMove the gear selector lever to neutral
position N.
XShift the transfer case to neutral
position N.
XTo avoid damaging the vehicle, it should
only be tied down on the wheels/wheel
rims, not on chassis components such as
the transverse link or trailing arm.
Towing the vehicle - various problem
scenarios
! When removing drive shaft, place M10
nuts on bolts as distance sleeves and
tighten using M8 nuts.
Always install new self-locking nuts when
reinstalling the drive shaft.
XComply with all towing information
(Y page 246).
In case of engine damage, transmission
damage or malfunctions in electrical
equipment
XMove the gear selector lever to neutral
position N.
XShift the transfer case to neutral
position N.
In case of transfer case damage or for
towing vehicle distances exceeding 30
miles (50 km)
The propeller shafts to the drive axles must
be removed.
In case of front axle damage
Raise the front axle when towing. The
propeller shaft between the rear axle and the
transfer case must be removed.
248Towing the vehiclePractical hints
463_AKB; 3; 35, en-USd2ureepe,Version: 2.11.8.12009-07-16T20:59:56+02:00 - Seite 248