MERCEDES-BENZ GL-Class 2013 X166 Owner's Manual
Manufacturer: MERCEDES-BENZ, Model Year: 2013, Model line: GL-Class, Model: MERCEDES-BENZ GL-Class 2013 X166Pages: 454, PDF Size: 6.31 MB
Page 121 of 454

Folding the exterior mirrors in or out
electrically X
Make sure that the SmartKey is in position
1 or 2in the ignition lock.
X Briefly press button 0002.
Both exterior mirrors fold in or out.
i Make sure that the exterior mirrors are
always folded out fully while driving .They
could otherwise vibrate.
i If you are driving faster than
30 mph (47 km/h), you can no longer fold
in the exterior mirrors.
Setting the exterior mirrors If the battery has been disconnected or
completely discharged, the exterior mirrors
must be reset. The exterior mirrors will
otherwise not fold in when you select the
"Fold in mirrors when locking" function in the
on-board computer (Y page 281).
X Make sure that the SmartKey is in
position 1in the ignition lock.
X Briefly press button 0002.
Folding the exterior mirrors in or out
automatically If the "Fold in mirrors when locking" function
is activated in the on-board computer:
(Y page 281) R
the exterior mirrors fold in automatically as
soon as you lock the vehicle from the
outside.
R the exterior mirrors fold out again
automatically as soon as you unlock the
vehicle and then open the driver's or front-
passenger door.
Exterior mirror pushed out of position If an exterior mirror has been pushed out of
position, proceed as follows:
X
Vehicles without electrically folding
exterior mirrors: move the exterior mirror
into the correct position manually.
X Vehicles with electrically folding
exterior mirrors: press and hold button for
folding the mirrors 0002(Ypage 119) until you
hear a click and then the mirror engage in
position.
The mirror housing is engaged again and
you can adjust the exterior mirrors as usual
(Y page 118). Automatic anti-glare mirrors
The rear-view mirror and the exterior mirror
on the driver's side automatically go into anti-
glare mode if the following conditions are met
simultaneously:
R the ignition is switched on and
R incident light from headlamps strikes the
sensor in the rear-view mirror.
i The mirrors do not go into anti-glare mode
if reverse gear is engaged or if the interior
lighting is switched on. Mirrors
119Seats, steering wheel and mirrors Z
Page 122 of 454
Parking position for the exterior
mirror on the front-passenger side
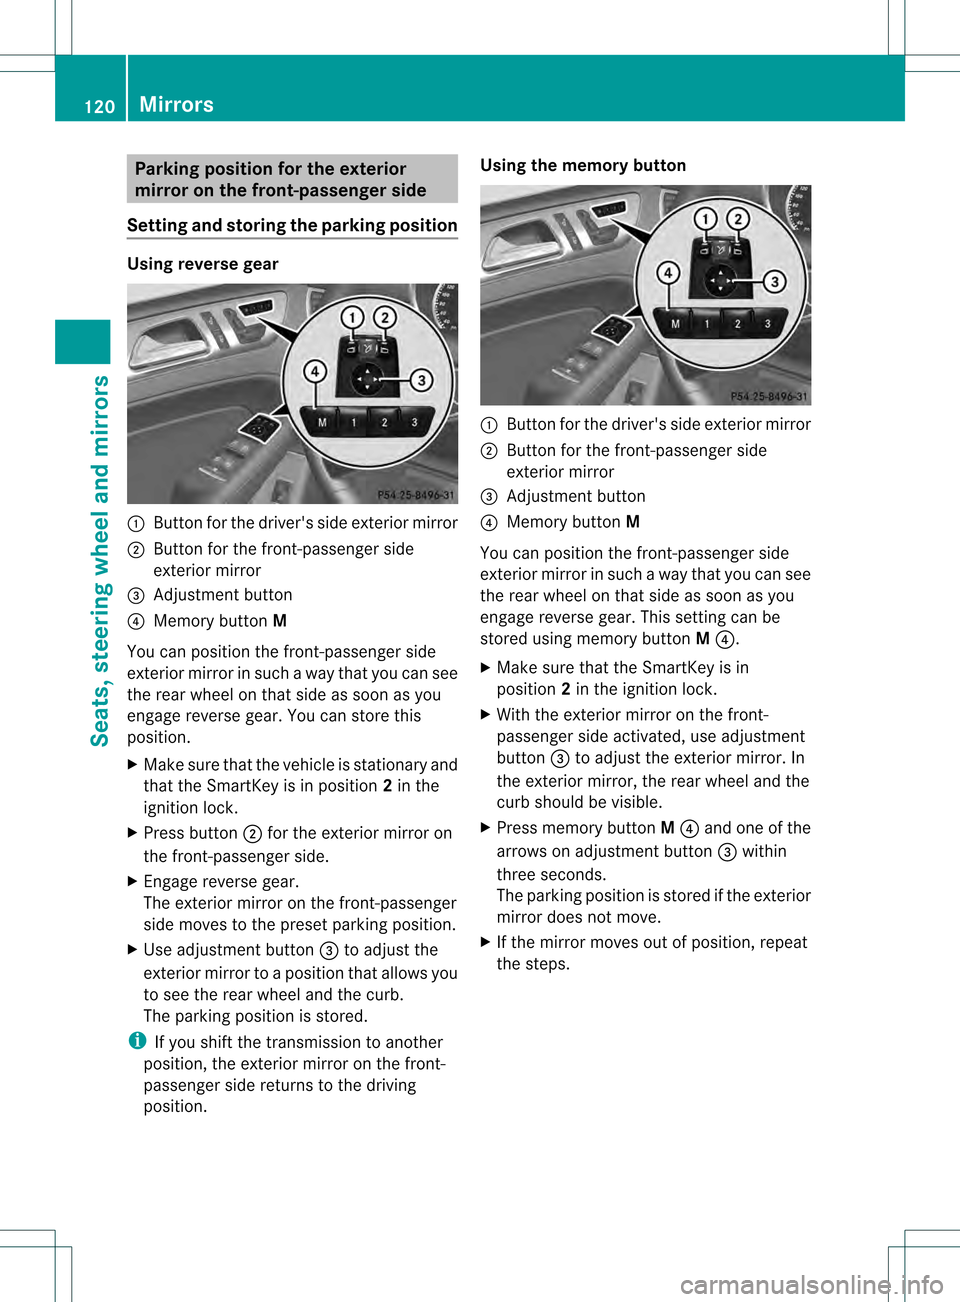
Setting and storing the parking position Using reverse gear
0002
Button for the driver's side exterior mirror
0003 Button for the front-passenger side
exterior mirror
0021 Adjustment button
0020 Memory button M
You can position the front-passenger side
exterior mirror in such a way that you can see
the rear wheel on that side as soon as you
engage reverse gear. You can store this
position.
X Make sure that the vehicle is stationary and
that the SmartKey is in position 2in the
ignition lock.
X Press button 0003for the exterior mirror on
the front-passenger side.
X Engage reverse gear.
The exterior mirror on the front-passenger
side moves to the preset parking position.
X Use adjustment button 0021to adjust the
exterior mirror to a position that allows you
to see the rear wheel and the curb.
The parking position is stored.
i If you shift the transmission to another
position, the exterior mirror on the front-
passenger side returns to the driving
position. Using the memory button
0002
Button for the driver's side exterior mirror
0003 Button for the front-passenger side
exterior mirror
0021 Adjustment button
0020 Memory button M
You can position the front-passenger side
exterior mirror in such a way that you can see
the rear wheel on that side as soon as you
engage reverse gear. This setting can be
stored using memory button M0020.
X Make sure that the SmartKey is in
position 2in the ignition lock.
X With the exterior mirror on the front-
passenger side activated, use adjustment
button 0021to adjust the exterior mirror. In
the exterior mirror, the rear wheel and the
curb should be visible.
X Press memory button M0020 and one of the
arrows on adjustment button 0021within
three seconds.
The parking position is stored if the exterior
mirror does not move.
X If the mirror moves out of position, repeat
the steps. 120
MirrorsSeats, steering wheel and mirrors
Page 123 of 454
Calling up a stored parking position
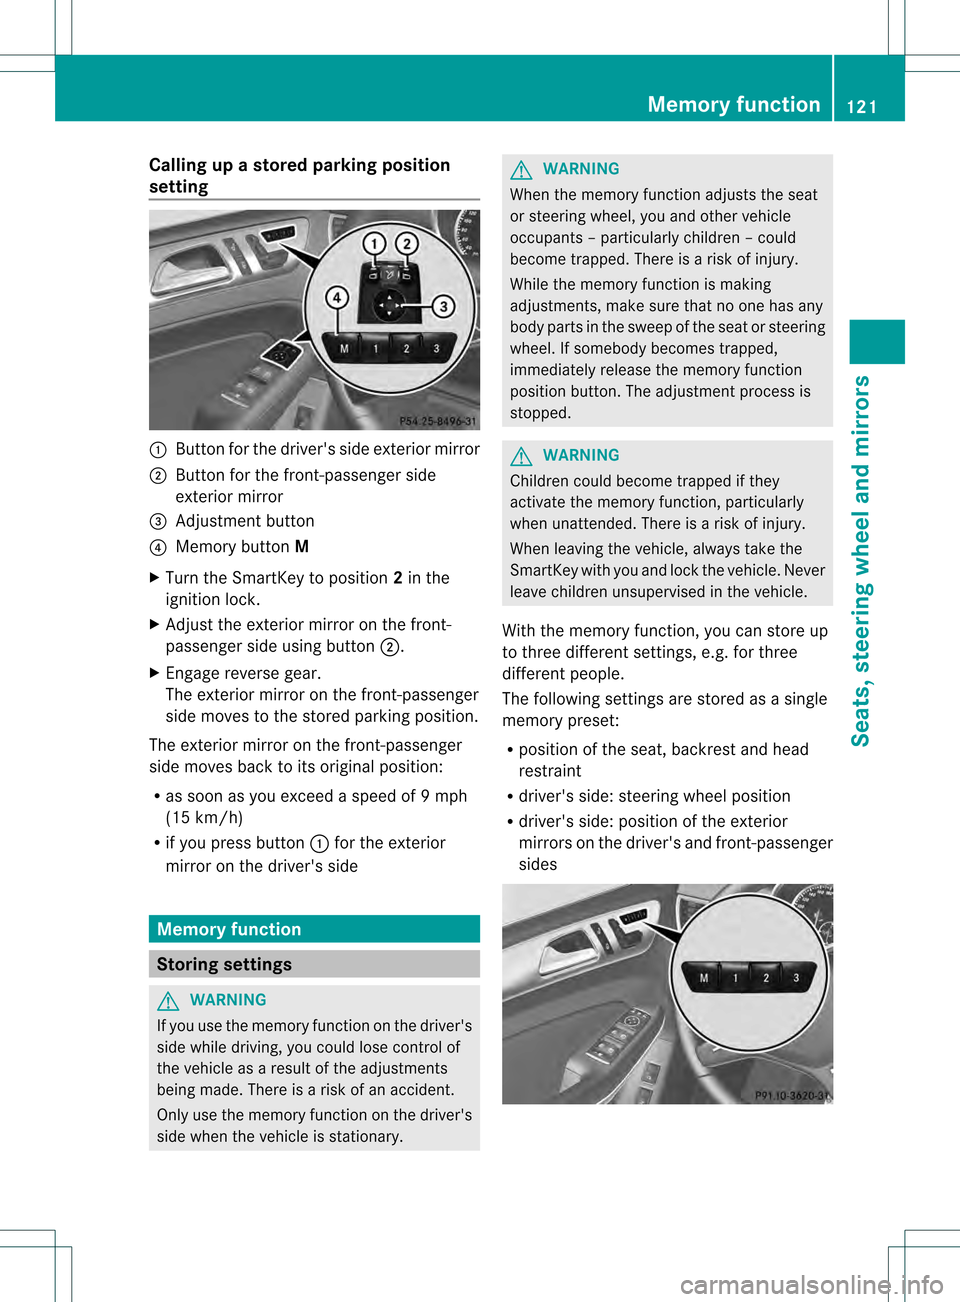
setting 0002
Butto nfor the driver's side exterior mirror
0003 Button for the front-passenger side
exterior mirror
0021 Adjustment button
0020 Memory button M
X Turn the SmartKey to position 2in the
ignition lock.
X Adjust the exterior mirror on the front-
passenger side using button 0003.
X Engage reverse gear.
The exterior mirror on the front-passenger
side moves to the stored parking position.
The exterior mirror on the front-passenger
side moves back to its original position:
R as soon as you exceed a speed of 9mph
(15 km/h)
R if you press button 0002for the exterior
mirror on the driver's side Memory function
Storing settings
G
WARNING
If you use the memor yfunctio nonthe driver's
side while driving, you could lose control of
the vehicle as a result of the adjustments
being made. There is a risk of an accident.
Only use the memory function on the driver's
side when the vehicle is stationary. G
WARNING
When the memory function adjusts the seat
or steering wheel, you and other vehicle
occupants –particularly childre n–could
become trapped. There is a risk of injury.
While the memory function is making
adjustments, make sure that no one has any
body parts in the sweep of the seat or steering
wheel. If somebody becomes trapped,
immediately release the memory function
position button .The adjustment process is
stopped. G
WARNING
Children could become trapped if they
activate the memory function, particularly
when unattended. There is arisk of injury.
When leaving the vehicle, always take the
SmartKey with you and lock the vehicle. Never
leave children unsupervised in the vehicle.
With the memory function, you can store up
to three different settings, e.g. for three
differen tpeople.
The following settings are stored as a single
memory preset:
R position of the seat, backrest and head
restraint
R driver's side: steering wheel position
R driver's side: position of the exterior
mirrors on the driver's and front-passenger
sides Memory function
121Seats, steering wheel and mirrors Z
Page 124 of 454
X
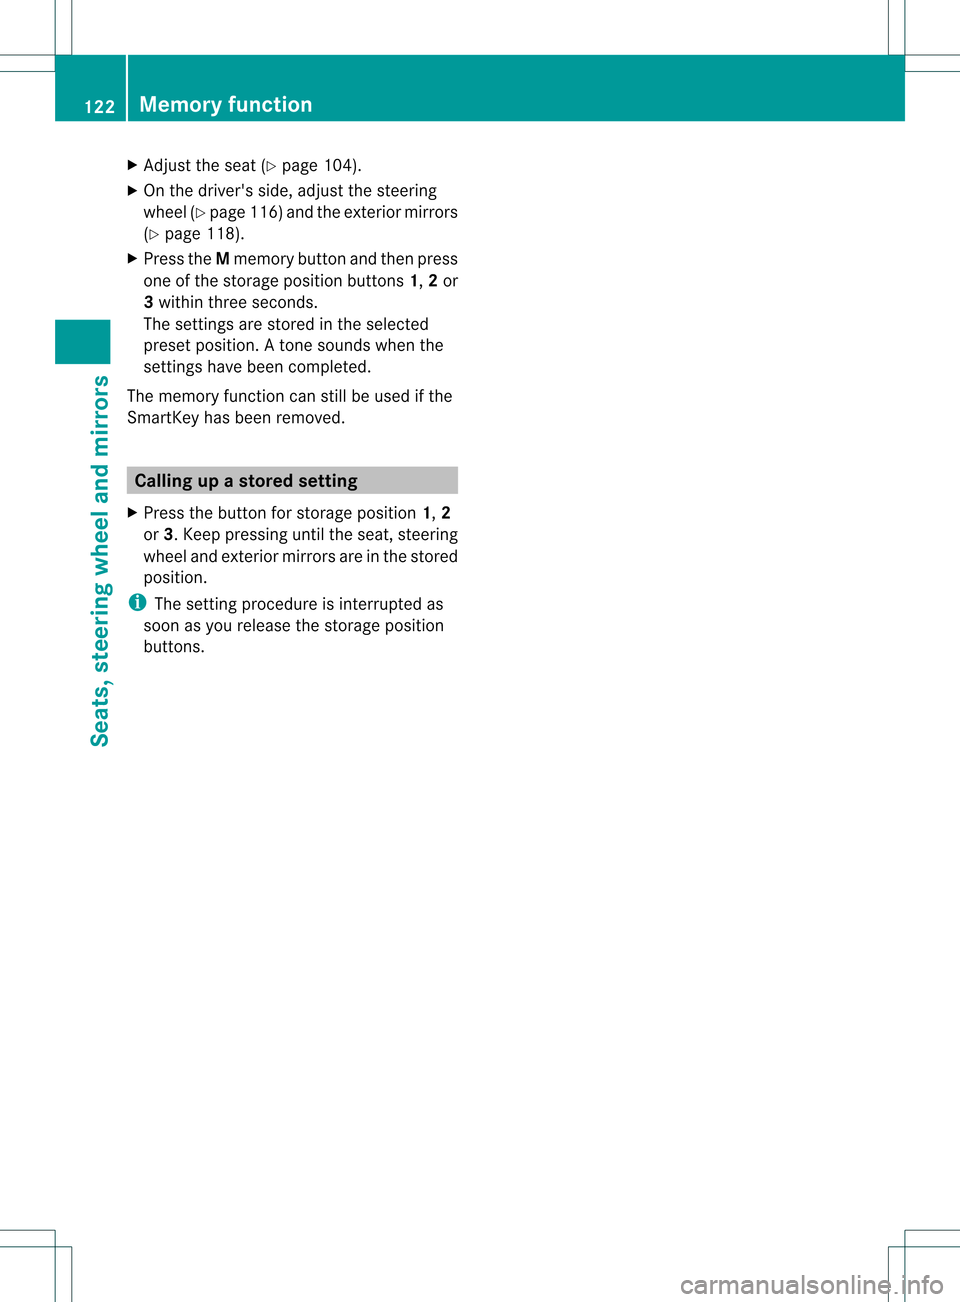
Adjust the sea t(Ypage 104).
X On the driver's side, adjust the steering
wheel (Y page 116 )and the exterio rmirrors
(Y page 118).
X Press the Mmemory button and the npress
one of the storage position buttons 1,2or
3 withi nthree seconds.
The settings are stored in the selected
preset position. Atone sounds when the
settings have been completed.
The memory function can still be used if the
SmartKey has been removed. Calling up
astore dsetting
X Press the button for storage position 1,2
or 3.K eep pressing until the seat, steering
wheel and exterior mirror sare in the stored
position.
i The setting procedure is interrupted as
soon as you release the storage position
buttons. 122
Memory functionSeats, steering wheel and mirrors
Page 125 of 454
Useful information
............................124
Exterior lighting ................................ 124
Interior lighting ................................. 131
Replacing bulbs ................................. 133
Windshield wipers ............................136 123Lights and windshield wipers
Page 126 of 454
Useful information
i This Operator's Manual describes all
models and all standard and optional
equipment of your vehicle available at the
time of publication of the Operator's
Manual. Country-specific differences are
possible. Please note that your vehicle may
not be equipped with all features
described. This also applies to safety-
related systems and functions.
i Read the information on qualified
specialist workshops: (Y page 28).Exterior lighting
General notes
For reasons of safety, Mercedes-Benz
recommends that you drive with the lights
switched on even during the daytime. In some
countries, operation of the headlamps varies
due to legal requirements and self-imposed
obligations. Driving abroad
Conversion to symmetrical low beam Switch the headlamps to symmetrical low
beam in countries in which traffic drives on
the opposite side of the road from the country
where the vehicle is registered. This prevents
glare to oncoming traffic. When using
symmetrical lights, the edge of the road is not
lit as widely and as far ahead as normal.
Have the headlamps converted at a qualified
specialist workshop as close to the border as
possible before driving in these countries.
Conversion to asymmetrical low beam
after returning Have the headlamps converted back to
asymmetrical low-beam headlamps at a
qualified specialist workshop as soon as
possible after crossing the border again. Setting the exterior lighting
Setting options Exterior lighting can be set using:
R
the light switch
R the combination switch (Y page 127)
R the on-board computer (Y page 278)
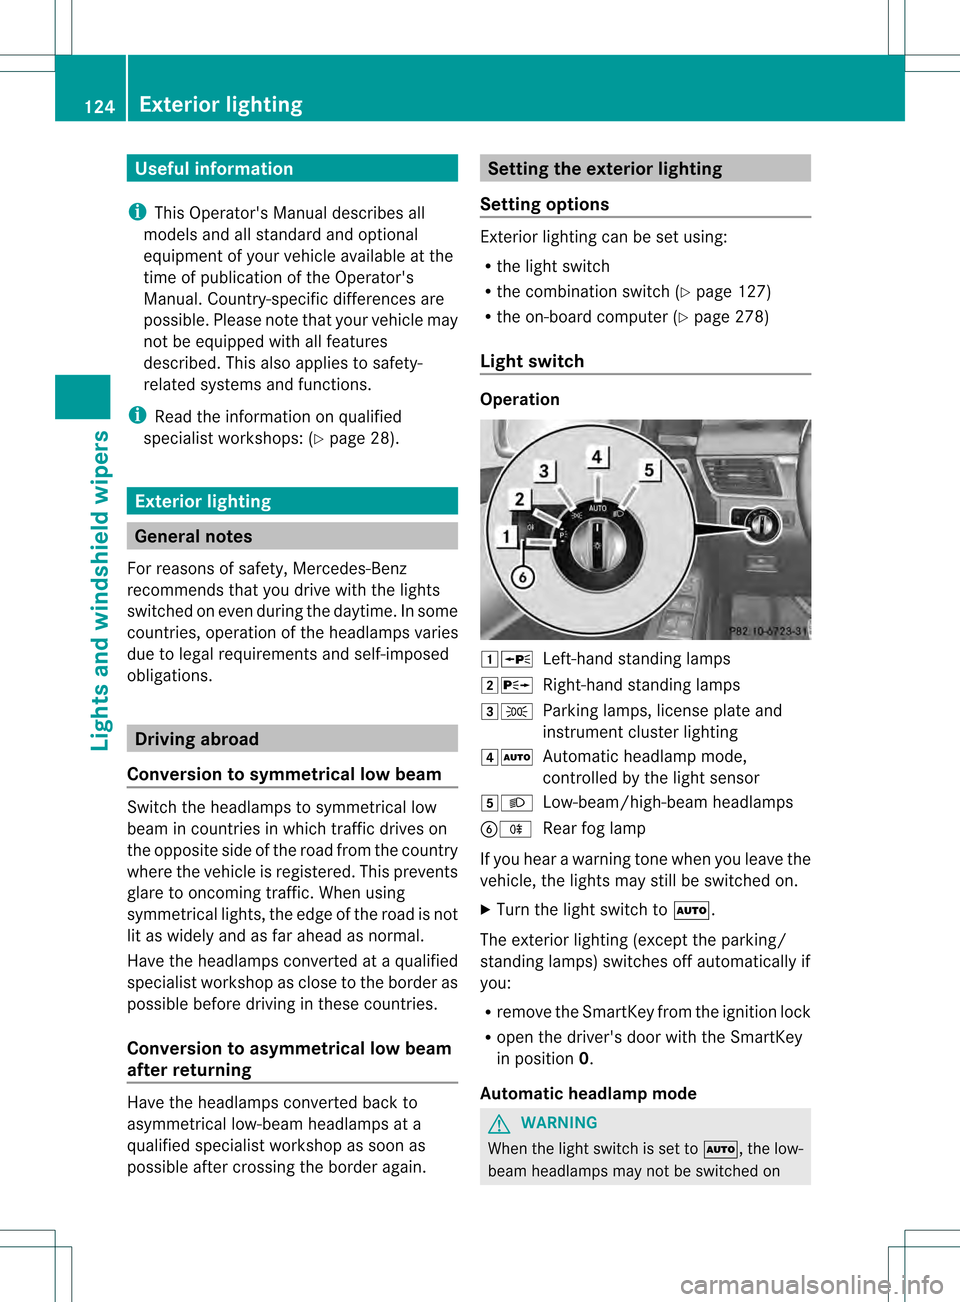
Light switch Operation
00040011
Left-hand standing lamps
00050013 Right-hand standing lamps
00060016 Parking lamps, license plate and
instrumen tcluste rlighting
000B0006 Automatic headlamp mode,
controlled by the light sensor
000C000D Low-beam/high-beam headlamps
001F0010 Rear fog lamp
If you hear a warning tone when you leave the
vehicle, the lights may still be switched on.
X Turn the light switch to 0006.
The exterior lighting (except the parking/
standing lamps) switches off automatically if
you:
R remove the SmartKey fro mthe ignition lock
R open the driver's door with the SmartKey
in position 0.
Automatic headlamp mode G
WARNING
When the light switch is set to 0006, the low-
beam headlamps may not be switched on 124
Exterior lightingLights and windshield wipers
Page 127 of 454
automatically if there is fog, snow or other
causes of poor visibility due to the weather
conditions such as spray. There is a risk of an
accident.
In such situations, tur nthe light switch to
000D.
The automatic headlamp feature is only an
aid. The driver is responsible for the vehicle's
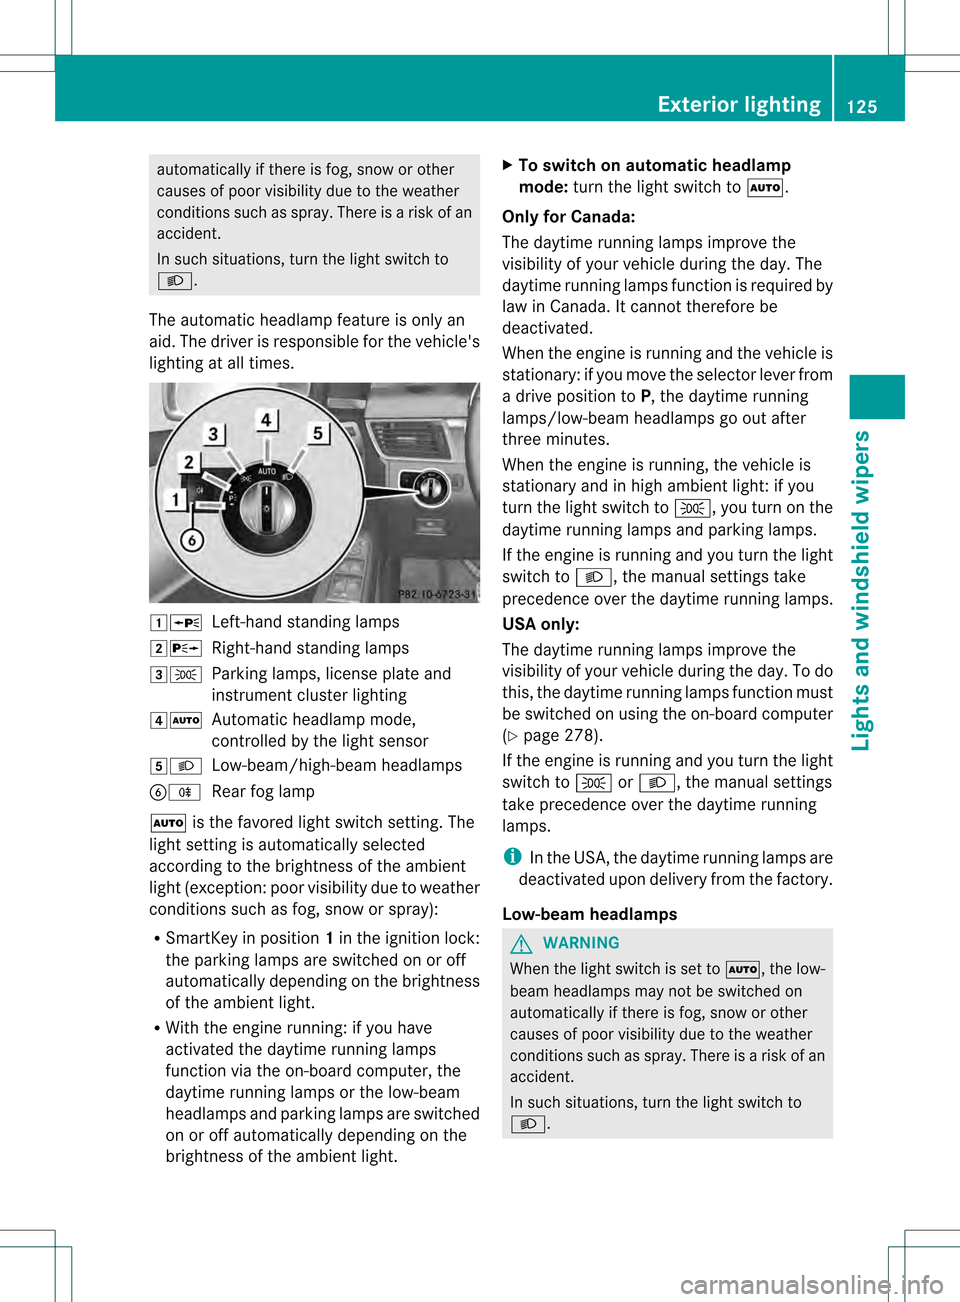
lighting at all times. 00040011
Left-hand standing lamps
00050013 Right-hand standing lamps
00060016 Parking lamps, license plate and
instrumentc luster lighting
000B0006 Automatic headlamp mode,
controlled by the light sensor
000C000D Low-beam/high-beam headlamps
001F0010 Rear fog lamp
0006 is the favored light switch setting. The
light setting is automatically selected
according to the brightnes softhe ambient
light (exception: poor visibility due to weather
conditions such as fog, snow or spray):
R SmartKey in position 1in the ignition lock:
the parking lamps are switched on or off
automatically depending on the brightness
of the ambient light.
R With the engine running: if you have
activated the daytime running lamps
function via the on-board computer, the
daytime running lamps or the low-beam
headlamps and parking lamps are switched
on or off automatically depending on the
brightness of the ambient light. X
To switch on automatic headlamp
mode: turn the light switch to 0006.
Only for Canada:
The daytime running lamps improve the
visibility of your vehicle during the day. The
daytime running lamps function is required by
law in Canada. It cannot therefore be
deactivated.
When the engine is running and the vehicle is
stationary: if you move the selector lever from
a drive position to P, the daytime running
lamps/low-beam headlamps go out after
three minutes.
When the engine is running, the vehicle is
stationary and in high ambient light: if you
turn the light switch to 0016, you turn on the
daytime running lamps and parking lamps.
If the engine is running and you turn the light
switch to 000D, the manual settings take
precedence over the daytime running lamps.
USA only:
The daytime running lamps improve the
visibility of your vehicle during the day. To do
this, the daytime running lamps function must
be switched on using the on-board computer
(Y page 278).
If the engine is running and you turn the light
switch to 0016or000D, the manual settings
take precedence over the daytime running
lamps.
i In the USA, the daytime running lamps are
deactivated upon delivery from the factory.
Low-beam headlamps G
WARNING
When the light switch is set to 0006, the low-
beam headlamps may not be switched on
automatically if there is fog, snow or other
causes of poor visibility due to the weather
conditions such as spray. There is a risk of an
accident.
In such situations, turn the light switch to
000D. Exterior lighting
125Lights and windshield wipers Z
Page 128 of 454
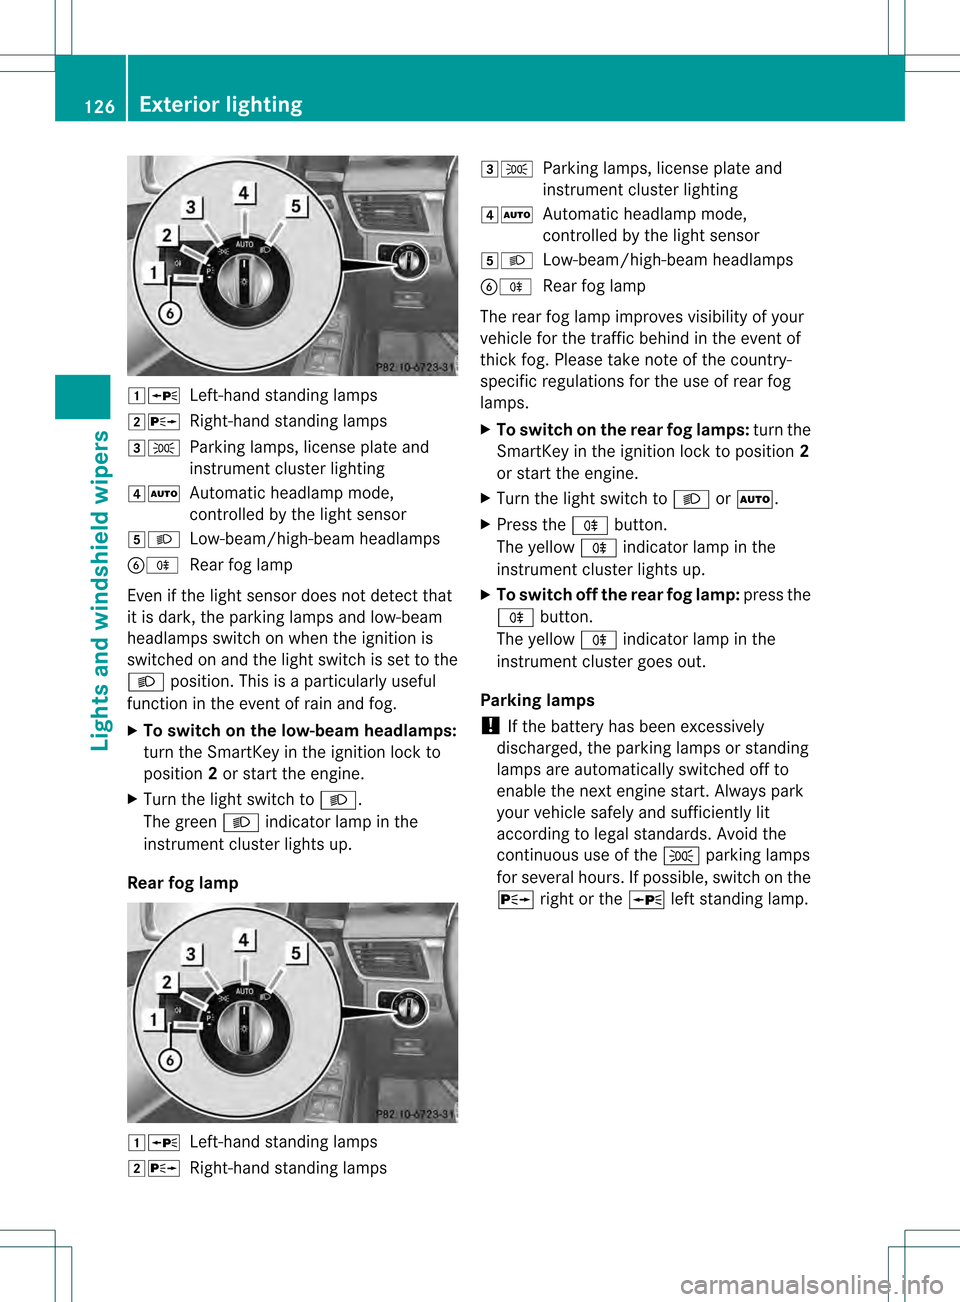
00040011
Left-hand standing lamps
00050013 Right-hand standing lamps
00060016 Parking lamps, license plate and
instrument cluster lighting
000B0006 Automatic headlamp mode,
controlled by the lights ensor
000C000D Low-beam/high-beam headlamps
001F0010 Rear fog lamp
Even if the light sensor does not detec tthat
it is dark, the parking lamps and low-beam
headlamps switch on when the ignition is
switched on and the light switch is set to the
000D position. This is a particularly useful
function in the event of rain and fog.
X To switch on the low-beam headlamps:
turn the SmartKey in the ignition lock to
position 2or start the engine.
X Turn the light switch to 000D.
The green 000Dindicator lamp in the
instrumentc luster lights up.
Rear fog lamp 00040011
Left-hand standing lamps
00050013 Right-hand standing lamps 00060016
Parking lamps, license plate and
instrumen tcluste rlighting
000B0006 Automatic headlamp mode,
controlled by the light sensor
000C000D Low-beam/high-beam headlamps
001F0010 Rear fog lamp
The rear fog lamp improves visibility of your
vehicle for the traffic behind in the event of
thick fog. Please take note of the country-
specific regulations for the use of rear fog
lamps.
X To switch on the rea rfog lamps: turn the
SmartKey in the ignition lock to position 2
or start the engine.
X Turn the light switch to 000Dor0006.
X Press the 0010button.
The yellow 0010indicator lamp in the
instrumen tcluster lights up.
X To switch off th erear fog lamp: press the
0010 button.
The yellow 0010indicator lamp in the
instrumen tcluster goes out.
Parking lamps
! If the battery has been excessively
discharged, the parking lamps or standing
lamps are automatically switched off to
enable the nex tengine start. Always park
your vehicle safely and sufficiently lit
according to legal standards .Avoid the
continuous use of the 0016parking lamps
for several hours .Ifpossible, switch on the
0013 right or the 0011left standing lamp. 126
Exterior lightingLights and windshiel
dwipers
Page 129 of 454

00040011
Left-hand standing lamps
00050013 Right-hand standing lamps
00060016 Parking lamps, license plate and
instrument cluster lighting
000B0006 Automatic headlamp mode,
controlled by the lights ensor
000C000D Low-beam/high-beam headlamps
001F0010 Rear fog lamp
X To switch on: turn light switch to 0016.
The green 0016indicator lamp in the
instrument cluster lights up.
Standing lamps 00040011
Left-hand standing lamps
00050013 Right-hand standing lamps
00060016 Parking lamps, license plate and
instrument cluster lighting
000B0006 Automatic headlamp mode,
controlled by the light sensor
000C000D Low-beam/high-beam headlamps
001F0010 Rear fog lamp Switching on the standing lamps ensures the
corresponding side of the vehicle is
illuminated.
X
To switch on the standing lamps: the
SmartKey is not in the ignition lock or it is
in position 0.
X Turn the light switch to 0011(left-hand side
of the vehicle) or 0013(right-hand side of
the vehicle). Combination switch
Turn signal 0002
High-beam headlamps
0003 Turn signal, right
0021 High-beam flasher
0020 Turn signal, left
X To indicate briefly: press the combination
switch briefly to the pressure point in the
direction of arrow 0003or0020.
The corresponding turn signal flashes three
times.
X To indicate: press the combination switch
beyond the pressure point in the direction
of arrow 0003or0020. Exterior lighting
127Lights and windshield wipers Z
Page 130 of 454

High-beam headlamps
0002
High-beam headlamps
0003 Turn signal, right
0021 High-beam flasher
0020 Turn signal, left
X To switch on the high-beam headlamps:
turn the SmartKey in the ignition lock to
position 2or start the engine.
X Turn the light switch to 000Dor0006.
X Press the combination switch beyond the
pressure point in the direction of
arrow 0002.
In the 0006position, the high-beam
headlamps are only switched on when it is
dark and the engine is running.
The blue 000Cindicator lamp in the
instrument cluster lights up when the high-
beamh eadlamps are switched on.
X To switch off the high-beam
headlamps: move the combination switch
back to its normal position.
The blue 000Cindicator lamp in the
instrument cluster goes out.
i Vehicles with Adaptive Highbeam Assist:
when Adaptive Highbeam Assist is active,
it controls activation of the high-beam
headlamps (Y page 129). High-beam flasher 0002
High-beam headlamps
0003 Turn signal, right
0021 High-beam flasher
0020 Turn signal, left
X To switch on: turn the SmartKey in the
ignition lock to position 1or 2or start the
engine.
X Pull the combination switch in the direction
of arrow 0021. Hazard warning lamps
X
To switch on the hazard warning lamps:
press button 0002.
All turn signals flash. If you now switch on
a turn signal using the combination switch,
only the turn signal lamp on the
corresponding side of the vehicle will flash.
X To switch off the hazard warning
lamps: press button 0002.128
Exterior lightingLights and windshield wipers