remove seats MERCEDES-BENZ GL SUV 2012 Owners Manual
[x] Cancel search | Manufacturer: MERCEDES-BENZ, Model Year: 2012, Model line: GL SUV, Model: MERCEDES-BENZ GL SUV 2012Pages: 441, PDF Size: 10.66 MB
Page 104 of 441

Seats
Important safety notes
G
WARNING
The seat scan still be adjusted when there is
no key in the ignition lock. For this reason,
children shoul dnever be left unsupervised in
the vehicle. They could adjust the seats and
becom etrapped. G
WARNING
Only adjus tthe driver's seat when the vehicle
is stationary .You will otherwise be distracted
from the road and traffic condition sand you
could los econtrol of the vehicle as aresult of
the seat moving. This could cause an acci-
dent. G
WARNING
If you adjust the seat height carelessly, you or
others could be trapped and thereby injured.
Children in particula rcould unintentionally
press the buttons to electrically adjust the
seats and becom etrapped.
Take care that:
R while moving th eseats, your hands do not
get under the lever assembly of the seat
adjustmen tsystem.
R children in the vehicle do not slid etheir
hands unde rthe levers. G
WARNING
Make sur ethat nobody can becom etrapped
when adjustin gthe seats.
Observ ethe note sonairbags.
Secur echildren as recommended; see the
"Childre ninthe vehicle" section. G
WARNING
Make sur ethat the bac kofyour head is sup-
ported at eye level by the cen tralarea of the
head restraint. If your head is not supported
correctly by th ehead restraint ,you coul dsuf-
fer asever eneck injury in the event of an accident
.Never driv eifthe head rest raints are
not engaged and set correctly. G
WARNING
As eat belt can only offer its intended degree
of protection when the back rest is almost ver-
tical and the occupan tiss itting upright. Avoid
seat positions that do not allow the seat belt
to be routed correctly. Adjust the backrest so
that it is as upright as possible .Never travel
with the back rest reclined too fa rbackwards.
You could otherwise be seriousl yoreven
fatally injured in th eevent of an accident or
sudden braking.
! To avoid damag etothe seats and the seat
heating, observe the followin ginformation:
R do not spill any liquids on the seats. If
liquid is spilled on the seats, dry them as
soon as possible.
R if the sea tcover sare damp or wet, do not
switc hont he seat heating. The seat
heating should also not be used to dry
the seats.
R clea nthe seat cover sasrecommended;
see "In terior care".
R do not transport heav yloads on the
seats. Do not plac eshar pobjects on the
seat cushions ,e.g. knives, nails or tools.
Th es eats should only be occupied by
passengers, if possible.
R when the seat heatin gisinoperation ,do
not cover the seats with insulating mate-
rials, e.g. blanke ts,c oats, bags, seat cov-
ers, child seats or booster seats.
! Make sure that ther eare no objects in the
footwell or behind th eseats when moving
the seat back .There is arisk that the seats
and/or the objects could be damaged.
i The head restraint scannot be removed
from the fron tseats. The rear-compart-
men thead restraints, however ,can be
removed (Y page 104).
For more information ,contac taqualified
specialist workshop. Seats
101Seats, steering wheel and mirrors Z
Page 107 of 441
Removi
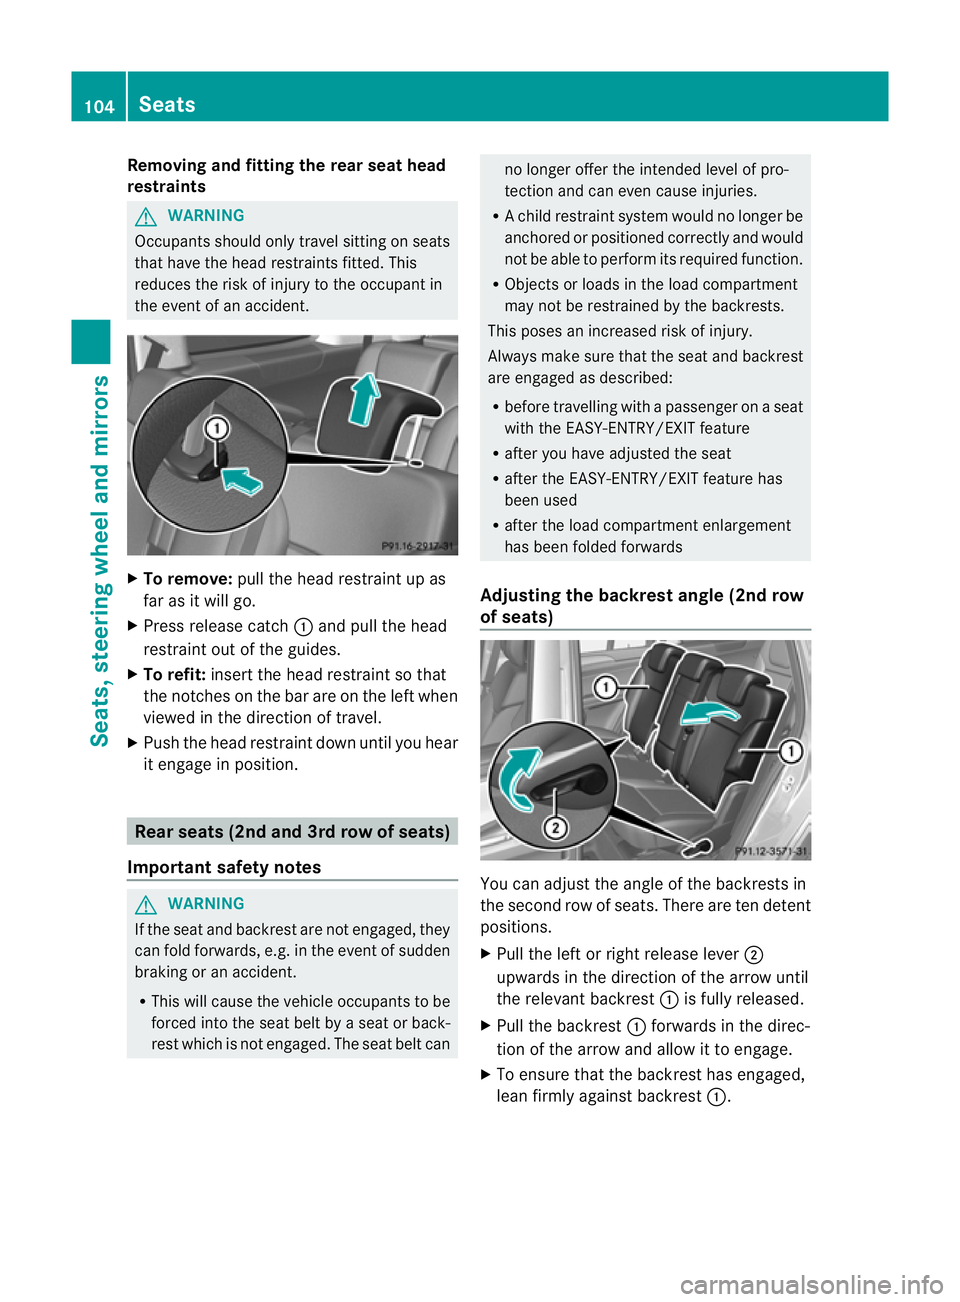
ngand fitting the rear seat head
restraints G
WARNING
Occupants sh ouldonly travel sitting on seats
tha thave the head restraint sfitted. This
reduces the risk of injury to the occupant in
the even tofanaccident. X
To remove: pullthe head restraint up as
fa ra sitw ill go.
X Press release catch :and pull the head
restraint out of the guides.
X To refit: insertthe head restraint so that
the notches on the bar ar eonthe leftwhen
viewed in the direction of travel.
X Push the head restraint down until you hear
it enga ge in po sition. Rea
rseat s(2nd and 3rd row of seats)
Important safet ynotes G
WARNING
If the seat and backrest are not engaged, they
can fold forwards, e.g. in the even tofsudden
braking or an accident.
R This will cause the vehicle occupants to be
forced int othe seat belt by aseat or back-
res twhich is not engaged. The seat belt can no longer offer the intended level of pro-
tec
tion and can even cause injuries.
R Ac hild restraint system would no longer be
anchored or positioned correc tlya nd would
not be able to perform its require dfunction.
R Objects or loads in the load compartment
may not be restrained by the backrests.
This pose sanincrease drisk of injury.
Always make sure that the seat and backrest
are engaged as described:
R before travelling with apassenger on aseat
with the EASY-ENTRY/EXI Tfeature
R after you have adjusted the seat
R after the EASY-ENTRY/EXI Tfeatur ehas
been used
R after the load compartmen tenlargement
has bee nfolded forwards
Adjusting th ebackrest angle (2nd row
of seats) Yo
uc an adjust the angle of the backrests in
the second row of seats. There are ten detent
positions.
X Pull the left or right release lever ;
upwards in the direction of the arrow until
the relevant backrest :is fully released.
X Pull the backrest :forwards in the direc-
tion of the arrow and allow it to engage.
X To ensure that the backrest has engaged,
lean firmly against backrest :.104
SeatsSeats
,steering whee land mirrors
Page 109 of 441
If yo
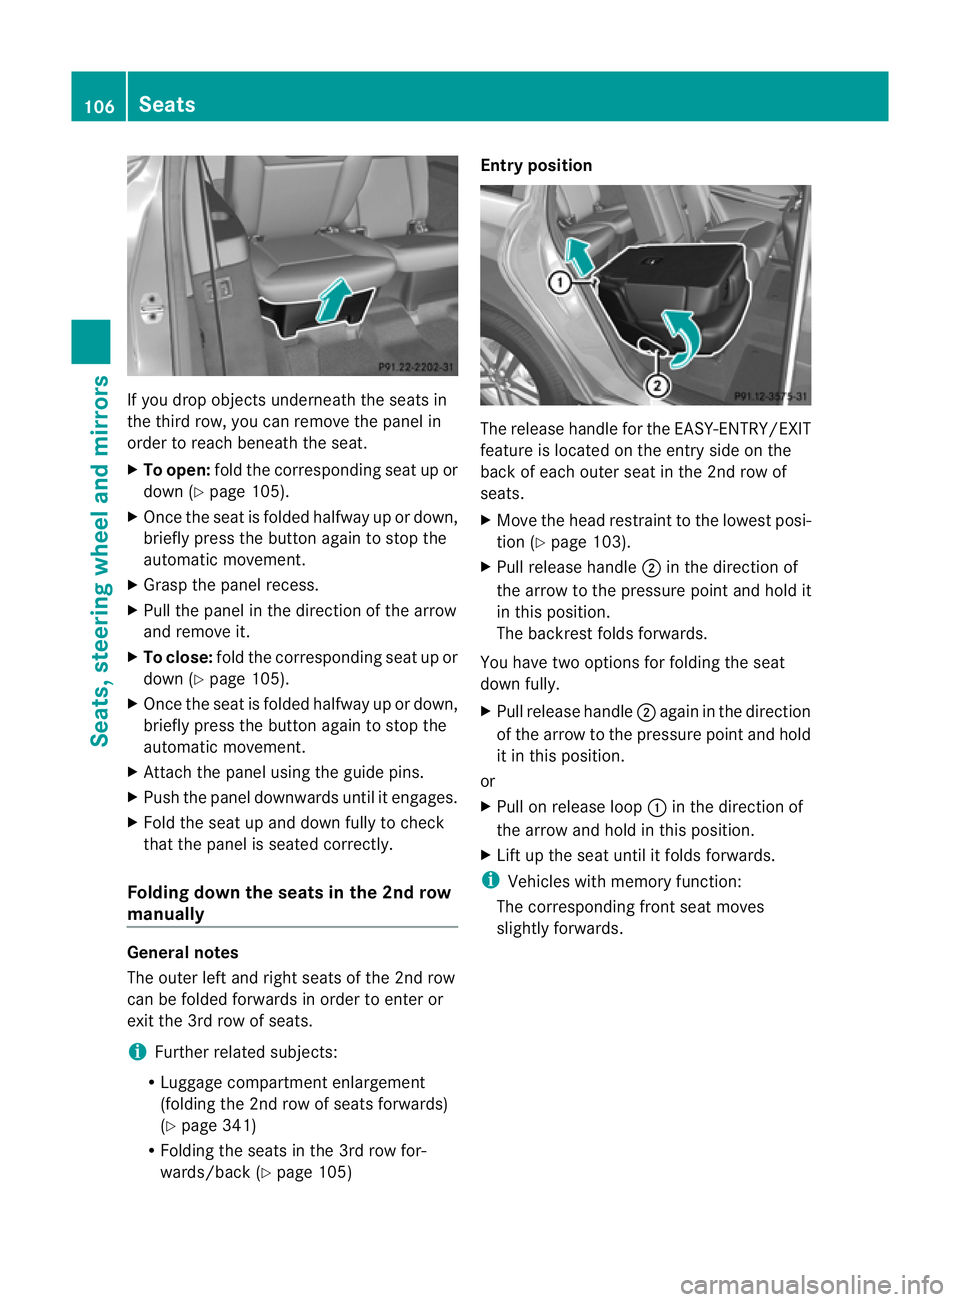
udrop objects underne atht he seats in
the thir drow, you can remove the panel in
order to reach beneat hthe seat.
X To open: foldt he correspondin gseat up or
down (Y page 105).
X Once the seat is folded halfway up or down,
briefly press the button again to stop the
autom atic movement.
X Grasp the panel recess.
X Pul lthe pane lint he direction of the arrow
and remove it.
X To close: foldthe correspondin gseat up or
down (Y page 105).
X Once the seat is folded halfway up or down,
briefly press the button again to stop the
autom atic movement.
X Attach the panel using the guide pins.
X Push the panel downwards until it engages.
X Fold the seat up and down fully to check
that the panel is seated correctly.
Folding down the seats in the 2nd row
manually General notes
The outer left and right seats of the 2nd row
can be folded forwar
dsin order to enter or
exit the 3r drow of seats.
i Further related subjects:
R Luggage compartment enlargement
(folding the 2n drow of seats forwar ds)
( Y page 341)
R Folding the seats in the 3r drow for-
war ds/ back (Y page 105) Entry positi
on Th
er eleas ehandle for the EASY-ENTRY/EXIT
feature is located on the entry side on the
back of each outer seat in the 2nd row of
seats.
X Move the head restraint to the lowest posi-
tion (Y page 103).
X Pul lreleas ehandle ;in the direction of
the arrow to the pressure point and hold it
in this position.
The backrest folds forwards.
You have two options for folding the seat
down fully.
X Pul lreleas ehandle ;again in the direction
of the arrow to the pressure point and hold
it in this position.
or
X Pul lonr eleas eloop :in the direction of
the arrow and hold in this position.
X Lif tu pt he seat until it folds forwar ds.
i Vehicl eswith memory function:
The corresponding front seat moves
slightly forwar ds.106
SeatsSeats, steerin
gwheel and mirrors
Page 114 of 441
i
Further related subjects:
R EASY-ENT RY/EXIT feature
(Y page 111)
R storing setting s(Ypag e115) Ste
ering wheel heating
Switchin gon/off X
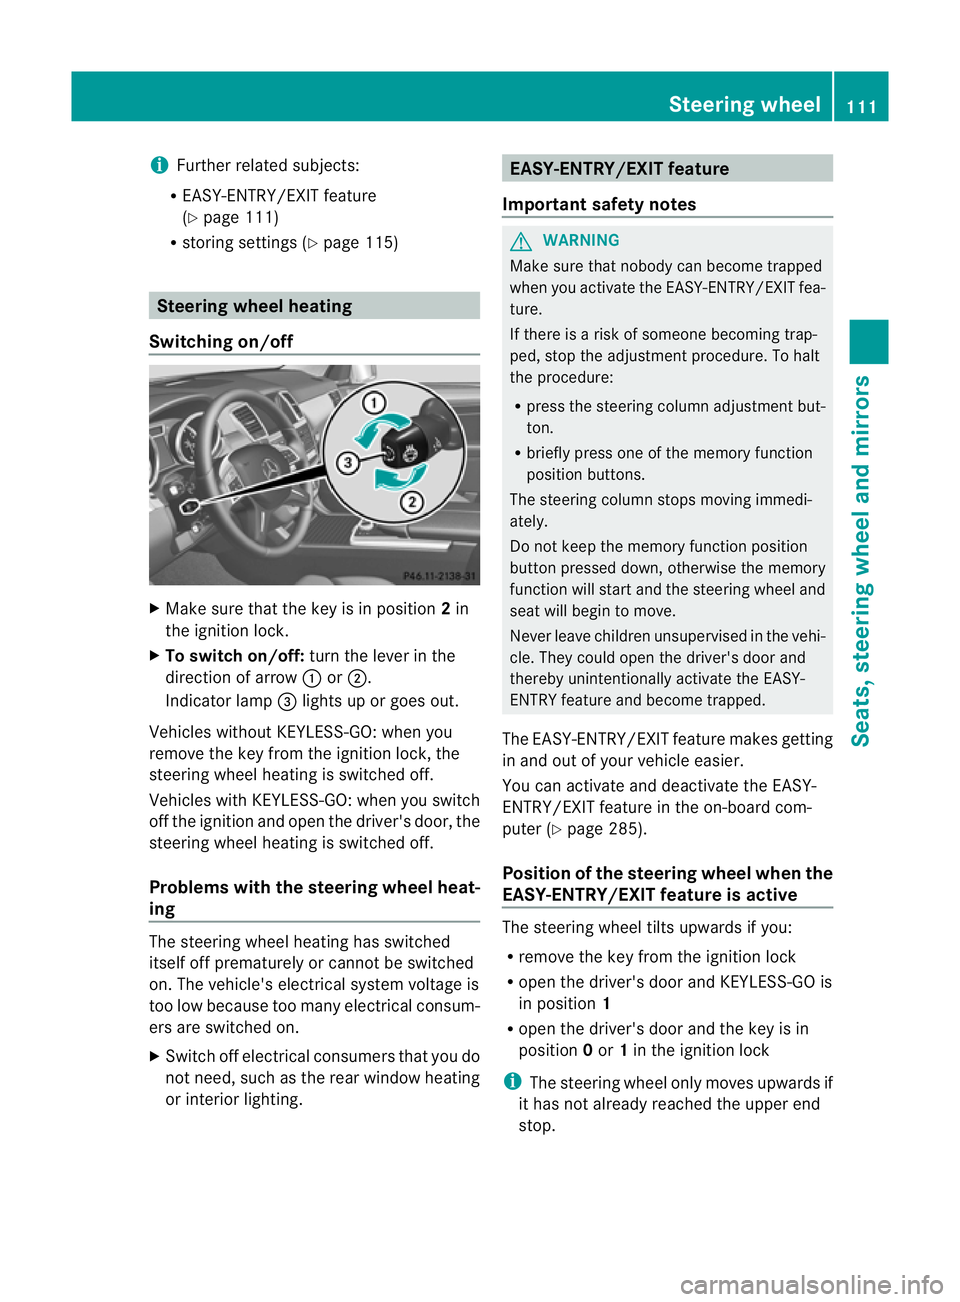
Make sure that the key is in position 2in
the ignition lock.
X To switch on/off: turn the lever in the
direction of arrow :or;.
Indicator lamp =lights up or goe sout.
Vehicles without KEYLESS-GO: when you
remove the key from the ignition lock, the
steering wheel heating is switched off.
Vehicles with KEYLESS-GO: when you switch
off the ignition and open the driver' sdoor, the
steerin gwheel heating is switched off.
Problems wit hthe steering whee lheat-
ing The steerin
gwheel heating has switched
itsel foff prematurely or cannot be switched
on. Th evehicle' selectrical system voltage is
too low because too many electrical consum-
ers are switched on.
X Switc hoff elect rical consumers that you do
not need, such as the rear window heating
or inte rior lighting. EASY-ENTRY/EXIT feature
Important safety notes G
WARNING
Make sur ethat nobody can becom etrapped
when you activate th eEASY-ENTRY/EXI Tfea-
ture.
If there is arisk of someon ebecomin gtrap-
ped, stop th eadjustment procedure. To halt
the procedure:
R press the steerin gcolum nadjustment but-
ton.
R briefly press one of the memory fun ction
position buttons.
The steerin gcolum nstops moving immedi-
ately.
Do not keep the memory function position
button pressed down, otherwise the memory
function will start and the steerin gwheel and
seat will begin to move.
Never leav echildren unsupervised in the vehi-
cle. They coul dopen the driver' sdoor and
thereby unin tentionally activate the EASY-
ENTRY feature and become trapped.
The EASY-ENTRY/EX ITfeature make sgetting
in and out of your vehicle easier.
You can activa teand deactivat ethe EASY-
ENTRY/ EXIT feature in th eon-board com-
puter (Y page285).
Positio nofthe steering whee lwhen the
EASY-ENTRY/EXIT feature is active Th
es teering whee ltilts upwards if you:
R remov ethe key from the ignition lock
R open the driver's door and KEYL ESS-GO is
in position 1
R ope nthe driver's door and the key is in
position 0or 1in the ignition lock
i The steerin gwheel only moves upwards if
it has not already reached the upper end
stop. Steering wheel
111Seats, steering whee land mirrors Z
Page 118 of 441
X
Make sur ethat the key is in position 2in
the ignition lock.
X With the exterior mirror on the front-
passenger side activated, use adjustment
button =to adjust the exterior mirror. In
the exterior mirror, the rea rwheel and the
ker bshould be visible.
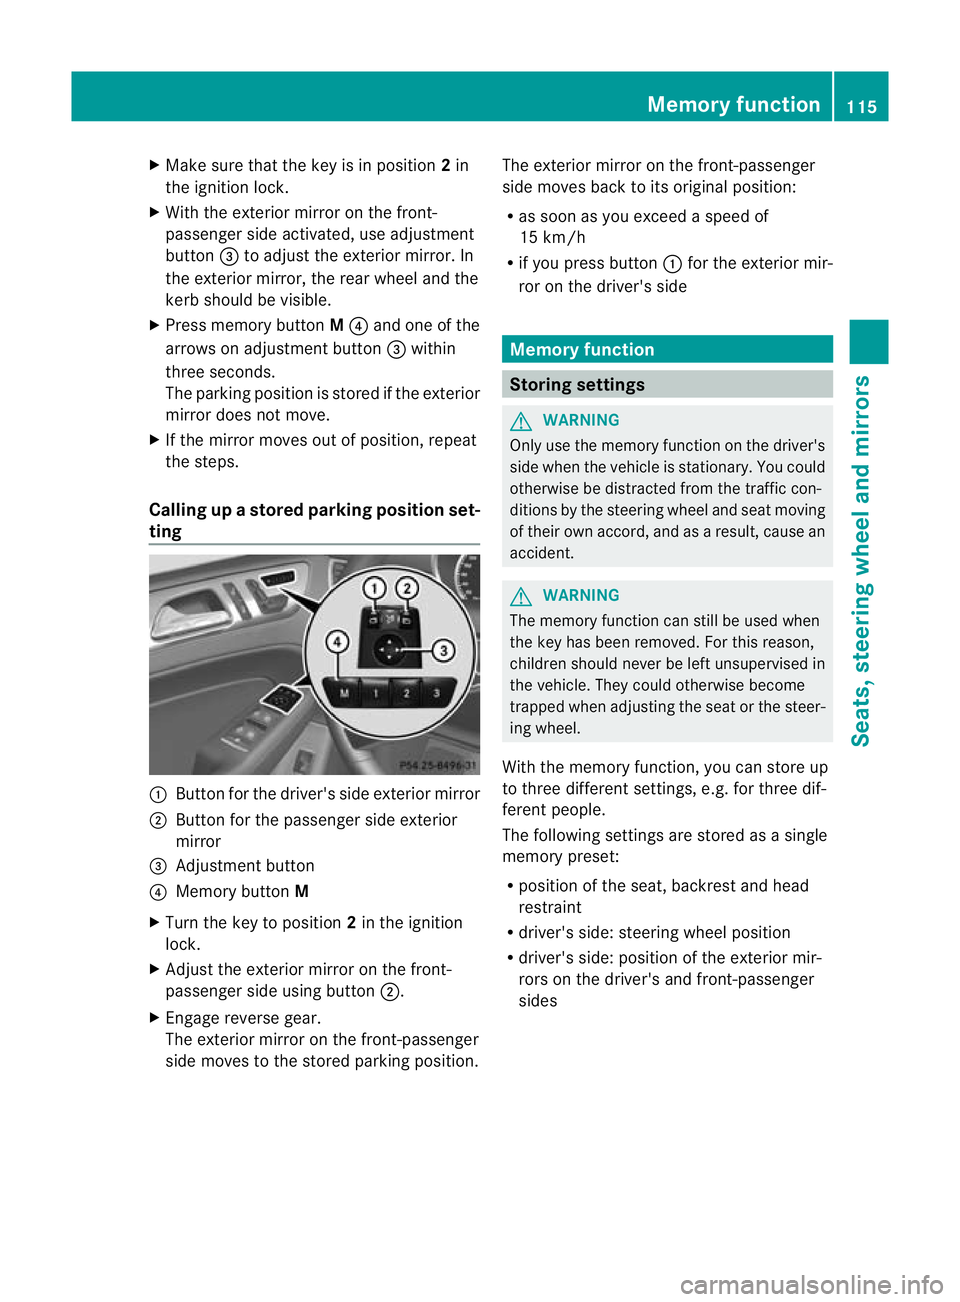
X Press memory button M? and one of the
arrow sona djustment button =within
three seconds.
The parking position is stored if the exterior
mirror does not move.
X If the mirror moves out of position, repeat
the steps.
Calling up astore dparkin gposition set-
ting :
Button for the driver's sid eexterio rmirror
; Button for the passenger side exterior
mirror
= Adjustment button
? Memo rybutton M
X Turn the key to position 2in the ignition
lock.
X Adjust the exterior mir roront he front-
pa ssenger side usin gbutton ;.
X Engage reverse gear.
The exterior mirror on the front-passenger
side moves to the stored parking posi tion. The exterior mir
roront he front-passenger
side moves bac ktoits original position:
R as soo nasyou exceed aspeed of
15 km/h
R if you press button :for the exterior mir-
ror on the driv er'sside Me
mo ry function Storing settings
G
WARNING
Only use the memory function on the driver's
side when the vehicle is stationary. You could
otherwise be distracted fro mthe traffic con-
diti ons by th esteerin gwheel and seat moving
of their own accord, and as aresult ,cause an
accident. G
WARNING
The memory function can still be used when
the key has been removed. For this reason,
children shoul dnever be left unsupervised in
the vehicle. They could otherwise become
trapped when adjusting the seat or the steer-
ing wheel.
With the mem ory function,you can store up
to three differen tsettings, e.g. for three dif-
ferent people.
The followi ngsettings ar estore dasa single
mem orypreset:
R position of the seat ,backrest and head
restraint
R driver's side: steerin gwheel position
R driver' sside: position of the exterior mir-
ror so nthe driver' sand front-passenger
sides Memory function
115Seats, steering wheel and mirrors Z
Page 130 of 441
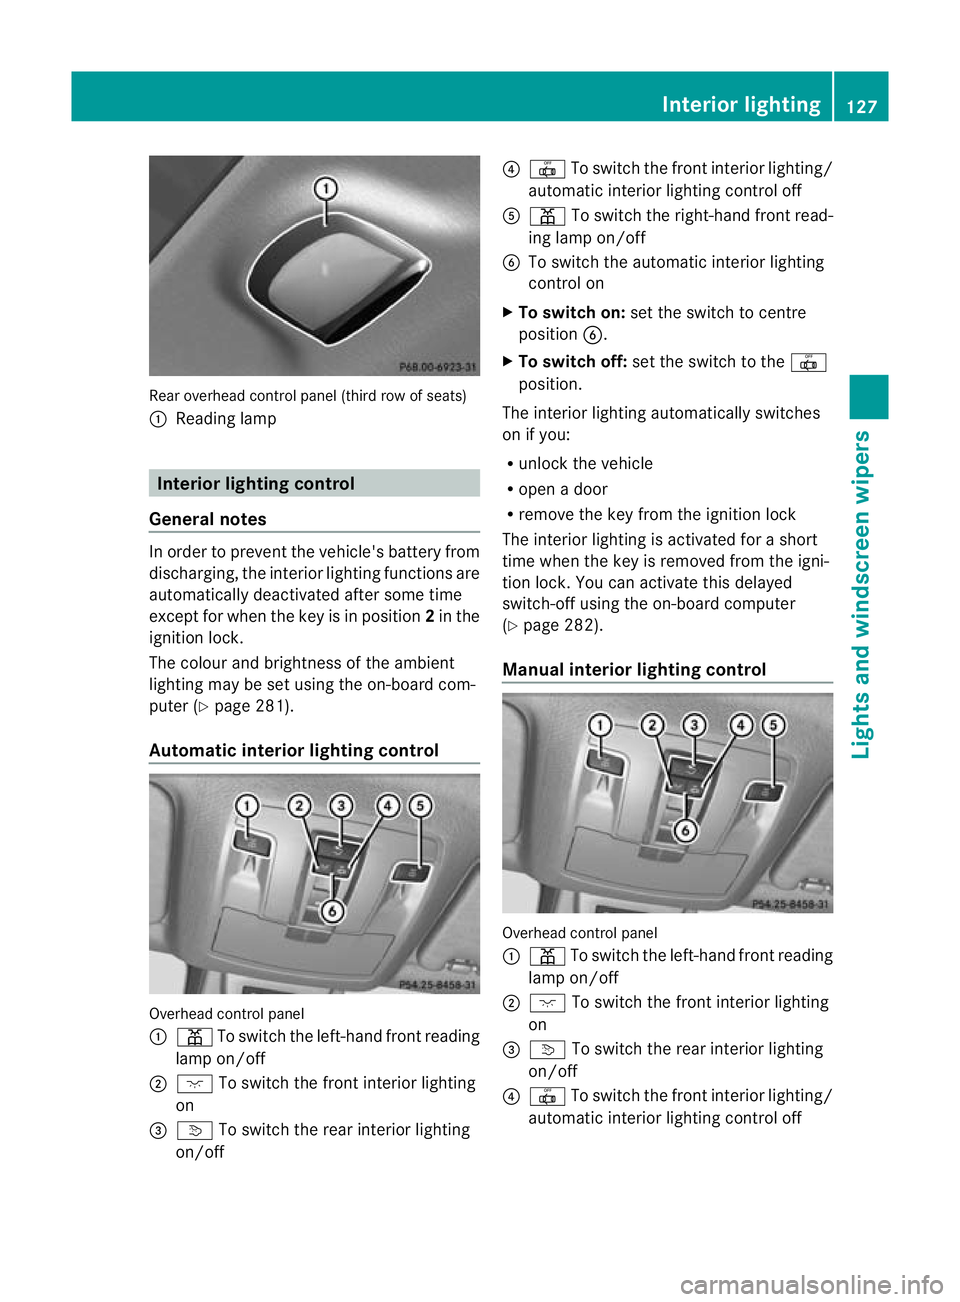
Rear overhead control panel (thir
drow of seats)
: Readin glamp Interior lightin
gcontrol
General notes In order to preven
tthe vehicle' sbattery from
discharging, the interior lighting functions are
automatically deactivated after some time
except for when the key is in position 2in the
ignition lock.
The colour and brightness of the ambient
lighting may be set using the on-board com-
puter (Y page 281).
Automatic interior lighting control Overhead control panel
:
p To switch the left-hand front reading
lamp on/off
; c To switch the front interior lighting
on
= v To switch the rear interior lighting
on/off ?
| To switch the front interior lighting/
automatic interior lighting control off
A p To switch the right-hand front read-
ing lamp on/off
B To switch the automatic interior lighting
control on
X To switch on: set the switch to centre
position B.
X To switch off: set the switch to the |
position.
The interior lighting automatically switches
on if you:
R unlock the vehicle
R open adoor
R remove the key from the ignition lock
The interior lightin gisactivate dfor as hort
tim ew hen the key is removed from the igni-
tion lock .You can activate this delayed
switch-of fusing the on-boar dcomputer
(Y page 282).
Manua linterior lighting control Overhead con
trolpanel
: p To switch the left-hand front reading
lamp on/off
; c To switch the front interior lighting
on
= v To switch the rear interior lighting
on/off
? | To switch the front interior lighting/
automatic interior lighting control off Interior lighting
127Lights and windscreen wipers Z
Page 350 of 441
You can remove the rubber mat of the cup
holder to clean it. Clean it with clean
,luke-
warm water only.
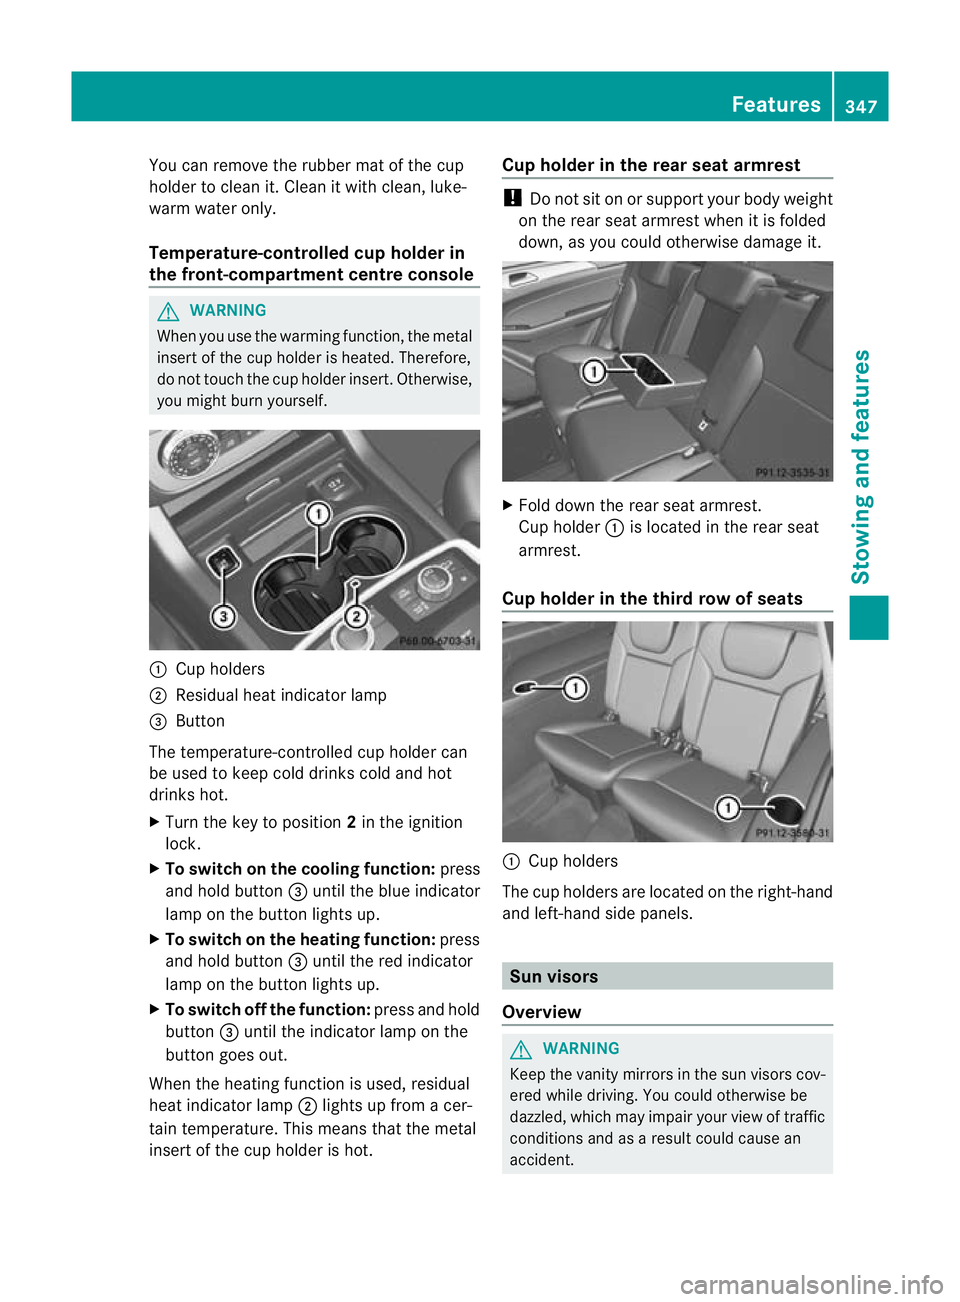
Temperature-controlled cup holder in
th ef ront-compartment centr econsole G
WARNING
When you use the warmin gfunction ,the metal
insert of thecup holder is heated. Therefore,
do not touch the cup holder inser t.Otherwise,
you migh tburny oursel f. :
Cuph olders
; Residual heat indicator lamp
= Button
Th et emperature-c ontrolle dcup holde rcan
be used to keep cold drinks cold and hot
drinks hot.
X Turn the key to position 2in the ignition
lock.
X To switch on th ecooling function: press
and hold button =until th eblue indicator
lamp on th ebutton lights up.
X To switch on th eheating function: press
and hold button =until the red indicator
lamp on the button lights up.
X To switch off th efunc tion: press and hold
button =until the indicator lamp on the
button goes out.
When the heatin gfunction is used, residual
heat indicator lamp ;lights up fro macer-
tain temperature. This mean sthat the metal
insert of the cup holder is hot. Cu
ph older in th erears eat armrest !
Do not sit on or support your body weight
on the rear seat arm rest when it is folded
down ,asy ou coul dotherwise damage it. X
Fold down the rear seat armrest.
Cup holder :is located in the rear seat
armrest.
Cup holder in th ethird row of seats :
Cup holders
The cup holders are located on the right-hand
and left-han dside panels. Sun visors
Overview G
WAR
NING
Keep the vanity mirrors in the sun visors cov-
ered whil edriving.Y ou coul dotherwise be
dazzled, which may impair your view of traffic
conditions and as aresult could cause an
accident. Features
347Stowing and features Z
Page 352 of 441
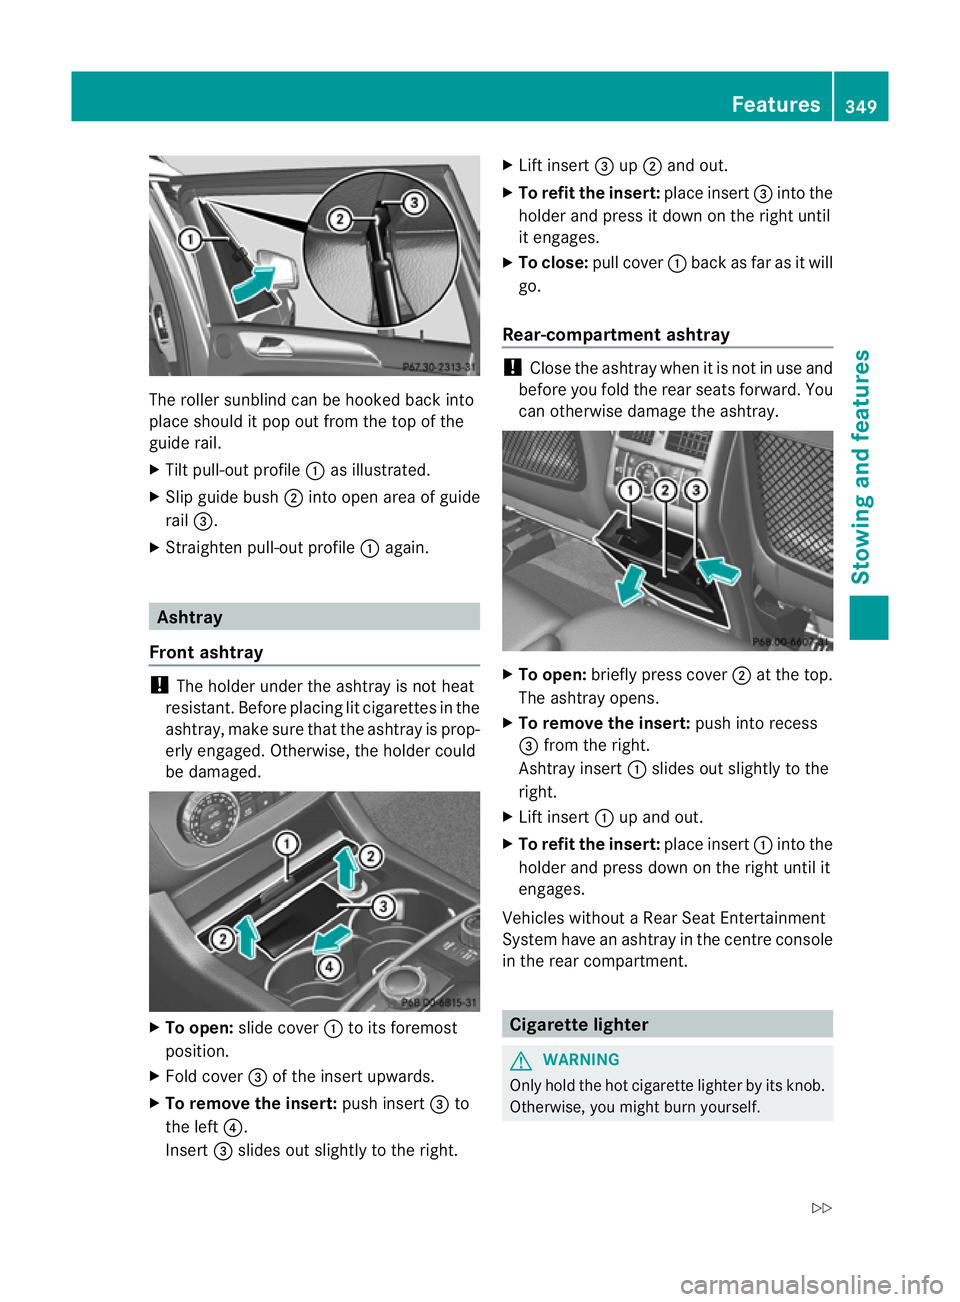
The roller sunblind can be hooked back into
plac eshould it pop out from the top of the
guide rail.
X Tilt pull-out profile :as illustrated.
X Sli pg uide bush ;into open area of guide
rail =.
X Straighten pull-out profile :again. Ashtray
Front ashtray !
The holder under the ashtray is not heat
resistant. Before placing lit cigarettes in the
ashtray, make sure that the ashtray is prop-
erly engaged. Othe rwise, the holder could
be damaged. X
To open: slide cover :to its foremost
position.
X Fold cover =of the insert upwards.
X To remove the insert: push insert=to
the left ?.
Insert =slides out slightly to the right. X
Lif tinsert =up; and out.
X To refit the insert: place insert=into the
holder and pres sitdown on the right until
it engages.
X To close: pull cover :back as far as it will
go.
Rea r-compartment ashtray !
Close the ashtray when it is not in use and
before you fold the rear seats forward. You
can otherwise damage the ashtray. X
To open: briefly press cover ;at the top.
The ashtray opens.
X To remove the insert: push intorecess
= from the right.
Ashtray insert :slides out slightly to the
right.
X Lif tinsert :up and out.
X To refit the insert: place insert:into the
holder and pres sdown on the right until it
engages.
Vehicles withou taRear Seat Entertainment
System have an ashtray in the centre console
in the rear compartment. Cigarett
elighter G
WAR
NING
Only hol dthe hot cigarette lighte rbyits knob.
Othe rwise, you might burn yourself. Features
349Stowing and features
Z
Page 361 of 441
Australia
Country Radio type approval num-
ber
Frequency range (MHz)
AU (Aus-
tralia) 28 June
MHz
:27,30 ,40, 433, 868 NZ
(New
Zealand) 20 March 06
MHz: 27
,30, 40, 433 Floormats
G
WARNING
Mak esure that there is sufficient clearance
around the pedal swhen floormats are used,
and that the floormats are prope rlys ecured.
The floormat smust be correctly secured at all
times using the securing knob and retainers.
Before you drive off ,chec kthe floormats and
secur ethem if necessary. Afloormat which is
not properly secured can slip and thereby
interfere with the movemen tofthe pedals.
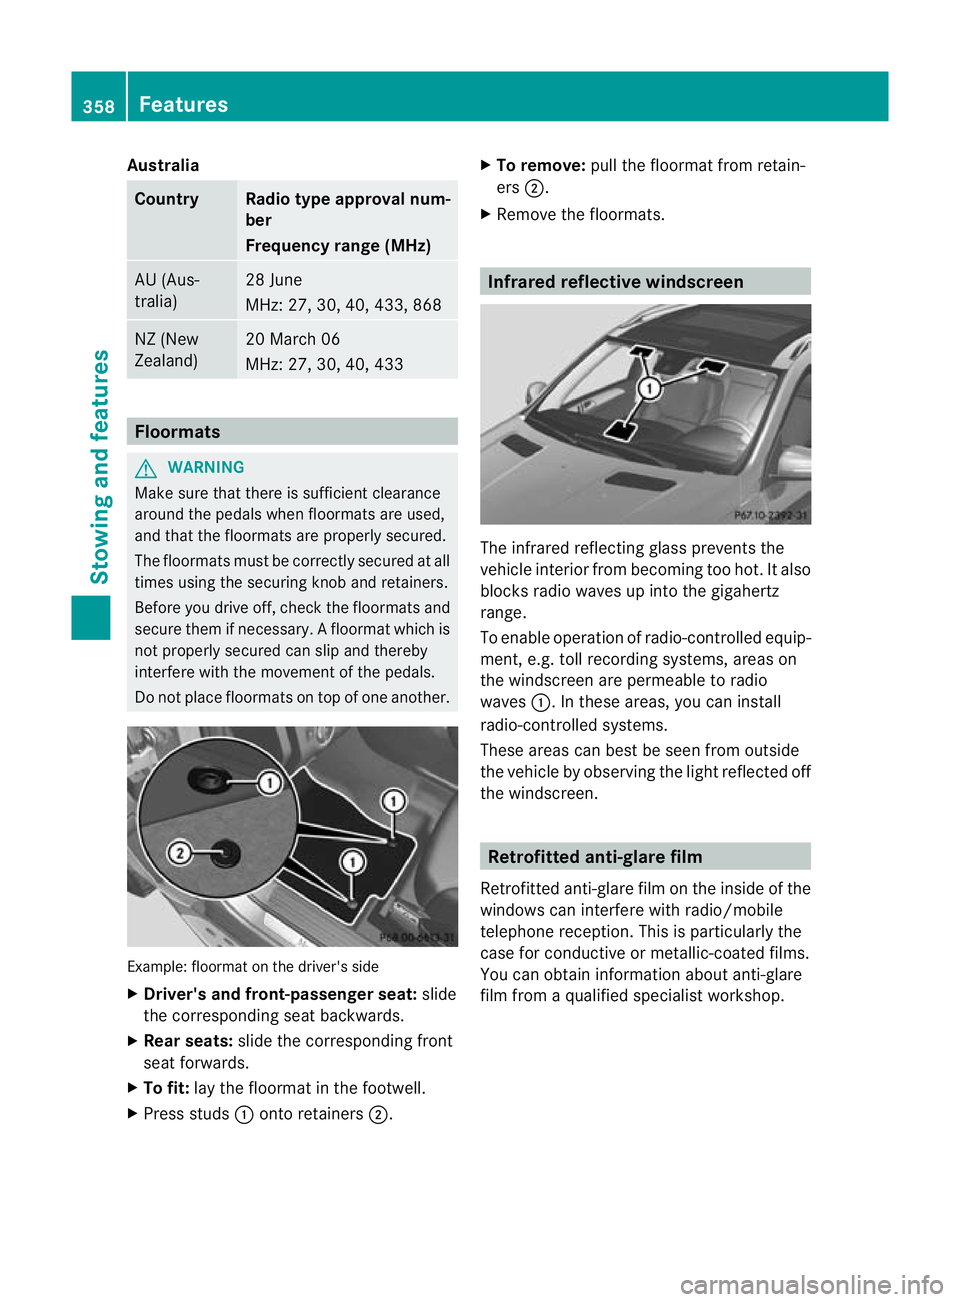
Do not plac efloormats on top of one another. Example: floormat on the driver's side
X
Driver's and front- passenger seat: slide
the corresponding seat backwards.
X Rea rseats: slide the corresponding front
seat forwards.
X To fit: lay the floormat in the footwell.
X Press studs :onto retainers ;. X
To remove: pull the floormat from retain-
ers ;.
X Remove the floormats. Infrared reflective windscreen
The infrared reflectin
gglass prevent sthe
vehicle interior from becoming too hot. It also
blocks radio waves up int othe gigahertz
range.
To enable operation of radio-controlled equip-
ment, e.g. toll recording systems, areas on
the windscreen ar epermeable to radio
waves :.Int hese areas, you can install
radio-controlled systems.
These areas can best be seen from outside
the vehicle by observin gthe light reflected off
the windscreen. Ret
rofi tted anti-glar efilm
Retrofitted anti-glare film on the inside of the
windows can inter ferewith radio/mobile
telephone reception. This is particularly the
case for conductive or metallic-coated films.
You can obtain information about anti-glare
film from aqualified specialist workshop. 358
FeaturesStowin
gand features
Page 385 of 441
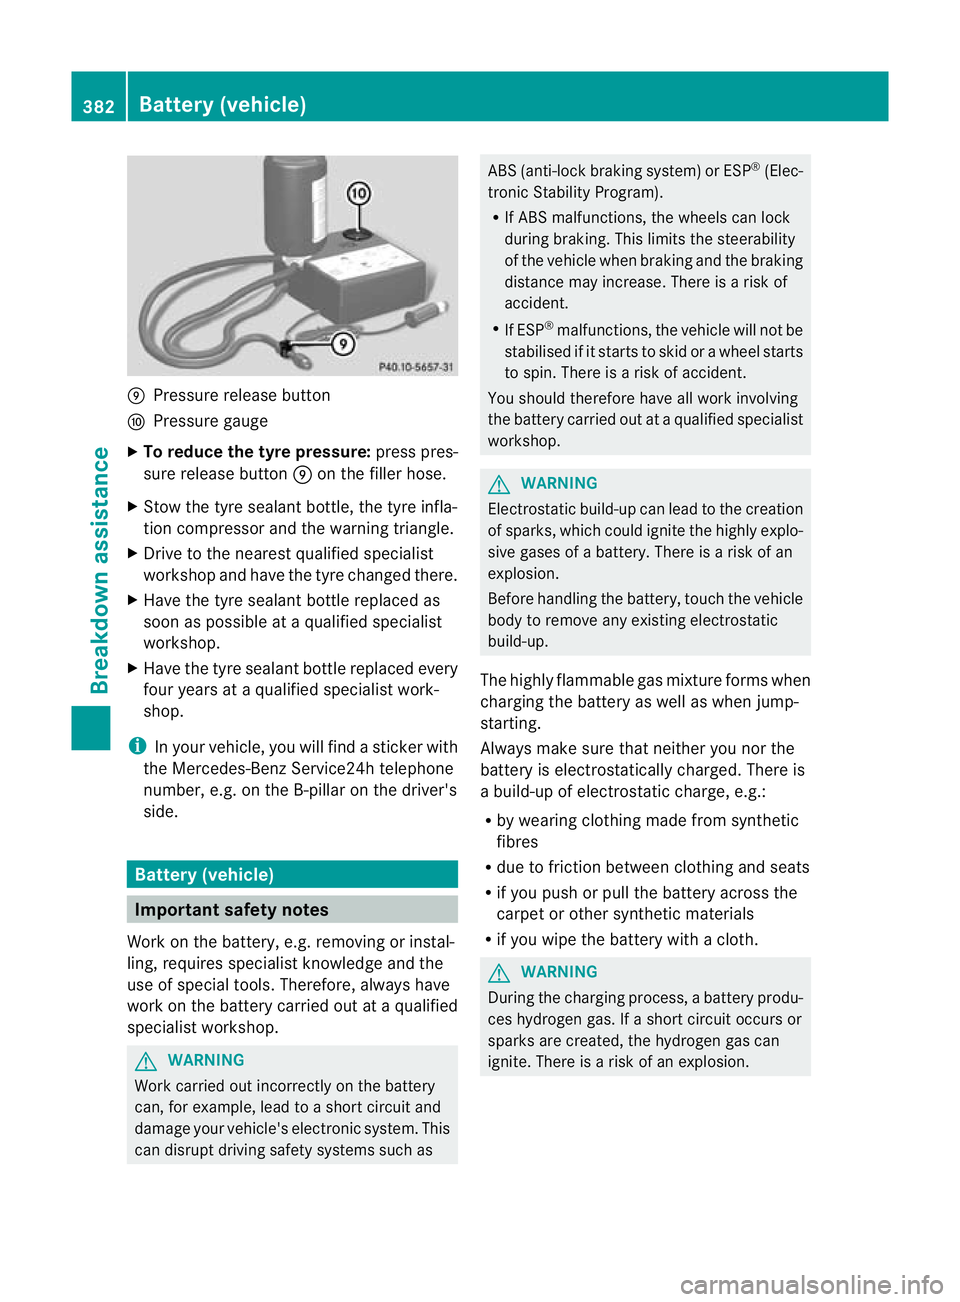
E
Pressur erelease button
F Pressur egauge
X To reduce the tyr epressure: press pres-
sure releas ebutton Eon the filler hose.
X Stow the tyre sealant bottle, the tyre infla-
tion compressor and the warning triangle.
X Drive to the nearest qualified specialist
worksho pand have the tyre changed there.
X Have the tyre sealant bottle replace das
soon as possible at aqualified specialist
workshop.
X Have the tyre sealant bottle replaced every
four years at aqualified specialist work-
shop.
i In your vehicle, you will find asticker with
the Mercedes-Benz Service24h telephone
number, e.g. on the B-pillar on the driver's
side. Battery (vehicle)
Important safety notes
Work on the battery, e.g. removin gorinstal-
ling ,requires specialist knowledge and the
use of special tools. Therefore, always have
work on the batter ycarried out at aqualified
specialist workshop. G
WARNING
Work carried out incorrectly on the battery
can, for example, lead to ashort circui tand
damage your vehicle's electronic system. This
can disrupt driving safety systems such as ABS (anti-lock braking system) or ESP
®
(Elec-
tronic Stability Program).
R If ABS malfunctions ,the wheels can lock
during braking. This limits the steerability
of the vehicle when brakin gand the braking
distance may increase. There is arisk of
accident.
R If ESP ®
malfunctions, the vehicle will not be
stabilised if it start stoskid or awheel star ts
to spin. There is arisk of accident.
You should therefore have all work involving
the batter ycarried out at aqualified specialist
workshop. G
WARNING
Electrostatic build-up can lead to the creation
of sparks, which could ignite the highly explo-
sive gases of abattery. There is arisk of an
explosion.
Befor ehandling the battery, touch the vehicle
body to remove any existing electrostatic
build-up.
The highly flammable gas mixture forms when
charging the battery as well as when jump-
starting.
Always make sure that neither you nor the
batter yiselectrostatically charged. There is
ab uild-up of electrostatic charge, e.g.:
R by wearing clothing made from synthetic
fibres
R due to friction betwee nclothin gand seats
R if you pus horpull the batter yacross the
carpe torother synthe ticm aterials
R if you wipe the batter ywithacloth. G
WARNING
Durin gthe charging process, abatter yprodu-
ces hydroge ngas. If ashort circui toccurs or
sparks are created, the hydroge ngas can
ignite. There is arisk of an explosion. 382
Battery (vehicl
e)Breakdown assistance