change time MERCEDES-BENZ GLC 2017 Owners Manual
[x] Cancel search | Manufacturer: MERCEDES-BENZ, Model Year: 2017, Model line: GLC, Model: MERCEDES-BENZ GLC 2017Pages: 374, PDF Size: 8.42 MB
Page 3 of 374
Welcome to the world of Mercedes-Benz We urge you to read this Operator's Manual
carefully and familiarize yourself with the vehi-
cle before driving. For your own safety and a
longer vehicle life, follow the instructions and
warning notices in this Operator's Manual.
Ignoring them could result in damage to the
vehicle or personal injury to you or others.
Vehicle damage caused by failure to follow
instructions is not covered by the Mercedes-
Benz Limited Warranty.
The equipment or product designation of your
vehicle may vary depending on: R
Model R
Order R
Country specification R
Availability
Mercedes-Benz therefore reserves the right to
introduce changes in the following areas: R
Design R
Equipment R
Technical features
The equipment in your vehicle may therefore
differ from that shown in the descriptions and
illustrations.
The following are integral components of the
vehicle: R
Digital Operator's Manual R
Printed Operator's Manual R
Maintenance Booklet R
Equipment-dependent supplements
Keep these documents in the vehicle at all
times. If you sell the vehicle, always pass all
documents on to the new owner.
Your Operator's Manual:
Digital form inside the vehicle
The Digital Operator's Manual provides
comprehensive and specifically adapted
information on your vehicle's equipment
and multimedia system. It contains infor-
mative animations, individual language
settings and an intuitive search function.
Booklet inside the vehicle
In addition to this manual and the afore-
mentioned digital media, you also have the
option to obtain a comprehensive printed
version of the Supplement for your multi-
media system from your authorized
Mercedes-Benz Center. Digital form via the Internet
The Operator's Manual on the Internet pro-
vides easy access to all information
regarding your vehicle and multimedia sys-
tem. It also provides helpful animations,
interesting background information and a
wide array of search options.
Digital form as an App
Using the Mercedes-Benz Guides App, you
can view all the information on your vehicle
and multimedia system via mobile Internet
or download it independently of network
access. Available for smartphones or tab-
lets.
Please note that the Mercedes-Benz Guides App
may not yet be available in your country.
Mercedes-Benz USA, LLC
Mercedes-Benz Canada, Inc.
A Daimler Company
2535842902
É2535842902^ËÍ
Page 9 of 374
General notes ................................ 311
Interior .......................................... .3 16
Matte finish ................................... 314
Paint .............................................. 313
Plastic trim ................................... .3 17
Power washer ................................ 313
Rear view camera .......................... 316
Roof lining ...................................... 318
Seat belt ........................................ 318
Seat cover ..................................... 317
Selector lever ................................ 317
Sensors ......................................... 315
Side running board ........................ 315
Steering wheel ............................... 317
Trim pieces ................................... .3 17
Washing by hand ........................... 312
Wheels .......................................... .3 14
Windows ........................................ 314
Wiper blades .................................. 315
Wooden trim .................................. 317
Cargo compartment
Opening/closing (from outside,
HANDS-FREE ACCESS) .................... 87
Plug-in module (telescopic rods) .... 287
Cargo compartment cover
Important safety notes .................. 285
Notes/how to use ......................... 285
Cargo compartment enlargement ... 281
Cargo compartment floor
Important safety notes .................. 288
Opening/closing ............................ 288
Stowage well (under) ..................... 288
Cargo compartment plug-in mod-
ule (telescope bars) .......................... 287
Cargo net
Attaching ....................................... 286
Important safety information ......... 285
Cargo tie down rings ......................... 284
CD
see also Digital Operator's Man-
ual ................................................. .2 68
CD player (on-board computer) ....... .2 17
Center console
Lower section .................................. 40
Upper secti on
.................................. 38
Central locking
Locking/unlocking (SmartKey) ....... .7 7 Change of address .............................. 29
Change of ownership .......................... 29
Changing the media source ............ .2 16
Charge-air pressure (on-board
computer, Mercedes-AMG vehi-
cles) .................................................... 224
Child
Restraint system .............................. 60
Child seat
Forward-facing restraint system ...... 63
LATCH-type (ISOFIX) child seat
anchors ............................................ 61
On the front-passenger seat ............ 62
Rearward-facing restraint system .... 62
Top Tether ....................................... 61
Child-proof locks
Important safety notes .................... 63
Rear doors ....................................... 64
Children
Special seat belt retractor ............... 59
Children in the vehicle
Important safety notes .................... 59
Cigarette lighter ................................ 292
Cleaning
Mirror turn signal ........................... 315
Trailer tow hitch ............................. 316
Climate control
Control panel for dual-zone auto-
matic climate control ..................... 123
Controlling automatically ............... 125
Cooling with air dehumidification .. 125
Cooling with air dehumidification
(multimedia system) ...................... 273
Defrosting the windows ................. 127
Defrosting the windshield .............. 126
ECO start/stop function ................ 124
General notes ................................ 123
Indicator lamp ................................ 125
Ionization ....................................... 129
Ionization (multimedia system) ...... 273
Notes on using the automatic cli-
mate control .................................. 124
Overview ........................................ 272
Overview of systems ...................... 123
Perfume atomizer .......................... 128
P e rfume atomizer (multimedia
system) .......................................... 272 Index 7
Page 23 of 374
SUV
(Sport Utility Vehicle) ....................... 30
Switching air-recirculation mode
on/off ................................................ .1 28
Switching on media mode
Via the device list .......................... 276
T Tachometer ........................................ 209
Tail lamps
Display message ............................ 239
Tailgate
Display message ............................ 253
Emergency unlocking ....................... 89
HANDS-FREE ACCESS ..................... 87
Important safety notes .................... 84
Limiting the opening angle ............... 89
Obstruction detection ...................... 85
Opening dimensions ...................... 370
Opening/closing (automatically
from inside) ...................................... 88
Opening/closing (automatically
from outside) ................................... 86
Opening/closing (manually from
outside) ............................................ 85
Reversing feature ............................. 85
Tank content
Fuel gauge ....................................... 36
Technical data
Capacities ...................................... 364
Drawbar load (maximum) ............... 371
Information .................................... 362
Trailer loads ................................... 371
Vehicle data ................................... 370
Telephone
Accepting a call (multifunction
steering wheel) .............................. 218
Authorizing a mobile phone (con-
necting) ......................................... 275
Connecting a mobile phone (gen-
eral information) ............................ 275
Display message ............................ 254
Introduction ................................... 218
Menu (on-board computer) ............ 218
Number from the phone book ........ 218
Redialing ........................................ 219
Rejecting/ending a call ................. 218 see also Digital Operator's Man-
ual .................................................. 268
Switching between mobile
phones ........................................... 276
see Mobile phone
Temperature
Coolant (display in the instrument
cluster) .......................................... 209
Engine oil (on-board computer,
Mercedes-AMG vehicles) ............... 224
Outside temperature ...................... 209
Setting (climate control) ................ 126
Transmission oil (on-board com-
puter, Mercedes-AMG vehicles) ..... 224
Timing (RACETIMER) ......................... 225
Tire pressure
Calling up (on-board computer) ..... 343
C h ecking manually ........................ 342
Display message ............................ 250
Maximum ....................................... 342
Not reached (TIREFIT) .................... 324
Notes ............................................. 341
Reached (TIREFIT) .......................... 324
Recommended ............................... 339
Using the TIREFIT kit ...................... 323
Tire pressure loss warning system
General notes ................................ 342
Important safety notes .................. 342
Restarting ...................................... 343
Tire pressure monitor
Checking the tire pressure elec-
tronically ........................................ 345
Function/notes ............................. 343
General notes ................................ 343
Important safety notes .................. 344
Radio type approval for the tire
pressure monitor ........................... 346
Restarting ...................................... 345
Warning lamp ................................. 266
Warning message .......................... 345
Tire pressure sensors
Display message ............................ 251
Tire-change tool kit ........................... 320
TIREFIT kit
Important safety notes .................. 322
Storage location ............................ 320
Tire pressure not reached .............. 324
Tire pressure reached .................... 324 Index 21
Page 29 of 374
Protecting the environment
General notes
H Environmental note
Daimler's declared policy is one of compre-
hensive environmental protection.
The objectives are for the natural resources
that form the basis of our existence on this
planet to be used sparingly and in a manner
that takes the requirements of both nature
and humanity into account.
You too can help to protect the environment
by operating your vehicle in an environmen-
tally responsible manner.
Fuel consumption and the rate of engine,
transmission, brake and tire wear are affected
by these factors: R
operating conditions of your vehicle R
your personal driving style
You can influence both factors. You should
bear the following in mind:
Operating conditions: R
avoid short trips as these increase fuel con-
sumption. R
always make sure that the tire pressures
are correct. R
do not carry any unnecessary weight. R
remove roof racks once you no longer need
them. R
a regularly serviced vehicle will contribute
to environmental protection. You should
therefore adhere to the service intervals. R
always have service work carried out at a
qualified specialist workshop.
Personal driving style: R
do not depress the accelerator pedal when
starting the engine. R
do not warm up the engine when the vehicle
is stationary. R
drive carefully and maintain a safe distance
from the vehicle in front. R
avoid frequent, sudden acceleration and
braking. R
change gear in good time and use each gear
only up to �
Page 31 of 374
vehicle occupants while driving and this
defect has already been repaired at least
twice and Mercedes-Benz, LLC has been
informed in writing of the necessity of a
repair.
(2) the defect or malfunction, though less seri-
ous than (1) above, has already been
repaired at least four times and Mercedes-
Benz has been informed in writing of the
necessity of a repair.
(3) the vehicle cannot be used for longer than
30 calendar days because of repair work
resulting from this or other substantial
defects or malfunctions.
Please send your written notice to:
Mercedes-Benz USA, LLC
Customer Assistance Center
3 Mercedes Drive
Montvale, NJ 07645-0350
Maintenance Always bring the Maintenance Booklet with you
when taking the vehicle to an authorized
Mercedes-Benz Center. Your customer service
advisor will enter every service into your Main-
tenance Booklet on your behalf.
Roadside Assistance The Mercedes-Benz Roadside Assistance Pro-
gram offers technical help in the event of a
breakdown. Calls to the toll-free Roadside Assis-
tance Hotline are answered by our agents 24
hours a day, 365 days a year.
1-800-FOR-MERCedes(1-800-367-6372)
(USA)
1-800-387-0100(Canada)
For additional information, refer to the
Mercedes-Benz Roadside Assistance Program
brochure (USA) or the "Roadside Assistance"
section in the Service and Warranty Booklet
(Canada). You will find both in the vehicle docu-
ment wallet.
Change of address or change of own-
ership
In the event of a change of address, please send
us the "Notification of Address Change" in the Service and Warranty Booklet or simply call the
Mercedes-Benz Customer Assistance Center
(USA) at the hotline number
1-800-FOR-MERCedes (1-800-367-6372) or
Customer Service Center (Canada) at
1-800-387-0100. This will assist us in contact-
ing you in a timely manner should the need arise.
If you sell your Mercedes, please leave all liter-
ature in the vehicle so that it is available to the
next owner.
If you have purchased a used car, please send us
the "Notification of Used Car Purchase" in the
Service and Warranty Booklet or simply call the
Mercedes-Benz Customer Assistance Center
(USA) at the hotline number
1-800-FOR-MERCedes (1-800-367-6372) or
Customer Service (Canada) at 1-800-387-0100.
Vehicle operation outside the USA
and Canada When you are abroad with your vehicle, observe
the following points: R
Service facilities or replacement parts may
not be readily available. R
Lead-free fuel for vehicles with a catalytic
converter may not be available. Leaded fuel
can cause damage to the catalytic converter. R
The fuel may have a considerably lower
octane number. Unsuitable fuel can cause
engine damage.
Some Mercedes-Benz models are available for
delivery in Europe through our European Deliv-
ery Program. For details, consult an authorized
Mercedes-Benz Center or write to one of the
following addresses.
In the USA
Mercedes-Benz USA, LLC
European Delivery Department
One Mercedes Drive
Montvale, NJ 07645-0350
In Canada
Mercedes-Benz Canada, Inc.
European Delivery Department
98 Vanderhoof Avenue
Toronto, Ontario M4G 4C9Service and vehicle operation 29
Introduction Z
Page 81 of 374
KEYLESS- GO start function
Gene ra l notesBear in min d that th e engin e can be started by
any of th e vehicl e occupant s if there is a Smart -
Key in th e vehicl e ( Y
page 134).
Changing the settings of the locking
system You can chang e th e setting s of th e locking sys-
tem. This mean s that only th e driver's door and
th e fuel filler flap are unlocke d when th e vehicl e
is unlocked. This is useful if you frequentl y travel
alone. X
To change th e setting: press and hold down
th e �6 and �7 buttons simultaneousl y
for approximately six seconds until th e bat -
tery chec k lamp ( Y
page 80) flashes twice .
If th e setting of th e locking system is changed
within th e signal range of th e vehicle, pressing
th e �7 or �6 button:R
locks or R
unlocks th e vehicl e
The SmartKey no w function s as follows :X
To unlock: press th e �6 butto n once .X
To unlock centrally: press th e �6 butto n
twice .X
To lock: press th e �7 button.X
To restor e th e factory settings: press and
hold th e �6 and �7 buttons simultane -
ousl y for approximately six seconds until th e
battery chec k lamp ( Y
page 80) flashes
twice .
The KEYLESS-GO function s can be changed as
follows :X
To unlock th e driver's door : touch th e inner
surfac e of th e door handle on th e driver's
door .X
To unlock centrally: touch th e inner surfac e
of th e door handle on th e front-passenger
door or th e re ar door .X
To lock centrally: touch th e outer sensor
surfac e on on e of th e door handles . Mechanical key
Gene ra l notesIf th e vehicl e can no longer be locke d or
unlocke d wit h th e SmartKey or KEYLESS-GO ,
use th e mechanical key.
If you use th e mechanical ke y to unloc k and
open th e driver's door , th e anti-thef t alarm sys-
te m will be triggered . Switc h off th e alarm
( Y
page 76) .
If you unloc k th e vehicl e usin g th e mechanical
key, th e fuel filler flap will no t be unlocke d auto -
matically. X
To unlock th e fuel filler flap: insert th e
SmartKey int o th e ignition lock.
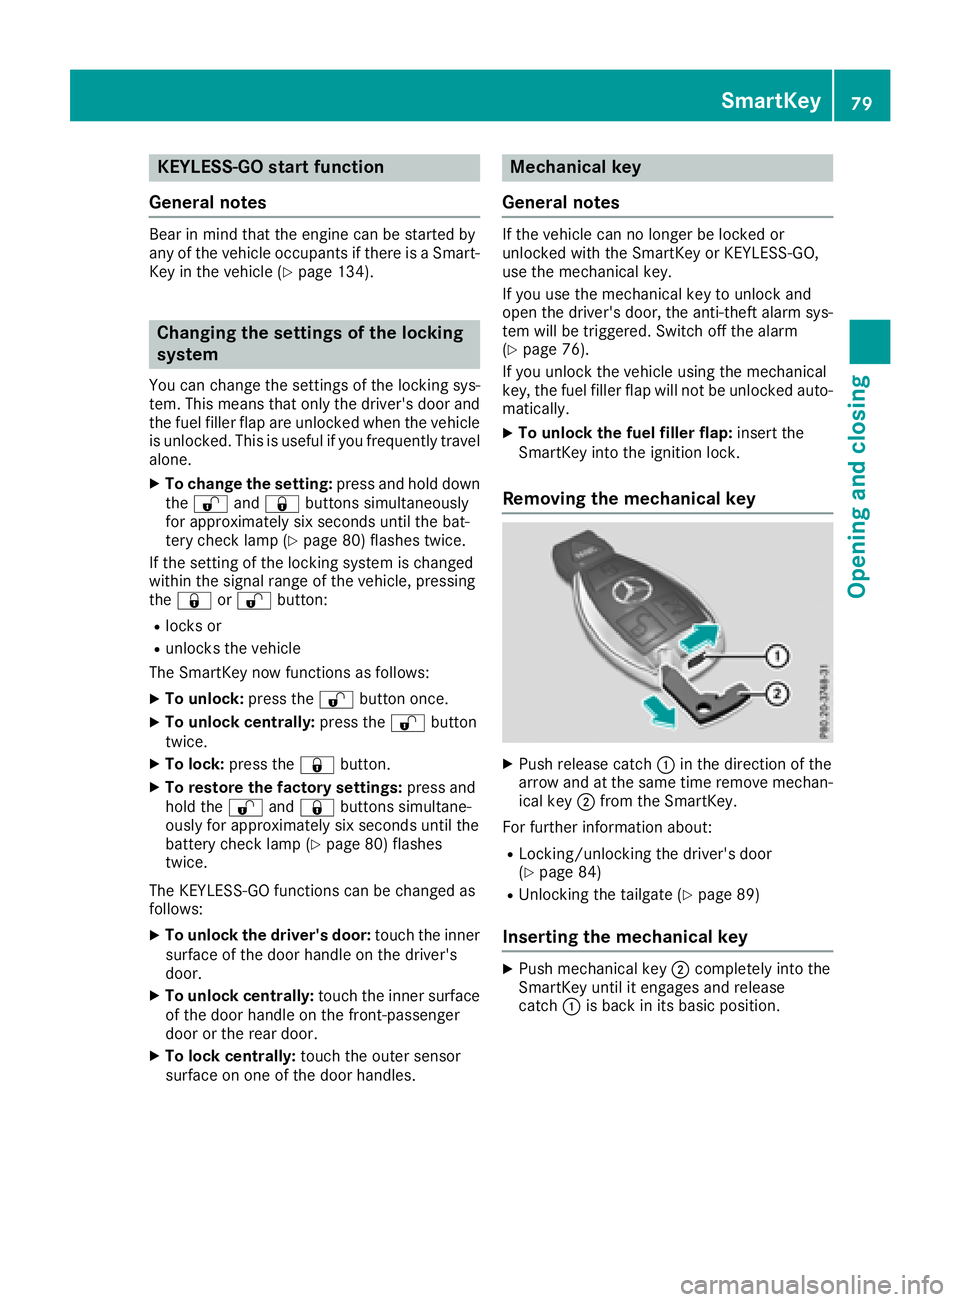
Removing the me chanical key
X
Push release catch �C in th e direction of th e
arrow and at th e sam e time remove mechan -
ical ke y �D from th e SmartKey.
Fo r further information about :R
Locking/unlocking th e driver's door
( Y
page 84 ) R
Unlocking th e tailgat e ( Y
page 89 )
Inserting the me chanical key X
Push mechanical ke y �D completely int o th e
SmartKey until it engage s and release
catch �C is bac k in it s basic position .SmartKey 79
Opening and closing Z
Page 118 of 374
Protect bulbs from moisture during operation.
Do not allow bulbs to come into contact with
liquids.
Replace only the bulbs listed ( Y
page 116).
Have the bulbs that you cannot change yourself
replaced at a qualified specialist workshop.
If you require assistance replacing bulbs, con-
sult a qualified specialist workshop.
If the new bulb still does not light up, consult a
qualified specialist workshop.
Headlamps and lights are an important aspect of
vehicle safety. You must therefore make sure
that these function correctly at all times. Have
the headlamp setting checked regularly.
Vehicles with LED headlamps: the front and
rear light clusters of your vehicle are equipped
with LED bulbs. Do not replace the bulbs your-
self. Contact a qualified specialist workshop
which has the necessary specialist knowledge
and tools to carry out the work required.
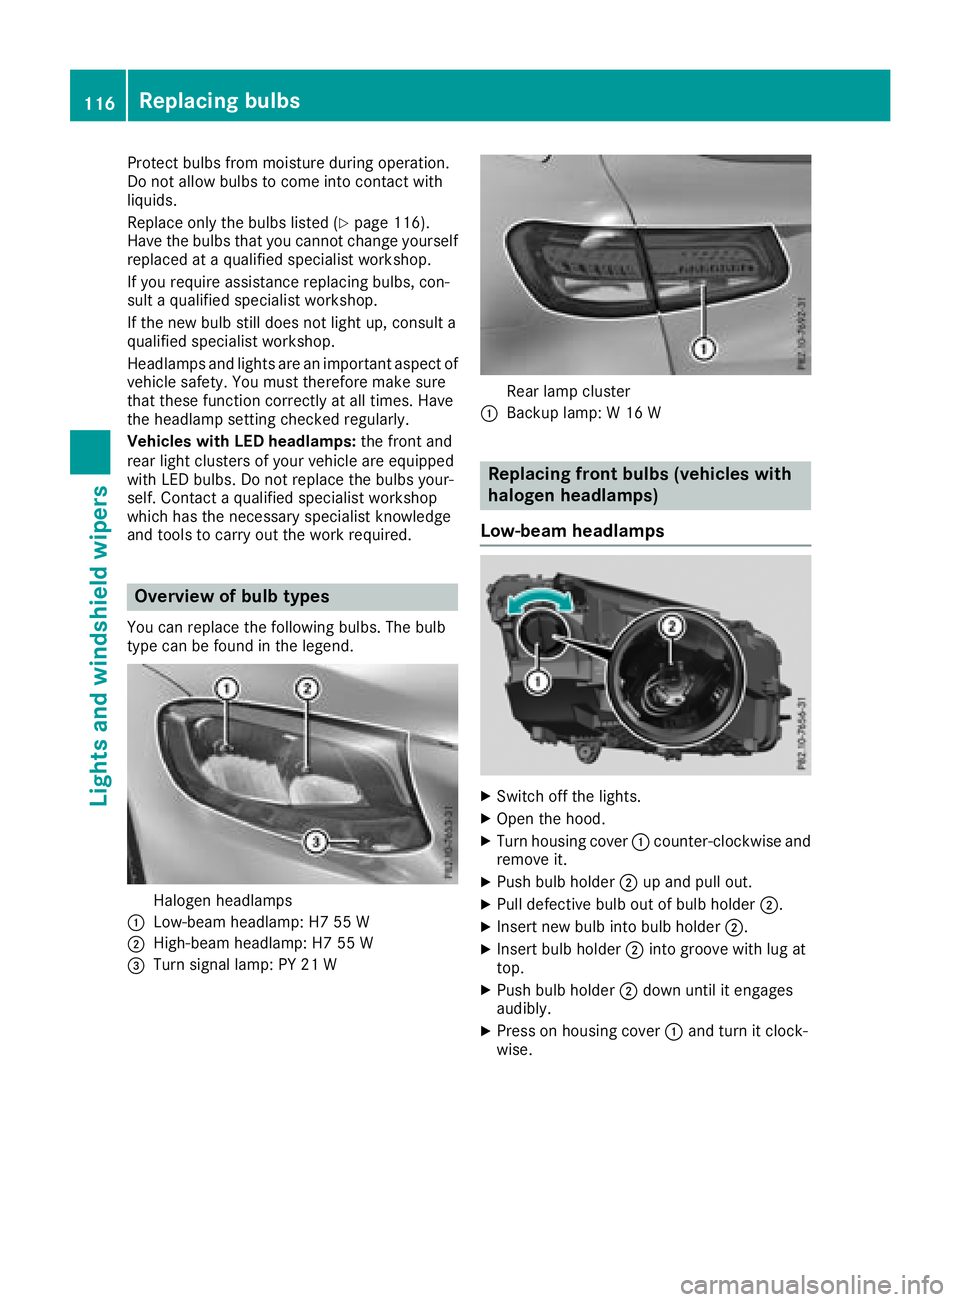
Overview of bulb types You can replace the following bulbs. The bulb
type can be found in the legend.
Halogen headlamps�C
Low-beam headlamp: H7 55 W
�D
High-beam headlamp: H7 55 W
�
Page 133 of 374
Notes on breaking-in a new vehicle
Important safety notes The sensor system of some driving and driving
safety systems adjusts automatically while a
certain distance is being driven after the vehicle
has been delivered or after repairs. Full system
effectiveness is not reached until the end of this
teach-in procedure.
New and replaced brake pads and discs only
reach their optimum braking effect after several
hundred kilometers of driving. Compensate for
this by applying greater force to the brake pedal.
The first 1000 miles (1500 km) The more you look after the engine when it is
new, the more satisfied you will be with its per-
formance in the future. R
You should therefore drive at varying vehicle
and engine speeds for the first 1000 miles
(1500 km). R
Avoid heavy loads, e.g. driving at full throttle,
during this period. R
When changing gears manually, change up in
good time, before the tachometer needle rea-
ches �
Page 136 of 374
G WARNING
Flammable materials introduced through
environmental influence or by animals can
ignite if in contact with the exhaust system or
parts of the engine that heat up. There is a risk
of fire.
Carry out regular checks to make sure that
there are no flammable foreign materials in
the engine compartment or in the exhaust
system.
General notes Vehicles with a gasoline engine: the catalytic
converter is preheated for up to 30 seconds
after a cold start. The sound of the engine may
change during this time.
Automatic transmission X
Shift the transmission to position �]
( Y
page 141).
The transmission position indicator on the
multifunction display shows �]
( Y
page 142).
i You can start the engine in transmission
position �] and �\\ .
Starting procedure with the SmartKey To start the engine using the SmartKey instead
of the Start/Stop button, pull the Start/Stop
button out of the ignition lock. X
To start a diesel engine: turn the SmartKey
to position �H in the ignition lock
( Y
page 132).
The �\( preglow indicator lamp in the instru-
ment cluster lights up. X
Turn the SmartKey to position �I in the igni-
tion lock ( Y
page 132) and release it as soon
as the engine is running.
i Vehicles with a diesel engine: you can
start the engine without preglow if the engine
is warm.
If the engine will not start: X
Remove the SmartKey from the ignition lock. X
Reinsert the SmartKey into the ignition lock
after a short waiting period. X
Turn the SmartKey to position �H in the igni-
tion lock ( Y
page 132).
The indicator lamps in the instrument cluster
light up ( Y
page 256). X
Turn the SmartKey to position �I in the igni-
tion lock ( Y
page 132) and release it as soon
as the engine is running.
Starting procedure with the Start/Stop
button The Start/Stop button is only available on vehi-
cles with KEYLESS-GO or the KEYLESS-GO start
function.
The Start/Stop button can be used to start the
vehicle manually without inserting the SmartKey
into the ignition lock. The Start/Stop button
must be inserted in the ignition lock and the
SmartKey must be in the vehicle. This mode for
starting the engine operates independently of
the ECO start/stop automatic engine start func-
tion.
You can start the engine if a valid SmartKey is in
the vehicle. Switch off the engine and always
take the SmartKey with you when leaving the
vehicle, even if you only leave it for a short time.
Pay attention to the important safety notes. X
Depress the brake pedal and keep it
depressed. X
Press the Start/Stop button once
( Y
page 133).
Vehicles with a gasoline engine: the engine
starts.
Vehicles with a diesel engine: preglow is
activated and the engine starts.
Starting procedure via smartphone Observe the important safety notes on starting
the engine ( Y
page 133).
You can also start your engine via your smart-
phone from outside the vehicle. In this case, the
previously selected climate control setting is
activated. In this way you can cool or heat the
interior of the vehicle before starting the jour-
ney.
Only start the engine via your smartphone if it is
safe to start and run the engine where your vehi-
cle is parked.
Observe the legal stipulations in the area where
your vehicle is parked. Engine start via smart-
phone may be limited to certain countries or
regions.134
Driving
Driving and parking
Page 141 of 374
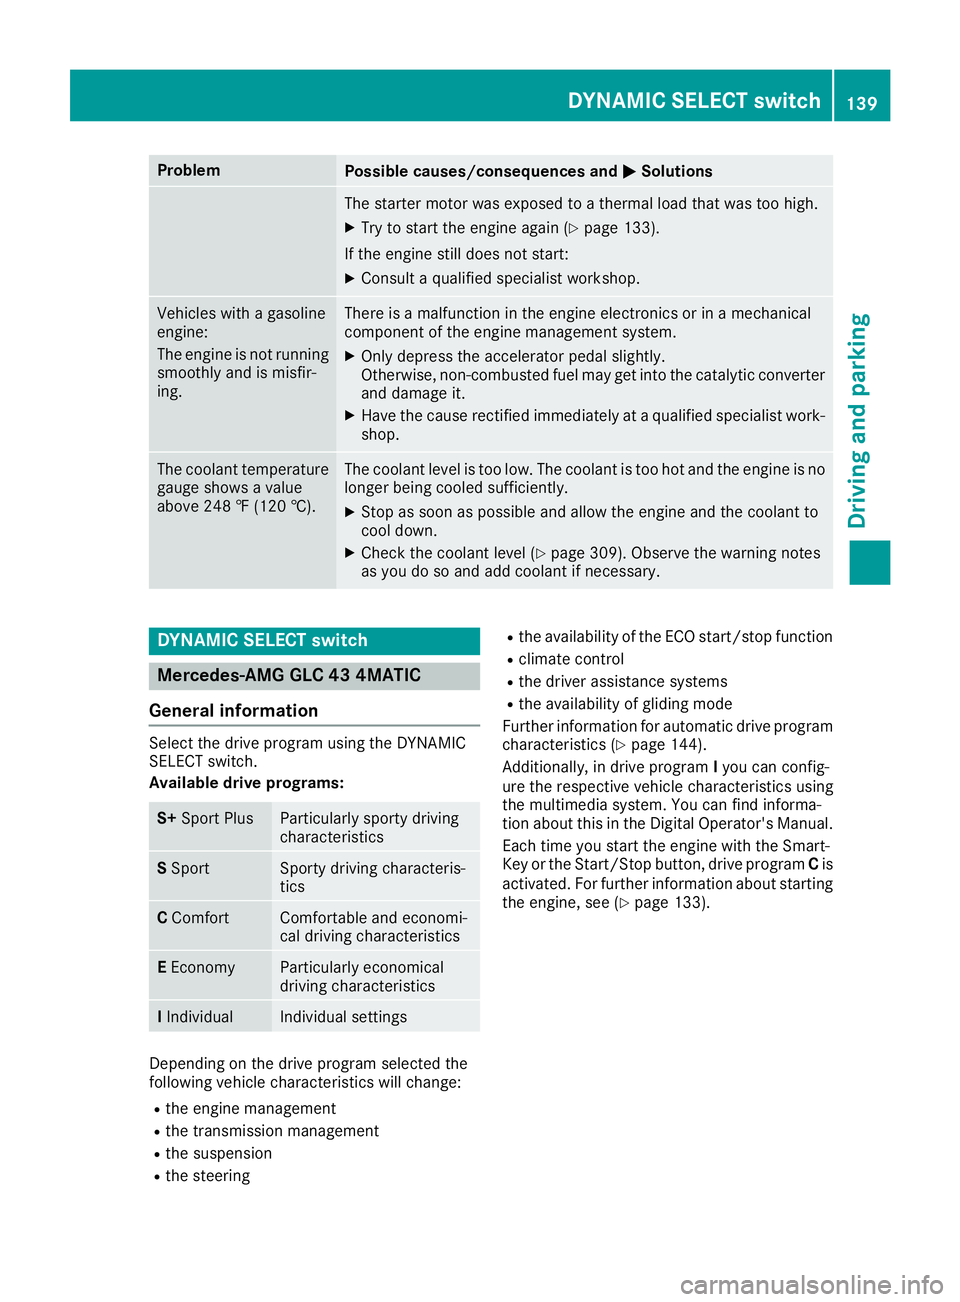
Problem
Possible causes/consequences and �P Solutions
The starter motor was exposed to a thermal load that was too high. X
Try to start the engine again ( Y
page 133).
If the engine still does not start: X
Consult a qualified specialist workshop.
Vehicles with a gasoline
engine:
The engine is not running
smoothly and is misfir-
ing. There is a malfunction in the engine electronics or in a mechanical
component of the engine management system. X
Only depress the accelerator pedal slightly.
Otherwise, non-combusted fuel may get into the catalytic converter
and damage it. X
Have the cause rectified immediately at a qualified specialist work-
shop.
The coolant temperature
gauge shows a value
above 248 ‡ (120 †). The coolant level is too low. The coolant is too hot and the engine is no
longer being cooled sufficiently. X
Stop as soon as possible and allow the engine and the coolant to
cool down. X
Check the coolant level ( Y
page 309). Observe the warning notes
as you do so and add coolant if necessary.
DYNAMIC SELECT switch
Mercedes-AMG GLC 43 4MATIC
General information Select the drive program using the DYNAMIC
SELECT switch.
Available drive programs:
S+ Sport Plus Particularly sporty driving
characteristics
S Sport Sporty driving characteris-
tics
C Comfort Comfortable and economi-
cal driving characteristics
E Economy Particularly economical
driving characteristics
I Individual Individual settings
Depending on the drive program selected the
following vehicle characteristics will change: R
the engine management R
the transmission management R
the suspension R
the steering R
the availability of the ECO start/stop function R
climate control R
the driver assistance systems R
the availability of gliding mode
Further information for automatic drive program
characteristics ( Y
page 144).
Additionally, in drive program I you can config-
ure the respective vehicle characteristics using
the multimedia system. You can find informa-
tion about this in the Digital Operator's Manual.
Each time you start the engine with the Smart-
Key or the Start/Stop button, drive program C is
activated. For further information about starting
the engine, see ( Y
page 133).DYNAMIC SELECT switch 139
Driving and parking Z