light MERCEDES-BENZ GLC-Class 2016 X253 Comand Manual
[x] Cancel search | Manufacturer: MERCEDES-BENZ, Model Year: 2016, Model line: GLC-Class, Model: MERCEDES-BENZ GLC-Class 2016 X253Pages: 222, PDF Size: 6.39 MB
Page 159 of 222

Displaying thevehicle identification
number (VIN )
XTo callup Internet function s (Ypage 151).
XTo selectMercedes-Ben zApp s:turn and
press th econtroller .
XTo highlight Download POI:turn th econ-
troller.
XTo selec tG: slide9 thecontroller .
The vehicle identification number is dis -
played .
Exiting amenu
XPress th e% button.
Deleting destinations automatically
afterimporting to th eserver
Destination son th eserver are automatically
delete dafter seven days.
XSelec tth eOption smen ufo rth eDownload
POIAp p (Ypage 158).
The men ushows th ecurren tsettings.
XTo selec tDelete fro mserver after
importing:turn and press th econtroller .
Switc hth esetting on Oor of fª.
Exiting amenu
XPress th e% button.
Further Mercedes-Benz App s
General notes
To be able to use Mercedes-Ben zApps, you
first hav eto register. To do so, you hav eto ente
ryour nam eand posta laddress once in
th evehicle and confirm th egenera lterm sand
conditions. Amessage to this effect appears
th efirst time you cal lup th eonlin eand Inter-
ne tfunctions.
Fo rindividual Mercedes-Ben zApps, it may be
necessary to pay license fees befor eusing.
Use is then limited to acertain period of time.
License fees mus tbe paid again fo ruse
beyond this time period.
Mercedes-Benz Mobile Websit e
Connectingto th eInternet : (Ypage 151)
The onlin efunction scontain th eMercedes -
Benz Mobile Websit eas apredefined favorite.
XTo cal lup Internet function s (Ypage 151).
XSelectth eMercedes-Ben zMobile Web ‐
sitemenu.
The Mercedes-Ben zhom epage appears .
iYou cannotdelete th eMercedes-Ben z
Mobile Websit emenu.
Calling up Mercedes-Benz App s
XTo callup Internet function s (Ypage 151).
XTo selectMercedes-Ben zApp s:turn and
press th econtroller .
The available Mercedes-Ben zApp s
are
displayed .
XTo selectth edesire dapp: turn and press
th econtroller .
Additional Mercedes-Ben zApps can be pur -
chased on th eMercedes-Ben zwebsite. You
Further Mercedes-Benz Apps157
Online and Internet functions
Z
Page 160 of 222

can find further information at:
http://apps.mercedes-benz.com/apps/
The available features are country-depend-
ent.
Closing Mercedes-Benz Apps
XPress the%button.
The Internet menu appears.
or
XPress the %button for longer than two
seconds.
The Mercedes-Benz Apps menu or the
Internet menu appears.
Adjusting the settings of individual
apps
XTo call up Internet functions (Ypage 151).
XTo select Mercedes-Benz Apps: turn and
press the controller.
XTo highlight the desired app: turn the con-
troller.
XTo select G: slide 9the controller.
The current app settings are displayed.
Resetting adjustments
This function resets all Mercedes-Benz Apps
settings to the factory settings.
XTo call up Internet functions (Ypage 151).
XTo select Mercedes-Benz Apps: turn and
press the controller.
The available Mercedes-Benz Apps
are
displayed.
XTo select G: slide 9the controller.
XTo select Reset: turn and press the con-
troller.
A prompt appears asking whether you
really wish to reset.
XSelect YesorNo.
If you select Yes
the settings are reset.
If you select No
the process is canceled.
Web browser
Calling up a website
Function restrictions
Internet pages cannot be shown while the
vehicle is in motion.
Entering a web address
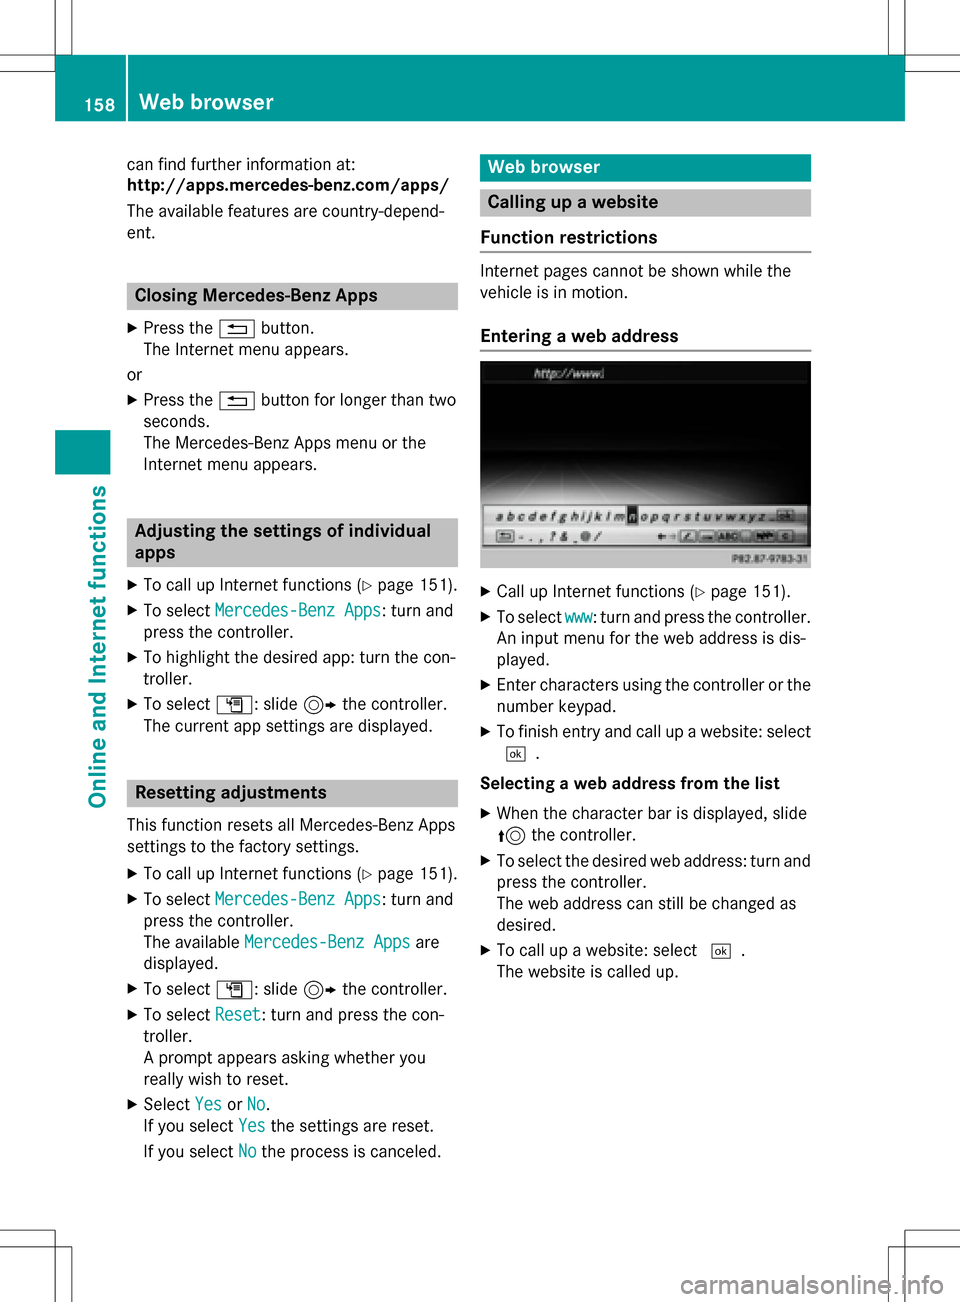
XCall up Internet functions (Ypage 151).
XTo select www: turn and press the controller.
An input menu for the web address is dis-
played.
XEnter characters using the controller or the
number keypad.
XTo finish entry and call up a website: select
¬.
Selecting a web address from the list
XWhen the character bar is displayed, slide
5 the controller.
XTo select the desired web address: turn and
press the controller.
The web address can still be changed as
desired.
XTo call up a website: select ¬.
The website is called up.
158Web browser
Online and Internet functions
Page 161 of 222

Navigating the website
StepResult
XTurn the control-
ler.Navigates from one
selectable item (e.g.
link, text field or
menu) to the next
and highlights the
respective element
on the website.
Sliding the control-
ler:
XLeft or right
1
XUp or down4
XDiagonally2
Moves the pointer
on the page.
XPress the control-
ler.Opens the selected
item.
XPress%.Calls up the menu.
Menu functions
:Closes the browser
;Goes back/forward
=Updates/cancels
?URL entry
AFavorites
BCloses the window
COptions
XTo show the menu: press the%but-
ton.
XTo call up the Options menu: select3
by turning and pressing the controller.
XTo close the website: select&.
XTo call up the previous website: select
t.
XTo call up the next website: selectu.
XTo refresh the website: selectÎ.
The website is refreshed. This procedure
may take some time.
iWhile the website is loading, a cross
appears in the menu. This can be used to
cancel the loading procedure.
XTo enter a URL: selectg.
XEnter a web address (URL) (Ypage 158).
XFavorites: selectf.
XTo close the active window: selecth.
Options menu
Opening in a new window
In order to be able to use this function, the
cursor must be on a link.
XTo show the menu: press the%but-
ton.
XTo select 3: turn and press the control-
ler.
XSelect Open In A New Window.
The website is opened in a new window.
Web browser159
Online an d Internet functions
Z
Page 171 of 222

XTo select theSave Current Station/
Channeloption: turn and press the con-
troller.
XTo select the position of the required preset
entry: turn and press the controller.
or
XSelect the Edit Station Presetoption.
XSelect the position of the required preset:
turn the controller.
This can also be a preset position that is
already occupied, which is then overwritten
by the current station.
XSlide9the controller.
An additional menu appears.
XTo select the Save Current Station/
Channeloption: turn and press the con-
troller.
The currently set station is stored in the
selected preset position. A tone signals a
successful preset entry.
or
XIn the main display field, press and hold the
controller.
A list of current allocated preset positions
appears.
XTo select the position of the required preset
and confirm: turn the controller and press.
Moving highlighted stations
XIn radio mode: slide 6the controller.
The radio menu bar appears.
XTo select Preset: turn and press the con-
troller.
XSelect Edit Station Preset.
XTo select the required preset entry: turn the
controller.
XSlide9the controller.
An additional menu appears.
XTo select the Move Highlighted Sta‐
tion/Channeloption: turn and press the
controller.
The list of stored stations appears again.
XTo move the highlighted station to the new position: turn the controller and press to
confirm.
Deleting highlighted stations
XIn radio mode: slide 6the controller.
The radio menu bar appears.
XTo select Preset: turn and press the con-
troller.
XSelect Edit Station Preset.
XTo select the required preset entry: turn the
controller.
XSlide9the controller.
XTo select the Delete Highlighted Sta‐
tion/Channeloption in the additional
menu: turn and press the controller.
XTo select Yes: turn and press the controller.
The highlighted station is deleted.
or
XTo select No: turn and press the controller.
The process is canceled.
iFrequencies are already stored in
COMAND. There are 100 preset positions
available.
Activating/deactivating the station
presets display
You can use this function to change to the
station presets display.
Activating
XIn radio mode: slide 6the controller.
XTo select Preset: turn and press the con-
troller.
XTo select StationPresetView:On: turn
and press the controller.
The station preset display appears.
XTo switch between the stored stations: turn
the controller.
Station169
Radio
Page 191 of 222

RUSB storage device
RMP3
iData can only be copied from an MP3
player if this can be configured as a mass
storage device.
Video files from DVD-V cannot be copied.
While copying, several functions will not be
available. If this is the case, you will see a
message to this effect.
1. Selecting a data medium
XIn media mode: press the Õbutton.
The menu appears with the available media
sources.
XTo select the media source: turn the con-
troller and press to confirm.
XTo switch to the menu bar: slide 6the
controller.
XTo select Options: turn and press the con-
troller.
XSelect Save Files to Media Register.
The media list appears. A data medium
from which files can be copied is selected
automatically.
iThe Save Files to Media Register
function can be reached from any media
application.
XSelect the displayed data medium.
The data medium is loaded.
If the data medium contains files that can
be copied, a selection menu appears.
2. Selecting files
XTo select AllMediaFiles: turn and press
the controller.
This command copies all files from the
selected data medium. The symbol next to
All Media Files
is filled in. All subse-
quent entries have a checkmark Obeside
them.
XSelect a folder.
A checkmark Onext to the folder entry
highlights the selection.
XTo select Continue: turn and press the
controller.
The copying menu appears.
3. Starting the copying process
In the example, files are copied from a USB
device to the Media Register.
XTo select Start: press the controller.
iThe selection of a target folder is optional.
If there is no target folder given, the selec-
ted files are saved to the main directory of
the Media Register.
Media Register189
Media
Z
Page 192 of 222

XTo selectTarget Folder: turn and press
the controller.
XSelect a folder.
XSelect Continue.
XTo select Start: press the controller.
The copying procedure starts and is shown
in the progress bar.
It may take some time for the copying proc-
ess to be completed, depending on the
amount of data. If there is not enough mem-
ory space, a message to this effect
appears.
Once the copying procedure is complete,
you will hear the first track of the copied
album. You can now copy more files to the MEDIA REGISTER.
XTo cancel copying: selectCancel.
Files are stored in the MEDIA REGISTER up until the point of cancellation.
iIt is possible to change to a different func-
tion (e.g. radio) during the copying proce-
dure. The copying procedure continues in
the background. While the copying proce-
dure is taking place, this is shown by a sym-
bol in the status bar.
Renaming/deleting files
XIn media mode: press the Õbutton.
The menu appears with the available media sources.
XTo select the media source: turn the con-
troller and press to confirm.
XTo switch to the menu bar: slide 6the
controller.
XTo select Options: turn and press the con-
troller.
XSelect Manage Media Register.
XSelectRename / Delete Files.
The file list is displayed.
XTo highlight the selected files: turn and
press the controller.
XSlide 9the controller.
You can select between Edit
andDelete.
XTo select Editfor the file: turn and press
the controller.
The following entry field appears:
XRename the file.
XTo save changes with ¬: turn and press
the controller.
Renaming a file only changes the name.
Depending on whether or not the Show
Track Informationoption has been
selected, this change may not be seen in
the main display field.
XTo select Deletefor the file: press the con-
troller.
190Media Register
Media
Page 193 of 222

Deleting all files
!
In order to preven tmalfunctions, do no t
use COMAN Ddurin gthis time.
Thi sfunction delete sall files from th eMEDI A
REGISTER.
XIn media mode: press th eÕ button.
The men uappears wit hth eavailable media
sources.
XTo selec tth emedia source :turn th econ-
trolle rand press to confirm .
XTo switch to themen ubar :slid e6 the
controller .
XTo selectOption s:turn and press th econ-
troller.
XSelec tManage Media Register.
XSelec tDelete All Media Files.
The prompt Would
youliketodelete
all media files?appears .Nois high-
lighted.
XTo selec tYes:turn and press th econtroller .
The Please Wait.. .
message appears .
The Data
Delete dmessage then appears .
Al lfiles are deleted.
or
XTo selec tNo:press th econtroller .
The process is canceled.
Calling up memory space inf o
XIn media mode: press theÕ button.
The men uappears wit hth eavailable media
sources.
XTo selec tth emedia source :turn th econ-
trolle rand press to confirm .
XTo switch to themen ubar :slid e6 the
controller .
XTo selectOption s:turn and press th econ-
troller.
XSelec tManage Media Register.
XSelec tMemory Inf o.
Selectingaplayback mode
The following option sare available :
RNormal Track Sequence:th etrack sare
played in th enormal order (e.g. track 1, 2, 3
etc.).
RRandom Medium: all th etrack son th e
medium are played in random order .
RRandomTrackList:th etrack sin th ecur -
rentl yactive track list are played in random
order .
Media Register191
Media
Z
Page 205 of 222

XTo activate or deactivate: check or uncheckthe box in front of Dynamic Image
Enhancement.
Manual image enhancement
In order to manually adjust the brightness,
contrast and color, the dynamic image
enhancement function must be switched off.
XTo selectBright.,Contrastor Color:
turn and press the controller.
A sliding menu appears.
XTo select the required value: turn the con-
troller.
XTo exit the sliding menu: slide 8the
controller.
XTo activate/deactivate Automatic Day‐
light Adjustment: press the controller.
Setting the picture format
The following options are available for the
screen format for the DVD being played:
RAuto
R16:9
R4:3
RZoom
XTo set the picture format: turn and press
the controller.
The dot before the menu entry shows the
selected format.
DVD's control menu
Most DVDs have theirown control menu
which can be operated using the controller.
Showing the DVD's control menu
XTo select Menufrom the DVD functions
menu: turn and press the controller.
The DVD functions menu is hidden and the
DVD's menu entries (e.g. scenes, language,
trailers) are displayed.
XTo select a menu entry: turn and press the
controller.
Video menu
:Type of data medium
;Current title
=Shows the menu bars for the DVD basic
display
?Current scene
ATrack time
Video DVD mode203
Media
Z
Page 206 of 222

Operating the video menu
XTo show: in full-screen video mode, slide
6the controller.
XTo hide: slide 5the controller.
XTo select the next or previous scene: turn
the controller clockwise/counter-clock-
wise.
XTo fast forward or rewind: slide 9or
8 and hold the controller until the
desired position has been reached.
XTo hide the video menu: slide 5the con-
troller.
XTo show the menu bars for the DVD basic
display: press the controller.
The video menu is hidden and the DVD
basic menu appears.
DVD functions
Showing/hiding the DVD functions
XTo show DVD functions: in full-screen
video mode, press the controller.
The DVD functions menu is shown.
XTo hide: in DVD functions select %: turn
and press the controller
XTo show the DVD basic display: select
ò from the DVD functions: turn and
press the controller.
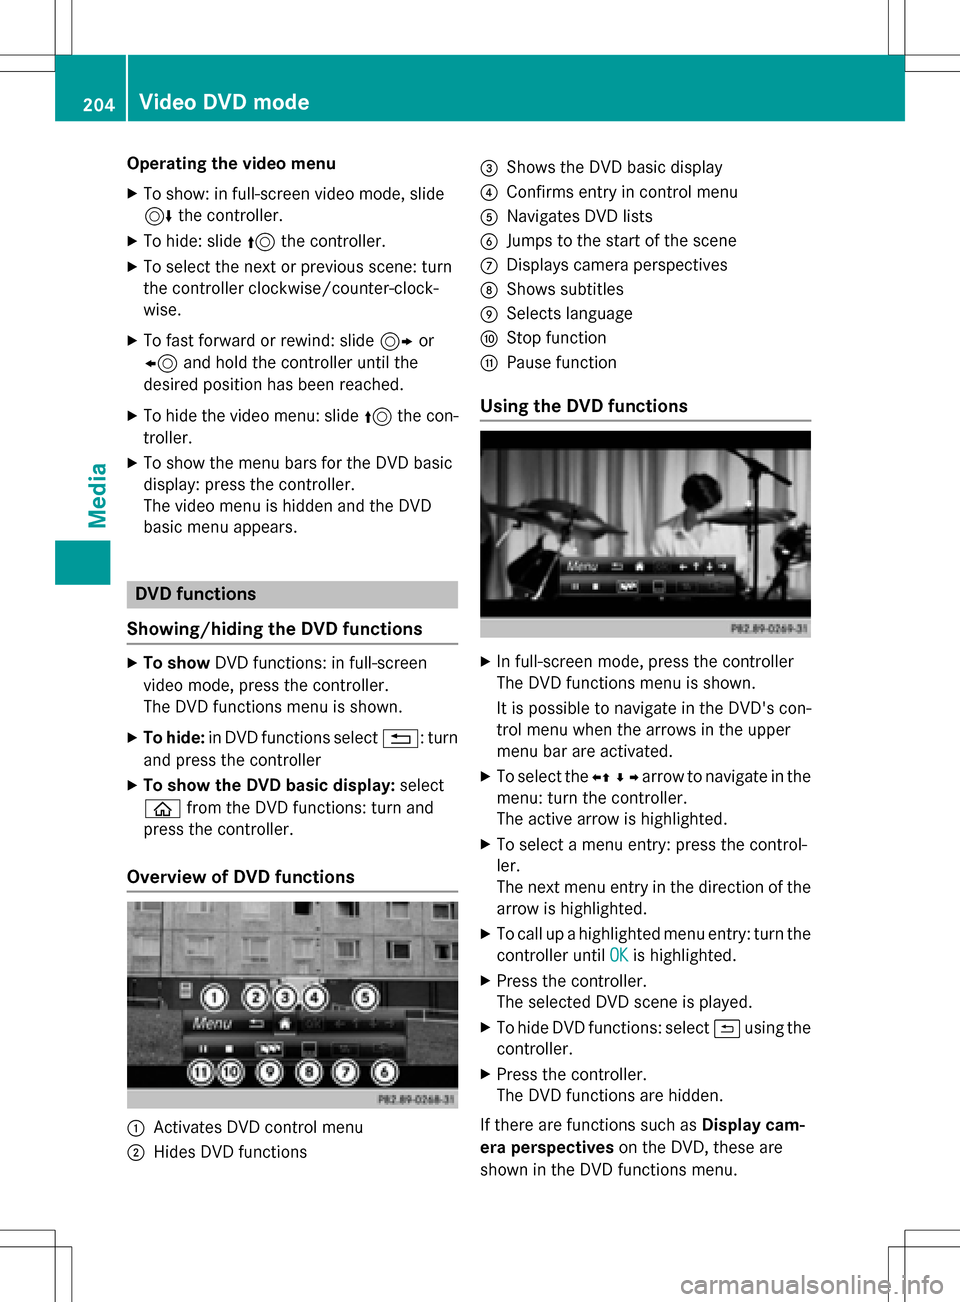
Overview of DVD functions
:Activates DVD control menu
;Hides DVD functions
=Shows the DVD basic display
?Confirms entry in control menu
ANavigates DVD lists
BJumps to the start of the scene
CDisplays camera perspectives
DShows subtitles
ESelects language
FStop function
GPause function
Using the DVD functions
XIn full-screen mode, press the controller
The DVD functions menu is shown.
It is possible to navigate in the DVD's con-
trol menu when the arrows in the upper
menu bar are activated.
XTo select the XZ¬Yarrow to navigate in the
menu: turn the controller.
The active arrow is highlighted.
XTo select a menu entry: press the control-
ler.
The next menu entry in the direction of the arrow is highlighted.
XTo call up a highlighted menu entry: turn the
controller until OK
is highlighted.
XPress the controller.
The selected DVD scene is played.
XTo hide DVD functions: select &using the
controller.
XPress the controller.
The DVD functions are hidden.
If there are functions such as Display cam-
era perspectives on the DVD, these are
shown in the DVD functions menu.
204Video DVD mode
Media
Page 217 of 222

XTo select state/province or city: enter the
first few letters by turning and pressing the
controller.
XTo switch to the list without the character
bar: slide5the controller or select ¬.
XTo delete an entry: select 2in the char-
acter bar and press the controller.
Pressing briefly deletes the last letter
entered.
Pressing and holding longer deletes the
entire entry.
XTo select the state/province or city from
the list: turn and press the controller.
After selecting a state (or province) the list of locations appears.
After selecting a location, the information
chart displays the weather forecast for the
selected location. The data is supplied by
the nearest weather station.
Option 2: selecting the area in the
weather map
XCall up the weather map (Ypage 215).
XMove the weather map so that the cross-
hair is over the desired area (
Ypage 215).
XPress the controller.
The information chart shows the weather
forecast for the selected area. The data is
supplied by the nearest weather station.
Memory functions
Storing the area in the weather memory
You can save locations that are called up fre-
quently in ten preset positions (0, 1-9) in the
weather memory.
XIn the weather memory: select the area
for the weather forecast (
Ypage 213).
The selected location appears at the top in
the status bar.
XTo select Positionin the information
chart: turn and press the controller.
XSelect Presets.
XSelect a preset using the controller.
XPress and hold the controller until you hear
a tone.
The area is entered on the selected preset.
Selecting an area from the weather
memory
XDirectly from the weather memory:
select Position
from the information
chart: turn and press the controller.
XSelect Presets.
XSelect the memory position which contains
the location you require.
The weather data for the selected area is
displayed.
Weather map
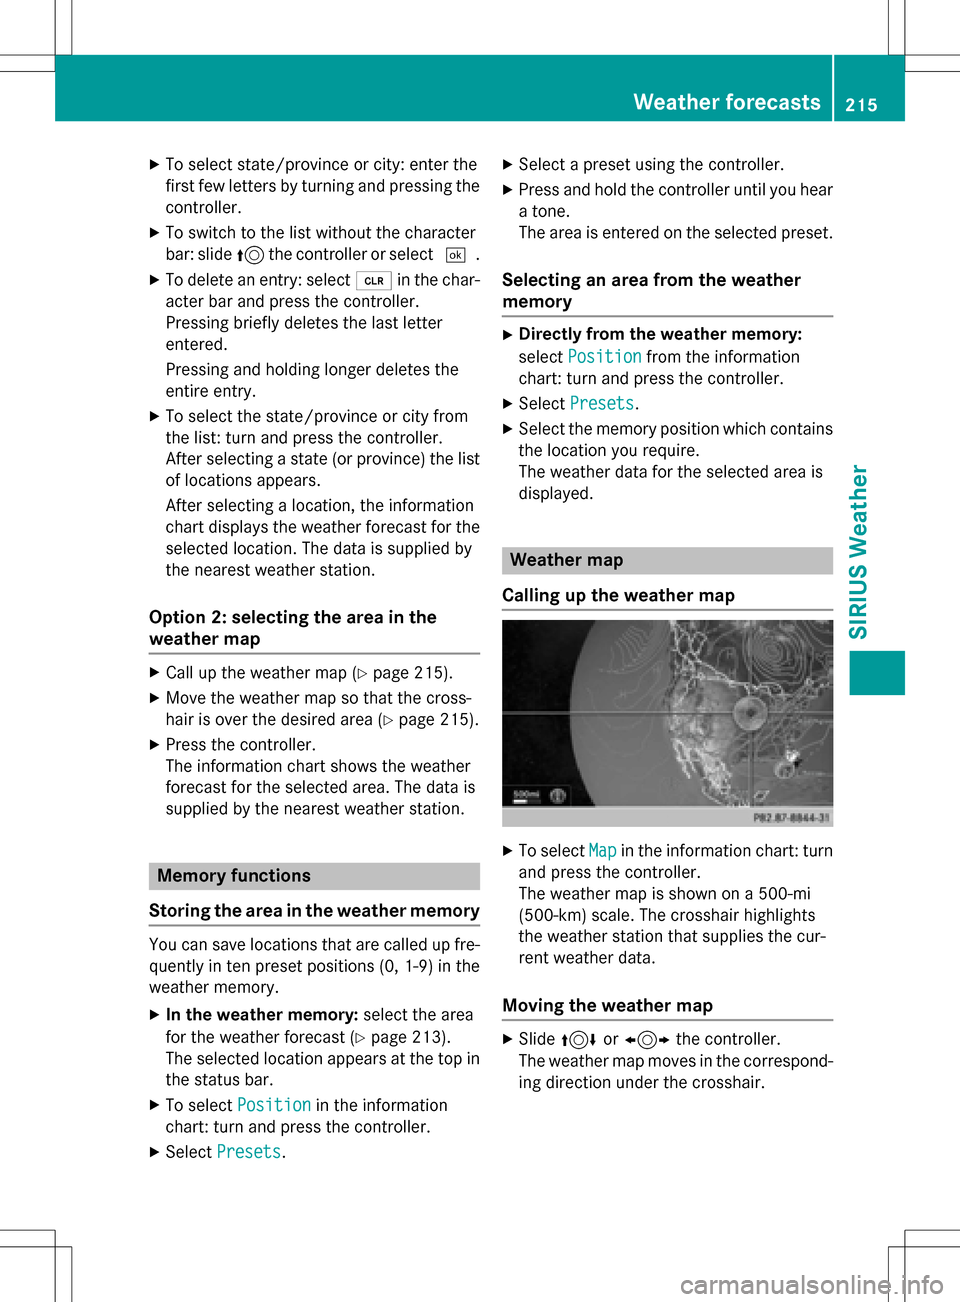
Calling up the weather map
XTo select Mapin the information chart: turn
and press the controller.
The weather map is shown on a 500-mi
(500-km) scale. The crosshair highlights
the weather station that supplies the cur-
rent weather data.
Moving the weather map
XSlide 4 or1 the controller.
The weather map moves in the correspond-
ing direction under the crosshair.
Weather forecasts215
SIRIUS Weather