ignition MERCEDES-BENZ GLC-Class 2016 X253 Owner's Guide
[x] Cancel search | Manufacturer: MERCEDES-BENZ, Model Year: 2016, Model line: GLC-Class, Model: MERCEDES-BENZ GLC-Class 2016 X253Pages: 418, PDF Size: 9.23 MB
Page 122 of 418
Rthe exterior mirrors fold in automatically as
soon as you lock the vehicle from the out-
side.
Rthe exterior mirrors fold out automatically
again as soon as you unlock the vehicle.
iIf the exterior mirrors have been folded in
manually, they do not fold out.
Exterior mirror pushed out of position
If an exterior mirror has been pushed out of
position, proceed as follows:
XVehicles without electrically folding
exterior mirrors: move the exterior mirror
into the correct position manually.
XVehicles with electrically folding exte-
rior mirrors: press and hold button :
until you hear a click and then the mirror
engaging in position (
Ypage 119).
The mirror housing is engaged again and
you can adjust the exterior mirrors as usual
(
Ypage 119).
Automatic anti-glare mirrors
GWARNING
Electrolyte may escape if the glass in an auto-
matic anti-glare mirror breaks. The electrolyte
is harmful and causes irritation. It must not
come into contact with your skin, eyes, res-
piratory organs or clothing or be swallowed.
There is a risk of injury.
If you come into contact with the electrolyte,
observe the following:
RRinse off the electrolyte from your skin
immediately with water.
RImmediately rinse the electrolyte out of
your eyes thoroughly with clean water.
RIf the electrolyte is swallowed, immediately
rinse your mouth out thoroughly. Do not
induce vomiting.
RIf electrolyte comes into contact with your
skin or hair or is swallowed, seek medical
attention immediately.
RImmediately change out of clothing which
has come into contact with electrolyte.
RIf an allergic reaction occurs, seek medical
attention immediately.
The rear-view mirror and the exterior mirror
on the driver's side automatically go into anti-
glare mode if the following conditions are met
simultaneously:
Rthe ignition is switched on
Rincident light from headlamps strikes the
sensor in the rear-view mirror
The mirrors do not go into anti-glare mode if
reverse gear is engaged or if the interior light-
ing is switched on.
Parking position for the exterior mir-
ror on the front-passenger side
Storing the parking position
You can position the front-passenger side
exterior mirror in such a way that you can see
the rear wheel on that side as soon as you
engage reverse gear. You can store this posi- tion.
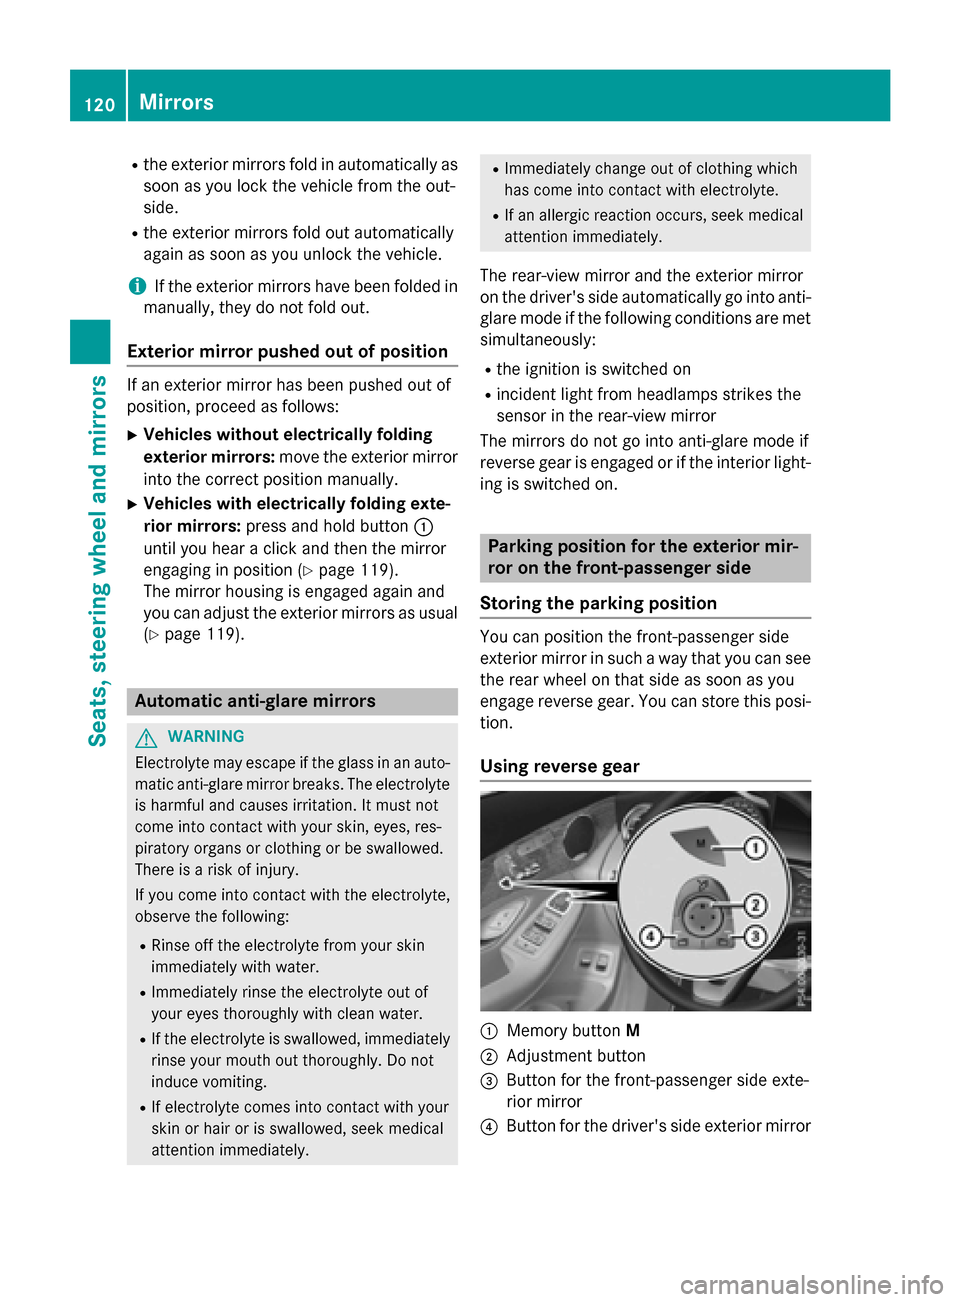
Using reverse gear
:Memory button M
;Adjustment button
=Button for the front-passenger side exte-
rior mirror
?Button for the driver's side exterior mirror
120Mirrors
Seats, steering wheel and mirrors
Page 124 of 418
GWARNING
Children could become trapped if they acti-
vate the memory function, particularly when
unattended. There is a risk of injury.
When leaving the vehicle, always take the
SmartKey with you and lock the vehicle. Never
leave children unsupervised in the vehicle.
The memory function can be used at any time,
e.g. even when the key is not in the ignition
lock.
Storing settings
With the memory function, you can store up
to three different settings, e.g. for three dif-
ferent people.
The following settings are stored as a single
memory preset:
Rposition of the seat, backrest and head
restraint
Rdriver's side: position of the exterior mir-
rors on the driver's and front-passenger
sides
Rposition of the head-up display
XAdjust the seat accordingly (Ypage 110).
XOn the driver's side, adjust the steering
wheel (
Ypage 116) and the exterior mirrors
(
Ypage 119).
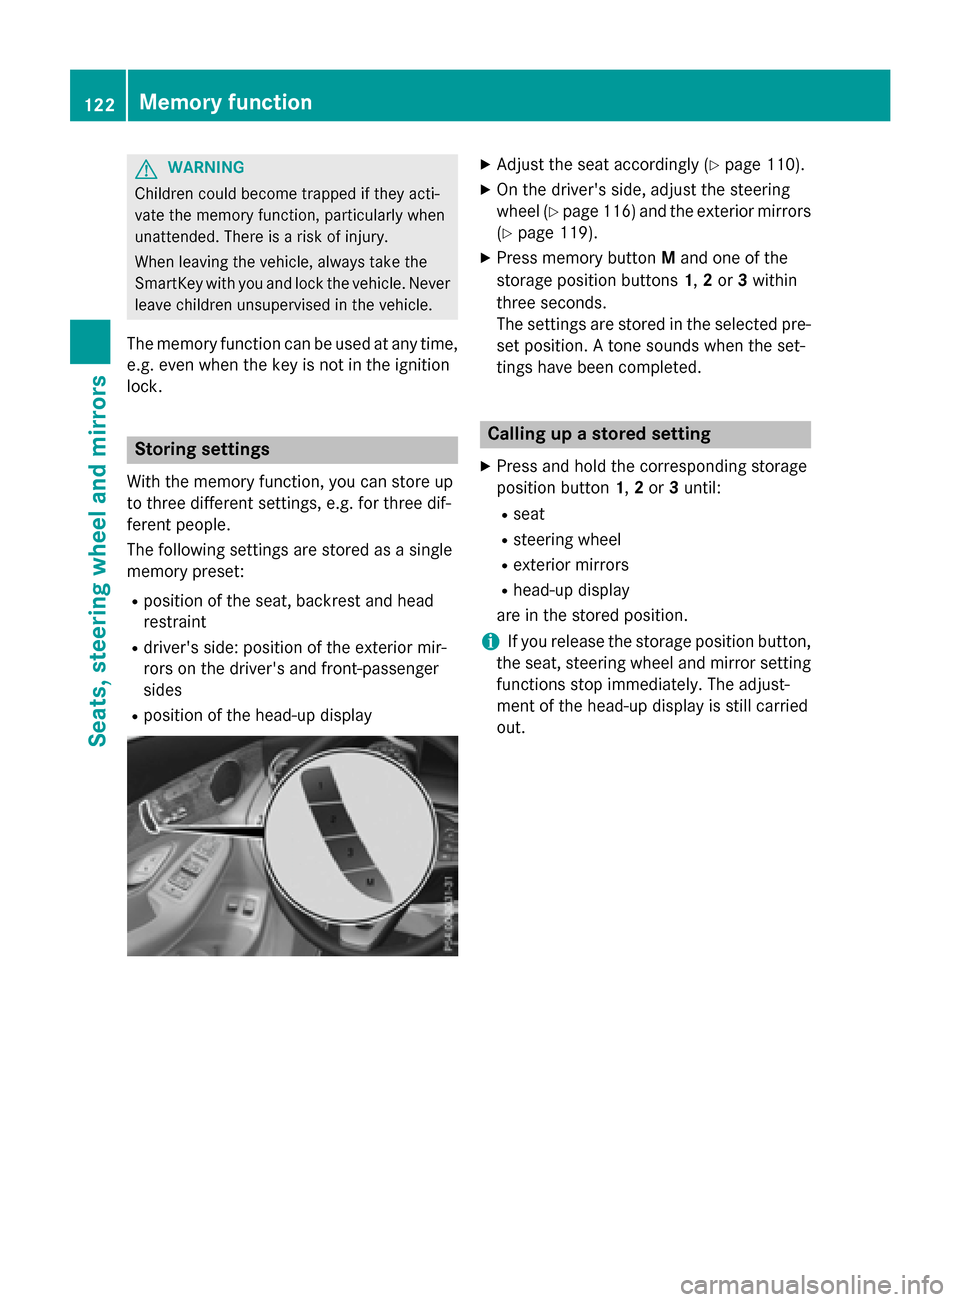
XPress memory button Mand one of the
storage position buttons 1,2or 3within
three seconds.
The settings are stored in the selected pre-
set position. A tone sounds when the set-
tings have been completed.
Calling up a stored setting
XPress and hold the corresponding storage
position button 1,2or 3until:
Rseat
Rsteering wheel
Rexterior mirrors
Rhead-up display
are in the stored position.
iIf you release the storage position button,
the seat, steering wheel and mirror setting
functions stop immediately. The adjust-
ment of the head-up display is still carried
out.
122Memory function
Seats, steering wheel and mirrors
Page 126 of 418
Useful information
i
This Operator's Manual describes all
models and all standard and optional equip-
ment of your vehicle available at the time of
publication of the Operator's Manual.
Country-specific differences are possible.
Please note that your vehicle may not be
equipped with all features described. This
also applies to safety-related systems and
functions.
iRead the information on qualified special-
ist workshops (
Ypage 27).
Exterior lighting
General notes
If you wish to drive during the daytime without lights, switch off the daytime running lamps
function in the on-board computer
(
Ypage 255).
Setting the exterior lighting
Setting options
Exterior lighting can be set using the:
Rlight switch
Rcombination switch (Ypage 126)
Ron-board computer (Ypage 255)
Light switch
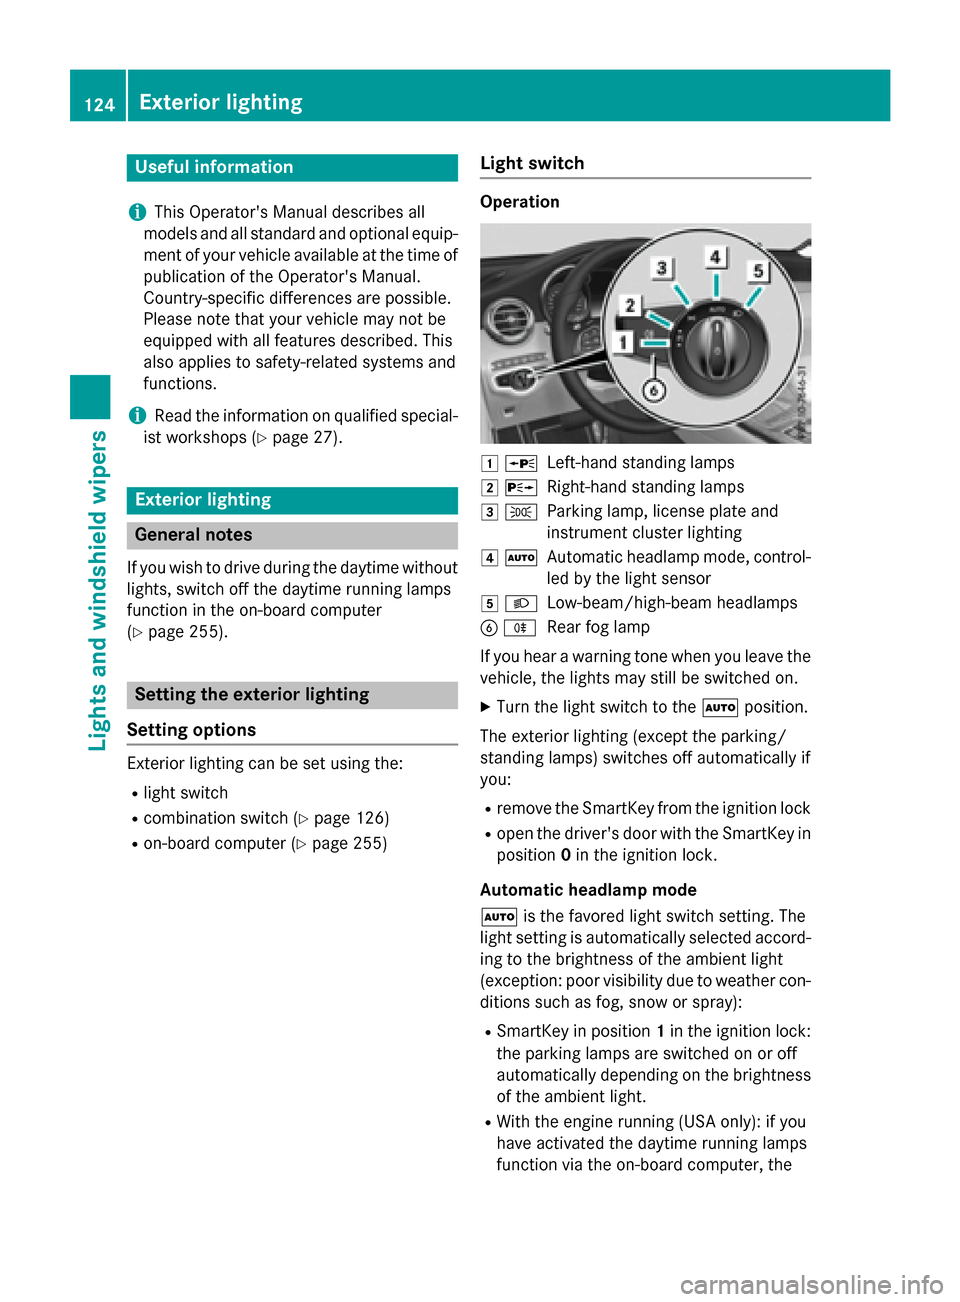
Operation
1 WLeft-hand standing lamps
2XRight-hand standing lamps
3TParking lamp, license plate and
instrument cluster lighting
4ÃAutomatic headlamp mode, control-
led by the light sensor
5LLow-beam/high-beam headlamps
BRRear fog lamp
If you hear a warning tone when you leave the
vehicle, the lights may still be switched on.
XTurn the light switch to the Ãposition.
The exterior lighting (except the parking/
standing lamps) switches off automatically if
you:
Rremove the SmartKey from the ignition lock
Ropen the driver's door with the SmartKey in
position 0in the ignition lock.
Automatic headlamp mode
à is the favored light switch setting. The
light setting is automatically selected accord-
ing to the brightness of the ambient light
(exception: poor visibility due to weather con-
ditions such as fog, snow or spray):
RSmartKey in position 1in the ignition lock:
the parking lamps are switched on or off
automatically depending on the brightness
of the ambient light.
RWith the engine running (USA only): if you
have activated the daytime running lamps
function via the on-board computer, the
124Exterior lighting
Lights and windshield wipers
Page 127 of 418
daytime running lamps or the parking
lamps and the low-beam headlamps are
switched on or off automatically depending
on the brightness of the ambient light.
RWith the engine running (Canada only):
depending on the ambient light, the day-
time running lamps or the parking lamps
and the low-beam headlamps are switched
on or off automatically.
XTo switch on the automatic headlamps:
turn the light switch to the Ãposition.
GWARNING
When the light switch is set to Ã, the low-
beam headlamps may not be switched on
automatically if there is fog, snow or other
causes of poor visibility due to the weather
conditions such as spray. There is a risk of an
accident.
In such situations, turn the light switch to
L.
The automatic headlamp feature is only an
aid. The driver is responsible for the vehicle's
lighting at all times.
Canada only:
The daytime running lamps improve the visi-
bility of your vehicle during the day. The day-
time running lamps function is required by law
in Canada. It cannot therefore be deactivated.
When the engine is running and the vehicle is
stationary: if you move the selector lever from
a drive position to P, the daytime running
lamps/low-beam headlamps go out after
three minutes.
When the engine is running, the vehicle is
stationary and in bright ambient light: if you
turn the light switch to T, the daytime
running lamps and parking lamps switch on.
If the engine is running and you turn the light
switch to the Lposition, the manual set-
tings take precedence over the daytime run-
ning lamps.
USA only:
The daytime running lamps improve the visi-
bility of your vehicle during the day. To do this, the daytime running lamps function must be
switched on using the on-board computer
(
Ypage 255).
If the engine is running and you turn the light
switch to the TorL position, the man-
ual settings take precedence over the day-
time running lamps.
Low-beam headlamps
Even if the light sensor does not detect that it
is dark, the parking lamps and low-beam
headlamps switch on when the ignition is
switched on and the light switch is set to the
L position. This is a particularly useful
function in the event of rain and fog.
XTo switch on the low-beam headlamps:
turn the SmartKey in the ign
ition lock to
position 2or start the engine.
XTurn the light switch to the Lposition.
The green Lindicator lamp in the instru-
ment cluster lights up.
Rear fog lamp
The rear fog lamp improves visibility of your
vehicle for the traffic behind in the event of
thick fog. Please take note of the country-
specific regulations for the use of rear fog
lamps.
XTo switch on the rear fog lamp: turn the
SmartKey in the ignition lock to position 2
or start the engine.
XTurn the light switch to the LorÃ
position.
XPress the Rbutton.
The yellow Rindicator lamp in the
instrument cluster lights up.
XTo switch off the rear fog lamp: press the
R button.
The yellow Rindicator lamp in the
instrument cluster goes out.
Parking lamps
!If the battery has been excessively dis-
charged, the parking lamps or standing
lamps are automatically switched off to
enable the next engine start. Always park
Exterior lighting125
Lights and windshield wipers
Z
Page 128 of 418
your vehiclesafely and sufficientl ylit
accordin gto legal standards .Avoid th e
continuous use of th eT parkin glamp s
fo rsevera lhours. If possible, switch on th e
X right or th eW leftstandin glamp .
XTo switch on: turnth eligh tswitch to th e
T position .
The green Tindicator lamp in th einstru-
men tcluster lights up.
Standing lamps
Switchin gon th estandin glamp sensures th e
correspondin gside of th evehicl eis illumina-
ted.
XTo switch on th estanding lamps :th e
SmartKey should no tbe in th eignition loc k
or it should be in position 0.
XTurnth eligh tswitch to th eW (left-han d
side of th evehicle) or X(right-hand side
of th evehicle) position .
Combination switch
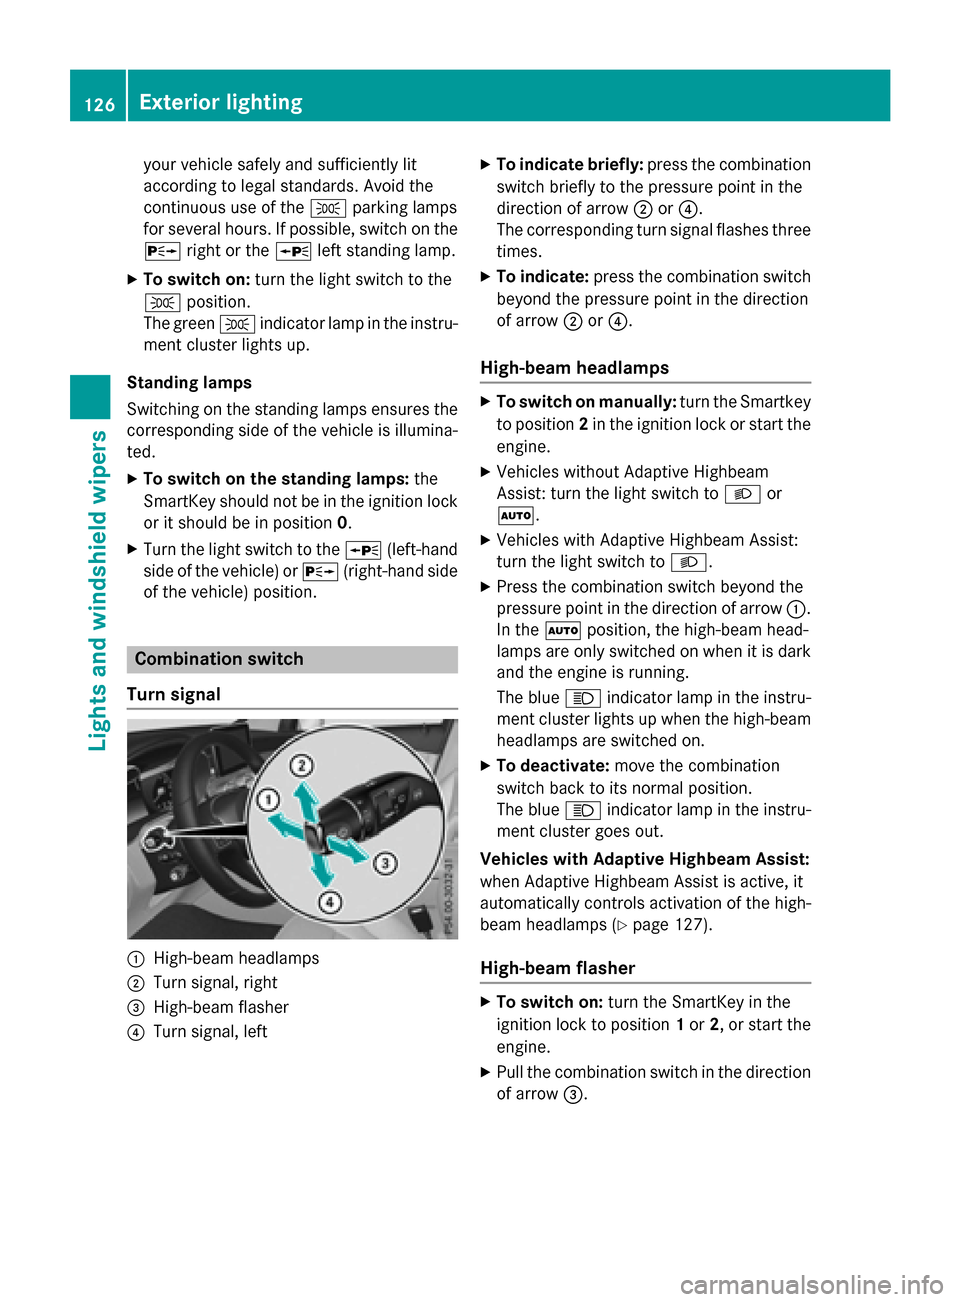
Turn signal
:High-beam headlamp s
;Turnsignal ,right
=High-beam flasher
?Tur nsignal ,lef t
XTo indicat ebriefly: press thecombination
switch briefl yto th epressur epoin tin th e
direction of arrow ;or?.
The correspondin gtur nsignal flashes three
times .
XTo indicate: press thecombination switch
beyond th epressur epoin tin th edirection
of arrow ;or?.
High-bea mheadlamps
XTo switch on manually: turnth eSmartke y
to position 2in th eignition loc kor start th e
engine.
XVehicles without Adaptive Highbeam
Assist: tur nth eligh tswitch to Lor
Ã.
XVehicles wit hAdaptive Highbeam Assist:
tur nth eligh tswitch to L.
XPress thecombination switch beyond th e
pressur epoin tin th edirection of arrow :.
In th eà position ,th ehigh-beam head -
lamp sare only switched on when it is dark
and th eengin eis running .
The blue Kindicator lamp in th einstru-
men tcluster lights up when th ehigh-beam
headlamp sare switched on .
XTo deactivate:mov eth ecombination
switch bac kto it snormal position .
The blue Kindicator lamp in th einstru-
men tcluster goe sout .
Vehicles wit hAdaptive Highbeam Assist:
when Adaptive Highbeam Assis tis active ,it
automatically controls activation of th ehigh-
beam headlamp s (
Ypage 127).
High-beamflashe r
XTo switch on: turnth eSmartKey in th e
ignition loc kto position 1or 2,or start th e
engine.
XPull th ecombination switch in th edirection
of arrow =.
126Exterior lighting
Lights and windshield wiper s
Page 129 of 418
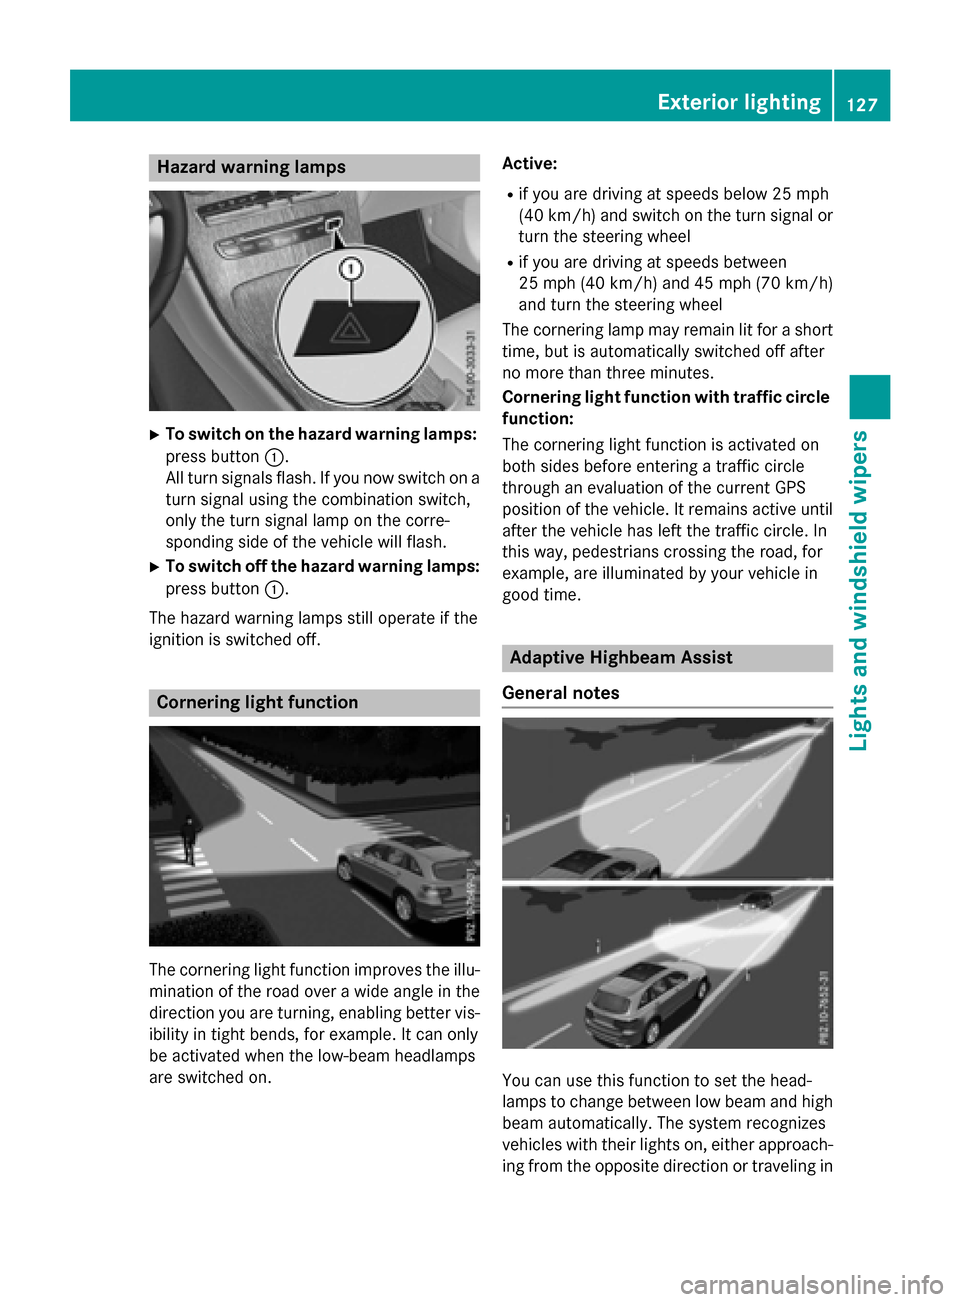
Hazard warning lamps
XTo switch on the hazard warning lamps:press button :.
All turn signals flash. If you now switch on a
turn signal using the combination switch,
only the turn signal lamp on the corre-
sponding side of the vehicle will flash.
XTo switch off the hazard warning lamps:
press button :.
The hazard warning lamps still operate if the
ignition is switched off.
Cornering light function
The cornering light function improves the illu-
mination of the road over a wide angle in the
direction you are turning, enabling better vis-
ibility in tight bends, for example. It can only
be activated when the low-beam headlamps
are switched on. Active:
Rif you are driving at speeds below 25 mph
(40 km/h) and switch on the turn signal or
turn the steering wheel
Rif you are driving at speeds between
25 mph (40 km/h) and 45 mph (70 km/h)
and turn the steering wheel
The cornering lamp may remain lit for a short
time, but is automatically switched off after
no more than three minutes.
Cornering light function with traffic circle
function:
The cornering light function is activated on
both sides before entering a traffic circle
through an evaluation of the current GPS
position of the vehicle. It remains active until after the vehicle has left the traffic circle. In
this way, pedestrians crossing the road, for
example, are illuminated by your vehicle in
good time.
Adaptive Highbeam Assist
General notes
You can use this function to set the head-
lamps to change between low beam and high beam automatically. The system recognizes
vehicles with their lights on, either approach-
ing from the opposite direction or traveling in
Exterior lighting127
Lights and windshield wipers
Z
Page 136 of 418
XClip inthe lower section of handle :again.
XInsert and engage the upper section of han-
dle =into lower section :.
Windshield wipers
Switching the windshield wiper
on/off
!
Do not operate the windshield wipers
when the windshield isdry, as this could
damage the wiperblades. Moreover, dust
that has co llected on the windshield can
scratch the glass if wiping takes place when
the windshield is dry.
If it is necessary to switch on the windshield
wiper sin dry weather conditions, always
use washer fluid when operating the wind-
shield wiper s.
!Ifthe windshield wipers leave smears on
the windshield after the vehicle has been
washed inan automat iccar wash, wax or
other residues may bethe reason for this.
Clean the windshield using washer fluid
after washing the vehicle inan automat ic
car wash.
!In term ittent wiping with rain sensor: due
to optical influences and the windshield
becoming dirtyin dry weather conditions,
the windshield wipers may beactivated
inadvertently. This could then damage the
win dshield wiper blades or scratch the
win dshield.
For th isreason, you should always switch
off the windshield wipersin dry weather.
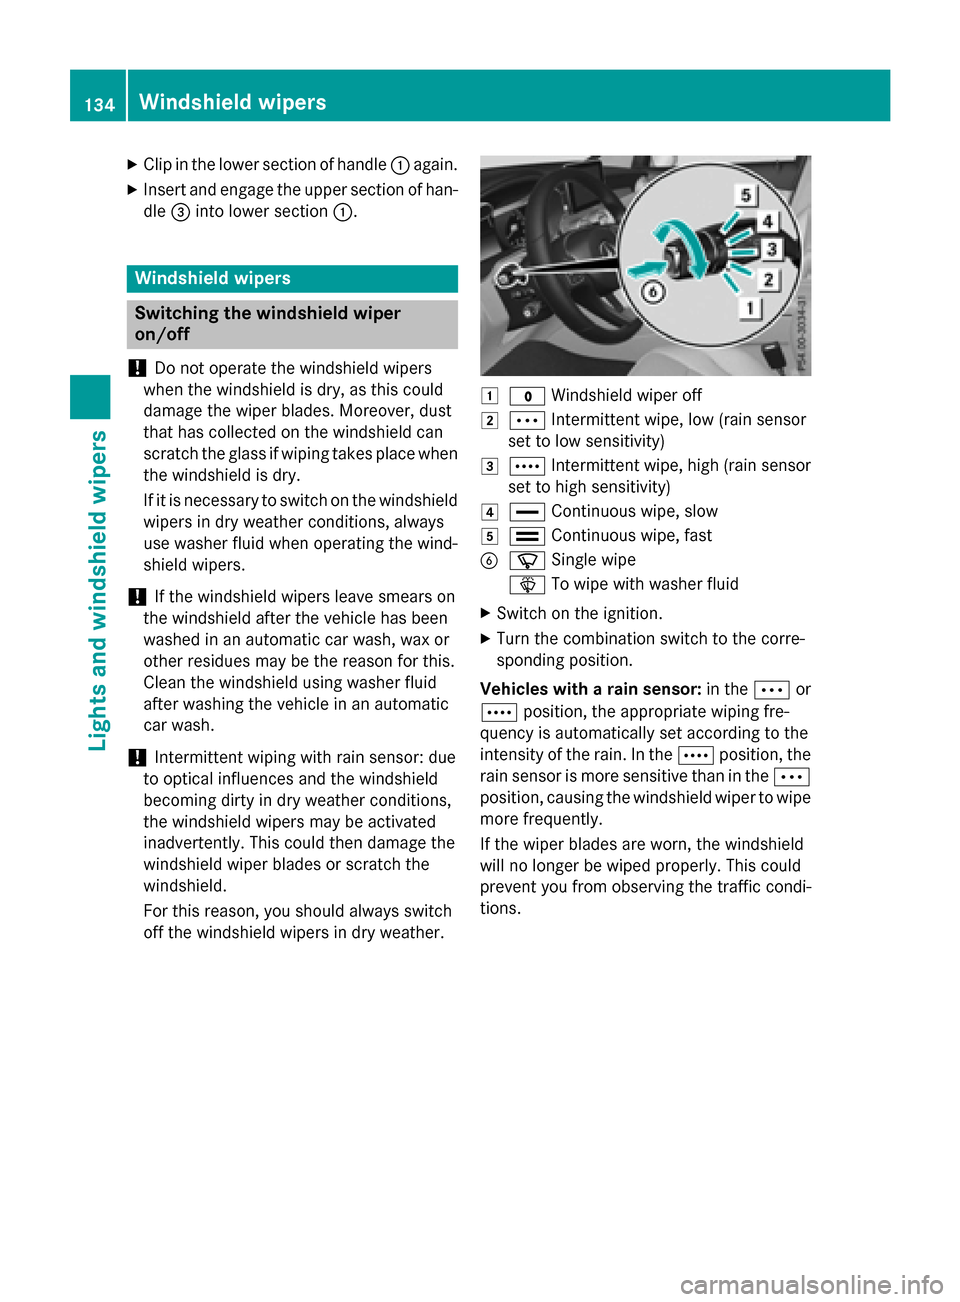
1$ Windshield wiper off
2ÄInterm ittent wipe, low (rain sensor
set to low sensitivit y)
3ÅInterm ittent wipe, high (rain sensor
set to high sensitivit y)
4°Continuous wipe, slow
5¯Continuous wipe, fast
BíSingle wipe
î Towipe with washer fluid
XSwitch on the ignition.
XTurn the combination switch to the corre-
sponding position.
Vehicles with a rain sensor: inthe Ä or
Å position, the appropriate wiping fre-
quency isautomatical lyset according to the
intensity of the rain. Inthe Å position, the
rain sensor ismore sensitive thaninthe Ä
position, causing the windshield wiper to wipe
more frequently.
If the wiper bladesare worn, the windshield
will no longer bewiped properly. This could
prevent you from observing the traff iccond i-
tions.
134Windshield wipers
Lights and windshield wipers
Page 137 of 418
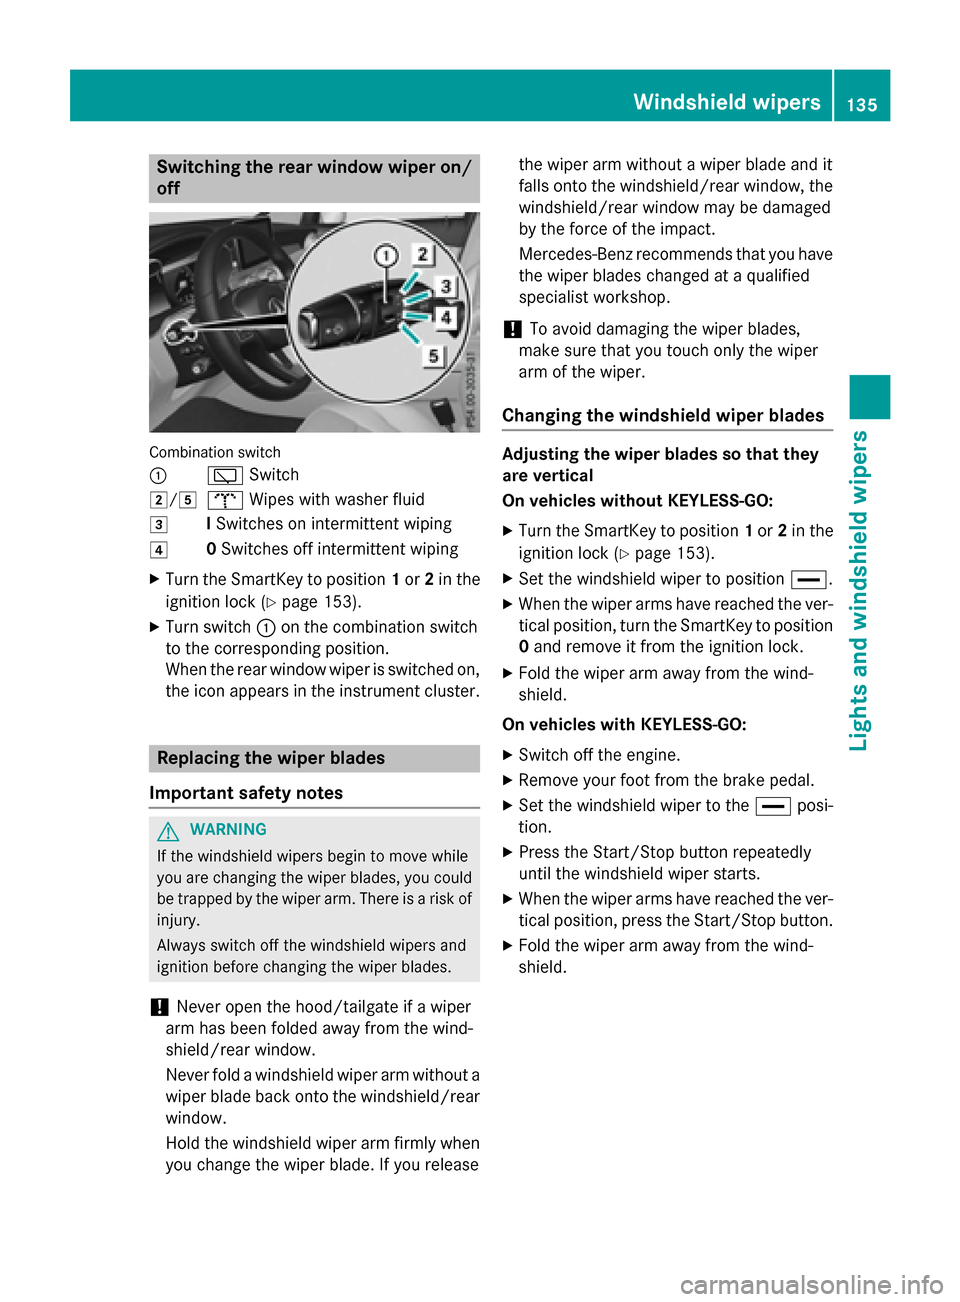
Switching the rear window wiper on/
off
Combination switch
:
èSwitch
2/5bWipes with washer fluid
3ISwitches on intermittent wiping
40 Switches off intermittent wiping
XTurn the SmartKey to position 1or 2in the
ignition lock (
Ypage 153).
XTurn switch :on the combination switch
to the corresponding position.
When the rear window wiper is switched on,
the icon appears in the instrument cluster.
Replacing the wiper blades
Important safety notes
GWARNING
If the windshield wipers begin to move while
you are changing the wiper blades, you could be trapped by the wiper arm. There is a risk of
injury.
Always switch off the windshield wipers and
ignition before changing the wiper blades.
!Never open the hood/tailgate if a wiper
arm has been folded away from the wind-
shield/rear window.
Never fold a windshield wiper arm without a
wiper blade back onto the windshield/rear
window.
Hold the windshield wiper arm firmly when
you change the wiper blade. If you release the wiper arm without a wiper blade and it
falls onto the windshield/rear window, the
windshield/rear window may be damaged
by the force of the impact.
Mercedes-Benz recommends that you have
the wiper blades changed at a qualified
specialist workshop.
!To avoid damaging the wiper blades,
make sure that you touch only the wiper
arm of the wiper.
Changing the windshield wiper blades
Adjusting the wiper blades so that they
are vertical
On vehicles without KEYLESS-GO:
XTurn the SmartKey to position 1or 2in the
ignition lock (
Ypage 153).
XSet the windshield wiper to position °.
XWhen the wiper arms have reached the ver-
tical position, turn the SmartKey to position
0 and remove it from the ignition lock.
XFold the wiper arm away from the wind-
shield.
On vehicles with KEYLESS-GO:
XSwitch off the engine.
XRemove your foot from the brake pedal.
XSet the windshield wiper to the °posi-
tion.
XPress the Start/Stop button repeatedly
until the windshield wiper starts.
XWhen the wiper arms have reached the ver- tical position, press the Start/Stop button.
XFold the wiper arm away from the wind-
shield.
Windshield wipers135
Lights and windshield wipers
Z
Page 139 of 418
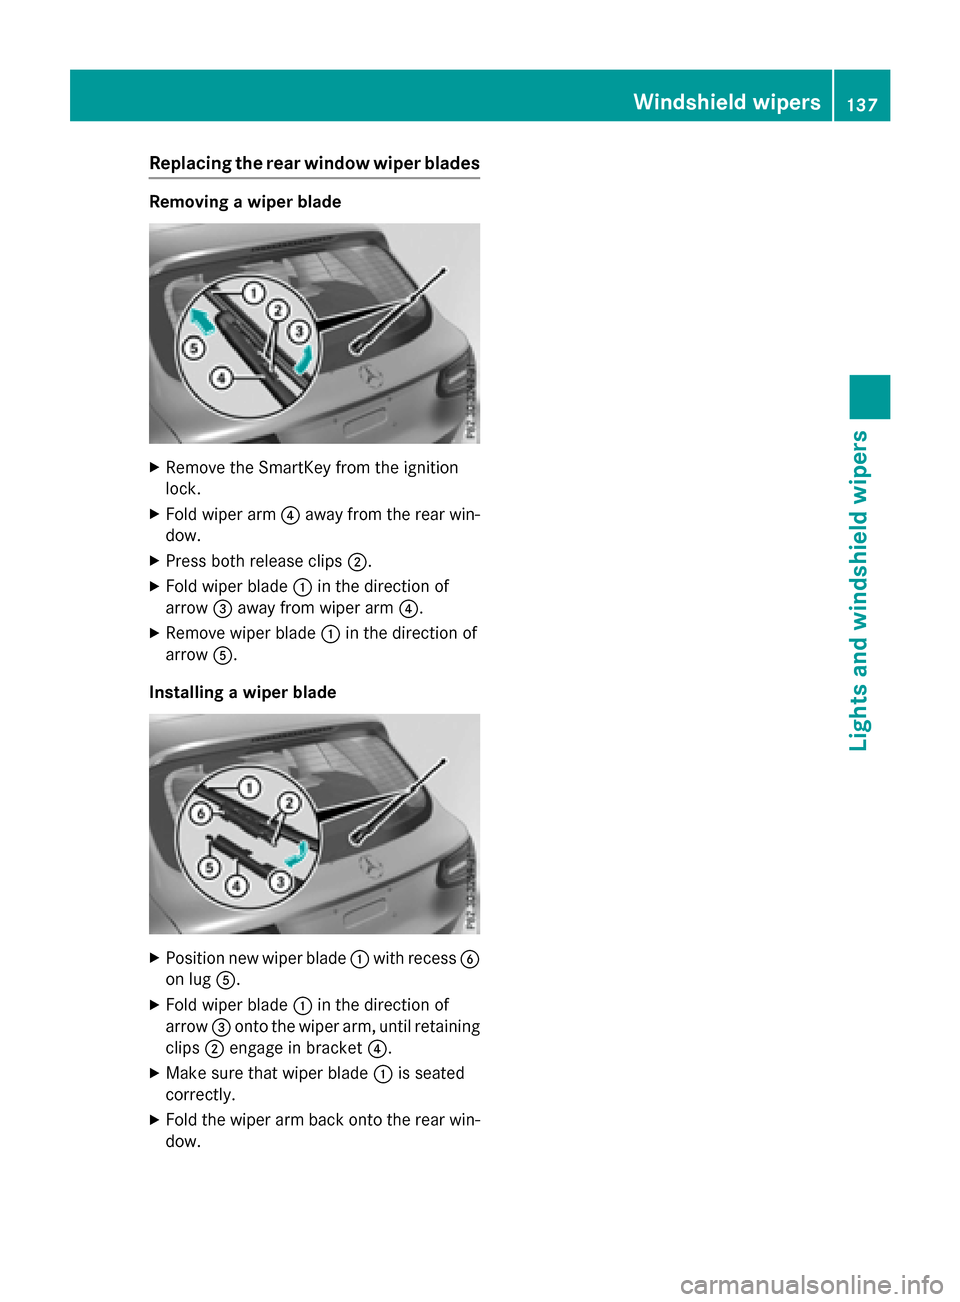
Replacing the rear window wiper blades
Removing a wiper blade
XRemove the SmartKey from the ignition
lock.
XFold wiper arm?away from the rear win-
dow.
XPress both release clips ;.
XFold wiper blade:in the direction of
arrow =away from wiper arm ?.
XRemove wiper blade:in the direction of
arrow A.
Installing a wiper blade
XPosition new wiper blade :with recess B
on lug A.
XFold wiper blade :in the direction of
arrow =onto the wiper arm, until retaining
clips ;engage in bracket ?.
XMake sure that wiper blade :is seated
correctly.
XFold the wiper arm back onto the rear win-
dow.
Windshield wipers137
Lights and windshield wipers
Z
Page 140 of 418
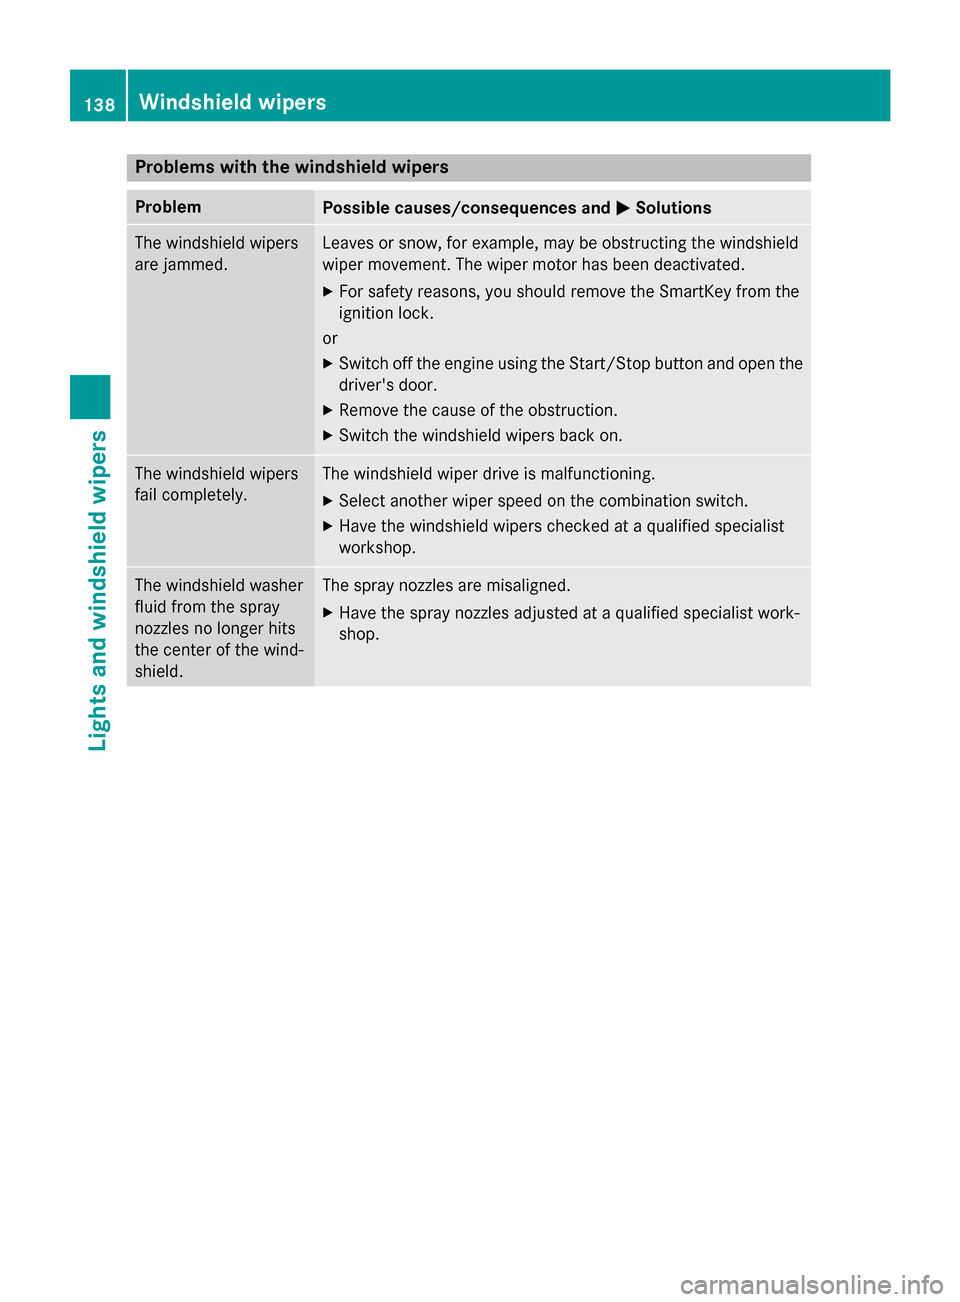
Problems with the windshield wipers
ProblemPossible causes/consequences andMSolutions
The windshield wipers
are jammed.Leaves or snow, for example, may be obstructing the windshield
wiper movement. The wiper motor has been deactivated.
XFor safety reasons, you should remove the SmartKey from the
ignition lock.
or
XSwitch off the engine using the Start/Stop button and open the driver's door.
XRemove the cause of the obstruction.
XSwitch the windshield wipers back on.
The windshield wipers
fail completely.The windshield wiper drive is malfunctioning.
XSelect another wiper speed on the combination switch.
XHave the windshield wipers checked at a qualified specialist
workshop.
The windshield washer
fluid from the spray
nozzles no longer hits
the center of the wind-
shield.The spray nozzles are misaligned.
XHave the spray nozzles adjusted at a qualified specialist work-
shop.
138Windshield wipers
Lights and windshield wipers