ignition MERCEDES-BENZ GLC-Class 2016 X253 Workshop Manual
[x] Cancel search | Manufacturer: MERCEDES-BENZ, Model Year: 2016, Model line: GLC-Class, Model: MERCEDES-BENZ GLC-Class 2016 X253Pages: 418, PDF Size: 9.23 MB
Page 175 of 418
GWARNING
If you leave children unsupervised in the vehi-
cle, they could set it in motion by, for example:
Rrelease the parking brake.
Rshift the automatic transmission out of the
parking position P.
Rstart the engine.
In addition, they may operate vehicle equip-
ment and become trapped. There is a risk of
an accident and injury.
When leaving the vehicle, always take the
SmartKey with you and lock the vehicle. Never
leave children unsupervised in the vehicle.
!Always secure the vehicle correctly
against rolling away. Otherwise, the vehicle
or its drivetrain could be damaged.
To ensure that the vehicle is secured against
rolling away unintentionally:
Rthe electric parking brake must be applied.
Rthe transmission must be in position Pand
the SmartKey must be removed from the
ignition lock.
Rthe front wheels must be turned towards
the curb on steep uphill or downhill gradi-
ents.
Rthe empty vehicle must be secured at the
front axle with a wheel chock or similar, for
example, on uphill or downhill gradients.
Ra laden vehicle must also be secured at the
rear axle with a wheel chock or similar, for
example, on uphill or downhill gradients.
Switching off the engine
Important safety notes
GWARNING
The automatic transmission switches to neu-
tral position Nwhen you switch off the engine.
The vehicle may roll away. There is a risk of an
accident.
After switching off the engine, always switch
to parking position P. Prevent the parked vehi-
cle from rolling away by applying the parking
brake.
Vehicles with automatic transmission
XApply the electric parking brake.
XShift the transmission to position P.
XWith the SmartKey:turn the SmartKey to
position 0in the ignition lock and remove it.
The immobilizer is activated.
XWith the Start/Stop button: press the
Start/Stop button (
Ypage 153).
The engine stops and all the indicator
lamps in the instrument cluster go out.
When the driver's door is closed, this cor-
responds to SmartKey position 1. When the
driver's door is open, this corresponds to
SmartKey position 0: "SmartKey removed".
If you switch the engine off with the trans-
mission in position Ror D, the automatic
transmission shifts to Nautomatically.
With the SmartKey: if you then open the
driver's door or the front-passenger door or
remove the SmartKey from the ignition, the
automatic transmission shifts to Pautomati-
cally.
With the Start/Stop button: if you then
open the driver's door or the front-passenger
door, the automatic transmission shifts to P
automatically.
If you want the automatic transmission to
remain in neutral N, e.g. when having the
vehicle cleaned in an automatic car wash with
a towing system:
Using the SmartKey:
XSwitch on the ignition.
XDepress the brake pedal and keep it
depressed.
XShift to neutral N.
XRelease the brake pedal.
XRelease the electric parking brake.
XSwitch off the ignition and leave the Smart-
Key in the ignition lock.
Parking173
Driving and parking
Z
Page 176 of 418
With the Start/Stop button:
XSwitch on the ignition.
XDepress the brake pedal and keep it
depressed.
XRemove the Start/Stop button from the
ignition lock.
XInsert the SmartKey into the ignition lock.
XShift to neutralN.
XRelease the brake pedal.
XRelease the electric parking brake.
XSwitch off the ignition and leave the Smart-
Key in the ignition lock.
The engine can be switched off in an emer-
gency while the vehicle is in motion by press- ing and holding the Start/Stop button for
three seconds. This function operates inde-
pendently of the ECO start/stop automatic
engine switch-off function.
Electric parking brake
General notes
GWARNING
If you leave children unsupervised in the vehi-
cle, they could set it in motion by, for example:
Rrelease the parking brake.
Rshift the automatic transmission out of the
parking position P.
Rstart the engine.
In addition, they may operate vehicle equip-
ment and become trapped. There is a risk of
an accident and injury.
When leaving the vehicle, always take the
SmartKey with you and lock the vehicle. Never
leave children unsupervised in the vehicle.
The function of the electric parking brake is
dependent on the on-board voltage. If the on-
board voltage is low or there is a malfunction
in the system, it may not be possible to apply
the released parking brake.
XIf this is the case, only park the vehicle on
level ground and secure it to prevent it roll-
ing away.
XShift the automatic transmission to posi-
tion P.
It may not be possible to release an applied
parking brake if the on-board voltage is low or
there is a malfunction in the system. Contact a qualified specialist workshop.
The electric parking brake performs a func-
tion test at regular intervals while the engine
is switched off. The sounds that can be heard
while this is occurring are normal.
Applying or releasing manually
XTo apply: push handle :.
When the electric parking brake is applied, the red F(USA only) or !(Canada
only) indicator lamp lights up in the instru-
ment cluster.
The electric parking brake can also be
applied when the SmartKey is removed.
174Parking
Driving and parking
Page 177 of 418
XTo release:pull handle:.
The red F(USA only) or !(Canada
only) indicator lamp in the instrument clus- ter goes out.
The electric parking brake can only be
released:
Rwhen the SmartKey is in position 1or 2in
the ignition lock (
Ypage 153) or
Rif the ignition was switched on using the
Start/Stop button
Applying automatically
The electric parking brake is automatically
applied when the transmission is in position P
and:
Rthe engine is switched off or
Rthe driver is not wearing a seat belt and the driver's door is opened.
To prevent the electric parking brake from
being automatically applied, pull handle :.
The electric parking brake is also engaged
automatically if:
RDISTRONIC PLUS brings the vehicle to a
standstill or
Rthe HOLD function is keeping the vehicle
stationary
RActive Parking Assist is keeping the vehicle
stationary
In addition, at least one of the following con-
ditions must be fulfilled:
Rthere is a system malfunction.
Rthe power supply is insufficient.
Rthe vehicle is stationary for a lengthy
period.
The red !indicator lamp in the instrument
cluster lights up.
The electric parking brake is not automati-
cally engaged if the engine is switched off by
the ECO start/stop function.
Releasing automatically
Your vehicle's electric parking brake is auto-
matically released if all of the following con-
ditions are met:
Rthe engine is running.
Rthe transmission is in position Dor R.
Rthe seat belt has been fastened.
Ryou depress the accelerator pedal.
If the transmission is in position R, the trunk
lid must be closed.
If your seat belt is not fastened, the following
conditions must be fulfilled to automatically
release the electric parking brake:
Rthe driver's door is closed.
Ryou have shifted out of transmission posi-
tion Por you have previously driven faster
than 2 mph (3 km/h)
Ensure that you do not depress the acceler-
ator pedal unintentionally. Otherwise the
parking brake will be released and the vehicle
will start to move.
Emergency braking
The vehicle can also be braked during an
emergency by using the electric parking
brake.
XWhile driving, push handle :of the electric
parking brake (
Ypage 174).
The vehicle is braked as long as you keep
handle :of the electric parking brake
depressed. The longer electric parking
brake handle :is depressed, the greater
the braking force.
During braking:
Ra warning tone sounds
Rthe Please Release Parking Brake
message appears
Rthe red F(USA only) or !(Canada
only) indicator lamp in the instrument clus- ter flashes
When the vehicle has been braked to a stand-
still, the electric parking brake is engaged.
Parking175
Driving an d parking
Z
Page 178 of 418
Parking the vehicle for a long period
If you leave the vehicle parked for longer than
four weeks, the battery may be damaged by
exhaustive discharging.
If you leave the vehicle parked for longer thansix weeks, the vehicle may suffer damage as a
result of lack of use.
XVisit a qualified specialist workshop and
seek advice.
iYou can obtain information about trickle
chargers from a qualified specialist work-
shop.
Driving tips
General driving tips
Important safety notes
GWARNING
If you switch off the ignition while driving,
safety-relevant functions are only available
with limitations, or not at all. This could affect, for example, the power steering and the brake
boosting effect. You will require considerably
more effort to steer and brake. There is a risk
of an accident.
Do not switch off the ignition while driving.
GWARNING
If you operate mobile communication equip-
ment while driving, you will be distracted from traffic conditions. You could also lose control
of the vehicle. There is a risk of an accident.
Only operate this equipment when the vehicle
is stationary.
Observe the legal requirements for the coun-
try in which you are driving. Some jurisdic-
tions prohibit the driver from using a mobile
phone while driving a vehicle.
If you make a call while driving, always use
hands-free mode. Only operate the telephone
when the traffic situation permits. If you are unsure, pull over to a safe location and stop
before operating the telephone.
Bear in mind that at a speed of only 30 mph
(approximately 50 km/h), the vehicle covers
a distance of 44 ft (approximately 14 m) per
second.
Drive sensibly – save fuel
Observe the following tips to save fuel:
XThe tires should always be inflated to the
recommended tire pressure.
XRemove unnecessary loads.
XRemove roof racks when they are not nee-
ded.
XWarm up the engine at low engine speeds.
XAvoid frequent acceleration or braking.
XHave all maintenance work carried out as
indicated by the service intervals in the
Maintenance Booklet or by the service
interval display.
Fuel consumption also increases when driv-
ing in cold weather, in stop-start traffic and in
hilly terrain.
Drinking and driving
GWARNING
Drinking and driving and/or taking drugs and driving are very dangerous combinations.
Even a small amount of alcohol or drugs can
affect your reflexes, perceptions and judg-
ment.
The possibility of a serious or even fatal acci-
dent is greatly increased when you drink or
take drugs and drive.
Do not drink or take drugs and drive or allow
anyone to drive who has been drinking or tak-
ing drugs.
Emission control
GWARNING
Combustion engines emit poisonous exhaust
gases such as carbon monoxide. Inhaling
these exhaust gases leads to poisoning. There
176Driving tips
Driving and parking
Page 181 of 418
If the brakes have been subjected to a heavy
load, do not stop the vehicle immediately.
Drive on for a short while. This allows the air-
flow to cool the brakes more quickly.
Wet roads
If you have driven for a long time in heavy rain
without braking, there may be a delayed reac-
tion from the brakes when braking for the first
time. This may also occur after the vehicle has
been washed or driven through deep water.
You have to depress the brake pedal more
firmly. Maintain a greater distance from the
vehicle in front.
After driving on a wet road or having the vehi-
cle washed, brake firmly while paying atten-
tion to the traffic conditions. This will warm up
the brake discs, thereby drying them more
quickly and protecting them against corro-
sion.
Limited braking performance on salt-
treated roads
If you drive on salted roads, a layer of salt
residue may form on the brake discs and
brake pads. This can result in a significantly
longer braking distance.
RIn order to prevent any salt build-up, apply
the brakes occasionally while paying atten-
tion to the traffic conditions.
RCarefully depress the brake pedal and the
beginning and end of a journey.
RMaintain a greater distance to the vehicle
ahead.
Servicing the brakes
!The brake fluid level may be too low, if:
Rif the red brake warning lamp lights up inthe instrument cluster and
Ryou hear a warning tone while the engine
is running
Observe additional warning messages in
the multifunction display. The brake fluid level may be too low due to
brake pad wear or leaking brake lines.
Have the brake system checked immedi-
ately. Consult a qualified specialist work-
shop to arrange this.
!A function or performance test should
only be carried out on a 2-axle dynamom-
eter. If you wish to operate the vehicle on
such a dynamometer, please consult a
qualified specialist workshop in advance.
You could otherwise damage the drive train
or the brake system.
!The ESP®system operates automatically.
The engine and the ignition must therefore
be switched off (the SmartKey must be in
position 0or 1in the ignition lock or the
Start/Stop button must be in position 0or
1) if the electric parking brake is tested on
a brake dynamometer.
Braking triggered automatically by ESP
®
may cause severe damage to the brake
system.
All checks and maintenance work on the
brake system must be carried out at a quali-
fied specialist workshop.
Have brake pads installed and brake fluid
replaced at a qualified specialist workshop.
If the brake system has only been subject to
moderate loads, you should test the function-
ality of your brakes at regular intervals.
Information on BAS (Brake Assist) (
Ypage 68)
and BAS PLUS (Brake Assist PLUS)
(
Ypage 68).
For safety reasons, Mercedes-Benz recom-
mends only installing the following brake
disks and brake pads/linings:
Rbrake disks that have been approved by
Mercedes-Benz
Rbrake pads/linings that have been
approved by Mercedes-Benz or that are of
an equivalent standard of quality
Other brake disks or brake pads/linings can
compromise the safety of your vehicle.
Driving tips179
Driving and parking
Z
Page 198 of 418
Make sure no one is underneath the vehicle or
in the immediate vicinity of the wheel arches
when the vehicle is being lowered.
iIf one of the doors is open, the vehicle is
not lowered.
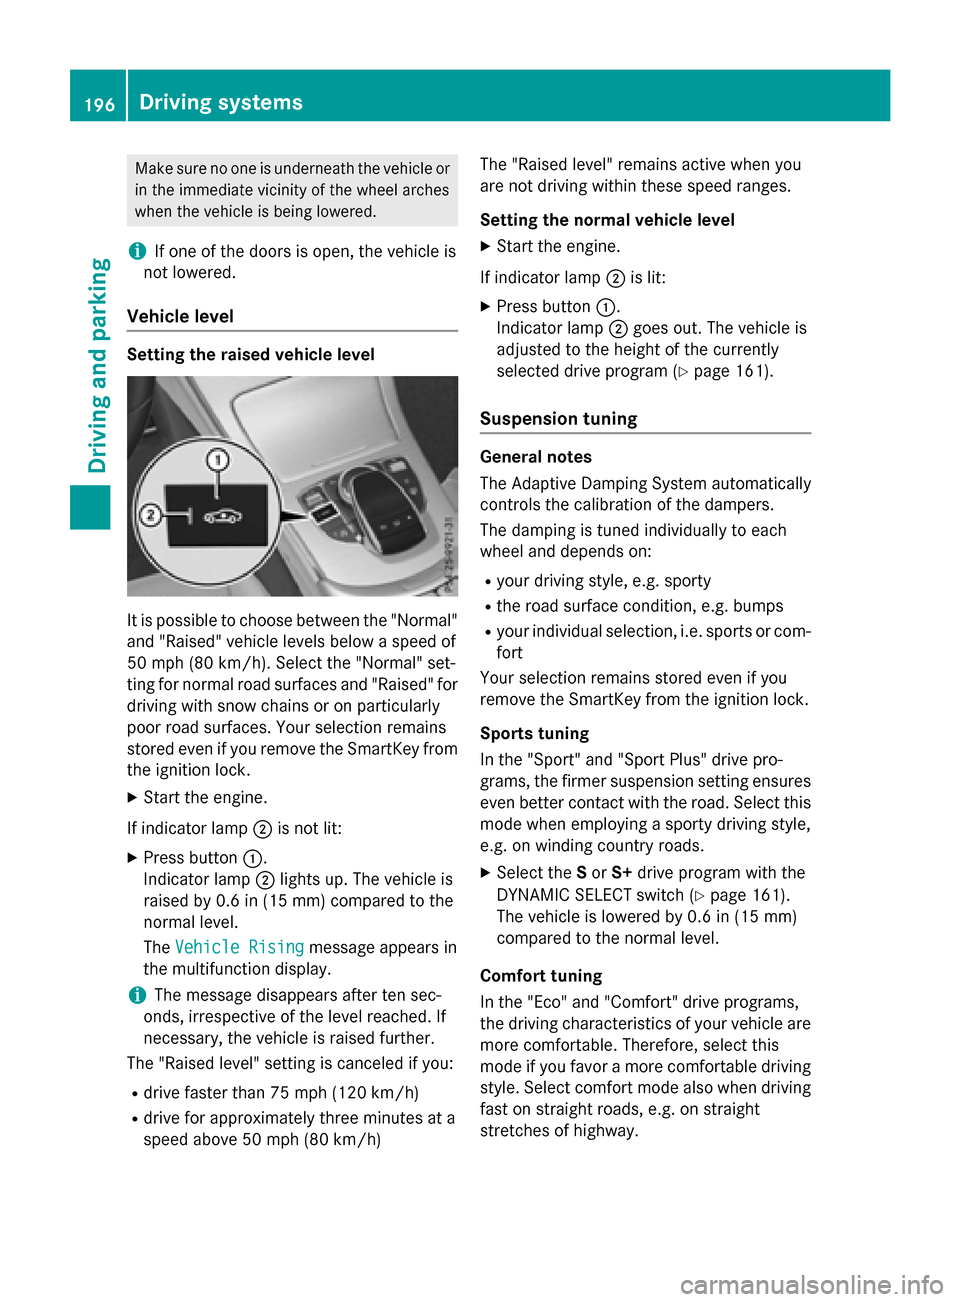
Vehicle level
Setting the raised vehicle level
It is possible to choose between the "Normal"
and "Raised" vehicle levels below a speed of
50 mph (80 km/h). Select the "Normal" set-
ting for normal road surfaces and "Raised" for
driving with snow chains or on particularly
poor road surfaces. Your selection remains
stored even if you remove the SmartKey from
the ignition lock.
XStart the engine.
If indicator lamp ;is not lit:
XPress button :.
Indicator lamp ;lights up. The vehicle is
raised by 0.6 in (15 mm) compared to the
normal level.
The Vehicle Rising
message appears in
the multifunction display.
iThe message disappears after ten sec-
onds, irrespective of the level reached. If
necessary, the vehicle is raised further.
The "Raised level" setting is canceled if you:
Rdrive faster than 75 mph (120 km/h)
Rdrive for approximately three minutes at a
speed above 50 mph (80 km/h) The "Raised level" remains active when you
are not driving within these speed ranges.
Setting the normal vehicle level
XStart the engine.
If indicator lamp ;is lit:
XPress button :.
Indicator lamp ;goes out. The vehicle is
adjusted to the height of the currently
selected drive program (
Ypage 161).
Suspension tuning
General notes
The Adaptive Damping System automatically
controls the calibration of the dampers.
The damping is tuned individually to each
wheel and depends on:
Ryour driving style, e.g. sporty
Rthe road surface condition, e.g. bumps
Ryour individual selection, i.e. sports or com-
fort
Your selection remains stored even if you
remove the SmartKey from the ignition lock.
Sports tuning
In the "Sport" and "Sport Plus" drive pro-
grams, the firmer suspension setting ensures
even better contact with the road. Select this
mode when employing a sporty driving style,
e.g. on winding country roads.
XSelect the Sor S+ drive program with the
DYNAMIC SELECT switch (
Ypage 161).
The vehicle is lowered by 0.6 in (15 mm)
compared to the normal level.
Comfort tuning
In the "Eco" and "Comfort" drive programs,
the driving characteristics of your vehicle are
more comfortable. Therefore, select this
mode if you favor a more comfortable driving
style. Select comfort mode also when driving
fast on straight roads, e.g. on straight
stretches of highway.
196Driving systems
Driving and parking
Page 200 of 418
you use wintertires (M+S tire s), with snow
chains if necessary.
PARKTRONIC
Important safety notes
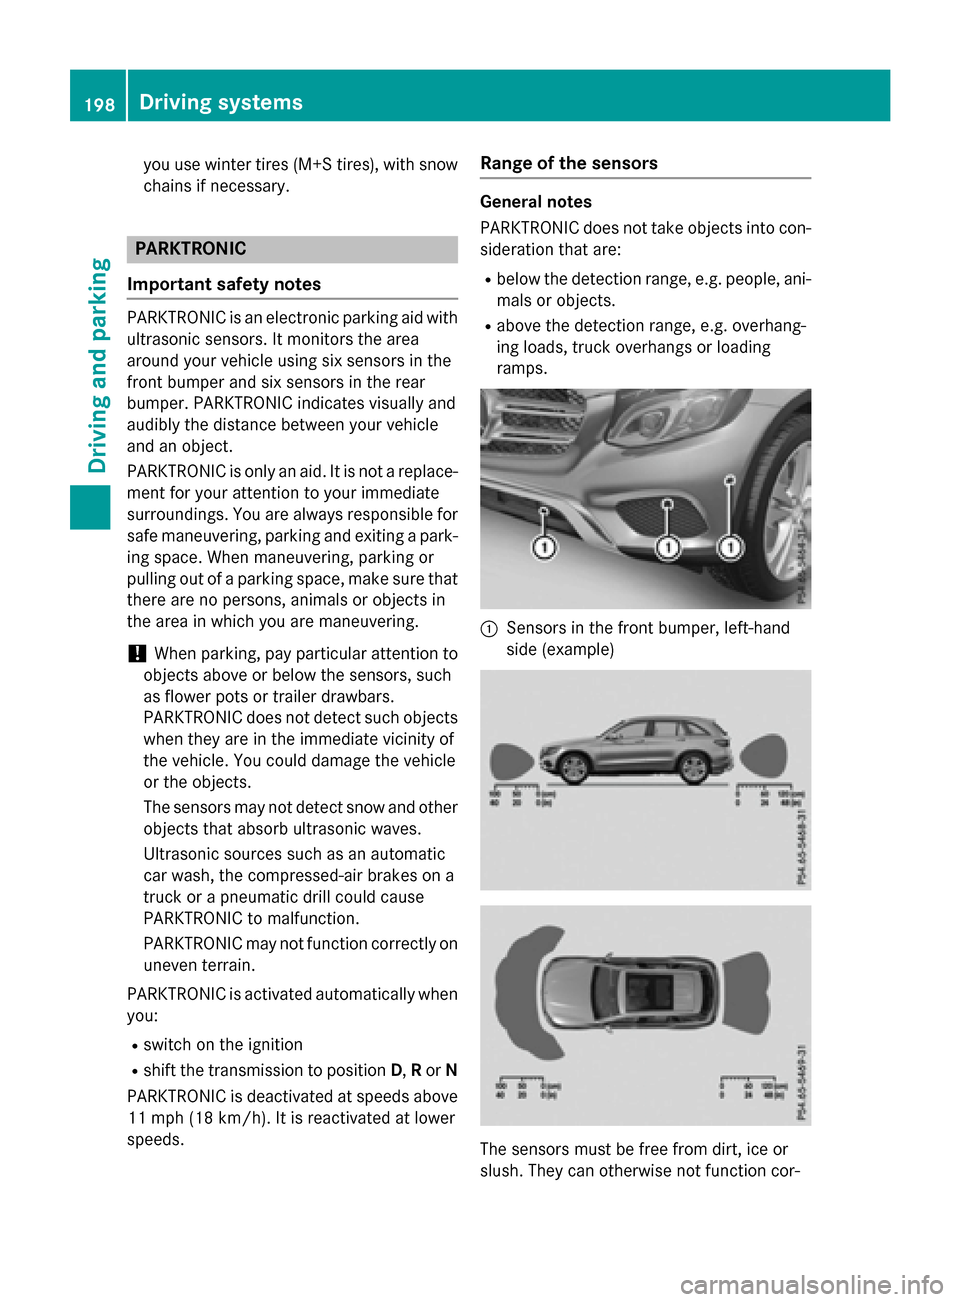
PARKTRONIC is an electronic parking aid with ultrasonic sensors. It monitors the area
around your vehicle using six sensors in the
front bumper and six sensors in the rear
bumper. PARKTRONIC indicates visually and
audibly the distance between your vehicle
and an object.
PARKTRONIC is only an aid. It is not a replace-
ment for your attention to your immediate
surroundings. You are always responsible for
safe maneuvering, parking and exiting a park-
ing space. When maneuvering, parking or
pulling out of a parking space, make sure that
there are no persons, animals or objects in
the area in which you are maneuvering.
!When parking, pay particular attention to
objects above or below the sensors, such
as flower pots or trailer drawbars.
PARKTRONIC does not detect such objects
when they are in the immediate vicinity of
the vehicle. You could damage the vehicle
or the objects.
The sensors may not detect snow and other
objects that absorb ultrasonic waves.
Ultrasonic sources such as an automatic
car wash, the compressed-air brakes on a
truck or a pneumatic drill could cause
PARKTRONIC to malfunction.
PARKTRONIC may not function correctly on
uneven terrain.
PARKTRONIC is activated automatically when
you:
Rswitch on the ignition
Rshift the transmission to position D,Ror N
PARKTRONIC is deactivated at speeds above
11 mph (18 km/ h). It is reactivated at lower
speeds.
Range of the sensors
General notes
PARKTRONIC does not take objects into con-
sideration that are:
Rbelow the detection range, e.g. people, ani-
mals or objects.
Rabove the detection range, e.g. overhang-
ing loads, truck overhangs or loading
ramps.
:Sensors in the front bumper, left-hand
side (example)
The sensors must be free from dirt, ice or
slush. They can otherwise not function cor-
198Driving systems
Driving and parking
Page 202 of 418
From the:
Rsixth segment onwards, you will hear an
intermittent warning tone for approx-
imately two seconds.
Rseventh segment onwards, you will hear a
warning tone for approximately two sec-
onds. This indicates that you have now
reached the minimum distance.
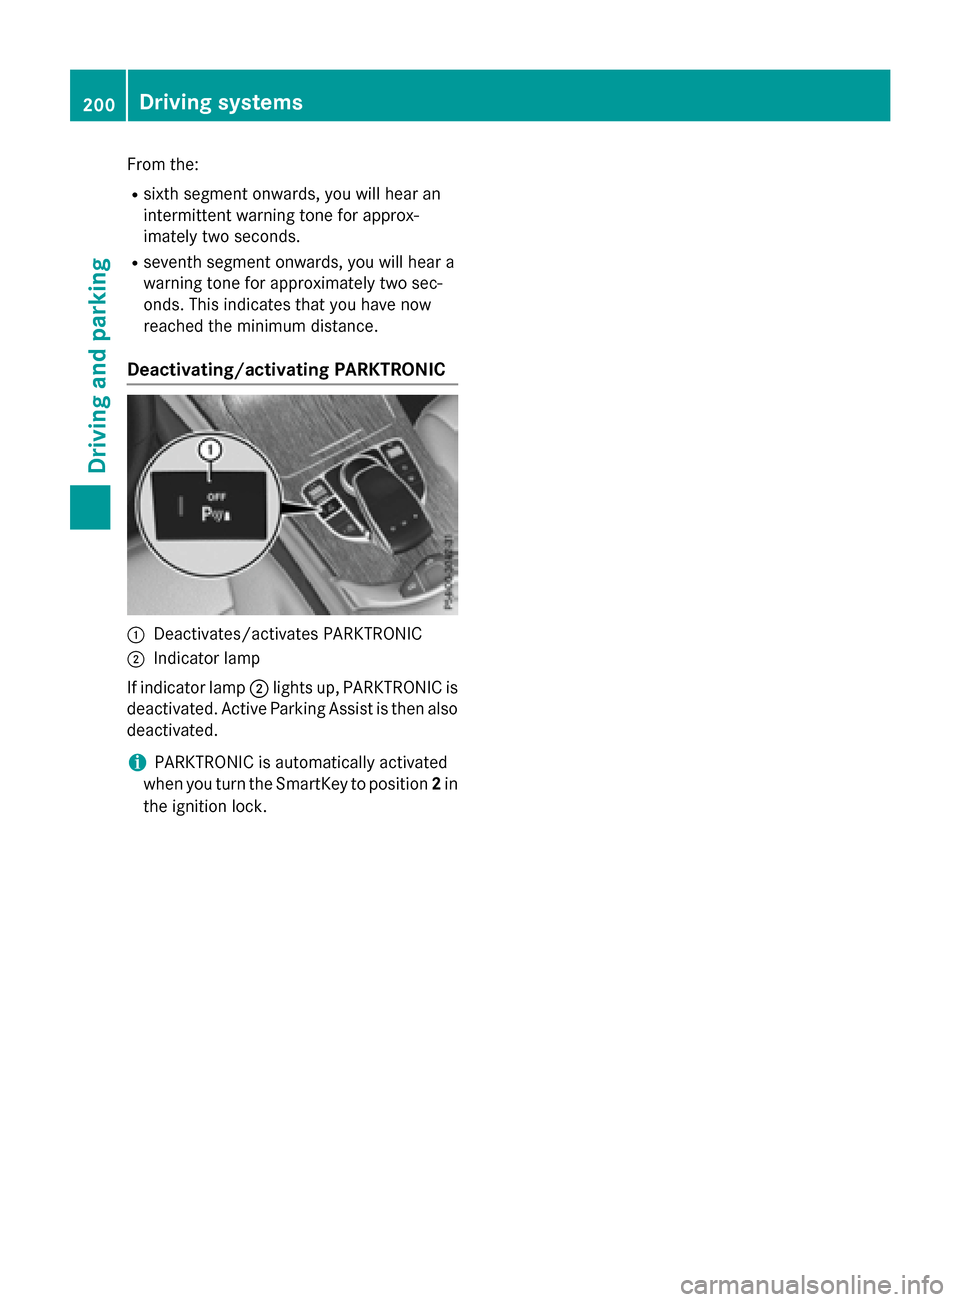
Deactivating/activating PARKTRONIC
:Deactivates/activates PARKTRONIC
;Indicator lamp
If indicator lamp ;lights up, PARKTRONIC is
deactivated. Active Parking Assist is then also
deactivated.
iPARKTRONIC is automatically activated
when you turn the SmartKey to position 2in
the ignition lock.
200Driving systems
Driving and parking
Page 203 of 418
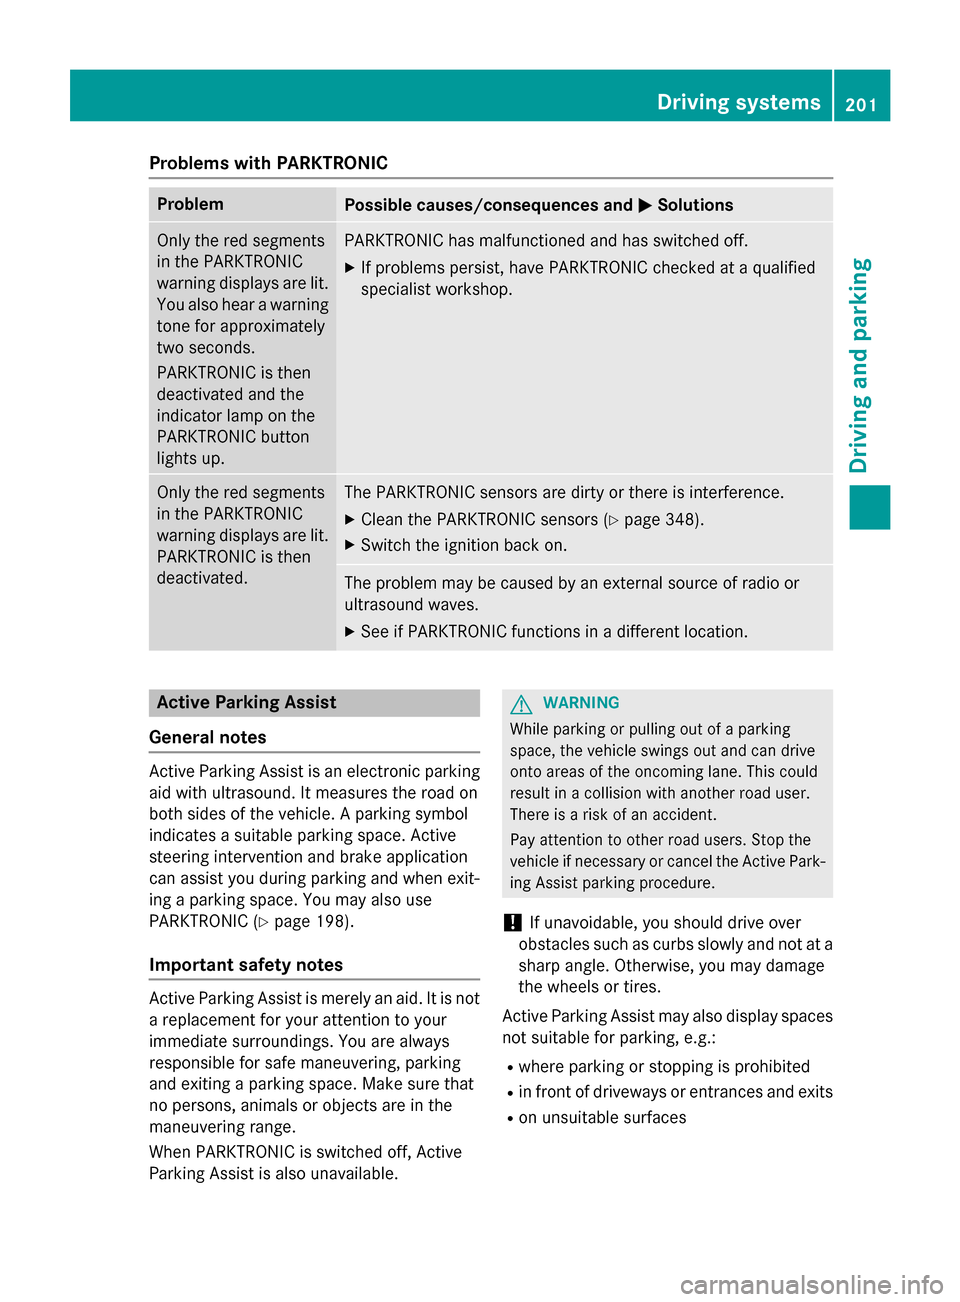
Problems with PARKTRONIC
ProblemPossible causes/consequences andMSolutions
Only the red segments
in the PARKTRONIC
warning displays are lit.
You also hear a warning
tone for approximately
two seconds.
PARKTRONIC is then
deactivated and the
indicator lamp on the
PARKTRONIC button
lights up.PARKTRONIC has malfunctioned and has switched off.
XIf problems persist, have PARKTRONIC checked at a qualified
specialist workshop.
Only the red segments
in the PARKTRONIC
warning displays are lit.
PARKTRONIC is then
deactivated.The PARKTRONIC sensors are dirty or there is interference.
XClean the PARKTRONIC sensors (Ypage 348).
XSwitch the ignition back on.
The problem may be caused by an external source of radio or
ultrasound waves.
XSee if PARKTRONIC functions in a different location.
Active Parking Assist
General notes
Active Parking Assist is an electronic parking
aid with ultrasound. It measures the road on
both sides of the vehicle. A parking symbol
indicates a suitable parking space. Active
steering intervention and brake application
can assist you during parking and when exit-
ing a parking space. You may also use
PARKTRONIC (
Ypage 198).
Important safety notes
Active Parking Assist is merely an aid. It is not
a replacement for your attention to your
immediate surroundings. You are always
responsible for safe maneuvering, parking
and exiting a parking space. Make sure that
no persons, animals or objects are in the
maneuvering range.
When PARKTRONIC is switched off, Active
Parking Assist is also unavailable.
GWARNING
While parking or pulling out of a parking
space, the vehicle swings out and can drive
onto areas of the oncoming lane. This could
result in a collision with another road user.
There is a risk of an accident.
Pay attention to other road users. Stop the
vehicle if necessary or cancel the Active Park- ing Assist parking procedure.
!If unavoidable, you should drive over
obstacles such as curbs slowly and not at a
sharp angle. Otherwise, you may damage
the wheels or tires.
Active Parking Assist may also display spaces
not suitable for parking, e.g.:
Rwhere parking or stopping is prohibited
Rin front of driveways or entrances and exits
Ron unsuitable surfaces
Driving systems201
Driving and parking
Z
Page 209 of 418
Activating/deactivating the rear view
camera
XTo activate:makesur ethat th eSmartKey
is in position 2in th eignition lock.
XMak esur ethat th eActivatio nby R
gearfunction is selected in Audio 20 or
COMAND (see th eDigital Operator' sMan -
ual).
XEngage revers egear .
The rear vie wcamera flap opens. The area
behind th evehicl eis shown wit hguide lines
in th eAudio 20 or COMAND display.
The imag efrom th erear vie wcamera is
available throughout th emaneuverin g
process.
To deacti vate:therear vie wcamera deacti -
vates if you shif tth etransmission to Por after
driving forwards ashort distance.
Messages in the Audio 20 orCOMAND
display
The rear vie wcamera may sho w adistorted
vie wof obstacles, sho wthem incorrectl yor
no tat all. The rear vie wcamera does no tsho w
objects in th efollowin gpositions:
Rver yclose to th erear bumper
Runder th erear bumper
Rin close range abov eth ehandle on th e
trunk lid
!Objects no tat ground level may appear to
be further away than they actually are, e.g. :
Rthebumper of aparked vehicl e
Rthedrawbar of atrailer
Rth eball couplin gof atrailer to whitch
Rtherear section of an HGV
Raslante dpos t
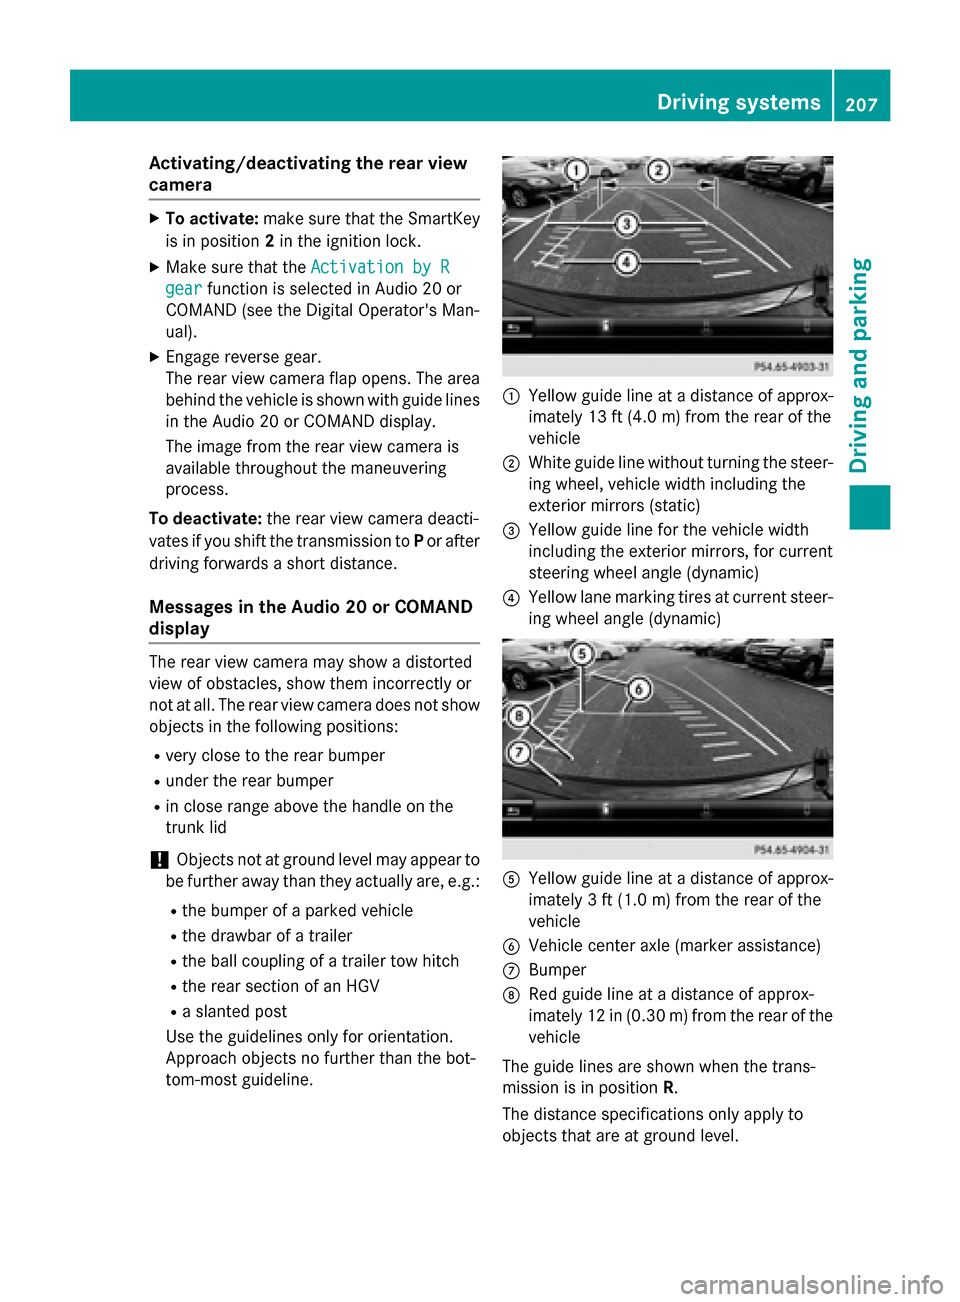
Use th eguidelines only for orientation .
Approach objects no further than th ebot -
tom-mos tguideline.
:Yello wguide lin eat adistanc eof approx -
imately 13 ft (4. 0m) from th erear of th e
vehicl e
;Whiteguide lin ewithout turnin gth e steer -
ing wheel, vehicl ewidt hincludin gth e
exterio rmirror s(static)
=Yello wguide lin efor th evehicl ewidt h
includin gth eexterio rmirrors, for curren t
steering whee langle (dynamic )
?Yellowlan emarking tires at curren t steer-
ing whee langle (dynamic )
AYellowguide lin eat adistanc eof approx -
imately 3ft (1.0 m) from the rear of the
vehicle
BVehicle center axle (marker assistance)
CBumper
DRed guide line at a distance of approx-
imately 12 in (0.30 m) fromthe rear of the
vehicle
The guide lines are shown when the trans-
mission is in position R.
The distance specifications only apply to
objects that are at ground level.
Driving system s207
Driving an d parking
Z