ECU MERCEDES-BENZ GLC COUPE 2016 Owners Manual
[x] Cancel search | Manufacturer: MERCEDES-BENZ, Model Year: 2016, Model line: GLC COUPE, Model: MERCEDES-BENZ GLC COUPE 2016Pages: 389, PDF Size: 7.34 MB
Page 15 of 389
Exterior lighting
Cleaning ........................................ .334
Settings options ............................ .115
see Lights
Exterior mirrors
Adjusting ....................................... 111
Anti-dazzle mode (automatic) ....... .112
Folding in/out (automatically) ....... 112
Folding in/out (electrically) ........... 111
Out of position (troubleshooting) ... 112
Parking position ............................. 112
Resetting ....................................... 111
Storing settings (memory func-
tion) ............................................... 113 F
Fault message see Display messages
Favourites
Overview ........................................ 295
Features ............................................. 315
Filler cap
see Fuel filler flap
Fire extinguisher ............................... 339
First-aid kit ......................................... 339
Fitting a wheel
Fitting a wheel ............................... 367
Lowering the vehicle ...................... 368
Preparing the vehicle ..................... 365
Raising the vehicl e......................... 366
Removing a whee l.......................... 367
Securing the vehicle against roll-
ing away ........................................ 365
Fitting/removing
front wheel arch cover ................... 123
Flat tyre
Changing a wheel/fitting the
spare whee l................................... 364
MOExtended tyre s......................... 341
Preparing the vehicle ..................... 341
TIREFIT kit ...................................... 342
see Emergency spare wheel
Floormat ............................................. 324
Foglamps (extended range) .............. 118
Frequencies
Mobile phone ................................. 371
Two-way radio ................................ 371 Front-passenger front airbag deac-
tivation
Display message ............................ 259
Front-passenger front airbag deac-
tivation system
Operation ......................................... 49
Problems ......................................... 53
System self-test ............................... 52
Fuel
Additives ........................................ 375
Consumption statistics .................. 233
Displaying the current consump-
tion ................................................ 233
Displaying the rang e...................... 233
Driving tips .................................... 170
E10 ................................................ 374
Fuel gaug e....................................... 34
Grade (petrol) ................................ 374
Important safety notes .................. 374
Low outside temperature s............. 376
Notes for GLC 300 4MATIC
Coupé, Mercedes-AMG GLC 43
4MATIC Coup é............................... 375
Problem (malfunction) ................... 164
Quality (diesel )............................... 375
Refuelling ....................................... 161
Tank content/reserve fue l............. 374
Fuel filler flap
Closing ........................................... 163
Opening ......................................... 162
Fuel filter (white display message) .. 265
Fuel level
Calling up the range (on-board
computer) ...................................... 233
Gaug e.............................................. 34
Fuel tank
Capacity ........................................ 374
Problem (malfunction) ................... 164
Fuses
Allocation chart ............................. 355
Before changing ............................. 354
Dashboard fuse box ....................... 354
Fuse box in the engine compart-
ment .............................................. 355
Fuse box in the front-passenger
footwell .......................................... 354
Fuse box in the luggage compart-
ment .............................................. 355 12
Index
Page 17 of 389
Reading lamp ................................
.121
Interior motion sensor
Deactivating ..................................... 81
Function .......................................... .81
iPod ®
See also Digital Owner's Manual .. .292
ISOFIX child seat securing system .... 58J
Jack Declaration of conformity ................ 28
Storage location ............................ 340
Using ............................................. 366
Jump starting (engine) ......................348 K
Key Changing the battery ....................... 85
Checking the battery ....................... 85
Convenience closing feature ............ 97
Convenience opening feature .......... 96
Display message ............................ 279
Door central locking/unlocking ....... 83
Emergency key element ................... 84
Important safety notes .................... 82
KEYLESS-GO start function .............. 84
Loss ................................................. 86
Modifying the programming ............. 84
Overview .......................................... 82
Positions (ignition lock) ................. 144
Problem (malfunction) ..................... 86
Starting the engine ........................ 146
Key positions
Key ................................................ 144
Start/Stop button .......................... 144
KEYLESS-GO
Activating ......................................... 83
Convenience closing ........................ 97
Deactivation ..................................... 83
Locking ............................................ 83
Removing the Start/Stop button ... 145
Start function ................................... 84
Unlocking ......................................... 83
Kickdown
Driving tips ................................... .157
Manual gearshifting ....................... 160 Kneebag
............................................... 48 L
Lamps see Warning and indicator lamps
Lane Keeping Assist
Activating/deactivating ................. 212
Activating/deactivating (on-
board computer) ............................ 242
Display message ............................ 268
Function/informatio n.................... 211
see Active Lane Keeping Assist
Lane package ..................................... 210
Lap time (RACETIMER) ...................... 247
Lashing eyelets ................................. 310
Level control (display message) ...... 267
Licence plate lamp (display mes-
sage) ................................................... 261
Light sensor (display message) ....... 261
Light switch
operation ....................................... 115
Lighting
see Lights
Lights
Activating/deactivating the Intel-
ligent Light System ........................ 243
Active light function ....................... 118
Adaptive Highbeam Assist ............. 119
Adaptive Highbeam Assist PLUS .... 119
Automatic headlamp mod e............ 115
Cornering light function ................. 118
Dipped-beam headlamp s............... 116
Driving abroad ............................... 115
Foglamps (extended range) ........... 118
General notes ................................ 115
Hazard warning lamps ................... 117
Headlamp flashe r........................... 117
Headlamp rang e............................ 117
Intelligent Light System (func-
tion) ............................................... 118
Light switch ................................... 115
Main-beam headlamp s................... 117
Misted up headlamp s.................... 120
Motorway mod e............................. 118
Parking lamps ................................ 116
Rear foglamp ................................. 116
Setting exterior lighting ................. 115 14
Index
Page 21 of 389
Tow-away protection ........................ 80
Protection of the environment
General notes ..................................26
Pulling away
Automatic transmission ................. 146
General notes ................................ 146
Hill start assist ...............................1 47
Trailer ............................................ 147 Q
QR code Mercedes-Benz Guide App ................. 1
Rescue card ..................................... 30
Qualified specialist workshop ........... 30
Quick access for audio and tele-
phone
Changing the station/music
track .............................................. 295 R
RACETIMER (on-board computer) .... 247
Radiator cover ................................... 326
Radio
Selecting a station ......................... 236
Radio mode
See also Digital Owner's Manual ... 292
Radio-based vehicle components
Declaration of conformity ................ 28
Rain closing feature
Sliding sunroof ................................. 99
Reading lamp ..................................... 121
Rear compartment
Setting the air vents ..................... .141
Setting the airflow ......................... 132
Setting the temperature ................ 131
Rear foglamp
Display message ............................ 261
Switching on/off ........................... 116
Rear seat
Display message ............................ 277
Rear window heating
Problem (fault) ............................... 133
Switching on/off ........................... 133
Rear-compartment seat belt sta-
tus indicator ........................................ 46 Rear-view mirror
Anti-dazzle mode (automatic) ....... .112
Dipping (manual) ........................... 110
Recuperation display ........................ 233
Reflective safety vest ....................... 338
Refuelling
AdBlue ®
......................................... 164
Fuel gauge ....................................... 34
Important safety notes .................. 161
Refuelling process ......................... 162
see Fuel
Remote control
Auxiliary heating/ventilation .......... 139
Changing the batteries (auxiliary
heating) ......................................... 140
Replacing bulbs
Dipped-beam headlamps .............. .122
Fitting/removing the cover (front
wheel arch) ................................... .123
Important safety notes .................. 121
Main-beam headlamps ................... 122
Overview of bulb types .................. 122
Turn signals (front) ......................... 123
Replacing the battery (auxiliary
heating remote control) .................... 140
Rescue card ......................................... 30
Reserve (fuel tank)
see Fuel
Reserve fuel
Display message ............................ 265
Warning lamp ................................. 286
Residual heat (climate control) ........135
Restraint system
Display message ............................ 257
Introduction ..................................... 41
Warning lamp ................................. 286
Warning lamp (function) ................... 42
Rev counter ........................................ 229
Reversing camera
"Reverse parking" function ............ 200
Cleaning instructions ..................... 335
Coupling up a trailer function ....... .201
Display in the multimedia system .. 199
General notes ................................ 198
Object detection (function/
notes) ............................................ 202
Switching on/off ........................... 198 18
Index
Page 22 of 389
wide-angle function ......................
.202
Reversing feature
Side windows ................................... 95
Sliding sunroof ................................. 99
Tailgate ............................................ 91
Reversing lamps
Display message ............................ 261
Roof carrier ........................................ 315
Roof lining and carpets (cleaning
instructions) ...................................... 337
Roof load (maximum) ........................ 379
Route guidance
See also Digital Owner's Manual ... 292 S
Safety Children in the vehicle ..................... 56
see Occupant safety
see Operating safety
SD card
Inserting/removing ........................ 303
SD memory card
See also Digital Owner's Manual ... 292
Selecting ........................................ 237
Seat
Adjusting (Performance Seat) ....... .106
Folding the backrest (rear com-
partment) forwards/back .............. 308
Seat belt
Centre rear-compartment sea t........ 45
Correct usage .................................. 44
Seat belts
Adjusting the driver's and front-
passenger seat belt ......................... 45
Adjusting the height ......................... 45
Cleaning ......................................... 337
Fastening ......................................... 45
Important safety guidelines ............. 43
Introduction ..................................... 43
Rear seat belt status indicator ......... 46
Releasing ......................................... 45
Warning lamp ................................. 280
Warning lamp (function) ................... 46
Seats
Adjusting (electrically) ................... 103
Adjusting (manually and electri-
cally) .............................................. 103 Adjusting the 4-way lumbar sup-
port ................................................ 106
Adjusting the head restraint .......... 104
Calling up a stored setting (mem-
ory function) .................................. 114
Cleaning the cover ......................... 337
Correct driver's seat position ........ 101
Important safety notes .................. 101
Seat heating .................................. 106
Seat heating problem .................... 108
Seat ventilation .............................. 107
Seat ventilation problem ................ 108
Storing settings (memory func-
tion) ............................................... 113
Switching seat heating on/of f....... 106
Switching the seat ventilation on/ off .................................................. 107
Securing a load .................................. 310
Securing luggage ............................... 310
Selector lever
Cleaning ......................................... 336
see Automatic transmission
Sensors (cleaning instructions) ....... 335
Service Centre
see Qualified specialist workshop
Service menu (on-board com-
puter) .................................................. 240
Service message
see ASSYST PLUS
Service products
AdBlue ®
special additive s.............. 376
Brake fluid ..................................... 377
Coolant (engine) ............................ 378
Engine oil ....................................... 377
Fuel ................................................ 373
Important safety notes .................. 373
Washer fluid ................................... 378
Setting the date/time format
See also Digital Owner's Manua l... 292
Setting the language
See also Digital Owner's Manua l... 292
Setting the time
See also Digital Owner's Manua l... 292
Settings
Factory (on-board computer) ......... 245
On-board compute r....................... 240
SETUP (on-board computer) ............. 246 Index
19
Page 26 of 389
Switching on/of
f........................... 117
TV
Operating (on-board computer) ..... 238
Two-way radio
Frequencies ................................... 371
Installation ..................................... 371
Transmission output (maximum) .... 371
Type identification plate
see Vehicle identification plate
Tyre changing tool kit ....................... 340
Tyre inflation compressor
see TIREFIT kit
Tyre pressure
Calling up (on-board computer) ..... 361
Display message ............................ 273
Not reached (TIREFIT) .................... 344
Reached (TIREFIT) .......................... 344
Recommended ............................... 359
Tyre pressure loss warning
General notes ................................ 360
Important safety notes .................. 361
Restarting ...................................... 361
Tyre pressure monitor
Checking the tyre pressure elec-
tronically ........................................ 362
Function/note s............................. 361
General notes ................................ 361
Important safety notes .................. 362
Radio type approval for the tyre
pressure monitor ........................... 364
Restarting ...................................... 363
Warning lamp ................................. 290
Warning message .......................... 363
Tyres
Changing a whee l.......................... 364
Checking ........................................ 356
Direction of rotation ...................... 365
Display message ............................ 273
Important safety notes .................. 356
Information on driving .................... 356
MOExtended tyre s......................... 358
Replacing ....................................... 364
Service life ..................................... 357
Snow chains .................................. 359
Storing ........................................... 365
Summer tyres in winter ................. 358
Tyre size (data ).............................. 368
Tyre tread ...................................... 357 Wheel and tyre combinations ........ 368
see Flat tyre U
Unlocking Emergency unlocking ....................... 90
From inside the vehicle (central
unlocking button) ............................. 89
USB devices
Connecting to the Media Inter-
face ............................................... 304
Using the TIREFIT
tyre pressure kit ............................ 343 V
Vanity mirror (in sun visor) .............. 317
Variable SPEEDTRONIC
see SPEEDTRONIC
Vehicle
Correct use ...................................... 30
Data acquisition ............................... 30
Display message ............................ 275
Electronics ..................................... 371
Equipment ....................................... 27
Implied warranty .............................. 30
Individual settings .......................... 240
Leaving parked up ......................... 170
Locking (in an emergency) ............... 90
Locking (key) ................................... 83
Lowering ........................................ 368
Operating safety .............................. 27
Parking .......................................... 167
Pulling away ................................... 146
Raising ........................................... 366
Registration ..................................... 30
Securing from rolling away ............ 365
Technical data ............................... 371
Towing away .................................. 350
Transporting .................................. 353
Unlocking (in an emergency) ........... 90
Unlocking (key) ................................ 83
Vehicle data ................................... 379
Vehicle dimensions ........................... 379
Vehicle emergency locking ................ 90
Vehicle identification number
see VIN Index
23
Page 32 of 389
documentation: director of the technical
department at Brano a.s.
4. Hradec nad Moravicí City
5. 05.05.2015 Date
Signed by
Director of Quality
TIREFIT kit Copy and translation of the original declaration of conformity:
EC declaration of conformity
In accordance with EC directive 2006/42/EC
We hereby declare that the product
Product designation: Daimler electric air pump
Model designation: 0851, DT/UW 200045
MB part no. :A 000 583 8000
complies with the following relevant regulations:
EMC 2004/108/EC (2014/30/EU)
Applied harmonised standards, in particular:
DIN EN 55014-1:2012-05
DIN EN 55014-2:2009-06
Manufacturer: Dunlop Tech GmbH
Address: Birkenhainerstrasse 77, 63450
Hanau, Germany
Authorised representative :I MS department
Date: March 2015
Signature: IMS-AM, IMS-AE-LDiagnostics connection
The diagnostics connection is used for connect- ing diagnostic equipment at a qualified special-
ist workshop. G
WARNING
If you connect equipment to a diagnostics
connection in the vehicle, it may affect the
operation of vehicle systems. As a result, the operating safety of the vehicle could be affec-
ted. There is a risk of an accident.
Only connect equipment to a diagnostics con-
nection in the vehicle, which is approved for
your vehicle by Mercedes-Benz. G
WARNING
Objects in the driver's footwell may restrict
the clearance around the pedals or block a
depressed pedal. This jeopardises the oper- ating and road safety of the vehicle. There is a
risk of an accident.
Stow all objects securely in the vehicle so that
they do not get into the driver's footwell.
Always fit the floormats securely and as pre-
scribed in order to ensure that there is always sufficient room for the pedals. Do not use
loose floormats and do not place several floor- mats on top of one another.
! If the engine is switched off and equipment
on the diagnostics connection is used, the
starter battery may discharge.
Connecting equipment to the diagnostics con-
nection can lead to emissions monitoring infor-
mation being reset, for example. This may lead
to the vehicle failing to meet the requirements of
the next emissions test during the main inspec- tion. Operating safety
29Introduction Z
Page 33 of 389
Qualified specialist workshop
A qualified specialist workshop has the neces-
sary special skills, tools and qualifications to
correctly carry out any necessary work on your
vehicle. This particularly applies to work rele-
vant to safety.
Observe the notes in the Service Booklet.
Always have the following work carried out at a
qualified specialist workshop:
R work relevant to safety
R service and maintenance work
R repair work
R modifications, installations and conversions
R work on electronic components
Mercedes-Benz recommends that you use a
Mercedes-Benz Service Centre. Vehicle registration
Mercedes-Benz may ask its Service Centres to
carry out technical inspections on certain vehi-
cles. The quality or safety of the vehicle is
improved as a result of the inspection.
Mercedes-Benz can inform you about vehicle
inspections only if it has your registration data.
It is possible that your vehicle has not yet been
registered in your name in the following cases: R if your vehicle was not purchased at an
authorised specialist dealer.
R if your vehicle has not yet been inspected at a
Mercedes-Benz Service Centre.
It is advisable to register your vehicle with a
Mercedes-Benz Service Centre.
Inform Mercedes-Benz as soon as possible
about any change in address or vehicle owner-
ship. You can do this at a Mercedes-Benz Ser-
vice Centre, for example. Correct use
If you remove any warning stickers, you or oth-
ers could fail to recognise certain dangers.
Leave warning stickers in position.
Observe the following information when driving
your vehicle:
R the safety notes in this manual
R technical data for the vehicle R
traffic rules and regulations
R laws and safety standards pertaining to motor
vehicles Implied warranty
! Follow the instructions in this manual about
the proper operation of your vehicle as well as
about possible vehicle damage. Damage to
your vehicle that arises from culpable contra- ventions against these instructions are not
covered either by Mercedes-Benz implied
warranty or by the New or Used-Vehicle War- ranty. QR code for rescue card
The QR code is secured in the fuel filler flap and
on the opposite side on the B-pillar. In the event
of an accident, rescue services can use the QR
code to quickly find the appropriate rescue card for your vehicle. The current rescue card con-
tains, in a compact form, the most important
information about your vehicle, e.g. the routing
of the electric cables.
You can find more information under
www.mercedes-benz.de/qr-code. Data stored in the vehicle
Many of the electronic components in your vehi- cle can store data.
These data memories temporarily or perma-
nently store technical information about:
R the vehicle's operating state
R events
R faults
In general, this technical information docu-
ments the state of a component, a module, a
system or the surroundings.
These include, for example:
R operating conditions of system components,
e.g. fluid levels
R status messages concerning the vehicle and
its individual components, e.g. wheel rota-
tional speed, vehicle speed, deceleration in
movement, lateral acceleration, accelerator
pedal position 30
Data stored in the vehicleIntroduction
Page 44 of 389
Panic alarm
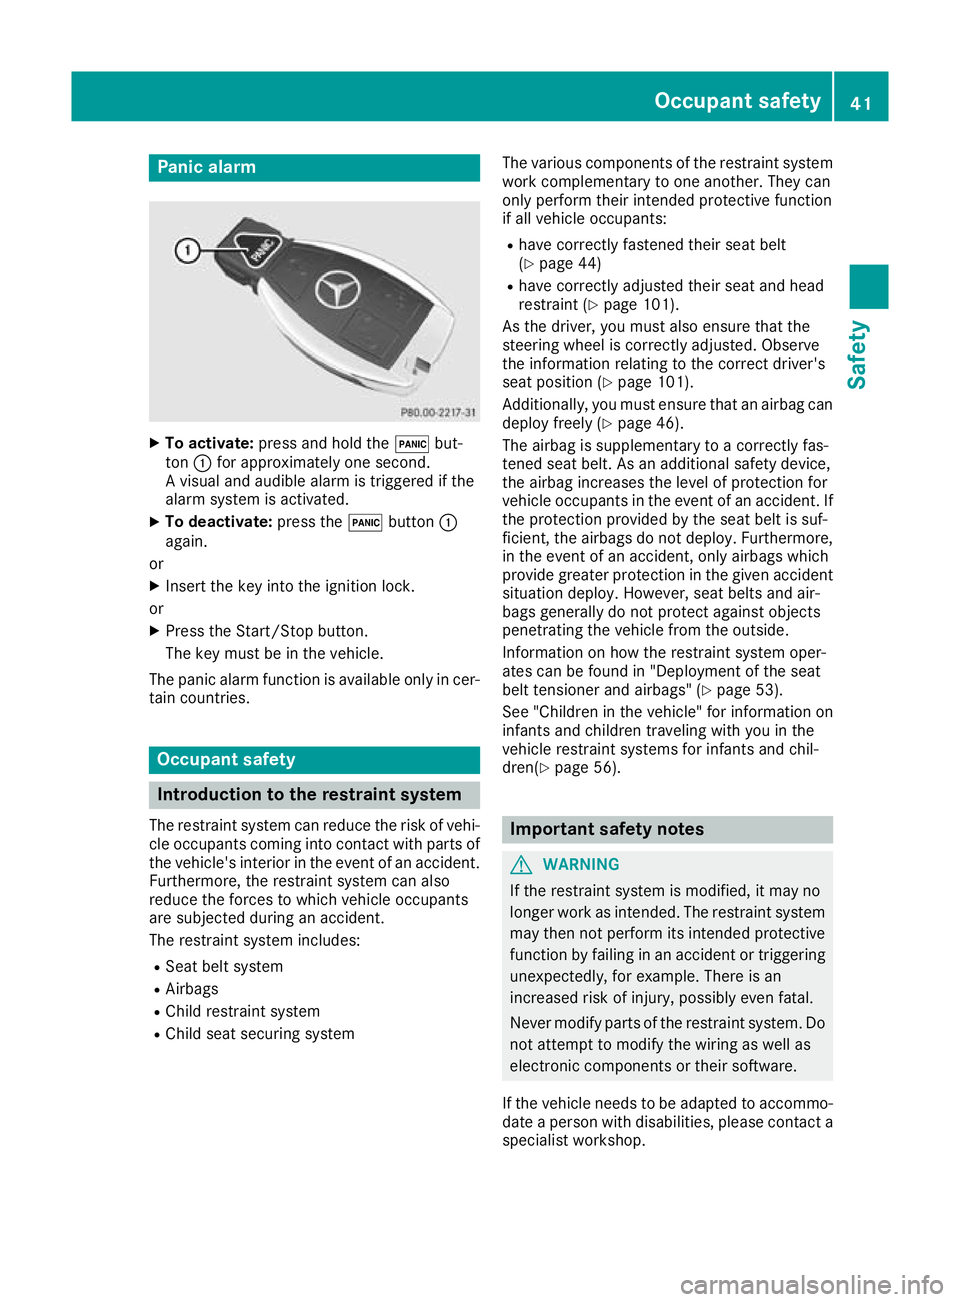
X
To activate: press and hold the !but-
ton :for approximately one second.
A visual and audible alarm is triggered if the
alarm system is activated.
X To deactivate: press the!button :
again.
or X Insert the key into the ignition lock.
or X Press the Start/Stop button.
The key must be in the vehicle.
The panic alarm function is available only in cer- tain countries. Occupant safety
Introduction to the restraint system
The restraint system can reduce the risk of vehi- cle occupants coming into contact with parts of
the vehicle's interior in the event of an accident.
Furthermore, the restraint system can also
reduce the forces to which vehicle occupants
are subjected during an accident.
The restraint system includes:
R Seat belt system
R Airbags
R Child restraint system
R Child seat securing system The various components of the restraint system
work complementary to one another. They can
only perform their intended protective function
if all vehicle occupants:
R have correctly fastened their seat belt
(Y page 44)
R have correctly adjusted their seat and head
restraint (Y page 101).
As the driver, you must also ensure that the
steering wheel is correctly adjusted. Observe
the information relating to the correct driver's
seat position (Y page 101).
Additionally, you must ensure that an airbag can
deploy freely (Y page 46).
The airbag is supplementary to a correctly fas-
tened seat belt. As an additional safety device,
the airbag increases the level of protection for
vehicle occupants in the event of an accident. If the protection provided by the seat belt is suf-
ficient, the airbags do not deploy. Furthermore,
in the event of an accident, only airbags which
provide greater protection in the given accident situation deploy. However, seat belts and air-
bags generally do not protect against objects
penetrating the vehicle from the outside.
Information on how the restraint system oper-
ates can be found in "Deployment of the seat
belt tensioner and airbags" (Y page 53).
See "Children in the vehicle" for information on
infants and children traveling with you in the
vehicle restraint systems for infants and chil-
dren(Y page 56). Important safety notes
G
WARNING
If the restraint system is modified, it may no
longer work as intended. The restraint system
may then not perform its intended protective function by failing in an accident or triggering
unexpectedly, for example. There is an
increased risk of injury, possibly even fatal.
Never modify parts of the restraint system. Do not attempt to modify the wiring as well as
electronic components or their software.
If the vehicle needs to be adapted to accommo- date a person with disabilities, please contact a
specialist workshop. Occupant safety
41Safety Z
Page 47 of 389
braking or sudden changes of direction. There
is an increased risk of injury, possibly even
fatal.
Always secure persons less than 1.50 mtall in
additional suitable restraint systems.
If a child younger than twelve years old and
under 1.50 m in height is travelling in the vehi-
cle:
R always secure the child in a child restraint
system suitable for this Mercedes-Benz vehi-
cle. The child restraint system must be appro-
priate to the age, weight and size of the child
R always observe the instructions and safety
notes on the "Automatic front-passenger
front airbag deactivation system"
(Y page 49)
R always observe the instructions and safety
notes on "Children in the vehicle"
(Y page 56) in addition to the manufactur-
er's operating and installation instructions for the child restraint system G
WARNING
Seat belts cannot protect as intended, if:
R they are damaged, have been modified, are
extremely dirty, bleached or dyed
R the seat belt buckle is damaged or
extremely dirty
R modifications have been made to the belt
tensioners, belt anchorages or inertia reels
Seat belts may sustain non-visible damage in an accident, e.g. due to glass splinters. Modi-
fied or damaged seat belts can tear or fail, for example in the event of an accident. Modified
seat belt tensioners may be deployed unin-
tentionally or not function as intended. There is an increased risk of injury, possibly even
fatal.
Never modify seat belts, seat belt tensioners,
seat belt anchorages and inertia reels. Ensure that seat belts are not damaged or worn and
are clean. After an accident, have the seat
belts checked immediately at a qualified spe-
cialist workshop.
Mercedes-Benz recommends that you only use
seat belts which have been approved specifi-
cally for your vehicle by Mercedes-Benz. Other- wise, your vehicle's general operating permit
could be invalidated.
AMG Performance seat: this seat is designed
for the standard three-point seat belt. If you fit
another multipoint seat belt, e.g. sport or racing
harness, the restraint system cannot provide
the best level of protection. G
WARNING
If you feed seat belts through the opening in
the seat backrest, the seat backrest may be
damaged or may even break in the event of an accident. This poses an increased risk of
injury or even fatal injury.
Only use the standard three-point seat belt.
Never modify the seat belt system.
Correct seat belt use Pay attention to the safety notes about the seat
belt (Y page 43).
All vehicle occupants must fasten their seat
belts correctly before you start driving. You
must also make sure that all vehicle occupants
have fastened their seat belts correctly during
the journey.
When fastening your seat belt, always make
sure that:
R the seat belt tongue is inserted into the belt
buckle that belongs to the seat.
R the seat belt is tightened across your body.
Avoid wearing bulky clothing, e.g. a winter
coat.
R the seat belt is not twisted.
Only then can the forces which occur be dis-
tributed over the area of the belt.
R the shoulder section of the belt is always
routed across the centre of your shoulder.
The shoulder section of the belt must not
come into contact with your neck or be routed
under your arm. Adjust the seat belt to the
appropriate height as necessary.
R The lap belt must be taut and as low as pos-
sible over your lap.
The lap belt must always be routed across
your hip joints and not across your abdomen.
Pregnant women must take particular care
with this. If necessary, push the lap belt down to your hip joint and pull it tight using the
shoulder section of the belt. 44
Occupant safetySafety
Page 48 of 389
R
The seat belt is not routed over sharp, pointed
or fragile objects.
If such objects are located on or in your cloth- ing, e.g. pens, keys, spectacles, etc. stow
these in a suitable location.
R Only one person should use each seat belt at
any one time.
Babies and children must never travel sitting
on the lap of another vehicle occupant. In the event of an accident, they could be crushed
between the vehicle occupant and seat belt.
R Do not secure any objects with a seat belt if
the seat belt is being used by one of the vehi-
cle's occupants.
You must also make sure that objects, e.g.
cushions, are never placed between a person and the seat.
Seat belts are solely intended to secure and
restrain persons. To secure objects, luggage or
loads, always observe the "Loading guidelines"
(Y page 305).
Fastening and adjusting the seat belts Observe the safety notes on seat belts
(Y
page 43) and the information on correct use
of seat belts (Y page 44).
If a passenger is wearing the centre rear seat
belt, also observe the information on the seat
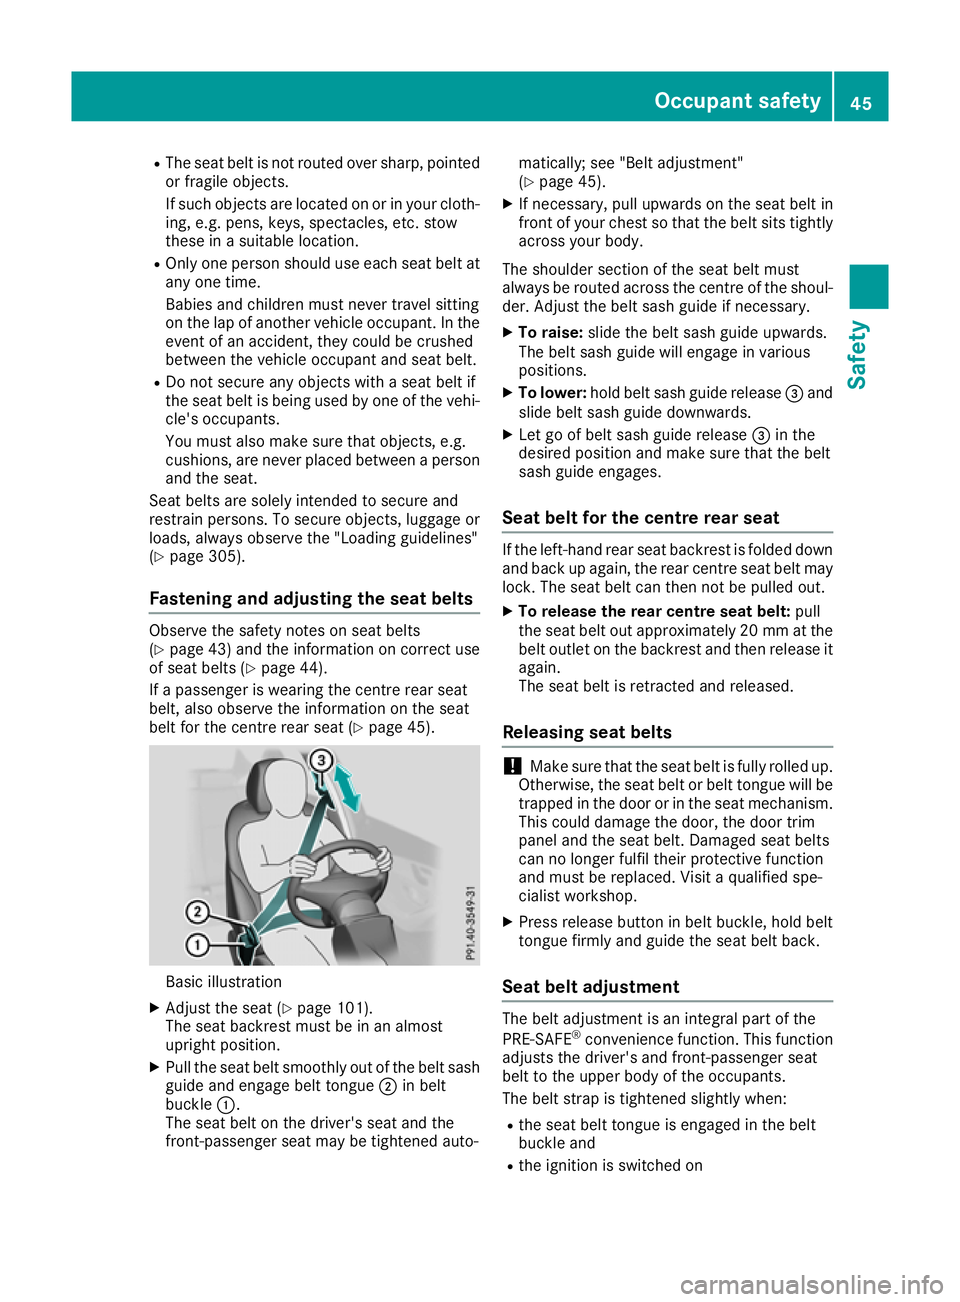
belt for the centre rear seat (Y page 45).Basic illustration
X Adjust the seat (Y page 101).
The seat backrest must be in an almost
upright position.
X Pull the seat belt smoothly out of the belt sash
guide and engage belt tongue ;in belt
buckle :.
The seat belt on the driver's seat and the
front-passenger seat may be tightened auto- matically; see "Belt adjustment"
(Y
page 45).
X If necessary, pull upwards on the seat belt in
front of your chest so that the belt sits tightly across your body.
The shoulder section of the seat belt must
always be routed across the centre of the shoul- der. Adjust the belt sash guide if necessary.
X To raise: slide the belt sash guide upwards.
The belt sash guide will engage in various
positions.
X To lower: hold belt sash guide release =and
slide belt sash guide downwards.
X Let go of belt sash guide release =in the
desired position and make sure that the belt
sash guide engages.
Seat belt for the centre rear seat If the left-hand rear seat backrest is folded down
and back up again, the rear centre seat belt may lock. The seat belt can then not be pulled out.
X To release the rear centre seat belt: pull
the seat belt out approximately 20 mm at the belt outlet on the backrest and then release itagain.
The seat belt is retracted and released.
Releasing seat belts !
Make sure that the seat belt is fully rolled up.
Otherwise, the seat belt or belt tongue will be
trapped in the door or in the seat mechanism. This could damage the door, the door trim
panel and the seat belt. Damaged seat belts
can no longer fulfil their protective function
and must be replaced. Visit a qualified spe-
cialist workshop.
X Press release button in belt buckle, hold belt
tongue firmly and guide the seat belt back.
Seat belt adjustment The belt adjustment is an integral part of the
PRE-SAFE ®
convenience function. This function
adjusts the driver's and front-passenger seat
belt to the upper body of the occupants.
The belt strap is tightened slightly when:
R the seat belt tongue is engaged in the belt
buckle and
R the ignition is switched on Occupant safety
45Safety Z