MERCEDES-BENZ GLC SUV 2015 Owners Manual
Manufacturer: MERCEDES-BENZ, Model Year: 2015, Model line: GLC SUV, Model: MERCEDES-BENZ GLC SUV 2015Pages: 497, PDF Size: 15.27 MB
Page 251 of 497
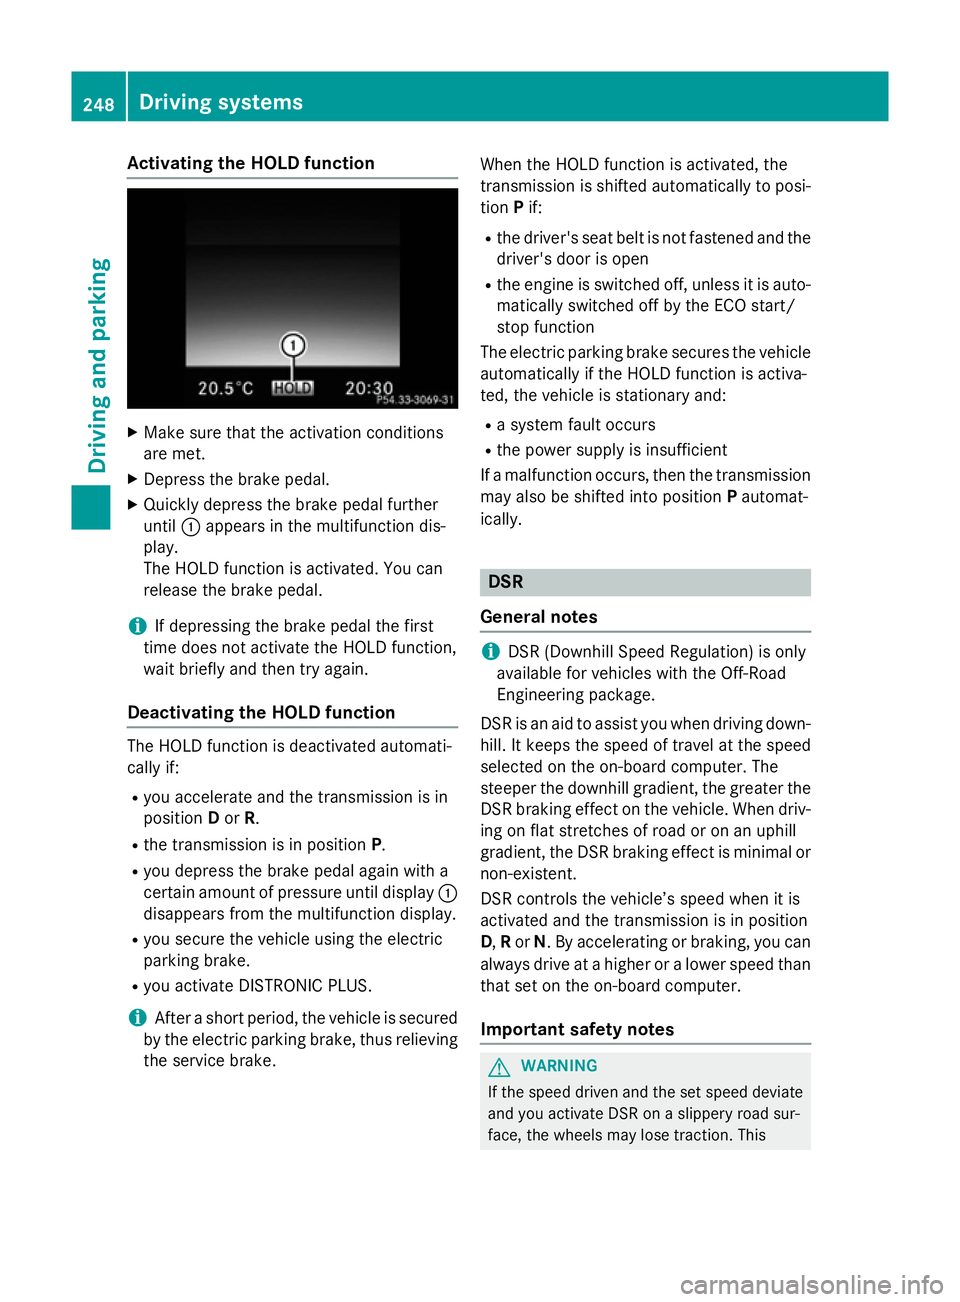
Activating the HOLD function
X
Make sure that the activation conditions
are met.
X Depress the brake pedal.
X Quickly depress the brake pedal further
until :appears in the multifunction dis-
play.
The HOLD function is activated. You can
release the brake pedal.
i If depressing the brake pedal the first
time does not activate the HOLD function,
wait briefly and then try again.
Deactivating the HOLD function The HOLD function is deactivated automati-
cally if:
R you accelerate and the transmission is in
position Dor R.
R the transmission is in position P.
R you depress the brake pedal again with a
certain amount of pressure until display :
disappears from the multifunction display.
R you secure the vehicle using the electric
parking brake.
R you activate DISTRONIC PLUS.
i After a short period, the vehicle is secured
by the electric parking brake, thus relieving
the service brake. When the HOLD function is activated, the
transmission is shifted automatically to posi-
tion Pif:
R the driver's seat belt is not fastened and the
driver's door is open
R the engine is switched off, unless it is auto-
matically switched off by the ECO start/
stop function
The electric parking brake secures the vehicle automatically if the HOLD function is activa-
ted, the vehicle is stationary and:
R a system fault occurs
R the power supply is insufficient
If a malfunction occurs, then the transmission may also be shifted into position Pautomat-
ically. DSR
General notes i
DSR (Downhill Speed Regulation) is only
available for vehicles with the Off-Road
Engineering package.
DSR is an aid to assist you when driving down-
hill. It keeps the speed of travel at the speed
selected on the on-board computer. The
steeper the downhill gradient, the greater the
DSR braking effect on the vehicle. When driv-
ing on flat stretches of road or on an uphill
gradient, the DSR braking effect is minimal or
non-existent.
DSR controls the vehicle’s speed when it is
activated and the transmission is in position
D, Ror N. By accelerating or braking, you can
always drive at a higher or a lower speed than that set on the on-board computer.
Important safety notes G
WARNING
If the speed driven and the set speed deviate and you activate DSR on a slippery road sur-
face, the wheels may lose traction. This 248
Driving systemsDriving and pa
rking
Page 252 of 497
increases the risk of skidding and having an
accident.
Before switching DSR on, please take into
consideration the road surface and the differ- ence between driving speed and the set
speed.
If you fail to adapt your driving style, DSR can
neither reduce the risk of accident nor over-
ride the laws of physics. DSR cannot take
account of road, weather and traffic condi-
tions. DSR is only an aid. You are responsible
for the distance to the vehicle in front, for
vehicle speed, for braking in good time and for staying in lane.
You are always responsible for keeping con-
trol of the vehicle and for assessing whether
the downhill gradient can be managed. DSR
may not always be able to keep to the set
speed, depending on road surface and tyre
conditions. Select a set speed suitable for the prevailing conditions and when necessary,
apply the brakes manually.
Further information about "Driving off-road"
(Y page 226).
Activating/deactivating DSR If you activate DSR and no speed has been
set, the vehicle decelerates to 6 km/h.
You can only activate DSR when driving at
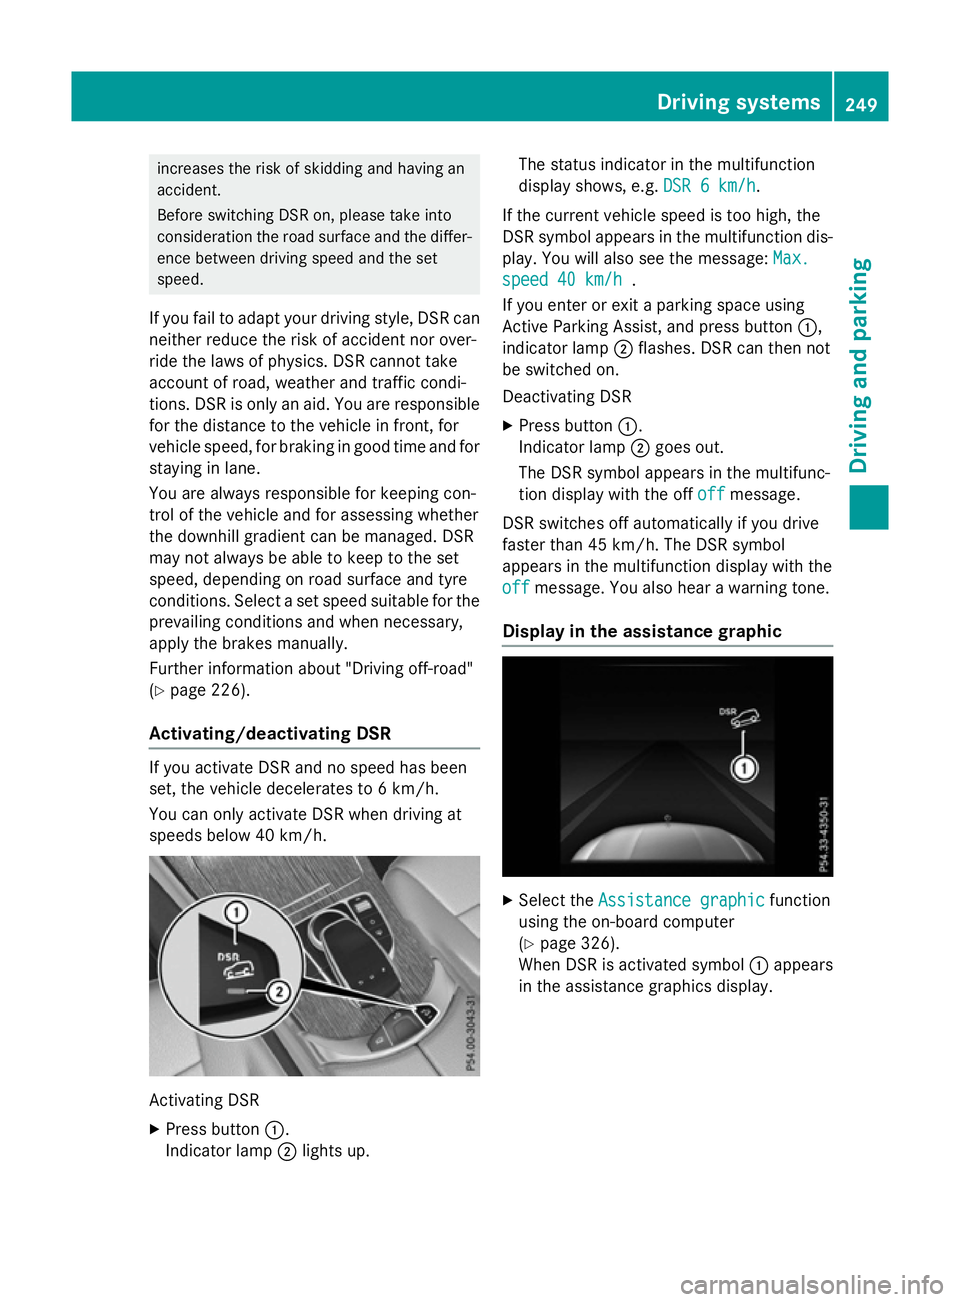
speeds below 40 km/h. Activating DSR
X Press button :.
Indicator lamp ;lights up. The status indicator in the multifunction
display shows, e.g.
DSR 6 km/h DSR 6 km/h.
If the current vehicle speed is too high, the
DSR symbol appears in the multifunction dis-
play. You will also see the message: Max. Max.
speed 40 km/h
speed 40 km/h .
If you enter or exit a parking space using
Active Parking Assist, and press button :,
indicator lamp ;flashes. DSR can then not
be switched on.
Deactivating DSR
X Press button :.
Indicator lamp ;goes out.
The DSR symbol appears in the multifunc-
tion display with the off off offmessage.
DSR switches off automatically if you drive
faster than 45 km/h. The DSR symbol
appears in the multifunction display with the
off
off message. You also hear a warning tone.
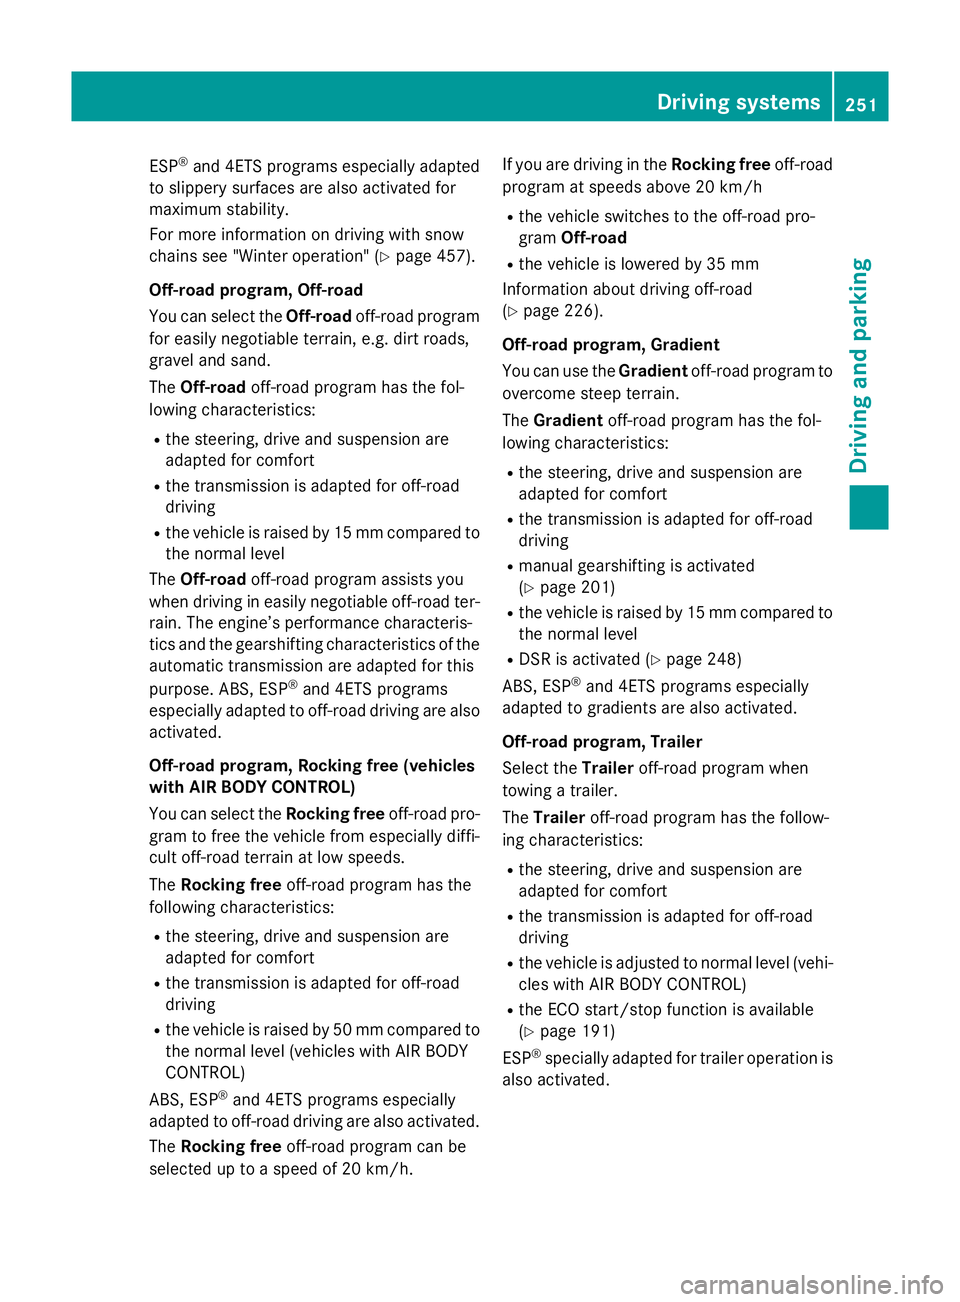
Display in the assistance graphic X
Select the Assistance graphic Assistance graphic function
using the on-board computer
(Y page 326).
When DSR is activated symbol :appears
in the assistance graphics display. Driving systems
249Driving and parking Z
Page 253 of 497
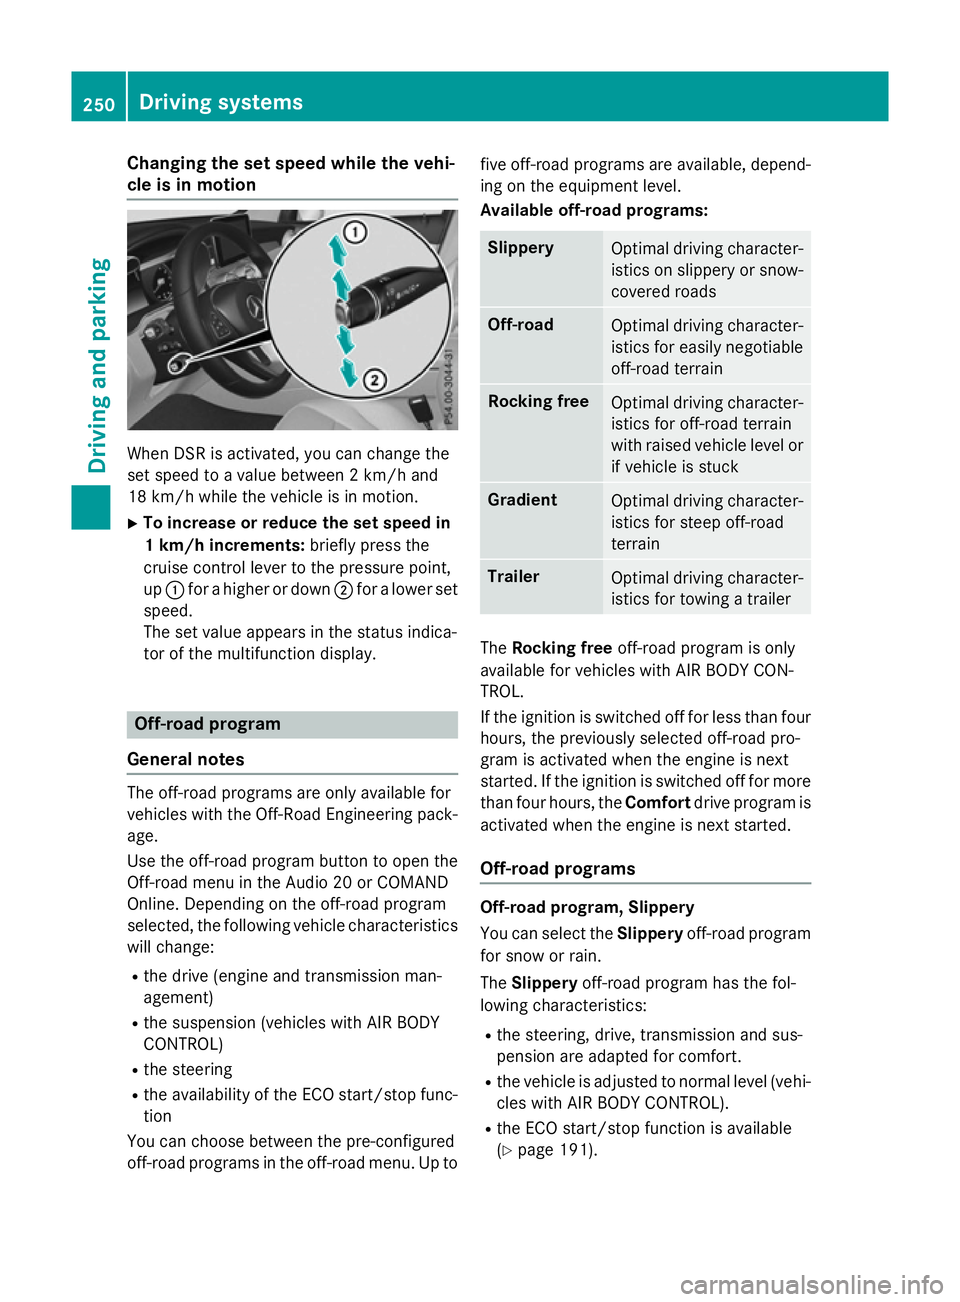
Changing the set speed while the vehi-
cle is in motion When DSR is activated, you can change the
set speed to a value between 2 km/h and
18 km/h while the vehicle is in motion.
X To increase or reduce the set speed in
1 km/h increments: briefly press the
cruise control lever to the pressure point,
up : for a higher or down ;for a lower set
speed.
The set value appears in the status indica-
tor of the multifunction display. Off-road program
General notes The off-road programs are only available for
vehicles with the Off-Road Engineering pack-
age.
Use the off-road program button to open the
Off-road menu in the Audio 20 or COMAND
Online. Depending on the off-road program
selected, the following vehicle characteristics
will change:
R the drive (engine and transmission man-
agement)
R the suspension (vehicles with AIR BODY
CONTROL)
R the steering
R the availability of the ECO start/stop func-
tion
You can choose between the pre-configured
off-road programs in the off-road menu. Up to five off-road programs are available, depend-
ing on the equipment level.
Available off-road programs: Slippery
Optimal driving character-
istics on slippery or snow-
covered roads Off-road
Optimal driving character-
istics for easily negotiable
off-road terrain Rocking free
Optimal driving character-
istics for off-road terrain
with raised vehicle level or
if vehicle is stuck Gradient
Optimal driving character-
istics for steep off-road
terrain Trailer
Optimal driving character-
istics for towing a trailer The
Rocking free off-road program is only
available for vehicles with AIR BODY CON-
TROL.
If the ignition is switched off for less than four
hours, the previously selected off-road pro-
gram is activated when the engine is next
started. If the ignition is switched off for more than four hours, the Comfortdrive program is
activated when the engine is next started.
Off-road programs Off-road program, Slippery
You can select the
Slipperyoff-road program
for snow or rain.
The Slippery off-road program has the fol-
lowing characteristics:
R the steering, drive, transmission and sus-
pension are adapted for comfort.
R the vehicle is adjusted to normal level (vehi-
cles with AIR BODY CONTROL).
R the ECO start/stop function is available
(Y page 191). 250
Driving systemsDriving and parking
Page 254 of 497
ESP
®
and 4ETS programs especially adapted
to slippery surfaces are also activated for
maximum stability.
For more information on driving with snow
chains see "Winter operation" (Y page 457).
Off-road program, Off-road
You can select the Off-roadoff-road program
for easily negotiable terrain, e.g. dirt roads,
gravel and sand.
The Off-road off-road program has the fol-
lowing characteristics:
R the steering, drive and suspension are
adapted for comfort
R the transmission is adapted for off-road
driving
R the vehicle is raised by 15 mm compared to
the normal level
The Off-road off-road program assists you
when driving in easily negotiable off-road ter-
rain. The engine’s performance characteris-
tics and the gearshifting characteristics of the automatic transmission are adapted for this
purpose. ABS, ESP ®
and 4ETS programs
especially adapted to off-road driving are also
activated.
Off-road program, Rocking free (vehicles
with AIR BODY CONTROL)
You can select the Rocking freeoff-road pro-
gram to free the vehicle from especially diffi- cult off-road terrain at low speeds.
The Rocking free off-road program has the
following characteristics:
R the steering, drive and suspension are
adapted for comfort
R the transmission is adapted for off-road
driving
R the vehicle is raised by 50 mm compared to
the normal level (vehicles with AIR BODY
CONTROL)
ABS, ESP ®
and 4ETS programs especially
adapted to off-road driving are also activated.
The Rocking free off-road program can be
selected up to a speed of 20 km/h. If you are driving in the
Rocking freeoff-road
program at speeds above 20 km/h
R the vehicle switches to the off-road pro-
gram Off-road
R the vehicle is lowered by 35 mm
Information about driving off-road
(Y page 226).
Off-road program, Gradient
You can use the Gradientoff-road program to
overcome steep terrain.
The Gradient off-road program has the fol-
lowing characteristics:
R the steering, drive and suspension are
adapted for comfort
R the transmission is adapted for off-road
driving
R manual gearshifting is activated
(Y page 201)
R the vehicle is raised by 15 mm compared to
the normal level
R DSR is activated (Y page 248)
ABS, ESP ®
and 4ETS programs especially
adapted to gradients are also activated.
Off-road program, Trailer
Select the Traileroff-road program when
towing a trailer.
The Trailer off-road program has the follow-
ing characteristics:
R the steering, drive and suspension are
adapted for comfort
R the transmission is adapted for off-road
driving
R the vehicle is adjusted to normal level (vehi-
cles with AIR BODY CONTROL)
R the ECO start/stop function is available
(Y page 191)
ESP ®
specially adapted for trailer operation is
also activated. Driving systems
251Driving and parking Z
Page 255 of 497
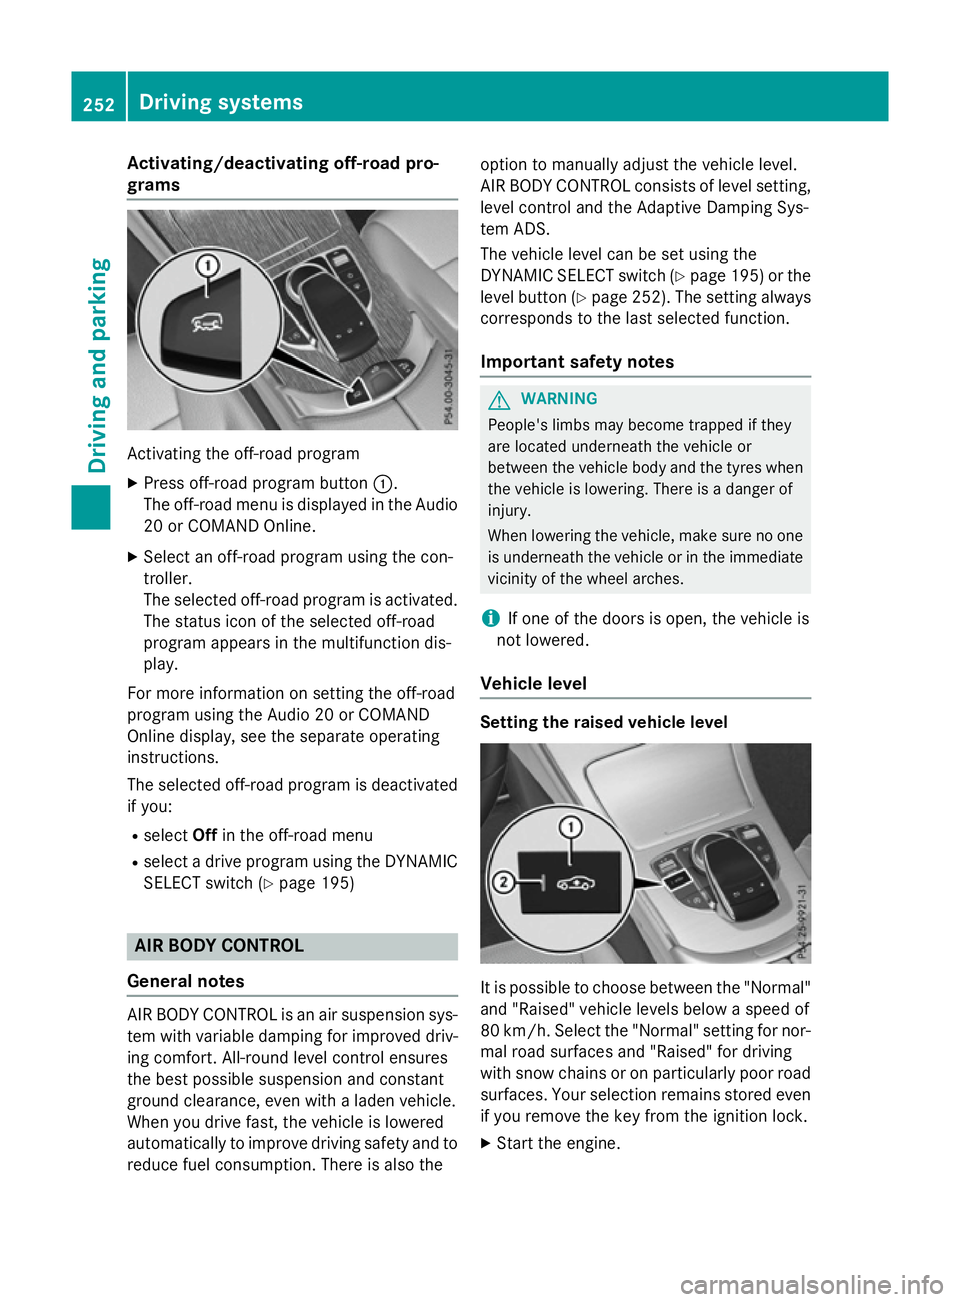
Activating/deactivating off-road pro-
grams Activating the off-road program
X Press off-road program button :.
The off-road menu is displayed in the Audio
20 or COMAND Online.
X Select an off-road program using the con-
troller.
The selected off-road program is activated.
The status icon of the selected off-road
program appears in the multifunction dis-
play.
For more information on setting the off-road
program using the Audio 20 or COMAND
Online display, see the separate operating
instructions.
The selected off-road program is deactivated if you:
R select Offin the off-road menu
R select a drive program using the DYNAMIC
SELECT switch (Y page 195)AIR BODY CONTROL
General notes AIR BODY CONTROL is an air suspension sys-
tem with variable damping for improved driv-
ing comfort. All-round level control ensures
the best possible suspension and constant
ground clearance, even with a laden vehicle.
When you drive fast, the vehicle is lowered
automatically to improve driving safety and to reduce fuel consumption. There is also the option to manually adjust the vehicle level.
AIR BODY CONTROL consists of level setting,
level control and the Adaptive Damping Sys-
tem ADS.
The vehicle level can be set using the
DYNAMIC SELECT switch (Y page 195) or the
level button (Y page 252). The setting always
corresponds to the last selected function.
Important safety notes G
WARNING
People's limbs may become trapped if they
are located underneath the vehicle or
between the vehicle body and the tyres when the vehicle is lowering. There is a danger of
injury.
When lowering the vehicle, make sure no one
is underneath the vehicle or in the immediate vicinity of the wheel arches.
i If one of the doors is open, the vehicle is
not lowered.
Vehicle level Setting the raised vehicle level
It is possible to choose between the "Normal"
and "Raised" vehicle levels below a speed of
80 km/h. Select the "Normal" setting for nor-
mal road surfaces and "Raised" for driving
with snow chains or on particularly poor road surfaces. Your selection remains stored even
if you remove the key from the ignition lock.
X Start the engine. 252
Driving systemsDriving and pa
rking
Page 256 of 497
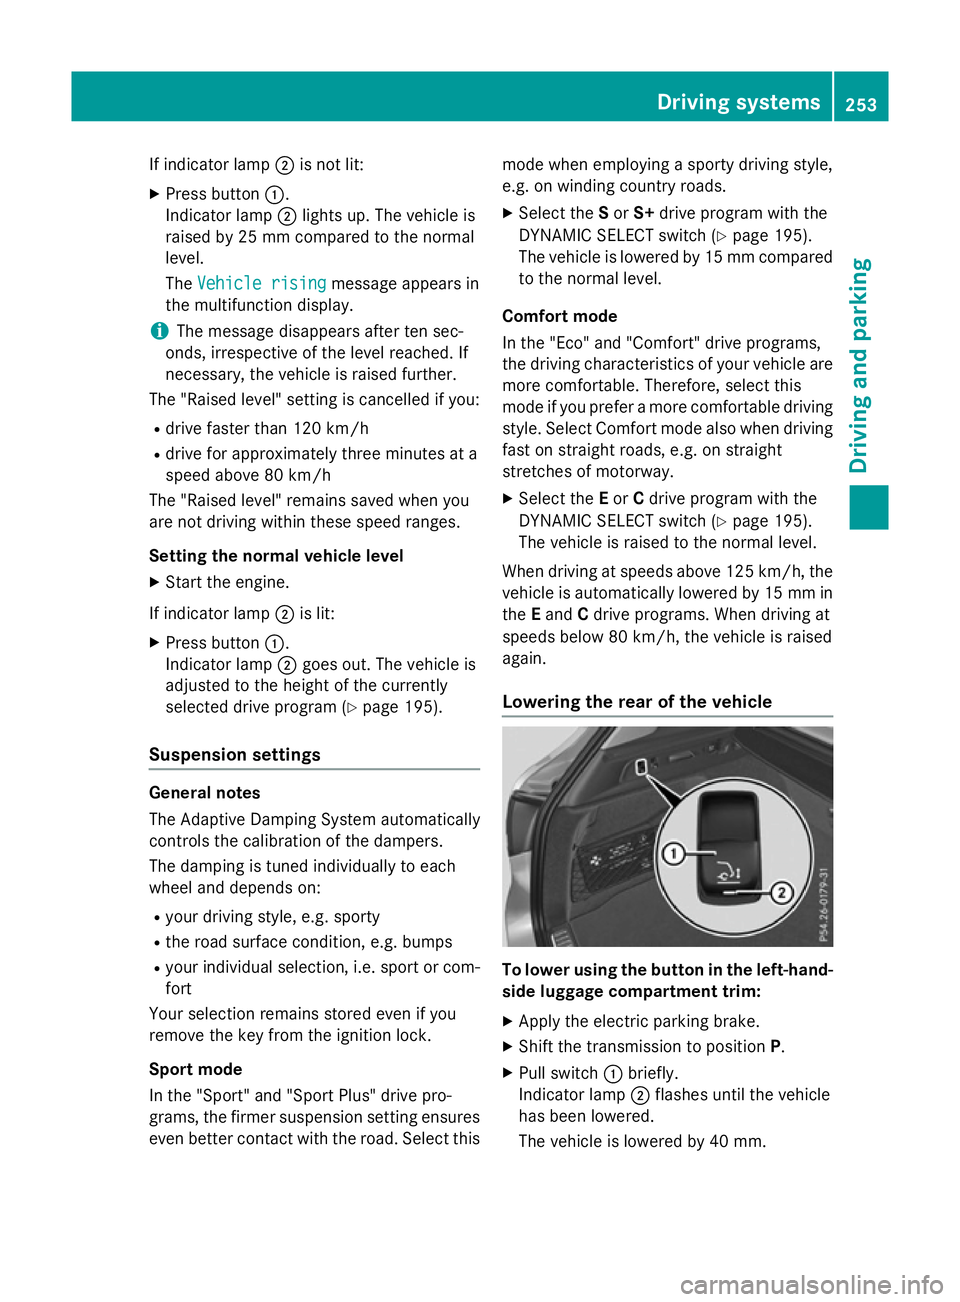
If indicator lamp
;is not lit:
X Press button :.
Indicator lamp ;lights up. The vehicle is
raised by 25 mm compared to the normal
level.
The Vehicle rising Vehicle rising message appears in
the multifunction display.
i The message disappears after ten sec-
onds, irrespective of the level reached. If
necessary, the vehicle is raised further.
The "Raised level" setting is cancelled if you:
R drive faster than 120 km/h
R drive for approximately three minutes at a
speed above 80 km/h
The "Raised level" remains saved when you
are not driving within these speed ranges.
Setting the normal vehicle level X Start the engine.
If indicator lamp ;is lit:
X Press button :.
Indicator lamp ;goes out. The vehicle is
adjusted to the height of the currently
selected drive program (Y page 195).
Suspension settings General notes
The Adaptive Damping System automatically
controls the calibration of the dampers.
The damping is tuned individually to each
wheel and depends on:
R your driving style, e.g. sporty
R the road surface condition, e.g. bumps
R your individual selection, i.e. sport or com-
fort
Your selection remains stored even if you
remove the key from the ignition lock.
Sport mode
In the "Sport" and "Sport Plus" drive pro-
grams, the firmer suspension setting ensures even better contact with the road. Select this mode when employing a sporty driving style,
e.g. on winding country roads.
X Select the Sor S+ drive program with the
DYNAMIC SELECT switch (Y page 195).
The vehicle is lowered by 15 mm compared
to the normal level.
Comfort mode
In the "Eco" and "Comfort" drive programs,
the driving characteristics of your vehicle are
more comfortable. Therefore, select this
mode if you prefer a more comfortable driving
style. Select Comfort mode also when driving fast on straight roads, e.g. on straight
stretches of motorway.
X Select the Eor Cdrive program with the
DYNAMIC SELECT switch (Y page 195).
The vehicle is raised to the normal level.
When driving at speeds above 125 km/h, the
vehicle is automatically lowered by 15 mm in the Eand Cdrive programs. When driving at
speeds below 80 km/h, the vehicle is raised
again.
Lowering the rear of the vehicle To lower using the button in the left-hand-
side luggage compartment trim:
X Apply the electric parking brake.
X Shift the transmission to position P.
X Pull switch :briefly.
Indicator lamp ;flashes until the vehicle
has been lowered.
The vehicle is lowered by 40 mm. Driving systems
253Driving and parking Z
Page 257 of 497
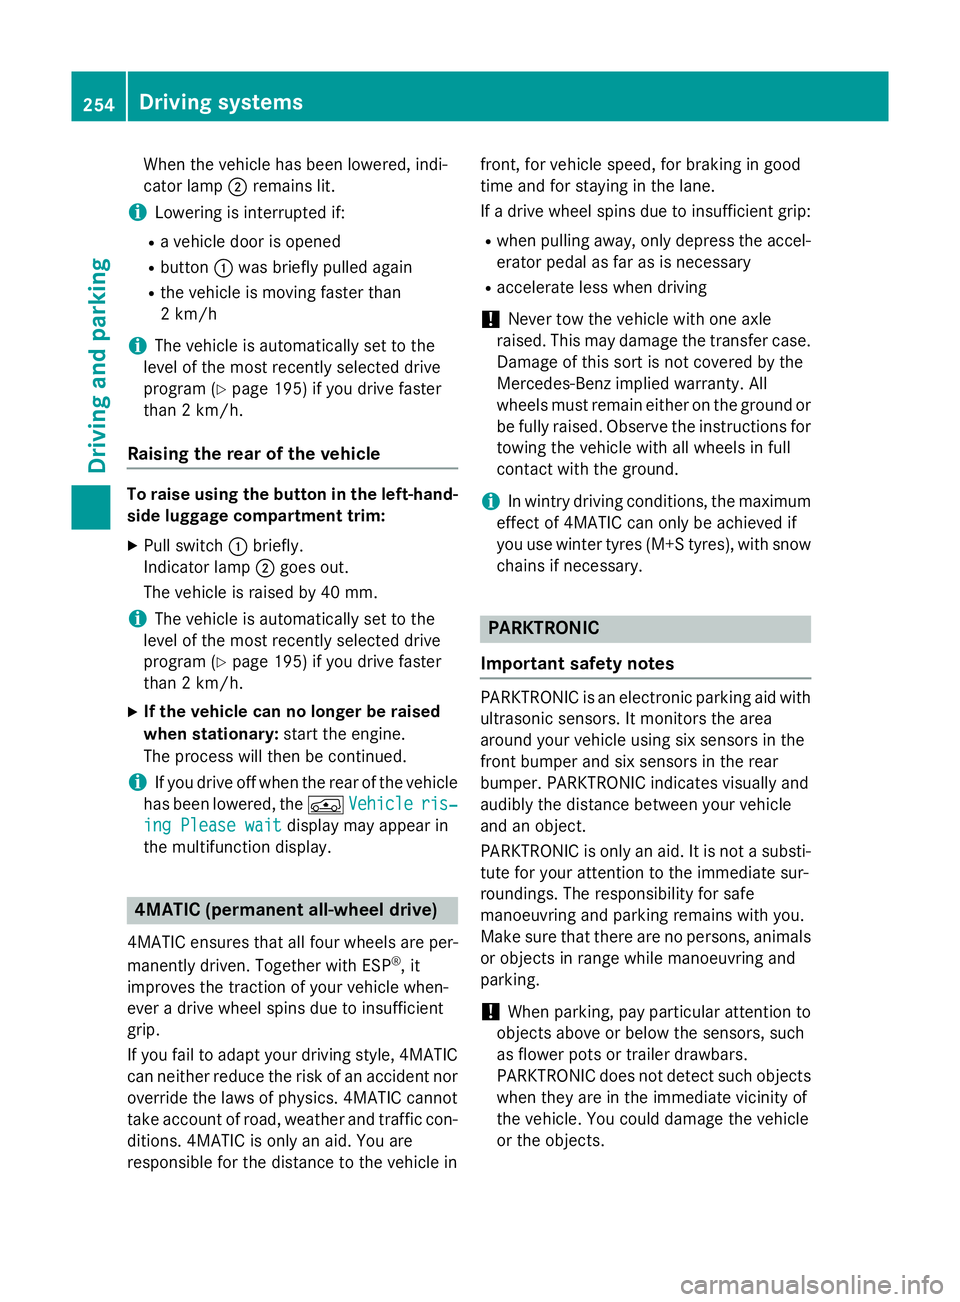
When the vehicle has been lowered, indi-
cator lamp ;remains lit.
i Lowering is interrupted if:
R a vehicle door is opened
R button :was briefly pulled again
R the vehicle is moving faster than
2 km/h
i The vehicle is automatically set to the
level of the most recently selected drive
program (Y page 195) if you drive faster
than 2 km/h.
Raising the rear of the vehicle To raise using the button in the left-hand-
side luggage compartment trim:
X Pull switch :briefly.
Indicator lamp ;goes out.
The vehicle is raised by 40 mm.
i The vehicle is automatically set to the
level of the most recently selected drive
program (Y page 195) if you drive faster
than 2 km/h.
X If the vehicle can no longer be raised
when stationary: start the engine.
The process will then be continued.
i If you drive off when the rear of the vehicle
has been lowered, the ÁVehicle
Vehicle ris‐ ris‐
ing Please wait
ing Please wait display may appear in
the multifunction display. 4MATIC (permanent all-wheel drive)
4MATIC ensures that all four wheels are per-
manently driven. Together with ESP ®
, it
improves the traction of your vehicle when-
ever a drive wheel spins due to insufficient
grip.
If you fail to adapt your driving style, 4MATIC can neither reduce the risk of an accident nor
override the laws of physics. 4MATIC cannot
take account of road, weather and traffic con- ditions. 4MATIC is only an aid. You are
responsible for the distance to the vehicle in front, for vehicle speed, for braking in good
time and for staying in the lane.
If a drive wheel spins due to insufficient grip:
R when pulling away, only depress the accel-
erator pedal as far as is necessary
R accelerate less when driving
! Never tow the vehicle with one axle
raised. This may damage the transfer case.
Damage of this sort is not covered by the
Mercedes-Benz implied warranty. All
wheels must remain either on the ground or be fully raised. Observe the instructions for
towing the vehicle with all wheels in full
contact with the ground.
i In wintry driving conditions, the maximum
effect of 4MATIC can only be achieved if
you use winter tyres (M+S tyres), with snow
chains if necessary. PARKTRONIC
Important safety notes PARKTRONIC is an electronic parking aid with
ultrasonic sensors. It monitors the area
around your vehicle using six sensors in the
front bumper and six sensors in the rear
bumper. PARKTRONIC indicates visually and
audibly the distance between your vehicle
and an object.
PARKTRONIC is only an aid. It is not a substi-
tute for your attention to the immediate sur-
roundings. The responsibility for safe
manoeuvring and parking remains with you.
Make sure that there are no persons, animals
or objects in range while manoeuvring and
parking.
! When parking, pay particular attention to
objects above or below the sensors, such
as flower pots or trailer drawbars.
PARKTRONIC does not detect such objects
when they are in the immediate vicinity of
the vehicle. You could damage the vehicle
or the objects. 254
Driving systemsDriving and parking
Page 258 of 497
The sensors may not detect snow and
objects which absorb ultrasonic sources.
Ultrasonic sources, such as an automatic
car wash, a lorry's compressed-air brakes
or a pneumatic drill, could cause
PARKTRONIC to malfunction.
PARKTRONIC may not function correctly on uneven terrain.
! Fold in the ball coupling if the trailer tow
hitch is not required. PARKTRONIC meas-
ures the minimum detection range to an
obstacle from the bumper, not the ball cou- pling.
PARKTRONIC is activated automatically when you:
R switch on the ignition
R shift the transmission to position D,Ror N
PARKTRONIC is deactivated at speeds above
18 km/h. It is reactivated at lower speeds.
PARKTRONIC is deactivated for the rear area when you establish an electrical connection
between your vehicle and a trailer.
Range of the sensors General notes
PARKTRONIC does not take into account
obstacles located:
R below the detection range, e.g. persons,
animals or objects
R above the detection range, e.g. overhang-
ing loads, tail sections or loading ramps of
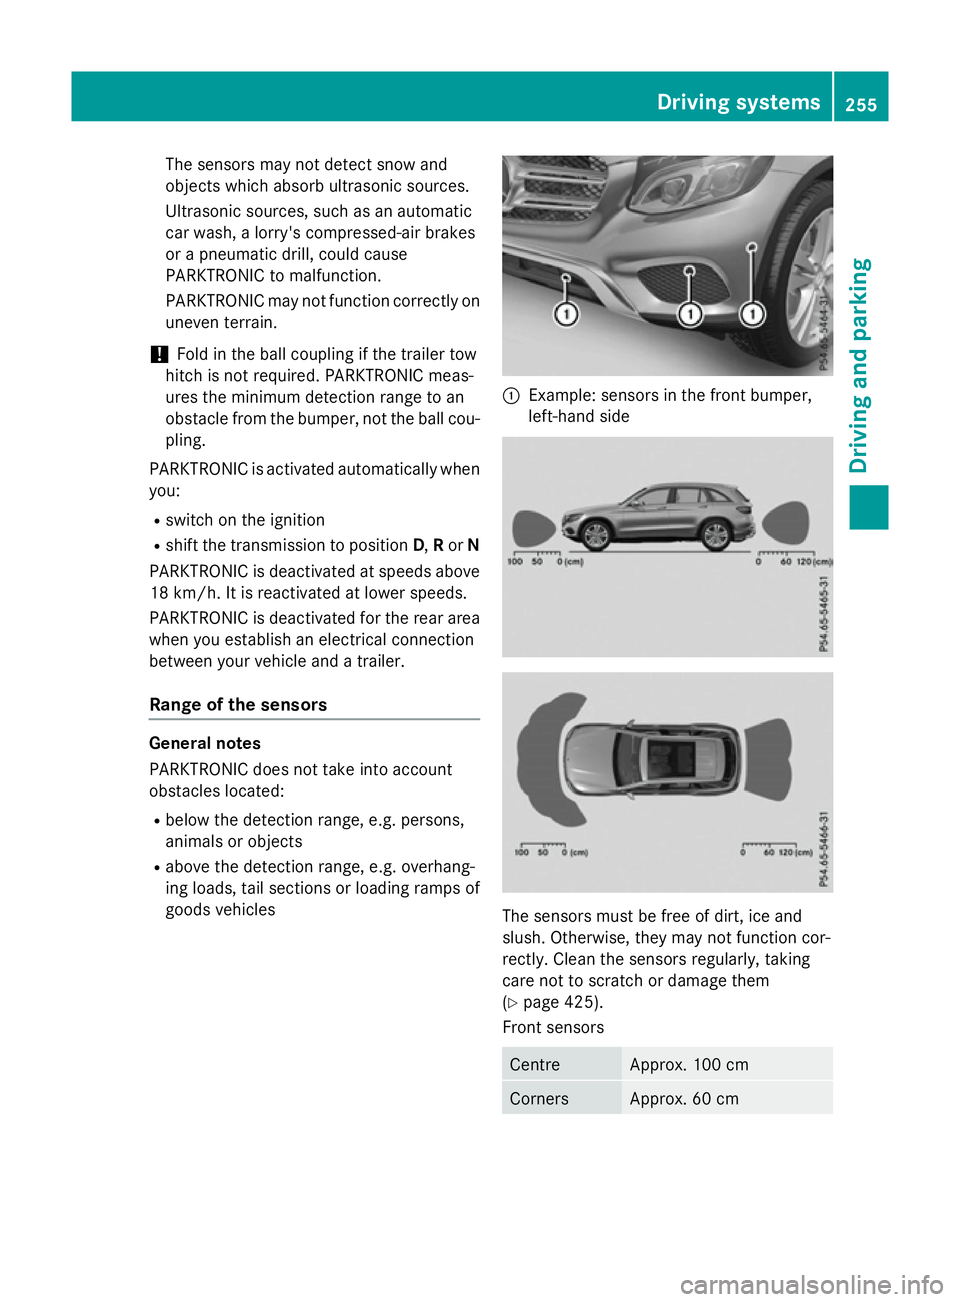
goods vehicles :
Example: sensors in the front bumper,
left-hand side The sensors must be free of dirt, ice and
slush. Otherwise, they may not function cor-
rectly. Clean the sensors regularly, taking
care not to scratch or damage them
(Y
page 425).
Front sensors Centre Approx. 100 cm
Corners Approx. 60 cm Driving systems
255Driving and parking Z
Page 259 of 497
Rear sensors
Centre Approx. 120 cm
Corners Approx. 80 cm
Minimum distance
Centre Approx. 20 cm
Corners Approx. 15 cm
If there is an obstacle within this range, the
relevant warning displays light up and a warn- ing tone sounds. If the distance falls below
the minimum, the distance may no longer be
shown.
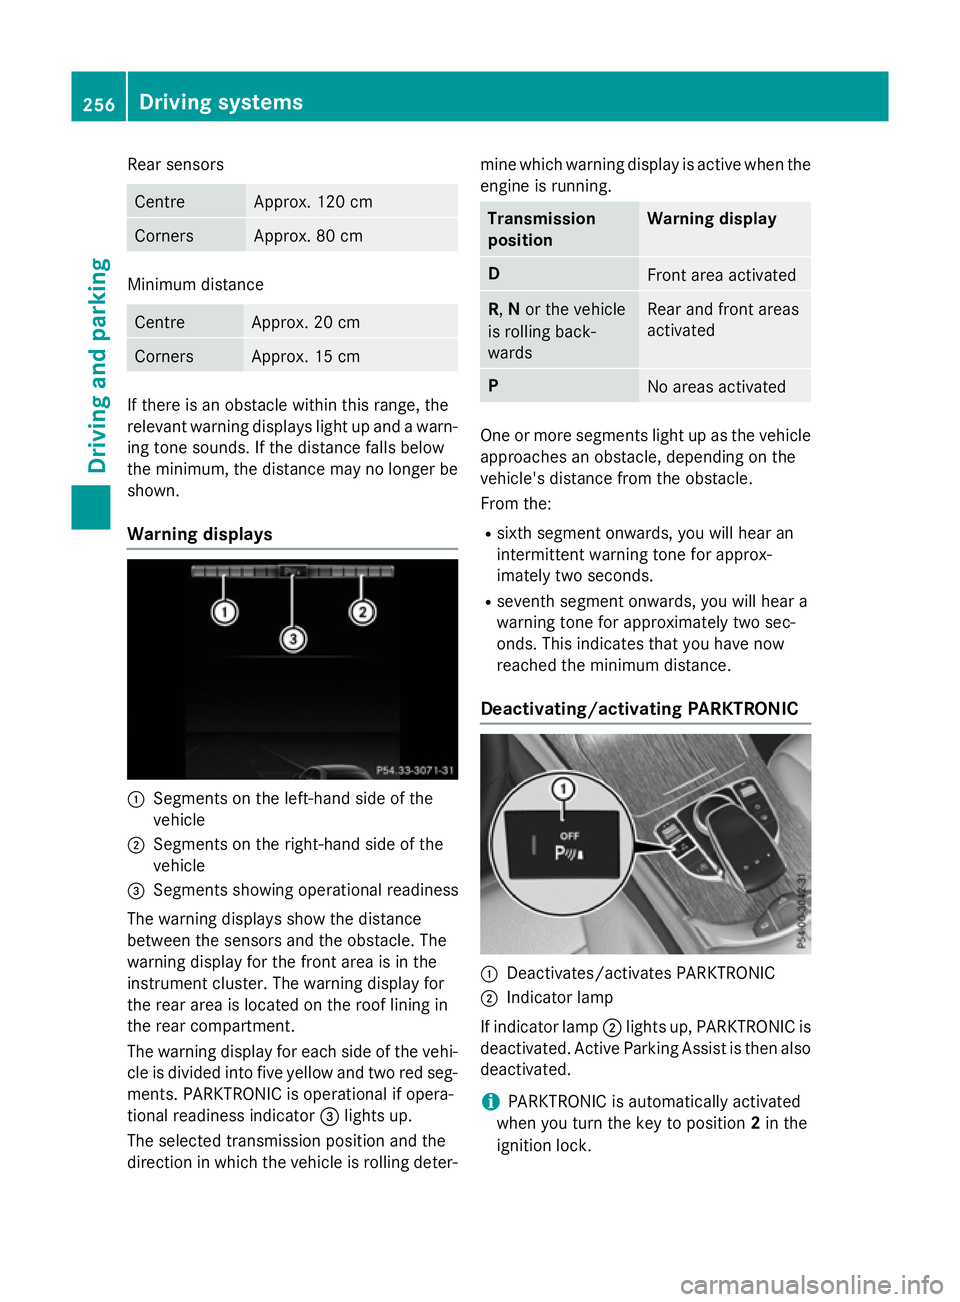
Warning displays :
Segments on the left-hand side of the
vehicle
; Segments on the right-hand side of the
vehicle
= Segments showing operational readiness
The warning displays show the distance
between the sensors and the obstacle. The
warning display for the front area is in the
instrument cluster. The warning display for
the rear area is located on the roof lining in
the rear compartment.
The warning display for each side of the vehi-
cle is divided into five yellow and two red seg- ments. PARKTRONIC is operational if opera-
tional readiness indicator =lights up.
The selected transmission position and the
direction in which the vehicle is rolling deter- mine which warning display is active when the
engine is running. Transmission
position Warning display
D
Front area activated
R,
Nor the vehicle
is rolling back-
wards Rear and front areas
activated
P
No areas activated
One or more segments light up as the vehicle
approaches an obstacle, depending on the
vehicle's distance from the obstacle.
From the:
R sixth segment onwards, you will hear an
intermittent warning tone for approx-
imately two seconds.
R seventh segment onwards, you will hear a
warning tone for approximately two sec-
onds. This indicates that you have now
reached the minimum distance.
Deactivating/activating PARKTRONIC :
Deactivates/activates PARKTRONIC
; Indicator lamp
If indicator lamp ;lights up, PARKTRONIC is
deactivated. Active Parking Assist is then also
deactivated.
i PARKTRONIC is automatically activated
when you turn the key to position 2in the
ignition lock. 256
Driving systemsDriving and pa
rking
Page 260 of 497
Problems with PARKTRONIC
Problem
Possible causes/consequences and
M
MSolutions Only the red segments
in the PARKTRONIC
warning displays are lit.
You also hear a warning
tone for approximately
two seconds.
PARKTRONIC is then
deactivated and the
indicator lamp on the
PARKTRONIC button
lights up. PARKTRONIC has malfunctioned and has been deactivated.
X If problems persist, have PARKTRONIC checked at a qualified
specialist workshop. Only the red segments
in the PARKTRONIC
warning displays are lit.
PARKTRONIC is then
deactivated. The PARKTRONIC sensors are dirty or there is interference.
X Clean the PARKTRONIC sensors (Y page 425).
X Switch the ignition back on. The problem may be caused by an external source of radio or
ultrasound waves.
X See if PARKTRONIC functions in a different location. Active Parking Assist
General notes Active Parking Assist is an electronic parking
aid with ultrasound. It measures the road on
both sides of the vehicle. A parking symbol
indicates a suitable parking space. Active
steering intervention and brake application
can assist you during parking and when exit-
ing a parking space. You may also use
PARKTRONIC (Y page 254).
Important safety notes Active Parking Assist is only an aid. It is not a
substitute for your attention to the immediate
surroundings. The responsibility for safe
manoeuvring and parking remains with you.
Make sure that no persons, animals or
objects are in the manoeuvring range.
When PARKTRONIC is deactivated, Active
Parking Assist is also unavailable. For vehicles with the trailer tow hitch folded
out, the minimum length for parking spaces is
slightly longer.
If you have attached a trailer to your vehicle,
you should not use Active Parking Assist.
Once the electrical connection is established
between your vehicle and the trailer, Active
Parking Assist is no longer available.
PARKTRONIC is deactivated for the rear area. G
WARNING
While parking or pulling out of a parking
space, the vehicle swings out and can drive
onto areas of the oncoming lane. This could
cause you to collide with other road users.
There is a risk of an accident.
Pay attention to other road users. Stop the
vehicle if necessary or cancel the Active Park- ing Assist parking procedure.
! If unavoidable, you should drive over
obstacles such as kerbs slowly and not at a Driving systems
257Driving and parking Z