length MERCEDES-BENZ GLC SUV 2015 Owners Manual
[x] Cancel search | Manufacturer: MERCEDES-BENZ, Model Year: 2015, Model line: GLC SUV, Model: MERCEDES-BENZ GLC SUV 2015Pages: 497, PDF Size: 15.27 MB
Page 48 of 497
!
To prevent damage to the hybrid drive
system please observe the following
instructions:
R only deactivate the hybrid drive system
manually in the following situations.
R work on the hybrid drive system may only
be carried out at a qualified specialist
workshop, even when it has been deac-
tivated manually.
Deactivate the hybrid system manually if:
R the 6 restraint system warning lamp in
the instrument cluster lights up after an
accident
R the vehicle is badly damaged, e.g. after an
accident, and the restraint system compo-
nents were not activated
R the vehicle is badly damaged and has to be
towed or transported
X If possible, move the vehicle out of the
danger zone: shift the transmission into
position N.
X Release the electric parking brake.
X Roll the vehicle to a safe place and park it
safely.
Get assistance from others if necessary.
The vehicle is locked automatically when the
ignition is switched on and the wheels are
turning. There is therefore a risk of being
locked out if the vehicle is being pushed or
tested on a dynamometer.
X Switch the ignition off.
X Shift the transmission to position P.
Apply the electric parking brake
(Y page 220).
Secure the vehicle against rolling away
(Y page 465).
X To use the high-voltage switch-off
device: open the bonnet. X
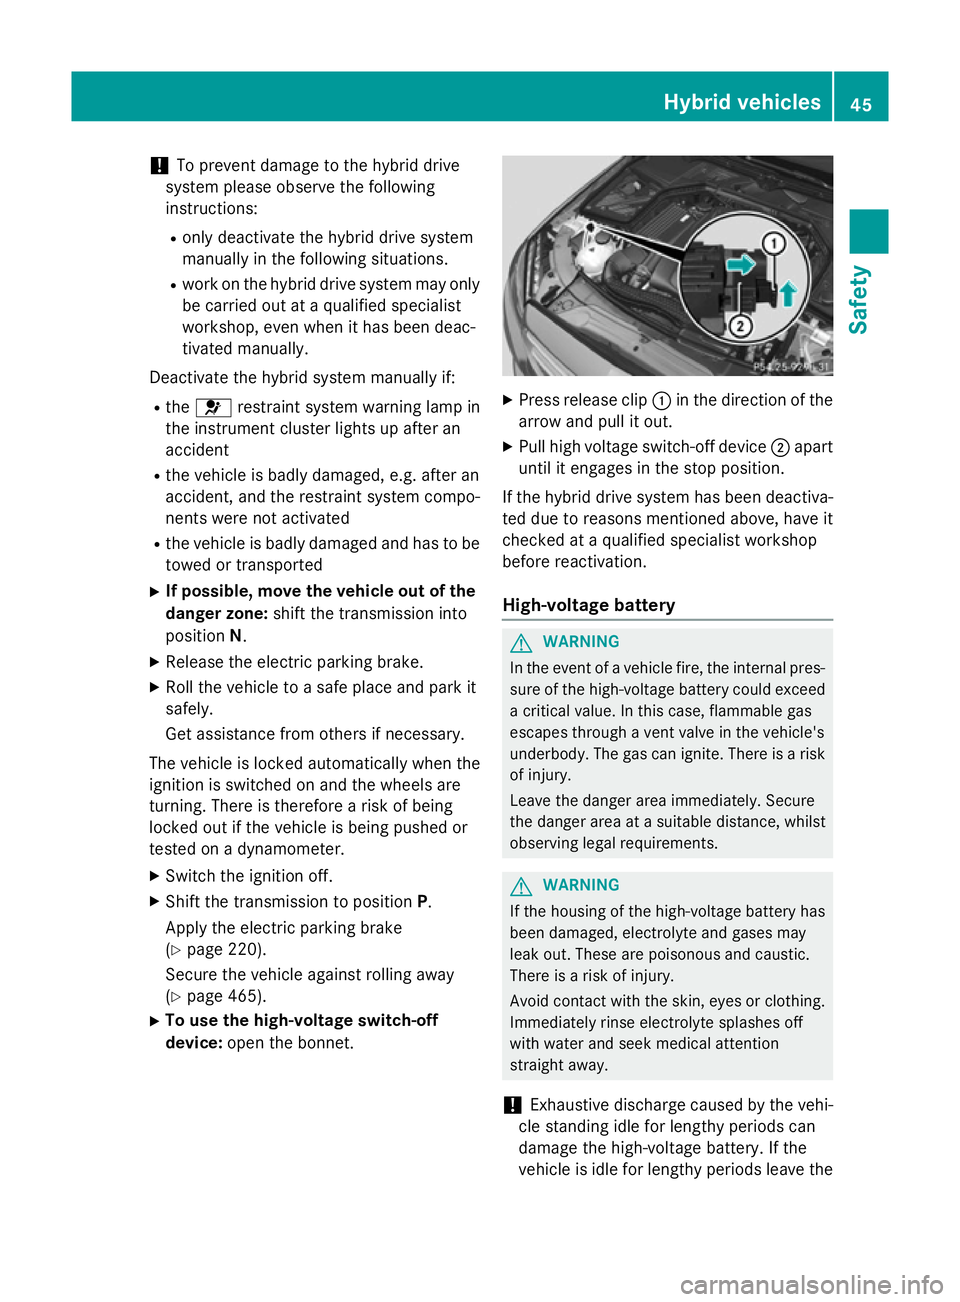
Press release clip :in the direction of the
arrow and pull it out.
X Pull high voltage switch-off device ;apart
until it engages in the stop position.
If the hybrid drive system has been deactiva- ted due to reasons mentioned above, have it
checked at a qualified specialist workshop
before reactivation.
High-voltage battery G
WARNING
In the event of a vehicle fire, the internal pres- sure of the high-voltage battery could exceeda critical value. In this case, flammable gas
escapes through a vent valve in the vehicle's
underbody. The gas can ignite. There is a risk
of injury.
Leave the danger area immediately. Secure
the danger area at a suitable distance, whilst
observing legal requirements. G
WARNING
If the housing of the high-voltage battery has
been damaged, electrolyte and gases may
leak out. These are poisonous and caustic.
There is a risk of injury.
Avoid contact with the skin, eyes or clothing. Immediately rinse electrolyte splashes off
with water and seek medical attention
straight away.
! Exhaustive discharge caused by the vehi-
cle standing idle for lengthy periods can
damage the high-voltage battery. If the
vehicle is idle for lengthy periods leave the Hybrid vehicles
45Safety Z
Page 59 of 497
Windowbags
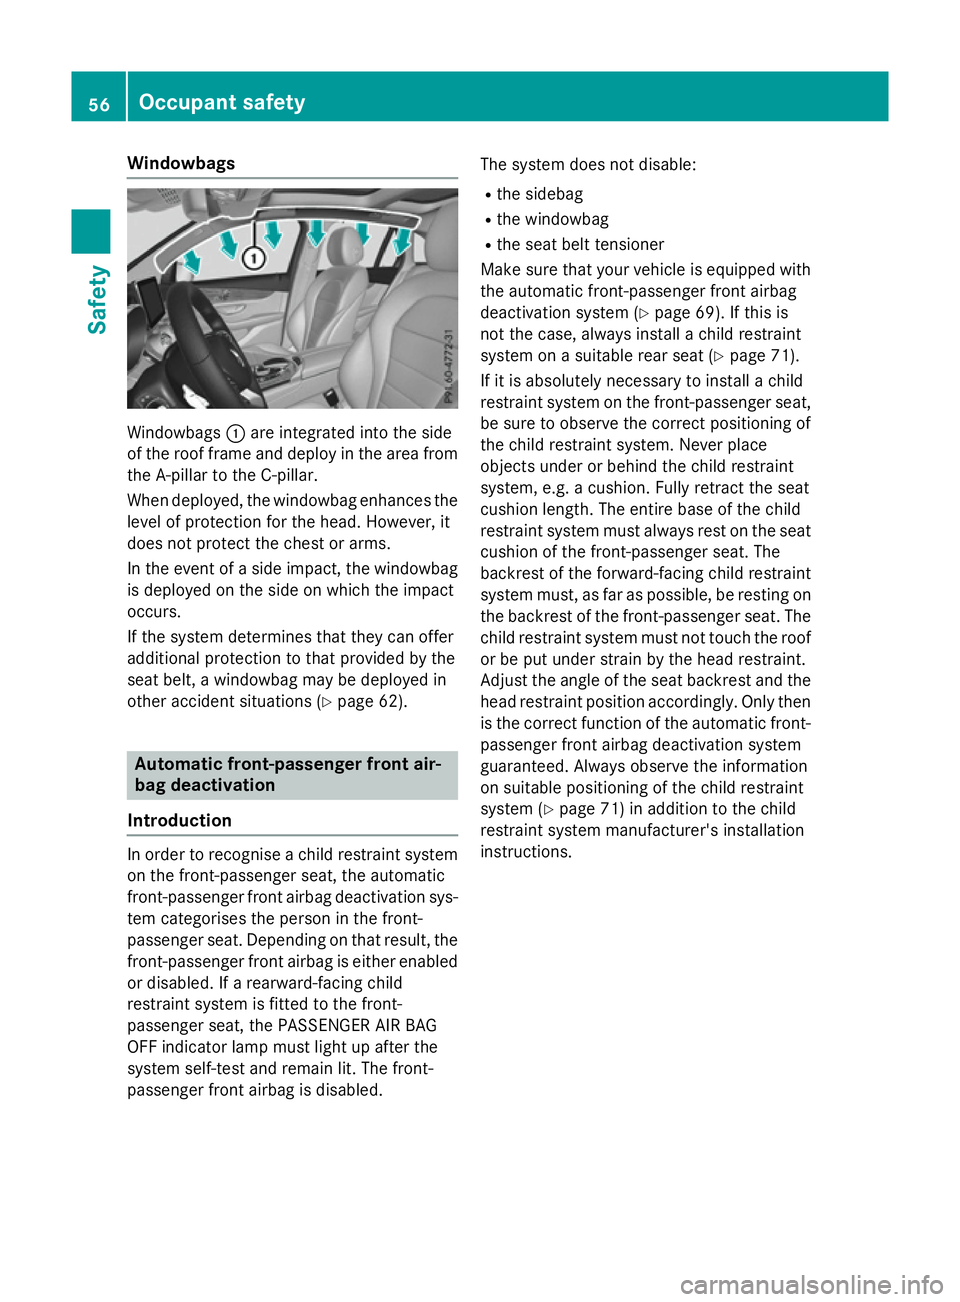
Windowbags
:are integrated into the side
of the roof frame and deploy in the area from the A-pillar to the C-pillar.
When deployed, the windowbag enhances the
level of protection for the head. However, it
does not protect the chest or arms.
In the event of a side impact, the windowbag
is deployed on the side on which the impact
occurs.
If the system determines that they can offer
additional protection to that provided by the
seat belt, a windowbag may be deployed in
other accident situations (Y page 62).Automatic front-passenger front air-
bag deactivation
Introduction In order to recognise a child restraint system
on the front-passenger seat, the automatic
front-passenger front airbag deactivation sys- tem categorises the person in the front-
passenger seat. Depending on that result, the
front-passenger front airbag is either enabled or disabled. If a rearward-facing child
restraint system is fitted to the front-
passenger seat, the PASSENGER AIR BAG
OFF indicator lamp must light up after the
system self-test and remain lit. The front-
passenger front airbag is disabled. The system does not disable:
R the sidebag
R the windowbag
R the seat belt tensioner
Make sure that your vehicle is equipped with
the automatic front-passenger front airbag
deactivation system (Y page 69). If this is
not the case, always install a child restraint
system on a suitable rear seat (Y page 71).
If it is absolutely necessary to install a child
restraint system on the front-passenger seat,
be sure to observe the correct positioning of
the child restraint system. Never place
objects under or behind the child restraint
system, e.g. a cushion. Fully retract the seat
cushion length. The entire base of the child
restraint system must always rest on the seat
cushion of the front-passenger seat. The
backrest of the forward-facing child restraint system must, as far as possible, be resting onthe backrest of the front-passenger seat. The
child restraint system must not touch the roof or be put under strain by the head restraint.
Adjust the angle of the seat backrest and the
head restraint position accordingly. Only then is the correct function of the automatic front- passenger front airbag deactivation system
guaranteed. Always observe the information
on suitable positioning of the child restraint
system (Y page 71) in addition to the child
restraint system manufacturer's installation
instructions. 56
Occupant safetySafety
Page 61 of 497
Make sure, both before and during the jour-
ney, that the status of the front-passenger
front airbag is correct. G
WARNING
If you secure a child on the co-driver's seat in a rearward-facing child restraint system and
the PASSENGER AIR BAG ON indicator lamp
lights up, the co-driver's airbag could be
deployed in the event of an accident. The child could be struck by the airbag. There is an
increased risk of injury, possibly even fatal.
In this case, always ensure that the co-driver's
airbag is disabled. The PASSENGER AIRBAG
OFF indicator lamp must light up.
If the PASSENGER AIR BAG OFF indicator
lamp remains off and/or the PASSENGER AIR BAG ON indicator lamp lights up, do not install
a rearward-facing child restraint system on
the front-passenger seat. Further information can be found under "Problems with the auto-matic front-passenger front airbag deactiva-
tion system" (Y page 61). G
WARNING
If you secure a child in a forward-facing child
restraint system on the front-passenger seat
and you position the front-passenger seat too close to the dashboard, in the event of an
accident, the child could:
R come into contact with the vehicle's inte-
rior if the PASSENGER AIR BAG OFF indi-
cator lamp is lit, for example
R be struck by the airbag if the PASSENGER
AIR BAG ON indicator lamp is lit
This poses an increased risk of injury or even fatal injury.
Always move the front-passenger seat as far
back as possible and fully retract the seat
cushion length. Always make sure that the
shoulder belt strap is correctly routed from
the vehicle belt outlet to the shoulder belt
guide on the child restraint system. The shoul-
der belt strap must be routed forwards and
downwards from the vehicle belt outlet. If
necessary, adjust the vehicle belt outlet and the front-passenger seat accordingly. Always
observe the information about suitable posi-
tioning of the child restraint system in this
Owner's Manual as well as the child restraint system manufacturer's installation instruc-
tions.
If the automatic front-passenger front airbag
deactivation system detects that:
R the front-passenger seat is unoccupied, the
PASSENGER AIR BAG OFF indicator lamp
lights up after the system self-test and
remains lit. This indicates that the front-
passenger front airbag is disabled.
R the front-passenger seat is occupied by a
child in a rearward-facing child restraint
system, the PASSENGER AIR BAG OFF indi-
cator lamp lights up after the system self-
test and remains lit. This indicates that the
front-passenger front airbag is disabled.
But in the case of a child in a rearward-
facing child restraint, the PASSENGER AIR
BAG ON indicator lamp can light up after
the system self-test and remain lit. This
indicates that the front-passenger front air- bag is enabled. The result of the classifica-tion is dependent on, among other factors,
the child restraint system and the child's
build. It is recommended that you fit the
child restraint system to a suitable rear
seat.
R the front-passenger seat is occupied by a
child in a forward-facing child restraint sys-
tem, either the PASSENGER AIR BAG ON or
PASSENGER AIR BAG OFF indicator lamp
lights up and remains lit after the system
self-test depending on the result of the
classification. The result of the classifica-
tion is dependent on, among other factors, the child restraint system and the child's
build.
Move the front-passenger seat as far back
as possible. Always observe the informa-
tion in "Child restraint systems on the front- passenger seat" (Y page 69) and in "Suit-
able positioning of the child restraint sys-
tem" (Y page 71). Alternatively, you can 58
Occupant safetySafety
Page 64 of 497
Problems with automatic front-passenger front airbag deactivation
Be sure to observe the notes on "System self-test" (Y
page 59).Problem
Possible causes/consequences and
M
MSolutions The PASSENGER AIR
BAG OFF indicator
lamp lights up and
remains lit, even
though the front-
passenger seat is occu-
pied by an adult or a
person with a build cor-responding to that of an
adult. The classification of the person on the front-passenger seat is
false.
X Make sure the conditions for a correct classification of the per-
son on the front-passenger seat are met (Y page 57).
X If the PASSENGER AIR BAG OFF indicator lamp remains lit, the
front-passenger seat may not be used.
X Have the automatic front-passenger front airbag deactivation
system checked as soon as possible at a Mercedes-Benz Ser-
vice Centre. The PASSENGER AIR
BAG OFF indicator
lamp does not light up
and/or does not stay
on.
The front-passenger
seat is:
R empty
R occupied with a rear-
ward-facing child
restraint system The automatic front-passenger front airbag deactivation system is
malfunctioning.
X Make sure there is nothing between the seat and the child
restraint system.
X Make sure that the entire base of the child restraint system rests
on the seat cushion of the front-passenger seat.
X Make sure that the seat cushion length is fully retracted.
X When installing the child restraint system, make sure that the
seat belt is tight. Do not pull the seat belt tight with the front-
passenger seat adjustment. This could result in the seat belt and the child restraint system being pulled too tightly.
X Check that the child restraint system is installed correctly.
X Make sure that no objects are applying additional weight to the
seat.
X If the PASSENGER AIR BAG OFF indicator lamp remains off and/
or the PASSENGER AIR BAG ON indicator lamp lights up, do not
install a rearward-facing child restraint system on the front-
passenger seat. It is recommended that you fit the child
restraint system to a suitable rear seat.
X Have the automatic front-passenger front airbag deactivation
system checked as soon as possible at a Mercedes-Benz Ser-
vice Centre. Occupant safety
61Safety Z
Page 74 of 497
Forward-facing child restraint system
If it is absolutely necessary to fit a forward-
facing child restraint system to the front-
passenger seat, always move the front-
passenger seat as far back as possible. Fully
retract the seat cushion length. The entire
base of the child restraint system must
always rest on the seat cushion of the front-
passenger seat. The backrest of the child
restraint system must, as far as possible, lie
flat against the backrest of the front-
passenger seat. The child restraint system
must not touch the roof or be put under strain
by the head restraint. Adjust the angle of the
seat backrest and the head restraint position accordingly. Always make sure that the shoul-
der belt strap is correctly routed from the
vehicle belt outlet to the shoulder belt guide
on the child restraint system. The shoulder
belt strap must be routed forwards and down- wards from the vehicle belt outlet. If neces-
sary, adjust the vehicle belt outlet and the
front-passenger seat accordingly.
Always observe the information on suitable
positioning of the child restraint system
(Y page 71) in addition to the child restraint
system manufacturer's installation and oper-
ating instructions. Suitable positioning of the child
restraint system
Introduction Only child restraint systems approved in
accordance with the ECE standards ECE R44
or ECE R129 (i-Size child restraint systems)
are permitted for use in the vehicle.
For certain child restraint systems in weight
categories II or III, this can mean that the area
of use is restricted. The maximum size setting of the child restraint system is not possible
due to possible contact with the roof.
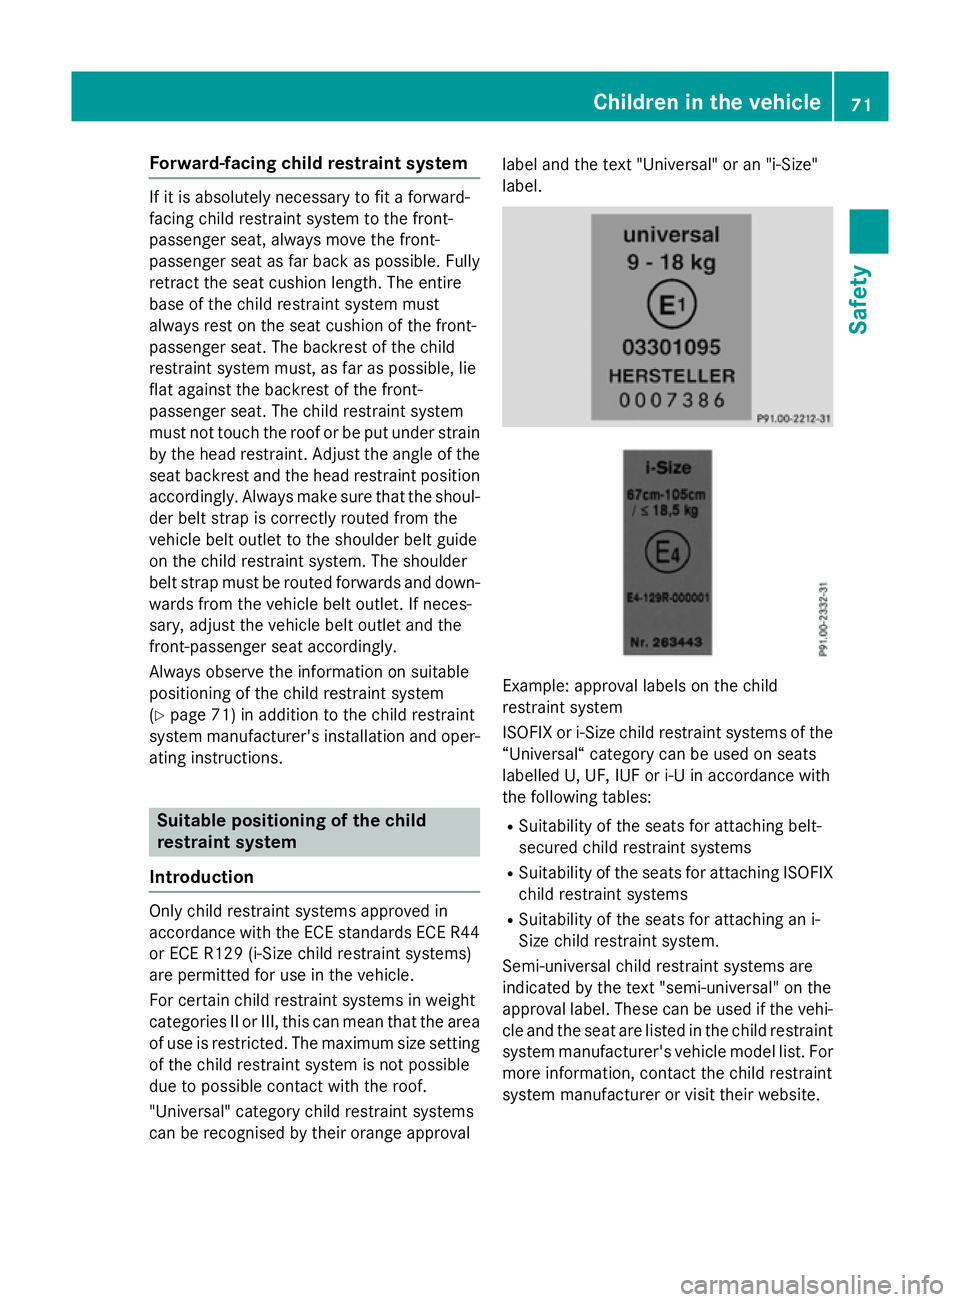
"Universal" category child restraint systems
can be recognised by their orange approval label and the text "Universal" or an "i-Size"
label.
Example: approval labels on the child
restraint system
ISOFIX or i-Size child restraint systems of the
“Universal“ category can be used on seats
labelled U, UF, IUF or i-U in accordance with
the following tables:
R Suitability of the seats for attaching belt-
secured child restraint systems
R Suitability of the seats for attaching ISOFIX
child restraint systems
R Suitability of the seats for attaching an i-
Size child restraint system.
Semi-universal child restraint systems are
indicated by the text "semi-universal" on the
approval label. These can be used if the vehi- cle and the seat are listed in the child restraint
system manufacturer's vehicle model list. For more information, contact the child restraint
system manufacturer or visit their website. Children in the vehicle
71Safety Z
Page 75 of 497
If it is absolutely necessary to fit a child
restraint system to the front-passenger seat:
X Always pay attention to the instructions
under "Child restraint system on the front-
passenger seat" (Y page 69).
There you will find instructions on how to
correctly route the shoulder belt strap from the vehicle belt outlet to the shoulder belt
guide on the child restraint system
(Y page 71).
X Move the front-passenger seat as far back
as possible and fully retract the seat cush-
ion length.
X Move the backrest to an almost vertical
position.
The entire base of the child restraint sys-
tem must always rest on the seat cushion of the front-passenger seat. The backrest of
the forward-facing child restraint system
must, as far as possible, be resting on the
backrest of the front-passenger seat. The
child restraint system must not touch the
roof or be put under strain by the head
restraint. Adjust the angle of the seat back- rest and the head restraint position accord-
ingly. Also observe the child restraint sys-
tem manufacturer's installation instruc-
tions.
X Move the seat cushion angle to the highest,
most vertical position. 72
Children in the vehicleSafety
Page 125 of 497
abdomen or neck injuries, for example. This
poses an increased risk of injury or even fatal injury.
Adjust the seat properly before beginning
your journey. Always ensure that the backrest is in an almost vertical position and that the
shoulder section of your seatbelt is routed
across the centre of your shoulder.
! To avoid damage to the seats and the seat
heating, observe the following information:
R do not spill any liquids on the seats. If
liquid is spilled on the seats, dry them as
soon as possible.
R if the seat covers are damp or wet, do not
switch on the seat heating. The seat
heating should also not be used to dry
the seats.
R clean the seat covers as recommended;
see "Interior care".
R do not transport heavy loads on the
seats. Do not place sharp objects on the
seat cushions, e.g. knives, nails or tools. The seats should only be occupied by
passengers, if possible.
R when the seat heating is in operation, do
not cover the seats with insulating mate- rials, e.g. blankets, coats, bags, seat cov-
ers, child seats or booster seats.
! Make sure that there are no objects in the
footwell under or behind the seats when
moving the seats back. There is a risk that
the seats and/or the objects could be dam-
aged.
i The rear-compartment head restraints
can be removed (Y page 125).
Vehicles without the through-loading fea-
ture: the head restraints cannot be
removed from the rear-compartment
seats.
For more information, contact a qualified
specialist workshop. i
Further related subjects:
R EASY-PACK quickfold rear bench seat
(Y page 393) Adjusting the seats manually and
electrically
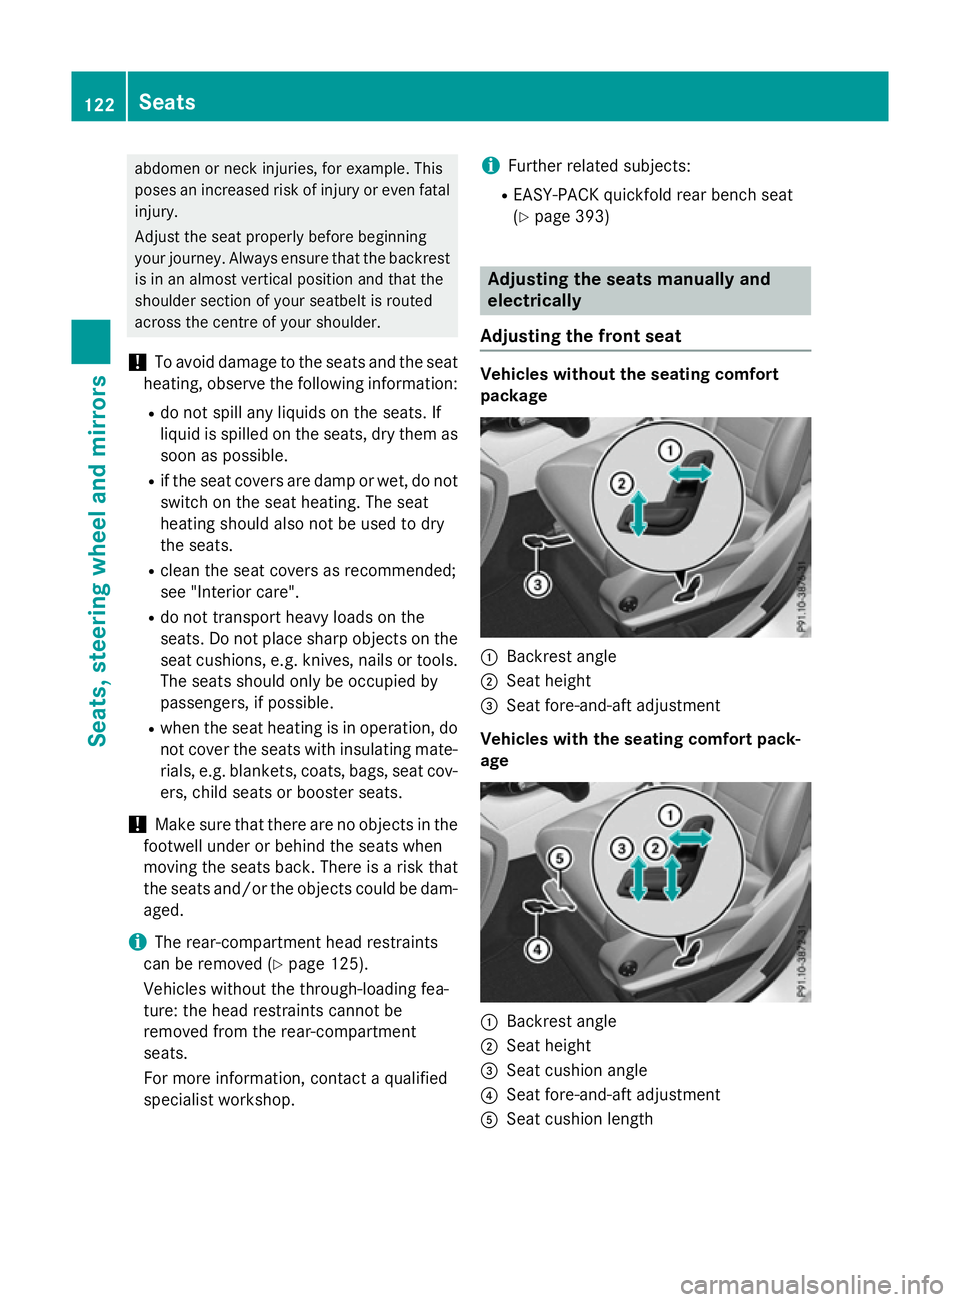
Adjusting the front seat Vehicles without the seating comfort
package
:
Backrest angle
; Seat height
= Seat fore-and-aft adjustment
Vehicles with the seating comfort pack-
age :
Backrest angle
; Seat height
= Seat cushion angle
? Seat fore-and-aft adjustment
A Seat cushion length 122
SeatsSeats, steering wheel and mirrors
Page 126 of 497
i
On vehicles with the seating comfort
package, the seat cushion length can only
be adjusted manually.
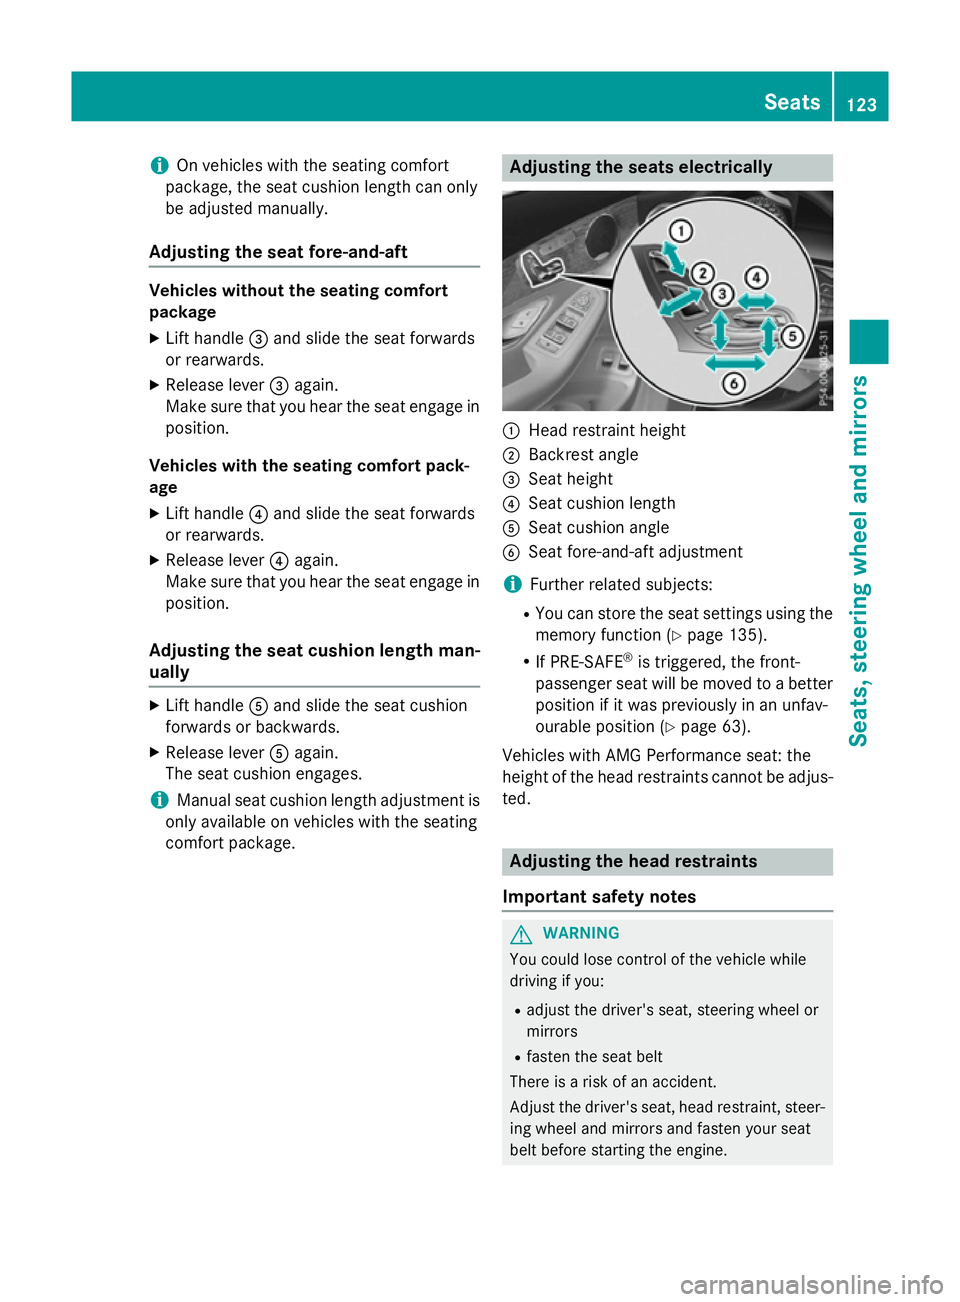
Adjusting the seat fore-and-aft Vehicles without the seating comfort
package
X Lift handle =and slide the seat forwards
or rearwards.
X Release lever =again.
Make sure that you hear the seat engage in
position.
Vehicles with the seating comfort pack-
age
X Lift handle ?and slide the seat forwards
or rearwards.
X Release lever ?again.
Make sure that you hear the seat engage in position.
Adjusting the seat cushion length man-
ually X
Lift handle Aand slide the seat cushion
forwards or backwards.
X Release lever Aagain.
The seat cushion engages.
i Manual seat cushion length adjustment is
only available on vehicles with the seating
comfort package. Adjusting the seats electrically
:
Head restraint height
; Backrest angle
= Seat height
? Seat cushion length
A Seat cushion angle
B Seat fore-and-aft adjustment
i Further related subjects:
R You can store the seat settings using the
memory function (Y page 135).
R If PRE-SAFE ®
is triggered, the front-
passenger seat will be moved to a better
position if it was previously in an unfav-
ourable position (Y page 63).
Vehicles with AMG Performance seat: the
height of the head restraints cannot be adjus-
ted. Adjusting the head restraints
Important safety notes G
WARNING
You could lose control of the vehicle while
driving if you:
R adjust the driver's seat, steering wheel or
mirrors
R fasten the seat belt
There is a risk of an accident.
Adjust the driver's seat, head restraint, steer-
ing wheel and mirrors and fasten your seat
belt before starting the engine. Seats
123Seats, steering wheel and mirrors Z
Page 152 of 497
X
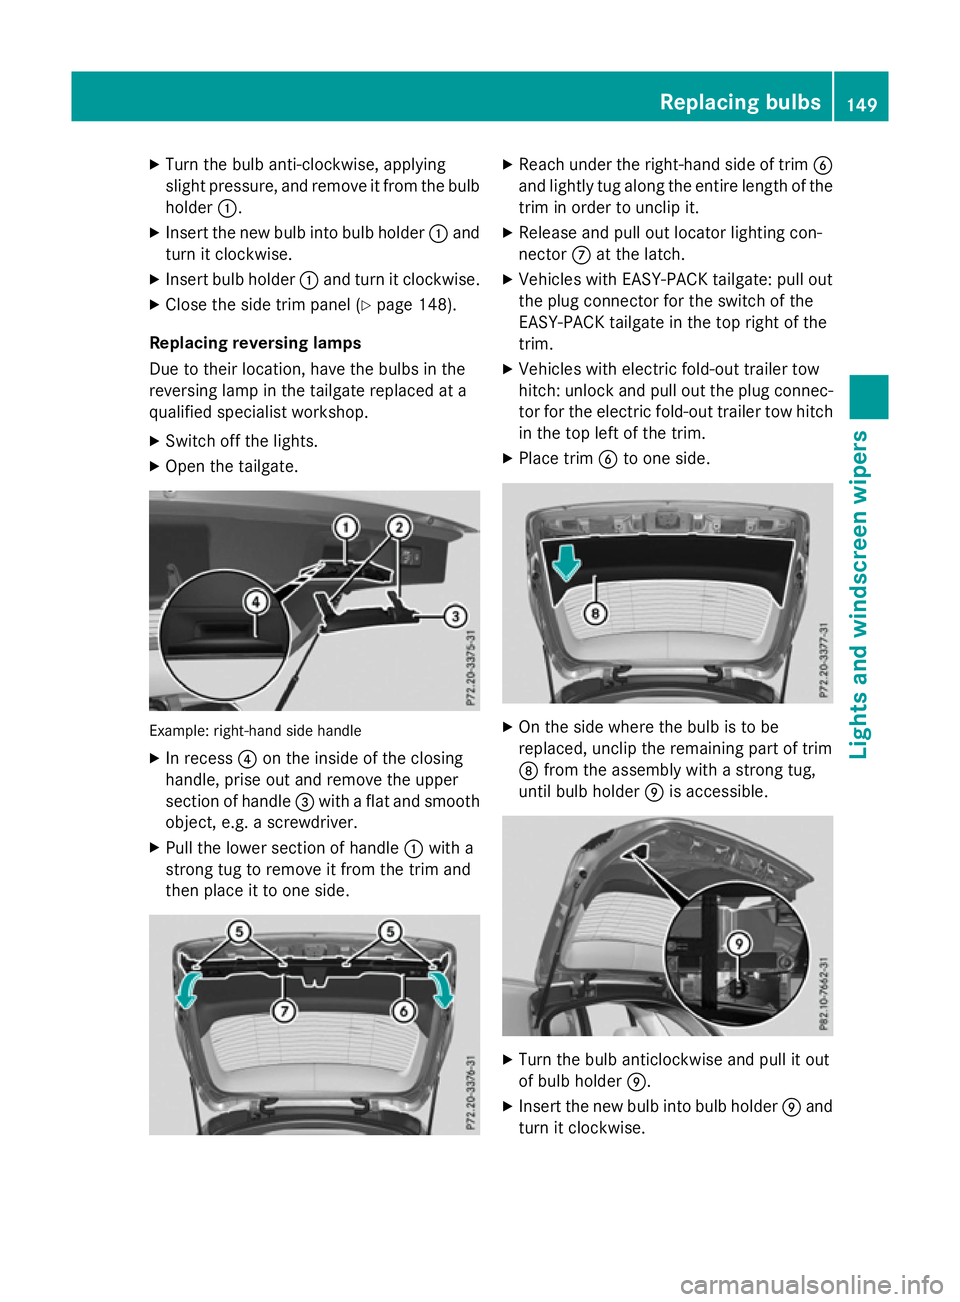
Turn the bulb anti-clockwise, applying
slight pressure, and remove it from the bulb
holder :.
X Insert the new bulb into bulb holder :and
turn it clockwise.
X Insert bulb holder :and turn it clockwise.
X Close the side trim panel (Y page 148).
Replacing reversing lamps
Due to their location, have the bulbs in the
reversing lamp in the tailgate replaced at a
qualified specialist workshop.
X Switch off the lights.
X Open the tailgate. Example: right-hand side handle
X In recess ?on the inside of the closing
handle, prise out and remove the upper
section of handle =with a flat and smooth
object, e.g. a screwdriver.
X Pull the lower section of handle :with a
strong tug to remove it from the trim and
then place it to one side. X
Reach under the right-hand side of trim B
and lightly tug along the entire length of the trim in order to unclip it.
X Release and pull out locator lighting con-
nector Cat the latch.
X Vehicles with EASY-PACK tailgate: pull out
the plug connector for the switch of the
EASY-PACK tailgate in the top right of the
trim.
X Vehicles with electric fold-out trailer tow
hitch: unlock and pull out the plug connec-
tor for the electric fold-out trailer tow hitch
in the top left of the trim.
X Place trim Bto one side. X
On the side where the bulb is to be
replaced, unclip the remaining part of trim
D from the assembly with a strong tug,
until bulb holder Eis accessible. X
Turn the bulb anticlockwise and pull it out
of bulb holder E.
X Insert the new bulb into bulb holder Eand
turn it clockwise. Replacing bulbs
149Lights and windscreen wipers Z
Page 224 of 497
In addition, they may operate vehicle equip-
ment and become trapped. There is a risk of
an accident and injury.
When leaving the vehicle, always take the key with you and lock the vehicle. Never leave
children unattended in the vehicle.
The function of the electric parking brake is
dependent on the on-board voltage. If the on-
board voltage is low or if there is a malfunc-
tion in the system, it may not be possible to
apply the released parking brake.
X If this is the case, only park the vehicle on
level ground and secure it to prevent it from
rolling away.
X Shift the automatic transmission to posi-
tion P.
It may not be possible to release an applied
parking brake if the on-board voltage is low or if there is a malfunction in the system. Con-
tact a qualified specialist workshop.
The electric parking brake carries out a func-
tion check at regular intervals when the
engine is switched off. Noises that occur are
normal.
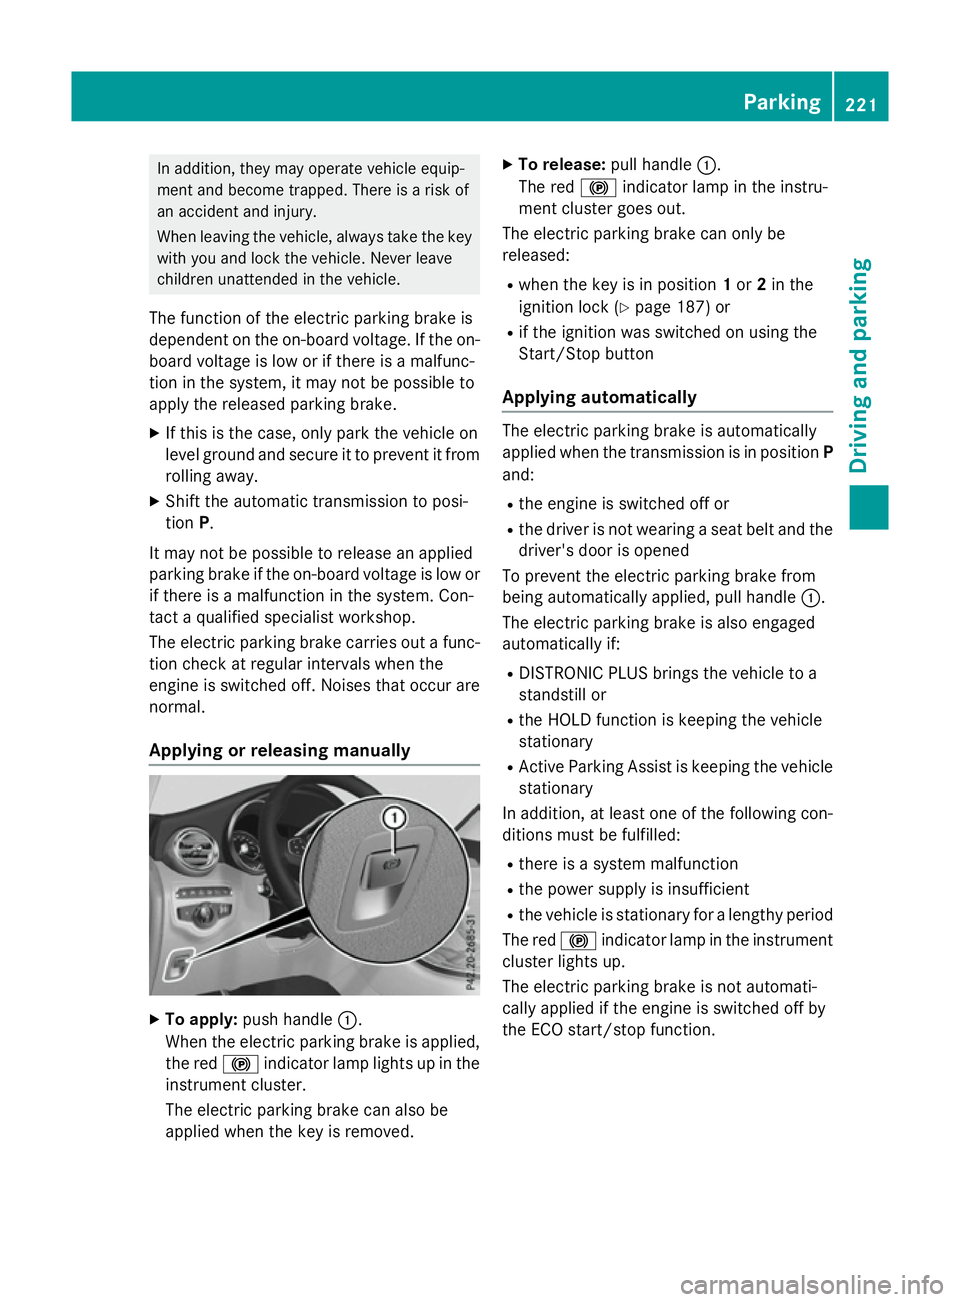
Applying or releasing manually X
To apply: push handle :.
When the electric parking brake is applied, the red !indicator lamp lights up in the
instrument cluster.
The electric parking brake can also be
applied when the key is removed. X
To release: pull handle:.
The red !indicator lamp in the instru-
ment cluster goes out.
The electric parking brake can only be
released:
R when the key is in position 1or 2in the
ignition lock (Y page 187) or
R if the ignition was switched on using the
Start/Stop button
Applying automatically The electric parking brake is automatically
applied when the transmission is in position
P
and:
R the engine is switched off or
R the driver is not wearing a seat belt and the
driver's door is opened
To prevent the electric parking brake from
being automatically applied, pull handle :.
The electric parking brake is also engaged
automatically if:
R DISTRONIC PLUS brings the vehicle to a
standstill or
R the HOLD function is keeping the vehicle
stationary
R Active Parking Assist is keeping the vehicle
stationary
In addition, at least one of the following con-
ditions must be fulfilled:
R there is a system malfunction
R the power supply is insufficient
R the vehicle is stationary for a lengthy period
The red !indicator lamp in the instrument
cluster lights up.
The electric parking brake is not automati-
cally applied if the engine is switched off by
the ECO start/stop function. Parking
221Driving and parking Z